Final Fantasy 7 Remake Chapter 16 Walkthrough: The Belly of the Beast (Spoiler-Free)
Shinra Tower awaits in Final Fantasy 7 Remake's Chapter 16--and our walkthrough will get you through in one piece.
You might have guessed that "The Belly of the Beast," the title of Final Fantasy Remake's Chapter 16, refers to taking the fight to Shinra. As you head to Midgar's Sector 0, you'll face some of the toughest challenges you've seen so far in the game. There are also quite a few diversions and a few secrets to find. We've got everything you need in our walkthrough below, from an outline of everything you can find, to strategies for defeating whatever Shinra throws at you.
Check out the rest of our Final Fantasy 7 Remake guides so you don't miss a single secret or collectible. You can also read our FF7 Remake review.
- Chapter 1
- Chapter 2
- Chapter 3
- Chapter 4
- Chapter 5
- Chapter 6
- Chapter 7
- Chapter 8
- Chapter 9
- Chapter 10
- Chapter 11
- Chapter 12
- Chapter 13
- Chapter 14
- Chapter 15
- Chapter 17
- Chapter 18
Chapter 16 Walkthrough: The Belly Of The Beast
Head into the Shinra building. You'll first meet resistance in the parking garage. Most of the fights won't be too tough, but as you press forward, you'll eventually face three Elite Riot Troopers, three Guard Dogs, and two 3-C SOLDIERS all at the same time. It's a tough battle; quickly try to use Fire spells on the Riot Troopers to knock some or all of them out fast. Switch Cloud to Punisher and focus on the Guard Dogs, using your counter to knock them back; you'll want to do the same with the SOLDIERS. Hit the dogs with Ice spells to do high damage and try to get rid of them as quickly as you can, because they're highly mobile and very irritating. With everything else destroyed, you should be free to fight the SOLDIERS slowly and deliberately with magic, blocks, and counter-attacks.
Before heading out of the garage, check the west corner for a chest that contains two mega-potions. When you reach the big lobby, check the southwest corner for the room for another chest with a Moogle Medal inside.
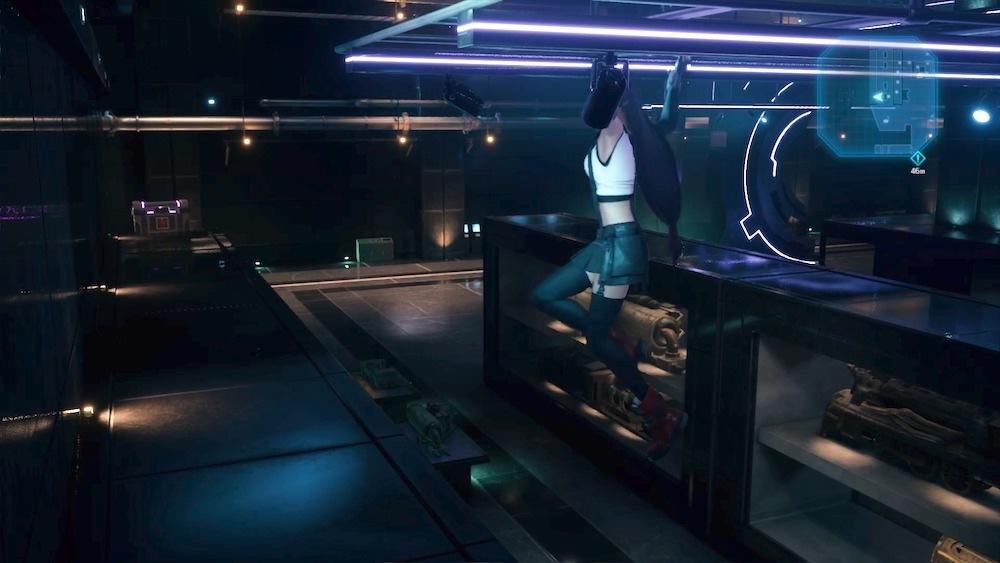
After you switch to Tifa, check the east side of the room, in a narrow corridor, to find a chest with 1,000 gil inside. To get back up to the lights, climb up on the hood of one of the cars and use the black stone blocks as stepping stones. When you get to the ladder with the red toolbox beside it, look for a prompt that will let you travel hand-over-hand to the west to reach a purple chest. It contains the Purple Pain weapon for Tifa.
Once Tifa gets the keycard, head back upstairs and to the east to open the Exhibition Hall. There's a chest against the north wall that contains an Iron Maiden armor.
You now have the option of either taking the elevator in the north end of the room, or the stairs at the west end. The stairs take much longer, but they're safer; with the elevator, you'll fight minor battles at the 10th and 20th floors. Both options will give you slightly different story moments with the characters, though, and are worth checking out.
Make your way up through the next few floors until you get to Floor 62. Run around the big round walkway in Corporate Archives to find a chest with 3,000 gil inside. Talk to Hart before you leave; give him the 10,000 gil he requests and you'll get the EKG Cannon weapon for Barret in exchange. Then head up to the 63rd Floor.

On the 63rd Floor, you can visit the Item Shop to buy new armors. Check the far eastern edge of the area up the rounded staircase to find a jukebox containing the Scarlet's Theme Music Disc--which should be your last one, unlocking the "Disc Jockey" Trophy. Head to the Combat Simulator when you're ready to advance--you'll have to fight two Cutters together, so bring Thunder Materia and get ready to throw down with some spells.
Once you clear the Combat Simulator, Chadley will show up and you can complete more Battle Intel submissions with him, or purchase materia. You can also access the Combat Simulator again and battle through additional rounds to earn new rewards. When you're done then take the escalators to the 64th Floor.
Intel-gathering on the 64th Floor will take you into the air vents above the conference rooms. The path isn't very complex--you'll want the first left, ignoring the right path, which is a dead-end. At the next fork, turn left to find an HP Up Materia. Double-back and take the right path to reach your objective.
As you follow Hojo, you'll next come to a break room with a vending machine and bench. The two chests here contain two antidotes and two celerises. As you go through the room with all the specimen tubes, check the south side for a chest with a remedy inside.
Final Fantasy 7 Remake News
- Final Fantasy 7 Remake Intergrade Review - Materia Improvements
- Final Fantasy 7 Remake Dress Guide: How To Get Every Dress In Wall Market
- What Would Suit Tifa Choices: Final Fantasy 7 Remake Dress Guide
- + Show More Final Fantasy 7 Remake News Links (2)
- Final Fantasy 7 Remake Guide: Corneo's Secret Stash Locations
- Final Fantasy 7 Remake Materia Guide: Essential Materia You Might've Missed
Boss Fight: Specimen HO512
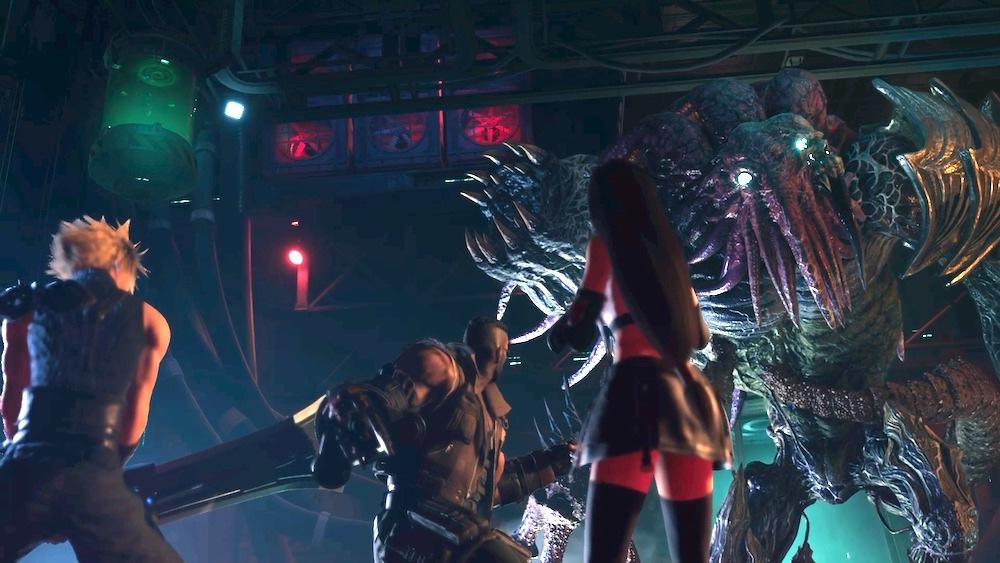
Specimen HO512 is somewhat similar to the Failed Experiment boss you fought in the Shinra Test Site, largely relying on smaller minion enemies to mess with you while it closes in to deal big damage. The boss especially likes a move called Rake, with which it closes the gap on one of your characters by dashing across the room, then follows up with big melee strikes. It's somewhere between very difficult and impossible to dodge the attack, so guard against the attack whenever possible and use Punisher mode to strike back when it hits you.
As you fight the boss, it'll spew out little HO512 monsters to harass and irritate you. Barret's Maximum Fury is good for thinning them out, as is Triple Strike, but make sure you keep on top of eliminating them. Meanwhile, avoid the Noxious Expulsion attack, which can poison you, by keeping your distance from the boss when you're not actively going after it. If the boss snatches one of your team, hit it with some big attacks to make it let go before it slams your character to the ground.
Your primary focus should be the big Left Claw target. Crippling it will open the boss up to a lot of damage. Stick with primarily physical attacks; HO512 doesn't have any magical weaknesses, so while you can use spells if you like there's no specific benefit to doing so unless you need to keep your distance.
After you do some damage, HO512 will suck up mako from a nearby tank, energizing it and producing a new, more dangerous batch of minion enemies. You still want to mostly want to prioritize eliminating the little guys first, as their Spinner attack can get really irritating when you're trying to deal with the boss. Try to stay clear of the boss's new Mako Expulsion attack by giving it a wide berth; after HO512 uses it, you should have a chance to close the gap and do some damage. Continue to focus on the Left Claw, which HO512 will regrow periodically after it sucks up mako.
If you see the boss go for the mako tank in the middle of the battle, drop what you're doing and go after it. Hit it with your strongest attacks, including Punisher mode, to interrupt it; that'll leave it pressured so you can drive up its stagger meter and do a lot of damage. The same is true if you happen to lop off the Left Claw.
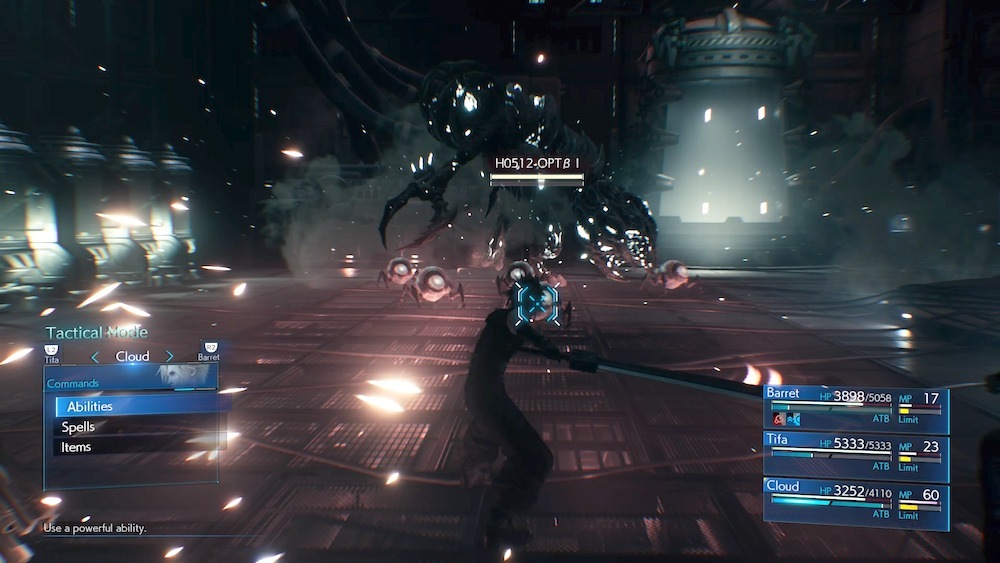
HO512 will enter a third phase before the end, producing even more dangerous minions--now they'll explode and try to take you with them. If you see them readying a move called Apoptosis, steer clear. The same is true of the boss's improved Mako Expulsion attack, which he'll now fire in a stream like a hose in one direction, but with a lot more damage.
Though the boss has some big area attacks, it mostly will come after you at fairly close range, so do your best to stay away from it and keep your team healthy. Attack it when it's vulnerable as it goes for the mako tanks and use counter-attacks to lessen the effectiveness of its strikes. Your team's Focused ability attacks will help push up its stagger meter, but you should be able to take it down so long as you hit it when it's vulnerable and keep from getting surrounded.
Before you leave via the elevator, heal up at the nearby bench. The next room will have a fight with Shinra security forces you've seen before, followed by a new unit called the Armored Shock Trooper. These guys are resistant to physical attacks, but weak to Thunder magic. Stay back when you see them activate their Eject attacks--it means the armor is going to explode, leaving behind an Enhanced Shock Trooper. These agile troopers are a pain to fight, so hit them with Fire to deal with them quickly. Punisher counters work well too, but hang well back when they use their Twister attack, which can juggle your characters in the air for big damage.
When you're done, chase down Hojo to end the chapter.
Keep going with our Final Fantasy 7 Remake Chapter 17 Walkthrough: Deliverance From Chaos.
Got a news tip or want to contact us directly? Email news@gamespot.com
Join the conversation