Final Fantasy 7 Remake Chapter 14 Walkthrough: In Search Of Hope (Spoiler-Free)
Chapter 14 has the most side-quests and activities of any portion of Final Fantasy 7 Remake--here's how to find every reward, collectible, and secret.
There are side-quest scattered throughout Final Fantasy 7 Remake, but the greatest concentration is in Chapter 14. You'll run all around the Midgar City slums to complete those quests, and some of them can be pretty confusing, with their solutions scattered in distant corners of the game's biggest map. Keep following our walkthrough to complete every side-quest, beat every boss, locate every collectible, and find every secret.
Check out the rest of our Final Fantasy 7 Remake guides so you don't miss a single secret or collectible. You can also read our FF7 Remake review.
- Chapter 1
- Chapter 2
- Chapter 3
- Chapter 4
- Chapter 5
- Chapter 6
- Chapter 7
- Chapter 8
- Chapter 9
- Chapter 10
- Chapter 11
- Chapter 12
- Chapter 13
- Chapter 15
- Chapter 16
- Chapter 17
- Chapter 18
Chapter 14 Walkthrough: In Search Of Hope
As you leave Aerith's House, make sure to snag the Pedometer Materia you'll see on the path ahead of you. Equip it as you walk around and it'll eventually transform into AP Up Materia, which allows you to level up linked materia more quickly.
When you enter the town in Sector 5, you'll have access to a bunch of new odd jobs. Drop by the Moogle Emporium in the Kids' Hideout to buy the Steel Pincers weapon for Barret.
Whack-A-Box Hard Mode
The new version of the Whack-A-Box game you can access in the Hideout is worth trying. It offers the Transference Module accessory if you can take the top score, which fills a character's limit gauge every time they use a full ATB meter.
To get the top score, equip Cloud's Iron Sword, to give you the Triple Slash move (you only get the moves that come with each weapon in Whack-A-Box, not the ones you've unlocked through proficiency). Your goal here is to keep moving through the area, hitting the boxes with the clock icons on them in order to keep your time up. Focus mostly on 1,500-point boxes; the smaller boxes will eat up time for a lot less payoff in most cases.
When you run up against a 1,500-point box, burn ATB charges on Triple Slash to do more damage, and switch to Punisher mode to try to get through them quickly. Two Triple Slash attacks can destroy a 1,500-point box, and at a few points, you'll find two together, and can get both with the same set of attacks. Save your ATB for these moments to clear the big boxes as fast as you can. If you keep moving, attacking the big boxes, and seeking out the clock boxes, you should have more than enough time to hit the 30,000-point threshold and become the champion.
Your rewards for finishing are an elixir for 10,000 points, a Crescent Moon Charm accessory for 20,000 points, and a Transference Module for 30,000 points. You also get a Moogle Medal every time you compete, if you need to stock up for something in the Moogle Emporium.
Chadley - Boss Fight: Leviathan

Leviathan's abilities don't have a particular element, but the best is weak against Thunder magic, so bring your best Lightning materia and outfit your team. The boss itself is a tough battle, mostly because its wily and tough to hit. It'll continually reposition around the huge battlefield, requiring your melee team to run around in an attempt to catch up. You'll want to hit the Leviathan with as much Lightning as you can because of this, and make use of Barret's ranged attacks. Aim for the head whenever you can.
In the first half of the fight, you'll mostly need to contend with hard-hitting Leviathan attacks that require you to pay attention to positioning. Its Briny Barrage attack is a tough one to dodge, so it's usually better to Guard through it. Briny Bellow shoots a laser beam at you that hits hard, but if you're quick you can sometimes dodge clear; the Leviathan will also turn its head to sweep the laser across part of the battlefield, so if you can keep moving, you can sometimes avoid it altogether. Be careful about staying too close to the Leviathan, however, because it'll activate its Gyre Spume area attack around itself to send you flying.
You want Tifa and Cloud to wail on the Leviathan's body (marked as "Dorsal Fin" on your menus) while Barret hits it in the head as much as possible, which will drive up its stagger meter. When it lowers its head to charge attacks like Aqua Focus, hit it as hard as you can in the dome to try to pressure it and knock it out of the attacks it's charging. Focused Shot, Focused Thrust, and Focused Strike are good to further push up the stagger meter--if you can knock the Leviathan down, you can really pummel it--but big damagers like Braver can be enough to stop the Leviathan from doing something painful to your team.
Be careful activating your big attacks like limit breaks, because the Leviathan likes to move around and force you to waste them. If it rears up, get ready for its big Spinning DIve attack, which is next to impossible to dodge and does huge damage as the Leviathan rams into you. Stick with Barret and keep hammering the Leviathan's head with spells and gunfire when it takes to the air, as well. You'll take a lot of damage in the fight, so make sure to keep your team healthy with healing magic and abilities like Pray.
After you've done some damage, the Leviathan will start flying around, using its Tidal Wave attack to create water cyclones around the battlefield. These will hurt you if they touch you, forcing you to keep moving, so get mobile while you keep firing on the Leviathan. Other than more things to deal with in the battle, nothing much changes, though; keep hammer the Leviathan's head as much as you can while the melee squad goes after the Dorsal Fin. We liked the Chocobo & Moogle summon for this fight as well, since the Chocobo Kick attack is geared at driving up enemies' stagger meters.
Be sure to keep your strength up, as eventually the Leviathan will hit you with its big summon attack, which can seriously injure your whole team. You should be able to weather it, and by that point, a few more concentrated attacks will finish the Leviathan off.
Final Fantasy 7 Remake News
- Final Fantasy 7 Remake Intergrade Review - Materia Improvements
- Final Fantasy 7 Remake Dress Guide: How To Get Every Dress In Wall Market
- What Would Suit Tifa Choices: Final Fantasy 7 Remake Dress Guide
- + Show More Final Fantasy 7 Remake News Links (2)
- Final Fantasy 7 Remake Guide: Corneo's Secret Stash Locations
- Final Fantasy 7 Remake Materia Guide: Essential Materia You Might've Missed
Side-Quest: Missing Children (Sector 5 Undercity)
Talk to Ms. Folia outside of the Kids' Hideout. She'll dispatch you to find the patrolling kids again. Head north toward Nut 'n' Bolts Hills and take the right path toward Lookout Point, going northeast. As you go, you'll see some purple smoke cross the path, pointing you toward the cemetery.

You'll have a mini-boss fight facing you in the cemetery against two Phantom monsters. These guys are weak against Fire magic, but they're a big pain in general. The Phantoms like to disappear as you attack them, then appear behind you for big attacks like Frozen Claw. Try to hit them with Fire spells while they're attacking your teammates to interrupt them and push up their stagger gauges. When they use their Drain Essence attack, stay well back--anyone caught in the vortex will lose a ton of health, while also healing the Phantoms.
Focus on one Phantom and hit it as hard as you can whenever it appears, and use Punisher mode counter-attacks when the ghosts disappear and attack you. Keep up the pressure until you take them both out. Your reward for finishing the quest is a Time Materia.
Side-Quest: Chocobo Search (Sector 5 Undercity)
Head north toward the train station out of the Sector 5 Center District to run into one of Chocobo Sam's Stablehands, who will send you out to look for some loose chocobos. That'll open up fast travel throughout the slums with Sam's Delivery Service, so you can get around more quickly. It'll be handy to do so, since the chocobos are pretty far away from each other.
Keep going north into the Nuts 'n' Bolts Hills and look for the chocobo at the north end of the area, at the path where you can head east toward Lookout Point. When you find the chocobo, you'll have to fight a Rust Drake. Skip out on hitting this thing with spells at first, as it'll absorb the magical energy as long as it's surrounded in that weird darkness. Instead, pummel it with ranged attacks as best you can until it casts Gravity. When that happens, get in close with melee strikes and do as much damage as you can to dispel the darkness. That'll open up the creature to magic attacks, so keep hitting it until it staggers and finish it off.

Find your second chocobo outside of Sector 5, past the train station to the west. Take the Sanctuary Way path toward the church and you'll find the chocobo about halfway.
The final chocobo is located in the Collapsed Expressway. You'll need to go in pretty deep to find it, but you can't miss it if you start at the shortcut path on the road between Sector 5 and Sector 6. When you get to it, you'll need to fight three Trypapoplis monsters. These guys are highly resistant to both magic and spells. Watch out for their Screech attack, which will stun anyone caught in it; when one uses it, all three will focus on the stunned character and use Aeroga spells on them. When that happens, quickly run to each of the Trypapoplises and beat them down to interrupt them and cancel the spell--an ATB ability will usually do the trick.
When the Trypapolises use Dance, hitting them causes them to clone themselves. The clones are quite a bit weaker and you can kill them fast, and that seems to increase the damage you'll do to the originals for a bit. But a sustained beatdown with abilities like Tifa's Chi Trap will drive up their stagger gauges--they won't stay staggered for long, but you can continually pummel them without them getting away, which is almost as good. This can be a lengthy fight, but you should be able to win out once you start separating and killing off the monsters.
Finishing the quest gets you the Sam's Lifetime Pass key item, which lets you take chocobo rides for free from Sam's Delivery Service, making fast travel a lot easier.
Side-Quest: Secret Medicine (Sector 5 Undercity)
Talk to the doctor across from the community center, who will send you to find herbs to make medicine. You need three items, but the first is easy: drop by the Moogle Emporium in the Kids' Hideout to purchase the Moogle Mortar.
Your second ingredient is located in the church where Cloud and Aerith first met. Head to the train station north and west of the Sector 5 Central District, then follow the path north to the church. Grab the herb growing there on the ground.

Finally, head to Evergreen Park and talk to Wymer to get the Subterranean Menace quest, which will take you to the underground lab. There, you'll have to fight the Behemoth Type 0 miniboss. Defeat it and return to the doctor to get Teluric Scriptures Vol. III manuscript for Aerith as a reward.
Side-Quest: Corneo's Secret Stash (Sector 5 Undercity)
Find Damon the reporter north of the Center District of Sector 5, where the path splits in Nuts 'n' Bolts Hills. Afterward, go northeast up the path toward Lookout Point. Talk to Mirielle, then pick up the Corneo's Vault Note key item on the ground behind her.
Find Kyrie in the church where Cloud met Aerith. You'll want to pick up the Tomboy Bandit quest from Johnny at the Sector 5 Train Station along the way, since these two quests dovetail a bit. After talking to Kyrie, you'll need to go to Wall Market's coliseum to deal with the Shinra goons who have been bothering her.
Once you have the key, head to the Collapsed Expressway to open your first stash--it's just inside the entrance, to the north, and will give you two Moogle Medals and the Diamond Tiara Key Item.

The second stash is in Steel Mountain, north of the Sector 5 Undercity. Head east from the Sector 5 Train Station to reach it easily, as you approach Lookout Point. It contains a Prayer Materia, a Circlet accessory, and a Ruby Tiara key item, among other things--including a whole bunch of Moogle Medals.

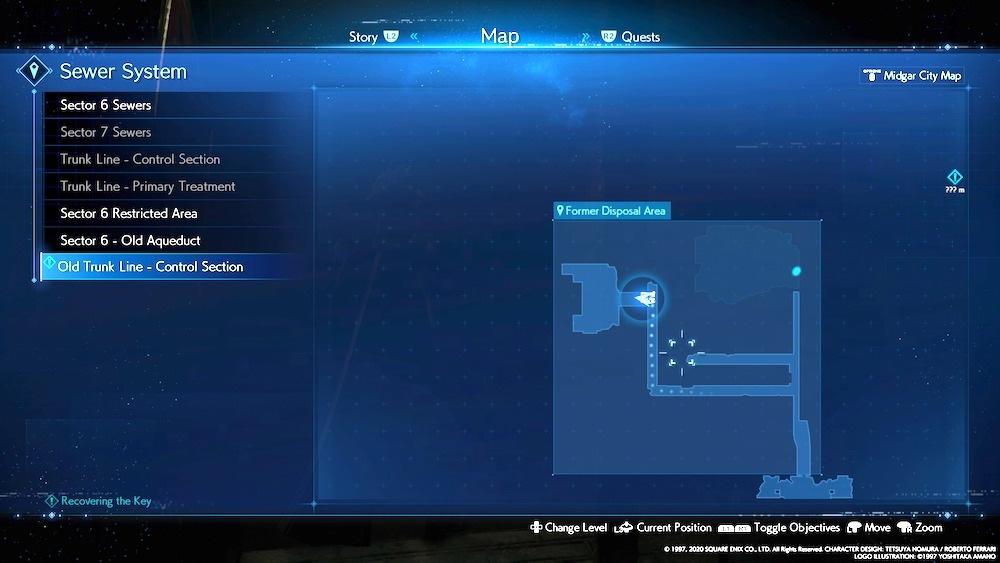
To get to the last stash, you have to re-enter the Sewers. You'll do that when you visit Don Corneo's mansion as part of the main quest. The stash itself is in the Former Disposal Area in the Old Trunk Line - Control Section. Work your way through the sewers until you defeat the Mischievous Shoat miniboss; after that, Leslie will lead you to a ladder with a switch beside it. Throw the switch, then return to the Former Disposal Area and enter the stash, which has now been drained.
Inside the final stash, you'll fight the Sahagin Prince, along with two more Sahagins. The Prince is tougher than his buddies, using counter-attacks in addition to the Jump and Harpoon attacks of his friends, but he's got the same weakness: Fire. Use your most powerful Fire spells to quickly stagger and put down the two Sahagins backing up the Prince, then focus up on it. Watch for him to go into his counterattack mode, then hit him with Fire to drive up his stagger gauge. The biggest threat in this fight is the Sahagins' ability to turn your team into frogs, but use maiden's kiss items if things get bad to bring them back. The key is to use Fire often and quickly to try to take out the Sahagins before they can zap you with too many status effects.
When you're done, finish the Sewers main quest with Leslie. Before you head topside, talk to Marle in Evergreen Park. You'll get the Art of Swordplay Vol. III manuscript for Cloud when you're done. You should also find a letter on the ground in the Urban Development District near Don Corneo's mansion on your way to leave for the plate above, which will unlock the "Divine Gratitude" Trophy.
Side-Quest: Tomboy Bandit (Sector 5 Undercity)
Head to the Sector 5 Train Station and you'll run into Johnny again, who will tell you he was mugged. His description sounds like Kyrie, the woman Mirielle also told you to look for in the Corneo's Secret Stash quest.
Continue west and north up to the church where Cloud met Aerith. Talk to Kyrie at the church and she'll send you to Wall Market's Coliseum.

In the Coliseum, you'll face the Beastmaster again, but with a new enemy working with him: the Hellhound. The Beastmaster is easy enough to deal with--hit him with melee strikes and Fire spells to knock him out in no time. The Hellhound is a tougher customer, but if you have the right spells handy, you can make quicker work of it.
The Hellhound is a two-headed monster, and each side of its personality has a flame that helps it generate powerful fire-based attacks. Extinguishing one or both of those flames with magic spells drives up its stagger meter in a hurry. You can use Ice spells to extinguish the Hellhound's red flame, or Cure spells to extinguish its purple flame. Either set of spells will knock the Hellhound down so you can close the gap to do more melee damage. Keep up a barrage of magic and melee and you should take the beast out with little difficulty.
Return to Kyrie to get the key to Don Corneo's Stash Key and Johnny's Wallet. Return to the Sector 5 Train Station to return the wallet to Johnny.
Side-Quest: Wavering Heart (Wall Market)
Drop by the gym to find Andrea there and a new Pullups minigame you can take part in. This time, Tifa can take part in the challenge. Similar to the squat minigame, it's pretty straightforward: beat Andrea to complete the quest. You can then keep at the minigame by challenging the other folks in the gym to earn yourself some additional rewards.
Side-Quest: The Power of Music (Wall Market)

Stop by the jukebox, accessible in the park on the east side of the inn. Betty, the girl there, will ask you to find music discs to cheer up the locals.
First, head to the Inn at the entrance to Wall Market, on the south side of the main square, and talk to the man in the lobby to pick up the Good Night, Until Tomorrow Music Disc. You'll find the second one in the Corneo Colosseum; talk to the souvenir seller there to snag the Fight On Music Disc. Finally, go through the passageway left of the entrance to the Honeybee Inn to find the Stand Up Music Disc.
Return to the jukebox and play each of the songs to complete the quest. You'll get the Way of the Fist Vol. III manuscript for Barret as a reward.
Side-Quest: Malicious Goons (Wall Market)
Drop by Madam M's parlour at the north end of Wall Market and she'll suggest Corneo is sending men to Aerith's house. Return to the Sector 5 Undercity and head to Aerith's. You'll find the guys in the vacant lot just short of her house, past the Leaf House.
You won't fight the goons themselves, but rather, a Tonberry. This thing's attacks are deadly, knocking out your characters in one hit, but it's slow and deliberate. The trick is to attack it from behind, and keep your distance when it's coming for you. Its Chef's Knife melee attack will take you out in one hit, but if you can dodge the Tonberry's attacks, you can lay down a lot of punishment and drive up its stagger meter. If you cast spells or use Barret's ranged attacks, make them the ones that don't have long animations--stand still too long and the Tonberry will hit you with another one-hit kill attack, this one long-range, so try to dodge it.

As the Tonberry's health drops, it'll start using an attack that freezes all your characters with Stop, which will open them up to killing blows. Keep your distance as much as you can to avoid it, and use Phoenix Downs to keep your team on their feet until the Tonberry eventually goes down.
Side-Quest: Subterranean Menace (Wall Market)
Go to Evergreen Park and talk to Wymer, who will ask you to clear the monsters out of the underground lab you previously visited. You'll also need to enter the lab to retrieve the last item you need for the Secret Medicine quest, which is the Behemoth's Horn.
Crawl down through the underground passage in Evergreen Park to reach the lab. You'll need to fight your way through it to get to the Behemoth Type 0 boss at the far end. There are some tough fights in here, including a Wrath Hound like the one you dealt with in a sidequest back in Episode 3, but nothing you haven't faced before.
The Behemoth is a different question. This giant monster is powerful, dangerous, and quick. Make sure you're fully healed before you slip through the door marked with the Shinra caution tape to fight it. First and foremost, try to stay away from the beast's head; it'll swipe at you with its claws, slam the ground to stagger your characters, and thrash them with its horns for big damage. You also generally want to try to keep away from it after you get in close for melee hits, as the Behemoth will occasionally spin in circles to slam everybody who's nearby.

Your goal in bringing down the Behemoth is to cripple first one half of its body, then the other. A good way to do this is to take over control of Barret, so you can focus fire on either its Upper Body or Lower Body with a variety of attacks, while staying out of harm's way. Anything you throw at the Behemoth will work, although unless you put a lot of punishment on the Behemoth's horns, avoid spells--magic will trigger counterattacks until the horns are destroyed.
It's going to take a lot of damage to cripple one of its body parts, but when you do manage it, quickly focus up on the other body part and lay down as much damage as you can, as quick as you can. Be careful, because the Behemoth will still be capable of attacking you, even if it can't get away from you. If you can cripple both sides, you can stagger it for some massive damage.
Repeat the process until the job is done; it'll take a while, but if you keep on top of healing spells, you should be okay. Use your best attacks but execute either with range or hit-and-run tactics to minimize the damage you take.
When you finish, return to Wymer in Evergreen Park to get your reward, the Sharpshooter's Companion Vol. III.
The Sewers
Once you've done (almost) everything else, go to Don Corneo's mansion. Use the door in his office to go downstairs into the dungeon to snag yourself a Chakra Materia. Back in Corneo's office, you'll gain access to the Sewers once again. Fight your way through them--the path is pretty linear. Eventually, Leslie will take the lead as you approach Don Corneo's hideout. In the breakroom just ahead, use the vending machine to get The Chase Music Disc.
A monster called an Abzu Shoat will soon snag the key to the door from Leslie, prompting a chase. When you see it hiding just past a pile of junk you have to pass under, cross the bridge over the waterway nearby instead to find a chest with two phoenix downs inside.
You'll start fighting Abzu Shoats not long after. Avoid their Typhoon attack, which can be devastating, and hit them with Fire spells to do big damage and stagger them. When you hit a battle with two of them at the same time, check the corner of the arena for a Poison Materia.
Keep following along until you fight the Mischievous Shoat and his buddies. Follow the same pattern as before, using Fire spells for staggering and taking down the Shoats one at a time. Afterward, follow Leslie to the ladder; beside it is a switch that will drain the water back in the Former Disposal Area, which will allow you to enter the last of Don Corneo's stashes for the Corneo's Secret Stash quest.
When you're done with the stash, follow Leslie back to the beginning of the area. Go after him through the door when he tells you to wait to find a bench where you can rest and restore your team.
Boss Fight: Abzu

Don Corneo's pet monster is back in this boss fight, and the primary difference is that it brings along a bunch of those Abzu Shoat creatures for you to deal with as well. Like the fight against the Failed Experiment, you'll want to dedicate a fair amount of time to knocking out the little guys in order to clear space to fight the boss, without getting knocked out of your spellcasting animations. As with the last time you fought Abzu, Fire spells are very effective in dealing damage, although they don't do almost anything to the boss's stagger gauge, so keep that in mind.
Use Barret's Maximum Fury with two ATB charges to take out several Shoats at once, while also making use of Cloud's Triple Slash. You'll want to focus your attacks on the boss's weak points again--if you took out one of its horns last time, you'll be able to target the other this time, as well as its tail. Crippling the boss weakens its attacks and opens it to a lot of punishment, if you can do so quickly, but damaging the appendages isn't a reliable way to push up its stagger gauge, so keep that in mind. Using Tifa and Level 2 limit breaks you can get from Corneo's Colosseum to attack the boss directly and stagger it is an effective strategy as well, so see what works best for you and your team.
The first phase of the fight is pretty similar to the last time you fought Abzu. Watch out for the Ground Pound and close-range melee attacks; use the debris around the room for cover, and be careful not to get surrounded by Shoats. You can do a lot of good controlling Barret here, cleaning up Shoats and then turning ranged attacks against the boss. Barret can run up ATB very quickly, which allows you to get a lot of attacks off, whether they're from spells or abilities. You can also use him in a healing role, especially with so much cover around, because he can often get clear of the fight to get spells off. Don't forget also that a big Fire spell will briefly set Abzu on fire, giving you a clear chance to hit the boss with Focused Thrust, Focused Shot, and Focused Strike to push have a huge impact on its stagger meter.
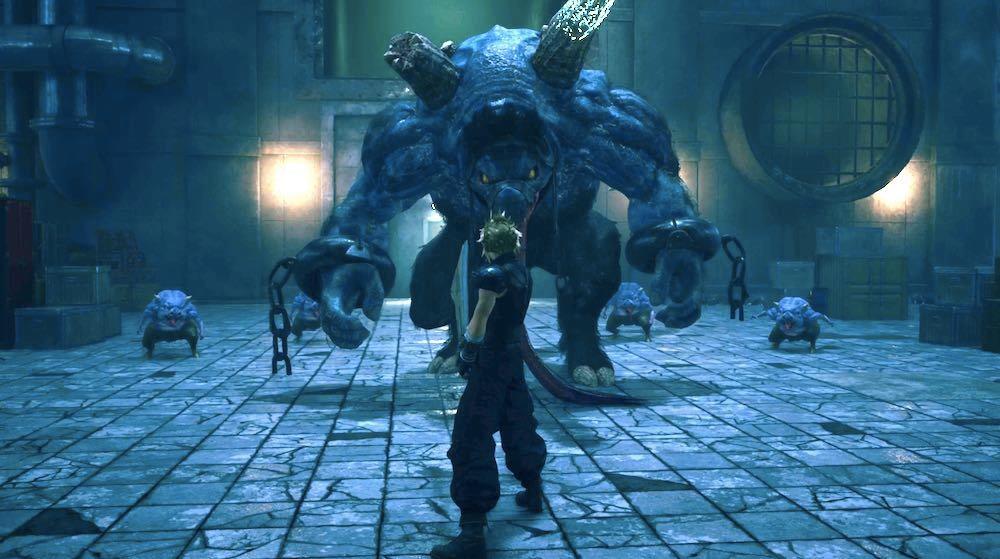
After you deal some damage, Abzu will summon a bunch of sewage to wash all of Don Corneo's furniture to the sides of the arena. When that happens, a bunch more Shoats will appear; knock them out as quickly as you can and then go after the boss again. Abzu will get a bit quicker and use its Charge attack more, but you won't need to change your strategy too much. Keep clearing out Shoats and stay away from the boss to avoid its Tail Spin attack and melee strikes. Abzu will also occasionally kick off Blackwater Blast attacks, so run to the side of the pipe the camera centers on to avoid the water.
In the final phase, Abzu's Shoats will get more aggressive, adding the Headbutt attack to their slate of moves and making them more of a threat. Again, try to clear them out as quickly as you can to minimize the number of threats to your team. Abzu himself will get very tough, adding the Pounce attack, as well as a Blackwater Blast that won't warn you where to expect it to come from; when that happens, close in on the boss to avoid it.
Keep up the pressure on the boss as best you can, avoiding attacks like Triple Charge and Ground Pound. When you see Abzu readying its Blackwater Deluge attack, get close to the and do as much as damage as you can to try to interrupt the attack, but stick close to try to avoid the water when it rushes in from one side of the room, then the other. If you're not confident you can avoid it, heal up to make sure you can weather the full damage, and get ready to deal with Poison effects as well. Keep your party healthy and keep up the melee and Fire spells and you'll finally fell Abzu for good.
After defeating Abzu, head back up when you're done in the sewers. Turn to your right after the cutscene and go back down the stairs toward the sewer to find a chest with three Moogle Medals.
Continued in Final Fantasy 7 Remake Chapter 15 Walkthrough: The Day Midgar Stood Still.
Got a news tip or want to contact us directly? Email news@gamespot.com
Join the conversation