Resident Evil 3 Remake Walkthrough - Sewers Guide
Find all the collectibles and deal with the Nemesis with our full guide to Resident Evil 3 Remake, venturing into the sewers and beyond.
Our complete Resident Evil 3 Remake continues, taking you out of Downtown Raccoon City and into the sewers below. We've marked every ammunition pickup, health item, weapon upgrade, and inventory expansion, as well as the collectibles you can snag along the way. Read on for all the information you need to survive Raccoon City, the T-Virus, and the Nemesis.
If you need more Resident Evil 3 content, we've got you covered. Check out our full Resident Evil 3 Remake walkthrough for help on everything. We've also got a complete list of Resident Evil 3 lockpick locks, as well as safe locations and codes, a guide to finding every Hip Pouch, a guide to finding the jewels for the Kite Road Railway Monument puzzle, and an explanation of when you should fight the Nemesis for big rewards.
Note: This walkthrough covers Resident Evil 3 Remake for the Assisted, Standard, and Hardcore difficulties; on Nightmare and Inferno difficulty, enemy encounters and item locations are remixed.
- Part 1: Racoon City Downtown
- Part 3: Raccoon City Police Department, Clocktower Plaza
- Part 4: Hospital
- Part 5: Underground Storage And NEST 2
Resident Evil 3 Remake Walkthrough Part 2: Sewers, Demolition Site, And Gun Shop
The Sewers
Open the door immediately on your left to find a safe room. Inside is the Sewer Map, a red herb, and two lockers that contain handgun ammo and shotgun ammo. Once you're done gathering what you need, head back out.
Follow the hallway to its end, where you'll hit a door with an electronic lock. The Increased Sewer Security file is on the wall beside it. The file discusses a Battery Pack you need to find in order to proceed. Go down into the waterway and slide down the ramp. You'll find a hand grenade in the trash on the right side of the path forward. (You can ignore the ladder here for now, since the doors at its top are locked.)
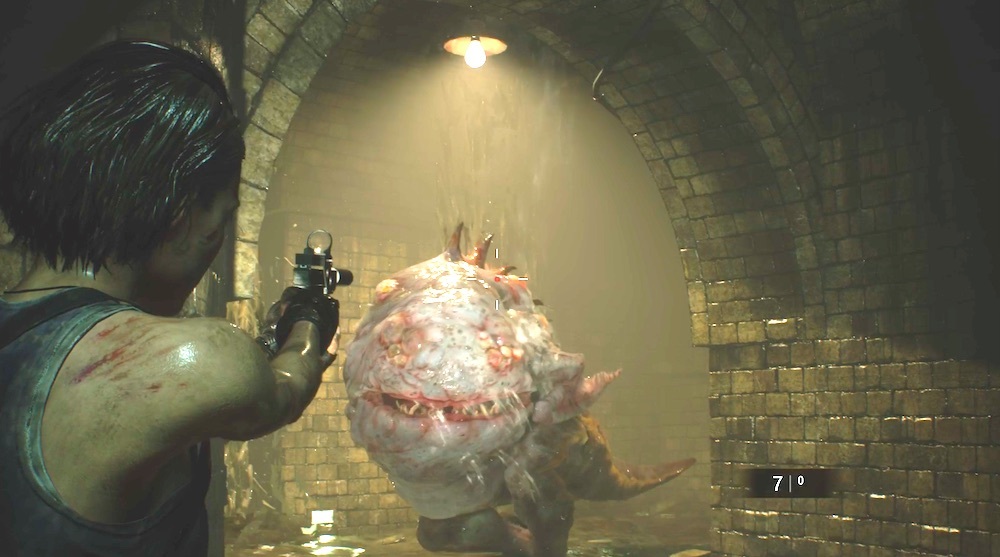
Keep going to the fork and take a left toward the office. You'll run into some kind of gross fish monster--a Hunter Gamma. When it opens its mouth to come after you, shoot into it to hurt it; don't bother trying to shoot it when its mouth is closed, because you won't do much damage. Stay well back, because the creature can take you out immediately if it gets you in its mouth.
Office
The Office is a safe room, and inside, you'll get the grenade launcher, and find the Research Assistant's Notes file and the Gun Shop Kendo file, which will teach you how to craft grenades for the launcher. Grab the Explosive B on your way out.
Head back to the fork and take the right path. You'll face more Hunter Gammas, but you should be able to drop each with a single flame round from your grenade launcher. Check your map to find a fork in the path, hidden by a big poopy waterfall. Take that path to find a wooden crate containing a green herb, and the Sewer Worker's Notes file nearby.
Head back to the fork and take the pathway to the end. Check the right wall before the ladder to find some grenade launcher flame rounds. Just past the ladder, you'll see bars blocking the way forward; look through the bars on the ground, on the right side, side to find a Charlie Doll.

Resident Evil Guides & News
Lab
Just inside the Lab, check the table to your right to find the Battery Pack that'll open doors for you. It requires two inventory slots, so make sure you have enough space. Continue around the corner to find the A Love Letter? file, which gives you some information on the Hunter Gammas--they're susceptible to flames in addition to having a weak point in their open mouths. It's okay, we taught you that already.
Along the wall, you'll also find a green herb, high-grade gunpowder, and two lockers. The unlocked one contains gunpowder; the other locker can be opened with your lockpick to reveal some Explosive A.
Return to the ramp you first slid down. You'll be accosted by a couple more Hunter Gammas along the way, but always one at a time. Clear them out and take the ladder to the left of the ramp. Use the Battery Pack to open the electronically locked door, then kill the Hunter Gamma that jumps out ahead of you. Hang a left to unlatch the iron door so you can reclaim the Battery Pack to take it with you, then use it to open the door to the Security Room. Inside, you'll find a Hip Pouch and gunpowder on the desk. Be sure to take the Battery Pack with you when you leave.
The path ahead will take you back to the start of the area, so you can return to the first safe room and save before using the battery pack to exit the area. After you pass through the battery pack door and start up the stairs, turn around to find a Charlie Doll up on the wall behind you.
Demolition Site
Run from the Nemesis, dodging the zombies, until you get inside. Use the safe room just head to save and check inside for Explosive A, which you can use to craft explosive rounds to use against the creature. Head up the escalator when you're ready, dodge past the zombies, and climb the stairs to the top. This isn't an especially hard escape.
Keep moving until you hit a typewriter as you climb a series of ladders, and check beside it for the Notice of Demolition Delay file.
Rooftop
Now you'll face the Nemesis for real. Try to keep objects between you and it, especially when it sprays flame at you. After a big gout of fire, the Nemesis will pause briefly and the flamethrower will open up, revealing several yellow vents. That's a good time to hit the creature with an explosive round from your grenade launcher to do a big blast of damage.
The Nemesis will also shoot flames into the air that'll rain down near you, so keep moving as much as possible and keep distance between. Also, note that when you try to line up a grenade launcher shot, the Nemesis will often dodge quickly to one side or another, so you'll need to stun it to avoid wasting ammo.

The creature will chase you around the roof, so try to use objects to your advantage, including generators, to slow it down and put space between you. When you stun it, shoot the big cylindrical fuel tank on its back until you can destroy it. If you need more ammo or health items, run around the edges of the area, as you'll find a bunch of pickups scattered around. Use your map to help zero in on anything you missed.
Once the tank is destroyed, the Nemesis will pursue you more aggressively. Dodge clear when it slams its flamethrower on the ground to avoid the explosion; do the same when the Nemesis lowers its shoulder to charge at you. Keep hammering it with the shotgun or the grenade launcher every opening you get to finish it off.
Back Downtown
Follow the pathway through the destroyed cars, climbing up onto the fire engine to advance, grabbing handgun ammo off the car hood to your left as you pass. When you jump off its ladder, turn right to head down to the Raccoon City Police Department parking garage--a familiar locale if you played Resident Evil 2 Remake. Check in front of the car for a case that hides some high-grade gunpowder. Back up on the street, make for the Gun Shop.
Gun Shop
Turn left to find Explosive B and the Semi-Automatic Barrel upgrade for the shotgun on the shelves. In front of the entry door is a green herb on top of a crate, and to the left, near the shooting targets, are some handgun bullets. Finally, there's gunpowder in the back corner, and a key to the padlock door hanging on the wall. Use the typewriter and Item Box before you head out.
Head to the padlocked door and open it up, then dispatch the zombie on the ground ahead of you before it gets up. Grab the red herb next to it, then kill the mutated zombie that comes around the corner. Use the door to enter the house just beyond. Before venturing further in, look on the shadowy counter beside the archway forward to find a Charlie Doll.

Head up the stairs to the bedroom, where you'll find the Raccoon Times Reader's Column file. Use the lockpick on the locked case to find explosive rounds inside, then leave the house.
Back To Carlos
Though it's counter-intuitive, you don't need to use Jill's quick dodge ability to avoid too many of the Nemesis's rockets; for the most part, he's not especially accurate and you can generally juke the rockets while maintaining your top speed as you run. Be careful not to get hung up on zombies or to let the Nemesis close the gap on you during your escape; watch for generators if you need something to hold him up for a bit. When you hit the power station, dodge past the Nemesis to get to the next area.
Keep running for it until you get to the stairs to the Toy Shop, then double back down the stairs and slip off to the side to avoid getting crushed. When the Nemesis shows up here, you can down him with explosives to get an item drop. Keep moving back down the alley toward the subway station, then follow Carlos when he shows up.
We've got everything else in Raccoon City covered--keep going with our walkthrough in Resident Evil 3 Remake Walkthrough Part 3.
Got a news tip or want to contact us directly? Email news@gamespot.com
Join the conversation