Resident Evil 3 Remake Walkthrough - Downtown Raccoon City Guide
Find all the collectibles and deal with the Nemesis with our full guide to Resident Evil 3 Remake.
Resident Evil 3 Remake returns you to Raccoon City in the throes of its T-Virus outbreak. Like Capcom's reimagining of Resident Evil 2 before it, the game is full of secrets, collectibles, and wide-open areas that can be a bit confusing to navigate. There's a ton of stuff to find in Resident Evil 3, and it's easy to miss things--especially because the game is full of points of no return, where you'll get pushed on in the story, unable to return to past areas.
That's okay, though: We've played through Resident Evil 3 Remake and scoured every corner and find everything we can. Our complete walkthrough guide starts Jill's journey in the middle of Raccoon City's downtown. We've tried to be a spoiler-free as we can be with this walkthrough, focusing on pickups, collectibles, and strategies. Note also that this walkthrough covers Assisted, Standard, and Hardcore difficulties. On Nightmare and Inferno difficulties, enemy and item locations get remixed for greater challenge.
If you need more Resident Evil 3 content, we've got you covered. Check out our full Resident Evil 3 Remake walkthrough for help on everything. We've also got a complete list of Resident Evil 3 lockpick locks, as well as safe locations and codes, a guide to finding every Hip Pouch, a guide to finding the jewels for the Kite Road Railway Monument puzzle, and an explanation of when you should fight the Nemesis for big rewards.
- Part 2: Sewers, Demolition Site, Gunshop
- Part 3: Raccoon City Police Department, Clocktower Plaza
- Part 4: Hospital
- Part 5: Underground Storage And NEST 2
Resident Evil 3 Remake Walkthrough Part 1: Downtown
Jill's Apartment
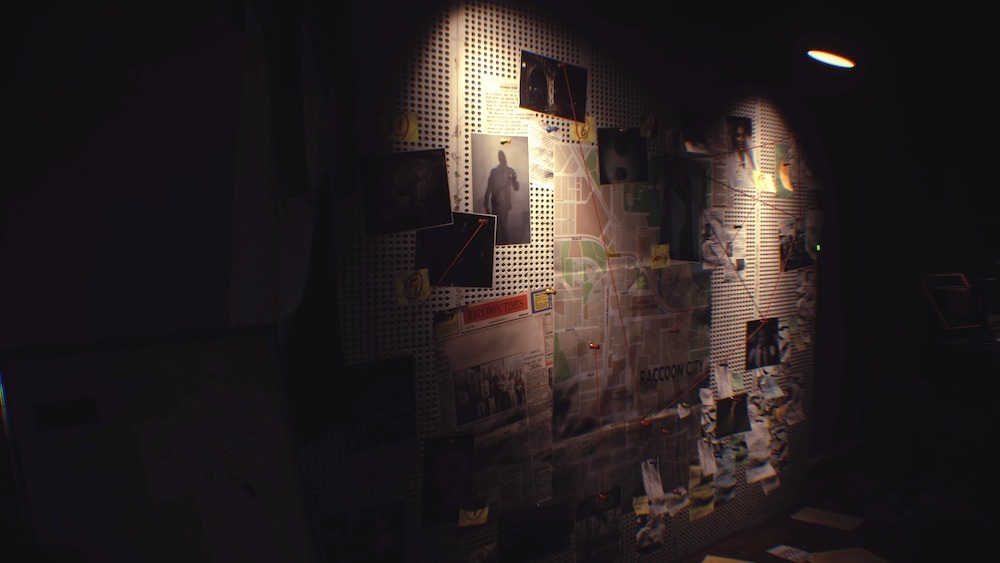
We start with Jill waking up in her apartment. When you can look around, check Jill's investigation board for Jill's Report and Investigation Notes files. On the blue book to the left of the board is the Unsealed Envelope file, and you'll find the Message from a Colleague file on the table beside the pizza, which updates you on the status of another of Jill's S.T.A.R.S. team members, Brad Vickers. Head to the bathroom to progress.
Escaping Through The City
You'll meet up with Brad Vickers outside of your apartment and make your way through the city. Once you have a handgun, try to conserve ammo as best you can--you don't need to fight the zombies and aren't in good shape to do so anyway, so run away instead. Eventually, you'll make for a parking garage, after receiving some orders from a helicopter above. Right after the helicopter gets in touch, you'll run into a man hiding in a cargo container. Walk to the container to speak to him repeatedly, unlocking your first objective from the Records screen. Check the barrel beside the door you exit by for some handgun ammo.
The Subway
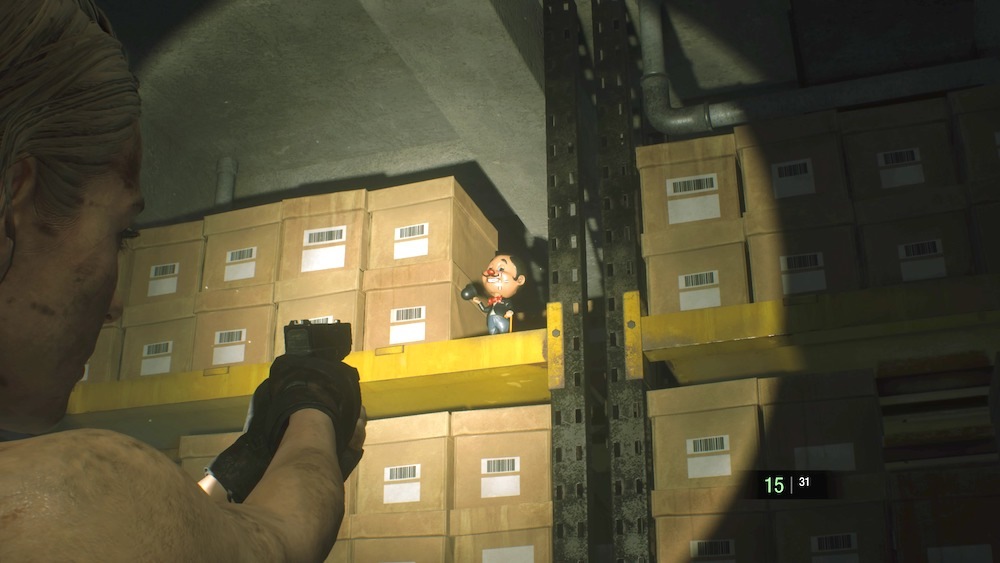
As soon as the cutscene ends and Carlos starts to lead you into the subway, stop and turn around. Head back up the stairs and look for the newspaper stands on the right side of the sidewalk. There's a Charlie Doll bobblehead between the red and blue stands; there are 20 of these hidden in the game, and you collect them by shooting them.

After talking with Victor, leave the subway car and check the bench to the left of the exit stairs. You'll find the UBCS Ammo Crafting Guide file. At the top of the stairs, get the Tabloid Front Page file on the newsstand.
After talking with Carlos on the radio, head to the top of the stairs to find two green herbs and two bottles of gunpowder. Use your knife to smash the box with the yellow tape a little to your left to find a Red Herb as well. There's also a locked case here you can't open yet--you'll need the Lockpick, which you won't find until later.
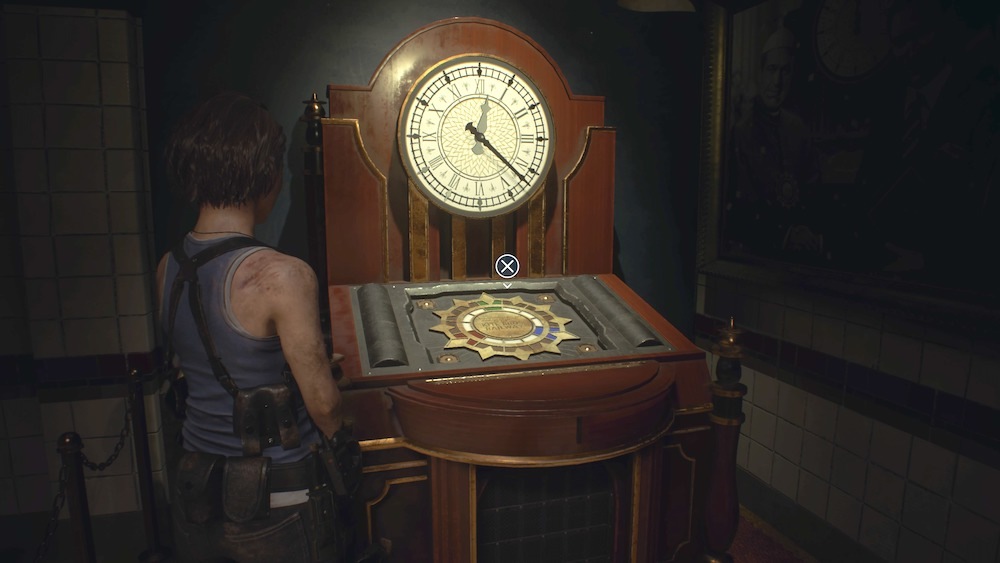
Find the Kite Bros Railway monument puzzle through the gate and to the left. You'll soon start finding Jewels you can plug into this thing to solve it. Use the typewriter to save your game and check the table for the UBCS Herb Guide file. To the right of the Typewriter is also an Item Box, letting you stash spare items for when you need it.
The Street By The Toy Shop
Take the stairs to street level and follow it to the left. Note that the Toy Uncle store is locked with a padlock and you can't open it just now. Carlos will tell you that you need to head through the alley, which is on fire; check it and you'll see a fire hydrant you could use to put out the flames, with the right tool. Backtrack a bit and zombies will smash their way through the fence you previously passed, opening a staircase down. Use Jill's Dodge maneuver to get past them or clear them out, but if you can, save the red barrel for later. Head down, where you'll have to deal with more zombies; shoot the sparking generator on the right side to electrocute them, briefly stunning them so you can get by or shoot them.
Ahead is the Donut Shop; you'll find handgun ammo beside the car to the left of the door, as well as gunpowder inside the shop on the table with the two bodies. Look to the right of the microwave in the corner behind the counter to find a Charlie Doll.

The back room of the Donut Shop is a safe room where you can save, which is a good spot to note for later. Inside the room is also a Fancy Box; examine it to find a Red Jewel inside. That goes in the Kite Bros Monument back in the subway, so drop it in the Item Box here to use later.
You can leave the Donut Shop by the other door to enter another area, but first, leave the way you came. Back in the courtyard by the stairs, turn left to find a staircase up to a fire escape. Take the one to the left to enter an art storage room.
Inside, check to the left of the safe to find the Drugstore Owner's Journal file, which gives a hint about where to find the code to open the nearby safe. The safe code is left 9, right 3, left 7; inside, you'll find the Handgun Dot Sight upgrade.
Watch out for the zombie in this room as you continue toward the far door. Before you exit, check up on the shelf for a Charlie Doll. Just outside, look left of the door for some handgun ammo.
The Street By The Subway Office
Follow the walkway to the stairs that lead you down to the street level. Here you can head to the Drugstore, which includes a number of useful items, but will also put you on track to fight several zombies. The front counter of the store has a green herb, and on the shelves further in you'll find high-quality gunpowder. At the back of the store near the poster of the Aqua Cure Queen, look left for handgun bullets.
Back outside, head left from the Drugstore entrance, and you can get around a black car. You'll find a zombie crawling out from under the car, along with a wood box you can destroy to find a green herb inside.
Resident Evil Guides & News
Kite Bros Subway Office
Now head to the other side of the street to enter the Kite Bros Railway building. Be careful as you enter; you'll find a zombie around the corner down the first hallway. After you've dispatched it, turn right to find a Fire Hose on the ground. You'll need the hose to get past the flaming alleyway back near the start of this area.
Enter the room beside the hose to find some lockers, which contain gunpowder and a hand grenade you'll want for later (as well as a padlocked locker you can't open yet). On the table nearby you'll find the Subway Employee's Memo file. It'll give a hint as to how to get the shotgun out of the nearby gun locker. You'll need the Bolt Cutters to cut the chain holding it shut.
Leave this room and enter the one at the end of the hallway next. On a chair near the control panel, you'll find the Kite Bros Railway Manual file. Look under the desk beside the control panel to find a Charlie Doll. You can't do anything else here just yet.

Instead of backtracking through the Donut Shop, go back through the storage room containing the Drugstore owner's safe. From here, run down the path to the right, which will take you out on a rooftop. You'll face some zombies here, but you can easily dispatch them by shooting the explosive red barrel in the corner behind them. Once you're clear, check one of the bodies near the edge of the building for gunpowder. You can now lower a ladder on the edge of the rooftop that'll lead back down to where you started, out front of the toy shop.
Garage
Head to the alley and use the Fire Hose on the fire hydrant to open the way forward. Up the stairs and inside the garage, grab the Bolt Cutters off the wall. You can use them on the door nearby, but you can't unlock the padlocked locker yet.
You'll need to go through the chained doorway in this room to advance, but this is a good opportunity to go open some locked doors in the rest of the downtown area before advancing. First, head back to the Kite Bros Subway Office and retrieve the shotgun from the weapons locker. You'll want the shotgun for the next section, so this is a worthy detour.
While you're here, open the chained door in the fence next to the Kite Bros Subway Office. It'll give you access to an alley containing a few zombies, some handgun ammo, and a case with shotgun ammo.
You'll also want to visit the Grocery Store across from the Toy Store, which you can open with the Bolt Cutters. Inside is high grade gunpowder, a first aid spray, and a Fancy Box, which contains the Blue Jewel. With two jewel, it's worth heading back to the subway entrance and plugging them into the Kite Bros Monument; the first will get you a grenade, and the second will unlock the Tactical Shotgun upgrade.
Back in the Garage, go through the chained doorway, grab the shotgun shells off the table on the left and check the body to find the Training Log file. Go up the stairs to get outside, then hang a right at the fork to find handgun bullets and the UBCS Suicide Note file near a body on the ground. Back the other way, grab the Electrician's Note file off the wall, which tells you about shooting generators to zap zombies. There's a generator just ahead you can use on two zombie dogs that attack you.
Continue toward the Power Substation. Go past the door in the fence to find a crate you can break behind a car, with a green herb inside.
Power Substation
You'll face three zombies inside the power substation. At the top of the stairs, grab the red herb and then enter the next room, where you'll find the Fax from Substation Chief file on your left, which explains how to turn the power back on. Beside the typewriter and the item box, you'll find the Hip Pouch on top of a step ladder, which will expand your inventory. Look on top the cabinet beside the door out of this room to find a Charlie Doll as well.

Through the next door, you'll find two green herbs at the bottom of the stairs, and the Green Herbs: They Work! and Substation Internal Memo files, which will give you clues about how to proceed. At the end of the hall is a body holding a case; inside is the Lockpick. Head around the corner to the right from the body to find handgun ammo inside a crate you can destroy. Use the lockpick on the door to enter the rest of the substation.
The next area is a maze infested with spider-like creatures known as Drain Deimos, and you'll need to navigate it to find and turn on four power breakers. They're not too tough to find--three are in the extreme corners of the area, while the fourth is down a side hallway between the furthest two. Keep your map handy to help navigate.
When you first enter the maze, you'll get jumped by a Drain Deimos. As the green herb file mentioned, you'll need to use a green herb to get rid of the maggots it injects into your body. If you let them fester, they'll eventually result in an instant death. There are more herbs scattered around the maze, and they'll get marked on your map if you see them but don't take them, in case you need them later.
Make your way down the first hallway to its end and turn left to find the first breaker. You're vulnerable while turning it on, so make sure to check your surroundings to avoid getting attacked by more Drain Deimos. The shotgun makes short work of them, whereas the pistol will take multiple shots to put them down.
After activating the first breaker, take the nearby ladder to find the Chad's Notes file about the poor guy with the maggot problem. You'll also find another herb up here. Cross to the other side of the maze and drop down. Make your way to the back corners for the next two breakers, then check the side hallway nearby the furthest one for the last breaker. When you've got them all, you're clear to make your way back out, but expect increased Drain Deimos resistance. Keep an eye on your map to avoid getting lost.
Once you've restored power in the control room, leave and head back down the stairs. Use the lockpick on the locker to find handgun ammo before leaving the building.
Dealing With Nemesis

You'll want to fight the Nemesis at least once before you get to the Kite Bros Subway Office. Knocking the Nemesis down here will get him to drop the Handgun Extended Magazine upgrade. If you progress too far through this area, though, you'll miss your chance. Your best bet is to toss a grenade at him right away, then make your escape. Note that you can knock him down again if you need to, but he won't drop anything else until later, so try to save your ammo.
To get away more effectively, utilize Jill's dodge move as much as possible to avoid the Nemesis's attacks and get around it. You'll need to run for it--the Nemesis mostly won't follow you through low doorways, so your goal is to get inside as quickly as you can. This alley also has a generator you can shoot when the Nemesis is nearby, which will briefly stun it, allowing you to unload on its black mechanical heart for extra damage. The generator's electricity can hurt you as well, though, so be careful.
Hustle back to the garage, where you can save and lockpick another locker, which has a first aid spray inside.
Back outside in the alley, you'll find that more zombies have filled in the street, and the Nemesis will be along shortly. Your goal is to get to the Kite Bros building on the other side of downtown. You can reach it either by taking the ladder up to the rooftop (a risky endeavor given how long it takes to climb) or through the Donut Shop at the bottom of the hill.
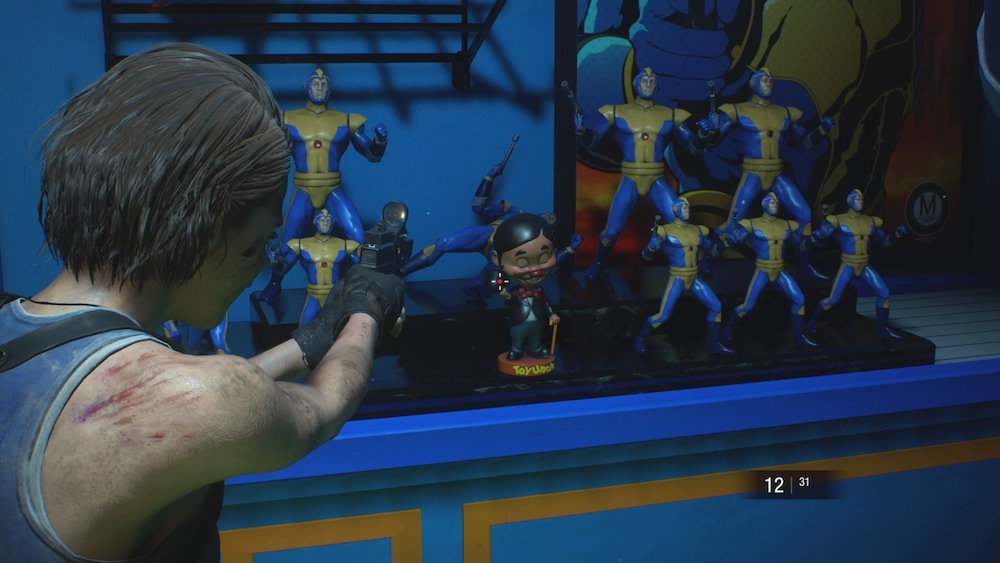
First, though, enter the Toy Store using the lockpick. Inside is a Fancy Box that contains a Green Jewel, which you can slot into the Kite Bros monument back in the subway. You'll also find the Your Charlie Doll file on the Charlie poster. Look for a Charle Doll among the Mega Man action figures on display.
The Donut Shop is not safe from the Nemesis--it will follow you inside. Note that there's a safe room here, as well as a locker you can open with the lockpick to get a hand grenade.
If you haven't fought the Nemesis for the Handgun Extended Magazine upgrade, do so now. Once you complete your work in the Subway Office, you'll lose your chance to get it.
Back To The Subway Office
Continue through the Donut Shop and sprint across the street to the Kite Bros subway office. Inside, check the room near where you got the firehose and the shotgun to find a locker you can lockpick to get yourself another first aid spray.
Inside the control room, look to the right of the control panel for a locked case to open with the lockpick, which gives you shotgun shells.
On the control panel, you need to solve a puzzle around programming the route the subway will take to reach the Fox Park station. Check the board to see the route you need to take, avoiding closed tracks. The letter switches designate which station to go to, while the numbers designate which tracks to take. The correct path is FA-02, RA-03, SA-02.

As you leave the subway office, you'll face a new kind of zombie with a whipping tentacle protruding from its head. Stay well back to avoid the tentacle; you'll notice the zombie shields its head, making it tough to get an effective shot. Hit it in the knees to get the shield to open (and to slow it down), then shoot it in the face to finish it off.
Mercifully, the Nemesis should have vacated the area as you leave, giving you a chance to head back through the Donut Shop, as well as to save.
Outside, you'll face the Nemesis again after a short cutscene. This is your second opportunity to knock down the Nemesis for another item: the Handgun Moderator upgrade. You have to down the Nemesis to get this upgrade before you return to the Subway or you'll miss your chance at it.
Make your way up the stairs and, if you haven't already, enter the Toy Store and get the stuff inside. Then continue past the cars to the wrought-iron alley doorway. You'll face a couple zombies here, but if you've got shotgun ammo, you can knock them out quickly with that.
At the end of the alley, duck around to the right to get into the subway, avoiding the nearby mutated zombie. Make sure you've found and picked up everything you want before heading into the subway, because you can't return.
The Subway
Inside the subway, put the last jewel in the Kite Bros Monument. Three jewels unlocks another Hip Pouch, expanding your inventory. You can also open a case with your lockpick at the top of the stairs, which contains more shotgun shells.
After the cutscene, run down the hallway, but note the Nemesis will be on you almost immediately. Keep moving until you pass a generator, which you can shoot to stun the Nemesis if you need to. Up ahead, you'll see a yellow vent cover on the wall. You'll need to interact with it three times to open it, which can leave you vulnerable to attack. Beside it are two explosive barrels; lead the Nemesis over and blow them up to stun it again and give you time to make your escape. This will also cause him to drop an item case with shotgun shells, if you need them.
Once you drop out of the vent, continue to the end of the hall and through the door to escape.
Keep fighting through Raccoon City with our Resident Evil 3 Remake walkthrough in Part 2: The Sewers.
Got a news tip or want to contact us directly? Email news@gamespot.com
Join the conversation