
INTRO:
Among the promotional artwork for the original version of Oxygen Not Included, there was a Duplicant who appears to have a leaking space helmet; the Dupe is careening across space, passing by multiple asteroids with very different compositions. None of this was reflected in the actual gameplay of the base game.
The Spaced Out! DLC intends to rectify that, at least the part about multiple asteroids with different compositions. The result is much more complex (and complicated) gameplay, but it also highlighted the many minor issues in the base game that were never and still are not addressed.
ACTIVATION:
For better or worse, the DLC cannot run without it being integrated into the code of the base game. Thus, after it is installed, the base game is overlaid with the coding for the DLC. There is a way to revert the installation of the game back to the base game, but such overall make-up of the game’s programming suggests poor planning since the development of the base game years ago. (That the developers have mentioned that the gameplay in the DLC is closer to their vision only reinforces this impression.)

NO CONVERSION OF PLAYTHROUGHS:
Any playthrough that is started with the DLC activated can only ever be played with the DLC re-activated (which is a process in itself). Any playthrough that has been started with the base game, or without the DLC activated, can only be played with the DLC de-activated. There are no means to convert save-games of playthrough to one mode or the other.
PREMISE:
Interestingly, the DLC takes place just after one of the possible end-game scenarios in the base game. Specifically, the Duplicants have managed to reach the Temporal Tear phenomenon, and one of them (specifically the Gossmann-type Duplicant) went through.
Shortly after going through it, the Duplicant returned with the rocket – followed by another Duplicant of the same type with the same rocket, and then another. This repeats, until the colony’s near-space is filled with many copies. Somehow, all these reached a critical mass of sorts, causing what appears to be Earth to appear next to the asteroid that the colony is on. The gravitational pull of Earth yanked the asteroid in.
The collision somehow created many planetoids, each with a specific set of biomes. The colony is of course thrashed, so the Duplicants have to start all over again – only with actual space travel this time.
TWO GAME MODES:
Like the base game, Spaced Out had a development phase that is measured in years. After receiving feedback from players, two options for playthroughs in the DLC have been implemented.
The first option is the intended option for the DLC’s gameplay. The first planetoid has much less space and fewer biomes than the asteroid in the base game, whereas the other biomes that are not in the first planetoid occur in other planetoids instead. These other planetoids are smaller than the first planetoid. Some of them are also small. Frequent space travel between them will be necessary.
The second option – called Classic Mode – is for the sake of players who are not eager for the micromanagement that is needed to deal with the much-limited space in the colonies. There are fewer planetoids, and they have much more space than the planetoids in the first option. Space travel is still necessary, but occurs less frequently.
That said, this review has been made from a playthrough with the first option.
NO OIL IN THE FIRST PLANETOID FOR INTENDED PLAYTHROUGH MODE:
The first major gameplay difference between the two options is the shifting of biomes to other planetoids. In particular, the oil biome is on another planetoid in a playthrough with the first option. Thus, in order to reliably reach the mid-game stage, the player must colonize that planetoid. Fortunately, this is not too difficult because it does not require a rocket; this will be elaborated later.

ADDITIONAL TYPES OF RESOURCES:
Understandably, the DLC introduces new types of resources, most of which have something to do with the gameplay elements of planetoids and radiation. Some are there just for the player’s gratification and curiosity, such as the new plants. These will be mentioned later in the article where relevant.
REVAMPED SKILL AND RESEARCH TREES:
To accommodate the significantly different gameplay and content in the DLC, the skill tree of Duplicants and the research tree have been reworked. Both trees are significantly narrower in horizontal width, but have more vertical height now to incorporate the inclusion of additional branches of science and associated skills. Likewise, the costs of research and experience requirements for Duplicant skills have also been adjusted to fit these changes.
TELEPORTERS – OVERVIEW:
The events in the DLC revealed that Gravitas – the corporation that created the Duplicants and the technology that they can use – has managed to invent travel by teleportation, as well as cargo teleportation. Indeed, the second planetoid that the player would encounter at the earliest is connected to the first one through the teleporter units. This is just as well because the distance between the two can be too far for an early-game colony.
DUPLICANT TELEPORTERS:
The first of the teleporters that the player would come across is the machine that sends a Duplicant on a one-way trip to the second planetoid. Although the phrase “one-way” is not mentioned, the text description of the machine does imply this.
The machine has its own recharging system, which cannot be hurried; it can only send one Dupe every four cycles. Thus, the player will want to carefully prepare the first Duplicant to be sent through; the Dupe cannot take anything from the first colony, with the exception of whatever the Dupe is wearing.
Finding the sender on the first planetoid will also reveal the whereabouts of the receiving unit on the second planetoid. Conveniently, it is in a location that has some basic facilities, though there is no toilet.
However, finding the sender unit on the second planetoid will not reveal the location of the receiver unit on the first planetoid. Fortunately, this receiver unit is usually near the sender unit, though they may be separated by a troublesome biome.
The sender unit on the second planetoid has its own recharge cycle too. Therefore, the player should not expect easy switching of Dupes between the two planetoids.
CARGO TELEPORTERS:
The cargo teleporters are the main means of transferring resources between the two planetoids. Indeed, the player might want to send raw resources from the second planetoid to the first one, if only because the first one has a colony that is further developed than the colony on the second.
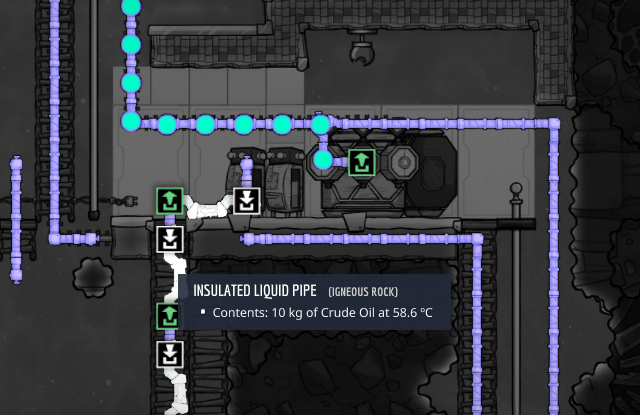
The main complication with these machines is how far they are from each other and how far they are from the locations where the colonies began. Thus, the player will have to build pipelines and conveyor lines from them to the colony proper, if the player does not want the Dupes to travel so far just to load and/or fetch cargo.
Conveniently, the cargo teleporters do not require any power to function. This is a very fortunate design.

STARMAP – OVERVIEW:
Shortly after the teleporters have been discovered, the gameplay element of the Starmap is revealed. This is a significantly different replacement of the Starmap in the base game.
The Starmap in the DLC is a large hexagon that is composed of smaller hexagonal tiles. The first planetoid is always at the center of the Starmap; the second planetoid is several tiles away.
Any other place in the Starmap has to be reached with rocket flight; it is also possible to send rockets between the first and second planetoids, but there is no major advantage over the teleporter system.
ORBIT TILES:
When a planetoid is revealed, the tiles that are immediately around it are also revealed. These are the orbit tiles; rockets that are launched from a planetoid can fly to any one of these tiles. Likewise, reaching any of these tiles lets a rocket land onto any platform on the planetoid; the player gets to choose which platform. Having a rocket reach any orbit tiles of a planetoid also completely reveals the topmost layer of the planetoid.
EMPTY TILES:
The majority of the Starmap is composed of “empty tiles”; travelling through these tiles is uneventful. However, the player will need to have rockets travel through these anyway, if only to allow the surveying of tiles that are further away.
HIDDEN TILES:
Most of the Starmap is initially opaque to the player. Any tile that is within a distance of three tiles from a revealed tile is partially revealed; empty tiles are revealed as such, whereas tiles that have things in them are highlighted with question marks. The latter’s contents are fully revealed after that tile has been surveyed.
SURVEYING TILES:
To survey tiles that are not fully revealed, the player needs to have Duplicants operating telescopes. There are two types of Telescopes: the first is the one in the base game, which has been retained in the DLC.
The other type of telescope is introduced in the DLC. It is much smaller and does not need Oxygen supplies, but it does not provide protection to the Duplicant that is operating it. This telescope can also be built in Spacefarer modules (more on these later), thus having the parent rocket function like a scouting vessel.
Both types of telescopes are subjected to the rules on line of sight for buildings, which remain as finicky as ever; there will be more on this later. The only exception is any telescope in a rocket; as long as it is placed next to the windows of the Spacefarer module, it will work.
Another problem is that the player does not get to have the telescope operators focus on specific tiles. They almost randomly choose the tiles that they survey, though they do always pick the ones that are the closest to the tile on which they reside.
Fortunately, telescope operation does not require any particular skill.

POINTS OF INTEREST:
Other than the planetoids, there are “points of interest”. There are two categories of these.
Firstly, there are the resource fields. These can be asteroid clusters or this game’s facsimile of nebulae. Extraction of resources from these require the use of Drillcones, which will be described later. Reaching them is a mid- to late-game endeavor, though if the player is thrifty on the use of resources, the player will likely not need to.
Secondly, there are the remnants of Gravitas’s space programmes. These do not provide resources, but can be harvested for artifacts from Gravitas’s halcyon days. Like in the base game, these artifacts provide significant décor with considerable range for just a 2-by-1 tile size, which would be of use to players who want good décor ratings in their colonies.
ROCKETS – OVERVIEW:
Inevitably and indubitably, the player will need to build rockets, just like in the base game. However, there are a few things that have been added to make this easier to manage. Indeed, throughout the development of the DLC, many things have been added to make this so, because the early version of rocket-building in the DLC is a headache and is only doable late-game. The only thing that is retained are the platforms on which the rockets are built on, launch from and land on.
Additional rocket engines in the DLC will be described in their own section later, due to their considerable gameplay significance.
ROCKET BURDEN:
“Rocket burden” replaces the limitation of rocket weight in the base game. Every rocket module has its own “burden” rating, which adds to the overall burden rating of a rocket. Higher overall burden leads to a slower rocket. Anything else, such as any materials in the storage modules or the tons of materials that can be in the crew modules, does not contribute to the overall burden rating of a rocket. This is very convenient.
ROCKET RANGE:
In the gameplay of the DLC, the travel distance of the Rockets in the base game has been reworked into “rocket range”. This is the maximum distance that the rocket can travel across the Starmap, regardless of its trips and travel routes.
The effective range of a rocket is mainly determined by the amount of fuel (and oxidizer, if applicable) that it uses to move across one tile on the Starmap. Thus, its total effective range at any time is the amount of fuel (and oxidizer) that it has in usable storage divided by its fuel usage rating.
The overall burden rating of the rocket and its effective speed do not affect its range.

ROCKET HEIGHT:
A notable addition to the gameplay of rockets is the implementation of a new limitation: rocket height. The height of a rocket is measured in the number of consecutive vertical tiles that the rocket stands across. This number cannot exceed the maximum rocket height, which in turn is dependent on the engine of the rocket.
CREW MODULES:
The most notable difference that rockets in the DLC has compared to rockets in the base game is that the crew modules have actual internal spaces now.
To achieve this, the developers have implemented these modules as additional instances in the game world; they occur as rooms that are bounded by tiles that cannot be deconstructed. Interestingly, these tiles are always made of Steel, regardless of what the modules are actually made off when they are built on the rocket platforms. If these tiles are destroyed for whatever reason, this causes an immediate game crash.
That said, these rooms have limited space. Incidentally, this is the reason for the early-version of rocket-building being so difficult in the DLC. The limited space remains limited, as per the developers’ wishes, but new machines and different versions of existing equipment have been added during development to make this easier to cope with. These will be described later.
NO ENTRY AND EXIT PORTS FOR SOME MODULES:
In the base game, storage modules on rockets have entry and exit ports for loading and removal of fluids and solids. For better or worse, this is not the case for the versions of these modules in the DLC. This function is taken up by the cargo-handling ports that can be built next to Rocket Platforms.
ROCKET LOADING PORTS:
Speaking of which, these ports enable the loading and removal of fuel and oxidizers into the pertinent storage modules of the rockets. This is a necessity, which means that Rocket Platforms that are servicing Rockets that need fuel and oxidizer storage take up more horizontal space than those in the base game. This is not for the betterment of the game.
These ports also enable the use of internal ports in the crew modules; in particular, this is necessary for the conveyance of solids. In practice though, the ports are not really necessary for this purpose. Thanks to game design decisions that will be described later, regular pipes and good-old handling by hand can do the job of transferring things into the crew modules.
INTERNAL PORTS:
The crew modules can have internal ports built onto their lowest floors. These ports take up valuable floor space, however. Furthermore, after the player has used them to transports goods into or out of the crew module, they have to be deconstructed in order to free up space. Understandably, this raised a lot of heckles during the development of the DLC.

BUILT-IN PORTS:
Internal ports that are built into the hulls of the crew modules have been implemented after players have complained about the tedium of using the internal ports that have to be built on the floor. These built-in ports are only for liquid and gas transfers; solids still have to be transferred in the usual ways, and a floor-based power port is needed to connect the crew module to any external battery module that is included in the rocket, as well as the power produced by the Engine, if any.
Nonetheless, these built-in ports make transfers of liquids and gases into and out of the crew module much easier. The only major setback is that these ports are implemented as tiles of their own, with lighter mass than the other tiles on the hull of the crew module. This results in less radiation absorption, thus exposing the crew to more radiation than when they are under other tiles in the hull; there will be more on radiation later.
POWER PRODUCTION WHILE TRAVELLING:
Some rocket engines produce power while their rockets are travelling across the Starmap. As mentioned earlier, this power has to be tapped by building a floor power port in the crew module.
Although this is a handy source of power while travelling, the player will need another source of electricity when the rocket has landed on a planetoid that is to be colonized.
HEAT & CO2 BUILD-UP IN CREW MODULES:
Observant players would notice that heat and carbon dioxide (CO2) build-up would be a major problem for crew modules. Indeed, the player will have to eventually do something about this, perhaps even while the rocket is in transit; the limited space in crew modules complicates this. There are still ways to do so, such as having liquid pipes with cool water in them wound throughout the module to absorb any heat.
BUILT-IN ENTRY PORTS ACT AS EXHAUST VENTS:
The built-in entry ports have a function that is not immediately clear to the new player. Any fluid that is channeled to these ports while the rocket is in space is immediately vented out into space and destroyed. This is the main means of removing any CO2 build-up in a module.
CONTROL OVER AMENITIES IN CREW MODULES:
When a rocket is being prepped in a colony that is already developed, the player will want to prevent Duplicants from using the facilities in the crew modules, especially the toilets, in order to conserve resources that have been reserved for space travel. Fortunately, the game does provide a means to do that via the Command Console of the crew module.
Likewise, the same Console can be used to enable the use of amenities in the crew module when the rocket is grounded on a planetoid that has yet to have working amenities.
DRILLCONE MODULE:
The Solo Spacefarer module has its own nose cone; the standard Spacefarer module has two options for its nose cone. There is the basic nose cone, which does nothing other than completing the rocket.
The Drillcone module requires a bit more rocket height and adds more to the burden of the rocket. However, it is necessary for the purpose of extracting resources from the aforementioned “Points of Interest”. The Drillcone expends Diamond in order to perform its function, however.

REMOVED ROCKET MODULES:
As the DLC gives, it also takes away. In addition to the removal of ports from storage modules, some rocket modules that are in the base game have been omitted entirely. The reason is that they have been rendered obsolete due to the differences in the gameplay.
The Command Capsule is of course an understandable omission; it has been superseded by the crew modules. The Sight-Seeing Module has also been omitted, thus removing a means of boosting Duplicant morale.
The Biological Cargo Bay is also a notable omission. This was previously intended to bring back critters from asteroids in the base game. In the DLC, the player has to wrangle them onboard rockets from the planetoids that they were from or take their eggs instead.
The Research module has also been removed; its purpose is replaced by a certain device that has to be installed in crew modules, which will be described later.
Perhaps the most contentious omission is the absence of the Solid Fuel Thruster. This was intended to give a marginal boost to the travel distance of a rocket in the base game. This module has not been reworked for inclusion in rockets for the DLC experience.
NEW AMENITIES – OVERVIEW:
Spaced Out implements amenities that are mainly meant for inclusion in crew modules. They can be built elsewhere, though they might function differently. There are also machines that are intended to help players deal with the different starting asteroids that the player can select.
The amenities that are associated with the additional gameplay mechanism of Radiation will be described later.
SUBLIMATION STATION:
Most of the gameplay content in Spaced Out is expressed mid- and late-game, but there are some notable early-game innovations too.
The most notable of these is the Sublimation Station. In the base game, Polluted Dirt turns into Polluted Oxygen slowly; with this flat and compact machine, this happens immediately, though with notably lower efficiency than with natural sublimation. When coupled with Deodorizers, the Station can produce enough clean Oxygen to compete with the Diffuser. More importantly, this is a very reliable way to get Clay (which the Deodorizers produce as a by-product).
SLUDGE PRESS:
The Sludge Press is a machine that is intended to process the two additional early-game resources that the DLC introduces. These are Mud and Polluted Mud. Mud can be processed into Dirt and clean Water, whereas Polluted Mud is pressed into Polluted Dirt and Polluted Water. The machine has a liquid port for channeling the extracted water, but the resultant solids are simply dropped onto the floor.

SIZE-REDUCED HAND SANITIZER:
Next, there is the reworked Hand Sanitizer. Its size is reduced in width, thus it has become much more space-efficient. Its building cost remains the same, however; sizable quantities of the rare Bleach Stone resource is needed to build it in the first place, not counting the Bleach Stone that has to be loaded into the device later.
WALL TOILET:
Another notable amenity is the Wall Toilet; it is a late addition during the development of the game; it serves as a toilet, but must be built onto vertical walls.
When it is in a crew module, it expels bodily waste into space – even when the rocket is supposed to be grounded. Outside of crew modules, however, it expels poop and pee out the other side of the wall that it is built into, for better or worse.
LADDER BED:
One half of the Ladder Bed serves as a ladder, the other half a bed. However, as a setback to balance this significant convenience, using the ladder half while a Duplicant is sleeping in the bed will wake the Dupe in addition to inflicting a severe de-buff. Waking the Duplicant also might cause the Duplicant’s scheduled behavior to reset, thus depriving the Dupe of sleep.
DIAMOND PRESS:
The Diamond Press is a late addition during the development of the DLC, just after the Drillcone has been implemented. As its name suggests, it makes Diamond, specifically out of Refined Carbon. It also needs Radbolts, which is a resource that is introduced in this DLC and will be described later.
DECONTAMINATION SHOWER:
In the base game, Duplicants must remove Atmo Suits and Oxygen Masks before they can use Hand Sanitizers or Wash Sinks for the purpose of removing germs on their person. Decontamination Showers allow them to do so without removing their gear.
However, the Shower does not do anything about the Bladder fills of the Duplicants; it also does not destroy the germs that were on their person. Moreover, the Decontamination Shower does not have any port for the purpose of channeling the Polluted Water that is created from the decontamination.
PARTY LINE PHONE:
The Party Line Phone is a recreational device that takes advantage of the distances between Duplicants that are on different planetoids and/or rockets.
Somehow, the device is always connected to any other Party Line Phone in real-time. A Duplicant that is using a phone will randomly connect to any other Duplicant that is using another Phone at the same time. Greater distances between the two lead to greater morale boosts. However, the conversation takes 40 seconds, which can be considerable.
ADDITIONAL ROCKET ENGINES – OVERVIEW:
Additional rocket engines have been implemented in order to allow players to have rockets built in the early- and mid-game segments. Two of these are particularly notable for not needing oxidizers, as will be described shortly.
SUGAR ENGINE:
The Sugar Engine is intended to be an early-game rocket engine. It requires Sucrose as fuel, which it keeps in its own built-in storage. This built-in storage cannot be augmented further because there are no solid fuel tanks in the game. It also needs oxidizers too.
Compared to the Carbon Dioxide Engine, it is much more troublesome to supply. Indeed, the trouble may not be worth the lower burden, higher rocket height limit and the power that it produces while moving. Besides, it has much lower engine power too. Furthermore, Sucrose has other uses, which will be described later.
CARBON DIOXIDE ENGINE:
The Carbon Dioxide Engine is also an early-game rocket engine, and it is better at being one than the Sugar Engine. Moreover, due to its use of Carbon Dioxide (CO2) in its gas form as fuel, it remains an economically viable rocket engine throughout the playthrough.
The most important design of the engine is that it is one of three that does not need oxidizers. Coupled with its own built-in fuel storage, this design in turn minimizes the burden rating and thus optimizes the speed of the rocket. Indeed, a CO2 engine with just the Solo Spacefarer module can achieve speeds that few other rocket module combinations can.
The worst disadvantage of the Engine is that it can only support a low rocket height. The player’s choices for the function of the rocket is very limited. Also, like the Sugar Engine, its range is also limited and cannot be augmented further because there are gas-based fuel tanks in the game.
SMALL PETROLEUM ENGINE:
The Small Petroleum Engine is an odd inclusion in the DLC. As its name suggests, it uses petroleum as fuel, but has smaller size and capacity than the regular Petroleum Engine.
Its main advantage over the regular version is its built-in storage capacity and better efficiency at fuel consumption. It can also draw fuel from fuel tank modules, though these tanks add burden that the engine cannot handle so well.
RADBOLT ENGINE:
Among the new engines, the Radbolt Engine is perhaps the most interesting, mainly because it is associated with the Radiation gameplay element.
The Engine requires its Radbolts, which will be described later. When it launches or lands, it dumps out a lot of Nuclear Fallout, and at extreme temperatures that are even higher than the rocket exhaust of the Petroleum Engine or Hydrogen Engine. When the Nuclear Fallout cools, it condensates into Nuclear Waste; there will be more on this later.
The engine’s major advantage is that it does not need oxidizers, compared to the other mid- and late-game engines. Even though it has less range than the other contemporary engines, it still has enough range to make trips between any planetoid and the first planetoid. Thus, the Engine can be used to make colonization rockets that have considerable speeds. However, the Engine notably does not produce any power while it travels.

REWORKED STEAM ENGINE:
In the DLC, the Steam Engine costs far less materials to build, and can be built with Refined Metal instead of just Steel. Oddly though, its base game version remains unchanged.
COLONIZING PLANETOIDS – OVERVIEW:
Gaining a foothold on a planetoid is perhaps the most exciting part of the gameplay in the DLC. This is not an easy endeavor, as will be described shortly.
ROCKETS CAN ONLY LAND ON PLATFORMS:
The foremost significant hurdle is that rockets can only land on platforms. There is no alternative. This means that Rocket Platforms have to be built on the planetoid first, which in turns means sending down Duplicants to do so.
SENDING DOWN DUPLICANTS:
Duplicants can be sent down onto a planetoid with the Trailblazer modules, which deploy one-way landers. The landers are then to be dismantled to yield the Refined Metal that is necessary to build the Rocket Platform. Incidentally, the player will likely need to send two landers down in order to have enough Refined Metal to make the platform. Losing the landers or the Refined Metal that they yield to hazards on the planetoid can be disastrous.
Furthermore, the player needs to build the Platform as soon as possible; the Duplicants would be landing on the topmost layers of the asteroid, often with no air and protection from incoming cosmic light and radiation.
LANDING THE ROCKET:
After building the platforms, the rocket needs to land. Since the rocket will be producing a lot of hot exhaust, the player needs to have the Duplicants stay away from the platform until the gases clear – something which is not easy to do, because the Duplicants are too stupid to recognize the danger. (There will be more on this complaint later.)
Furthermore, the player has to provide some means of having the Duplicants climb into the crew modules; it is more than likely that the rocket engine is too high for them to climb over. Fortunately, most planetoids have Raw Minerals within reach for the purpose of building Ladders.
HAVING SUPPLIES FOR BUILDING A COLONY:
After having grounded the rocket, the player can then have the Duplicants use the amenities in the rocket while building the basic facilities that are needed for a colony on the planetoid. This is not unlike the early-game phase, though the player needs to have forethought on the supplies that are to be laid in before the voyage begins.
This forethought can be difficult for new players to come up with, due to the different compositions of resources on the planetoids. The Starmap does provide some details on the planetoids, namely their biome permutations, but this is often not enough to inform a new player.
Generally, the planetoids that are nearer the first planetoid have more Raw Minerals and Metal Ores than those further away. Refined Metals are a scarcity on just about every asteroid. Likewise, resources under the “Manufactured Materials” category are next to non-existent on any planetoid. These details are not told to the new player.
If forewarned, the player will need to have these stocked on the rocket where possible. Any further supplies have to be brought in return trips, another rocket or interstellar payloads (more on this later); all of these pose complications of their own.

ROVER DRONES:
In lieu of sending Duplicants down, the player can also opt to land a Rover drone. The drone does not need to eat, poop or sleep, and can move at a considerable speed.
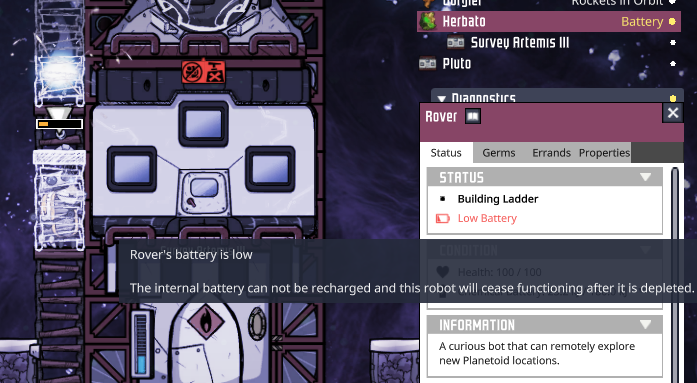
This might seem good in theory, but in practice, the Rover is a disappointment. It has a battery with limited lifetime and that cannot be recharged in any way. It also lacks the means to build anything other than early-game structures. It cannot dig through materials that are hard.
Most importantly, it cannot build Rocket Platforms; only Duplicants can do that. This is a significant limitation that is not told to the new player, who may well waste a rocket trip or overburden a rocket with a Rover module.
RADIATION – OVERVIEW:
The DLC introduces the gameplay mechanism of Radiation. As with many other things in Oxygen Not Included, the Radiation in this game is somewhat removed from actual radiation, mainly for the sake of gameplay affectation.
RADS:
For one, there is a reliably measurable quantity for Radiation, simply called “Rads” in this game. The intensity of any tile that has Radiation is given by a number in this measurement. Generally, more Rads is better for the purpose of generating Radbolts (more on this later), but more Rads means a greater hazard.
RADIATION SOURCES:
Sources of Rads are perhaps the most inconsistent and least predictable of the game designs concerning radiation. This is because each source of Radiation has its own unique coding that is used to generate their emissions of Rads.
For example, cosmic radiation always occurs along the vertical direction; there is no diffraction around corners or refraction through fluid media, among other physical occurrences that can be observed in real radiation. Thus, it is possible to protect Duplicants from cosmic radiation by building a few layers of tiles above their colony.
For another example, Radiation from a Research Reactor actually diffracts around corners and edges. Thus, providing protection from the (very intense) Rad emissions of the Reactor is much more complicated. The player would likely have to place extensive walls that are several tiles thick between the reactor and the Duplicants.
On the other hand, the Reactor’s emissions only reach a limited distance before they peter out completely, even in vacuum; this is part of the hardcoding for the Reactor’s emissions. Thus, the best protection from the Reactor’s emissions is simply distance.
Learning about the quirks in the emissions of each different source of Radiation can be both entertaining and irksome.

REWORKED WHEEZEWORT:
For the purpose of implementing a plant-based source of radiation, the Wheezewort in the base game is also a source of considerable radiation in the DLC. This means that the Wheezewort is no longer safely viable for the temperature regulation of domiciles in colonies. However, due to the gameplay designs of radiation that will be described shortly, they have gained other uses; examples of these will be described where pertinent.
RADIOACTIVE CONTAMINANTS & SOURCES:
“Radioactive Contaminants” are implemented in-game as a type of germ. Radioactive Contaminants are formed when things are exposed to rads from certain radiation sources.
These “dirty” sources are not immediately clear to the new player; how much they readily create Contaminants can also differ from source to source. For example, despite having the highest emissions among sources, Research Reactors create very little Contaminants, even in fluids. For a contrasting example, the exhaust from the Radbolt Engine creates a lot of Contaminants.
That said, only dirty sources can create more Contaminants, and/or sustain their population. Without these, Contaminants die off quickly, even when exposed to massive amounts of rads.
Until they die off, Contaminants cause anything that is contaminated to emit Radiation. In the case of contaminated solids, their emissions reach one tile away. Contaminated fluids only emit Radiation into the tiles that they occupy. Unless one is informed through other means, this can only be learned through observation.
CONTAMINANTS CANCEL OTHER GERMS:
In the base game, germs cannot infest an object that already has germs of another type, e.g. the Floral Scent germs cancel out Slimelung germs, if they occur within the same air. This is the case for Radioactive Contaminants too. Indeed, making use of this peculiar game design may be easier in this DLC due to how much more reliably controllable radiation sources are as sources of germs.
RADS KILL OTHER GERMS:
In addition to contaminants cancelling out other germs, radiation itself kills other germs. Although its potential at sterilizing other germs may not be as considerable as those of other means, radiation is much, much more consistent at doing so and does not have many factors that determine its efficiency. Thus, radiation is the most conveniently deployable means of sterilization in the DLC.
For example, to sterilize a seam of Slimelung-infested Slime, placing two Wheezeworts next to the seam would have most of the seam sterilized by the next cycle. Encapsulating the seam with insulation while chilling it with cold Metal Tiles might be quicker, but the encapsulation is much more troublesome than building the farm tiles for the Wheezeworts.
When coupled with the fact that exposure to radiation creates Contaminants that cancel out other germs, Radiation becomes the most efficient method of killing other germs.

RADIATION SICKNESS:
A new type of disease has been implemented to vex Dupes. Dupes absorb Rads as they pass through radioactive environs. There are ways to reduce the amounts absorbed, but there is no way to prevent this other than to prevent the Dupes from going there in the first place.
After a Duplicant has absorbed 100 Rads, the Dupe is subjected to Radiation Sickness. In addition to stat de-buffs, the Dupe frequently makes an animation that wastes time. The sickness gets worse with more Rads absorbed; additional symptoms include vomiting. Eventually, the Duplicant is incapacitated; failure to rescue the Dupe in time results in death.
RAD REMOVAL:
There are two methods of removing rads: one happens every time when the Duplicant goes to pee in a toilet. The Dupe removes 60 Rads every time, and the Polluted Water (or Dirt) that is made also notably has fewer Food Poisoning germs. The other method is the ingestion of the Basic Rad Pill, which removes 100 Rads per cycle.
LEAD SUITS:
The Lead Suit is a variant of the Atmo Suit that has been implemented for the purpose of protecting Duplicants in radioactive environs. In practice, it is actually quite useless.
Radioactive environs that are not irradiated by a Research Reactor generally will not be getting enough Rads to become sick, if they get to go to toilets. Even in the worst of such environs, having enough tiles between them and the source of Radiation is enough to prevent them from being irradiated in the first place.
Lead Suits are only of use when doing maintenance in environs that are irradiated by a Research Reactor. Even so, Lead Suits only block two-thirds of the incoming Rads; this is not enough to avoid getting sick from the emissions of the Reactor.
Lead Suits have less Oxygen capacity than Atmo Suits. Furthermore, they need their own types of checkpoints and docks, which are larger than those for Atmo Suits.
RADIATION-RELATED RESOURCES – OVERVIEW:
Understandably, additional types of materials have been introduced together with the Radiation gameplay mechanism. Not all of these materials are useful resources; some are intended to complicate the process of exploiting Radiation.
URANIUM ORE:
Uranium Ore is typically found in the Radioactive Biome, which is a variant of the Frozen Biome but is far colder; frozen Chlorine and Carbon Dioxide make for uncomfortable places for Duplicants to pass through, not counting the living hazards that are the Beetas (more on these later).
In this biome, the ore often occurs as non-contiguous seams, meaning that the surrounding ice and other frozen substances have to be dug out to expose them. The ore is also a very hard material, though there are few reasons to dig them out directly, as will be mentioned later.

ENRICHED URANIUM:
Uranium Ore is meant to be converted into Enriched Uranium, which is needed to fuel Research Reactors. There are two means of getting them, one of which is more efficient than the other; this more efficient method will be described later.
The less efficient means involves the use of a power-hungry machine that also produces Liquid Uranium. There may be some value from using the heat from the molten metal, but there are many other sources of heat that can be used to indirectly fuel Steam Turbines. More importantly, the machine – the Uranium Centrifuge – does not have good yields of Enriched Uranium.
DEPLETED URANIUM & LIQUID URANIUM:
There are many substances that serve little use in the gameplay, other than being used as heat exchange media in high temperature applications. Unfortunately, Depleted Uranium and Liquid Uranium are two of these. There could have been some means of recovering useful uranium from either material, but this has not been developed for the game.
RADBOLTS – OVERVIEW:
The main reason to mess around with Radiation is the generation of Radbolts. Radbolts are special resources that have special complications and risks, but they are needed to power many end-game machines, such as the aforementioned Diamond Press and Radbolt Engine. There are others, such as the Interplanetary Payload Launcher, which will be described later.
RADBOLT GENERATORS:
Radbolt Generators are the main means of creating Radbolts. If they are powered and the tiles that they occupy are exposed to Radiation, they begin to produce Radbolts; the rate of production is 1 Radbolt for every 10 rads per second. The rate of production does not affect their power consumption, which is a considerable 480 W as long as they are exposed to Radiation.
It is worth noting that Radbolt Generators will not consume any power if they are not exposed to any Radiation at all. Indeed, if they are made to operate in vacuum, the player can control their power consumption quite readily. However, they do generate heat; in vacuum, they will eventually accumulate enough heat such that they melt. (They do not have Overheat ratings, fortunately.)
RADBOLT PROJECTILES:
After a generator has accumulated 50 Radbolts, it is ready to fire a Radbolt “projectile”; the player can set a generator to accumulate more Radbolts before firing, but every Radbolt projectile that comes from a Generator will always contain 50 Radbolts.
Radbolt projectiles travel in a straight line, along the direction that that the emitter of the generator is aligned to. They can be redirected with the use of Reflectors, which fortunately do not need any energy. However, Reflectors will use a bit of the Radbolts in each projectile to power itself.
As the projectiles travel, they lose Radbolts at a minimum rate of 0.1 Radbolt per tile travelled; they lose more if they pass through fluid media. Therefore, the player will need to consider the distance that they travel through if the player wants to have optimal efficiency.
The projectile can pass across most solid things in their way, but they will hit tiles and rocks. They will also hit any Duplicant, critters and drones in the way, inflicting harm depending on how many Radbolts that they contained prior to impact. Anything that they hit will also be afflicted with Radioactive Contaminants.

MANUAL RADBOLT GENERATOR:
There is a Manual Radbolt Generator that does not require electricity but needs a Duplicant operator. It can use either Uranium Ore or Enriched Uranium, and in turn produces Depleted Uranium in solid form without any temperature changes. This is convenient, if the player wants some Radbolts quickly without spending time on complex set-ups.
In practice though, this device is inefficient, considering the amount of resources consumed in return for the Radbolts produced. Furthermore, the Radbolt projectiles that this generator produces have far fewer Radbolts than the regular version.
“NATURAL” VERSUS “ARTIFICIAL” RADIATION:
For the purpose of generating radbolts, the developers have implemented two overarching categories of radiation sources: ‘natural’ and ‘artificial’.
‘Natural’ sources include wild Wheezeworts and formations of uranium ore. They are not usually intense. Even for those that are indeed intense, such as sleeping Beetas (more on these later), they are not reliable because they tend to be erratically mobile. The only natural source that can be somewhat reliable is cosmic radiation, but this is usually not productive enough to be worth the electricity costs of Radbolt Generators.
‘Artificial’ sources require the use of radioactive resources that are introduced in this DLC, or the cultivation or raising of living things that emit radiation; the latter consumes other resources anyway. However, these sources are much more reliably deployed and exploitable.
RESEARCH REACTOR – OVERVIEW:
Chief of these artificial sources is the “Research Reactor”, which has a lot of coding and scripting that has been made just for it. If there is any singular piece of content that best represents the amount of effort that has gone into the gameplay of the DLC, it is this machine.
FUEL & COOLANT FOR REACTOR:
The Reactor can only be fed Enriched Uranium, and it also needs clean Water as coolant. How exactly it uses either will be described shortly.
Unfortunately, there are some requirements that are not told to the player. Specifically, these are the minimum amounts of both materials that have to be in the Reactor in order to function. The Reactor must have more than 250 grams of Enriched Uranium; it will not consume any if it has less than this amount. This minimum amount will retain the usually-high temperatures that the Reactor will subject its fuel too, meaning that the Reactor will always produce hot waste after it has begun operation.
The Reactor will be using 30 kg of Water as coolant at all times; if it expels this, it must need another 30 kg, or it will cease to function.
RADIATION OUTPUT:
Like real-world reactors, the Reactor does not produce electricity directly. However, unlike real-world reactors, it produces useful heat in an indirect manner and it is deliberately intended to dump out a lot of radiation into its surroundings. Indeed, for the latter matter, the radiation zone is extensive, with rad counts at five digits in tiles adjacent to the Reactor. This makes the Reactor the most reliable and potent source of rads – but not necessarily safe. There will be more elaboration this later.
However, the size of the Reactor complicates the collection of Rads. Although it can be surrounded by a lot of Radbolt Generators, building these can be a hassle as it involves a lot of scaffolding. The player will also need to consider that the radiation from the Reactor will create a lot of Radioactive Contaminants in the surrounding air, if the Reactor does not operate in vacuum.
NUCLEAR WASTE:
The main complication of the Research Reactor is its output of Nuclear Waste. Only the Reactor produces this substance; nothing else does.
When the Rector is operational, it rapidly increases the temperature of the Enriched Uranium in it; all of the resource is affected. Simultaneously, Enriched Uranium is removed; 10 kg of Nuclear Waste is produced for every 25 grams of Enriched Uranium that is consumed. (Incidentally, this is very much in contradiction to real nuclear physics, which observe diminishing mass instead.)
After about 200 kg of Nuclear Waste has been accumulated, the Reactor expels it. This Nuclear Waste has the same temperature as the Enriched Uranium; thus, it comes out hot. Furthermore, Nuclear Waste has a very high specific heat capacity, so it has a lot of thermal energy that can be tapped.
The Nuclear Waste – oddly enough – has little radiation output. Thus, it has little use in Radbolt production.
LEAKY NUCLEAR WASTE:
Nuclear Waste has a major trait that makes it very difficult to use as a working fluid. Nuclear Waste will not leak out of pipes, but it will leak out of machines that handle liquids. It also leaks out of Liquid Reservoirs, while also damaging it. These leaks make the substance impossible for use in closed-loop circulation.
Furthermore, the leaks occur as mass addition, meaning that the player will end up having more Nuclear Waste than what the circulation started with. The player will need to have a system to remove the surplus, which in turn increases the complexity and complication of heat exchange circuits that use Nuclear Waste.
STEAM EXPULSION:
The bulk of the heat output from a Reactor is through its hot Nuclear Waste. However, some of the Heat from the activated Enriched Uranium is transferred to the Water coolant in the reactor.
After its current batch of 30 kg Water has reached 400 degrees in temperature, it is expelled; it is likely to turn into Steam outright. If the Reactor is in the void of space, the Steam is lost but is otherwise not an issue. In other scenarios, the player would have to contend with the condensation of hot water that pools around the Reactor.

REACTOR MELTDOWN:
If the player continues to feed a Reactor with Enriched Uranium, the cooling provided by the Water in the Reactor will not be enough to cool down the Reactor if it is heated by its own Nuclear Waste or the superheated Steam that it has expelled. The player must provide other means of cooling the Reactor, such as Liquid Vents that pour Water onto the Nuclear Waste and Steam Turbines that leech away the resultant Steam.
Failure to provide adequate cooling causes the Reactor to heat up. After it reaches more than 1400 degrees, it fails spectacularly; lumps of the substance “Corium” shoots out of it while it breaks down into a superheated wreck. The lumps collide with anything in the vicinity, inflicting damage and imparting a lot of heat.
After the failure, the Reactor emits twice the amount of Radiation than before, but no longer consumes Enriched Uranium. This Radiation will take many cycles to ebb away. The Corium can only be removed with the highest Digging skill, and there is still the matter of the residual heat.
A meltdown is generally not in the player’s favour, but there are some players that use this to get an intense but cheap source of radiation.
DIFFERENT METHODS OF RESEARCH:
The inclusion of Radiation has allowed Klei to implement what passes for “material science research” in this game. There is the Materials Study Terminal, which is a large machine that appears to facilitate atomics research. It consumes Radbolts to produce Material Science Research points. It is intended to be used together with the Research Reactor, but most players who are wise would source Radbolts from easier sources like Wheezeworts instead.
The Orbital Data Collection Lab is the substitute source of Data Banks. It can only be installed in the crew modules of rockets and can only be operated when the rockets are in space. It also consumes Plastic, which poses a significant mid-game complication.
INTERPLANETARY PAYLOADS:
It is likely that the player might not have enough materials to build a colony on a planetoid that is to be colonized. Return trips to get more materials are costly and time-consuming.
To address this issue, there is the Interplanetary Payload Launcher; it is essentially a railgun that fires hardy shells that can contain up to 200 kilos worth of materials in any mixture. The Launcher has a storage capacity of its own that lets it hold enough materials for at least 8 consecutive shots at full loads.
The Launcher has three ports for the purpose of receiving solid, liquid and gaseous materials, respectively. Consequently, the Launcher is a large machine. It also requires open space above it, all the way to the upper edge of the game world.
Every launch requires the expenditure of Radbolts, the amount of which is proportional to the distance between the source of the payload and its destination in the Starmap. Each launch also consumes electricity, but only the launch does; in any other circumstance, the Launcher will not consume electricity.
The launched shells travel across the Starmap. Interestingly, their contents can be perceived too, so the player can examine the progress of the payloads as they move across space; there is actually no other way to track this progress, since the payloads have the same sprites.

OPENING PAYLOADS:
Opening payloads is time-consuming, at least without the use of a Payload Opener (which incidentally does look like an automated can-cutter). If a payload shell is opened manually, all of its contents spill onto the ground; this will be a problem if the contents include liquids and gases, which will not be in bottles.
A Payload Opener requires power and must be directly fed with Payloads; this means that the Opener is likely to be out in the void of space too. It also generates heat, though it does not have an Overheat rating.
ADDITIONAL CRITTERS – OVERVIEW:
The DLC also introduces new types of critters. They are described here, because some of them are satisfying inclusions in the gameplay, whereas some others are not.
DIVERGENTS:
There are two sub-types of critters that have been typified as “Divergents”; these are the Grubgrubs and Sweetles. One lays the eggs that hatch into the other, and vice versa; thus, ranches with these critters often have alternating generations and mixed populations.
Their main purpose is the tending of Grubfruit shrubs, which are some of the plants that are introduced in the DLC.
Unlike the other plants, Grubfruits could not produce their best yields when tended to by Duplicants. Attempting to do so only results in subpar fruits, which do not make for good fare. However, when tended to by the Divergents, they produce better fruits, which in turn produce better fare.
In practice though, the foods that can be made from Grubfruits do not have much of an advantage over the others in return for the trouble with operating a ranch-farm of Divergents and Grubfruits.
The Sweetle variant of the Divergents can be fed Sulfur, which is one of the resources that were there in the base game but have next to no use. The Sweetle excretes Sucrose, which is needed in the recipes for sweet foods and as fuel for the Sugar Engine. However, there are the deficiency of the Sugar Engine and the lack of gameplay incentives for sweet foods, as have been described already. Furthermore, Sucrose production is not likely to be reliably consistent, due to the Divergents’ breeding cycle.
PLUG SLUG:
The Plug Slug is always found in the second planetoid. At first glance, this Critter might not seem worthwhile to nurture; their diet of Metal Ores is a major consideration, and their excretion of Hydrogen gas poses a complication in getting the most productivity out of them.
However, there is worth in simply capturing wild Plug Slugs and placing them in confinement. During the night portions of the daily cycles, they hang from the ceiling and sleep; while they sleep, they generate electricity that can be captured by any wires or cables that have been strung through where they are sleeping.
Their power output wanes with hunger and age. However, the (ruthlessly callous) player can capture a lot of them to be incorporated in prison cells that can generate cheap electricity from entire generations of wild Plug Slugs.
BEETAS – OVERVIEW:
Beetas are the most interesting of the critters that have been introduced in the DLC. As their names suggest, these are bees. Interestingly, they cannot be domesticated in any way.
BEETAS NEED THE COLD:
The first and foremost thing that the player must keep in mind is that Beetas can only survive in temperatures well below sub-zero. Thus, the biomes in which they naturally occur – the Radioactive Biomes – are incredibly cold. Indeed, it is cold enough to liquefy Chlorine and Carbon Dioxide, even freezing them in the deeper parts of the biome.
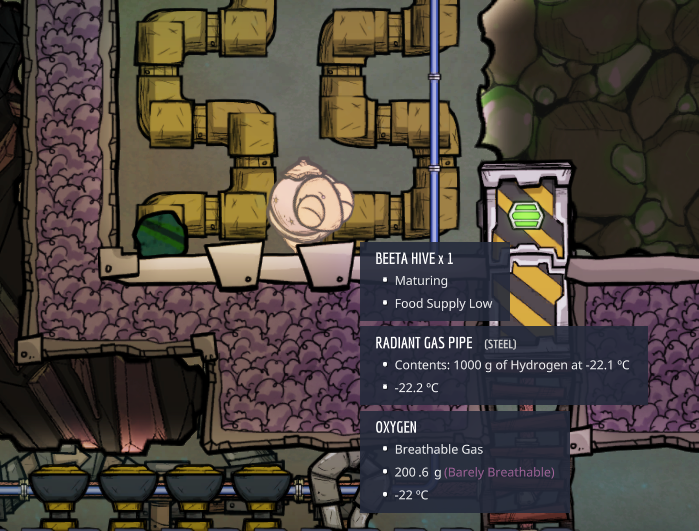
BEETA HIVE:
The main anchor of any cluster of Beetas is the Beeta Hive. It is actually a living thing; it was actually one of the Beetas that have since morphed. This happens if an individual of the species is caught and placed somewhere away from another Hive. As long as the temperature conditions are right – the player may have to provide refrigeration – and that there is Uranium Ore nearby, it will morph into a new hive. Otherwise, it dies.
SHORT LIFE-SPANS:
Beetas have life cycles that are very short. They appear as Beetiny larvae from the Hive; the larvae do not need any sustenance and merely crawls around the vicinity of the Hive, doing nothing else. A larva turns into an adult after one cycle. The adults have only four cycles left to their lifespan before they die; they might die earlier if the Hive creates more larvae.
If the player wishes to create a new Hive elsewhere, the Beetiny is much easier to transport around than an adult Beeta. Transport across space is another matter altogether, though few other planetoids have seams of Uranium Ore.
NUCLEAR WASTE LEFT-OVERS:
Critters that die usually leave behind things that the player would want. Beetas that just died leave behind 1 kilo of solid Nuclear Waste, which is usually not desirable. Fortunately, there is no reason for the player to clear the Beetas’ territory of accumulated Nuclear Waste, at least until their territory is to be reclaimed.
BEETA HOSTILITY:
Adults Beetas are potentially hostile to almost anything else; sometimes, they will track down a critter of another species or a Duplicant and sting the latter, inflicting considerable damage. The time and probability for this occurrence is unclear, though the proximity of creatures and the number of these appear to be a major factor. The Beetas then die after stinging whatever offended them.

COLLECTION OF ORE:
The mobile Beetas do not need sustenance, but the Hive does. For this purpose, each of the adult Beetas regularly scrapes exactly 1 kilo of Ore from nearby seams that they can reach. If there is any loose Ore nearby, it goes after these first. Indeed, the player may want to deposit any Ore that the Duplicants have dug out close to a hive.
If the Beeta scrapes Ore from seams, they are perfectly efficient with the extraction, compared with Duplicants. In the DLC, Duplicants still only extract 50% of materials from any rock tile that they take apart.
ORE DIGESTION:
A Beeta with Ore returns to the Hive with its haul. The Hive then promptly digests the Ore, converting 90% of it into Enriched Uranium. This is a considerably efficient, if somewhat slow compared to artificial means of getting Enriched Uranium.
The Hive emits intense waves of radiation while it is digesting, but this is generally not an issue if the Hive is located far away from domiciles.
HARVESTING:
The Enriched Uranium left-overs stay in the Hive indefinitely; the Hive will not expel them in any way. It must be extracted by a Duplicant; for this purpose, the code for harvesting plants has been implemented on the Hive too.
However, this also means that a Duplicant will try to harvest Enriched Uranium whenever any has been made. This might not be great for their health, considering the hostility of the adult Beetas.
Besides, when a Duplicant scoops out the Enriched Uranium, the Dupe will always extract all of the Enriched Uranium. Thus, the player could just wait until a substantial amount has been accumulated before making the harvest.
CARBON DIOXIDE SMOKE:
Making harvests from the hive and clearing away tiles to expose seams of Ore for the Beetas can be hazardous work, due to the hostility of the dault Beetas. Thus, there is the method of exposing the adult (and larvae) Beetas to Carbon Dioxide gas. The adult ones will particularly seek out puffs of the gas and breathe them in. The Hive will not breathe in any.
Beetas that have breathed in CO2 will go to sleep. The larvae’s morph into adulthood is also stalled. Thus, the adult ones will not attack Duplicants. However, this hazard is replaced with another; the sleeping Beetas emit a lot of radiation when they are sleeping.
The main complication is that CO2 gas turns into liquid at low enough sub-zero temperatures. This is not likely to be doable in the Radioactive biomes.

REWORKED SHINE BUGS:
All Shine Bugs emit radiation in the DLC, with the rarer variants emitting even more. Thus, they are no longer safely viable as floating décor in the domiciles of colonies. However, enterprising (and ruthlessly callous) players have been able to breed and concentrate their populations such that considerable radiation can be captured from these otherwise naturally cheap sources of radiation.
ADDITIONAL PLANTS:
The DLC also introduces additional plants, though these are low-key compared to critters. Grubfruits – and their relatively low worth compared to other plants – have been described earlier.
There is the Swamp Chard Heart on the Oily Swamp planetoid. It is the counterpart of the Muckroot and like the Muckroot, it is unremarkable. Similarly, there is the Bliss Burst decorative plant, which is the counterpart to the Mirth Leaf. Likewise, the Mellow Mallow is a counterpart of the Bluff Briar.
The Hexalent is also a counterpart of the Muckroot, albeit on the Radioactive planetoids. Its fruit, however, is very calorie-dense; players might want to consider hoarding it for a certain cyborg tree that will be described later.
There is the Bog Bucket, which consumes Polluted Water when cultivated. Unlike the other plants that use Polluted Water, they can be planted in any type of farm plot. However, they are mainly meant for early-game dietary needs; they have low calorie density, and there are few recipes that use their fruits.
SATURN CRITTER TRAP:
The Saturn Critter Trap is one of the more interesting additional plants. The plant can only grow in sub-zero conditions, but then it is the only one that can grow in these conditions. Its main purpose is to produce Hydrogen gas. Although there are other sources of the gas, the plant provides a source that is much lower in temperature than other sources.
The other purpose of the plant is population control of critters; they trap and consume just about any critter that moves past them. The critters are very much oblivious to the presence of the carnivorous plant. After digesting the critters, the plant expels “Plant Meat”, which is edible to Duplicants. Speaking of which, the plants do not trap Duplicants, which is fortunate.
IN-WORLD SOURCES OF RARE RESOURCES – OVERVIEW:
In the base game, rare resources have to be obtained from rocket-powered trips to locations in the Starmap. In the DLC, rare resources have to be obtained from things that are in the game world, specifically on the different planetoids.
In actual gameplay though, the player does not need these to progress into the end-game phases, unlike what happens in the base game. Therefore, getting to the planets that have the sources of these rare resources is actually optional.

GRAPHITE ON OCEAN PLANETOID:
Graphite is needed to produce Fullerene, which – like in the base game – is needed to produce Super Coolant. Graphite can only be found on the Ocean Planetoid, which poses the challenge of having vast bodies of water with liquid physics that can be unpredictable.
There is no renewable source of Graphite, however. After exhausting the Graphite in the Ocean Planetoid, the player has to hope for Fullerene yields from Points of Interest in the Starmap that have Fullerene in their list of possible yields.
In actual gameplay, the main purpose of having Super Coolant is to produce Liquid Oxygen and Hydrogen for use in Hydrogen Engines. However, the Radbolt Engine is a viable alternative to Hydrogen Engines, having comparable numbers of advantages and disadvantages. The Radbolt Engine does not need Super Coolant in any of its logistics, so the player can actually forgo Fullerene and thus Graphite altogether.
EXPERIMENT 52B:
The Marshy Planetoid contains the cybernetic tree that is Experiment 52B; presumably, it is a remnant of Gravitas research that survived the end of the world.
It is practically immortal, but it is also cantankerous and hungry. It will club any Critter or Duplicant that passes across it. If anything that has a calorie rating is deposited on tiles that it occupies, it eats it, regardless of its origin.
It produces Resin while eating; the rate of Resin production depends on the quality of the food that it is eating; higher-calorie food gives higher rates. However, there is no way to change the rate at which it eats food.
The tree does have a temperature tolerance, albeit a very wide range. The tree cannot die if it is subjected to temperatures outside of the range, but it will not eat and produce resin while it is incapacitated.
RESIN INTO ISORESIN:
After the cybernetic tree has produced 10 kilos of Resin, it will expel them via the taps that have been installed onto it. The Resin appears into the game world at tiles away from the tiles that the tree occupies, which can complicate its collection. Resin is also very viscous.
The Resin then has to be heated to 125 degrees; this has to be done elsewhere, to avoid stressing the tree. That said, the heating converts most of the Resin into Steam; a small portion turns into the Isoresin rare resource, which has to be removed quickly because it melts into near-useless Naphtha at 200 degrees.
NIOBIUM ON SUPERCONDUCTOR PLANETOID:
In the default game mode, Niobium can only be found on the planetoid that is the most difficult to colonize: the Superconductor planetoid. The planetoid is mainly composed of the volcanic biome and the Niobium biome, the latter being no less hot than the former. Both biomes have tiles that require very hard digging. The heat will also necessitate the use of Atmo Suits, even for players who have effective playstyles that avoid the use of these.
The planetoid also has incoming cosmic light of the highest brightness, which carries the risk of the Sunburn de-buff. It also has the most intense cosmic radiation. Indeed, the player will want to make a three-tile thick roof as soon as possible.
The Niobium occurs as pure metal seams. However, the seams are few. If the player needs more for whatever reason, the player will need to locate the Niobium Volcano and harness it.

RETAINED AND AMPLIFIED ISSUES – OVERVIEW:
The DLC is mainly there to expand gameplay. Quality-of-life improvements are apparently not part of the package. Unfortunately, the additional gameplay has exacerbated the minor problems in the base game.
IDLING DUPLICANTS:
Idle Duplicants automatically avoid unsafe places. In this DLC, this otherwise good design has become a goofy nuisance with the introduction of Radiation and other hazards. The player can expect idle Duplicants, especially those in travelling rockets, to shuffle all over the place. Moreover, due to the splitting of the game world into planetoids, there is greater likelihood of Duplicants becoming idle because there are fewer jobs that they can reach.
NO MEANS OF GATHERING IDLE DUPLICANTS:
Idle Duplicants find the nearest safe spot and linger there until a task comes up. They may be very far from where the task is located. This problem could have been addressed by assigning a place to be a spot for idle Duplicants to go to, but there is still no means for doing this.
STILL UNRELIABLE ASSIGNMENT OF TASKS:
Somewhere during the development of the DLC, Klei has implemented an option to have tasks assigned to Duplicants according to their proximity. This option only works for tasks that have been assigned the same priority level. There are still few means of forcing the reassignment of a task to a nearby Duplicant, especially if other Duplicants are already on their way to do that task.
DUPLICANTS STILL DO NOT RECOGNIZE DANGER:
With the introduction of more hazards, such as the cybernetic tree that will smack any Duplicant that moves across it, the Duplicants’ inability to recognize hazards in their pathfinding has gotten worse. The player can expect them to take paths that expose them to a lot of extant Radiation, especially at the top layers of a planetoid.
NO MEANS OF APPORTIONING STORAGE BINS:
The gameplay of this DLC necessitates exact reservation of resources and materials on rockets that are to be sent on a colonization mission. Unfortunately, the lack of any means to dictate the amount and mixture of materials that go into a storage container becomes a major impediment to this.
The player can still work around this limitation by having storage bins for the purpose of reserving resources. The player can then empty these and direct Duplicants to sweep their former contents into storage devices in the crew modules of rockets. This round-about way is not convenient to use though.

FINICKY LINE OF SIGHT TO SPACE:
There are several machines that need to have “clear” line of sight to space. Unfortunately, the game is not particularly clear on what is considered “clear”. The Telescopes, in particular, are very difficult to get working properly if the player intends them for use within an enclosure.
The player’s most reliable means of getting a “clear” line of sight is to expose the machines to the void of space, though consequently the player would have to deal with the risks and hazards due to the void.
REPLACING TILES STILL CAUSE DISPLACEMENT OF FLUIDS:
A post-launch gameplay improvement allows the player to have tiles replaced with other tiles without having to remove the earlier tiles. Unfortunately, this will not prevent the displacement of fluids across the two sides of the tiles. This setback is particularly notable when replacing the tiles of a Steam pocket.
VISUAL DESIGNS:
As is appropriate, the additional gameplay content in the DLC comes with their own sprite-work that is as whimsical as the ones before. For example, where the Sugar Engine looks like candy cane fireworks, the Carbon Dioxide Engine looks like soda bottles that have been taped together.
Likewise, there have been additional animations too, often for the new content. Since the release of the DLC, there has also been an update that greatly optimized the graphics of the game.
However, there are notable flaws in the graphical designs of the game. The most notable of these is that the sprites for Beetas frequently freeze, especially when they have just completed an action. There is also a lot of screen tearing when V-synching is turned off, much more so in the DLC than in the base game.
SOUND DESIGNS:
Most of the additional audio assets in the DLC are only heard after the player has reached the mid-game point. The first of these is likely the music track for the Starmap; the sense of wonderment that it tries to instill in listeners is something that followers of space sci-fi games would be all too familiar with.
The other additional audio assets are mainly for the additional gameplay content. There are the short chirps and buzzes that Plug Slugs emit whenever they move about, for example. The Beetas, curiously, do not buzz all the time; this is perhaps just as well, because that would have been quite annoying.
There are also the noises that are associated with Radiation. There are the clicks and crackles of Geiger counters when the player brings up the Radiation overlay, which serves as a general indicator that the player is looking at radiation-flooded places.
There are next to no new music tracks. Furthermore, there is still the recurring problem of the music tracks being cut out for whatever reason, though there is the option of restarting the music at the beginning of every cycle.

SUMMARY:
The DLC has some disappointing additions, like the Rover drones and critters and plants that are not worth domesticating. Furthermore, many of its additions amplified the many minor issues in the base game.
Still, certain additions make for very significant and interesting differences, namely the revamped space travel mechanisms and the Radiation gameplay element. These differences make for a markedly different experience. Indeed, for some, this can be too much complexity.
On the other hand, for players that are meticulous and have a knack for micromanagement, managing multiple colonies and sending resources across space can be very gratifying.