Hogwarts Legacy - All 150 Hogwarts Castle Field Guide Pages
Find all 150 Field Guide Pages in Hogwarts Legacy's gigantic castle.
You're bound to go around searching because there are 150 Hogwarts Legacy Field Guide Pages in Hogwarts Castle. This is just one particular type of collectible that you'll acquire as you explore this massive game. Our Hogwarts Legacy Hogwarts Castle Field Guide Pages article talks about all the scrolls you'll come across in every floor, wing, and classroom. We've also provided links to related guides that discuss spells and puzzles that are necessary to reach new areas.
- All Hogwarts Castle Field Guide Pages in Hogwarts Legacy
- Astronomy Wing Field Guide Pages
- Secret Rooms: Map Chamber Field Guide Pages
- Bell Tower Wing Field Guide Pages
- Library Annex Field Guide Pages
- Great Hall Field Guide Pages
- South Wing Field Guide Pages
- Grand Staircase: Slytherin Dungeon and Hufflepuff Kitchens Field Guide Pages
- Grand Staircase, Trophy Room, and Headmaster's Office Field Guide Pages
All Hogwarts Castle Field Guide Pages in Hogwarts Legacy
There are a variety of ways to collect Field Guide Pages in Hogwarts Legacy:
- Most are barely visible, so you need to stand in front of a particular spot and cast Revelio to make them appear. Revelio will also have a louder ping in case you're close to a page.
- Some are flying in mid-air, and you can grab them using Accio.
- A few require you to cast Incendio or Confringo at braziers and torches, followed by Accio to pull them toward you.
- All Moth Mirror Puzzles reward you with a Field Guide Page once completed.
- Certain areas are inaccessible, which means you'll need to learn Alohomora first (via The Caretaker's Lunar Lament quest). Moreover, some locks are of a higher level, and you'd need to upgrade Alohomora by picking up Demiguise Statues/Moons.
- Last but not least, there are a couple of instances when you'll solve Symbol Door Puzzles, too.

Before you start collecting Field Guide Pages in Hogwarts Legacy, there are a few caveats:
- There's a certain way that they're split up based on castle areas/wings. However, we feel that this is not ideal, considering that several pages are actually further away from the closest fast travel point. Some are close by or behind you as you spawn in, but they're considered part of a different area. As such, we've opted to enumerate them primarily based on the nearest Floo Flame.
- It's possible that some pages might bug out or your tallies might not get updated. If this occurs, try to recheck an area to see if you've missed anything. You may also try to save and reload your game.
Astronomy Wing Field Guide Pages
Charms Classroom
- The flying paper in the lounge.
- Go inside the Charms Classroom and climb up the steps. Continue climbing as you unlock doors. The page is in the small cell on the rooftop.
Professor Fig's Classroom
- Use Confringo on the gargoyle and Accio to pull the page.
DADA Tower
- Moth Mirror - In front of you once you spawn.
- Go down the flight of stairs and check the bird skeleton in the display cabinet.
DADA Classroom
- In front of the raised steps at the back of the classroom.
- In front of the stained glass next to the rhino skeleton display.
Astronomy Tower
- Moth Mirror - Next to the telescopes and blackboard.
- From the Floo Flame, go down the staircase and check the green painting of trolls.
- Continue down another flight of stairs and you'll see a statue holding a globe. Use Levioso on the globe.
Transfiguration Courtyard
- In front of the wyvern statue in the middle of the courtyard.
- Automatically acquired while you're learning the Reparo spell assignment.
- Another page in the adjacent building is also picked up as part of the assignment.
- Cast Levioso on the other statue near the one that you used Reparo on.
- Enter the small door next to the Floo Flame and check the painting to your right.
- Moth Mirror - In the small hallway with pungent gas.
- In the same gas-filled hallway as the Moth Mirror.
Transfiguration Classroom/History of Magic Classroom
- In front of a desk inside the classroom.
- Moth Mirror - Turn around and go through the large wooden door. The Moth Mirror is at the staircase.
- Across the staircase with the Moth Mirror, you'll see the History of Magic Classroom (the one with Professor Binns, the ghost, as the teacher). Grab the page here at the right-hand side.
- Unlock the large double doors to enter the Hieroglyphics Room. You'll find three pages here, as well as a wall that leads to a Depulso Puzzle Room (which we won't discuss in this guide):
- Sphinx statue
- Flying in between pillars (Accio)
- Mage statue (Levioso)
- This time, go up the staircase past the Moth Mirror. At the very top, lockpick the door and cast Levioso on the statue.
- Back outside at the fast travel point, turn around unlock the small wooden door (next to the larger one mentioned above). Go up the steps and cast Levioso on the statue.


Secret Rooms: Map Chamber Field Guide Pages
- Head up the steps so you can reach the Hogwarts cellar. You'll see a flying page that you can pull with Accio.
- Open the locked metal door in the cellar and interact with the frog statue. Cast Leviosa on the mage statue to make the page appear.
- Continue past the cellar and open the door with lots of pots (level 3 lock). The page should be in front of you.
- In the same room, cast Confringo on the gargoyle on the ceiling and pull the page with Accio.
- There's another room just before you reach the dragon statue. The page is in front of a cannon.
- Right in front of the dragon statue.
- From the dragon statue, go up the steps to see a Daedalian Cabinet. The page is in front of it.
- From the Daedalian Cabinet, enter the hidden door via the "K" on the tapestry. This is the Wolf Saga room. The page is in front of the leftmost tapestry.


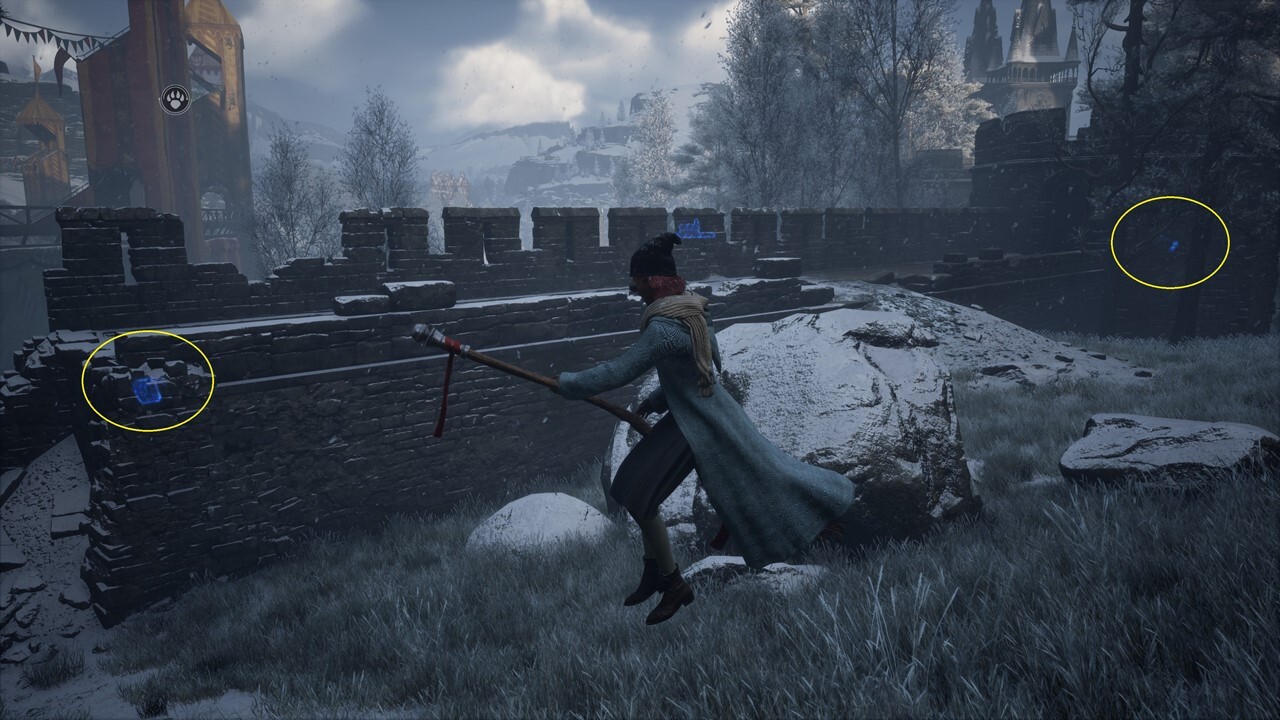
Bell Tower Wing Field Guide Pages
Bell Tower Courtyard (Main Chamber)
There are eight Hogwarts Legacy Field Guide Pages in this room alone:
- Broom display
- Armor with log display
- In front of the three bells
- Pike display
- Blank canvas up the steps near the pike display
- Flying above the marble steps (requires Accio)
- Cat display on the landing
- Dragon brazier (requires Confringo)
Bell Tower Courtyard (Music Room)
- Climb up the steps past the pike display/blank canvas and check the podium in the music room.
Hogwarts North Exit (Entrance Gate)
- Moth Mirror - Inside the shed next to the Floo Flame.
- Open the shed to the left of the Floo Flame.
- The torch on the wall; above the shed with the Moth Mirror.
- Inside the upper-left ramparts. Use Levioso on the statue.
Hogwarts North Exit (Quidditch Pitch)
- Keep following the ramparts heading west. You should see an Astronomy Table and you'd be fairly close to the Quidditch Pitch. Enter the small room and grab this off a metal cell
- Outside, you'll see a broken section of the ramparts overlooking the Quidditch Pitch.
Hogwarts North Exit (Greenhouses Exterior)
- Inside the ramparts room along the far-right wall.
- Flying above the yard near the Greenhouses exterior.
- Just behind the flying page in front of some beehives.
Beasts Classroom
- Flying above the hut (requires Accio).
Beasts Classroom (Owlery)
The Owlery, which is the tower on a hill behind the Beasts Classroom, has three pages:
- In the main room with all the owls
- Flying at the top of the tower.
- Cast Levioso on the statue at the top of the tower.


Library Annex Field Guide Pages
Central Hall
There are seven Hogwarts Legacy Field Guide Pages in this large area and one more past the staircase up top:
- Near the Central Hall statue; part of Like a Moth to a Frame quest.
- Right next to the fountain itself.
- One flying to the left of the fountain.
- Another that's flying to the right of the fountain.
- In front of the fat fella's statue near the door leading to the Transfiguration Courtyard.
- Inside a locked room (level 1) near the Greenhouses entrance. Use Levioso on the statue.
- Use Confringo on the brazier on a landing to the left of the Greenhouses entrance.
- For the last page near this section, go up the staircase at the Floo Flame, then make a right. It's on a ballustrade in front of some portraits.
Greenhouses
- Next to the large tree as you spawn in.
- In front of the tree in one of the smaller rooms to the right.
Potions Classroom
- Right next to Professor Sharp's desk.
- Moth Mirror - Down the spiral steps along a corridor lined with paintings.
- Go past the Moth Mirror. To your left, you'll spot a Symbol Door. Pick the Elephant and Unicorn symbols to open it. You'll find the page in front of the painting.
Library
- On the second floor next to a painting.
- Moth Mirror - On the second floor behind some bookcases.
- Flying all over the room (requires Accio).
- Go down to the Restricted Section. This page is in front of a desk.
- Keep heading down to the Restricted Section's storage area. Use Levioso on the statue.
Divination Tower
- Climb the ladder to reach the Divination Classroom.
- Flying beside the wooden scaffolding just a short distance away from the Floo Flame.
- Halfway through the scaffolding, look to your right to see a Symbol Door. Use the Owl and Hydra symbols to open the door. Past the hallway is the Arithmancy Classroom which has a page, as well as two more Symbol Doors.


Great Hall Field Guide Pages
Great Hall
- Right in front of you once you spawn in.
- In front of the owl lectern where the teachers usually are.
- While facing the tables, check the back-right where you'll see a Daedalian Cabinet. Go past it and use Confringo on the brazier.
Great Hall (Garden)
Exit the Great Hall using the large double doors to the right. You should see the garden area in front of you. You may also use the Grand Staircase: Quad Courtyard Floo Flame, though the image below uses our perspective from the Great Hall:
- Right beside the statue.
- Flying around the gazebo to your left.
- Go through the archway and cast Levioso on the statue.
- Use Accio on the one that's flying nearby.
- Look to your right and cast Confringo on the torch.
Great Hall (Reception Chamber)
Turn around and exit the Great Hall:
- Moth Mirror - Immediately after exiting the Great Hall, you'll see it on the wall to your left.
- Another page is next to the Moth Mirror.
- Go past the Moth Mirror to reach the connecting area to the Grand Staircase. Look to your right and you'll see the House Cup Hourglasses.
From the hourglasses, pass through another set of double doors to reach the reception area. There are three Hogwarts Legacy Field Guide Pages here:
- In front of the Hogwarts Crest.
- Use Levioso on the statue by the steps.
- Flying just above you.
Viaduct Courtyard
There are a couple of Hogwarts Legacy Field Guide Pages in the terrace area:
- Moth Mirror - At the outer section of the plaza overlooking the lake.
- The statue at the back-left section of the terrace.
- Use the elevator to reach the Underground Harbor. The page is on a boat.
Boathouse
- Next to a longboat at the back of the Boathouse.
- Use Confringo on the gargoyle inside the Boathouse.


South Wing Field Guide Pages
Clock Tower Courtyard
There are multiple Hogwarts Legacy Field Guide Pages in this area. There's also the Clock Tower Puzzle, where you can stop the hand/pendulum using Glacius just as it passes in front of four symbols. This will prevent the metal gates from closing, allowing you to grab some goodies. As for the pages themselves:
- Moth Mirror - Near the Floo Flame; as you spawn in, you'll see a door to your right that has a level 1 lock.
- In front of the well in the courtyard.
- Use Levioso on the statue.
- Cast Accio on the page that's flying above you.
Clock Tower Courtyard (Argyllshire)
From the Floo Flame, turn around and go through the door and cross to the opposite wing:
- Moth Mirror - You'll see a map of a place called Argyllshire. Above it is a button that you can press using the Depulso spell.
- In front of the Argyllshire map.
- In front of a statue down the steps.
- Use Confringo on the brazier near the statue.
- From the brazier, check the corridor with the bathrooms. There's a page in front of the boys' bathroom.
Faculty Tower (Outer Hall/Gryffindor Common Room)
- Turn around once you spawn and use Revelio on the witch statue to your left (i.e., Honeydukes Passageway).
- Go straight from the Floo Flame and ping the painting of the bull to the right.
- From the bull painting, go up the spiral staircase. Use Revelio in front of the portrait of the Fat Lady.
Faculty Tower
There are four pages in the first main area (which is where you'll spot the Symbol Door puzzle):
- While facing the Symbol Door Puzzle, unlock the door to your right and check the smaller room off to the side.
- Go up the steps once more and you'll notice this flying above you.
- Likewise, you'll see a door with pots. The page is in front of the door.
- Unlock the door with pots and grab your legendary chest loot. Then, cast Glacius on the fireplace to extinguish it. Go through the crawlspace and use Confringo on the brazier.
- Continue up the spiral staircase to a higher floor to get the other pages:
- Cast Revelio on the statue to the right.
- Use Levioso on the statue to the left.
- Check the mermaid mural in front of the prefects' bathroom.
Hospital Wing
- In front of the unicorn statue next to the Floo Flame.
- Flying around in the clinic.
Clock Tower Top/Hospital Wing
Continue going up the sets of staircases while unlocking doors with Alohomora to reach the top of the Clock Tower. Alternatively, you can use the Hospital Wing Floo Flame and head to the area with the giant gears:
- In front of the gear mechanism.
- Use Confringo on the torch.


Grand Staircase: Slytherin Dungeon and Hufflepuff Kitchens Field Guide Pages
Lower Grand Staircase/Slytherin Dungeon
- From the Floo Flame, go to your left and check the kelpie statue.
- Moth Mirror - Go to the right and follow the corridor until you see a suit of armor. The mirror is to your right.
- You'll see the girls' bathroom to the left of the Moth Mirror. Use Revelio to see a reference to the Chamber of Secrets.
- Follow the winding corridor and you'll notice several locked doors. The door at the back has a page, as well as an Eye Chest.
- A cell to the left has a brazier (use Confringo).
- Open the other metal door that leads to the Deathday Party Room:
- One is in front of some benches.
- Another is at the opposite end in front of a tapestry.
- The third will be fluttering above you.
In the Shadow of the Study/Crucio quest
- There's a main quest where you'll have a chance to learn Crucio. It will take you deep into Slytherin's Scriptorium. The room itself will have a Field Guide Page.
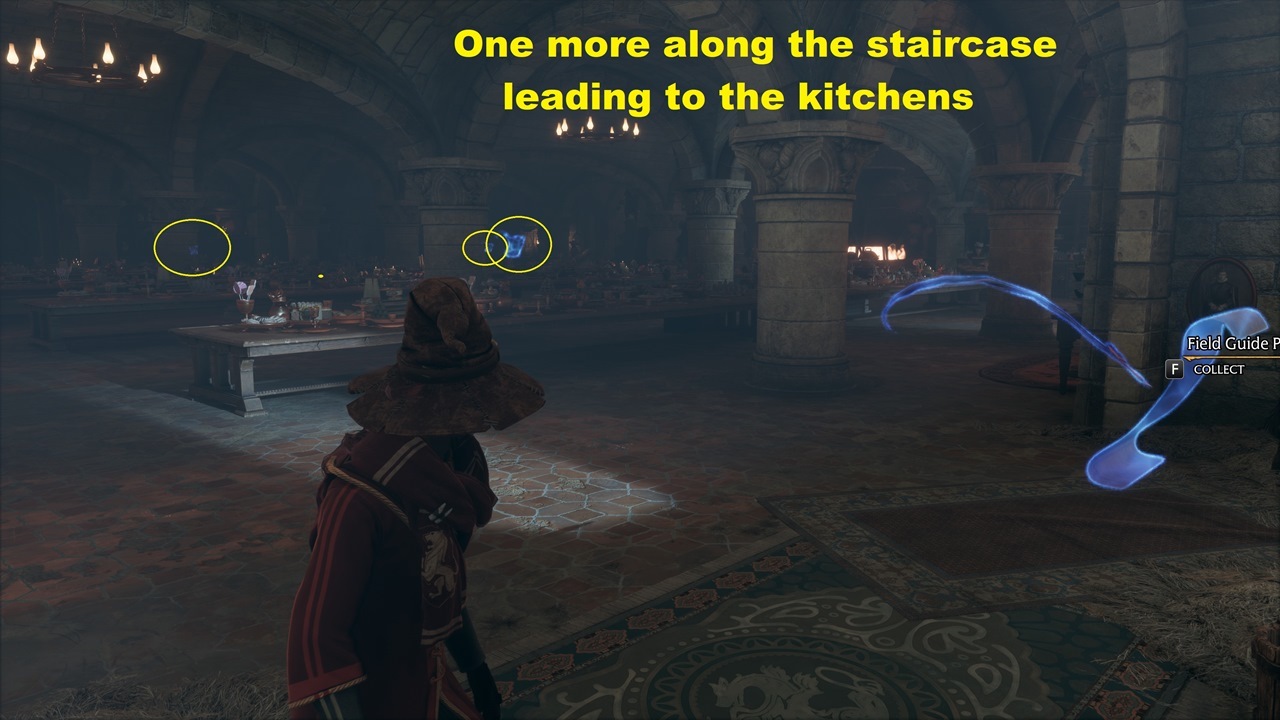
Grand Staircase/Hufflepuff Kitchens
From the Floo Flame, go down the spiral staircase. There are five Hogwarts Legacy Field Guide Pages in this area:
- Halfway down the staircase, you'll see a basket of fruits. Use Revelio here to make a page appear.
- In front of the entrance to the kitchens where you've got the "Tickle the Pear" prompt.
- At the back of the corridor in front of a small stack of barrels; in front of the Hufflepuff Common Room entrance.
- Inside the kitchen between the long tables.
- At the back of the kitchen in front of a stack of large barrels.


Grand Staircase, Trophy Room, and Headmaster's Office Field Guide Pages
Grand Staircase/Main Area
Let's call this section the main area of the Grand Staircase:
- Go forward from the Floo Flame and check the lion statue.
- There's a page that's flying around here. Use Accio to grab it.
- Go up the steps and use Levioso on the wizard statue.
- From the wizard statue, keep heading up until you reach a landing with a cat painting. Cast Revelio here.
- And, finally, you'll notice a torch all the way at the top (close to the Grand Staircase Tower Floo Flame). Use Confringo on this one.
Quad Courtyard
- We've discussed these locations in the Great Hall (Garden) section. However, we'll also add the relevant image here.
Ravenclaw Tower
- Moth Mirror - From the Floo Flame, go down the bottom of the marble staircase to find the mirror.
- From the Floo Flame, go up the marble spiral steps. You'll see a small bust to your right.
- Continue up the spiral steps until you reach the eagle statue which leads to the Ravenclaw Common Room. The page is in front of it.
Trophy Room
There are five Hogwarts Legacy Field Guide Pages in the Trophy Room:
- Troll Armor
- Knight in a large display case
- House Elf Armor
- Trophy cabinet
- Goblet of Fire casket
Trophy Room (Headmaster's Office)
You'll find several pages here. However, do note that the gargoyle will bar passage to the Headmaster's Office until you complete a main quest called Niamh Fitzgerald's Trial. Here are the page locations:
- Moth Mirror - On the wall next to the phoenix gargoyle.
- In front of the phoenix gargoyle.
- After clearing the Niamh Fitzgerald's Trial quest, you'll gain access to the Headmaster's Office, which has the following Hogwarts Legacy Field Guide Pages:
- One page is in front of a suit of armor.
- Another is on a desk where the Sorting Hat is displayed.
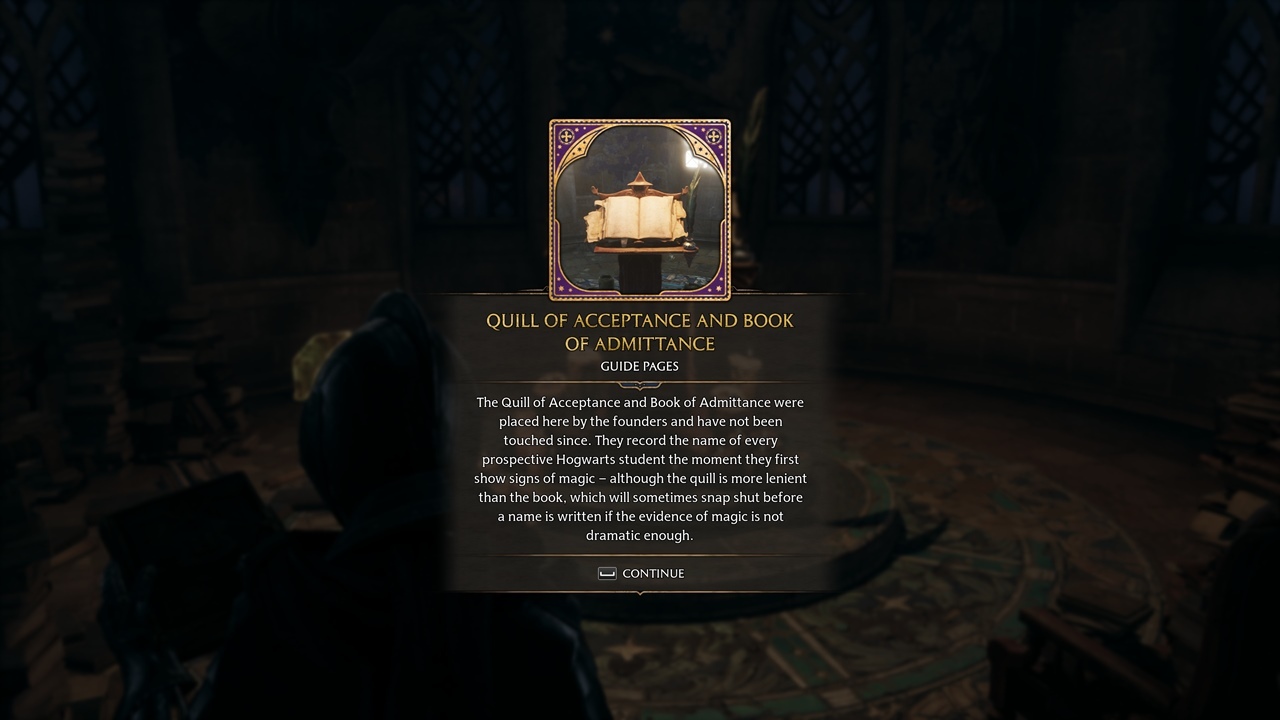
- In the Headmaster's Office, unlock the door leading to the outer wall's stone steps and enter the Headmaster's Upper Study. Pick up the Key of Admittance from the desk. Go back downstairs to the section opposite the phoenix gargoyle to see a strange door with several locks. Use the Key of Admittance and grab the page in the small room.


Hogwarts Legacy is developed by Avalanche Software, a subsidiary of Warner Bros. Interactive Entertainment. The game has been embroiled in controversy due to transphobic remarks from Harry Potter author JK Rowling. Although she is not personally involved with its development, she stands to profit from its success. For more, read our in-depth article on how Rowling's comments have impacted the trans community. In this article, you will also find links to trans creators you can support, as well as charities you can donate to.
Got a news tip or want to contact us directly? Email news@gamespot.com