Ghost Of Tsushima Side Missions Full Walkthrough: Tales of Tsushima Locations And Rewards
Below you can find details on how to find and complete every Tale of Tsushima.
Warning: We've ensured that our guides contain minimal spoilers so you can still enjoy your time playing even if you need help finding all the side-missions. However, if you want to know nothing about the game before playing, stop reading now and consult this walkthrough later when you want to find everything.
When you're not playing Ghost of Tsushima's main story missions, you're likely to spend your time exploring its vast, gorgeous world. Aside from pursuing collectibles, the meat of the game's side content is its side-missions, known simply as Tales of Tsushima. These bite-sized vignettes offer a quick look into the lives of Tsushima's inhabitants while often serving up some entertaining action and investigation. If you need to take a break from Jin's odyssey, Tales of Tsushima are well worth your time. They also net you Legend XP and a random minor Charm reward, so they're a great way to boost your strength.
Tales of Tsushima are scattered all across the map, and there are 61 in total to complete to obtain the Helping Sword Hand trophy. While the locations of some are made clear to you from the start, the rest require you to explore the world to find. You're not completely left in the dark, however, as some NPCs will clue you in on a Tale's location; visit any town and talk to any NPCs with speech bubbles over their heads. Still, they won't tell you where every Tale of Tsushima is, so you'll eventually need to find them all yourself if you want to 100% the game.
Fortunately, we've done all the work of finding every Tale of Tsushima for you, so you don't have to! Below you can find details on every Tale of Tsushima broken down by region. It's worth noting that some Tales of Tsushima are focused on the colorful cast of supporting characters you meet throughout your journey. Since those are tied to your progression through the game, we've compiled them in a section in the guide below. Be wary, as the Character Tales section contains light spoilers for later sections of the game.
The walkthrough details you'll find below for each Tale are kept straightforward, as the game often allows you the freedom to use whichever tactics you want to get through most combat/stealth encounters. But if you need a little more guidance towards how to best master fighting the Mongol threat, be sure to check out our Ghost of Tsushima combat guide. Otherwise, read our beginner's tips guide, which also contains links to our full Ghost of Tsushima spoiler-free walkthrough.
Izuhara Region
Izuhara region holds the majority of the game's side-missions, which--with some choice exceptions--you can find and complete at any time once the world opens up. You can easily spend your first 10 hours in the Izuhara region completing Tales, and doing so comes highly recommended for the sometimes tragic stories they often tell.
Incident at Hiyoshi Pass

Location: Southwest of Hiyoshi Springs and Hidden Springs Forest
The Incident at Hiyoshi Pass is relatively short and has you taking out a small pack of Mongols attacking a defenseless peasant named Banta on a bridge. As soon as the Tale starts, sneak up on the Mongols positioned on one cliffside and dispatch them with air assassinations; climb back up and repeat the same on the other side. Once they're taken care of, sneak across the river and take out the rest, either stealthily or with standard battle tactics if you get caught. Once that's done, talk to Banta and then his uncle to complete the Tale.
The Other Side of Honor
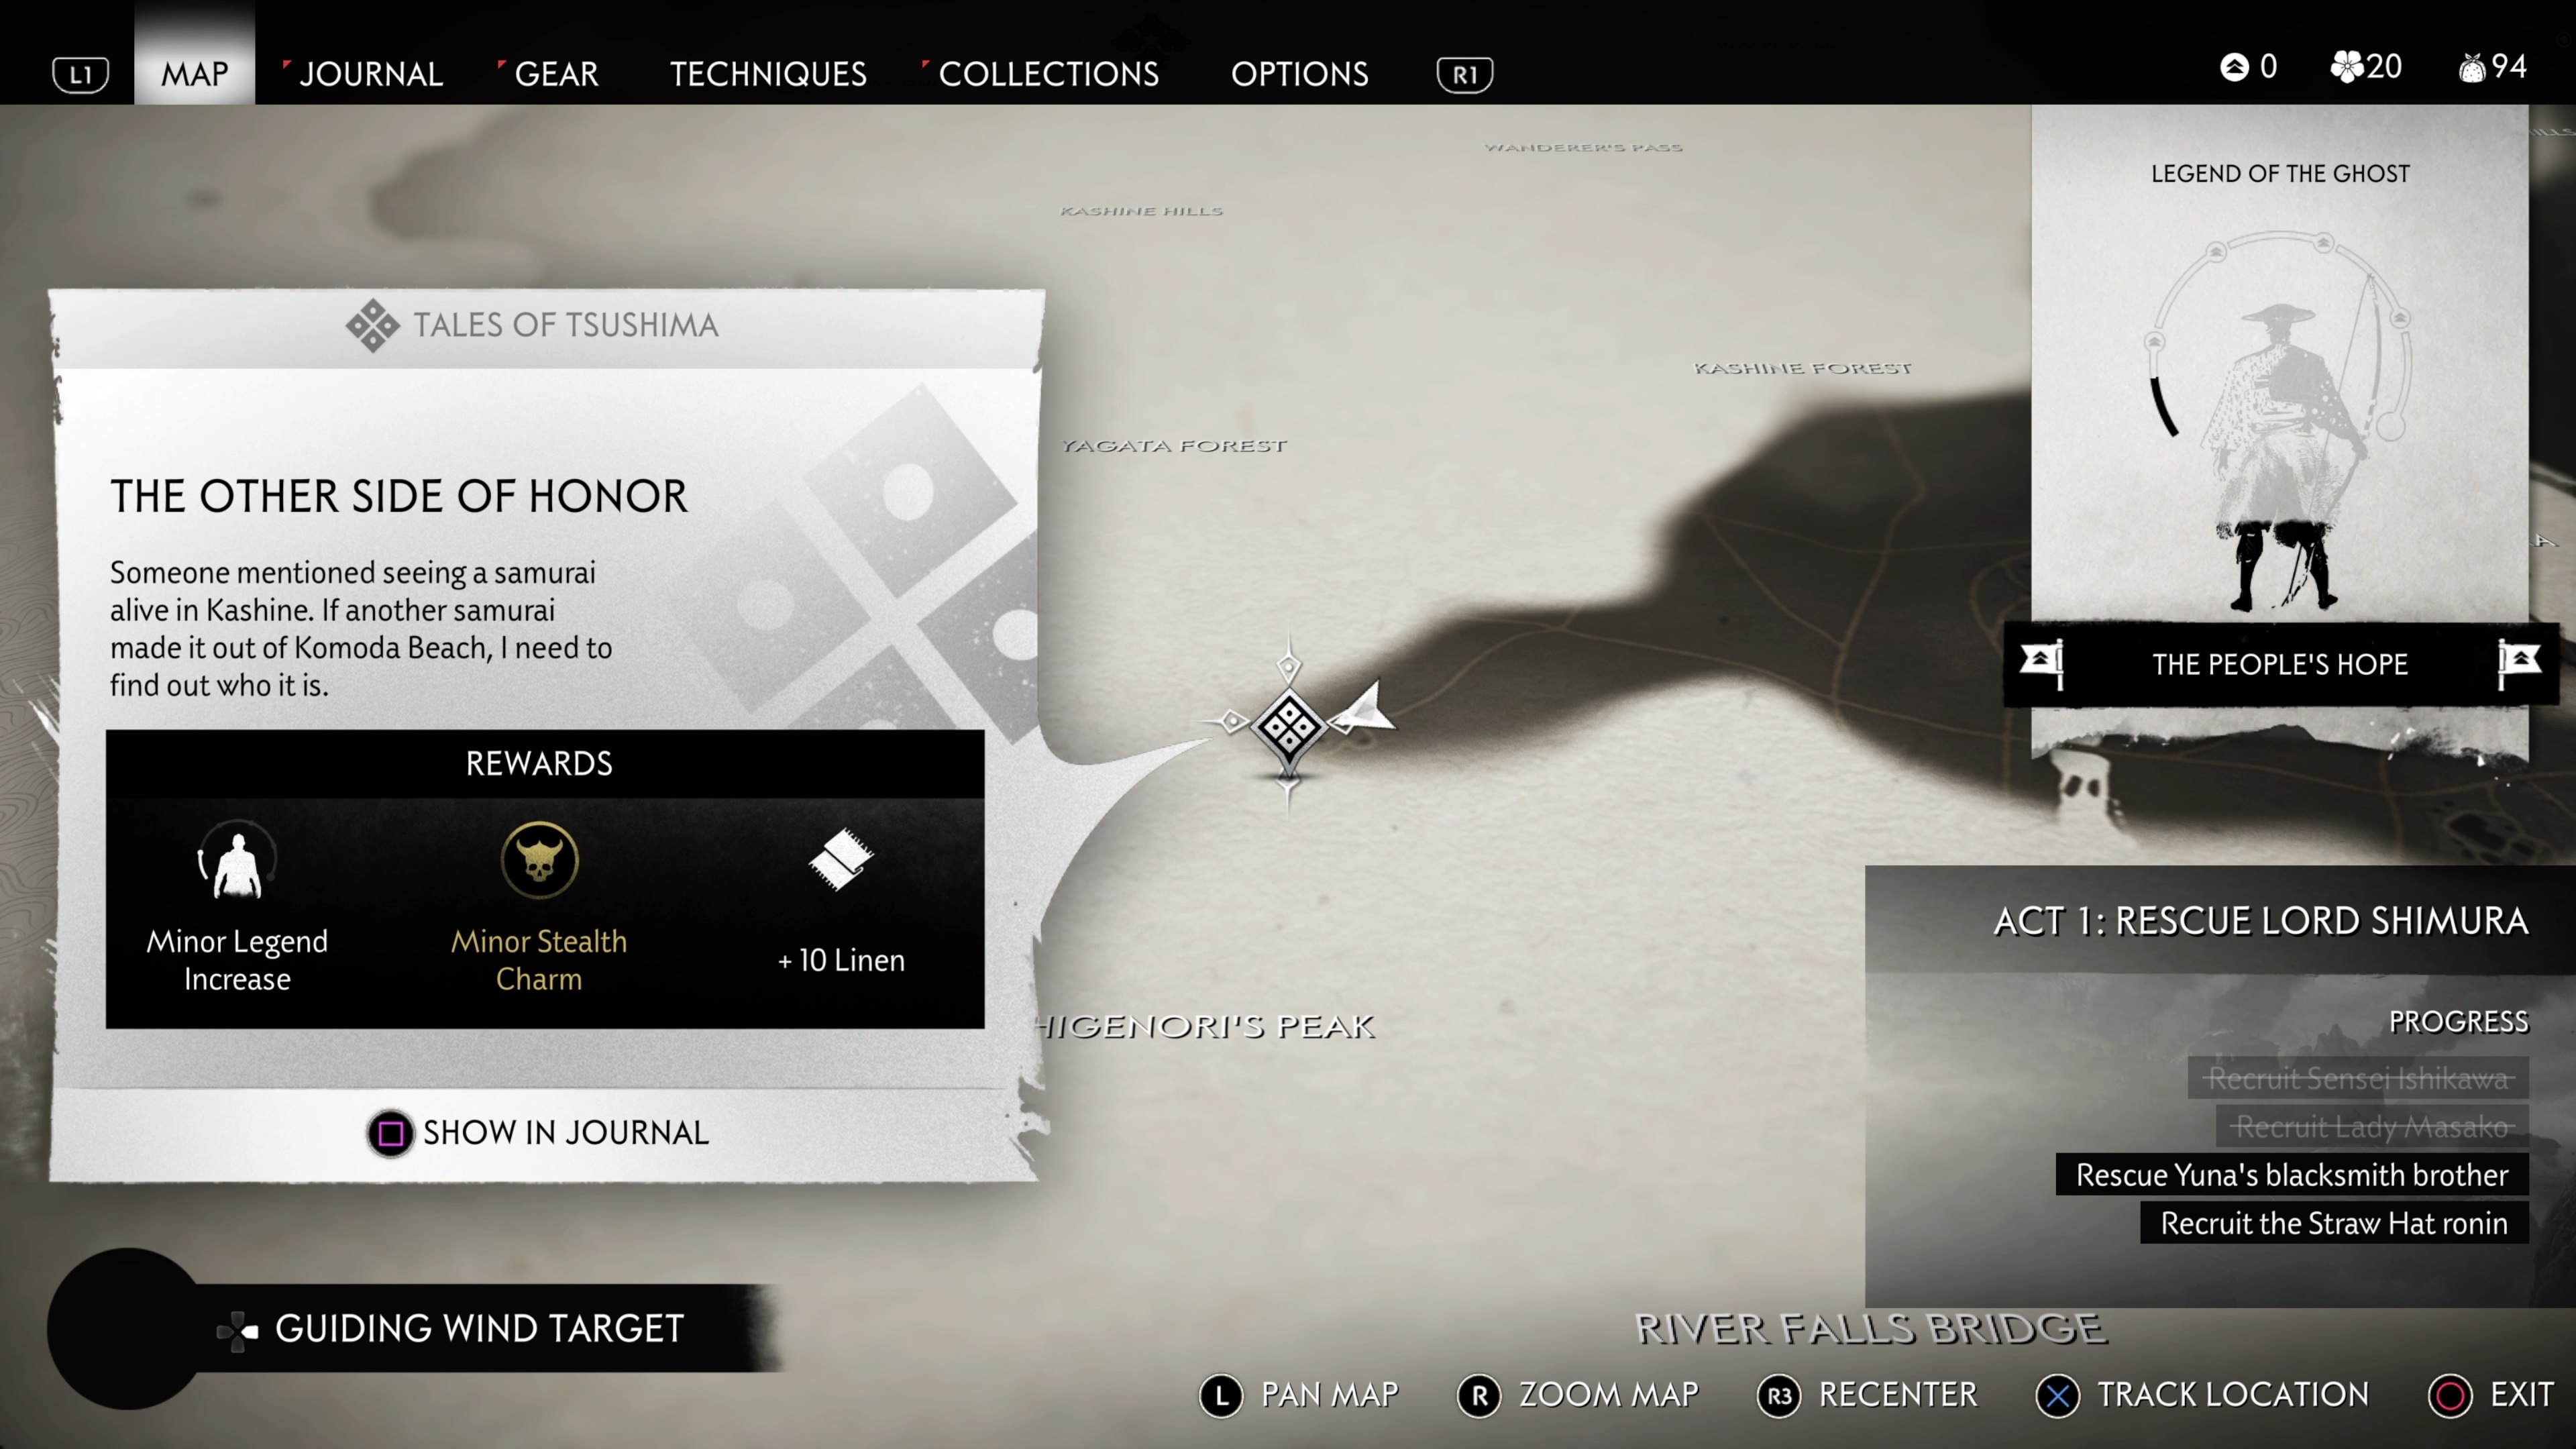
Location: South of Yagata Forest
The Other Side of Honor is largely story-focused, so there are no real obstacles to overcome. Simply talk to the villagers and investigate the environment when prompted, making sure to not stray too far from the search area.
The Cost of Iron

Location: Northwest of the Kuta Grasslands
The Cost of Iron is a semi-involved yet straightforward Tale with some investigation, combat, and tracking. Follow where the Guiding Wind prompts you, investigate the tracks, defeat the Mongols, and you'll be through this one in no time.
The Value of Sake
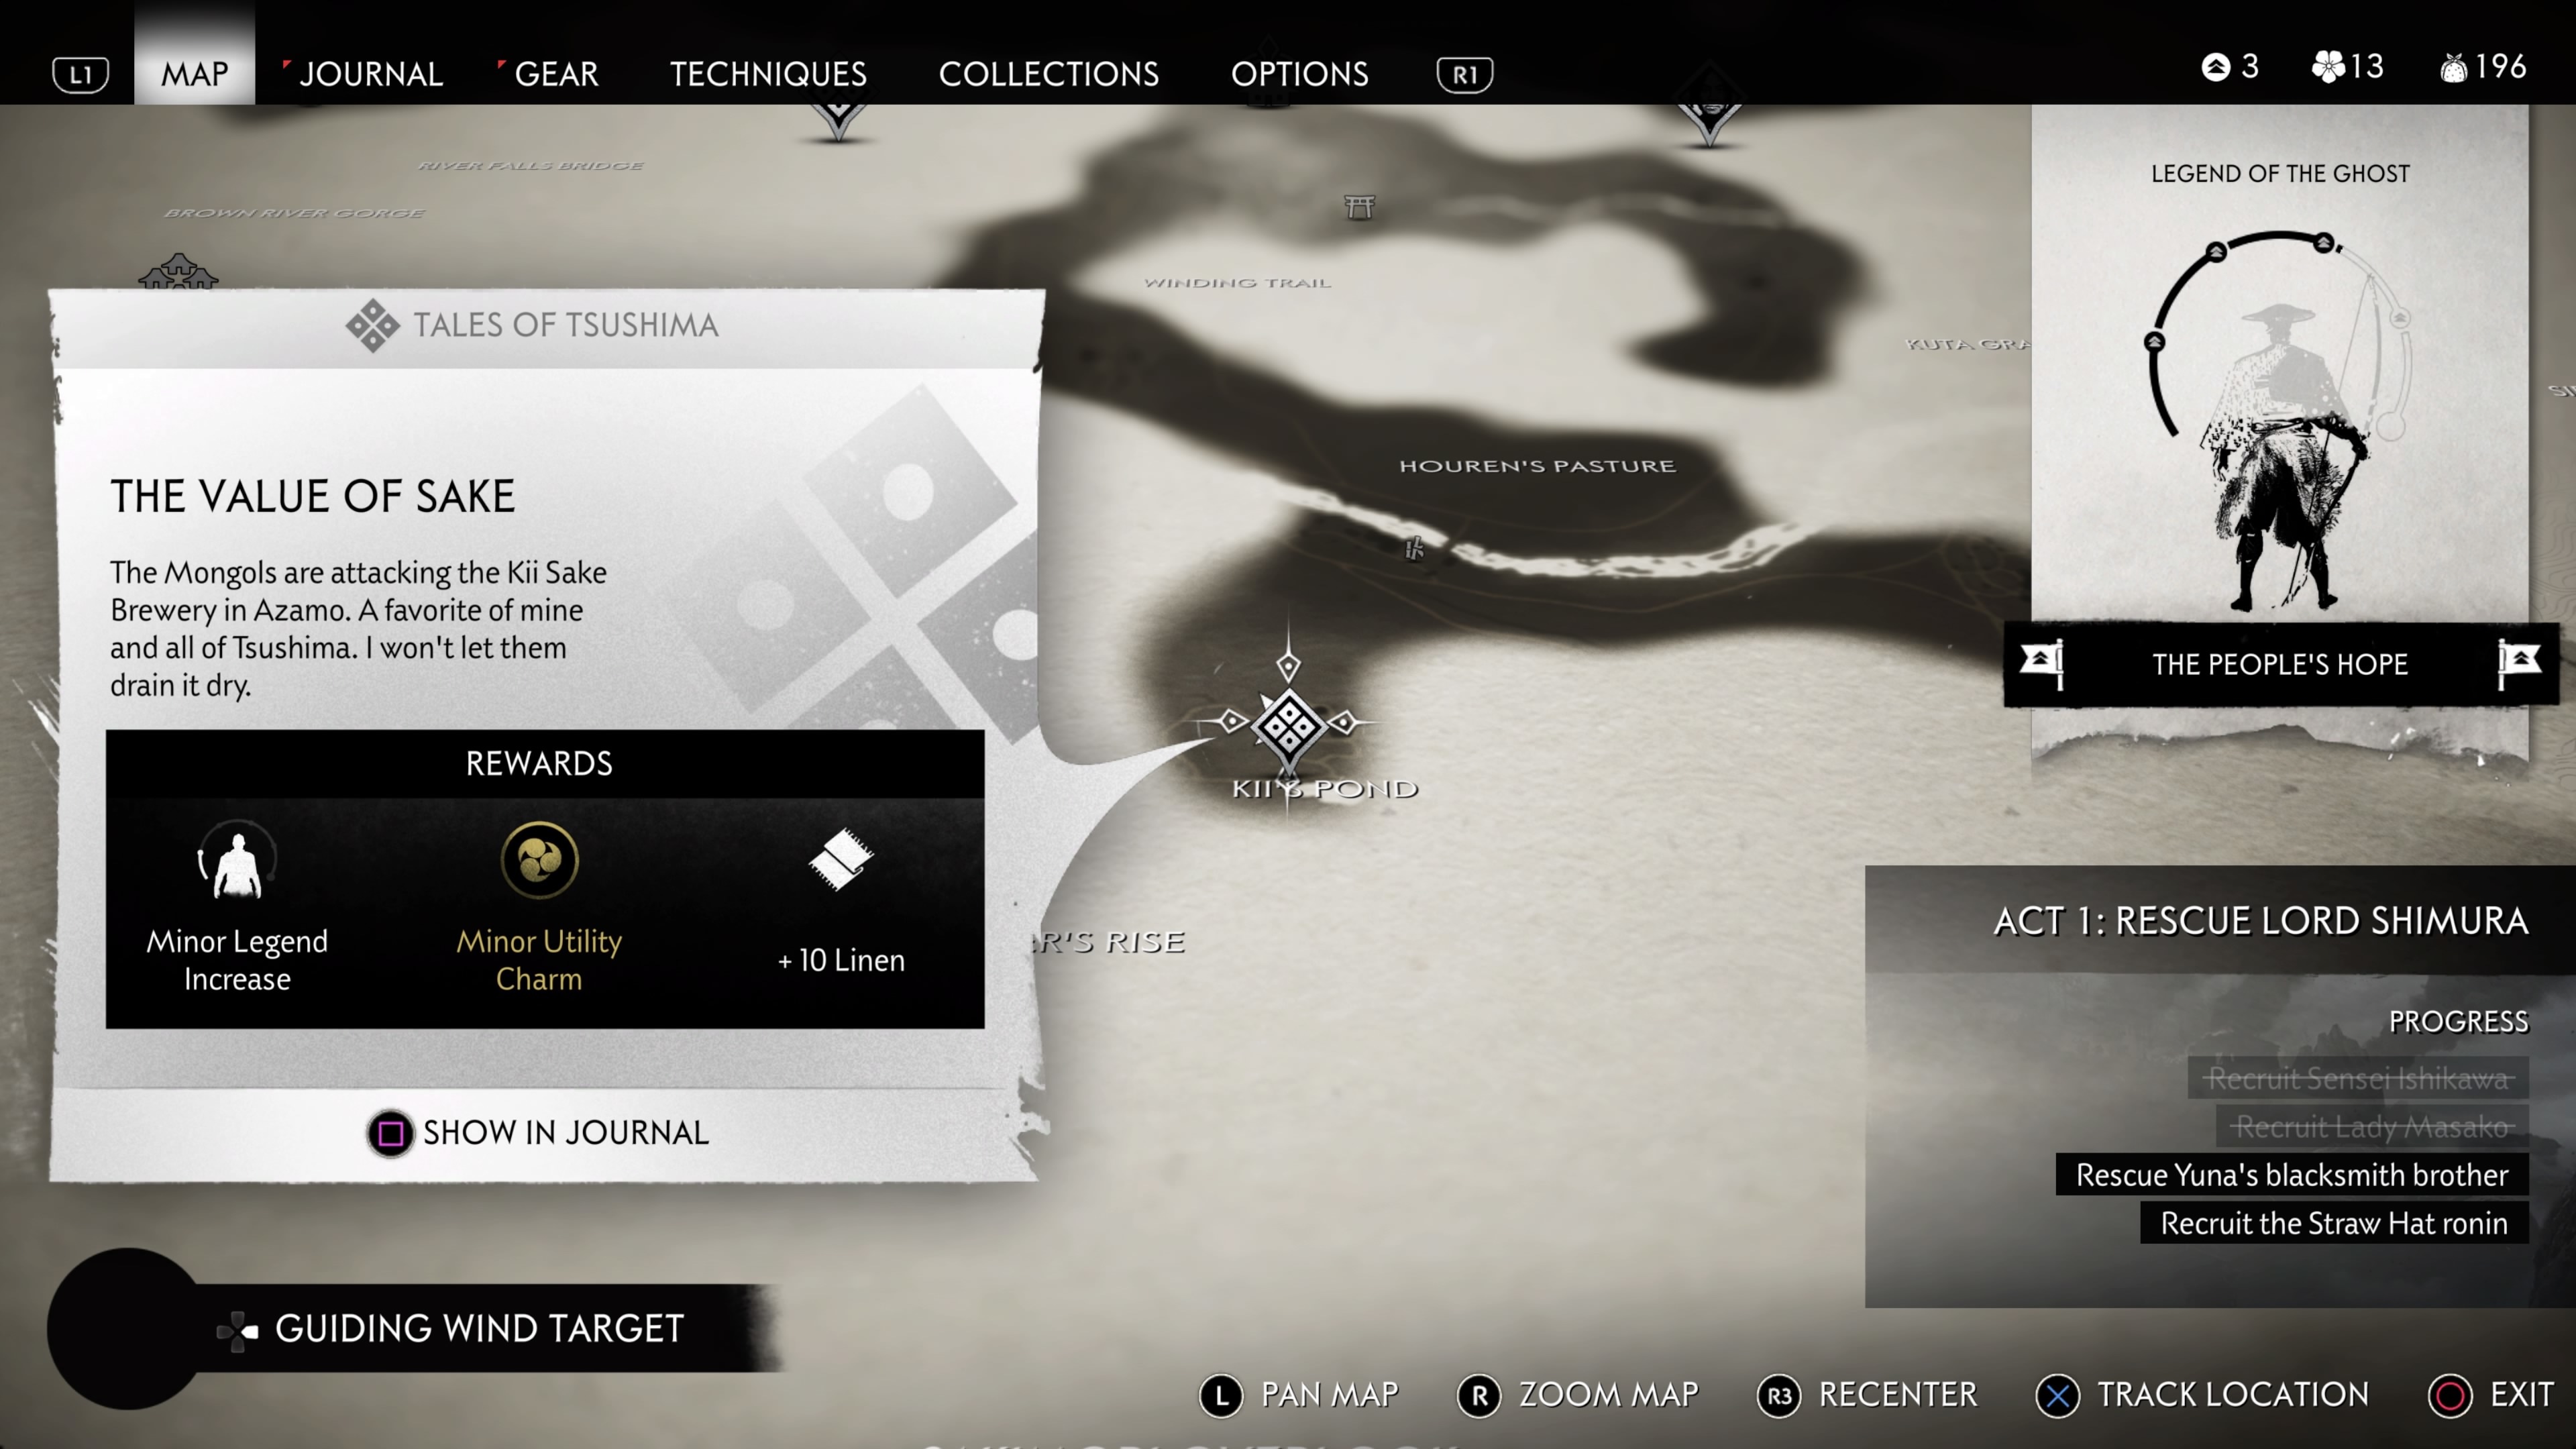
Location: North of Kii Pond
The Value of Sake has you setting up an ambush on some Mongols. If you're completing this early on, you'll want to prioritize getting the proper jump on the incoming troops. Hide in the bushes and wait for the first wave of Mongols to appear; we recommend using something explosive to start with, like the Black Powder Bombs, Sticky Bombs, Fire Arrows, or Explosive Arrows. Once they're dealt with, six more Mongols will enter the fray, so dispatch them, and you're good to go.
For Tsushima

Location: Further north of Kii's Pond--near Houren's Pasture
For Tsushima sees you working alongside an ally to bring the pain on some Mongol troops. It's a couple of fights long, so make sure you start the Tale with enough combat supplies. Otherwise, keep your weapon stances in order against the various enemy types, and you'll get to the end of this in no time.
Whispers in the Woods

Location: South of Yagata Forest
Whispers in the Woods has you taking a brief jaunt through some spooky woods at night to shine light on some recent disappearances. Once you assume control, follow the lanterns in the woods, and you'll eventually come upon a campsite to investigate. After that, head slightly northeast until you find a campfire with some more clues. Follow through on the next lead Jin stumbles upon, and you'll get to the bottom of this mystery soon after.
A Place To Call Home

Location: Southwest of Lake Izuhara (the island with the Ariake Haiku)
In A Place To Call Home, you've got to save a family from some Mongols. Follow the guiding wind and inflict justice upon them any way you want.
A Healer's Touch

Location: West of River Child's Wetlands
A Healer's Touch is another Tale where you spend your time mostly following an ally and fighting a ton of Mongols along the way. This one's twice the length of For Tsushima, so make sure you're stocked up on arrows and tools before starting this one.
A Mother's Peace
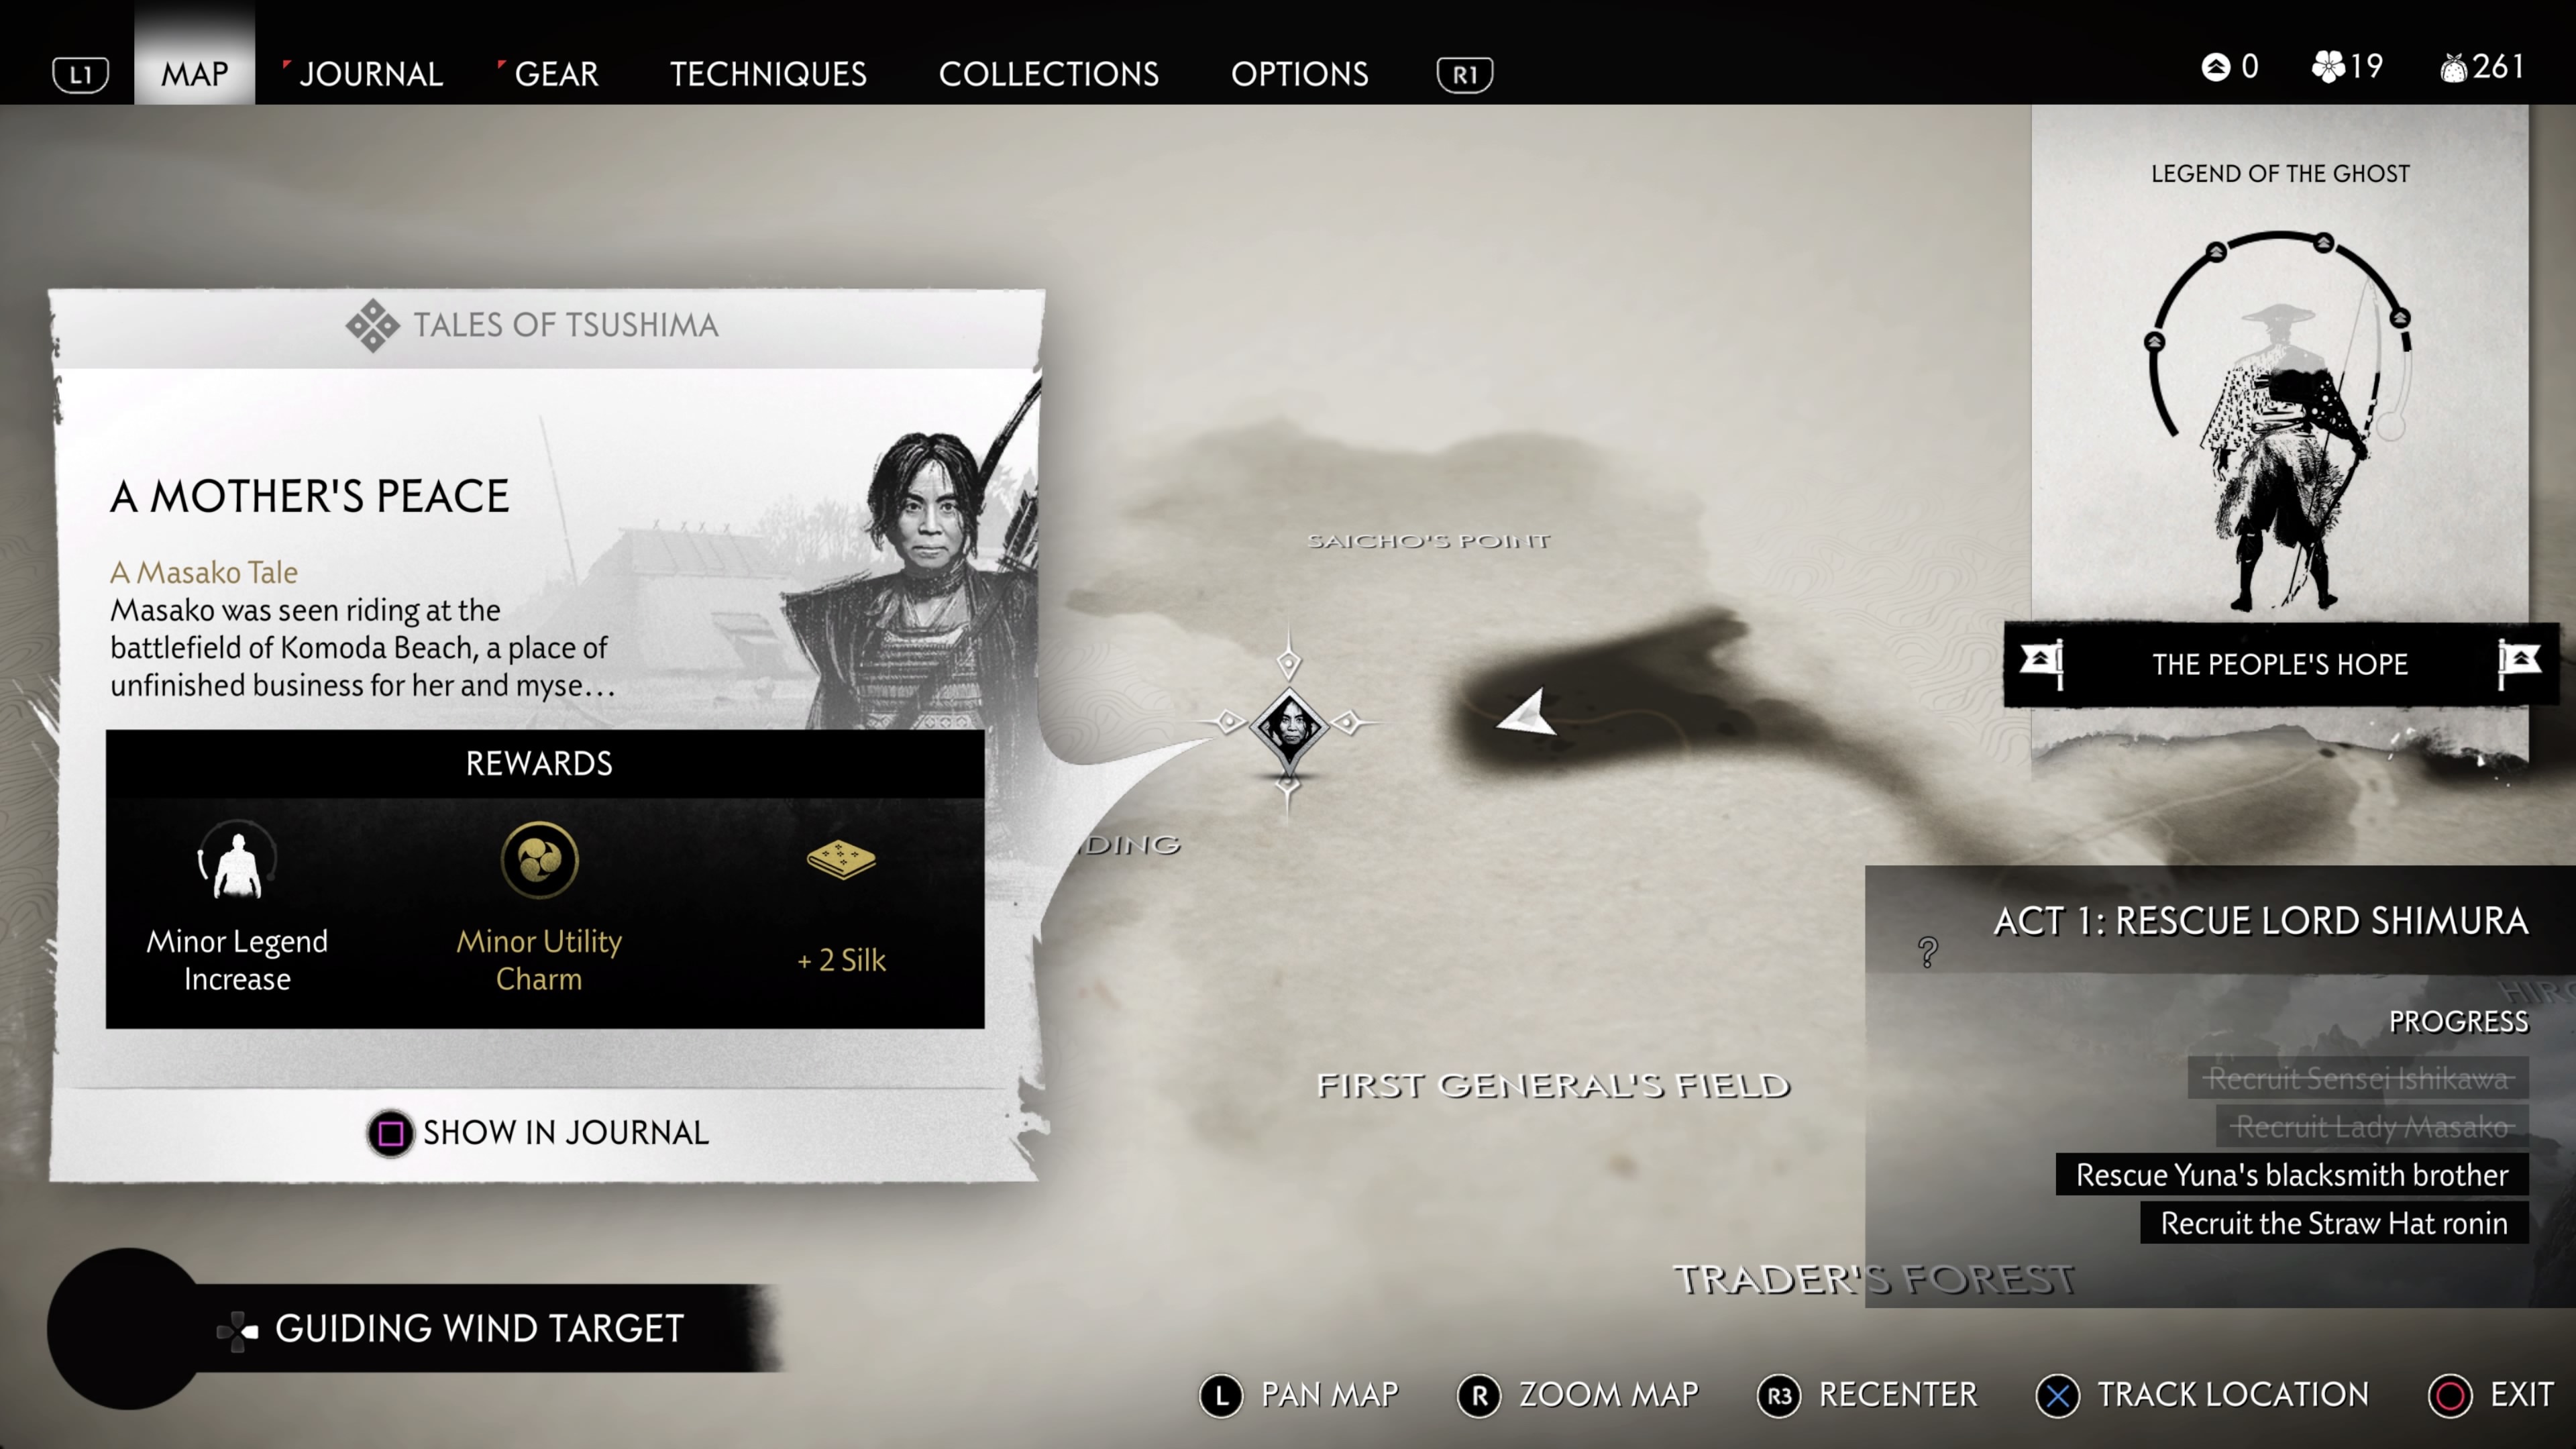
Location: South of Saicho's Point at the northwest-most point of the Izuhara region
This is a somewhat intriguing Tale of Tsushima that's entirely focused on Masako despite not being a part of her main questline. It goes without saying, but you need to recruit her in the main story first to access it. Regardless, once you arrive, defend Masako from a group of Mongols and then follow her on a linear story sequence through a beach. There are only two direct combat encounters in this Tale, so sit back and enjoy the story. It's pretty emotional, though, so you might want to pull out some tissues, too.
Lost at Sea
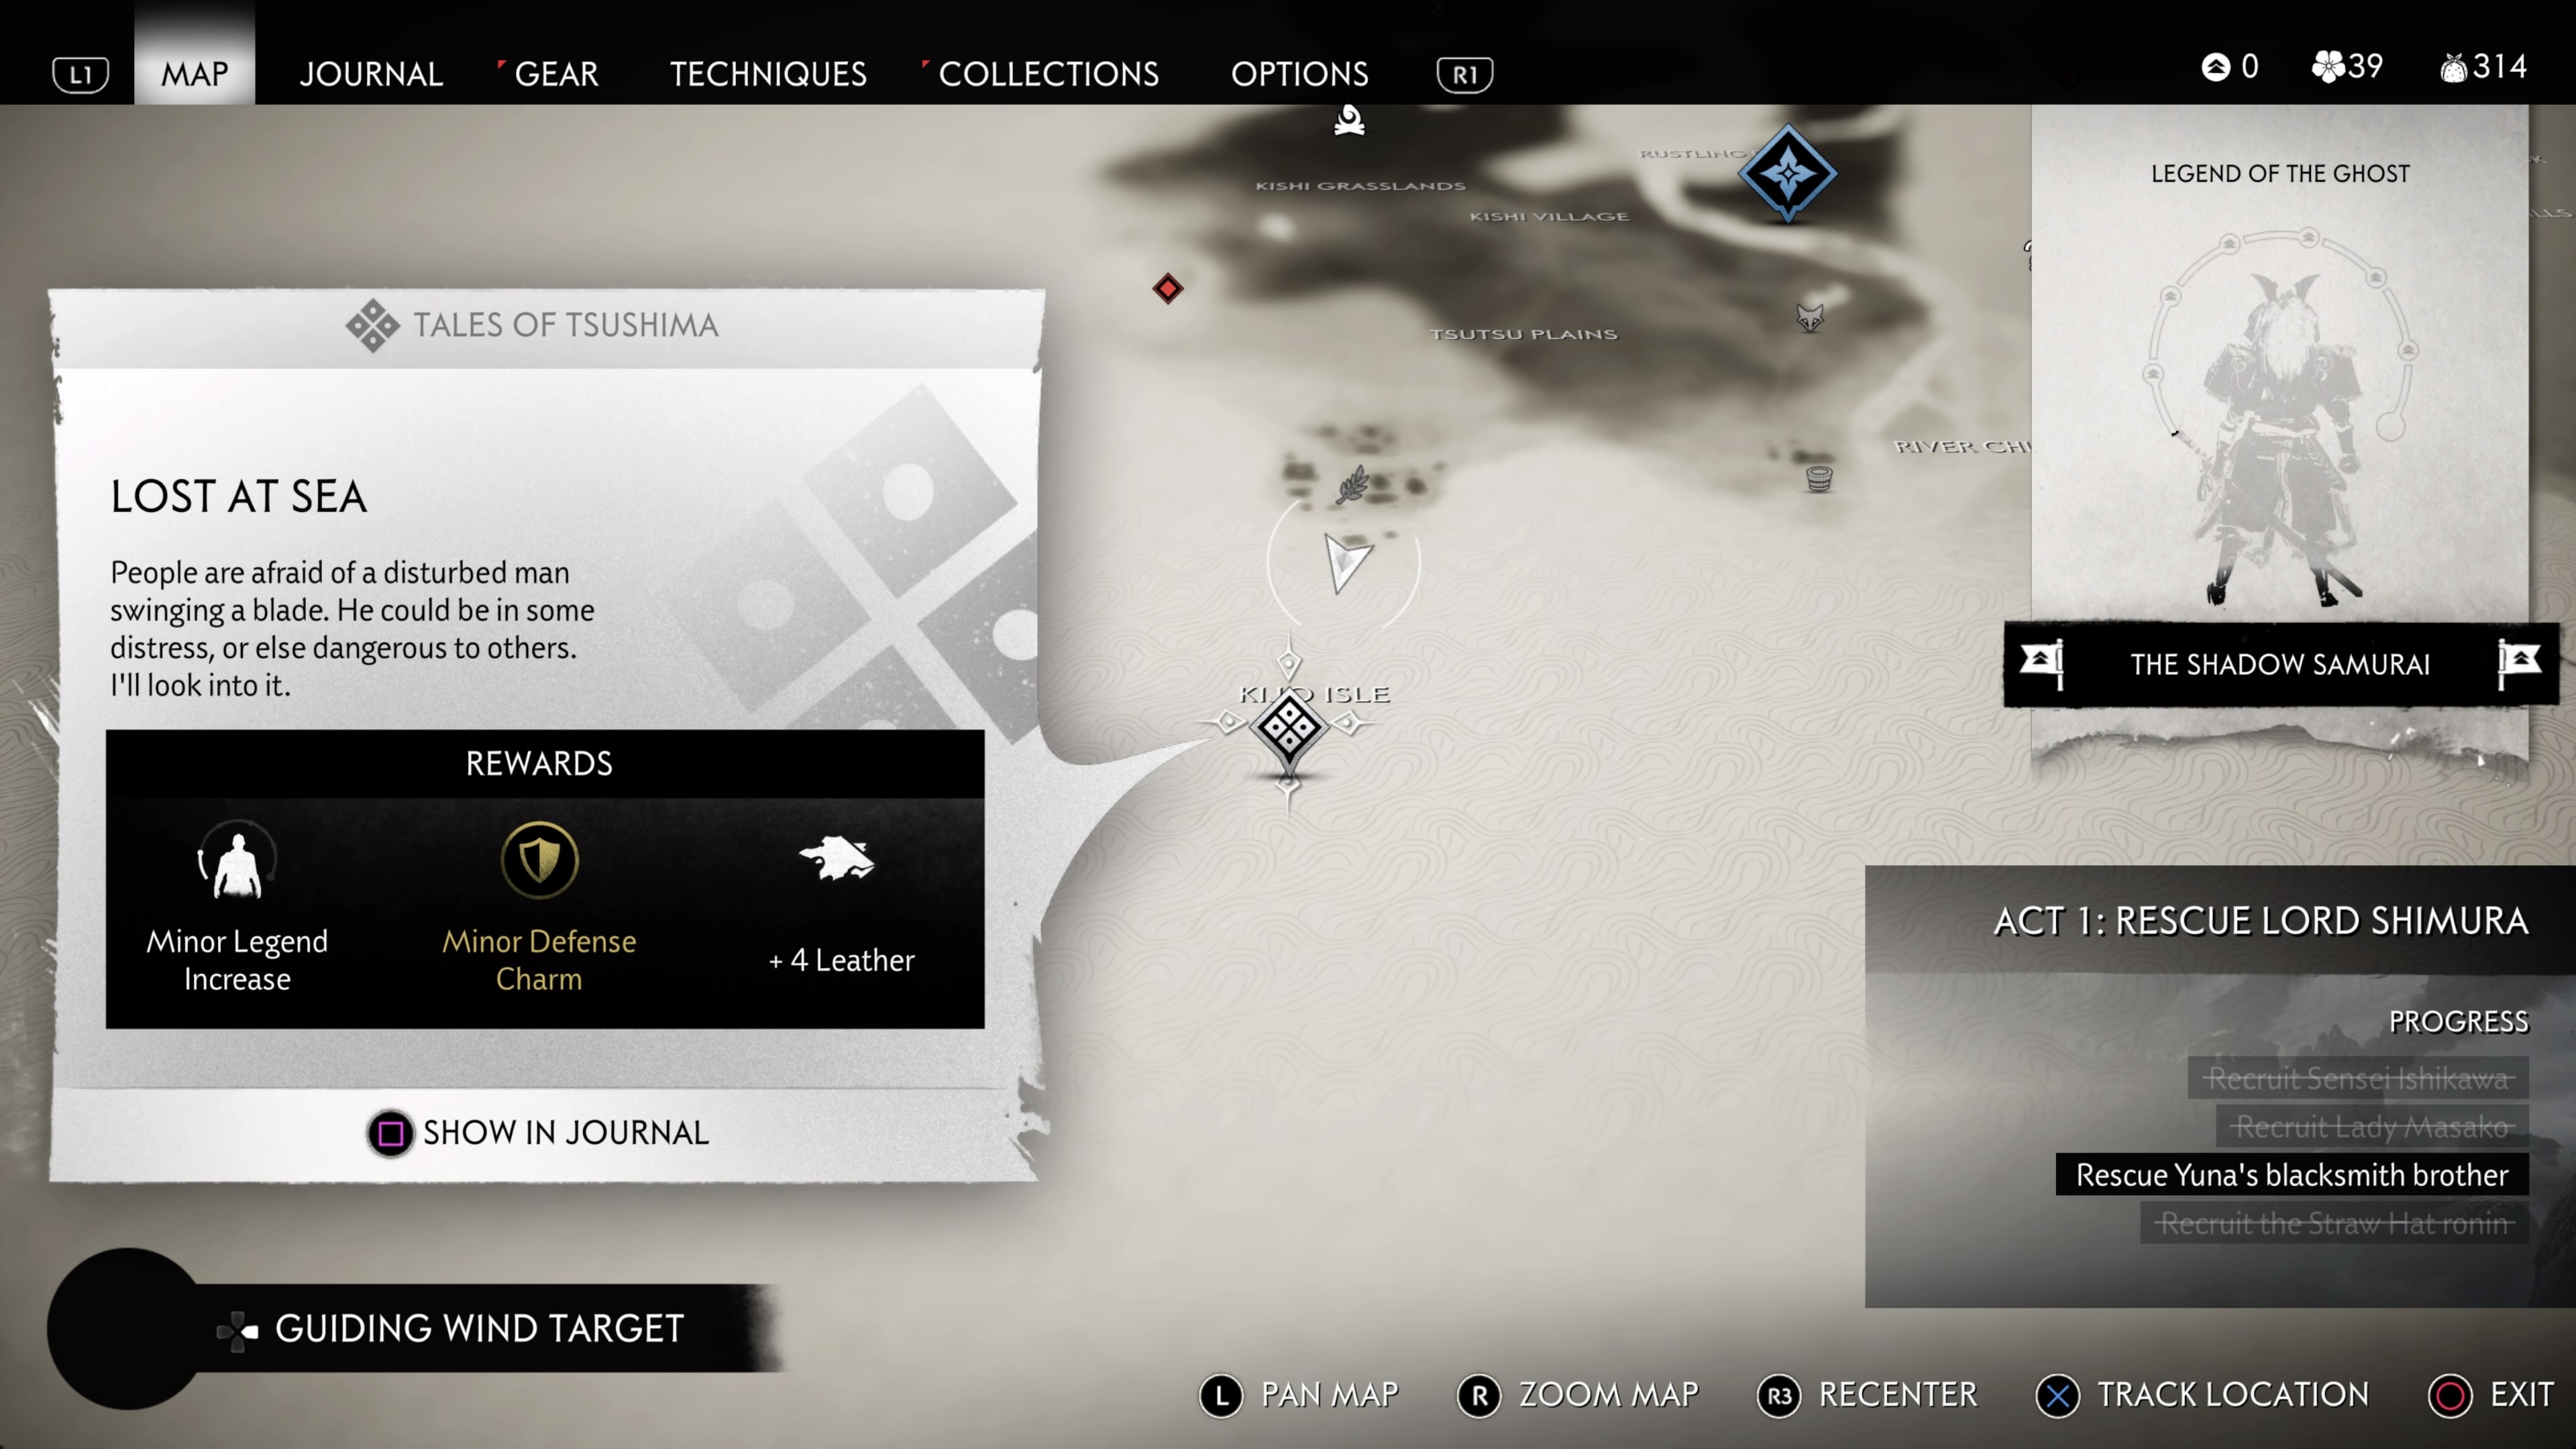
Location: Kijo Isle--the southwest-most point of the Izuhara region
A disturbed man needs your help to rescue his daughter from a Mongol ship. To avoid a bunch of Mongols rushing over to kill the disturbed man's daughter, we suggest going in quiet and stealthily taking out the patrolling guards. If you're keen to start a ruckus, just make sure you're well-equipped with arrows and tools to stop any Mongols making a b-line for the disturbed man's daughter. Clear the ship, and you'll clear the Tale.
Empty Baskets
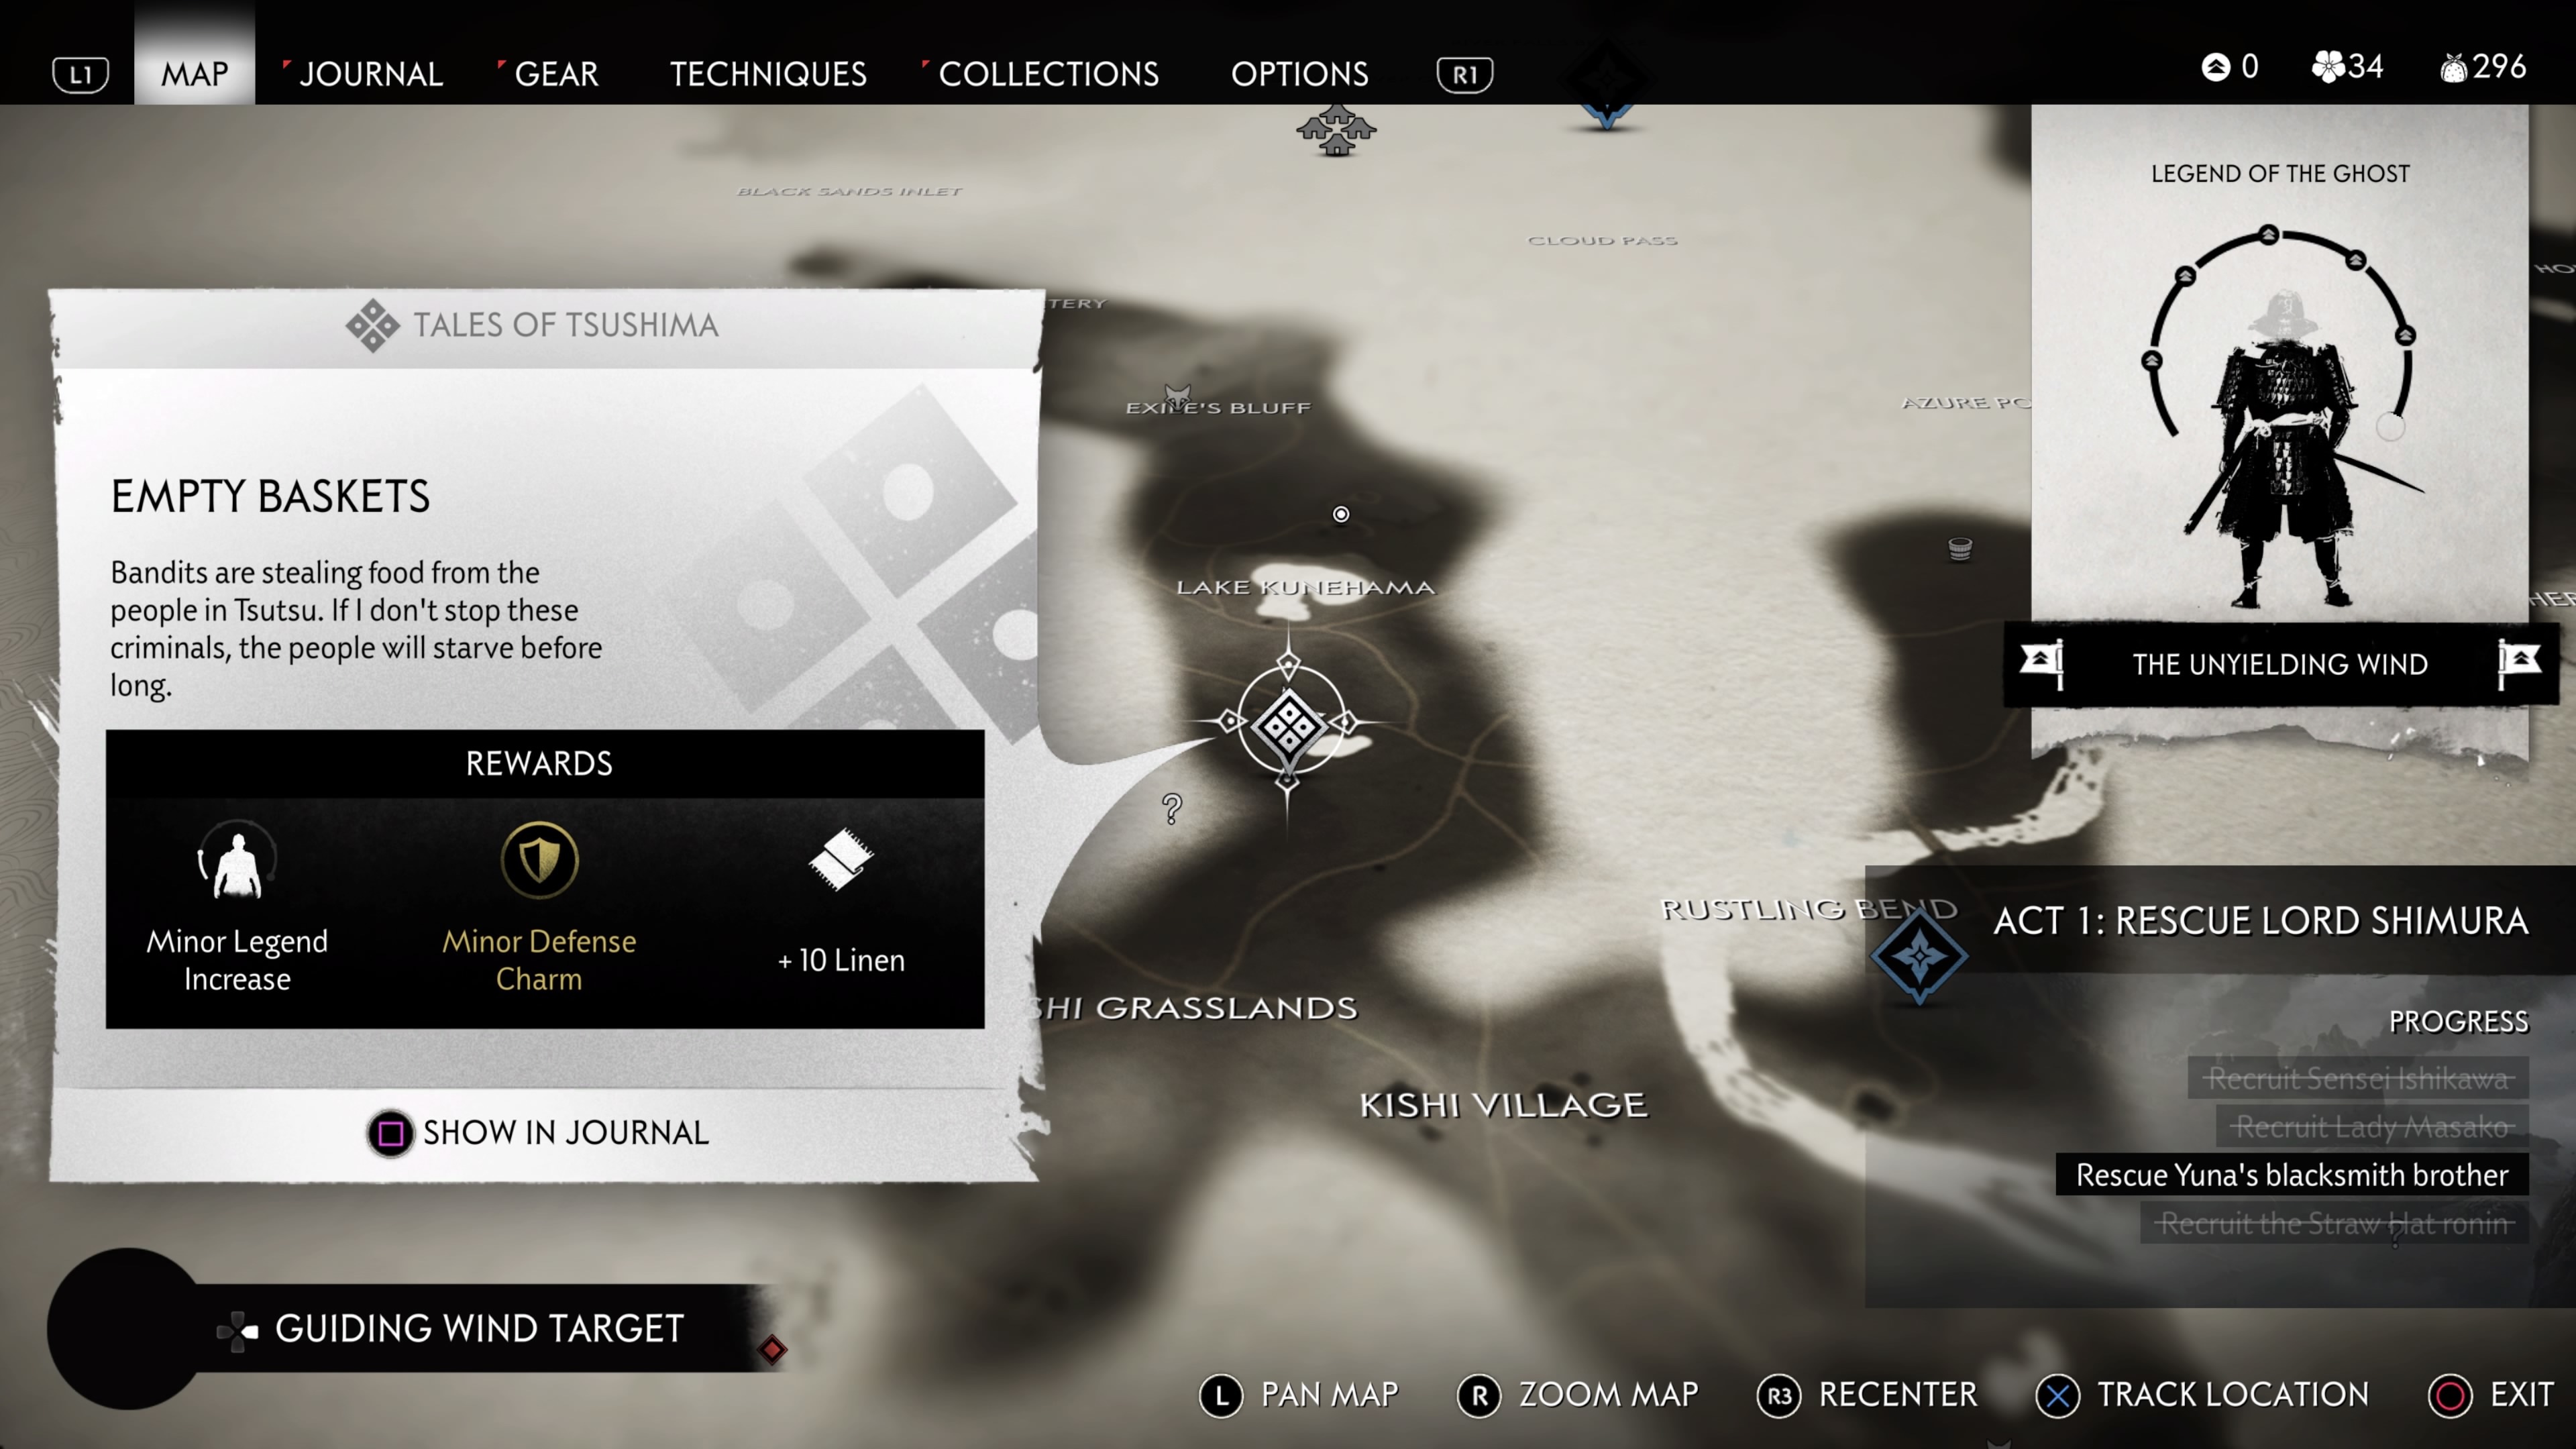
Location: South of Lake Kunehama
Empty Baskets is another quickie. Follow the Guiding Wind, kill the bandits, and run back to the quest-giver. We won't spoil the ending surprise, though.
Unfinished Business

Location: At the entrance of Azamo Bay at the southeast-most point of the Izuhara region.
Unfinished Business is unlocked after completing the main story mission Broken Blacksmith. It's pretty much a follow-up to that mission where you need to liberate a Mongol-invaded village you were sneaking through. Like other Mongol Camps, there's a list of objectives you need to complete before the area is liberated--each of which is clearly marked on the map. There are many Mongols in this area, so we recommend sneaking around first to thin out the herd.
Regardless of how you wish to clear out the village of its invaders, the Tale will end with a fight against a Mongol Warlord. Equip your Water Stance and try to break his guard. He'll often use an unblockable shield bash, so dodge left or right to avoid it and guard or parry the quick slash he delivers afterward. This automatically messes with his footing, leaving him open for some quick slashes. It's worth noting that he sometimes opens a combo with a standard slash, so maintain awareness of when to block, counterattack, and whittle away his Stagger meter, and you'll slay this formidable foe before long.
Honor Buried Deep

Location: Azamo Bay (After liberating it in Unfinished Business)
Honor Buried Deep is unlocked by completing Unfinished Business. Talk to the quest-giver and then follow the Guiding Wind to a house you need to investigate. Some bandits show up whom you need to follow for a while. Once they arrive at their destination, confront them to unlock the path to the Tale's final encounter.
The Laughing Bandits

Location: Kechi Fishing Village at the docks
The Laughing Bandits only opens up after you've completed Act 1 and have liberated the Kechi Fishing Village from Mongol control. Talk to the quest-giver and follow the Guiding Wind to a house. Investigate the area and find some tracks to follow, which lead you to some bandits to kill. Eliminate them and return to the quest-giver.
Toyotoma Region
The standard Tales of Tsushima take a backseat to the more character-focused ones in the Toyotoma region. Still, there's a nice handful of Tales you can find and complete at any time as soon as the area opens up after completing Act 1--though there are once more a couple of exceptions.
The River Children

Location: Southeast of Old Kanazawa Marsh--across the river and along the shore
The River Children focuses on an intriguing mythological figure from Japanese folklore and a fisherman's sudden disappearance. Follow the tracks to uncover the mystery behind the rumors haunting this part of Tsushima. Yeah, that's pretty vague, but trust us--it's better this way.
A Final Request
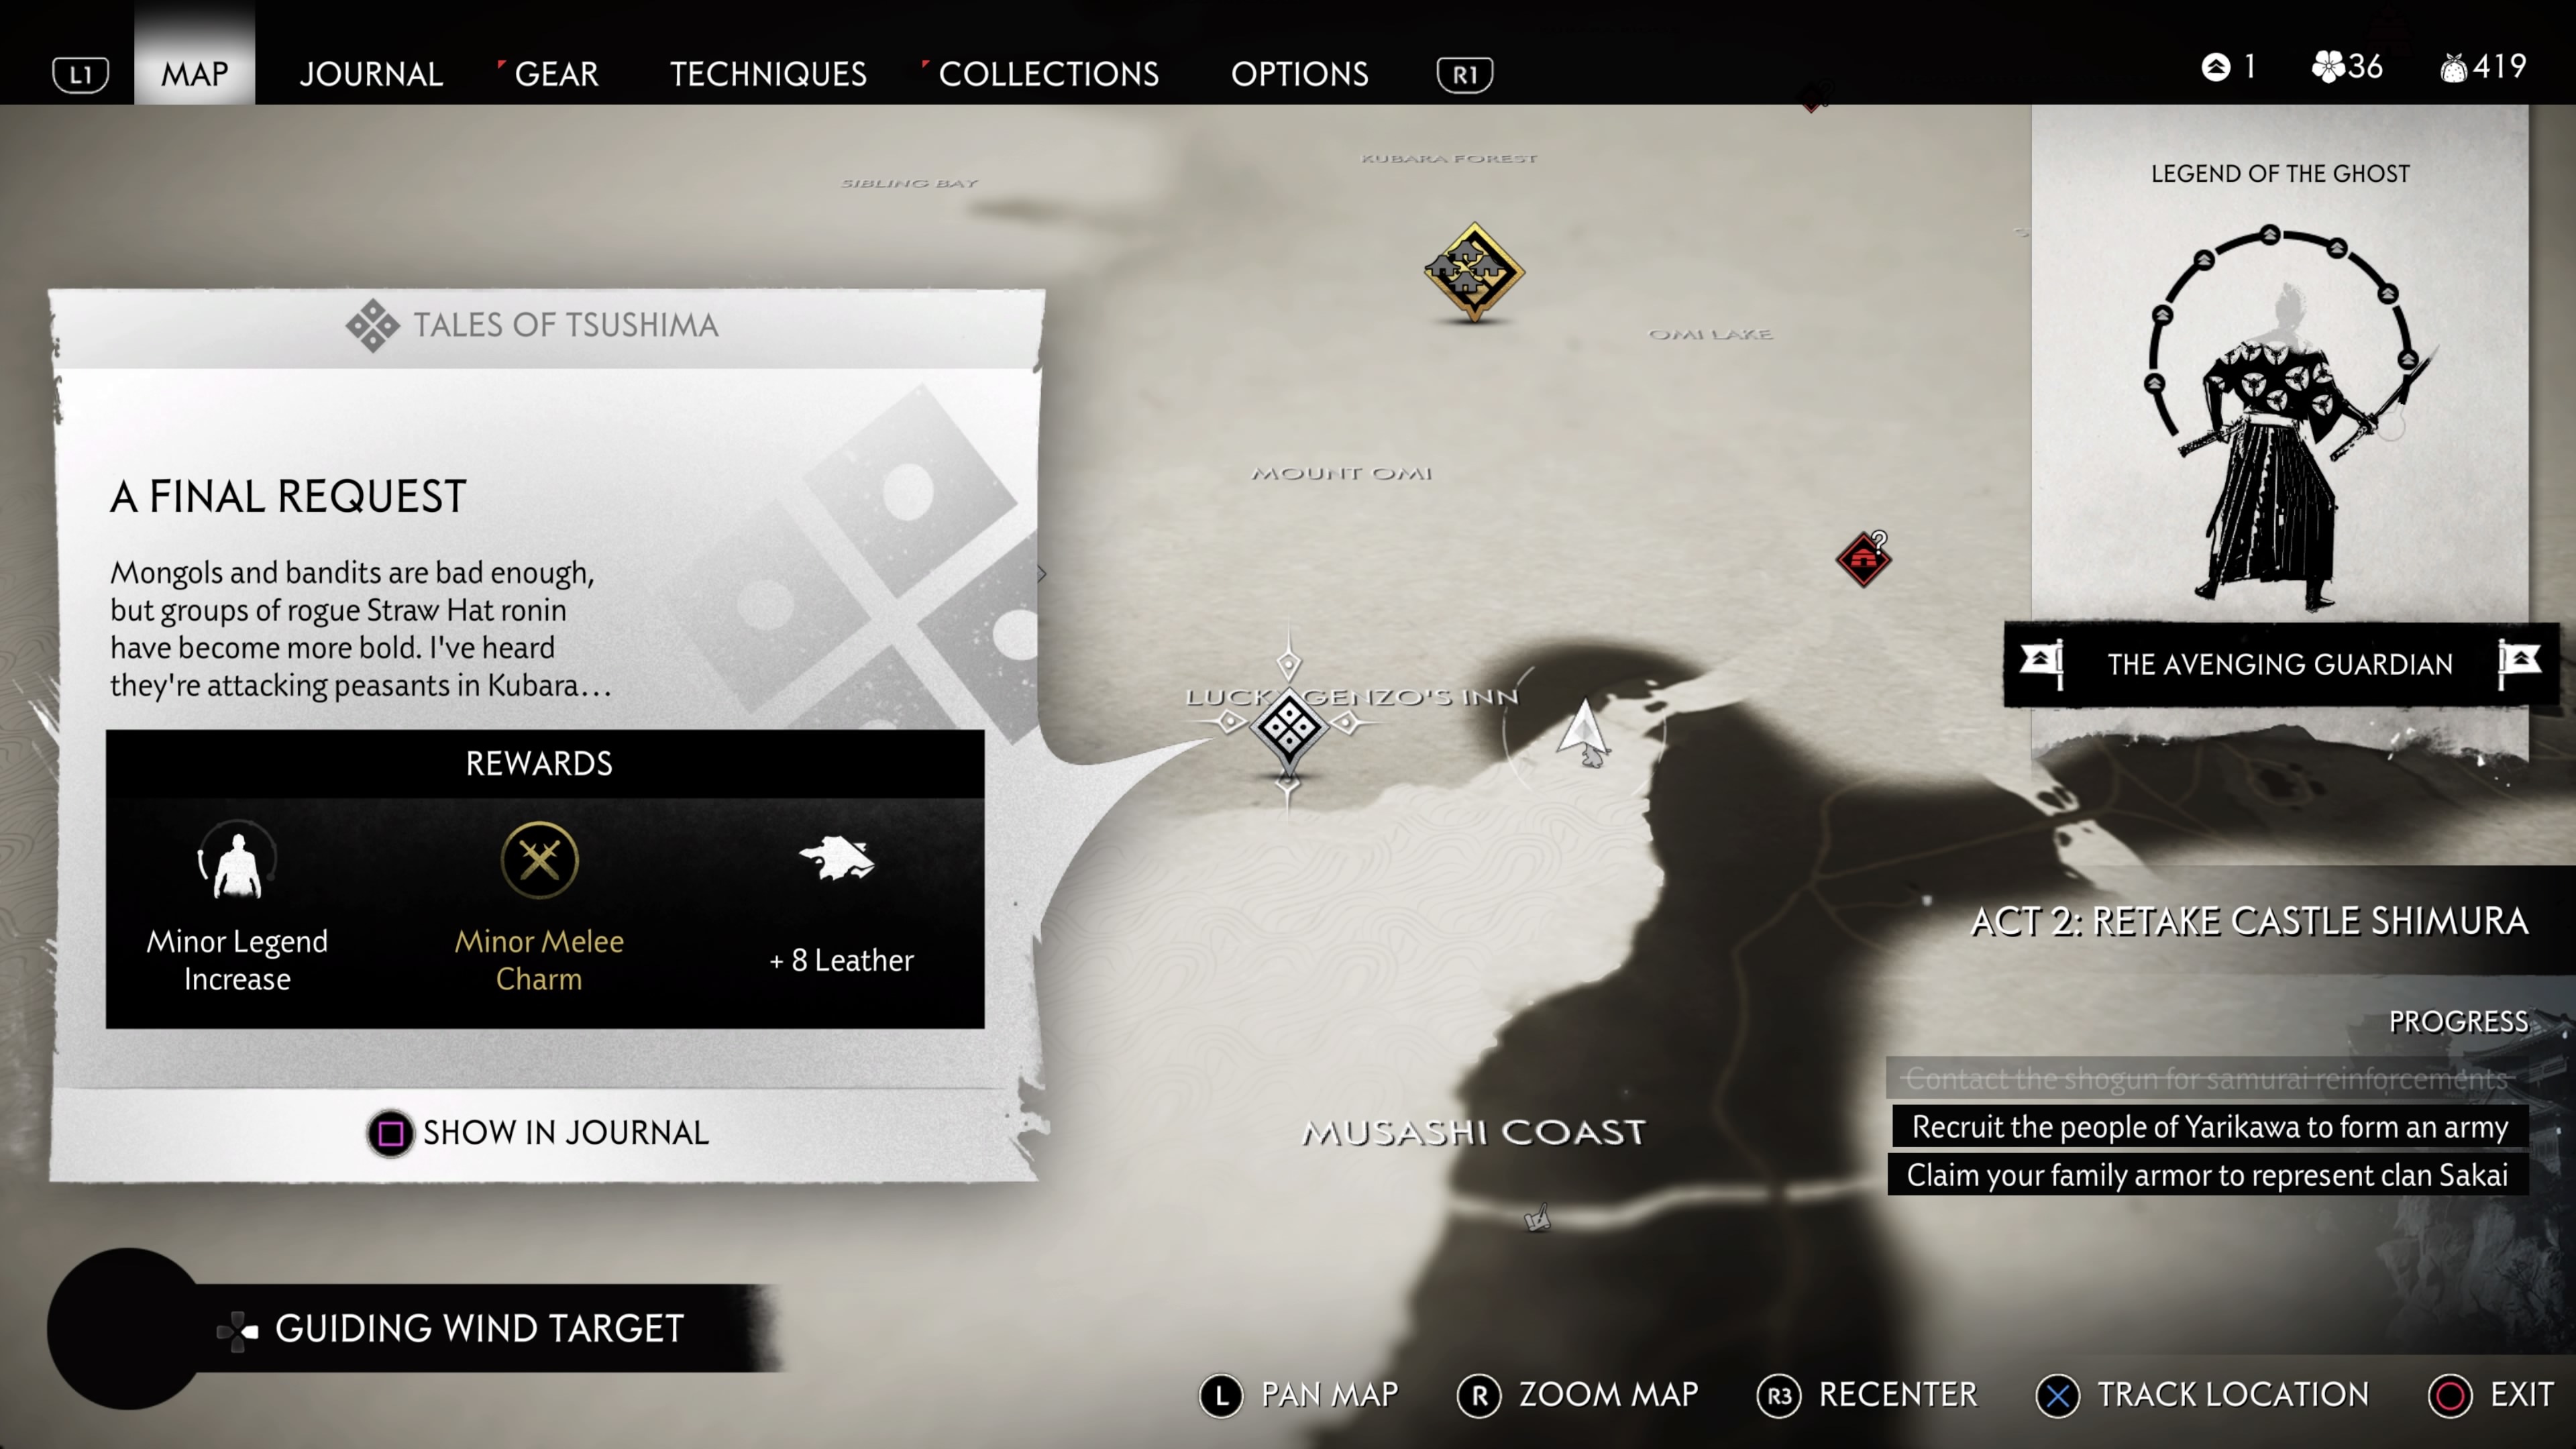
Location: Lucky Genzo's Inn
A Final Request has you fulfilling a wish muttered to you by a woman in her final breaths at Lucky Genzo's Inn. Follow the Guiding Wind and squash each ronin camp along the way until you find the lead you need to fulfill the woman's final request. If you haven't fought any ronin by now, they're pretty quick and ruthless, so make sure you've got your Perfect Parries on lock, or at least enough tools, like Stick Bombs and Smoke Bombs, to help you whittle their numbers.
Flesh and Stone
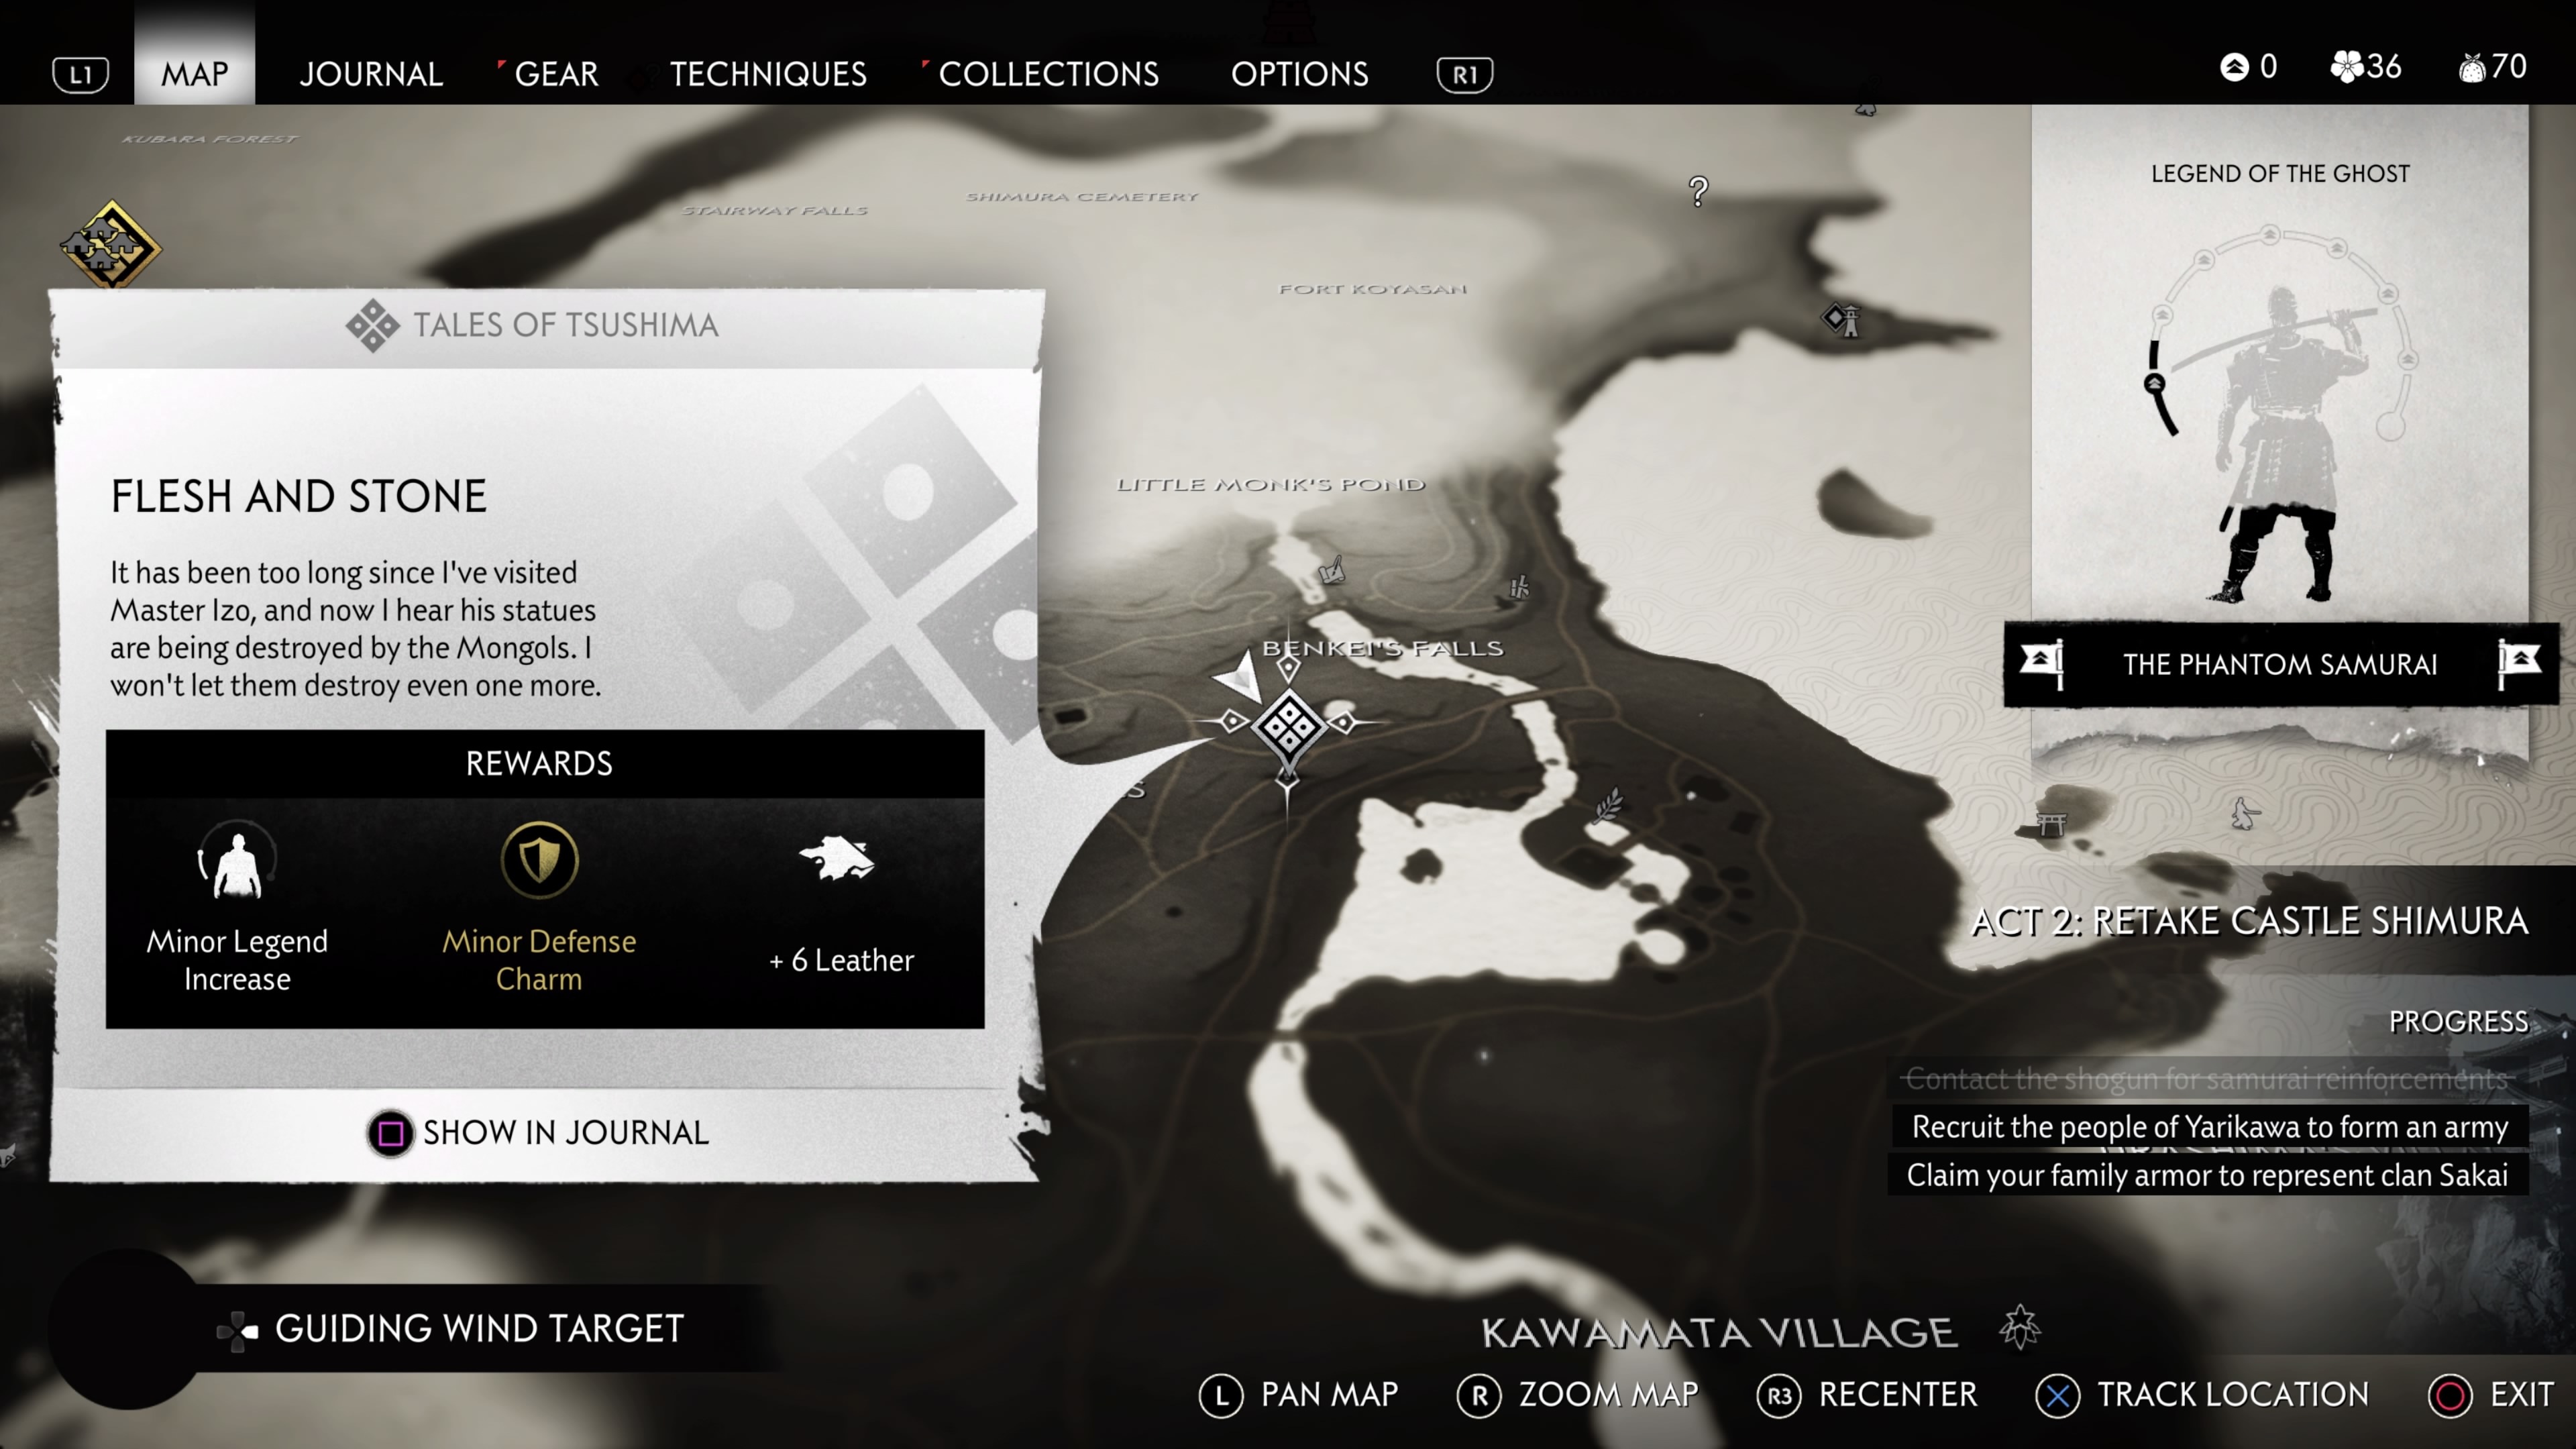
Location: South of Benkei's Falls
Flesh and Stone is another super straightforward Tale. Talk to the quest-giver and then run up the hill towards the local sculptor's house. Some Mongols are wreaking havoc there, so deal with them in kind. Talk to the Sculptor and return to the quest-giver.
A Wealthy Man Has All He Needs

Location: South of Lady Sanjo's Bridge
A Wealthy Man Has All He Needs has you helping out a desperate merchant. Interrogate the villagers in the Survivor Camp and then pursue the one who starts to run. Follow the Guiding Wind taking you to Umugi beach and then deal with the ronin who have set up camp there. Keep pushing towards the coastline until you see a tree with a couple of grappling hook points. You'll find a group of ronin threatening some innocent people; reign on their parade before they do anything stupid. Once all the ronin are dead, free the prisoners and proceed to the right until you come upon a rock with a point of interest to examine. Return to the Survivor Camp and talk to the quest-giver to end the Tale.
A Thief Of Innocence
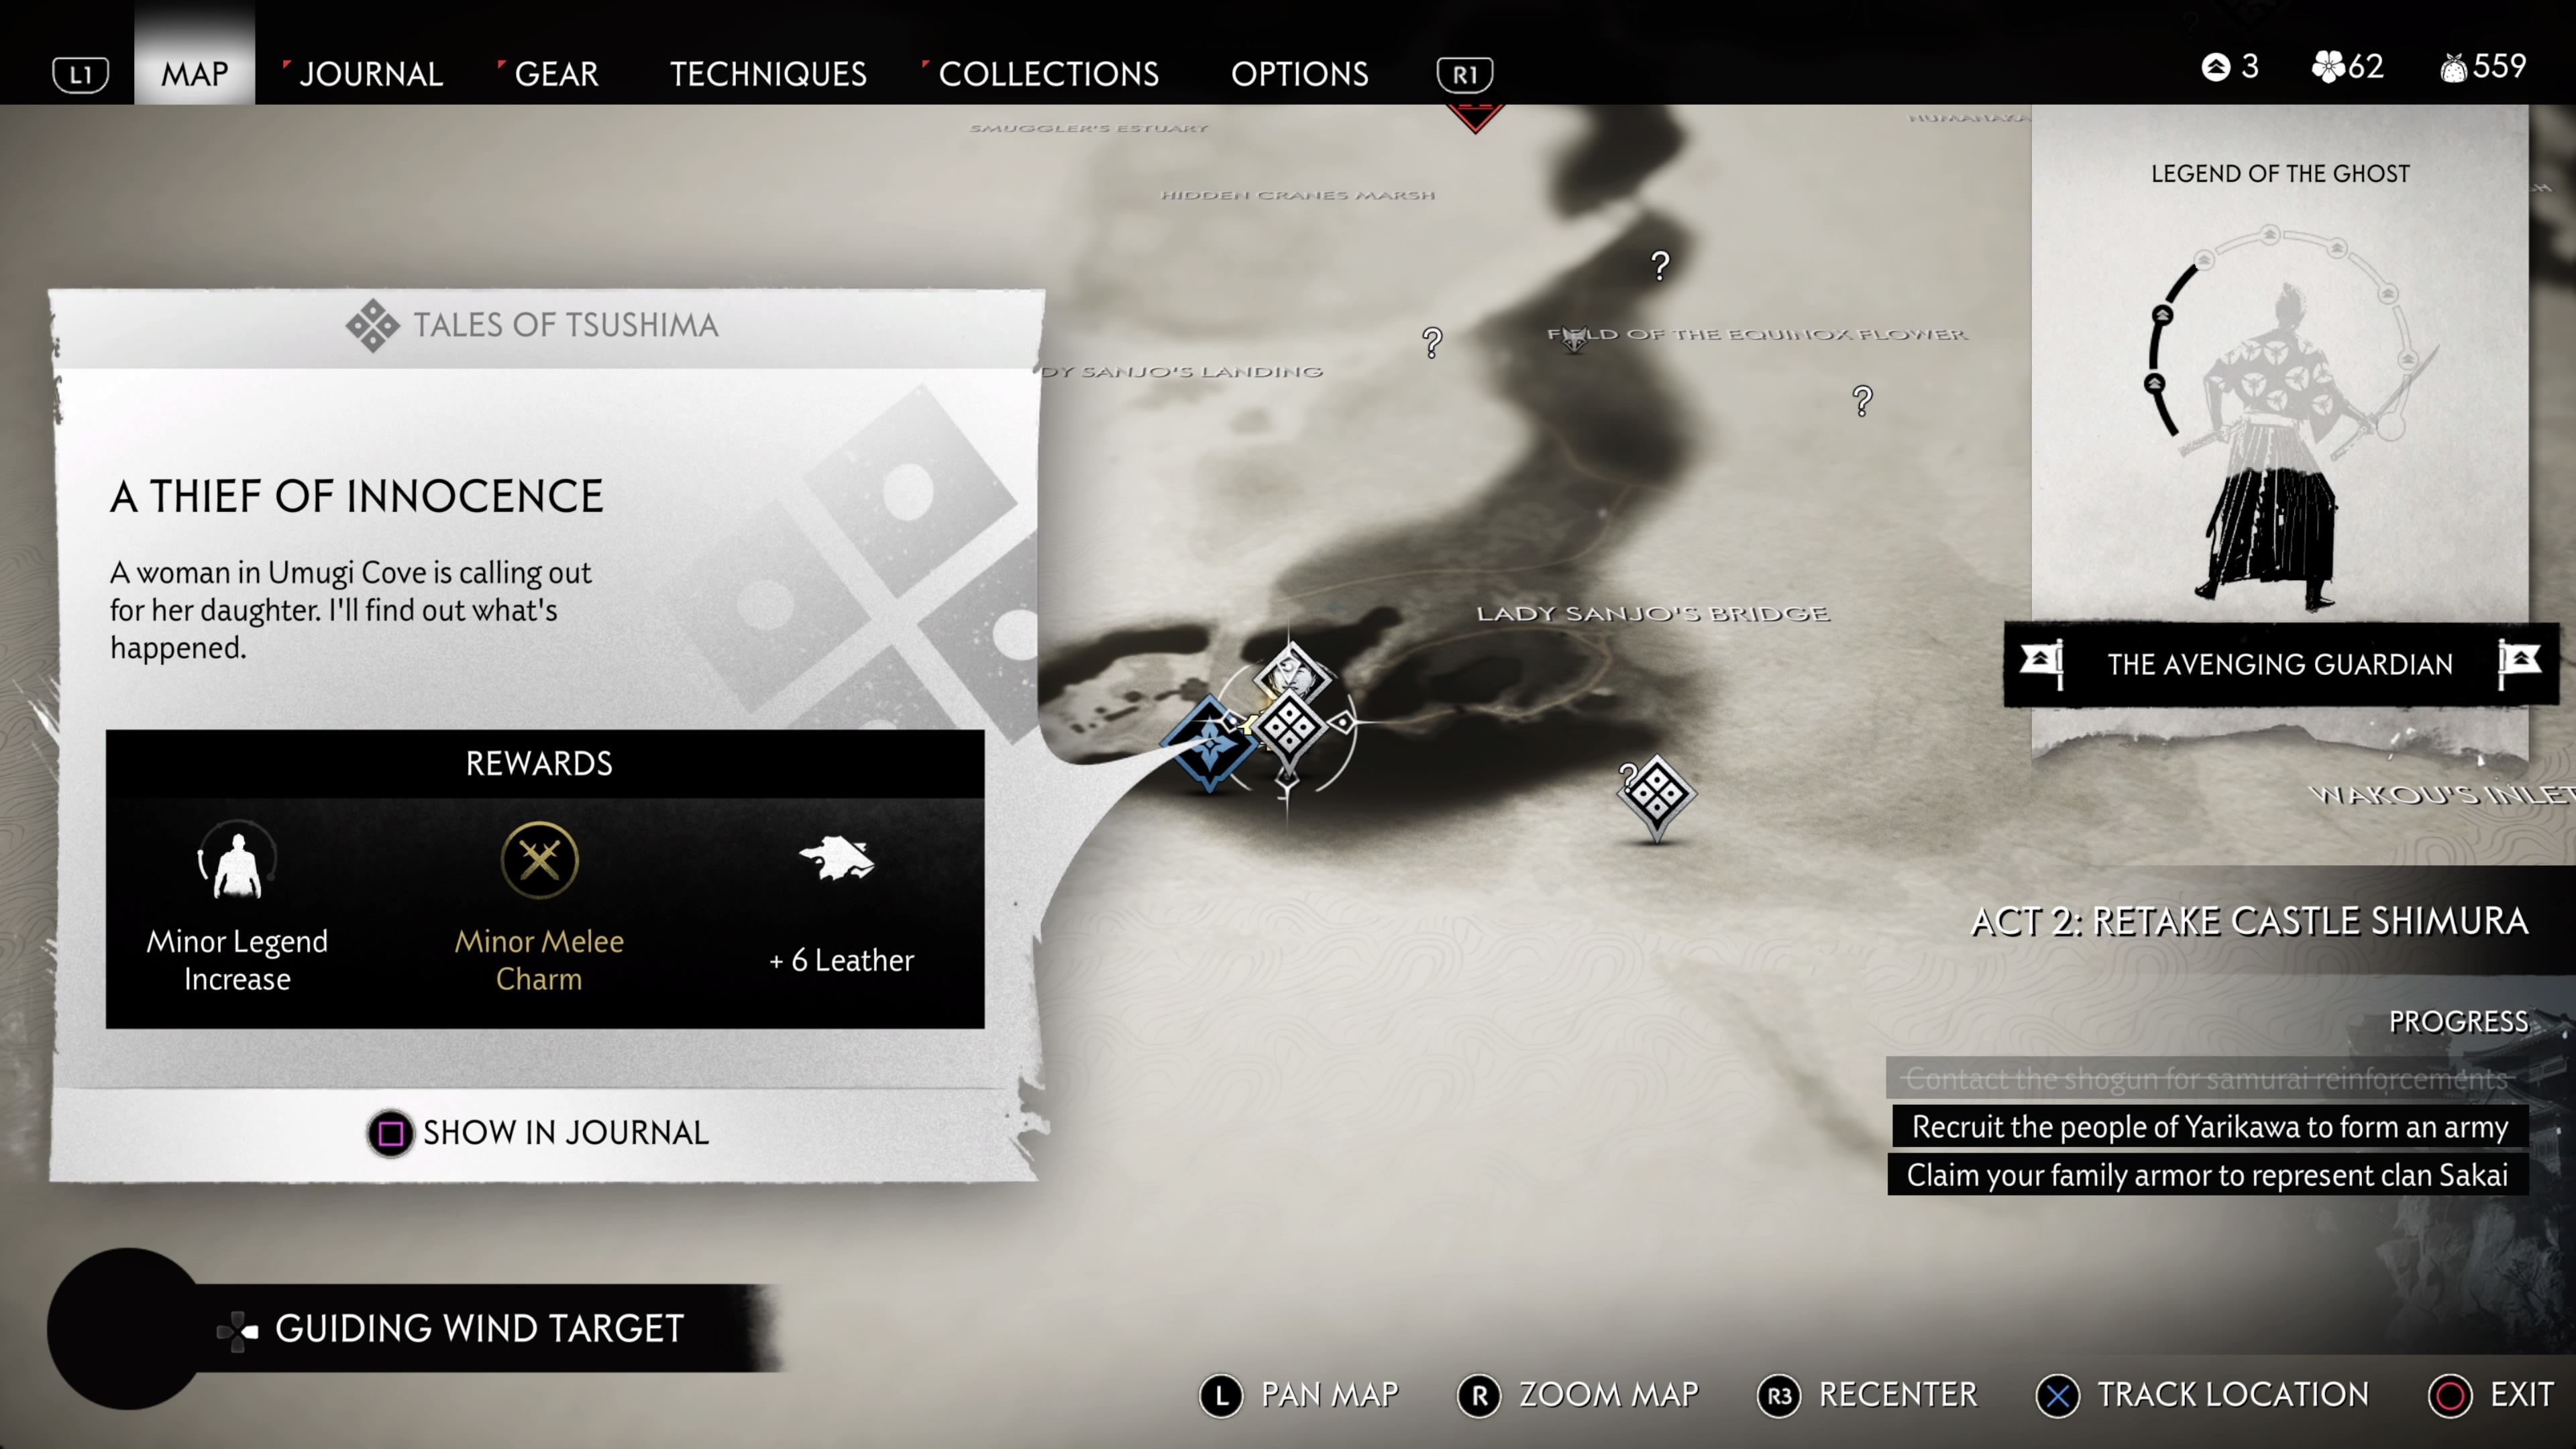
Location: Umugi Cove (a village at the southeast-most point of the Toyotoma region)
A Thief of Innocence unlocks after talking to Goro during the main story mission, A Message in Fire. Talk to the mother looking for her daughter, and then chat to some of the ronin hanging around Umugi Cove. Eventually, one of them will point you to Numanaka Inn. Follow the Guiding Wind to the inn's entrance and take out the bandits who have invaded. Once the coast is clear, free the kidnapped daughter and lead her to safety.
Peace for the Divine
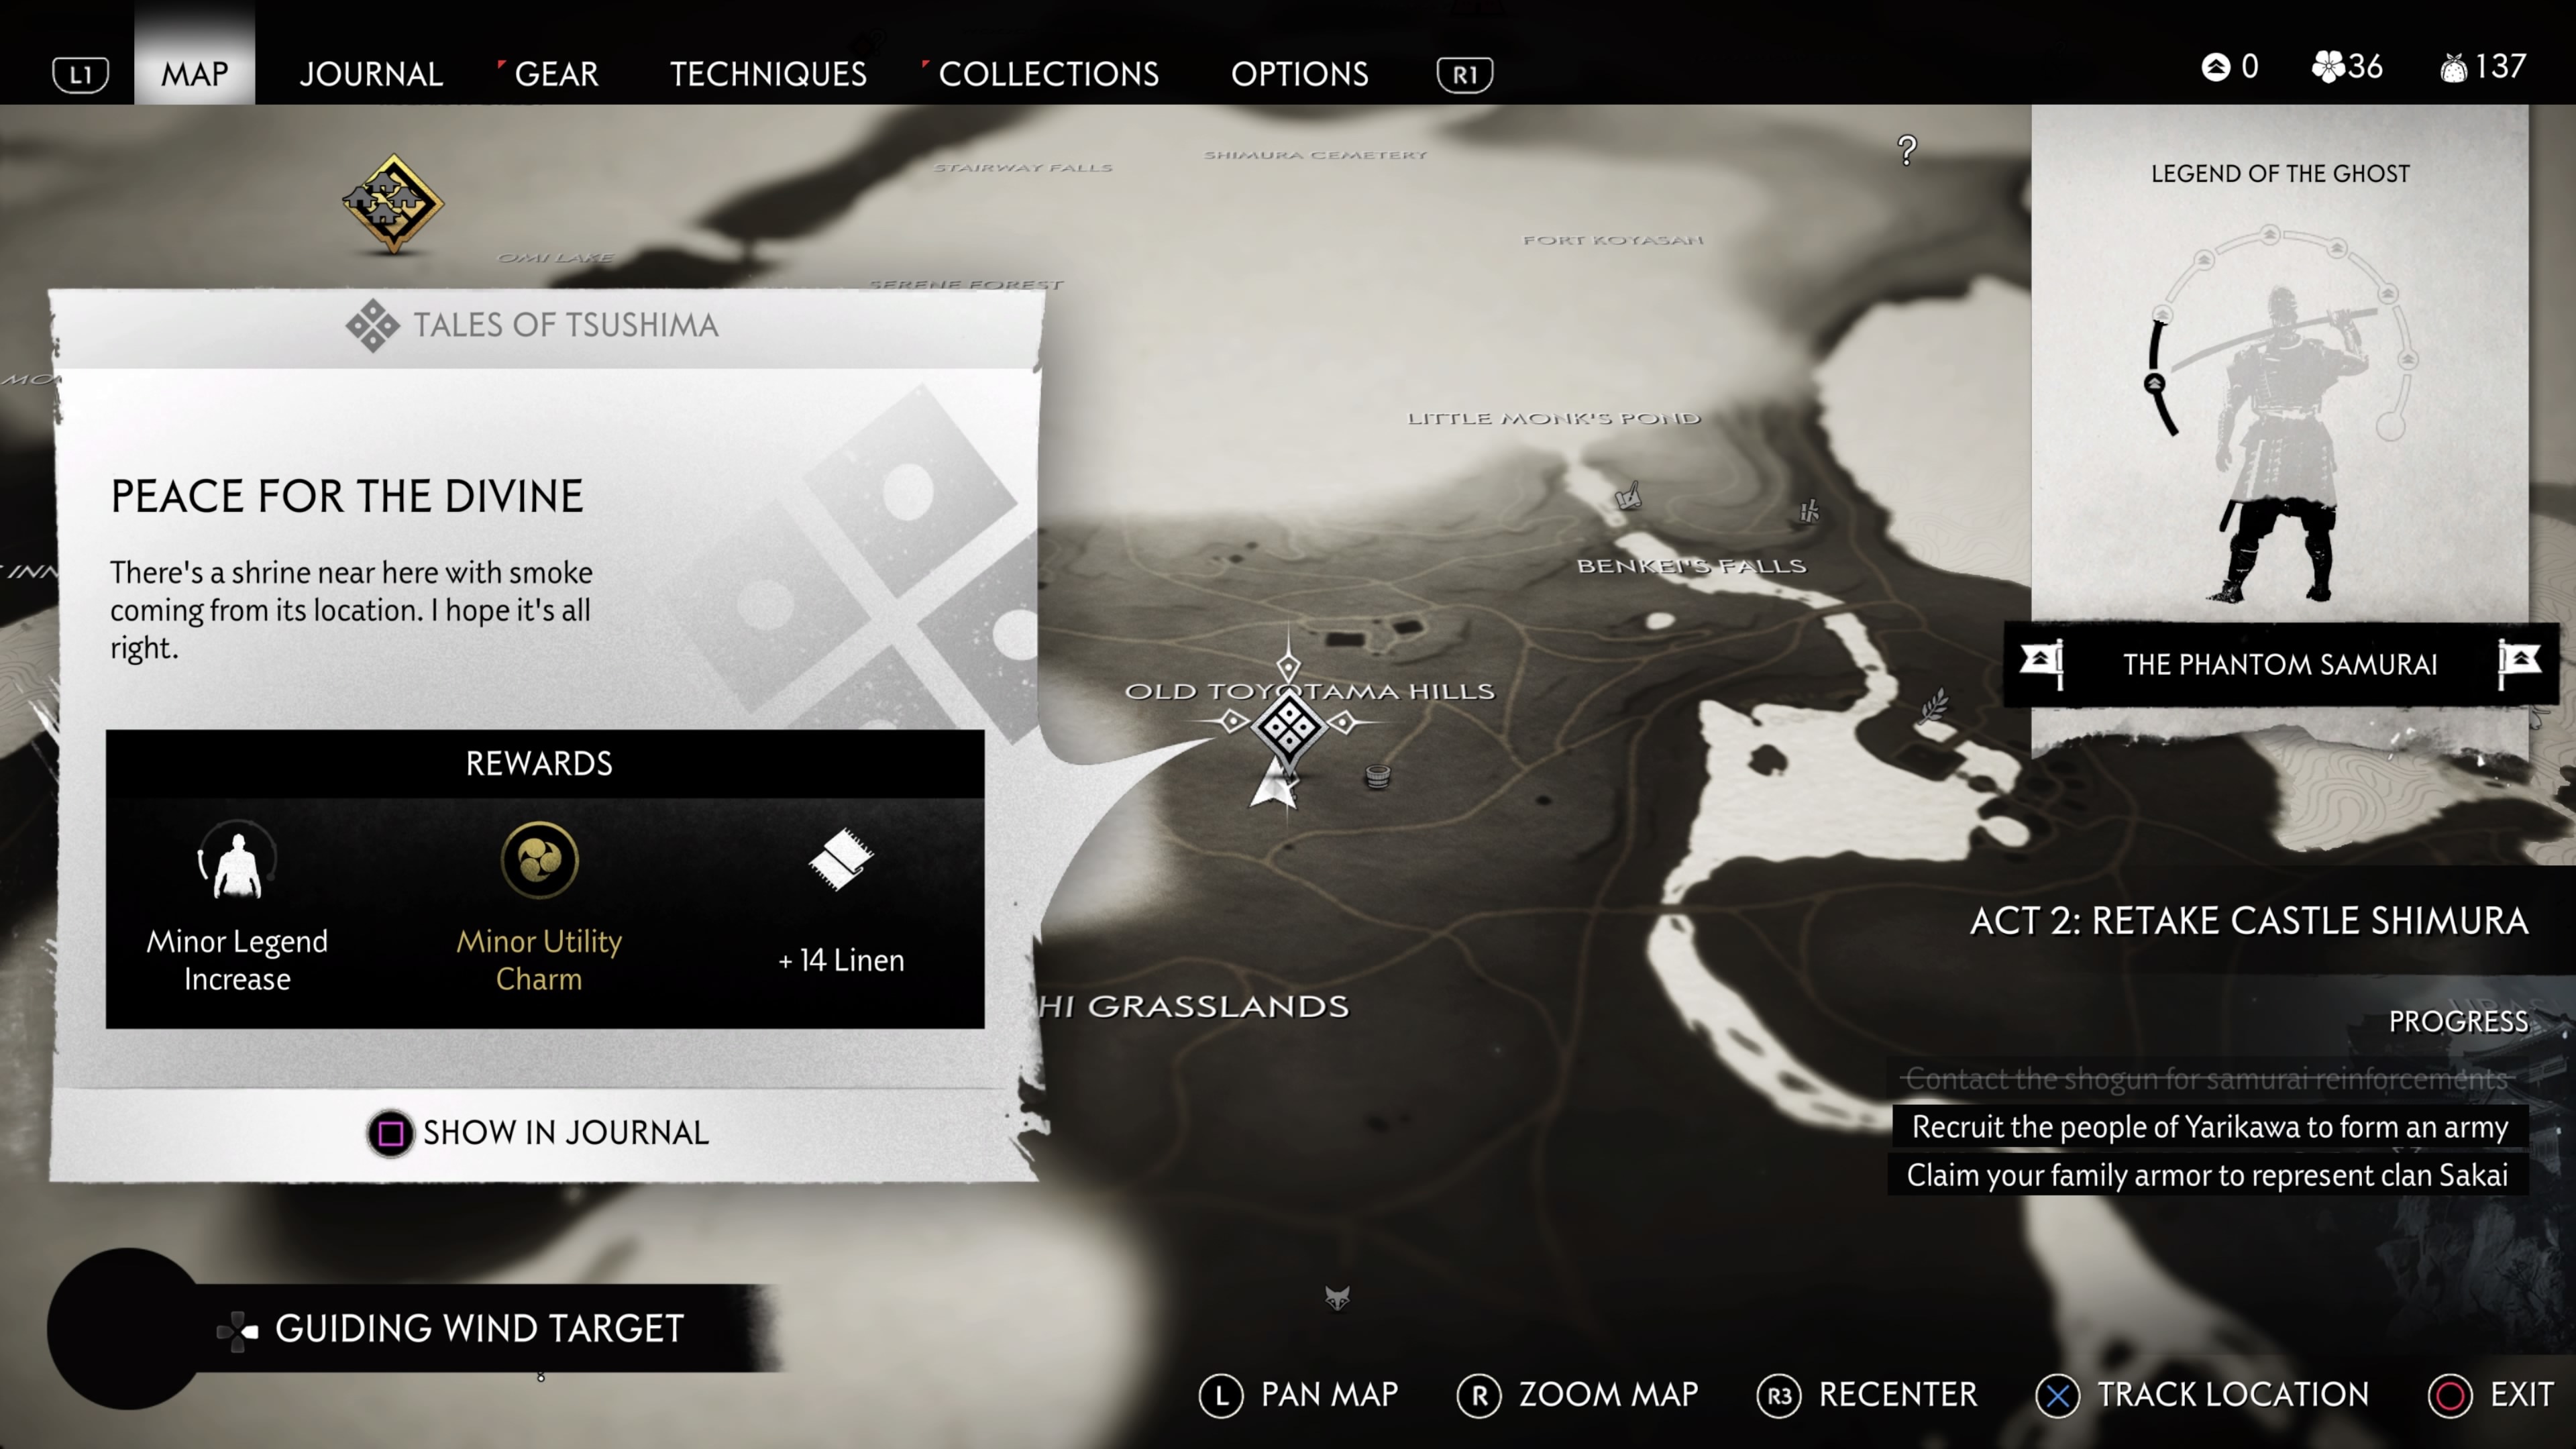
Location: Old Toyotama Hills
Peace for Divine is a fun little Tale. We won't spoil too many details about it, but you'll be once again following an ally and taking out some Mongols.
The Generosity of Lady Sanjo

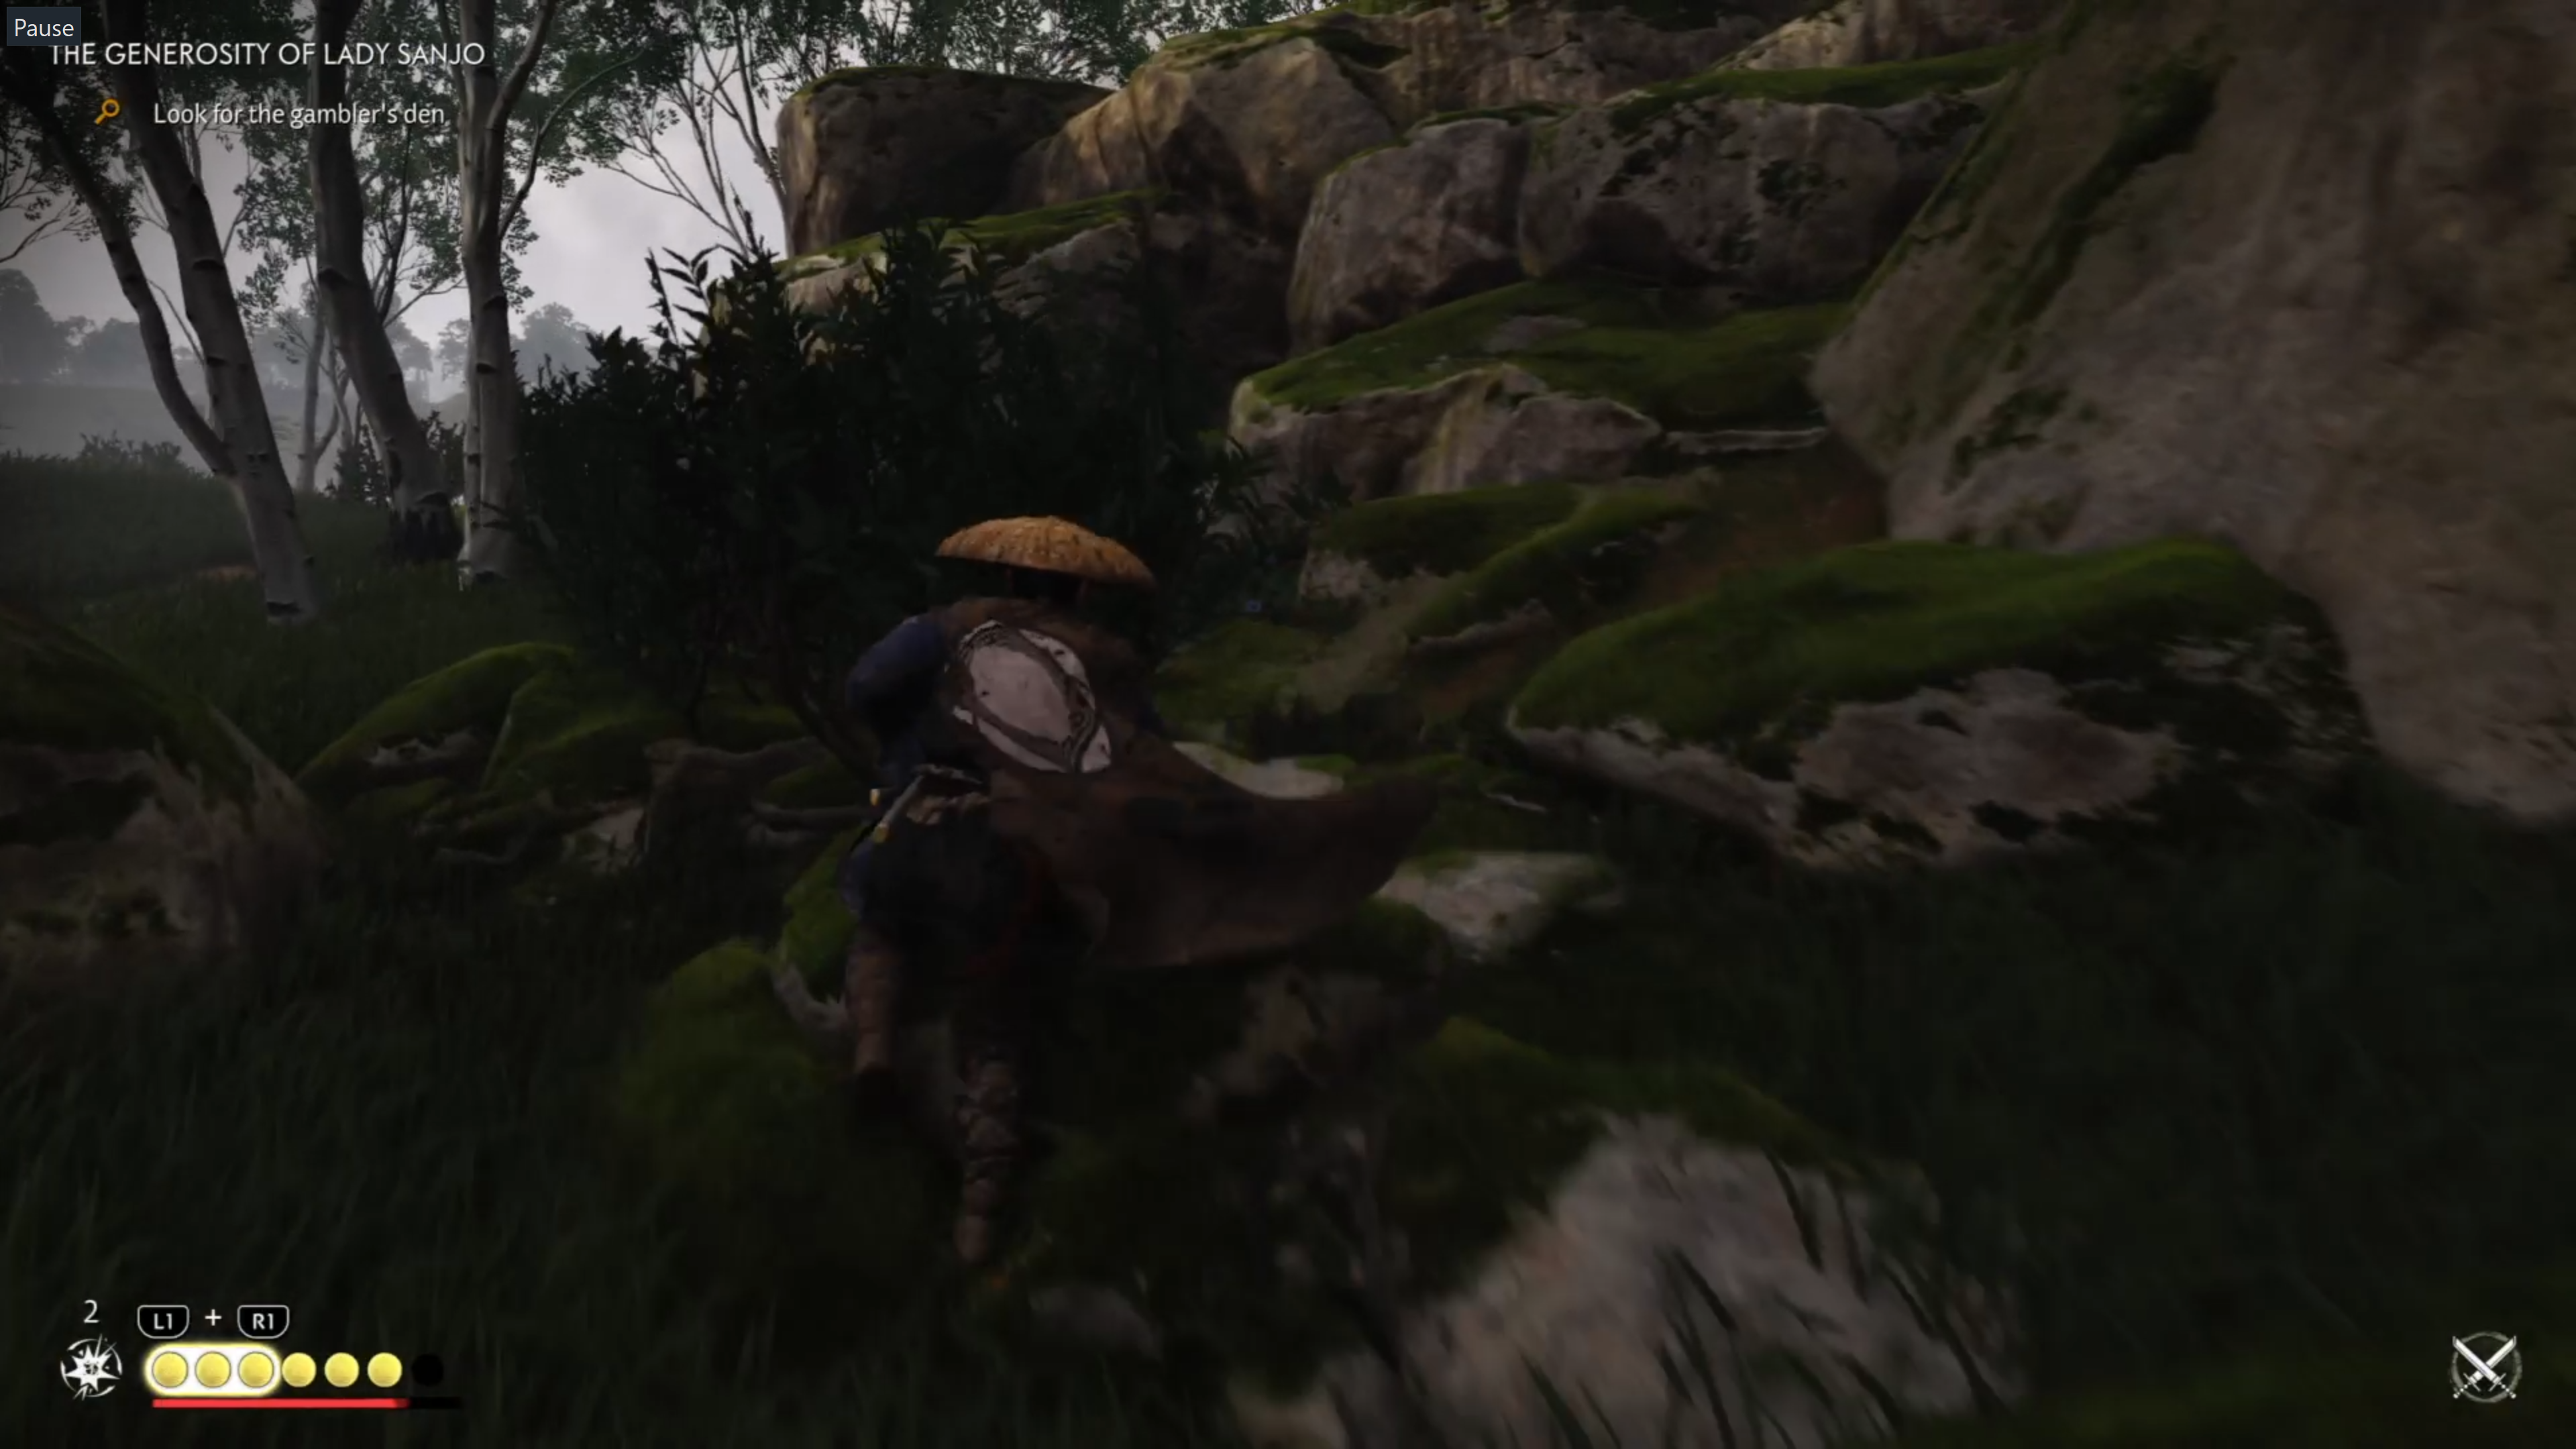

Location: Umugi Cove (a village at the southeast-most point of the Toyotoma region)
The Generosity of Lady Sanjo can be found in Umugi Cove, but it's not available after first unlocking the village. We're not entirely sure what specifically triggers it to show up, but we assume it unlocks after you leave the village and complete a few main story missions or Tales in the Toyotoma region. Regardless, come back frequently, and you'll eventually see it pop up where Lady Sanjo hangs out in Umugi Cove.
After you've chatted with Lady Sanjo, follow the Guiding Wind to the Three Paths Well. Once you arrive, go past the well and run left along the rock hill until you find some rocks to jump on. In the clearing, you'll see the gambler's den you're trying to track. Approach it to trigger a conversation with the man inside, who refuses to let you in. To get inside the gambler's den, turn around and jump on the rock leading to a tree you can use to grapple over to the roof. If you're at any point lost doing any of this, look at the screenshots above for reference.
Enter the gambler's den through the opening and talk to the man. Some ronin will barge onto the scene to attack, so deal with them. Once they're dead, return to Umugi Cove and talk to Lady Sanjo.
A Debt Repaid

Location: Directly southeast of Kawamata Village--just off the paths there, near the Black Dye Merchant
A Debt Repaid has you working with a bandit to fight some even worse bandits. Come to this Tale well-stocked on arrows and tools, as you'll be clearing a camp together. Do that, and this Tale will come to a close.
Kamigata Region
Once you start Act 3, you're well on your way to the end of the game. As such, there's only a small handful of Tales to complete--aside from the Character-focused ones, at least.
Fit for the Khan

Location: Jogaku Temple
As soon as you gain access to the Jogaku temple after completing the introductory missions of Act 3, you'll find this Tale's quest-giver standing outside the large red temple. He tells you of an armor he made for Khotun Khan with its pieces scattered across four different Mongol camps in the region. Like the Unbreakable Gosaku Mythic Tale, your job is to clear each camp to get all the key items you need. Fortunately, you won't have to look hard for them, as the locations of each Mongol camp are automatically highlighted on your map after ending your conversation with the quest-giver.
When it comes to clearing each camp of its Mongol presence, you're free to work your magic however you please. It's worth noting that two of the camps involve freeing hostages, while the other two have you clearing out Mongols and then defeating the camp's leader in a duel.
Once you've successfully acquired all four pieces, return to the quest-giver to earn your prize: the Mongol Commander's Armor. This gear set is super handy, as it allows you to disguise yourself from Mongols, slowing their ability to recognize you as a threat.
A Father's Choice

Location: North of Kin Falls
A Father's Choice has you helping a distraught father. It's pretty simple: follow the tracks, clear the enemies patrolling the area, and free the prisoner. Return to the father to end the Tale.
Hidden in Snow

Location: Slightly northwest of Sago Forest
Hidden in Snow has you investigating a mysterious town. After you see a man run away, investigate the buildings until you find one of the more friendly villagers greet you. Something is definitely off about this town, so head to the upper eastern section to find a couple of derelict buildings containing some clues to investigate. Once you've cleared through those, head to the lower western end to find a man who wants to talk to you. We won't say anything more, as this particular Tale is quite intriguing. Enjoy the rest!
The Cost of Fear
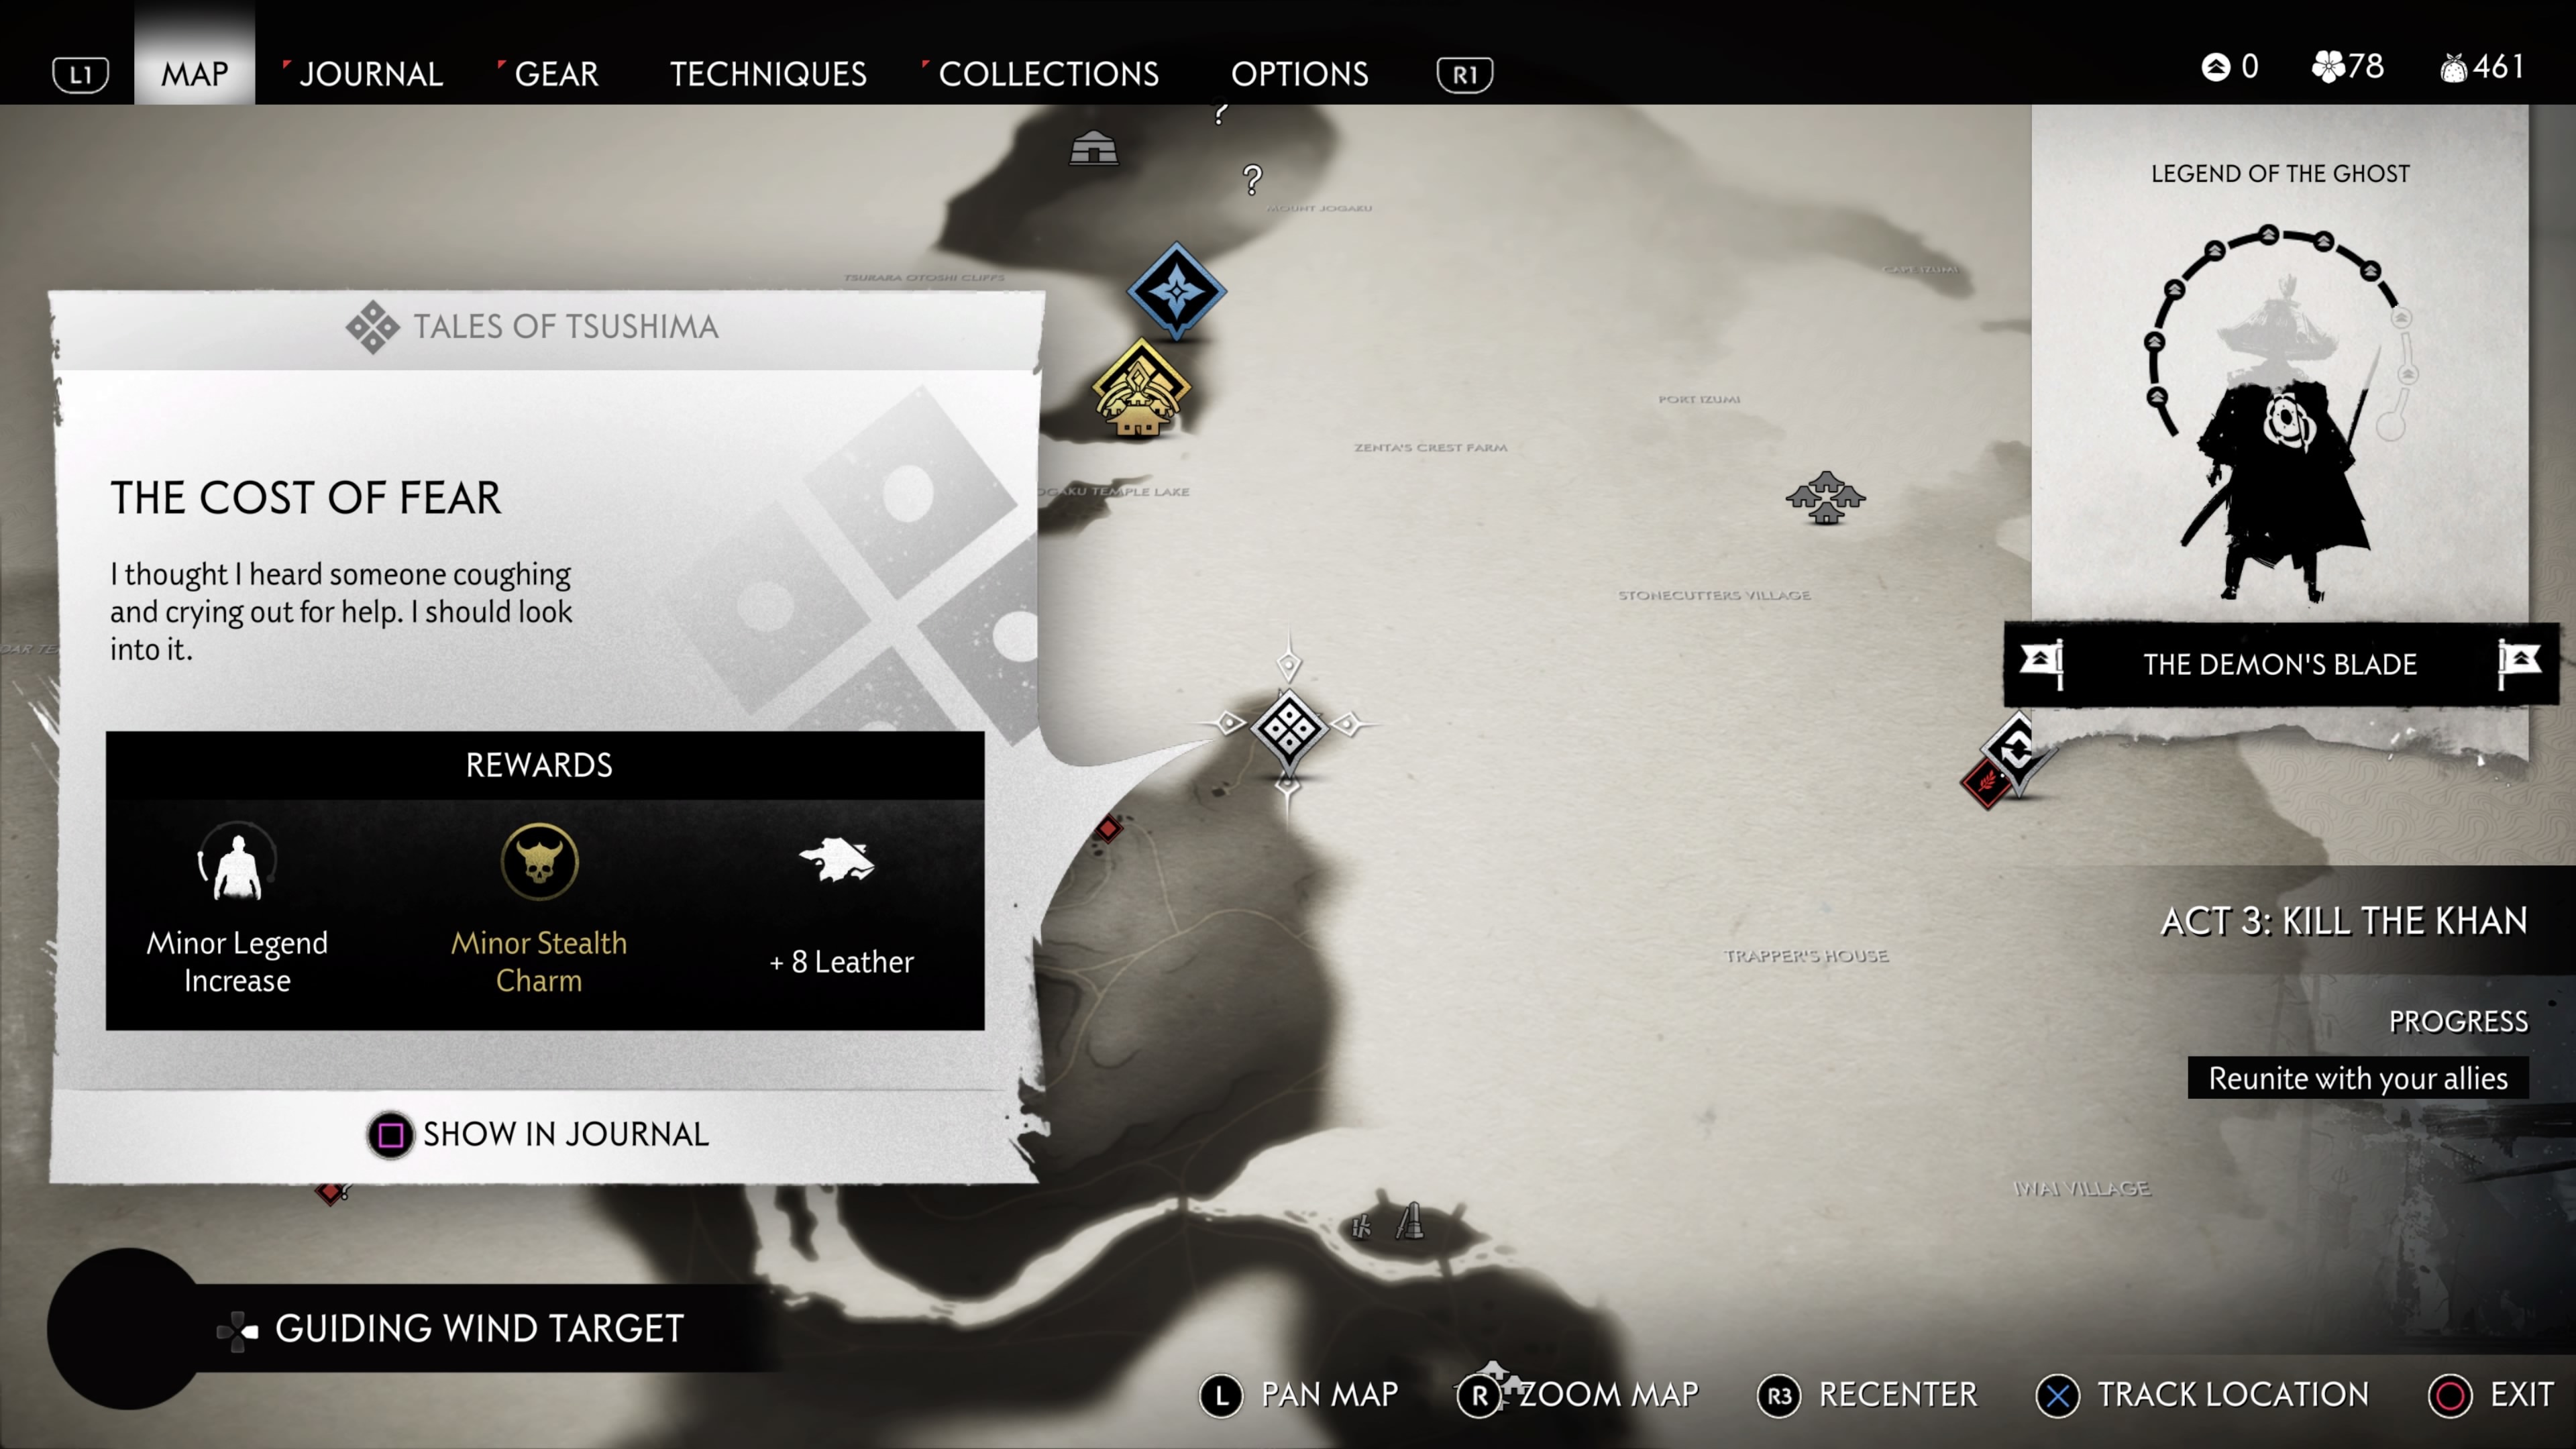
Location: Southeast of Jogaku Temple
You'll find the quest-giver for The Cost of Fear coughing up a storm. He asks you to help his family, who can be found in a small house just down the road. Try talking to the family, and you'll soon be directed to a Mongol camp nearby. Follow the Guiding Wind to the Mongol Camp, clear it, collect the resources you need to complete the section, and then return to the family to complete the Tale.
Character Tales
As mentioned, some Tales are associated with the game's supporting cast and dive deeper into their individual story arcs. These are multi-part questlines with some that last all the way until the end of the game. In terms of progression, new parts in a character's questline typically unlock after you complete whatever's currently available on the map. However, some arcs require you to push further into the main story to unlock more parts. Regardless, we've laid out everything you need to know about each Character Tale and when they unlock.
Sensei Ishikawa
The Sensei and The Student

Location: Sensei Ishikawa's Dojo
The Sensei and the Student is unlocked by completing The Tale of Ishikawa main story mission. You'll spend this Tale following Ishikawa, killing Mongols, and tracking more Mongol troops to a village where they're holding some hostages.
The Past Never Passes

Location: Sensei Ishikawa's Dojo
The Past Never Passes is unlocked by completing The Sensei and the Student. Start the Tale first by surveying the area and then follow the Guiding Wind to the various archer locations, slaughtering any Mongols you find along the way. There are way more archers in this particular Tale, so make sure you're dodging at the right time after they initiate their firing call. If you've got the technique that allows you to block arrows, then all the better to defend yourself with as you approach them to inflict some killing blows.
The Way of the Bow

Location: Sensei Ishikawa's Dojo
The Way of the Bow is unlocked by completing The Past That Never Passes. This Tale starts with a Mongol ambush; expect spearmen, shield troops, and archers. Once they're dealt with, follow Ishikawa downhill until you reach an area where you'll be briefly introduced to Flame Arrows. This handy new ammo type can set grass on fire, which can damage enemies caught in range of the affected area. You can also just fire them directly at enemies for a pretty gnarly insta-kill.
Soon enough, a wave of Mongols will start running down the hill, so you need to use what you've got to defend yourself and thin their numbers. There are some explosive barrels around to help maximize the damage you're doing, but you're mostly going to have to rely on your archery skills to get past this conflict. The Concentration technique is handy during this section, as it helps buy you some time to line up crucial shots. Lastly, pay attention to your ammo count and make sure to restock often as you're running about picking off Mongols and slicing them to pieces. Keep at it, and you'll be through this before you know it.
Dreams of Conquest

Location: North of Hakutaku Forest
Dreams of Conquest is unlocked upon reaching the Toyotoma region during Act 2. Reach the Survivor Camp north of Hakutaku Forest and talk to the man holding a baby. He'll direct you to Ishikawa's current location; follow the Guiding Wind to an ambush in progress on the poor sensei. Quickly dispatch the Mongol archers and talk to Ishikawa--a discussion cut short as more Mongol archers will soon attack you. After the conflict is over, follow Ishikawa to a camp where you'll fight more Mongols. Investigate all the clues in the camp to complete the Tale.
The Ghost and the Demon Sensei
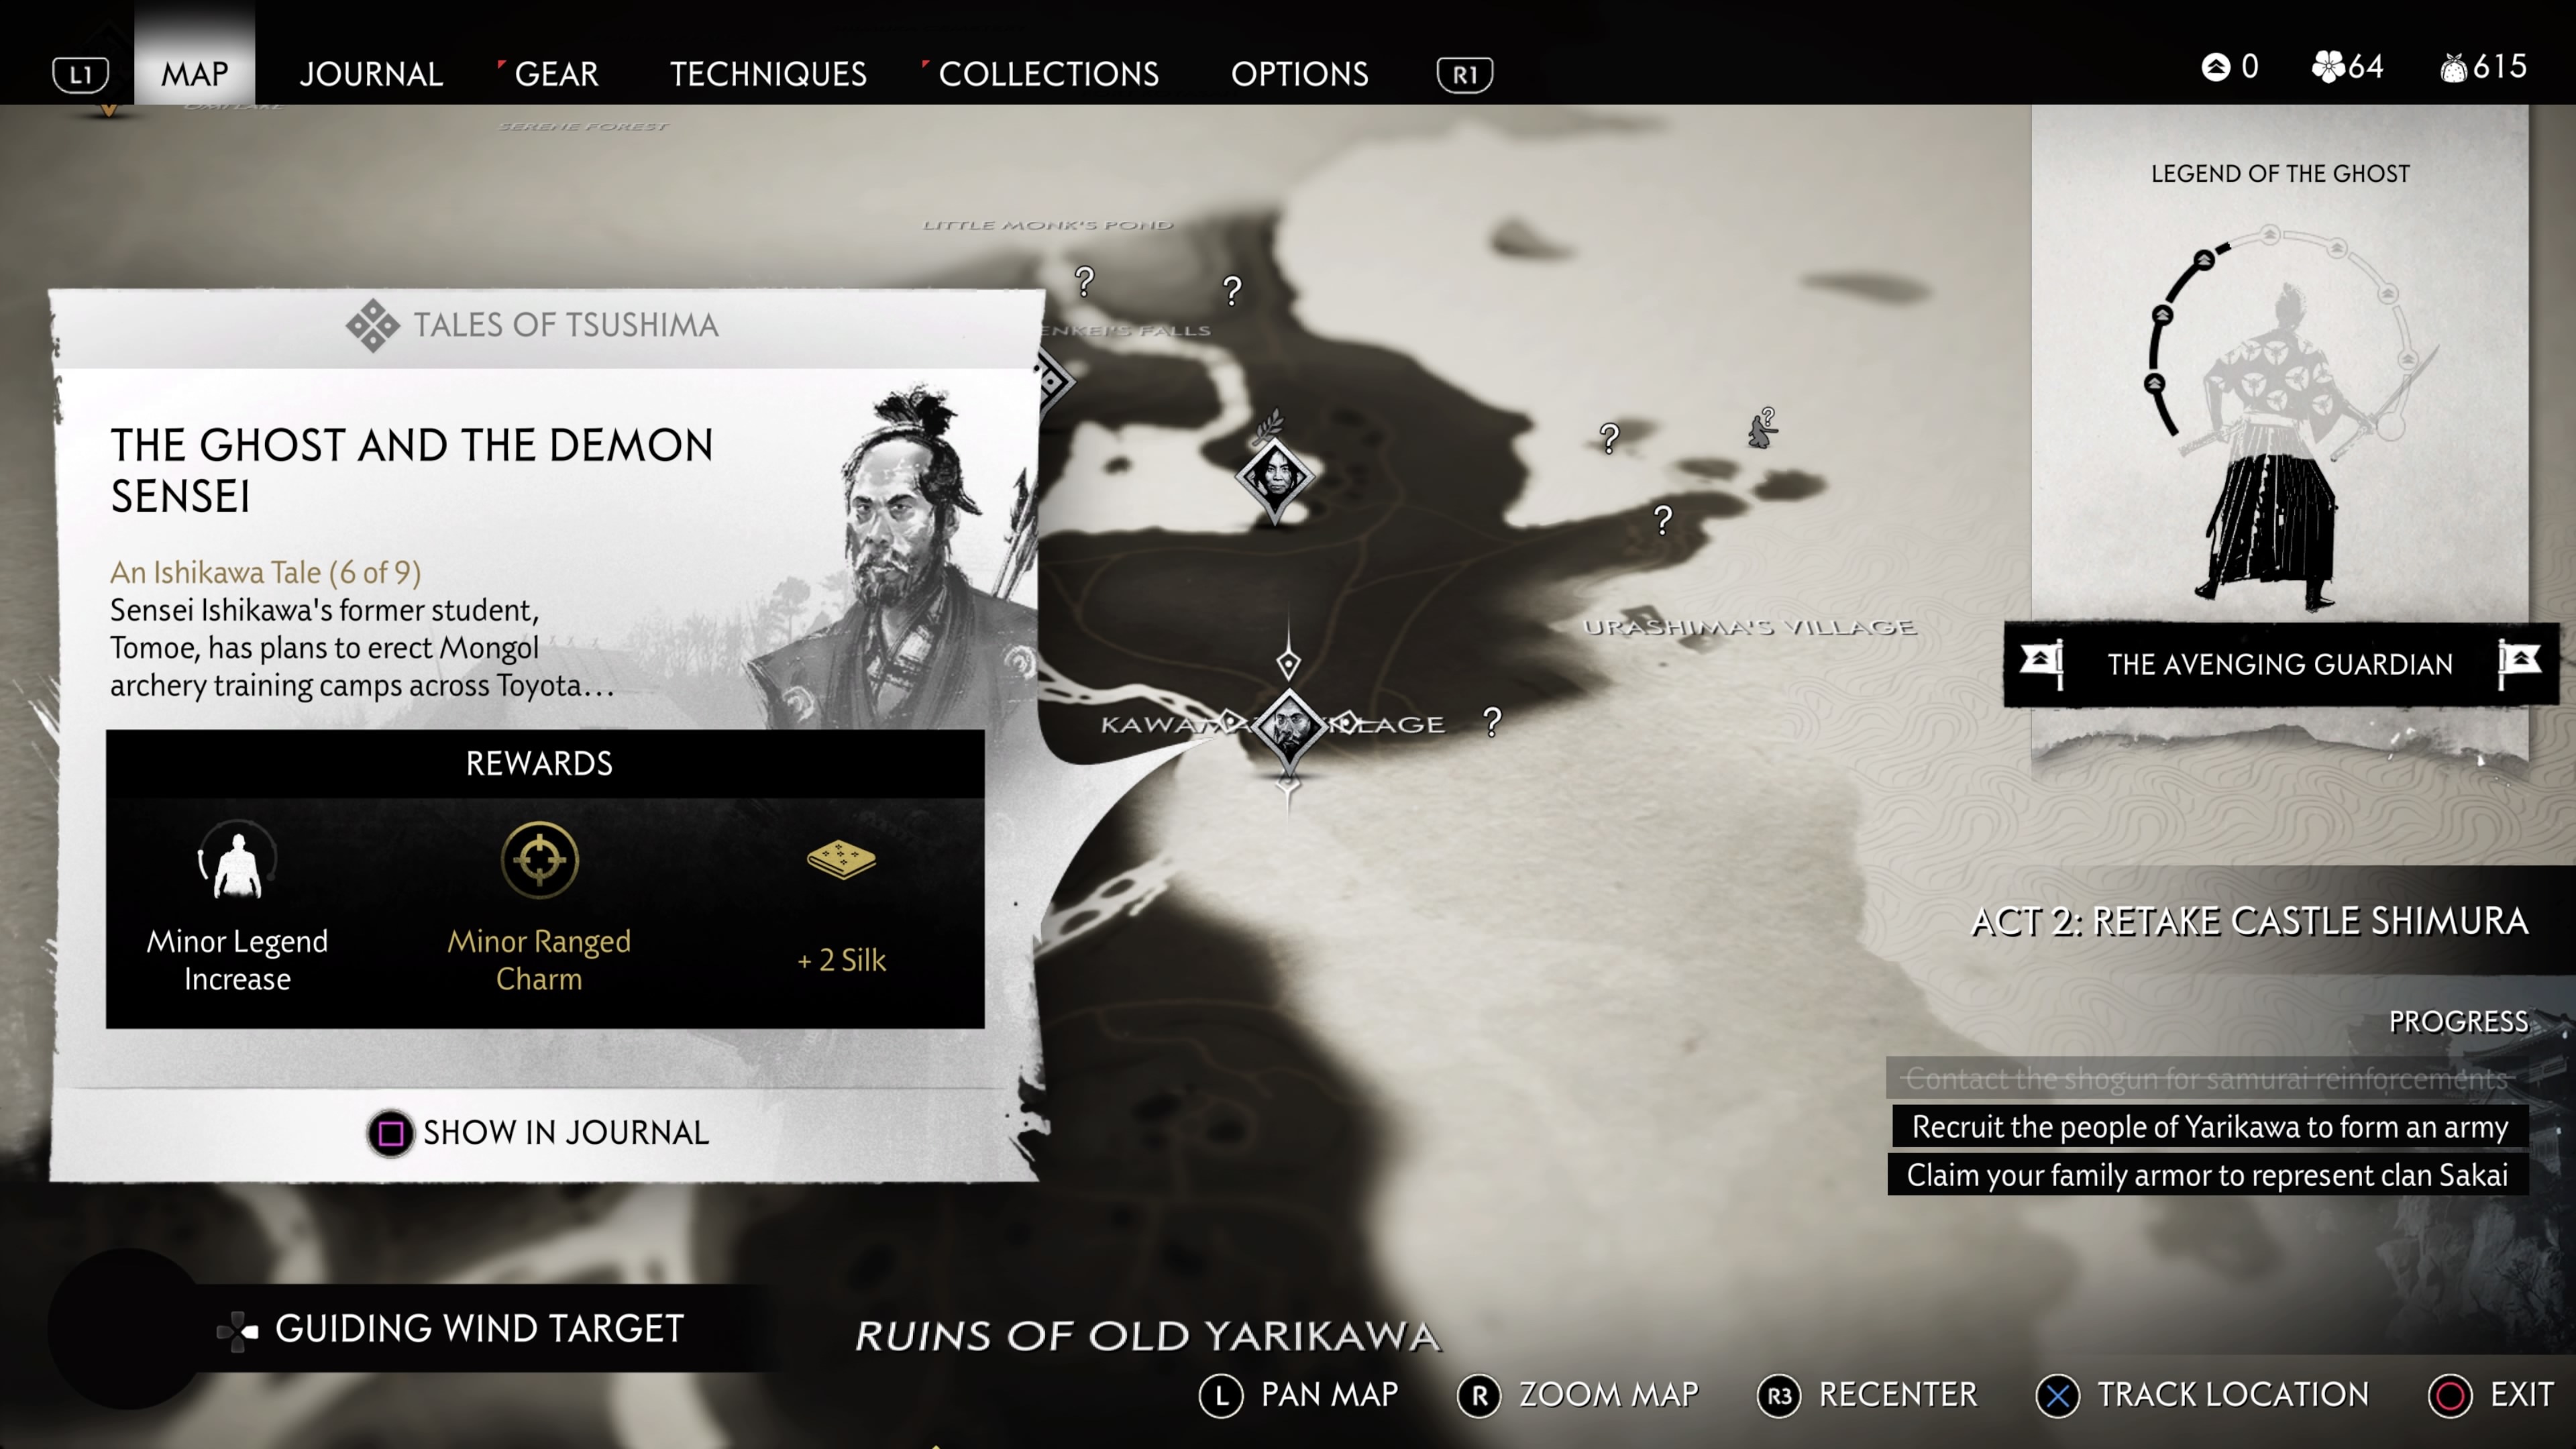
Location: Kawamata Village
The Ghost and the Demon Sensei is unlocked by completing Dreams of Conquest. Speak to the man bowing in terror at Kawamata Village and then follow the Guiding Wind to a lookout tower at the Old Toyotama Hill where Ishikawa is holed up. Take out all the archers ambushing the tower and then climb up to talk to Ishikawa.
Follow Ishikawa, investigate a grizzly murder scene, and then follow the tracks on horseback up to a Mongol camp. Unfortunately, an ambush awaits, so get out your bow and fire some concentration shots on the archers attacking from the cliff. Once they're done and dealt with, the Tale will end.
The Terror of Otsuna

Location: West of Old Toyotoma Hills
The Terror of Otsuna is unlocked by completing Dreams of Conquest. You'll find Ishikawa hanging out at a village to the west of Old Toyotoma Hills. Speak with him and follow alongside him on horseback until you reach a Mongol archery training camp.
Ambush the Mongols first with Explosive Arrows and Black Powder Bombs, and then jump down to clear the rest. Investigate the dirt path leading into the camp to find some horse tracks, which will cause Ishikawa's apprentice Tomoe to come out of hiding. Pursue her on horseback until you reach a cliffside. Return to Ishikawa to end the Tale.
Friends in Passing

Location: North of Jogaku Temple Lake
Friends in Passing is unlocked by completing the Wolves at the Gates story mission during Act 3. Talk to Ishikawa at the front gate of Jogaku Temple and then follow the Guiding Wind towards the eastern section of the Jogaku prefecture at a point south of the Trapper's House. Investigate the Mongol convoy when you arrive, and then follow the woman you meet there as she inspects her traps. The path forward is mostly story-focused up until a fight near the end against some Mongols, so sit back and enjoy the ride.
Laid to Rest
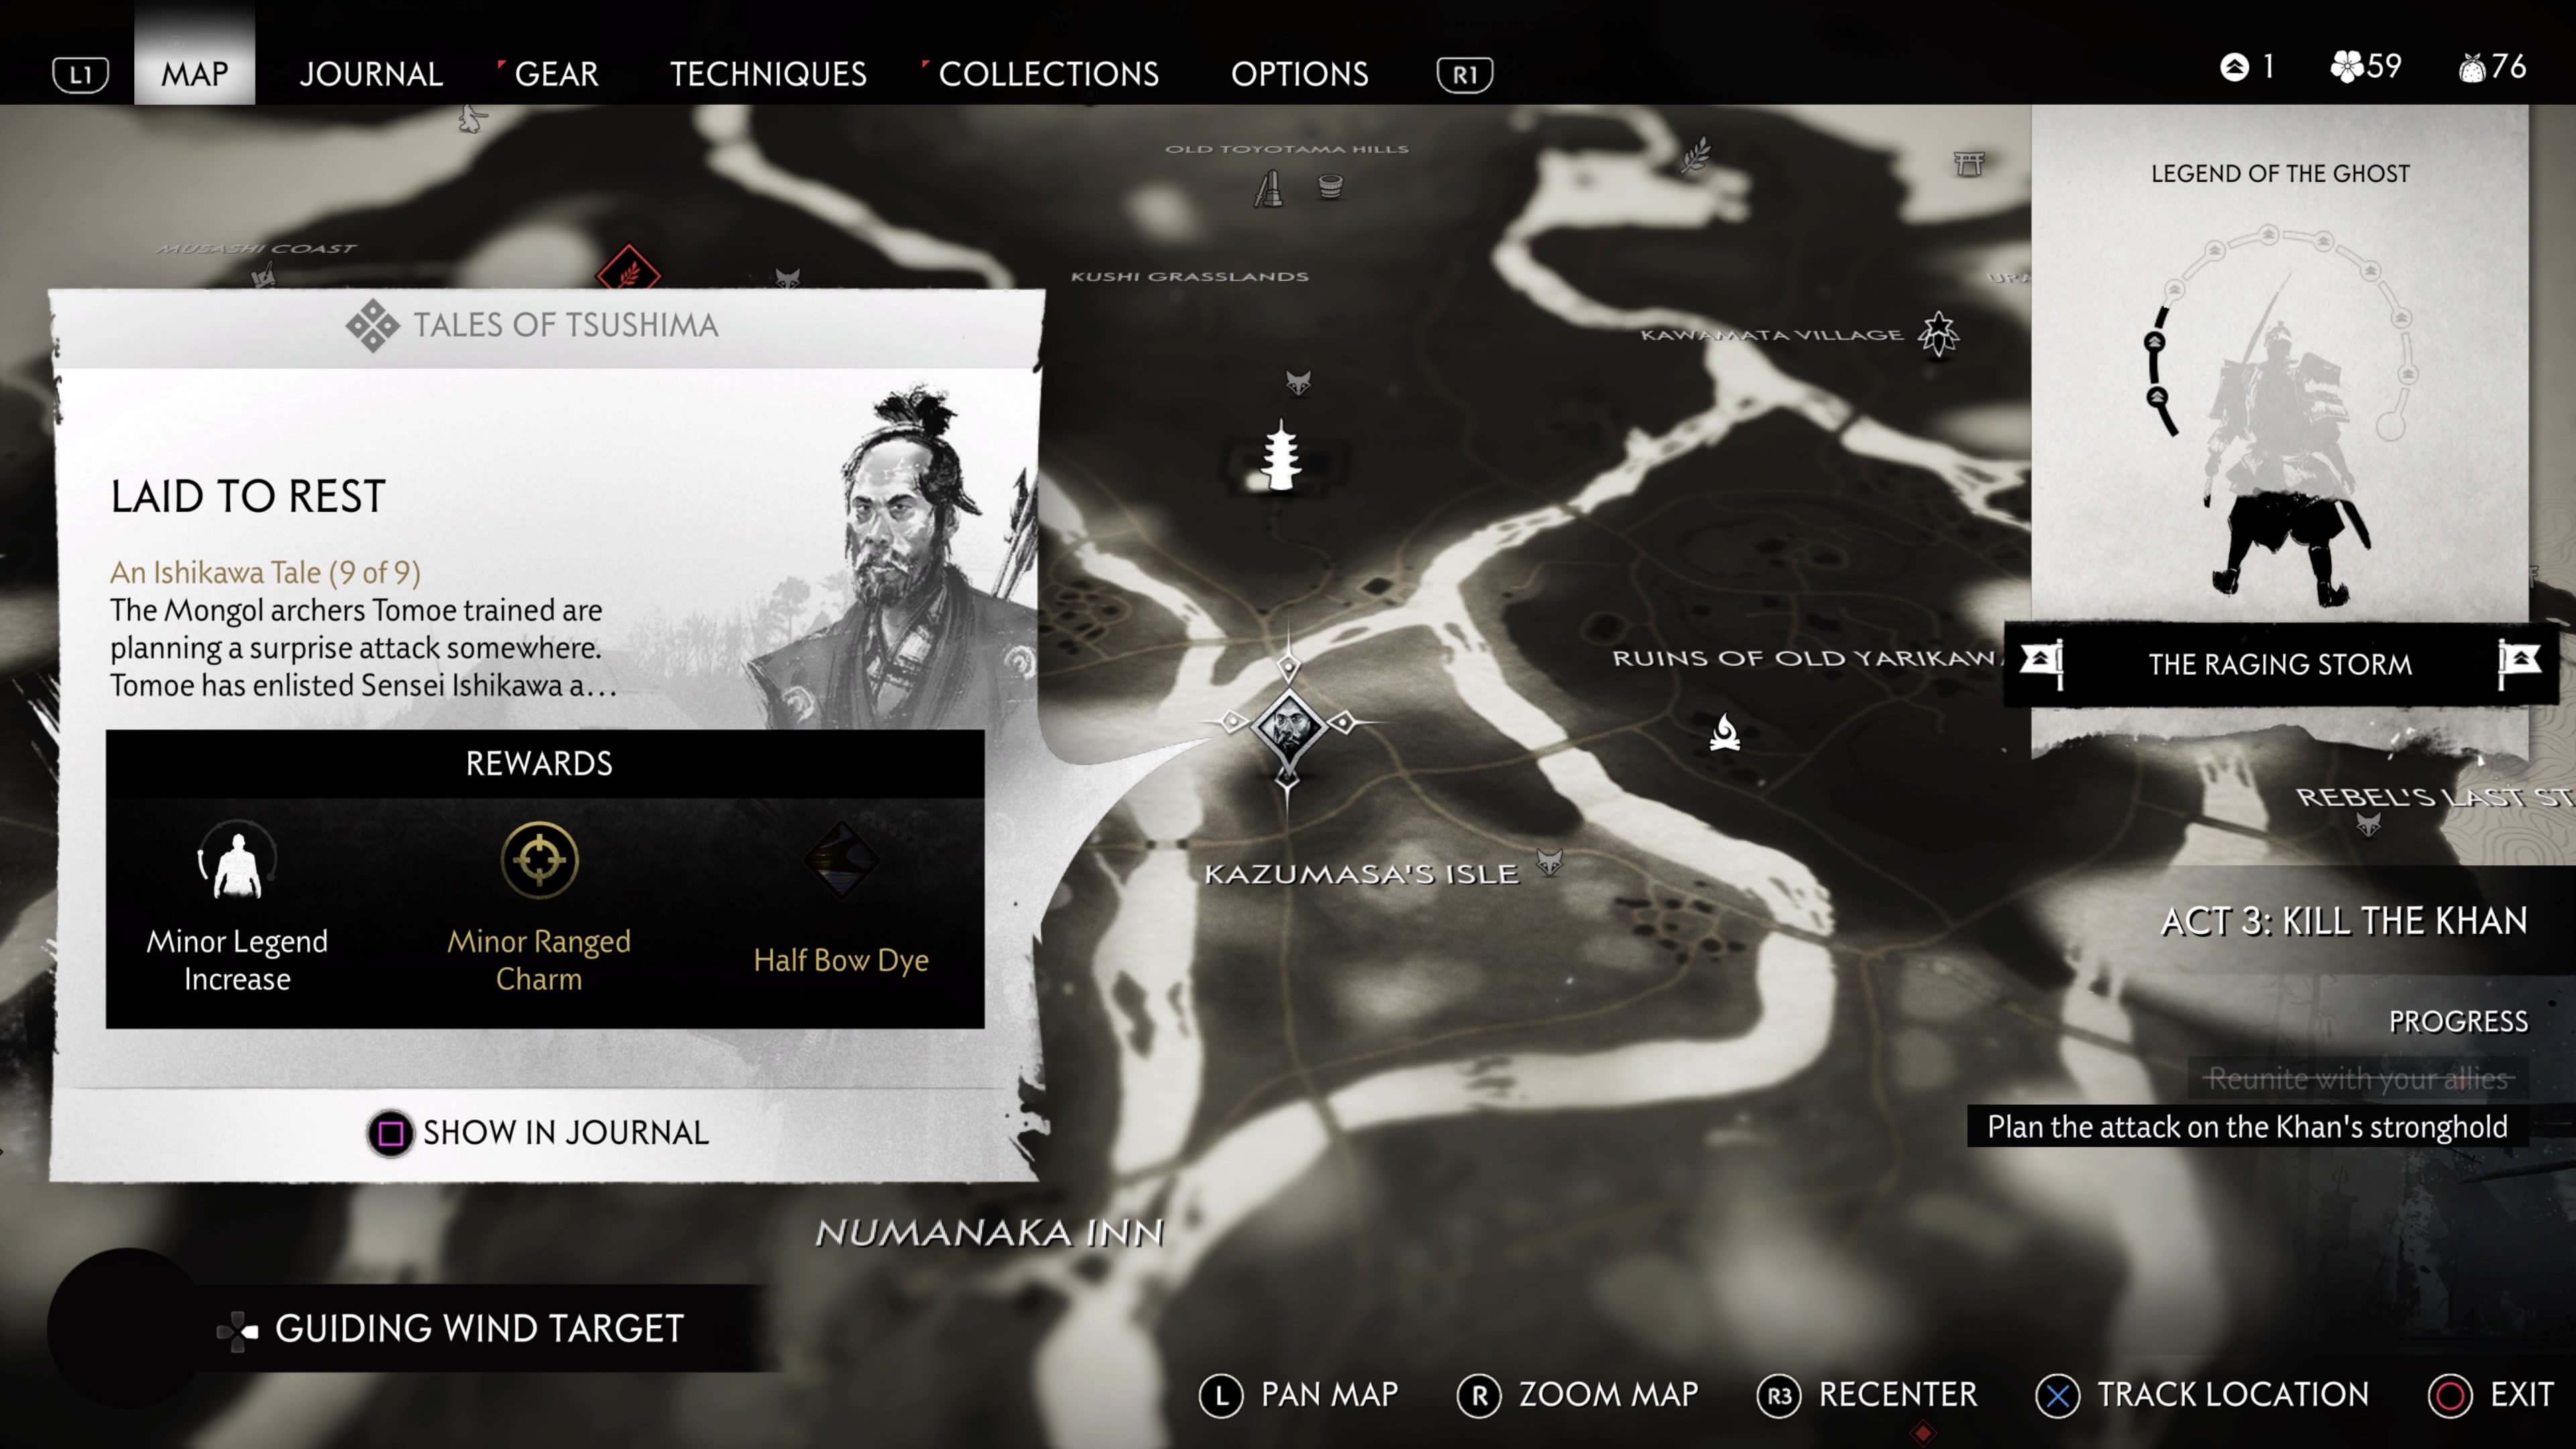
Location: North of Kazumasa's Isle (in the Toyotoma region)
Laid to Rest is unlocked by completing Friends In Passing. Meet up with Ishikawa at a burned-down village near the Umugi prefecture border, north of Kazumasa's Isle. Ride with him until you end up at the gambler's den you visited during The Generosity of Lady Sanjo. Meet up with Tomoe and follow alongside them as you fight against a barrage of Mongol ambushes.
Eventually, you'll start sneaking your way towards Umugi Cove. Follow their directions and sync your bow shots with both Ishikawa and Tomoe at the key moments. You'll then need to find a way through the bog to get into Umugi Cove without being seen. We recommend taking the route to the left, using any tall grass you encounter along the way as cover.
Once you're through sneaking, you'll have to ambush some more Mongols, so get ready for a fight. After all the danger is gone, follow Ishikawa to Umugi Cove to end the Tale.
Masako
The Headman

Location: The Golden Temple
The Headman is unlocked by completing The Tale of Lady Masako main story mission. Meet Masako at the Golden Temple and follow her out to find Hachi. Follow the road to find him when Masako loses his trail; use the cliffs to continue your pursuit and remain out of sight. When Hachi meets with the bandits, you'll need to trail them instead, but it's easy enough to stick with them. As you approach where they're staying, Masako will run out and engage the entire group, so get ready for a fight. Taking out the archers will make it a bit easier, so focus on them first. Afterward, head into the house to find Hachi's note and interrogate the woman who waits inside to end the quest.
The Husband

Location: The Adachi Estate
The Husband is unlocked by completing The Headman. Talk to Hina in the house and then follow Masako outside to a sitting area. Some commotion will break out, causing you to backtrack to Hina, who has now been shockingly murdered in cold blood. Investigate the scene for some clues and then follow the tracks of Hina's murderer down the path out the estate. You'll find some Mongols to kill at the end, so dispatch them and talk to Hina's murderer to end the Tale.
The Traitor

Location: Survivor Camp way south of the Hidden Spring Forest
The Traitor is unlocked by completing The Husband. Talk to Junshin, the monk, and then speak to Masako afterward. Follow alongside her to the Ariake Lighthouse and fight the bandits who have set up shop there. There's a decent variety of enemies out here, so make sure you're taking out the archers first and then effectively fighting the rest using the appropriate weapon stances. Once everyone is dead, climb to the top of the Lighthouse and talk to Masako.
The Fool
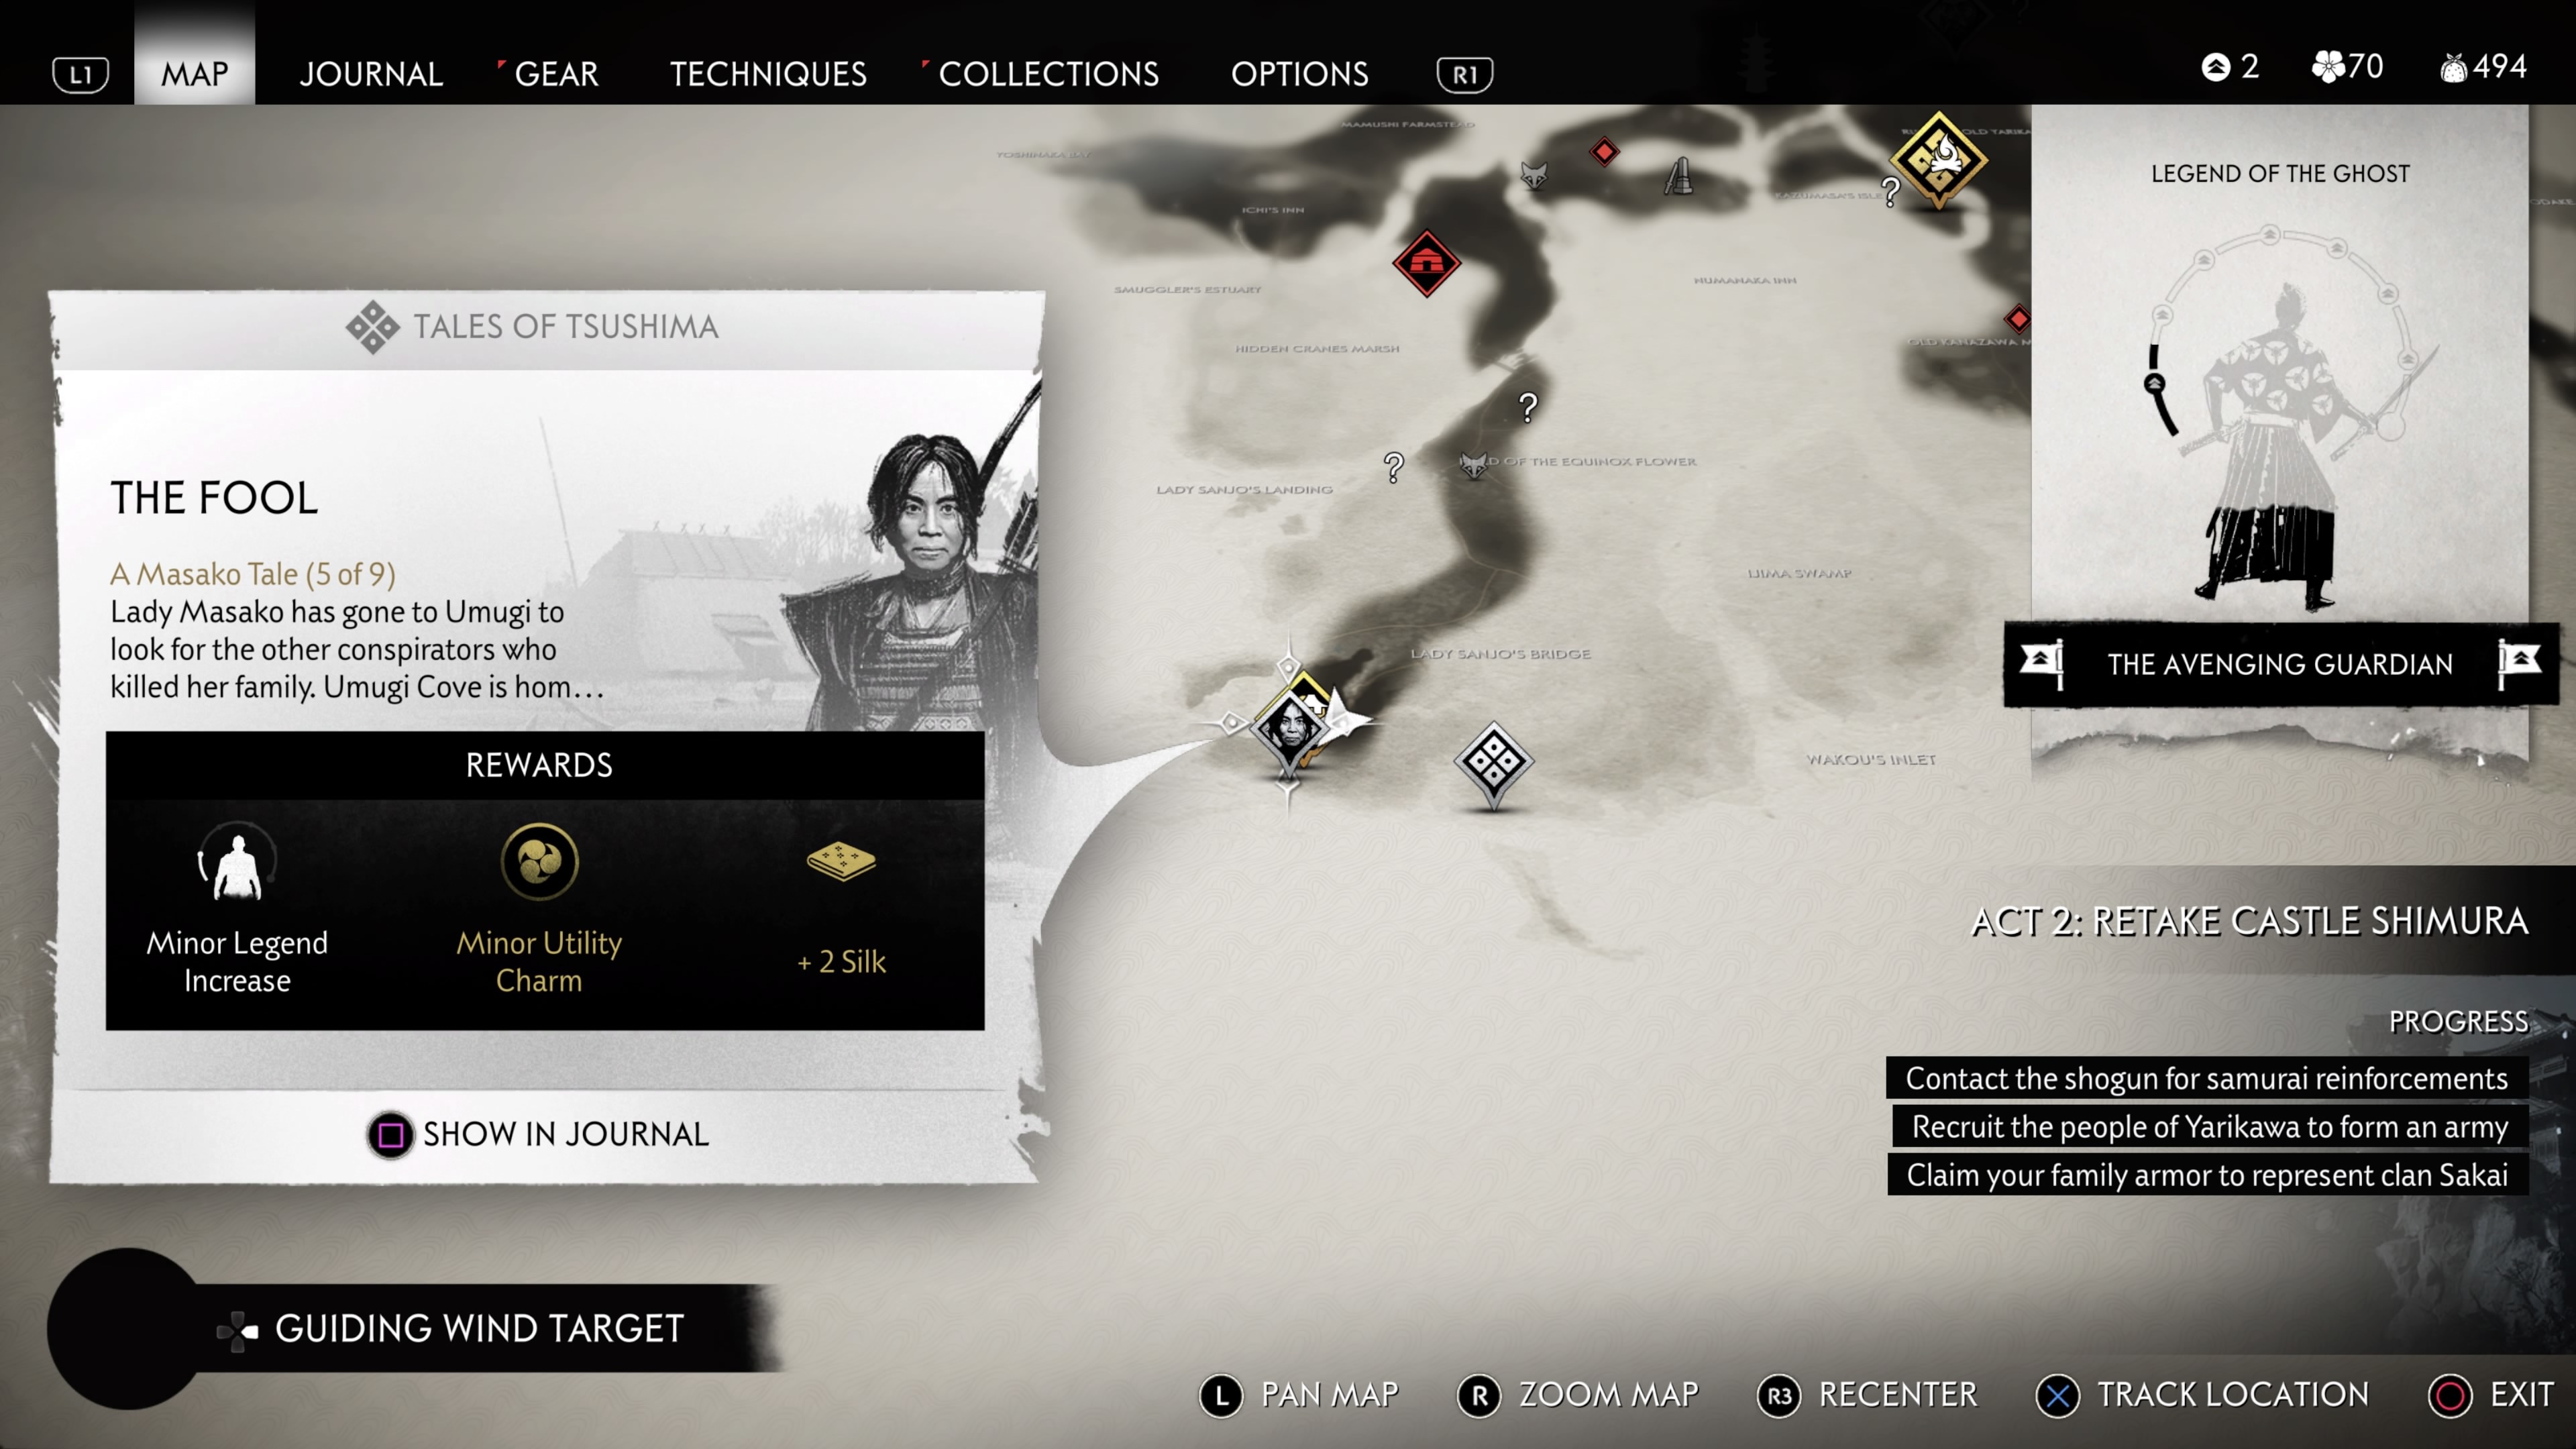
Location: Umugi Cove (a village at the southeast-most point of the Toyotoma region)
The Fool is unlocked upon reaching the Toyotoma region during Act 2. However, you must get past the initial section of the story mission, A Message in Fire--which automatically triggers when you arrive at Umugi Cove for the first time--before you can start the Tale. It's worth noting that the icon for The Fool will seem to disappear after starting the story mission, but don't be fooled, as you can still track the Tale via the Journal section in the pause menu. Regardless, the icon will reappear after you've met up with Lady Masako at the entrance of Umugi Cove.
Once the Tale starts, follow Masako up the hill. After the cutscene ends, it's your job to tail a suspicious individual en route to Umugi Cove. Stick to the tall grass and platform your way across the high ground to remain out of sight as you follow your target. Eventually, you'll regroup with Masako inside Umugi Cove, and you'll continue tailing your target, who's now joined by a suspicious ally. The two men soon get involved with some bandits, so pop out of cover and take them out to end the Tale.
The Family Man
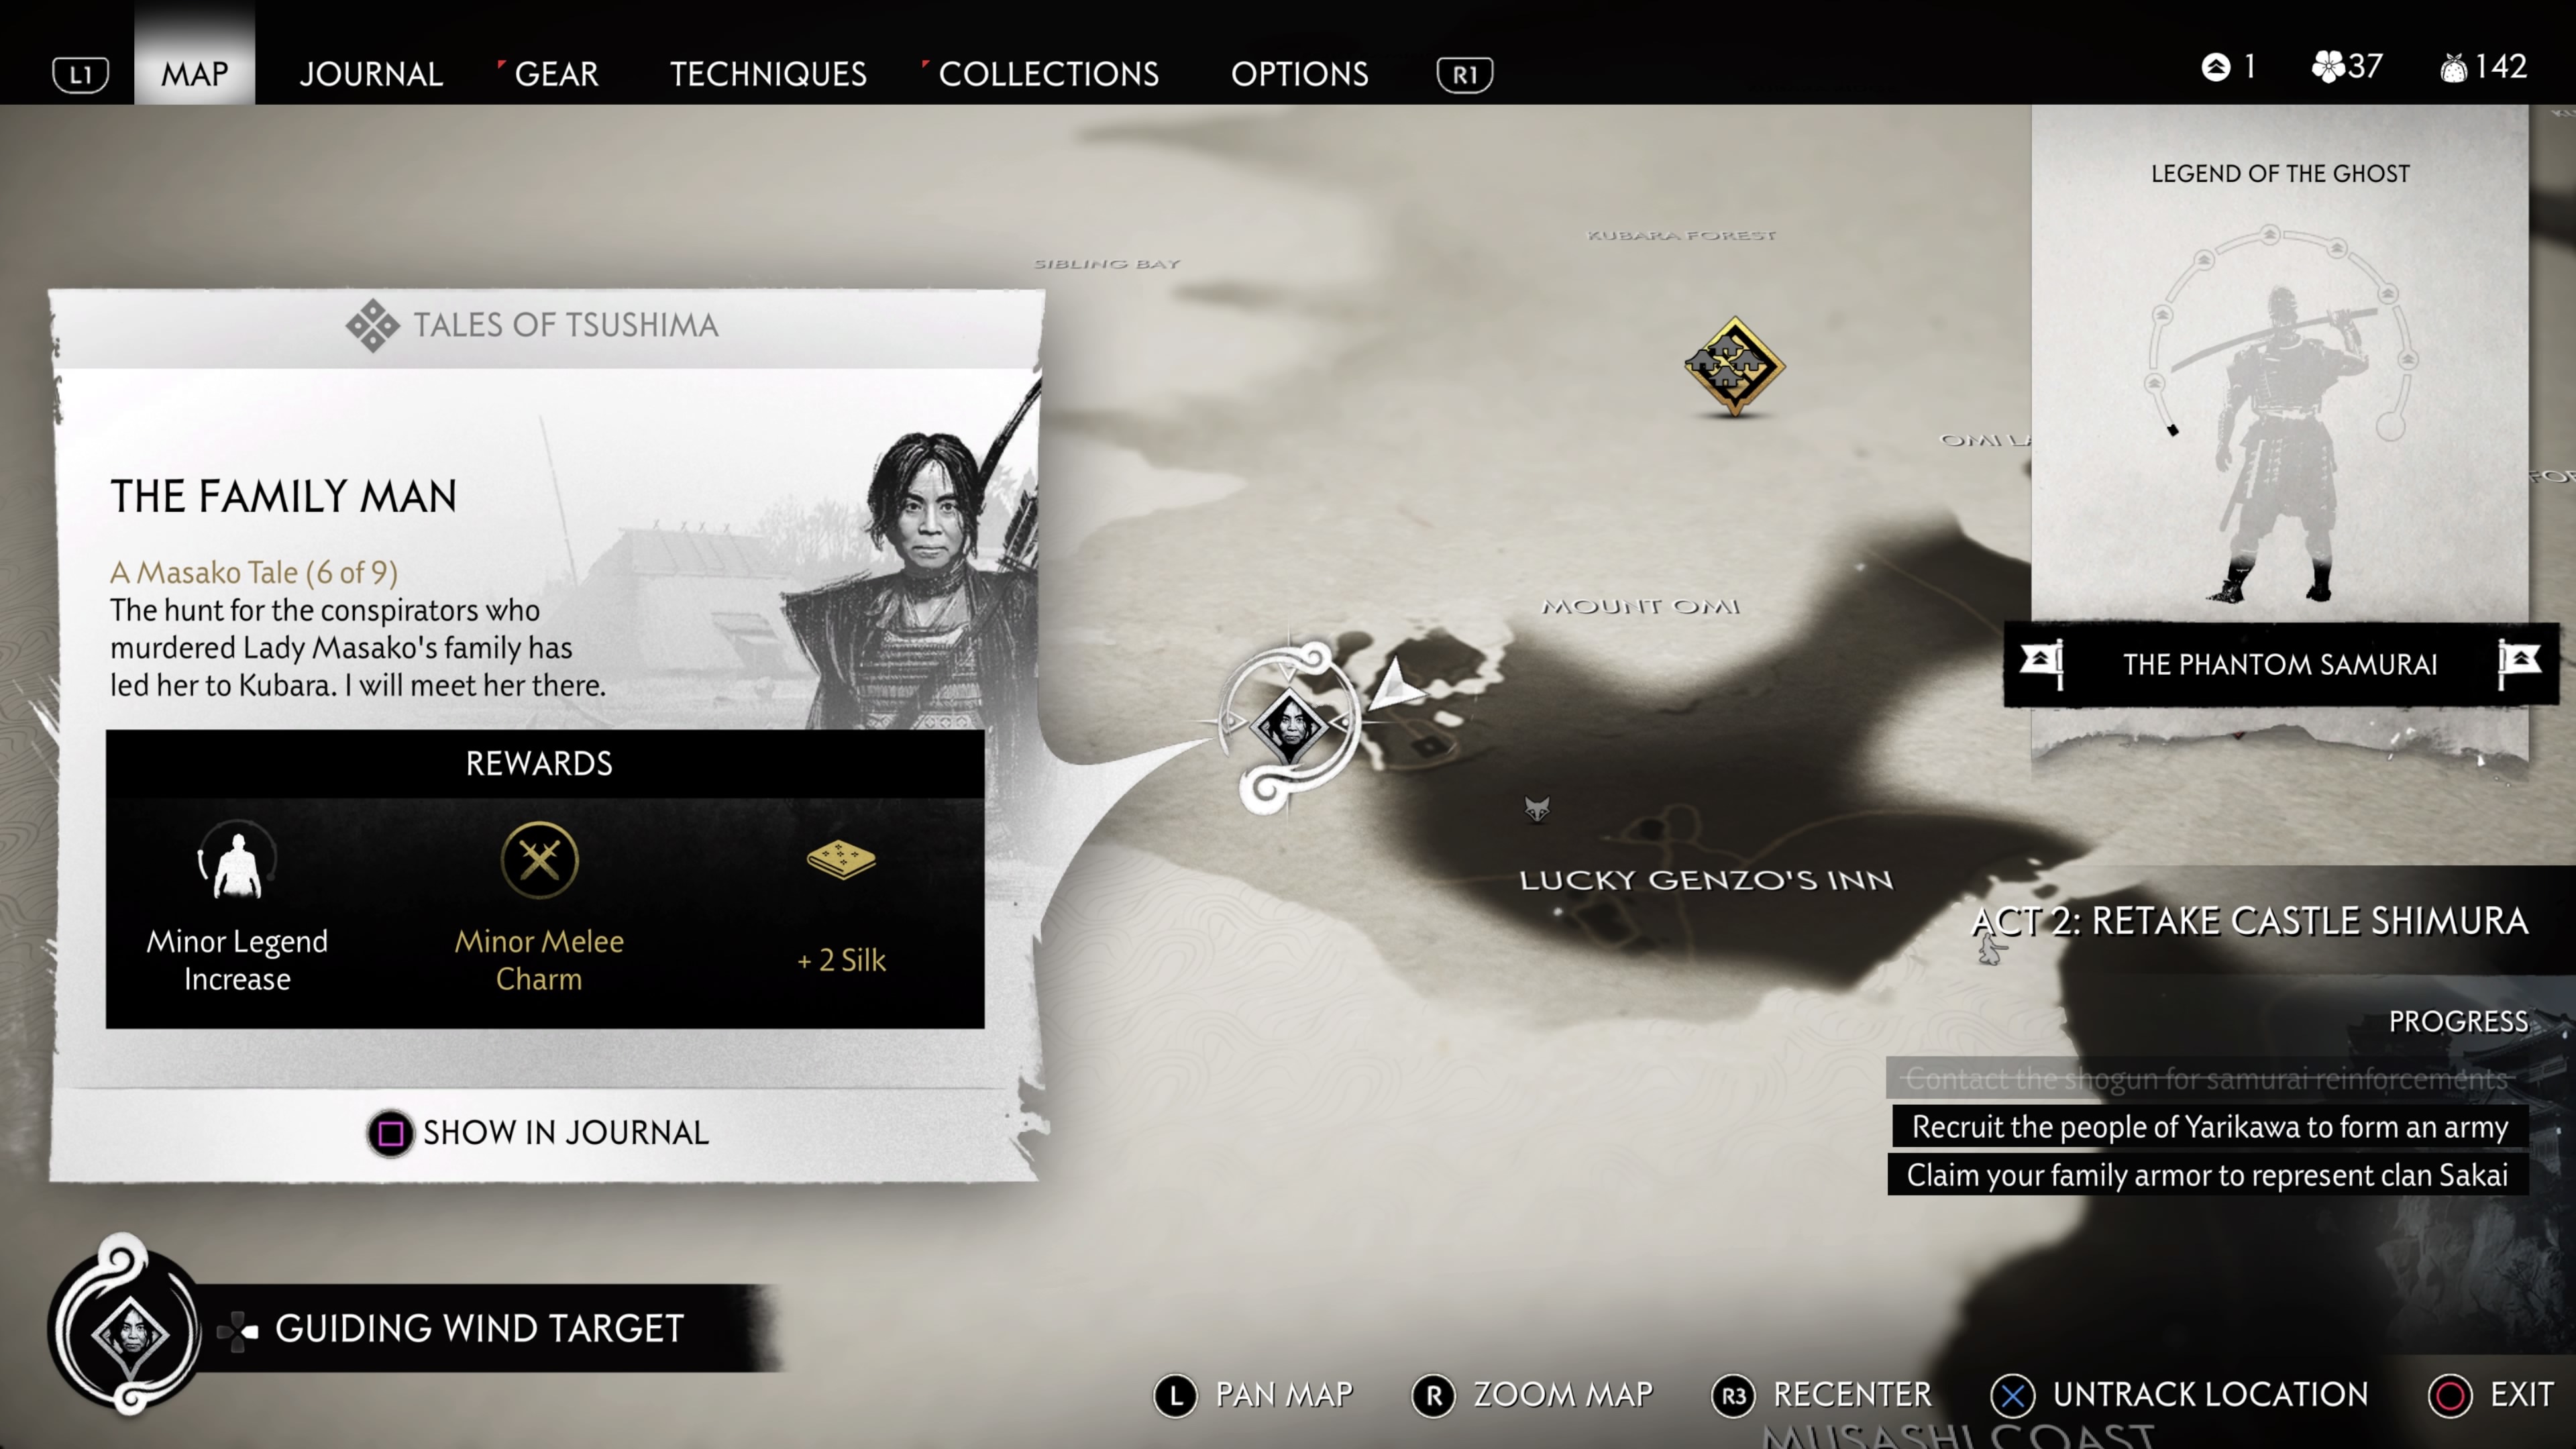
Location: Omi Monastery
The Family Man is unlocked upon reaching the Toyotoma region during Act 2. Talk to Masako at the Omi Monastery about a fella named Kajiwara, and then follow her to the beach, where you'll find Mongols to eliminate. Stealth is handy here if you can manage it, but the Mongols are pretty dense and tough to separate--with Masako helping, fighting them makes the encounter more or less a summer breeze. When you're done, investigate inside the house and find Kajiwara around the corner on the beach, behind the cliffs.
The Thief

Location: Koshimizu Farmstead
The Thief is unlocked upon reaching the Toyotoma region during Act 2. Talk to Junshin and then follow Masako to the Kushi Grasslands. There you'll tail a woman who a group of ronin is escorting. While doing so, your other objective is to assassinate the ronin without alarming any of the others.
Before you get any funny ideas about using your three-person chain assassination, know that doing so will alarm the woman, which instantly ends the mission. You need to wait for the proper opportunity to assassinate each ronin, so follow along, and the moments should be clear. Hopefully, you've upgraded to at least a two-person chain assassination by now, as the second assassination opportunity on the two distracted ronin is way less stressful with it; otherwise, use your smoke bombs to dispatch.
Once the woman arrives at her destination, you'll be ambushed by more ronin. Take them out and then follow both Masako and the woman to complete the Tale.
The Conspirator

Location: North of the Kushi Grasslands
The Conspirator is unlocked by completing The Fool, The Family Man, and The Thief. Speak with Masako and then follow her on horseback until you're forced to dismount and run down a pathway in the forest. You'll see some Mongols attacking some villagers, so charge in and kill them before more innocents are hurt.
Continue forward with Masako and assassinate the Mongol guards standing by the temple where Junshin is being held. Ascend the path up to the temple's roof and enter through the hole. Drop down and assassinate the guards with a chain assassination or just kill them regularly, and then assassinate the guard just outside the sliding door to the left. Rescue Junshin, but get ready because you've got to fight Masako now.
The duel against Masako can be tough and disorienting, as she has a decent variety of attacks. First off, she has a standard overheard swipe that you can parry--which should be your most opportune moment to damage her. She also has a lunging attack that emits a blue glow--hopefully, you'll have unlocked the Unyielding Sword Parry technique by now--that you need to guard against quickly to parry properly. And as to be expected, Masako has a few unblockable attacks that you can easily evade if you dodge back, then to the left or right.
However, Masako has one particular attack that's tough to read. You'll know it's happening when she takes a few steps forward while slashing at you during two distinct times. Try to bait this one out if you can, so you can see exactly what's going on. Essentially, she takes one step, quickly slashes on the second step, and then slashes again on the third step after a slight delay. To properly parry this, you'll want to guard right at the last moment of that second step. If you fail, you still have an opportunity to parry at the third, but just make sure you don't panic because that delay is a doozy. Regardless, keep at it, and you should quell Masako's anger before too long.
After you've defeated Masako, follow Junshin's tracks up the path alongside the temple and talk to him to end the Tale.
The Sister Betrayed

Location: Fort Kaminodake (in the Kamigata region)
The Sister Betrayed is unlocked by completing the Wolves at the Gates story mission during Act 3. Talk to Masako at the altar and then follow her on horseback to the Kikuchi estate. Fight the samurai guarding the front gate and then push into the estate. You'll encounter quite a fair amount of samurai, so don't hesitate to use everything you've got in your near end-game arsenal to defeat them. Once they're all gone, sit back and enjoy the conclusion to Masako's character arc.
Yuna
The Tale of Yuna
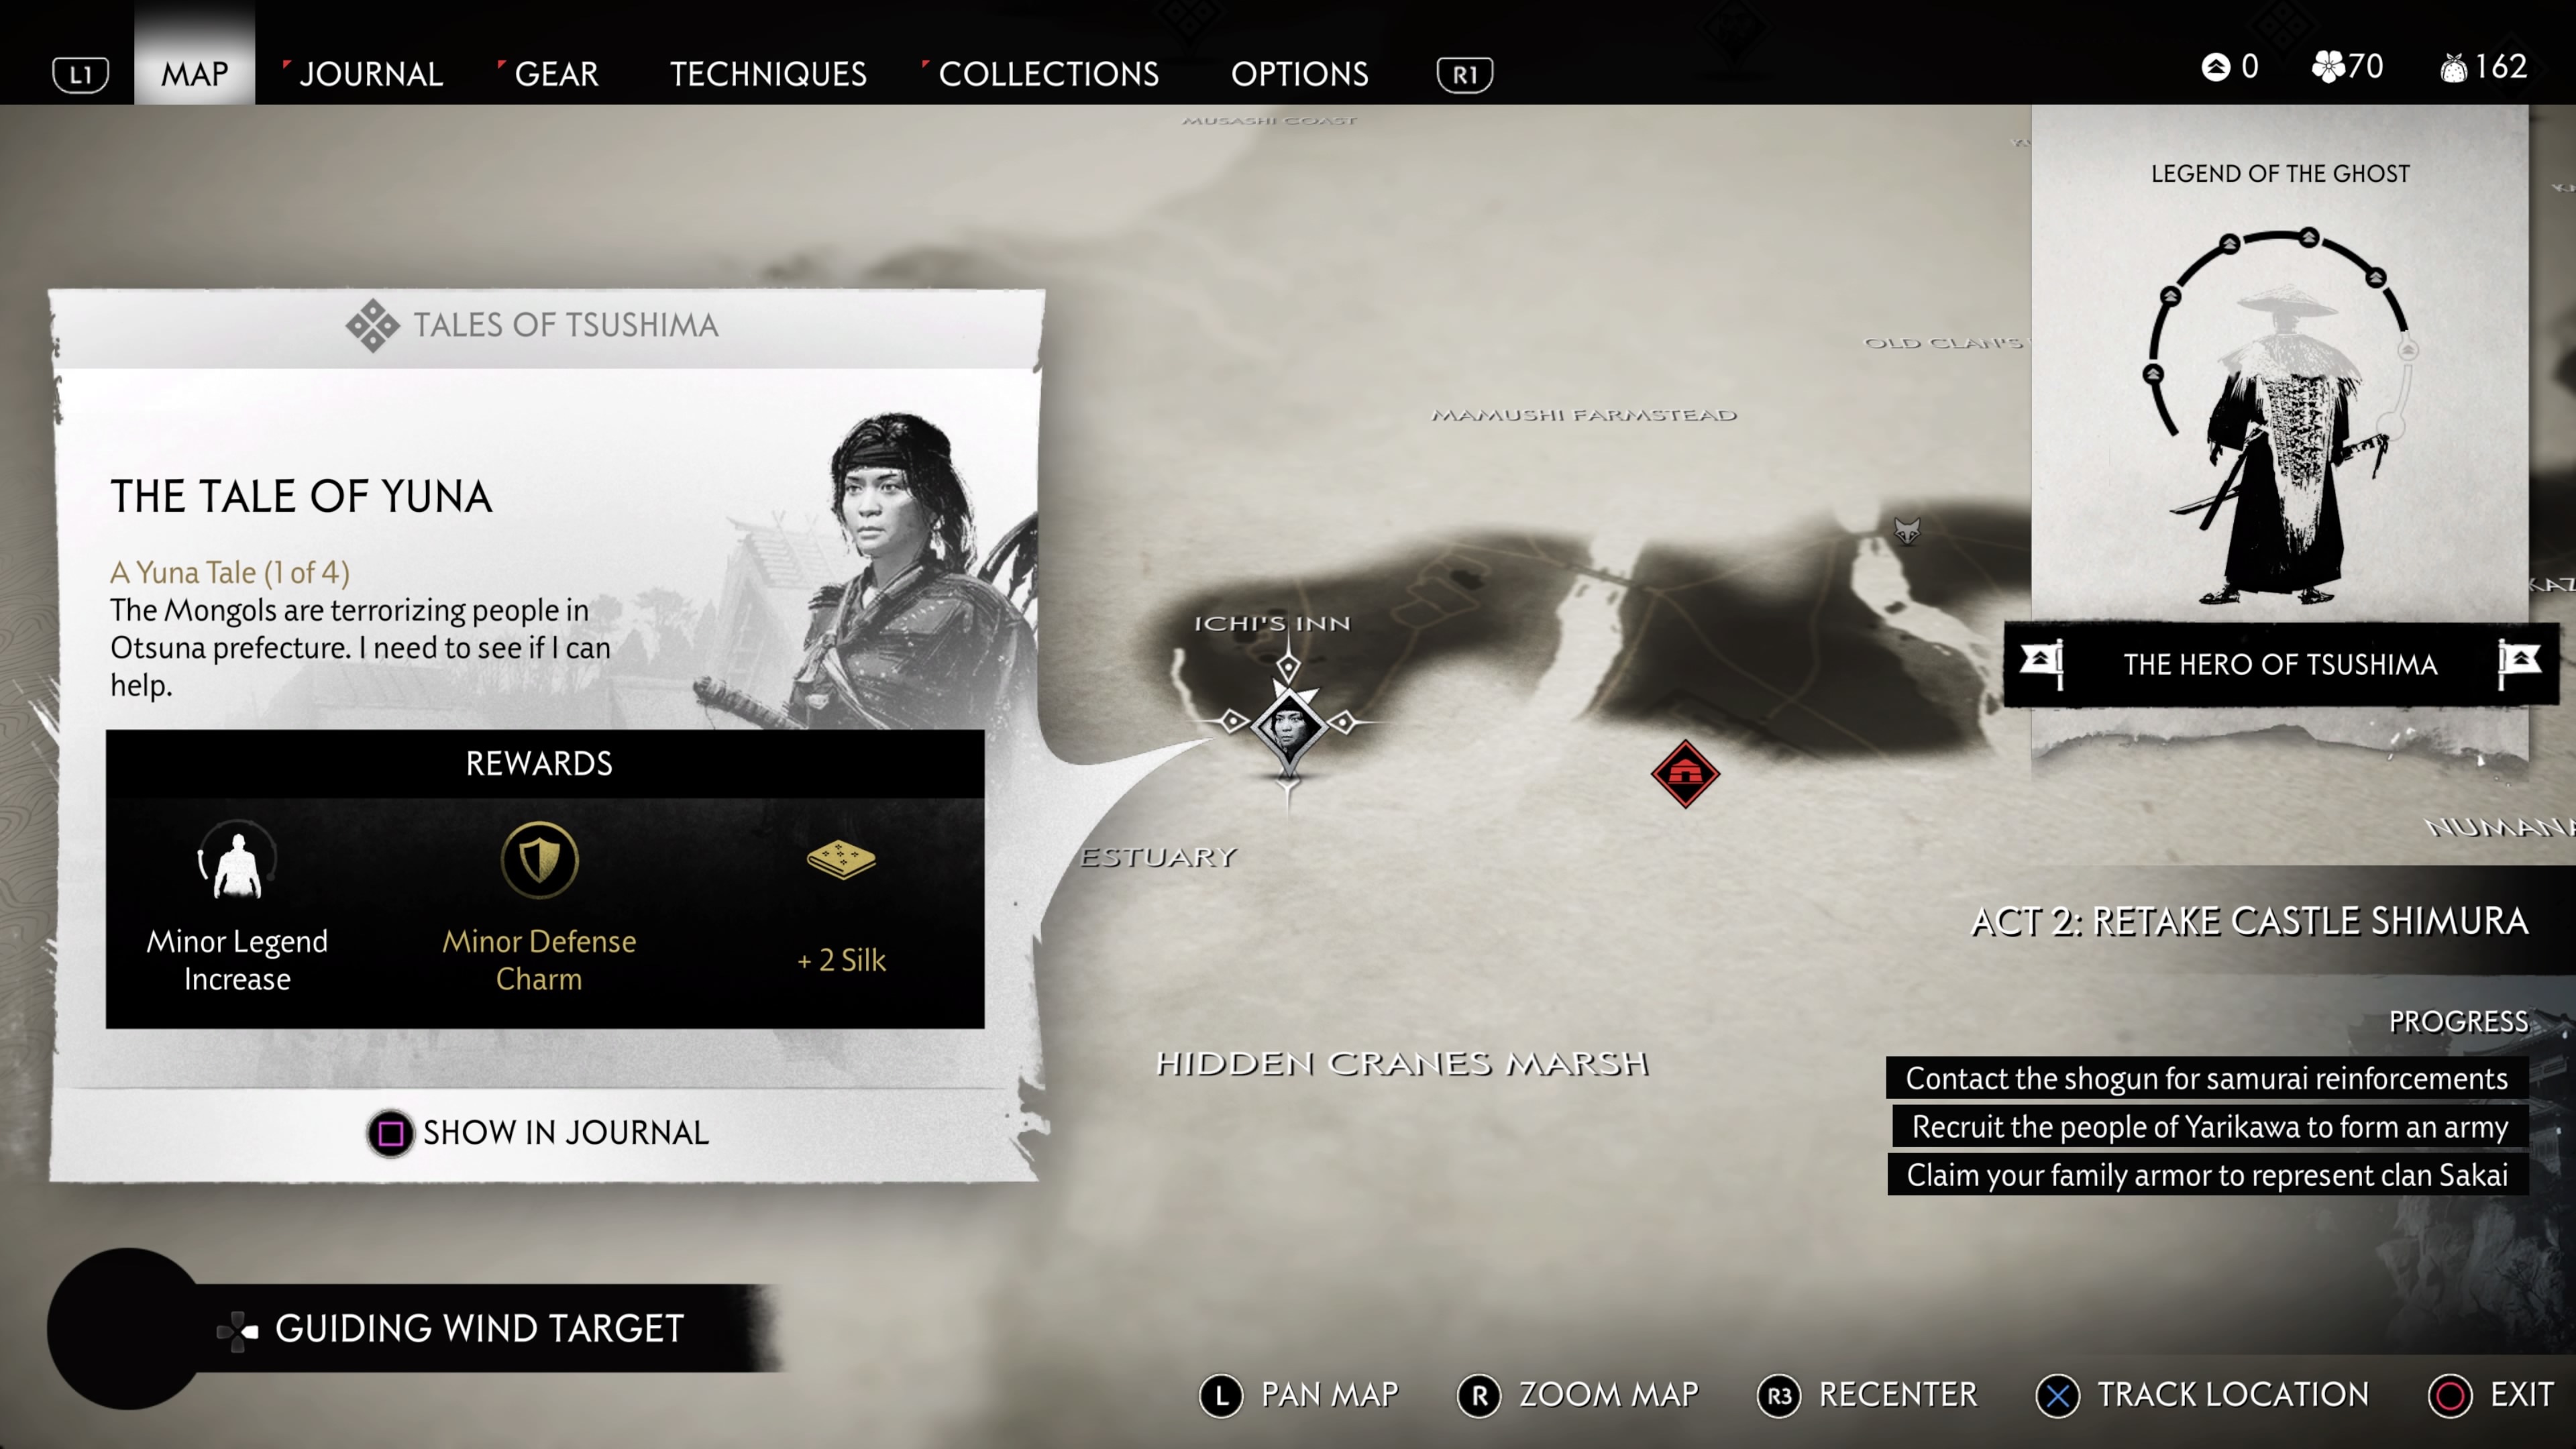
Location: South of Ichi's Inn (in the Toyotoma region)
The Tale of Yuna is unlocked upon reaching the Toyotoma region during Act 2. Find Yuna near Ichi's Inn, which is north of Smuggler's Estuary and Hidden Cranes Marsh. Follow her to the inn and jump down to talk to one of the villagers hanging around outside. He'll summon some Mongol guards; kill them all, and you'll trigger a cutscene wrapping up the Tale.
Silent Death
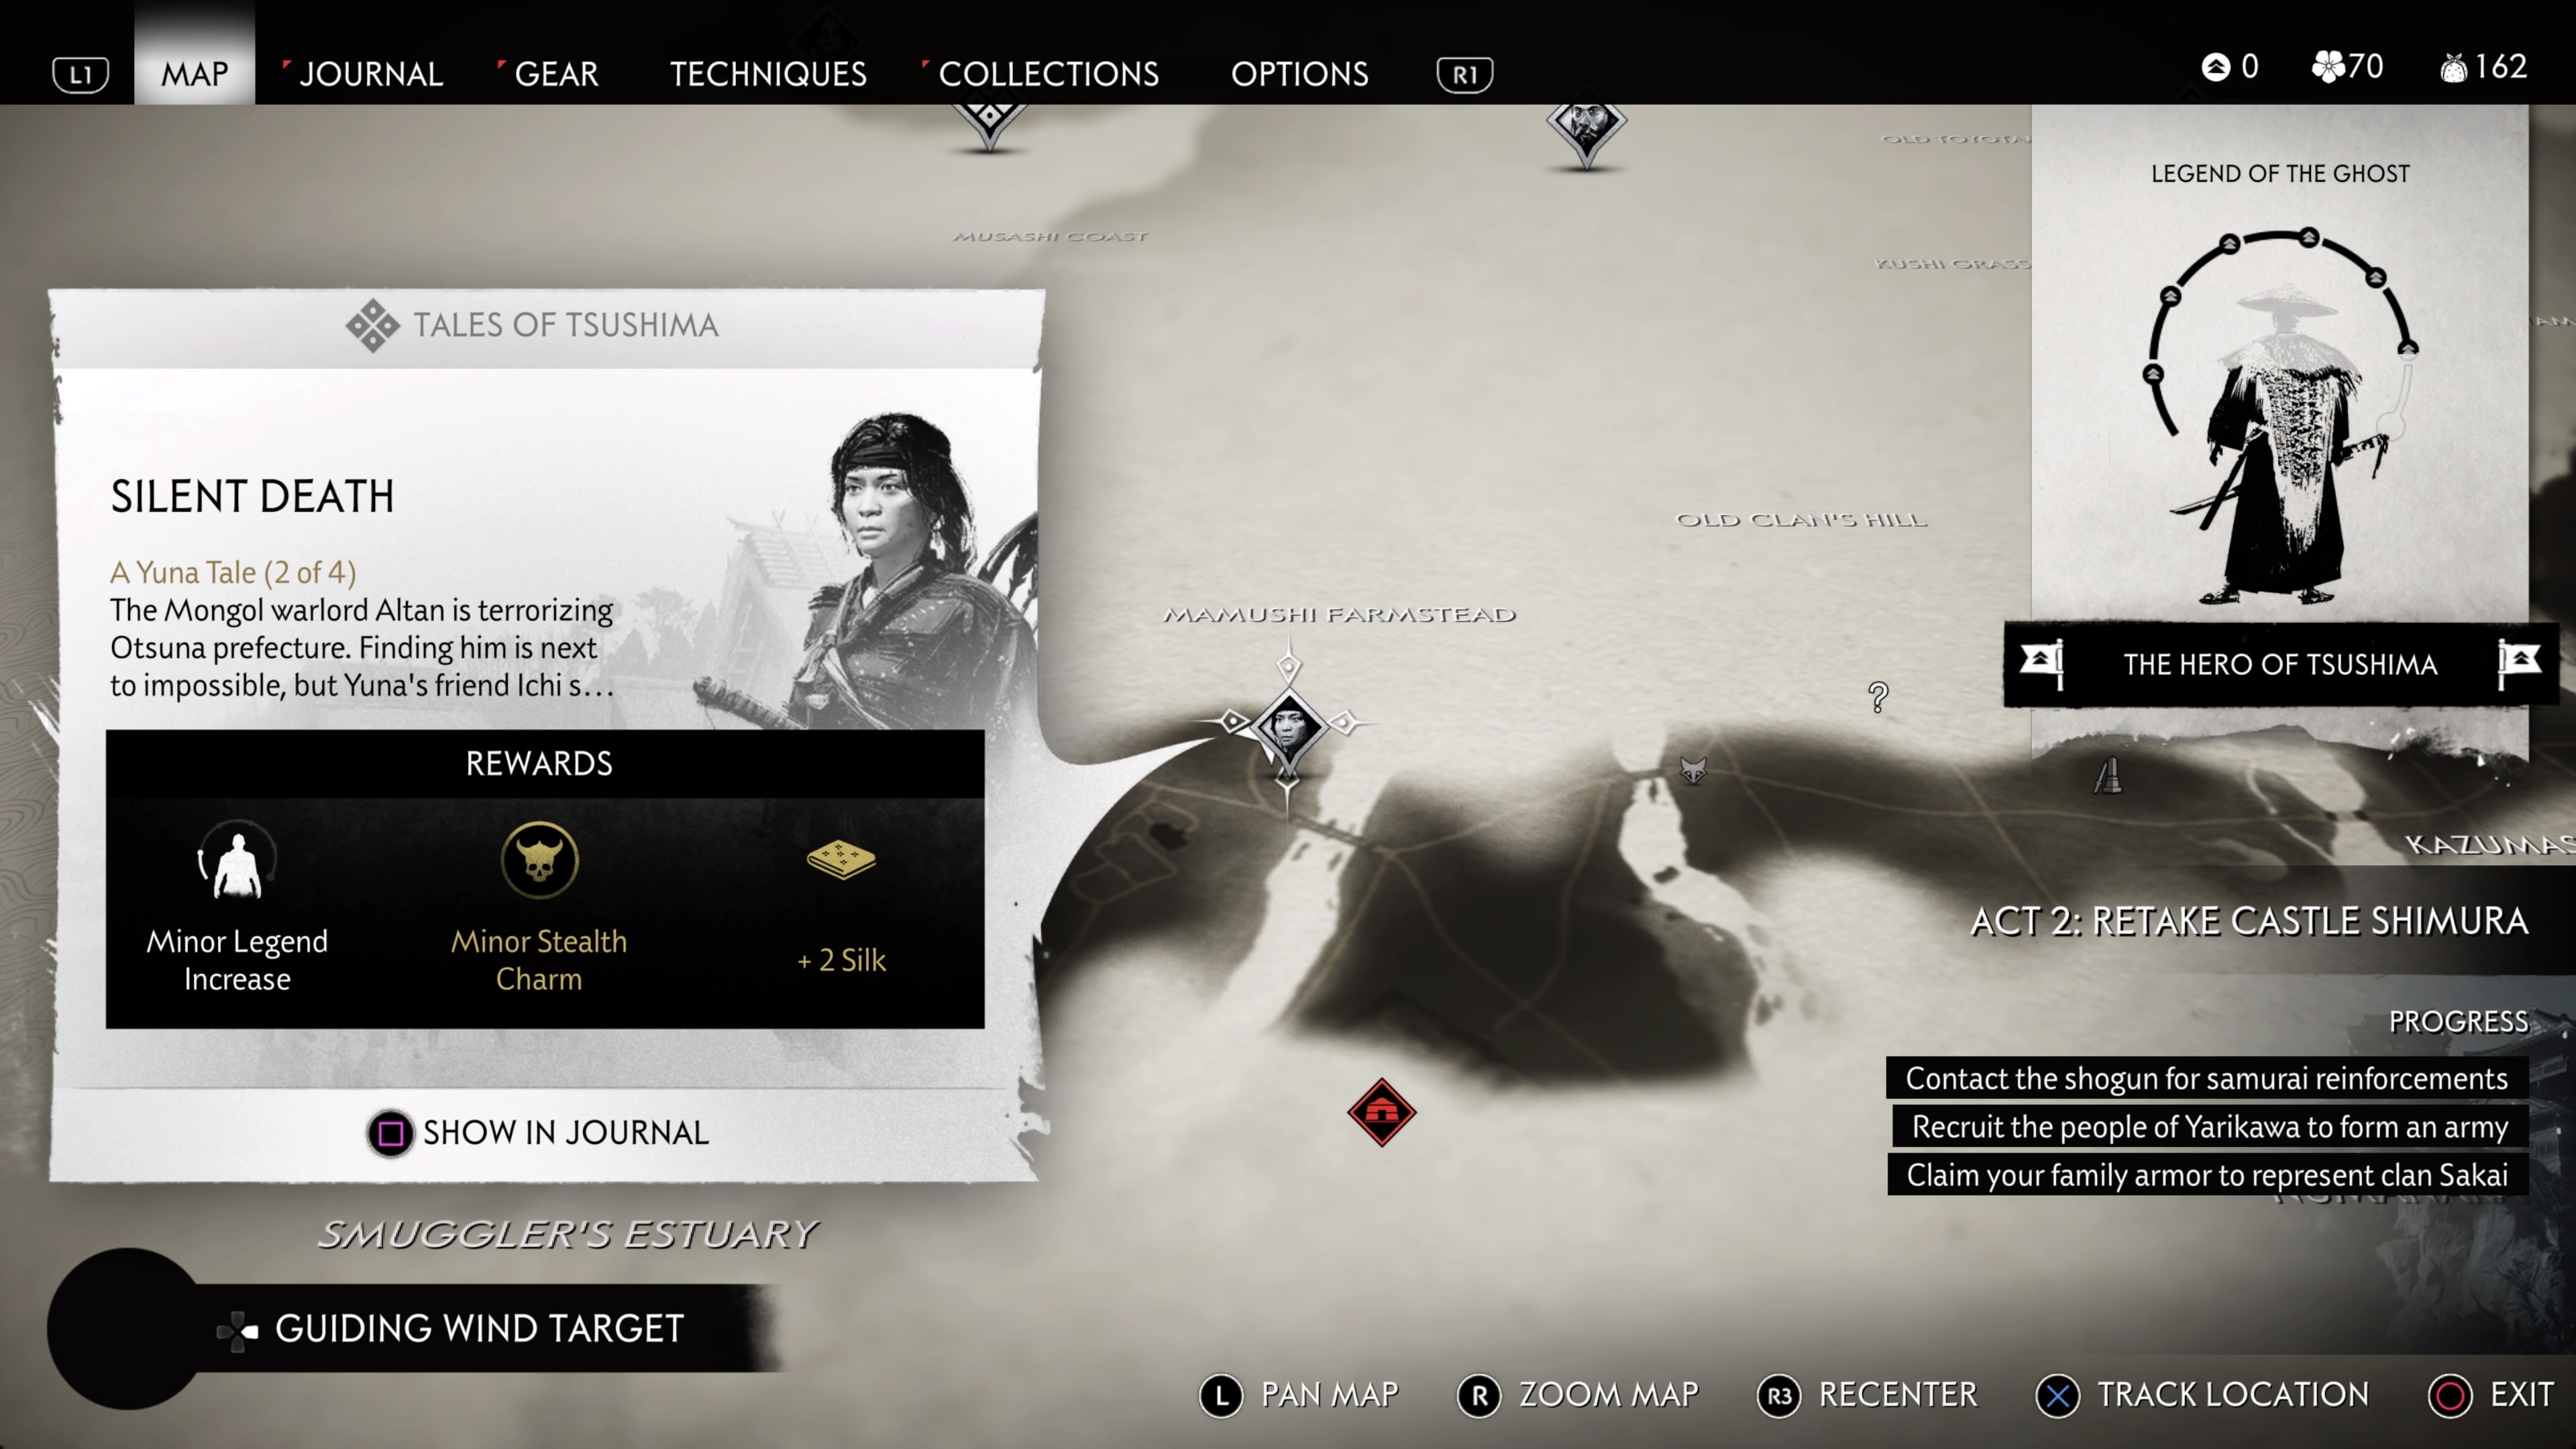
Location: South of Mamushi Farmstead
Silent Death is unlocked by completing The Tale of Yuna. You'll find Yuna waiting for you northeast of Ichi's Inn. Talk to her, and she'll lead you to Mamushi Farmstead, which is home to a trio of slave-owning brothers. Your job is to sneak through the farm and kill all three of the slaver brothers without being seen or killing a guard. It's not too difficult if you're careful; you'll find two of the brothers inside the grass-covered houses, which you can enter from the upper floor windows, making for easy air assassinations. The last is in the field with the tall grass, making it pretty easy to get close to him.
Make sure you don't cause too much of a ruckus when you perform your assassinations, and you should be able to get all three of their heads without trouble. Get out the way you came when you're done--the best way from the field is to head up to the ridge to the west; use the tall grass and the elevation to avoid the guards entirely. Return to Yuna at the front gate to end the Tale.
The Black Wolf

Location: West of Yoshinaka Bay
The Black Wolf is unlocked by completing Silent Death. Talk to Yuna and follow her to the Black Wolf's camp. It's up to you whether to sneak in or take the Mongols straight on. There aren't many, so it won't be too tough to do either, although it's worth noting that there are both spearmen and brutes among their ranks, so stealth is definitely the easier option if you're willing to be patient.
Regardless, after clearing them, you'll chase the Black Wolf out to a Mongol ship, where you'll fight some Mongols. As soon as the encounter begins, shoot some arrows while in concentration mode to thin the enemy ranks. Otherwise, watch out for the brute and spearman as they're always a lethal combination when together. Once they're all dead, a cutscene will trigger, and the Tale will end.
Message in Blood

Location: Ichi's Inn
Message in Blood is unlocked by completing The Black Wolf. Talk Yuna on the second floor of Ichi's Inn and then ride with her to Altan's nearby Mongol camp. Either challenge the entire camp to a direct fight or sneakily assassinate them all--the choice is yours. After all the Mongols have been laid to waste, you'll challenge Altan to a duel. He's just another Mongol with a shield and sword, so equip your water stance and wallop on him until he's dead to end the Tale.
Kenji
Servant of the People

Location: Aoi Fishing Village
Servant of the People is unlocked by completing the Broken Blacksmith story mission. Also, it's only accessible when Aoi Fishing Village is free from Mongol control.
Upon arriving at Aoi Village, talk to Kenji, and he'll convince you into stashing yourself inside an empty sake barrel to get you into a nearby Mongol camp. Once you're there, you can sneak around to eliminate the Mongols or take them on in a straight fight. It's not too hard a fight if you decide on the latter, especially if you thin out the Mongol numbers with stealth early on. Once the deed is done, the Tale will end.
Nattou and the Sake Seller
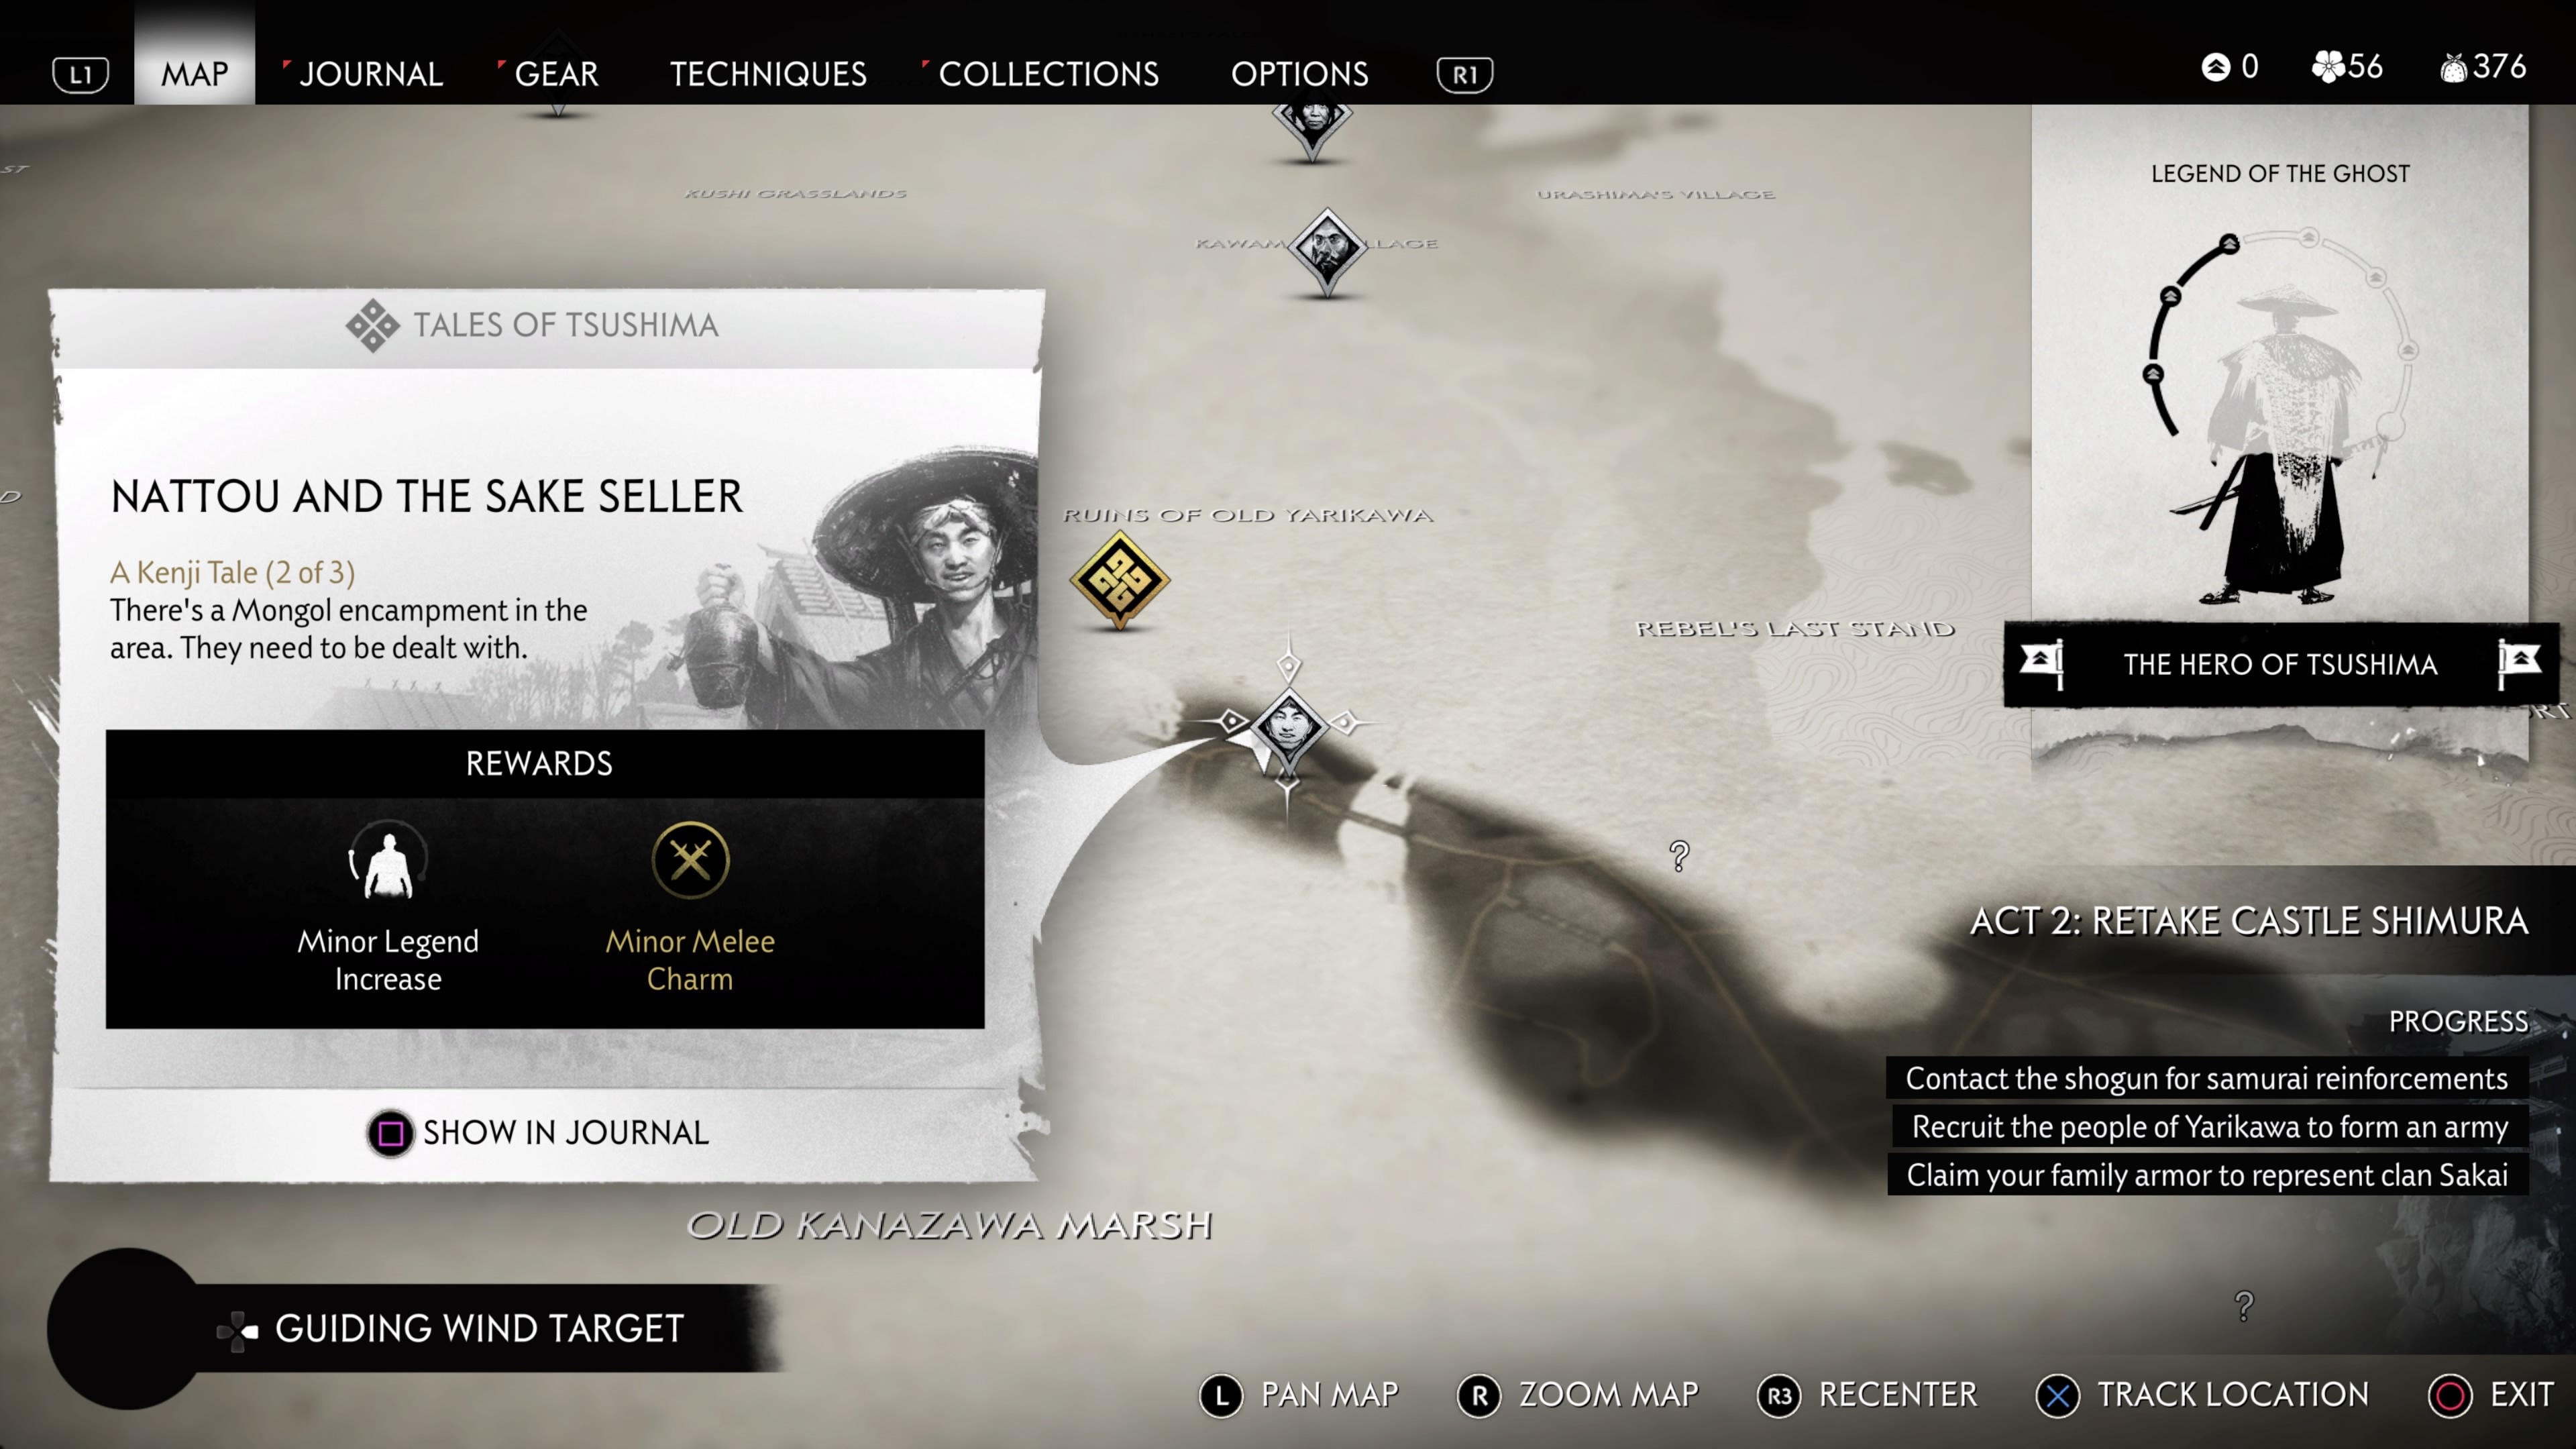
Location: South of the Ruins of Old Yarikawa
Nattou and the Sake Seller is unlocked upon reaching the Toyotoma region during Act 2. Talk to Kenji and follow him to the Mongol camp on Kazumasa's Isle. Head to the nearby tent for some supplies to loot. Instead, you'll find a prisoner named Nattou, who claims he was captured because of Kenji.
When the Mongols have returned to the camp, sneak out of the tent and chill out for a minute to let Kenji execute his plan. Before long, you'll have Mongols, Straw Hats, and a bear all fighting. Go ahead and wait for them to rip each other before getting involved. Once things quiet down, mop up whoever's left to finish the Tale.
The Delicate Art of Negotiation

Location: Umugi Cove (a village at the southeast-most point of the Toyotoma region)
The Delicate Art of Negotiation unlocks after talking to Lady Sanjo during A Message in Fire during Act 2. Talk to Kenji and follow him on horseback. When you arrive at the negotiation destination, he'll ask you to hide and come out if anything gets out of hand. Unfortunately, you'll notice things go awry the moment you hide in some tall grass, as several bandits are hiding on the sidelines, ready to ambush Kenji.
First off, assassinate the crouching bandit just ahead of you, and then jump up the rocks to kill the other one overseeing the negotiation. Next, deliver a headshot with your bow on the bandit off in the distance crouching in front of some tall grass. Hop down and then cross the river while submerged to make it to the other side, where some more bandits are looming about.
Make for the tall grass and hug the right side of the rocks to find some handholds to take you up. Look down and do an air assassination on the bandit below. Bust out your bow and take down the spearman in the distance. Cross forward to the next rock where some more bandits are; climb up and assassinate them from behind. You'll see another bandit far off crouching beside some rocks and tall grass making their way to some cover--shoot an arrow to their face. Jump down into the water and quickly cross over to find the final bandit in the area, who's perched on a rock.
By now, the negotiation talks are likely ending horribly, so sprint over to kill the guy that Kenji was talking to. Some Mongols will show up to also cause some trouble, so deal with them. If they try to make a beeline towards Kenji, use your Kunai or Sticky Bombs to stop them in their tracks. The Tale ends after all the Mongols and bandits in the area are dead.
Norio
The Last Warrior Monk

Location: Akashima Village
The Last Warrior Monk is unlocked upon reaching the Toyotoma region during Act 2. Talk to Nori in Akashima Village and investigate the area for some Mongol tracks on a pathway near one of the houses. Follow the tracks until you come upon the Mongols who've captured the missing monks. Start silently picking off the archers near the grapple hook point and then charge in on the rest of the Mongols while ensuring none of the monks are harmed. Clear the map of enemies, and you clear this Tale.
Three Actions, Three Illusions

Location: Akashima Village
Three Actions, Three Illusions is unlocked by completing The Last Warrior Monk. Meet up with Norio and follow him on horseback to a nearby Mongol camp. Challenge the first few Mongols you encounter to a standoff, and then head for the house to survey the camp. We recommend going quiet on this one as there are many enemies around, and you've got a monk hostage you need to protect. Once the coast is clear, rescue the monk to trigger a Mongol ambush. Open the conflict with some concentration shots from your bow and then fight off the rest while paying particular attention to any Mongols who may be trying to kill the monk.
Ghosts in the Fog

Location: Akashima Village
Ghosts in the Fog is unlocked by completing Three Actions, Three Illusions. After talking with Norio, climb up onto the roof to survey the area. Hop down and then prepare the incense burners for the incoming Mongol ambush. Once that's done, sneak through the village and take out all the Mongols who have entered the area. You're welcome to use the incense burners as environmental smoke bombs to aid in your efforts to take down the invaders; just trigger one with the action button when you're near it.
After all the Mongols are defeated, sprint to the temple where Norio is holed up with the other monks. Take out the attacking Mongols there, and the Tale is complete.
The Birth of Suffering
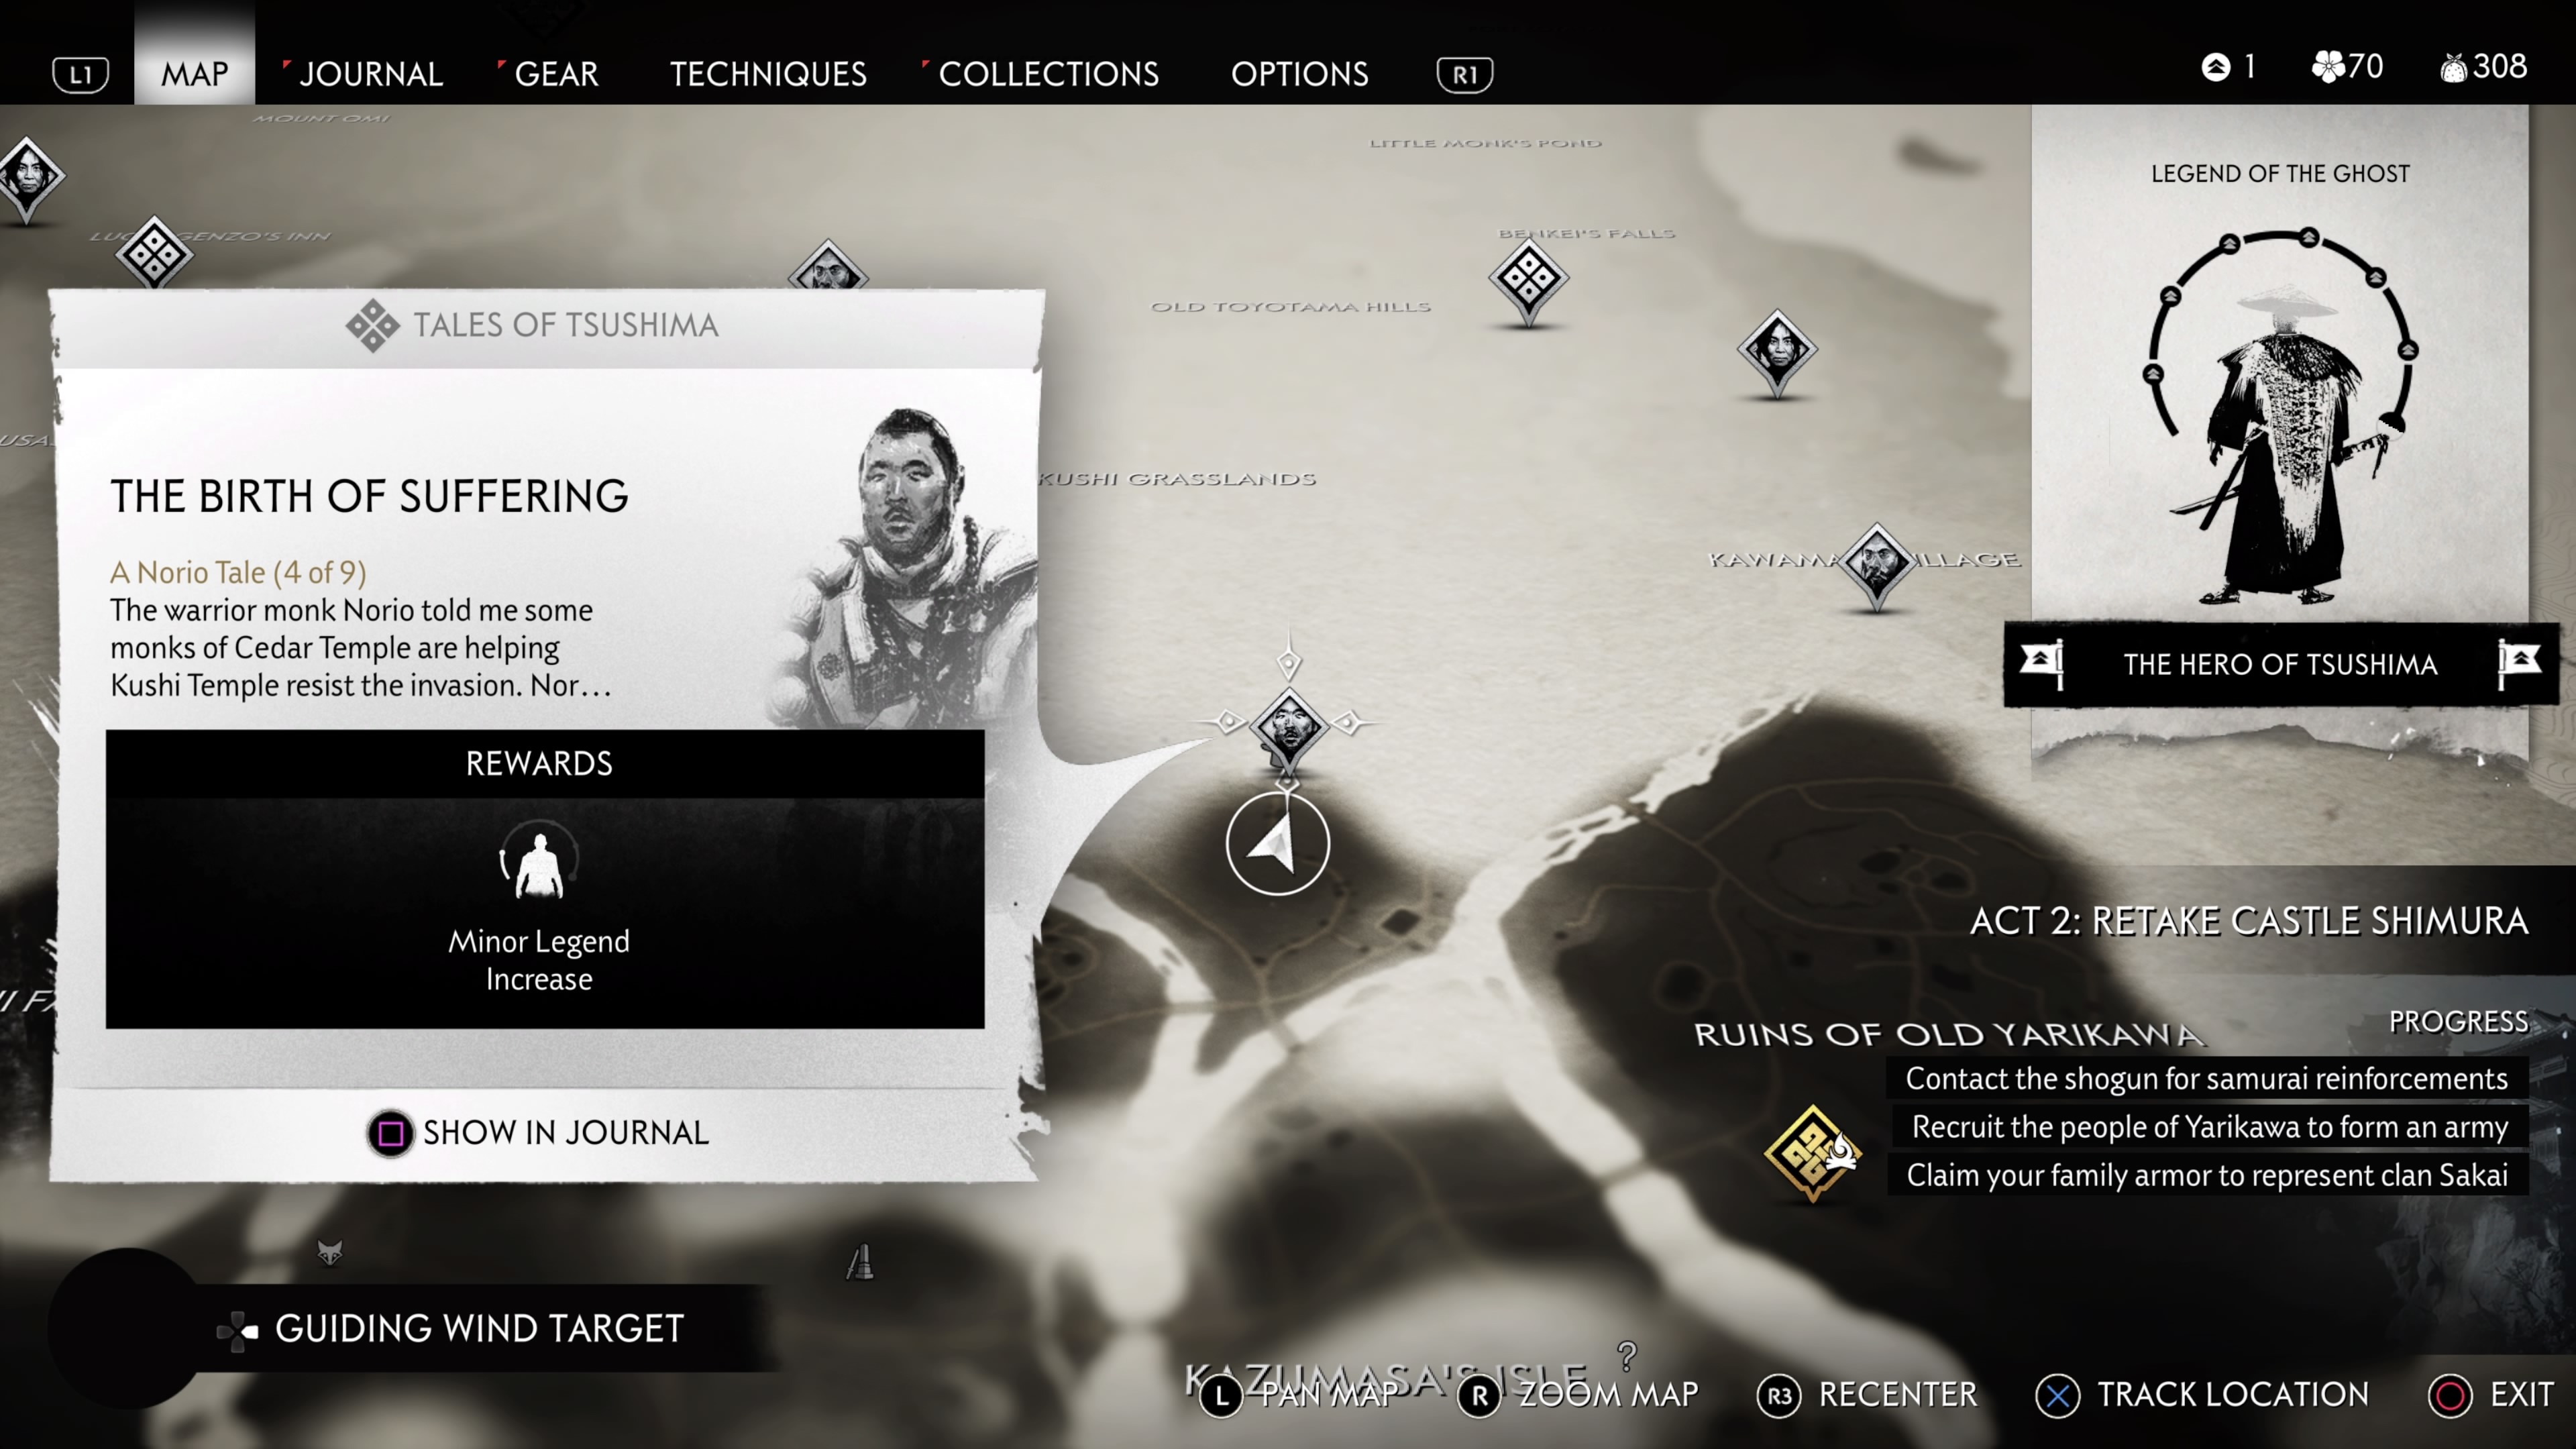
Location: Kushi Temple
The Birth of Suffering is unlocked by completing The Last Warrior Monk. This Tale begins as soon as you approach Kushi Temple, and it's actually rather short. Charge on in and help Norio defend the temple against a group of Mongols. Kill the invaders to end the Tale.
The Blood Sutra
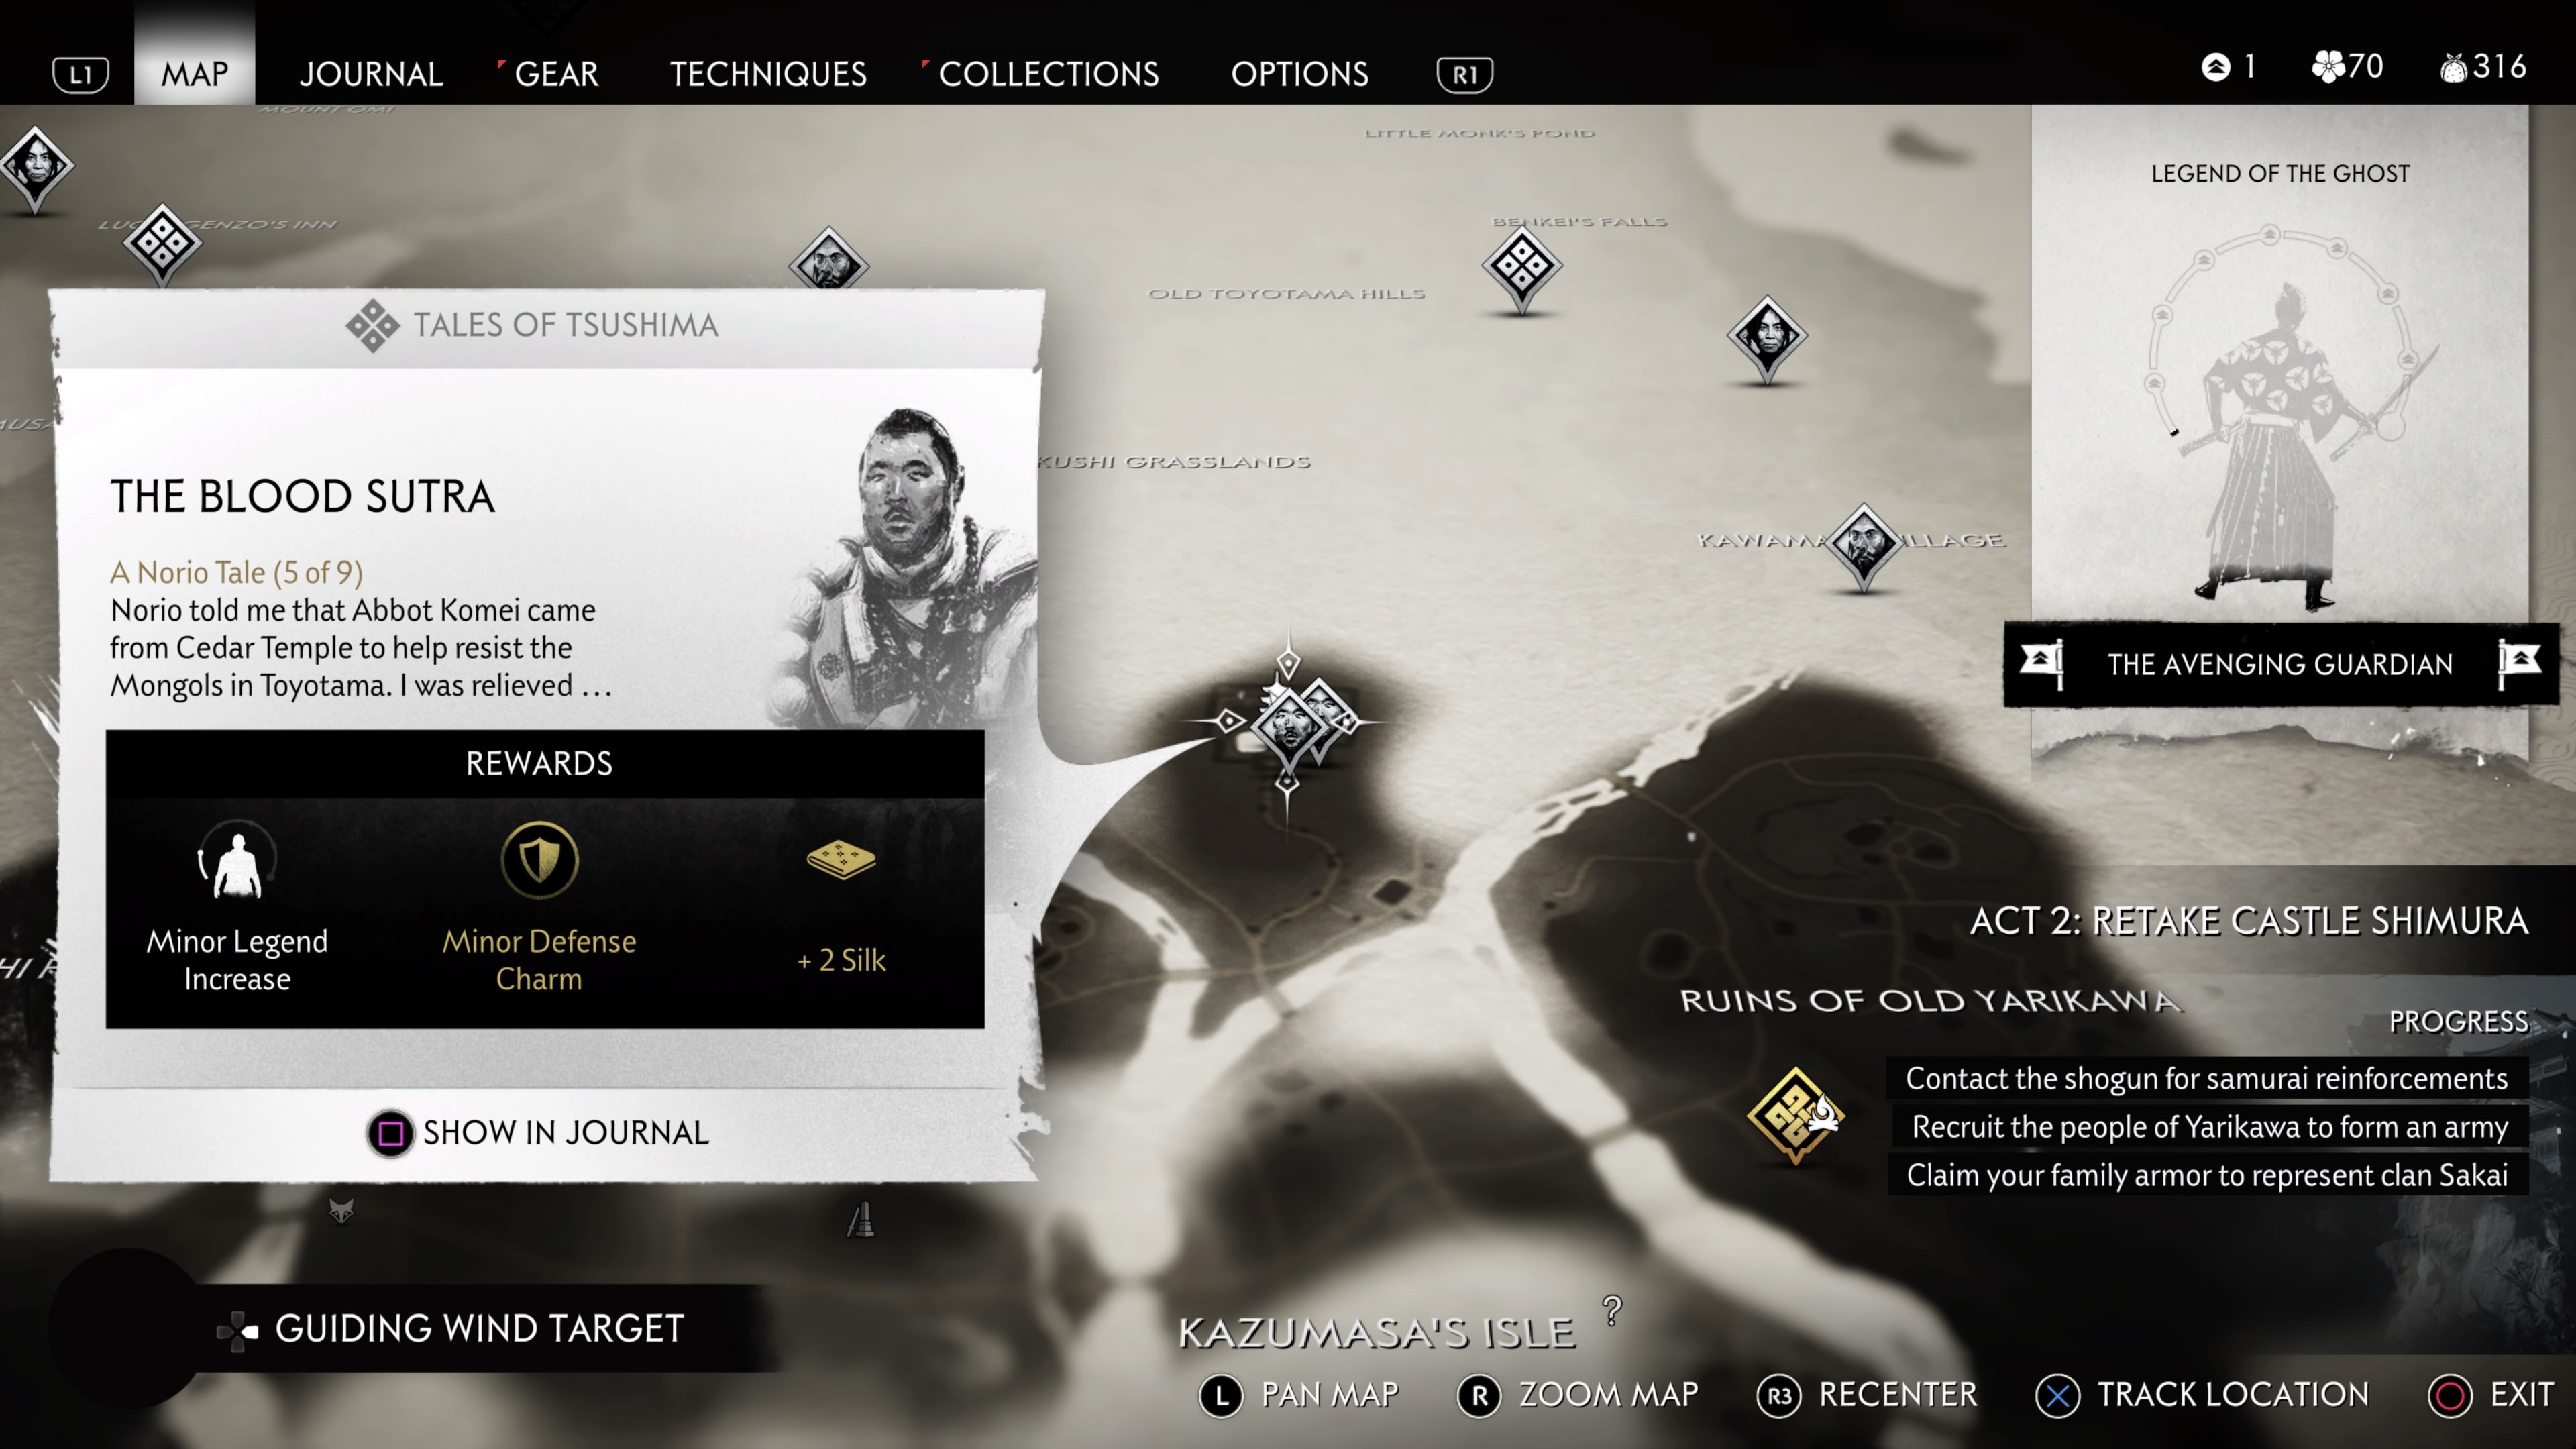
Location: Kushi Temple
The Blood Sutra is unlocked by completing The Birth of Suffering. After a brief chat with Norio, you set off alongside him to Koshimizu Farm. Once you arrive, you need to clear the area of the Mongols. Since this is another hostage situation, we recommend accomplishing this stealthily. Liberating the farm will clear it of Mongol presence on the map in general, as well as netting you a key you need for the Unbreakable Gosaku Mythic Tale.
Talk to Nori after clearing the farm, and you'll both head towards a burned-down house to look for clues around a missing monk. Follow the blood trail until you happen on some more Mongols to kill. Dispatch them and continue following the blood trail until you get to the edge of a waterfall. Jump down and enter the cave behind the waterfall to complete the Tale.
The Cause of Suffering
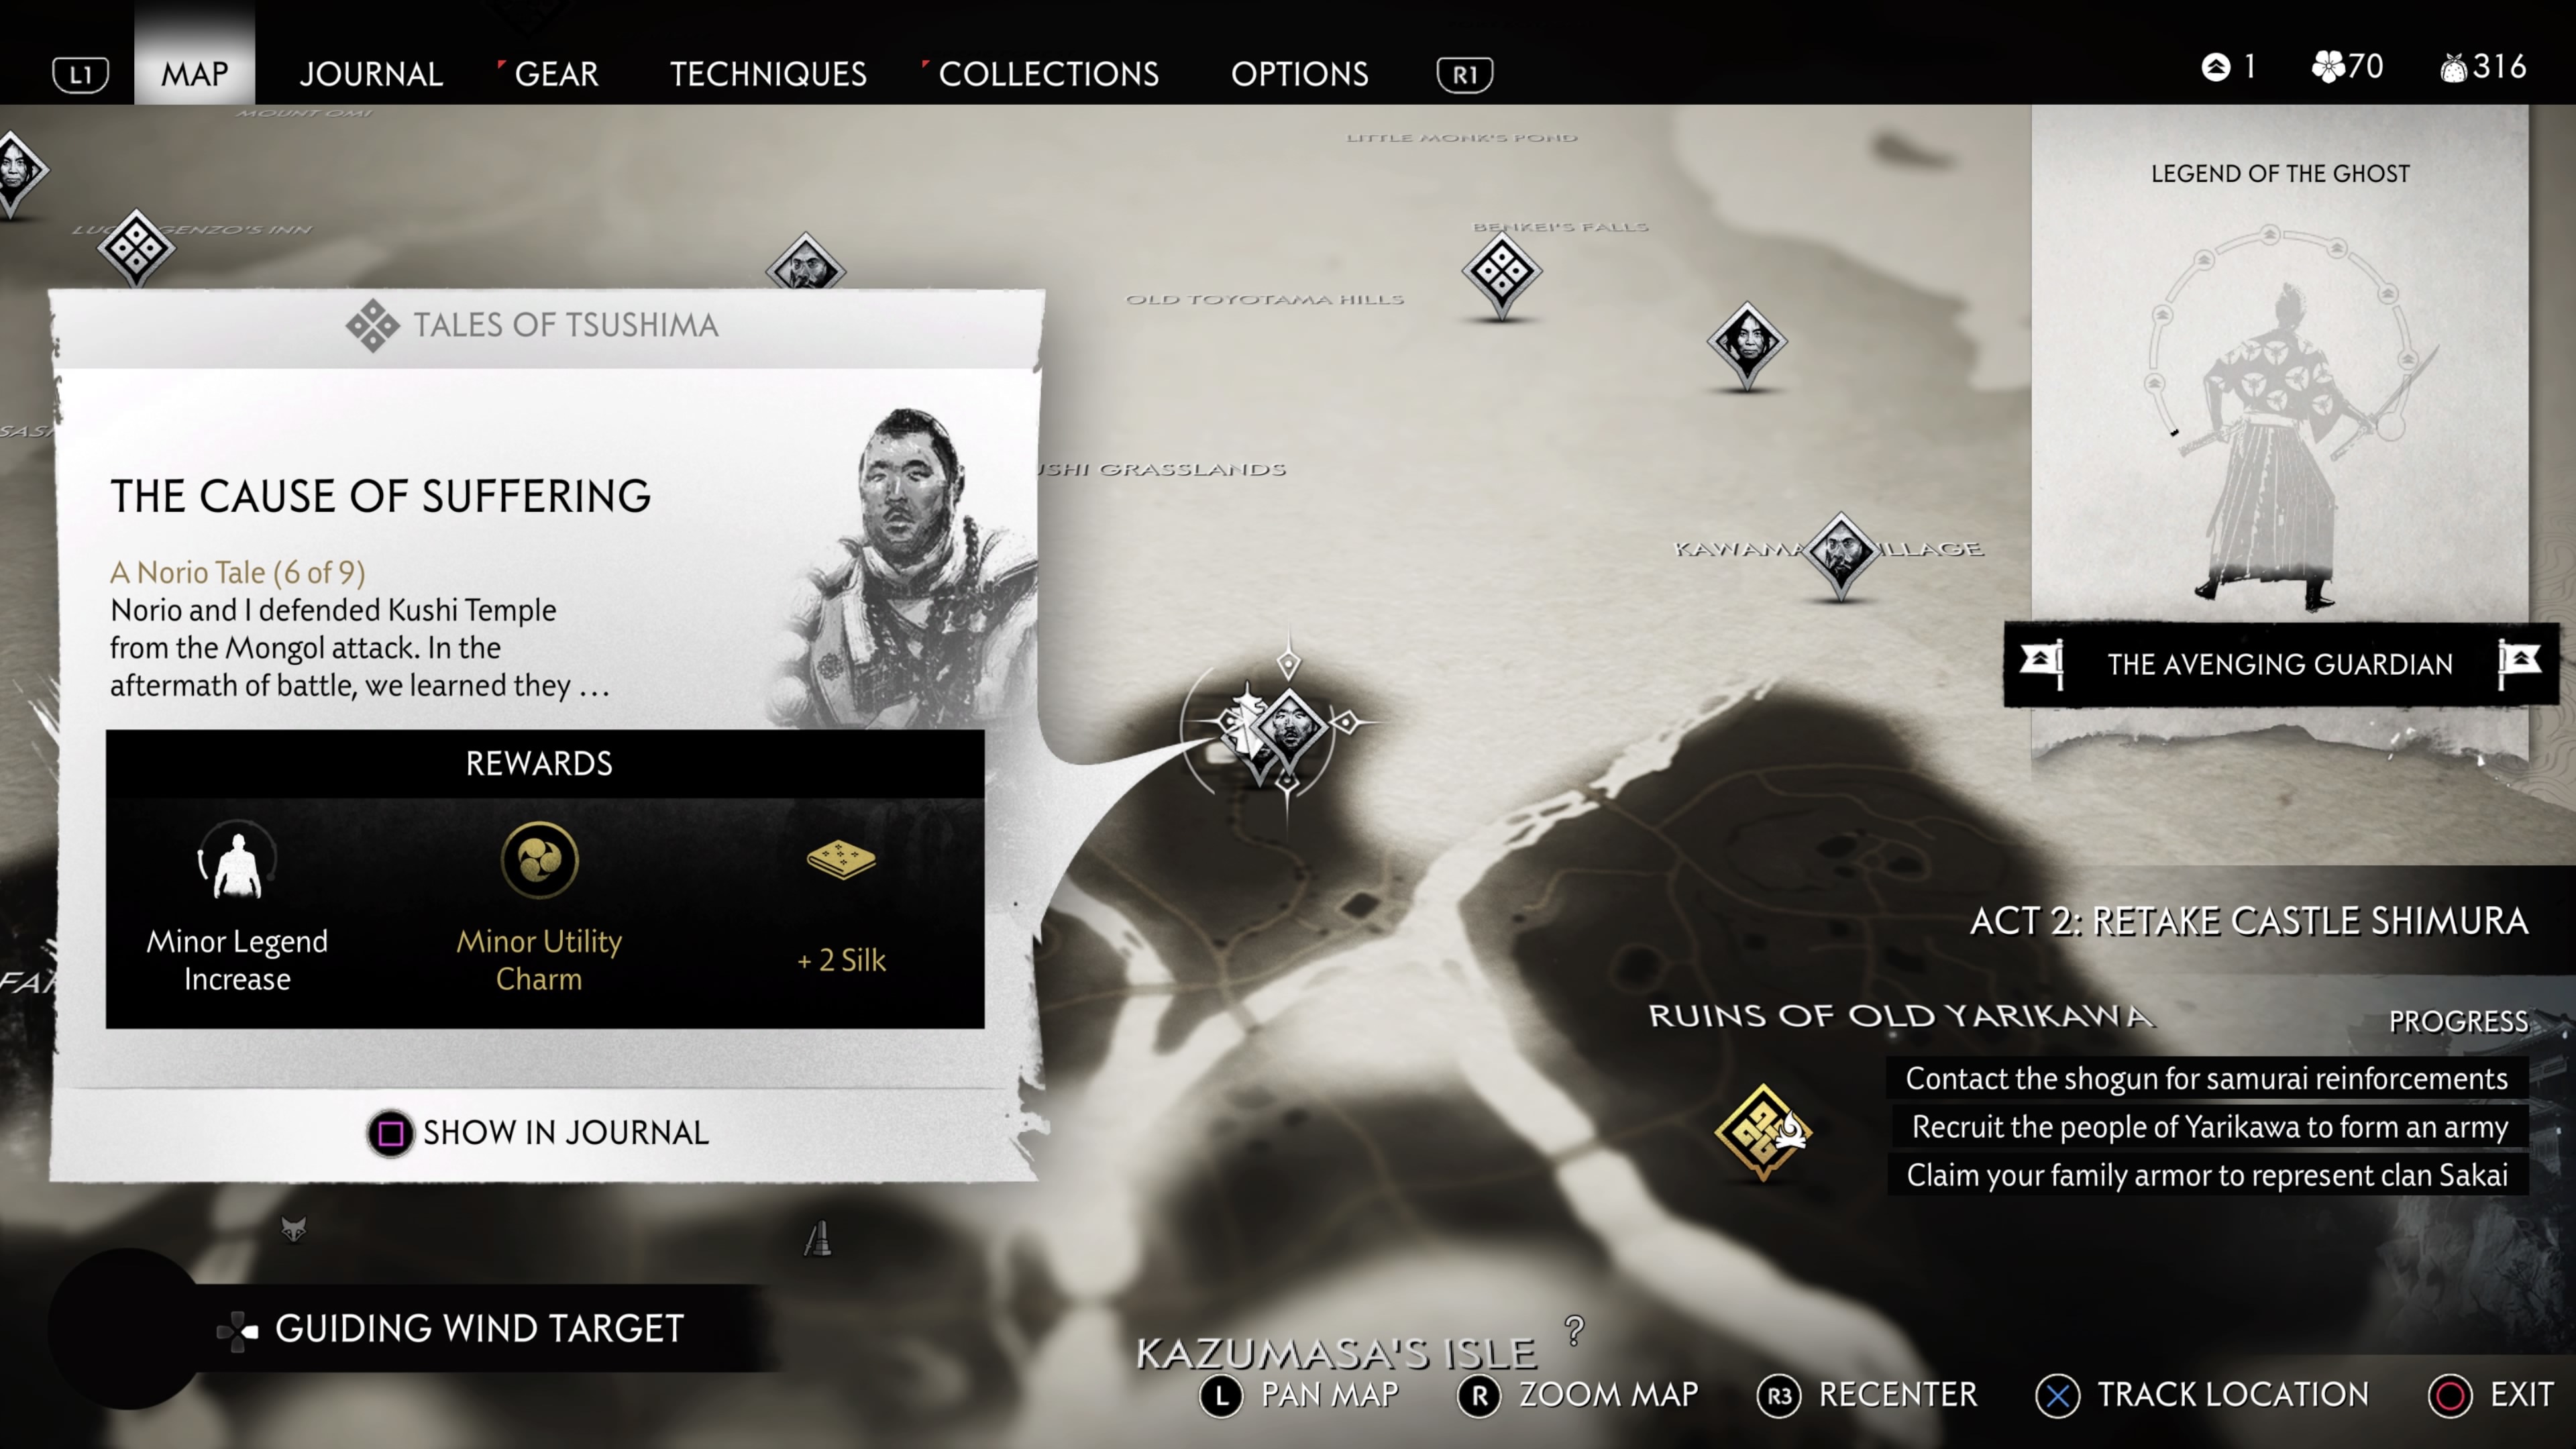
Location: Kushi Temple
The Cause of Suffering is unlocked by completing The Birth of Suffering. Norio is on a quest to reclaim a Buddha statue stolen by the Mongols. Follow him until you discover a dying monk on the road. After hearing their last words, head east towards a Mongol camp. With no hostages to defend, this one should be easy to clear no matter which playstyle you choose. Once the camp has been cleared, investigate the clue on the pathway by the campfire and some boxes. Follow the path until you find the missing Buddha statue, and the Tale will end.
The End of Suffering
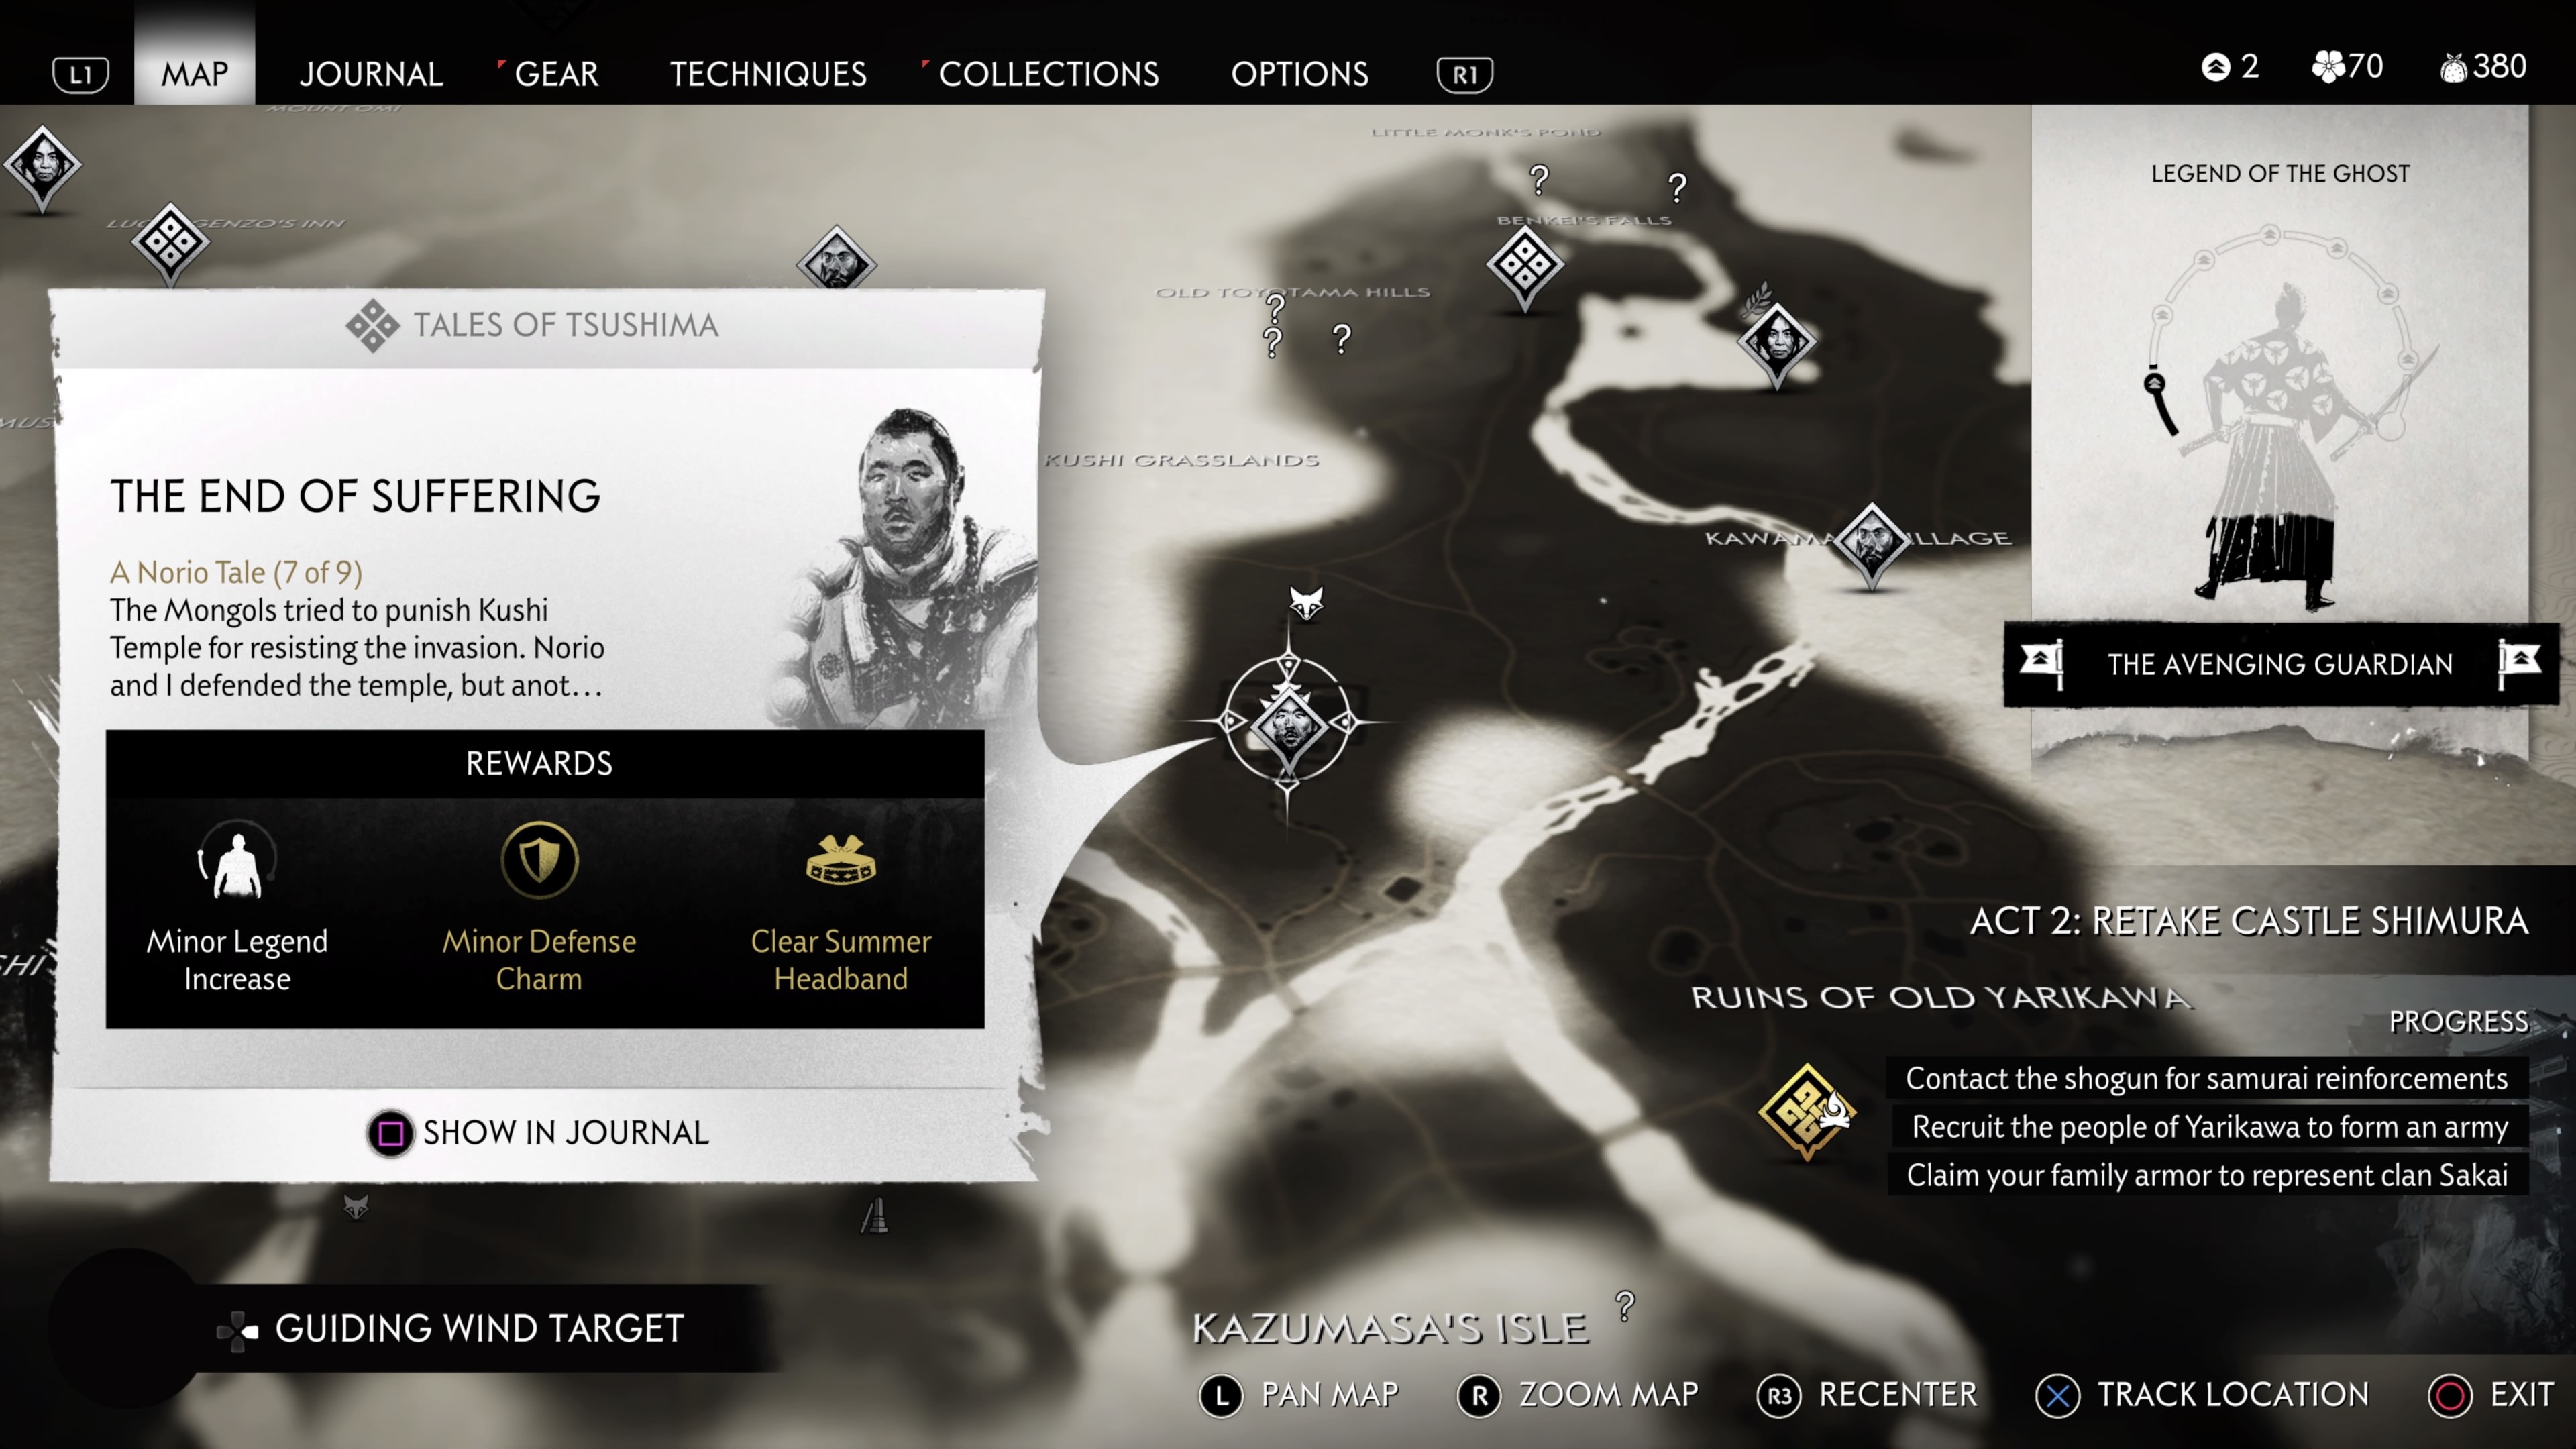
Location: Kushi Temple
The End of Suffering is unlocked by completing both The Blood Sutra and The Cause of Suffering. This Tale is a bunch of fights against a lot of Mongols, so make sure you're fully stocked on arrows and tools. First, head to the river to defend the monks and return to Kushi temple to fight off the rest of the invading forces. After you've successfully eliminated all the Mongols, the Tale will end.
The Guardian of Tsushima
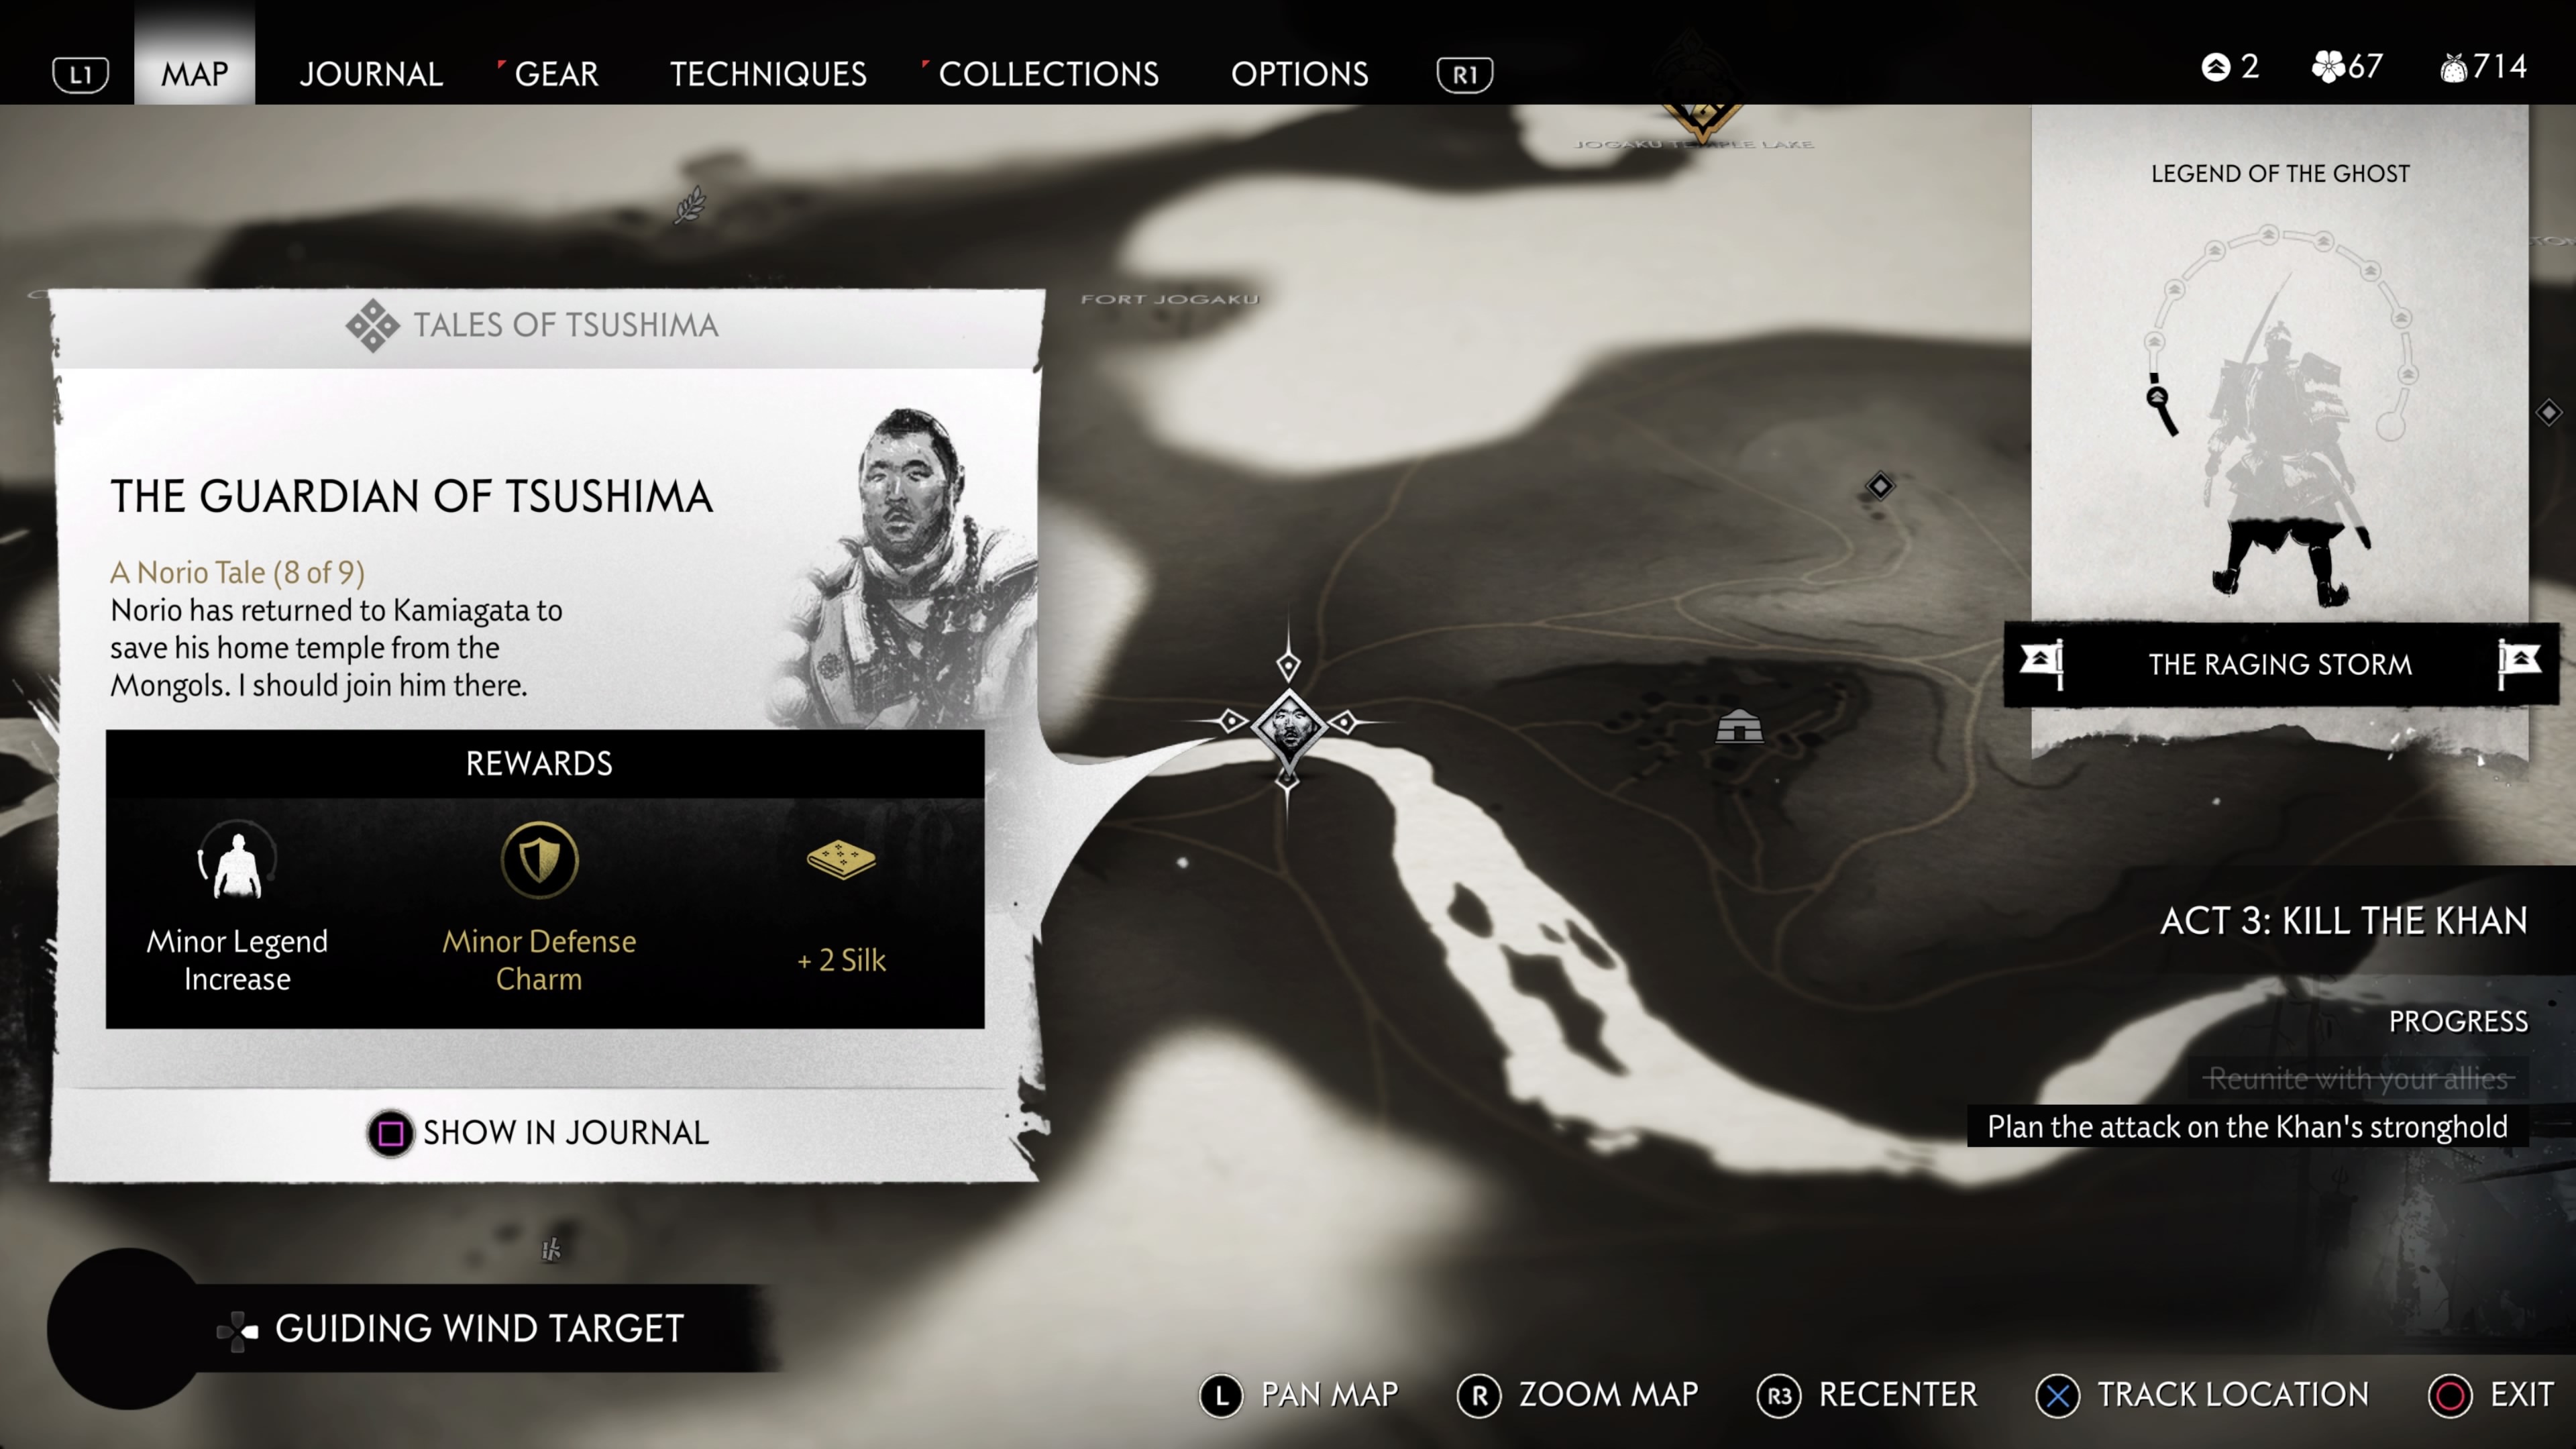
Location: The southern edge of the Kamigata region
The Guardian of Tsushima is unlocked by completing the Wolves at the Gates story mission during Act 3. Talk to the monk on the road, and he'll lead you to Norio. Talk with him, and you'll ride on horseback to Cedar Temple to wage war on the Mongols who have invaded the temple. There are a lot of enemies here, but you've got backup with Norio and his small band of warrior monks providing support. Make use of your various weapon stances to fight off the enemies while slipping in some tools and concentration arrow shots in between to help manage the overwhelming numbers charging at you. As soon as the assault ends, follow Norio to one of the temple buildings to end the Tale.
The Threefold World
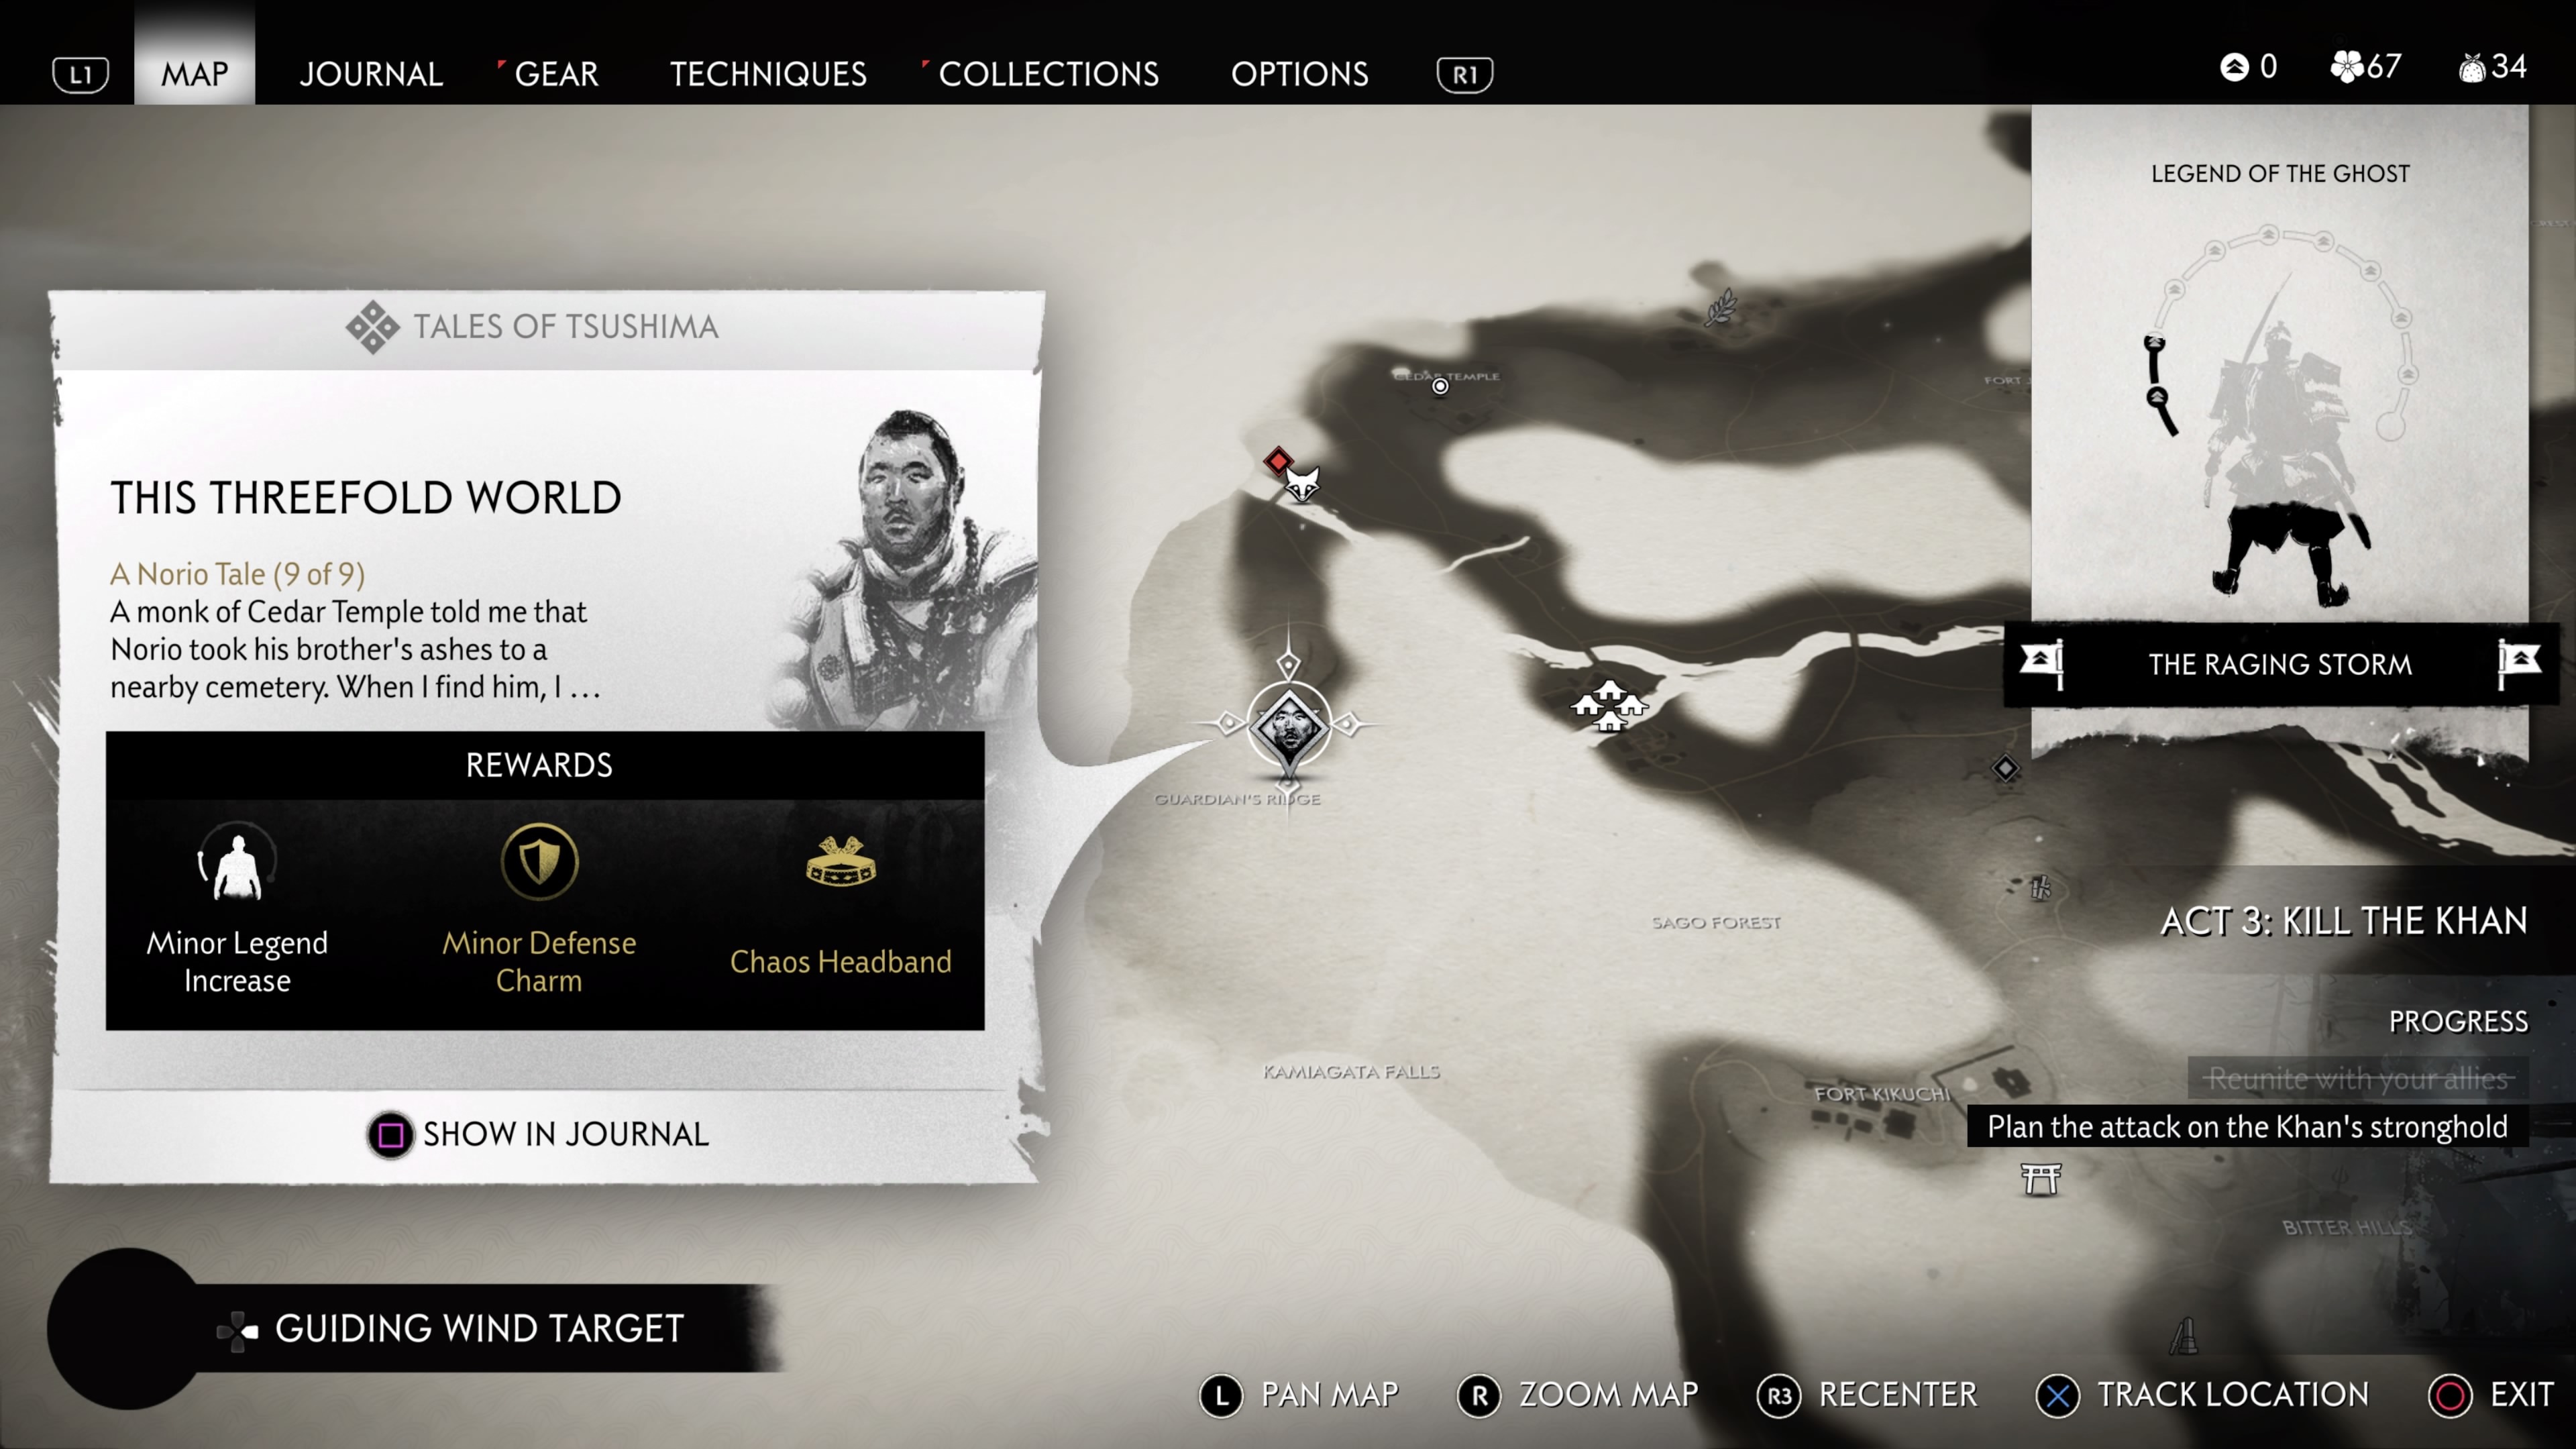
Location: Guardian's Ridge
The Threefold World is unlocked by completing The Guardian of Tsushima. Follow Norio to his nearby campsite and then rest. Once you're awake, follow the path down to the Mongol camp and approach Norio to end the Tale.
Yuriko
The Proud Do Not Endure

Location: North of Kubara Forest
The Proud Do Not Endure is unlocked by completing the Ghosts from the Past story mission during Act 2. Follow Yuriko until you happen upon a cemetery filled with Mongols. Clear the area and then travel with Yuriko until you reach the cemetery with the flowers you need to craft the Hallucination Darts for your Blowgun. Follow Yuriko again, and you'll eventually happen upon a Mongol camp at Riverside Farm. Clear the camp and then talk with Yuriko. Walk with her to the nearby cemetery to compose a haiku and end the Tale. It's worth noting you get a special Charm for completing this Tale called Yuriko's Keepsake, which gives your arrows a 15% chance of poisoning enemies.
The Art of Seeing
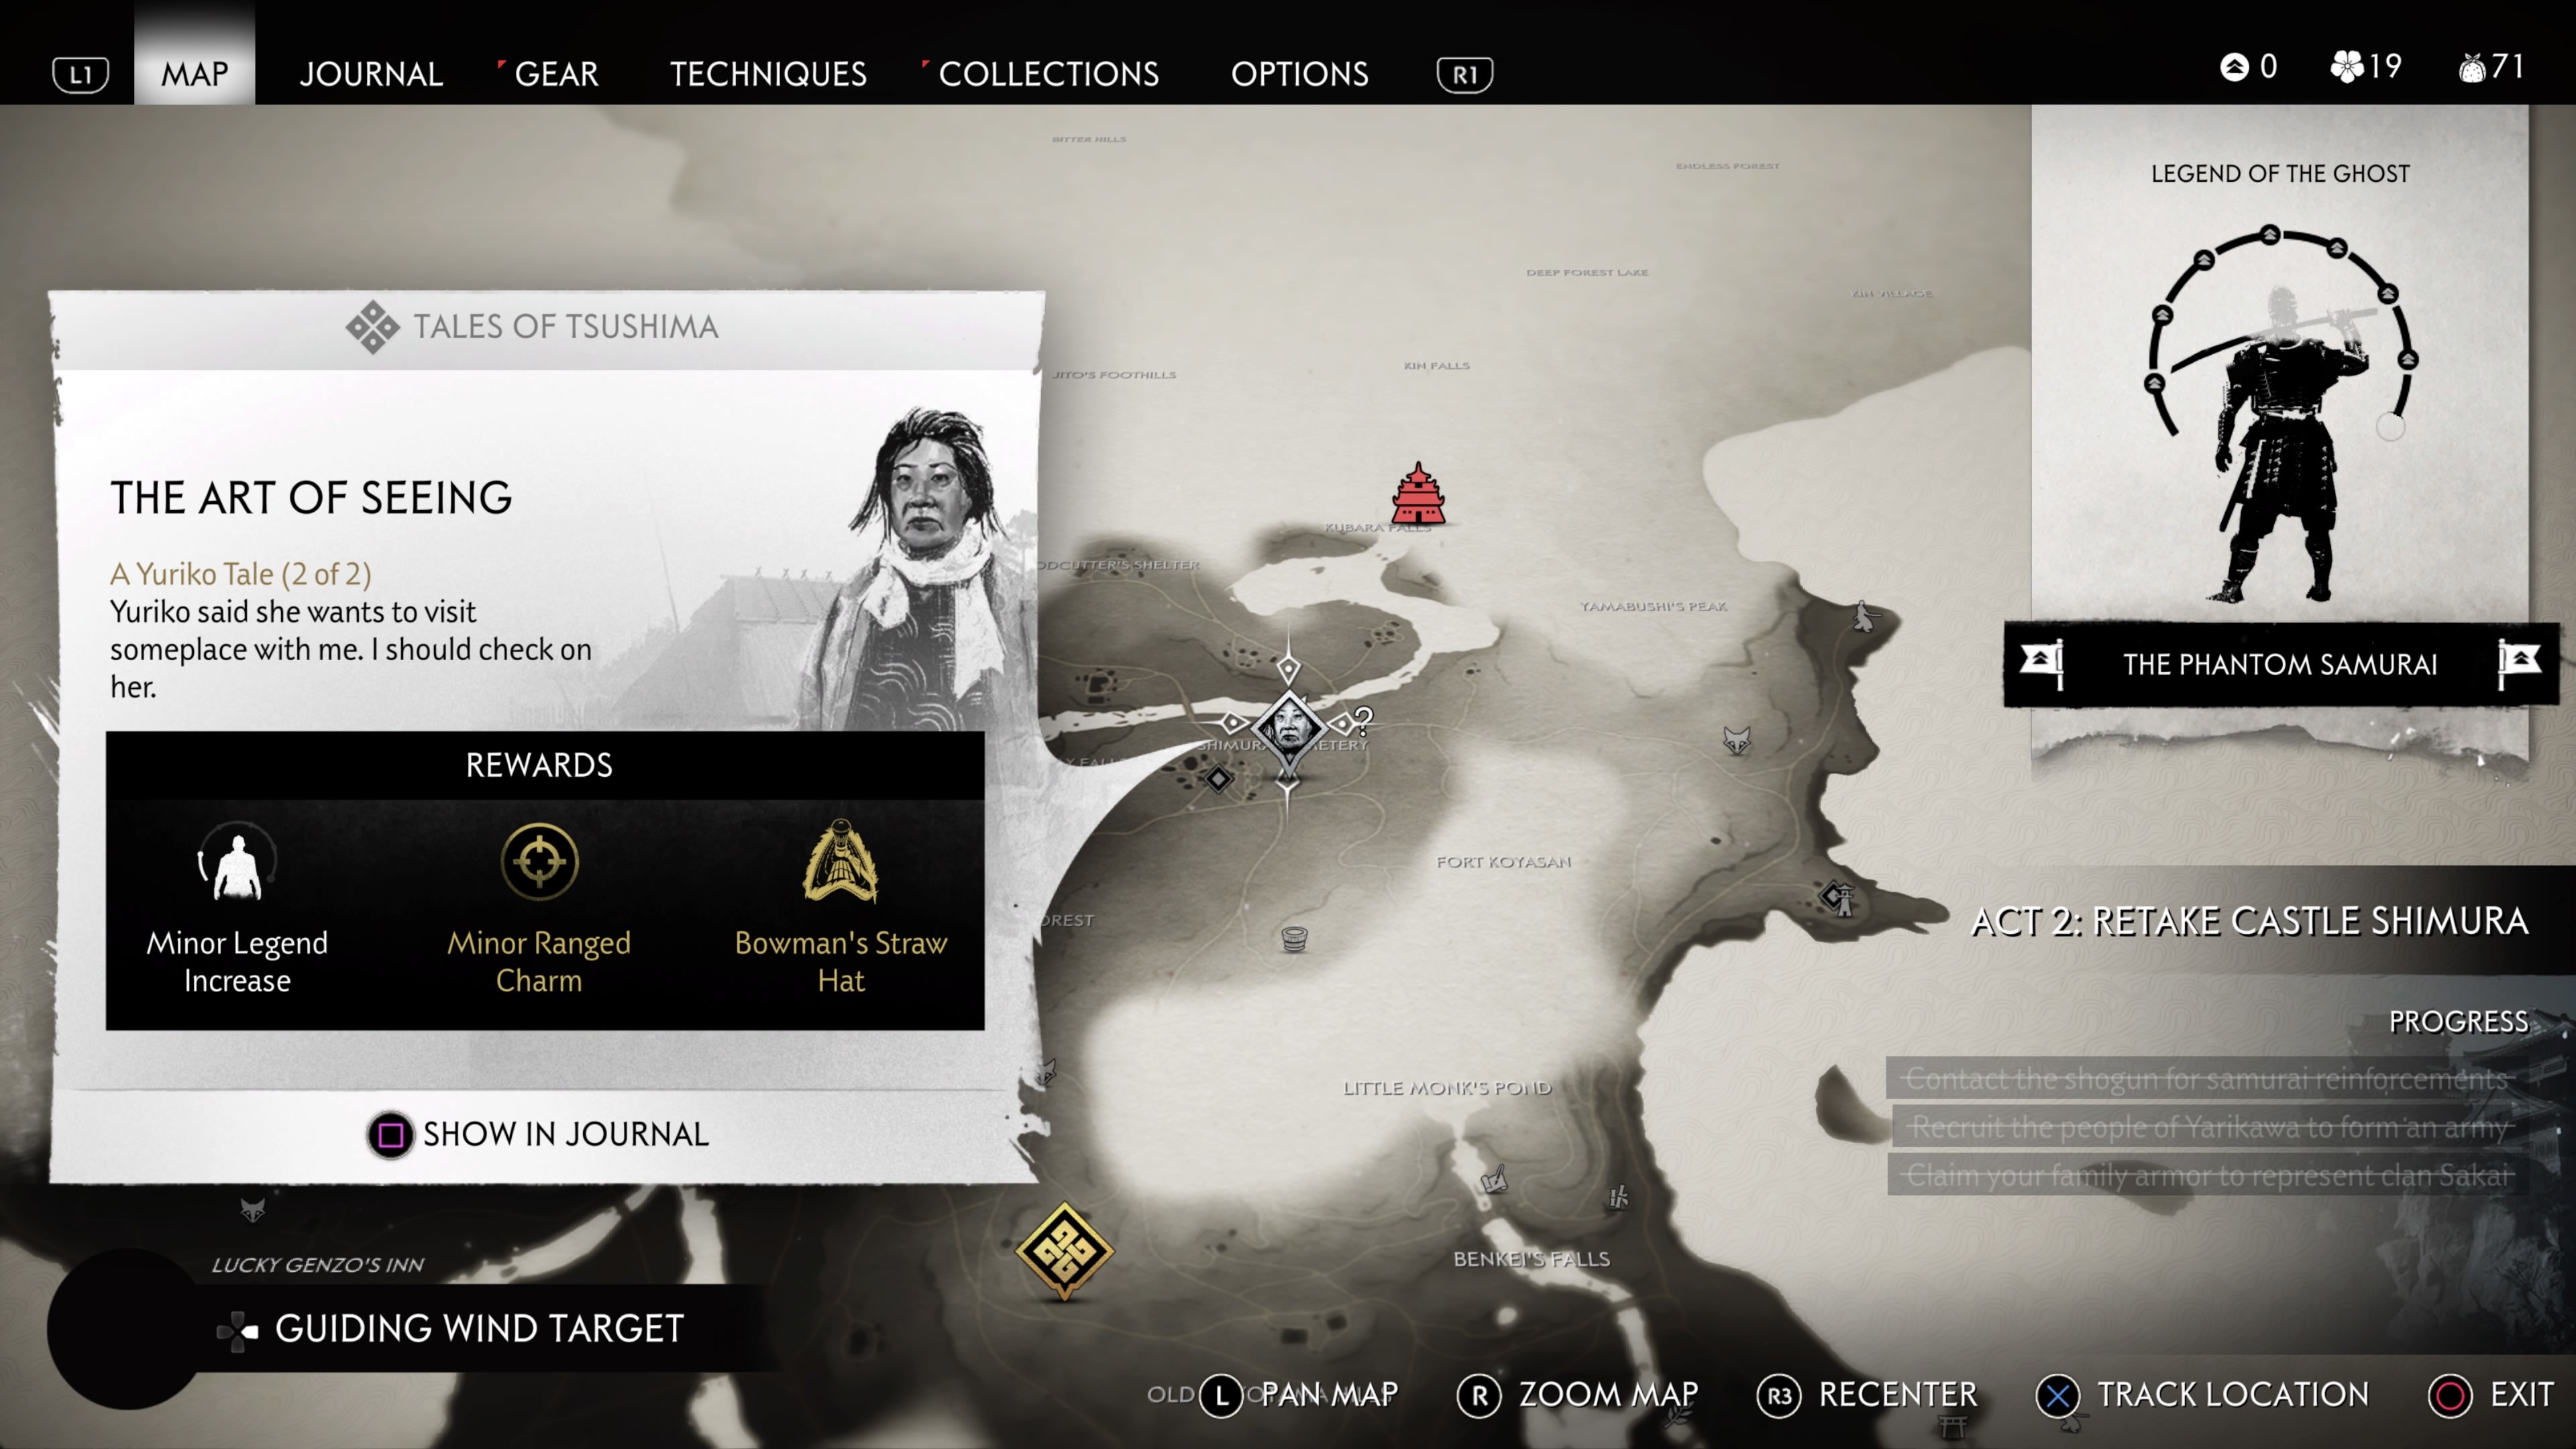
Location: Shimura Cemetery
The Art of Seeing is unlocked by completing The Proud Do Not Endure. Talk to Yuriko and follow her until you reach a hot spring. Next, run out into the woods to find some wild boar to hunt; shoot some concentration shows from your bow to down one with ease. Return to the hot spring and examine the footprints left by Yuriko. Follow the tracks up the hill until you find Yuriko. Travel with her to another nearby cemetery to end the Tale. The reward for this one is another Yuriko's Keepsake, which you can stack onto other Charm slots to increase your chances of an arrow poisoning enemies upon contact.
Ghost Of Tsushima News
- Ghost Of Tsushima Getting "Legends" Co-Op Multiplayer For Free
- Ghost Of Tsushima Review - Chaos In The Windy City
- Ghost Of Tsushima Mythic Tales Guide: How To Complete Them All
- + Show More Ghost Of Tsushima News Links (2)
- Ghost Of Tsushima Armor Guide: All Armor Sets And Locations
- Ghost Of Tsushima Walkthrough, Guides, Collectibles, And Tips (Spoiler-Free)
Got a news tip or want to contact us directly? Email news@gamespot.com
Join the conversation