Baldur's Gate 3 - Mind Flayer Parasite Specimen Locations Guide
Acquire Mind Flayer Parasite Specimens to gain additional points for your powers in Baldur's Gate 3.
Baldur's Gate 3 presents many opportunities for you to lay waste to your opponents. One facet involves Illithid Powers, where you unleash your true potential as the Absolute. However, enabling these abilities does require points. Our guide discusses how you can get Mind Flayer Parasite Specimens in Baldur's Gate 3 so you can unlock new skills. Likewise, please be reminded that this guide contains spoilers.
- Mind Flayer Parasite Specimen Locations in Baldur's Gate 3
- List of Mind Flayer Parasite Specimens
- Druid Grove/Wilderness - Brynna and co.
- Risen Road - Flint the Gnoll Warlord
- Goblin Camp/Shattered Sanctum - High Priestess Gut, Dror Ragzlin, and Minthara
- Grymforge - True Soul Nere
- Last Light Inn - Flaming Fist Marcus
- Moonrise Towers - Docked Ship
- Moonrise Towers - Disciple Z'rell and Linsella
- Mind Flayer Colony - Brine Pool
- Lower City: Bloomridge Park - Manip Edenosa
- Lower City: The Blushing Mermaid
- Lower City: Steel Watch Foundry
- List of Mind Flayer Parasite Specimens
Mind Flayer Parasite Specimen Locations in Baldur's Gate 3
The Baldur's Gate 3 Mind Flayer Parasite Specimen items can only drop from specific enemies or locations. These are related to the Illithid Wisdom/True Soul mechanic, since you have a psychic connection with many of these foes. Once you've obtained these orange and green bottles, you'll gain a point, which can then be used to unlock an ability. You can learn more in our Illithid Powers guide.
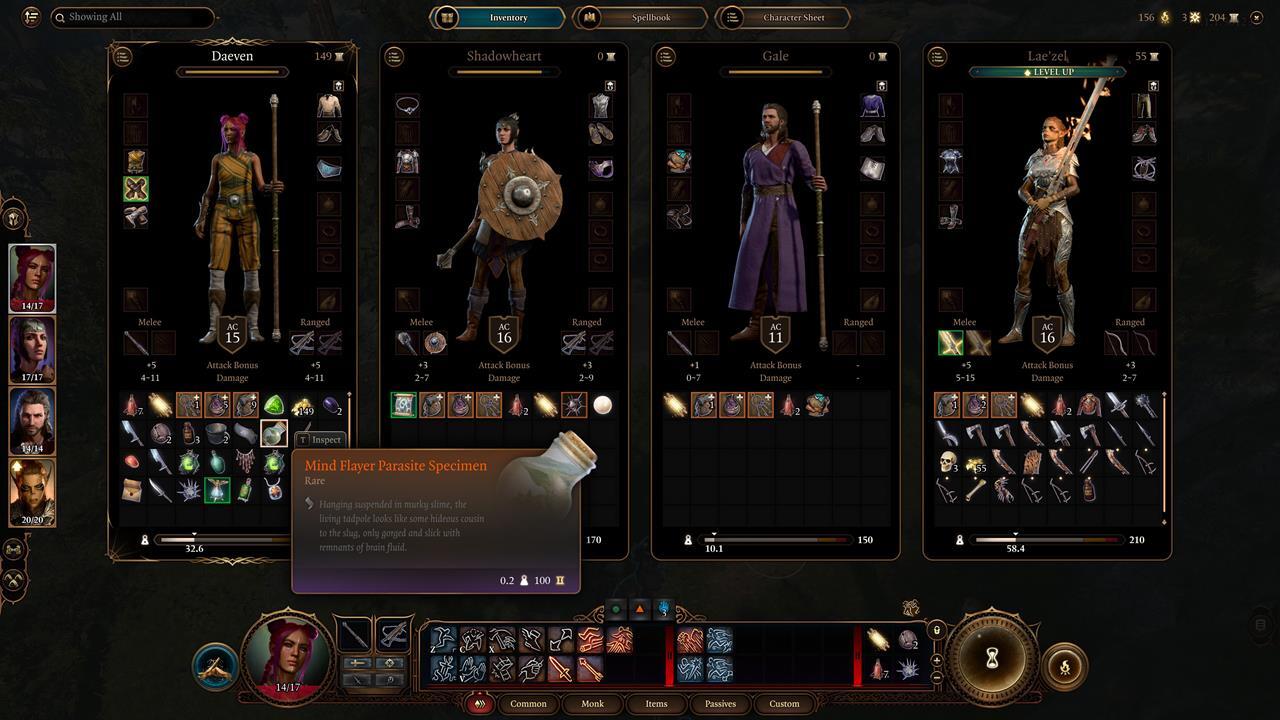
List of Mind Flayer Parasite Specimens
In any case, we list down the Baldur's Gate 3 Mind Flayer Parasite Specimen locations that we've discovered throughout our campaign. Take note that there are likely others that can be found along the way. However, you also need to be mindful of campaign progression, since you could miss out on certain areas and encounters as you advance further in the game.
Druid Grove/Wilderness - Brynna and co.
You'll stumble upon novice Brynna, her pal, and a dead fella just west of the Druid Grove. You can just use Illithid Wisdom to avoid fighting them. You can then loot the body to absorb the tadpole and obtain the specimen bottle.
Risen Road - Flint the Gnoll Warlord
Ideally, you'll want to battle these rabid gnolls while you're standing on an elevated section, such as a rock formation. This allows you to shove or cast pushing spells to send them to their doom. Likewise, you can get close enough to the Gnoll Warlord, and then use Illithid Wisdom to make it turn on its allies. Once the pack has been cleared, you can kill the Gnoll Warlord to grab this loot.


Goblin Camp/Shattered Sanctum - High Priestess Gut, Dror Ragzlin, and Minthara
The three Goblin leaders will need to be eliminated as part of a main quest:
- High Priestess Gut can be convinced to move to a small room. If you can take her out in a single turn, she won't even be able to call for backup.
- Dror Ragzlin, meanwhile, is surrounded by his thugs. If you try to enter his mind, you can make him ask questions to the dead Mind Flayer. However, you have to avoid the questions about who killed it, since you'll be revealed as a traitor. You could also position your ranged units and spellcasters on the wooden beams at the ceiling so you can avoid melee attacks.
- Minthara is quite a tricky character. You can actually romance Minthara, which implies that she's a potential companion. However, doing so means that you have to kill innocents, which will cause Wyll and Karlach to leave your party forever. It's better to just save the Tiefling refugees as part of the quest.

Grymforge - True Soul Nere
Both the Shattered Sanctum puzzle and Auntie Ethel's lair lead to the Underdark. That location also takes you to the Grymforge, which is the base of operations of Duergar slavers. There, you can choose to side with or battle True Soul Nere. Eliminating Nere rewards you with yet another Mind Flayer Parasite Specimen in Baldur's Gate 3.

Last Light Inn - Flaming Fist Marcus
Upon reaching the Last Light Inn during the game's second act, you'll finally meet Jaheira. She also introduces you to a Cleric named Isobel, who's casting a ward that prevents the curse from seeping into the sanctuary. Agents of the Absolute then invade the building in an attempt to kill Isobel. One enemy, Flaming Fist Marcus, also holds a specimen bottle.
We also have to mention that Isobel's survival is important. Apart from this battle, there are decisions related to the Dark Urge and the Nightsong that can lead to extremely drastic outcomes for many characters.

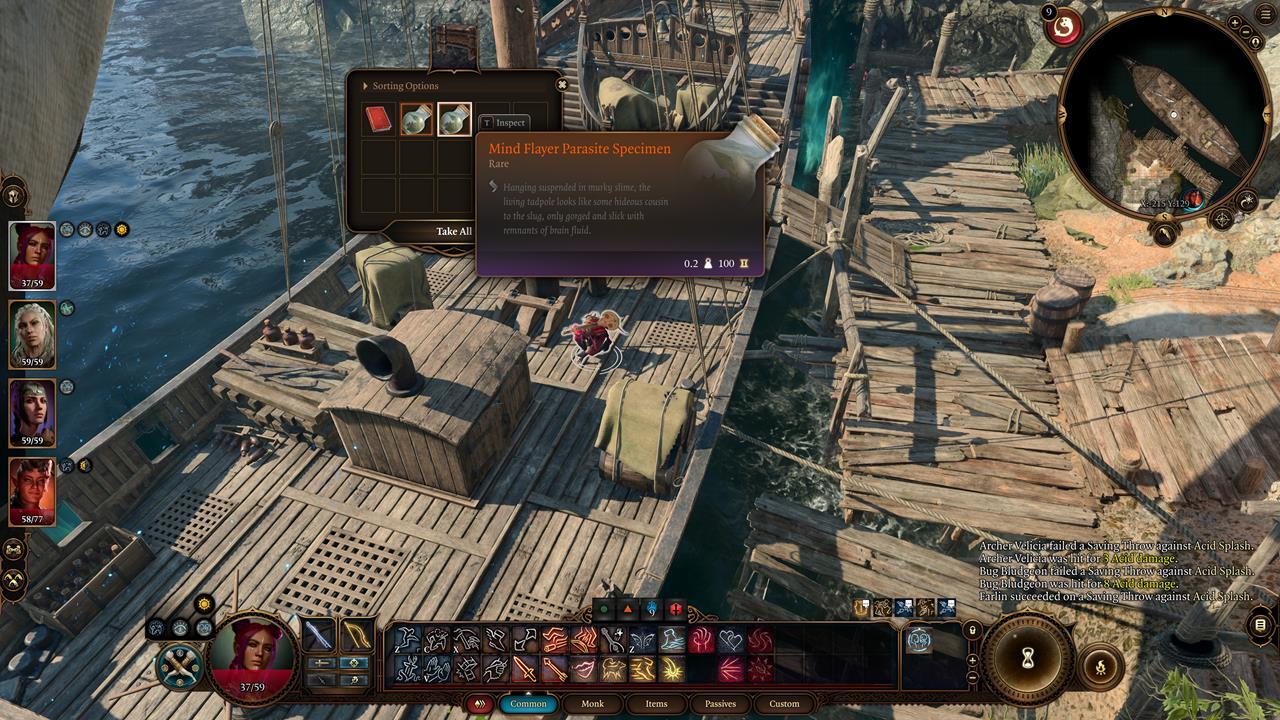
Moonrise Towers - Docked Ship
When you first reach Moonrise Towers, check the dockyards at the back to find a ship. You can use your Illithid Wisdom or other skills to persuade the guard that's patrolling the pier. Next, take a look at the barrels that are being loaded on the ship. You'll find two specimen bottles inside. (Credits to user Tmil93 for mentioning it in the comments in a different guide.)
Do note that the ship will leave port after some time passes (i.e. after you've progressed further in Act 2). But, don't worry if you miss your chance. You'll see the ship again at the smuggler's docks in Act 3.
You'll want to head to the northwestern edge of the map from the Rivington waypoint (the coordinates are X: -216; Y: 137). There are a couple of gangs that are fighting in the area. It's up to you if you wanna join the battle or if you prefer avoiding them completely. The two specimens are inside the ship's storage, and you'll still be able to grab them.
Moonrise Towers - Disciple Z'rell and Linsella
Eventually, you'll assault Moonrise Tower to put an end to Kethelric Thorm. Two of his lieutenants, Disciple Z'rell and Linsella, will enter the fray. Z'rell has the devastating Black Hole spell that slows down multiple targets while funneling them into one central location. Linsella, meanwhile, arrives fairly late to the fight, so you can beat her after taking out the priority targets.

Mind Flayer Colony - Brine Pool
After beating up Ketheric Thorm, you'll have to chase after him in the Mind Flayer Colony. After you encounter the pod room where Zevlor is imprisoned, you'll see a chamber that has Zariel's Asset. There's a brine pool nearby that you can interact with. At least one character has to pass the Perception check when touching the pool. This will net you an additional specimen bottle.
However, if your entire party fails the check, then you won't be able to obtain this one unless you reload an earlier save. This section itself prevents your party from fast traveling or swapping between teammates.

Lower City: Bloomridge Park - Manip Edenosa
You can find another Baldur's Gate 3 Mind Flayer Parasite Specimen while exploring Bloomridge Park in the Lower City. There's a chance that Bhaal cultists will ambush you in that area. After taking them out, a Flaming Fist by the name of Manip Edenosa will approach you. It seems that she's being controlled by the Absolute. After a short chat, she'll perish instantly, and you can claim the bottle from her corpse.

Lower City: The Blushing Mermaid
One of the quests that you can do in the Lower City is called Save Vanra. In it, you discover that a child has been eaten by Auntie Ethel, a hag that you probably met during Act 1. In the Blushing Mermaid's cellars, you'll find a cavern with more mind controlled enemies. After eliminating them, jump on the mushroom ledges to reach a wooden platform. The container is next to some gnarled branches.

Lower City: Steel Watch Foundry
Heading to the Steel Watch Foundry is a key task if you want to defeat Lord Gortash in Act 3, given that the building has the controls for all the mechs/golems. Check the back of the chamber just before the control room. You'll see a corpse that the denizens here have been experimenting on, as well as a Mind Flayer Parasite Specimen on a desk.

In any case, these are the Mind Flayer Parasite Specimens that we've found so far in Baldur's Gate 3. There are bound to be more to discover as we progress further in the campaign. We'll update our guide soon, so stay tuned.
Baldur's Gate 3 is filled to the brim with activities and secrets. You'll no doubt be part of an adventure that can take countless hours to complete. For other tips, you can visit our BG3 guides hub.
Got a news tip or want to contact us directly? Email news@gamespot.com
Join the conversation