Champions: Return to Arms Walkthrough
In the latest dungeon crawl from Snowblind Studios, you're once again called upon to conquer the forces of evil - or join them - as you make your way through the Planes and attempt to collect the Shards of Innoruuk. Our walkthrough features a walkthrough and tips for all of the Champion's Medallion and Bloodstone side quests.
Design by Marty Smith
Over the last three years, Snowblind Studios has made a name for themselves with fast-paced, action-oriented hack-n-slash games for the console market. After the release of Baldur's Gate: Dark Alliance in 2001, they refined their formula and released Champions of Norrath early in 2004. Now, with Champions: Return to Arms, the sequel to Champions of Norrath, Snowblind has delivered perhaps the finest hack-n-slash dungeon romp to yet appear on the PS2.
GameSpot's guide to Champions: Return to Arms is your one-stop shop for coverage of all of the game's many facets. One of the most intriguing aspects of the game is its inclusion of a number of side-quests and mini-games, in the form of the search for the Champion's Medallions and the Bloodstones. Some of these challenges are quite difficult; luckily for you, we've got maps and walkthroughs for them all, which should help you become a fully-certified champion and unlock the most powerful weapon in the game. Enjoy!
Table of Contents
ClassesWalkthrough
Plane of Innovation
Pit of Ill Omen
Plane of Water
Plane of Torment
Plane of Disease
Plane of Valor
Plane of Fire
Plane of Storms
Plane of Valor, part II
Faydark Forest
Plane of Nightmares
Plane of Fear
Classes
Shaman
Shamans are a tough class to jump into the game with; they don't start out very strong, and their low-level spells are fairly weak. We found ours to be really powerful at the end of the game, though, mostly due to three of their spells and their ability to use almost every set of weapons and armor in the game, save for bows and two-handed swords. Although the class description indicates that they're more of a spellcasting class than a melee-oriented one, we found it best to pump up the Shaman's strength and send him into battle with a big two-handed weapon. 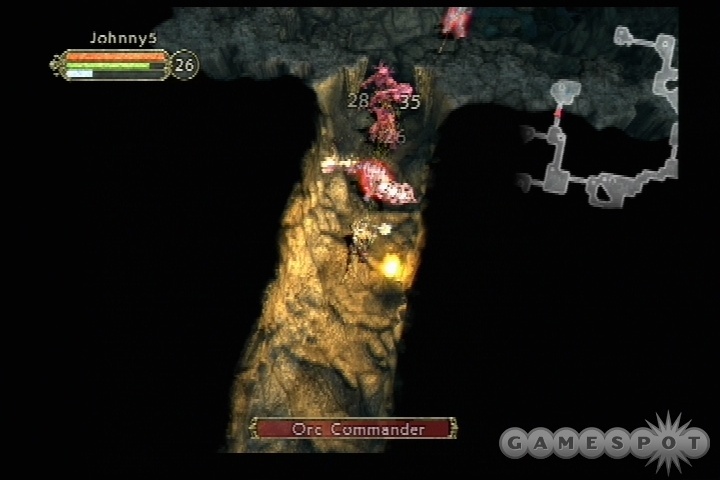
The three key spells here are going to be Tagar's Insects, Healing, and Planar Wind. Tagar's Insects is just tremendously useful, especially after you rank it up until it'll affect three or more enemies for five seconds apiece. In addition to the damage (which isn't very significant as you proceed through the game), Insects will cause afflicted enemies to become distracted once a second, forcing them into their stun animation and preventing them from acting for a moment. Even boss enemies will usually be afflicted by this effect, giving you a few seconds of nearly unfettered movement and attacking.
Healing is a no-brainer. You'll want to have this one bound all the time, pretty much; it heals faster than any potion will ever be capable of, and can eventually heal most of a life bar if you level it up high enough.
Last up is Planar Wind. For its level, this is one of the more brutal direct-damage spells you'll find in the game. It shoots out a beam of light directly in front of the shaman, hurting anyone it hits, and penetrating through its initial targets to hit anyone behind them. It's also relatively cheap to cast, allowing you to level it up until it starts to become unwieldy. Higher levels will increase the width of the beam, making it a cinch to nail large groups of enemies in one shot. Archers, especially, become much less annoying when you can zap them from long range.
Berserker
The Berserker is an offensive-minded class, with a focus on dealing damage quickly. This might sound somewhat analogous to the warrior, but the distinction comes in the selection of skills, especially the crucial Bind Wound, which allows them to naturally regenerate damage more quickly. The Berserker's early skills all center around increasing his damage in combat, which forces Bind Wound up the skill tree to level 17, whereas the warrior can start dumping points into it at level three. Unless you can find items that increase your health regeneration rate, you're going to have to invest a bit of money in health potions to ensure that you always have a decent supply on hand, as those will be all that stand between yourself and death.In addition to your melee focus, Berserkers can also invest some of their skill points towards improving their ability to throw axes. You can completely ignore these skills, if you wish, as they exist in their own little tree and don't act as prerequisites to anything more useful. Almost every class will want to have some kind of thrown attack, so you may want to get a few ranks in Summon Axe when you have spare skill points, but your primary method of dealing damage as a Berserker will lie in melee combat, so that's where you should spend your skill points.
The primary skills here are going to be Blunt Weapons or Slashing, along with Critical Hit, Bind Wound, Dual Wield, and Battle Cry, when it becomes available. Critical Hit is a tremendous help against bosses and tough normal enemies, since it'll give you a good chance of doing triple damage on a successful attack. Bind Wound and Dual Wield are obvious passive abilities to invest your points in; Bind Wound will net you a set increase to your health regeneration, while Dual Wield will let you wield a weapon in both hands, thus allowing you to do that much more damage. Battle Cry is the last skill you get, but it's the only one that'll give you a chance to stun your enemies, which can be tremendously helpful when you're dealing with hordes of low-level enemies or bosses.
Warrior
Warriors, like Berserkers, are offense-minded melee damage-dealers, but they're not quite as willing to sacrifice their health as Berserkers are, preferring a slightly more cautious approach to combat, with passive defensive skills becoming available earlier and more skills that will impart stunning effects. Beyond that, there's not much to say; if you're looking for a well-balanced melee combat class, then the Warrior should be right up your alley.The skills you're likely to find most useful will be Blunt Weapons, Slashing, Bind Wound, Critical Hit, perhaps Shield Bash (if you happen to use a shield), Dual Wield, Stunning Strike, and Ancestral Call when it becomes available. Most of these are passive, which is always useful. Critical Hit is going to be your boss-killer, while Shield Bash and Stunning Strike will both be useful due to their abilities to stun enemies, which is pretty much always going to come in handy. Although Ancestral Call isn't available until level 20, it'll be a great way to buff yourself and your teammates for a short period of time, which will make dealing with large groups of foes that much easier.
Ranger
The Ranger is the distance-attack specialist among all of the classes in Return to Arms, with a focus on using bows to deal heavy damage from long range. This is a class that's likely going to be best used in online groups, where you'll have warriors and berserkers to run up to the enemies and get their attention, but it's still a viable choice for solo play. In addition to a bow and arrow, Rangers are also able to use both slashing and blunt weapons, and will get specialization skills for both.Most of your skill points, though, will probably be sunk into the Archery skill, which gives you a passive damage boost to all of your bow attacks. If you happen to find an excellent melee weapon, then feel free to use that on weaker enemies, but boosting Archery will let you dish out the pain at long range; you won't be able to take on every boss monster at long distance, though, so you'll probably want to have a good backup weapon, just in case.
In addition to Archery and the usual passive skills, the Ranger will want to put points into Endurance (since you likely won't be boosting your strength very much), Cold Arrow (useful for freezing enemies), Regeneration (to get mana back more quickly), Entangle (to break up crowds or force enemies to sit still while you plunk them with arrows), and Minor Healing (healing spells are pretty much always useful).
Cleric
Clerics are team-oriented characters, with a number of spells that buff teammates, in addition to a few spells that are specifically targeted against undead opponents. They're also capable of healing themselves and others, and obtain healing abilities earlier in the game than most other classes with this capability. There are restrictions on Clerics, though, most notable being the fact that they're incapable of using slashing weapons; blunt weapons, such as maces, are their trademark weapons. Although this is a limitation, at least you won't have to experience the Warrior's dilemma, where you find an incredible sword and regret focusing on Blunt Weapon specialization; Clerics aren't even capable of using swords, so every slashing weapon can be sold to the vendor, sight unseen.In addition to the passive abilities here, Clerics will want to focus on: Healing, which can be used to heal yourself or your teammates; Hammer of Wrath, which will summon a helpful hammer that can distract and damage enemies; and Blinding Light, which has a good chance at confusing nearby enemies. After these spells, you're going to have a number of direct-damage abilities that will come in useful, or you can focus on your melee attacks and use things like Shield Bash and Retribution to increase your efficacy in that area.
Wizard
The Wizard is likely going to be one of the most difficult classes to use in a solo game. Although they deal a lot of damage, they rely on their spells to do so, and are much less effective in melee combat than other classes, both in terms of dishing out blows and taking hits. If you choose to be a Wizard, then you'll need to dump most of your stat points into Intelligence to get a large mana pool, leaving few for Strength and Stamina (although Stamina should be your second choice when you have some stat points to spare). 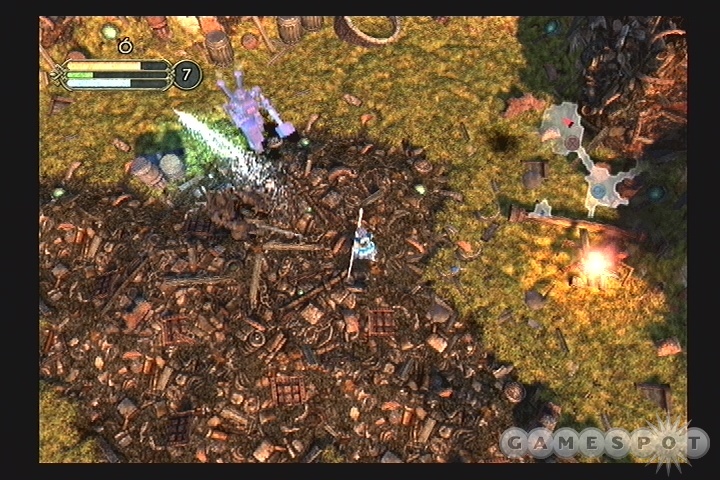
As a Wizard, you'll have the opportunity to use both fire and ice attacks, along with a couple of lightning spells, so you'll be able to tailor your spell choice according to the plane that you're on. If you notice that your enemies take more damage from ice or fire, then hotkey a pair of spells from that family and go to town. Against enemies who aren't resistant to both, you'll find that fire spells generally deal more damage, while cold spells have a good chance to slow your enemies down, giving you more time to avoid them or fire more spells at them. Beyond the direct damage spells, though, your choices for skills will usually come back to the passive skills, of which Concentration will probably be the most important, since it lets you regenerate your mana much more quickly than you normally would. Endurance will partially compensate for your low strength, in that you'll be able to pick up more loot before you have to warp back to your handler, while Bind Wound will let you regenerate health over time, saving you from continually having to pump health potions.
So far as the other spells go, you can probably safely ignore anything that modifies weapon damage, unless you've found an exceptional blunt weapon to use. For the most part, you're going to want to rely on your spells as the brunt of your attacking abilities, saving weapons for small numbers of weak enemies.
Shadow Knight
Shadow Knights are spellcasting melee warriors, eager to use disease and undeath as tools to further their aims. Although they're going to be right in the mix of battle with Warriors and Berserkers, their skills revolve more around dealing direct damage and confusing opponents, rather than buffing their own battle skills, making this a varied and interesting class to play with.In addition to the usual suite of passive enhancers, Shadow Knights will get a number of spells that will impart disease states to their enemies. Disease effects usually deal a bunch of upfront damage, but can also spread to nearby enemies and deal a bit of damage over time. The secondary damage is usually going to be quite minor, but can cause enemies to enter their damage animations, which will stop them temporarily, letting you get around them to deal extra damage. The Shadow Knights also have a couple of spells (Engulfing Darkness and Shadow Step) which will allow them to confuse enemies for a short period of time, giving them an edge in combat.
One of the more interesting spells here is Summon Skeleton, which will summon in a skeletal minion to aid you in combat. Although the skeleton will always lag behind you in levels, it'll be a welcome addition to the team in most combats with tough enemies, as it will provide at least a second or two of distraction, which can often get you into position for a killing blow from the rear.
Walkthrough
Plane of War
Lost Battleground
Take your bearings here at the beginning of the game and get used to the control scheme and combat system in Return to Arms, if you didn't play the previous title. You'll want to get used to using the right analog stick to both zoom the view in and out (by tilting it up and down) and to display your minimap (by clicking on it). When you've got the basics down, you can start chopping through the kobolds in this area, who should've prove a serious challenge for most characters, but be sure to make checkpoint saves at each of the save pillars you come across, just in case you come into some trouble.
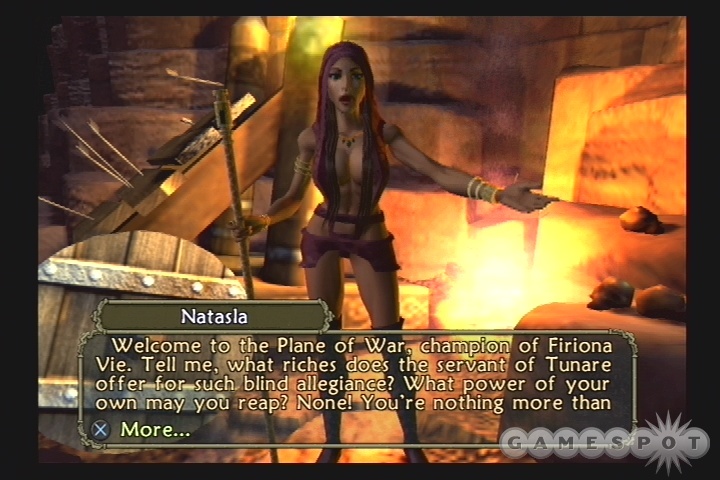
Soon after you enter the Plane of War, you'll come across Natasia, a servent of Rallos Zek, the ominous Warrior who apparently runs the Plane. She'll offer you a choice between Good or Evil; the choice is yours. If you choose the Evil path, then you'll be afforded a shortcut to Draenor at the end of the level; if you stick with the good, then you'll have to take the long way round to fight Rallos Zek. This will also have further implications throughout the game, though. If you choose to become evil, then Natasia will take the place of Fiorina Vie as your handler and vendor in between Planes. There's also likely to be a different ending if you happen to be evil when you beat the final boss.
For the most part, though, the choice between good and evil is a cosmetic one; you seem to head to the same planes as either persuasion, in the same order, with the same basic goals, but your motivation may be slightly different. For the sake of this walkthrough, we went through as a good-oriented character; if there are any significant changes for evil characters, we'll update the guide as we uncover them.
Light Side: Field of Strife
If you do choose the path of the light when talking to Natasia, then you'll be forced to head through the Field of Strife to reach Draenor. Your first challenge here will be to kill 13 orcs, due to the fact that they're preventing your friendly engineer Elf from accessing a nearby bridge. In order to lower the bridge, you'll need to kill all of the orcs, which will allow the Elf to walk over to the bridge. The orcs have a habit of dropping their equipment when they die, which is a neat effect, but can also be a bit confusing, since none of it is pickupable. You might just want to tap the square button while walking over their corpses to be sure that you have everything that they dropped.After the first bridge is dropped, you'll come across your first true boss monsters, in the form of a pair of Evil Shamans. Both of them will have large coteries of orc guards, but the Shamans themselves won't move all that much, so you should try to draw the guards away from them and kill them before resting up and taking on the Shamans.

The Shamans are off to the left and right of the main path; they'll attack you with an acid rain attack and a ball of lightning, as well as some powerful melee attacks. If you have some mana potions and/or ranged attacks, then taking them on from a distance is probably the better option, if only because they deal a lot more damage with their melee attacks. They can also revive any fallen orcs nearby, so be sure to get them out of range before attempting to kill the Shamans. Also, keep in mind that they'll quickly regenerate health if you get far enough away for their health bars to disappear from your screen. Both of them will drop some pretty nice loot, though, and will probably provide you enough experience for a level or two.
The last bridge will be guarded by more orcs, who are looking over a pair of catapults. You'll need to destroy the catapults for the engineer to reach the final bridge. Destroying them isn't too difficult; it's getting to the catapults that'll be the hard part, since the path is littered with orcs and troll archers, and you'll be forced to pass underneath the catapult fire. It's best to just ignore the enemies as best you can until you reach the path leading to the catapults, then kill everyone around you; this will let you avoid most of the damage from the catapults, although you may be in danger of getting surrounded. Each of the catapults will have an explosives-laden crate near it; ignite these to blow them both, then head down into the Armory/War Room.
The Armory
You don't have any particular goals in the Armory; just to get through it. Do your best to save up your potions during your journey through the pit, though, as you'll be facing off against Rallos Zek at the end of it. Rallos is mildly formidable, with some impressively damaging sword attacks to contend with, but he has a simple pattern. If you just run away from him, he'll eventually rear up and plant his sword in the ground, causing a blue circle to appear; if you're in this circle, you'll be knocked off your feet and take a mild amount of damage. The key here is that the circle extends in front of him, meaning that if you stand behind him while he's planting the sword, you won't get hit by the shockwave, and you'll be able to swing away at him four or five times before he stands back up and gets into a sword-swinging mood again. Melee characters won't be able to do much but wait for this cycle to repeat often enough to kill Zek; characters with ranged attacks can feel free to use those while Zek is following you around, in addition to hitting him with your ranged weapon.
Repeating this process will eventually drive Zek into the wilderness; apparently, instead of defeating him as the life bar would indicate, he just got bored of getting his butt kicked and ran off. He'll drop a Shard of War after he's defeated; one of your overarching goals in the game will be to find one of these on each plane that you visit.
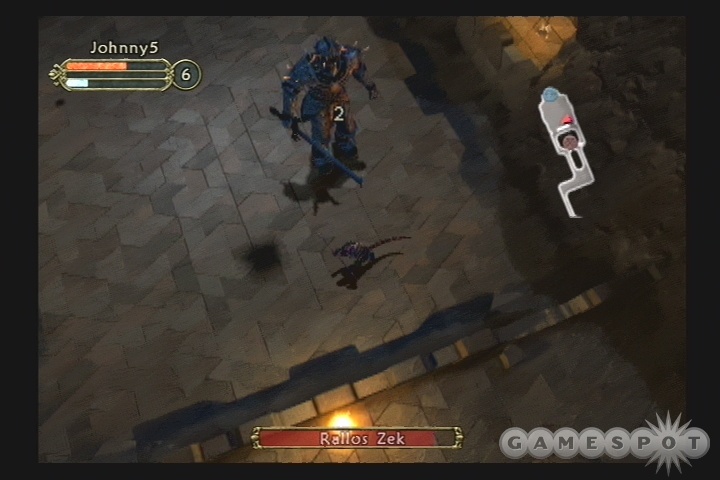
Dark Side: Drundar
Drundar is the home of Rallos Zek, who is now your new master if you've chosen to stride the evil side of the path. In order to prove your worth to him, though, you'll have to access his little arena of torment, then fight his henchmen.First up is gaining access to the inside of the arena. This entails travelling around the exterior of the arena and tracking down eight different switches; when you've flipped them all, then the doors to the Arena will unlock. The main obstacles here will be the large troll enemies, that wield huge hammers; they're quick and powerful, but you should be able to block all of their attacks and counterattack at close range. Just be sure to make a checkpoint save after the first pair of locks, as the second pair can be a pain to get to, due to the number of enemies in the area.
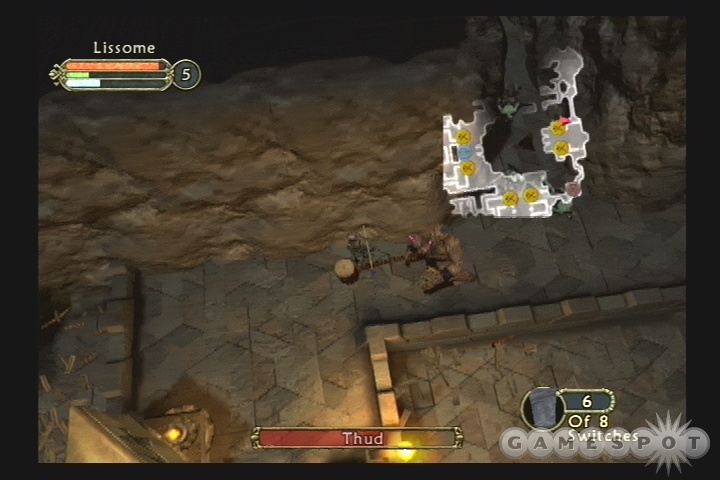
After the third set of locks, you'll have to fight a boss, the appropriately named Thud. Thud's pretty much the same as the other troll enemies, in that he uses the exact same attacks, but he has far more health than they do, making this a long battle of attrition. Still, if you block, then counterattack while he's winding up for another swing, you should be able to take him down in a couple of minutes. Spellcasters might prefer to try and kite him by firing spells, running away, turning and firing again, running away again, etc.
After you unlock all eight of the keys, the Arena will open up, so head in there for your little test. Be sure to make either a checkpoint or real save. This would also be a good time to head back to town and buy some throwing weapons, if you don't already have some, as the Four Horsemen are going to be a pain to kill without ranged attacks. What's more, there's another boss after them who's also a bruiser at melee range, so be sure to grab around 100 ranged attack weapons if you can afford them.
Boss: The Four Horsemen
As soon as you enter the Arena, the Four Horsemen will appear. These guys will use a bunch of different ranged attacks on you, ranging from an acid rain to a homing disease beacon. As we mentioned, though, it's a lot easier taking them down from range than it is taking them on in melee combat, as they'll group up on you and quickly sap all of your health, unless you can break them off so that one member of the group is flying solo, which is difficult to do. (You may want to try using the pillars around the edge of the arena if you're really set on getting them in melee combat.) 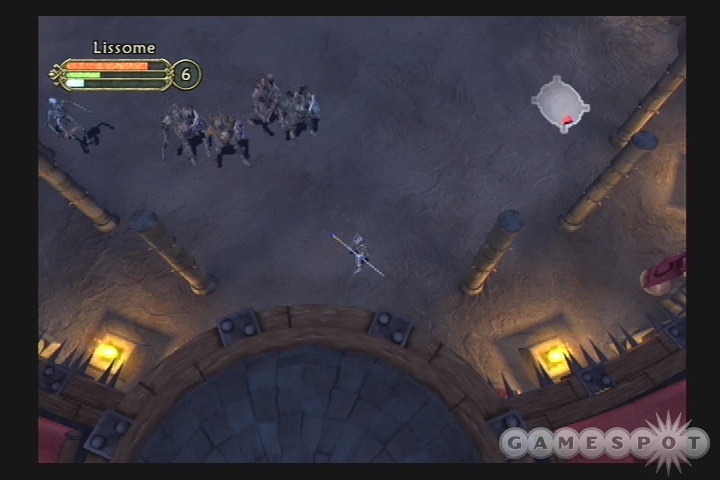
One of the horsemen will, in fact, summon in a speedy skeleton to fight you. You can kill it if you want, but the horseman will just summon it again, so the best tactic is to just ignore it if you can, and focus on taking down the horsemen. If you can distinguish them from one another (and it's pretty tough to do), try to single one out, then start pelting him with spells or thrown weapons until he falls, then repeating the process on the next guy, until they all. Fall. Down.
Boss: The Avatar of Woe
The Avatar of Woe is essentially another boss-level replica of the troll enemies you fought; he comes in hard, with big melee attacks, but again, he's not too bad to take down if you have enough thrown weapons left. It's pretty dangerous to take him out at melee range, as his attacks are swift, and he'll occasionally come down with an unblockable two-handed slam that will knock you off your feet, and deal incredible damage if you have to be right underneath it. It's far better to just run-and-gun as much as possible, stay out of range of his melee attacks, and deal your damage from a distance until he falls. When he does, you'll finally meet up with Rallos Zek, who commands you to enter the other planes and gather together the rest of the Shards.
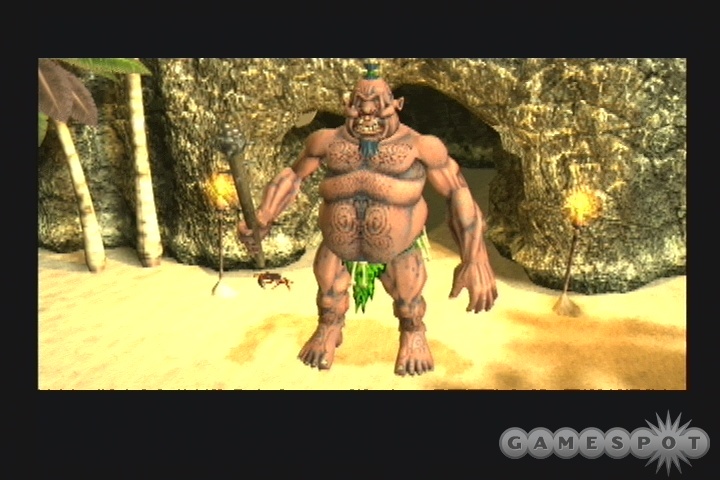
Plane of Innovation
Whether you're playing good or evil, the game starts to play pretty similarly at this point; regardless of your choice, you'll shortly stumble across Nitram after entering this plane, who asks you to bring him a Copper Sprocket. If you're good, he needs it to prevent another gnomish engineer from completing the siege engine; if you're evil, he needs it to complete the siege engine yourself. Regardless, you'll have to maneuver through the junkyard level and find the entrance to the Mines below in order to find the Copper Sprocket.
The Junkyard level is full of Clockwork enemies, to the exclusion of pretty much everything else. These guys are immune to poison and disease, so you won't be able to infect them with any of your goodies; they'll still take plenty of damage from the initial shot of poison or disease spells, so they're not entirely useless. They seem to be particularly weak to cold damage, which will be useful to any Erudite spellcasters. Meleeing them can be difficult due to their confusing attack patterns and their propensity for stunning you, but it's doable.
The Mines
As in the Junkyard above, the Mines will be overrun with Clockworks, of the same sorts. In addition, though, there are little suicidal gnomes scattered about, who'll run up to you and set their little powder caskets alight; they'll damage you severely if you happen to be near them when they blow. Luckily for you, it's easy to either run away after they light their fuse (they'll go immobile at this point), or just melee them to death before they have a chance to explode. There are more of the small caskets scattered around, though, so feel free to use them to knock out the Clockworks, who move slowly enough to make it fairly easy to time it so that they blow while your enemies are running by.
Boss Fight: Iron Guardian
After descending to a short, albeit darkened, second level of the mine, you'll find a passageway leading back to the surface, and your next boss, the Iron Guardian. This guy can be a pain in the butt for ranged attackers, due to the fact that he'll constantly shoot out metal spikes at you, which can quickly sap your entire life bar if you don't keep your guard up. He has a pretty predictable attack pattern with them, though, so it's not difficult to figure out when they're coming and guard accordingly. If you're a spellcaster, then feel free to guard, cast, guard again, and repeat the pattern until the beast falls, although this will take a while and a bunch of mana potions. 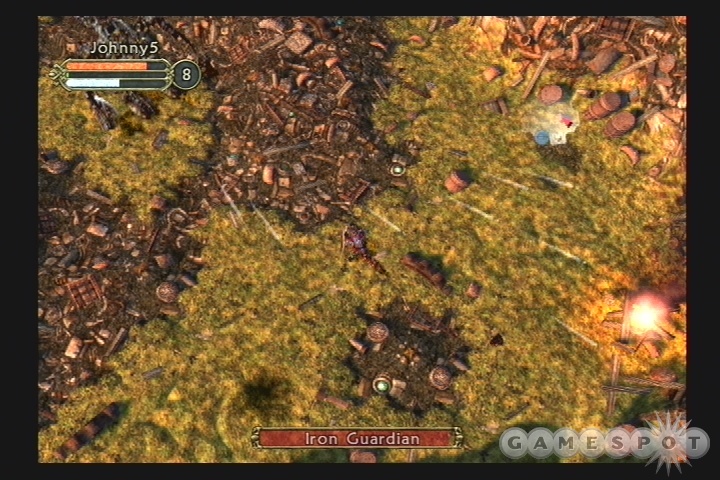
Melee characters should feel free to get right up next to the Iron Guardian. When you're standing in front of him, he has a pair of predictable attacks. In the first, he'll swing at you with both arms, then pause; in the other, he'll use his right arm for two short swings before coming in with a roundhouse with the left. All of these attacks can be blocked without being knocked down or taking any damage, though, allowing you to counterattack in between the Guardian's swings without too much worry.
The other thing to consider here is the influx of suicidal dwarves who'll magically be able to avoid the Guardian's attacks and come right up next to you. If you can stand next to the Guardian and force them to come to you, then they'll damage the Guardian when they explode, as well, but be careful about maneuvering around the Guardian to avoid the blast, as he does have one knockdown attack that he'll use on you when you're to his rear.
When the Guardian goes down, grab the loot that he drops, including the Copper Sprocket, and return it to either Nitram or Giwin, depending on your alignment. That'll complete your mission here, and nab you the Shard of Innovation.
Norrath: Pit of Ill Omen
Kerriel's Cave
Kerriel's Cave is overrun with mermen, many of which will be enchanted with various elemental properties. Luckily, they usually use a simple stabbing motion to attack you, which is easy to block, so long as you don't let them surround you. 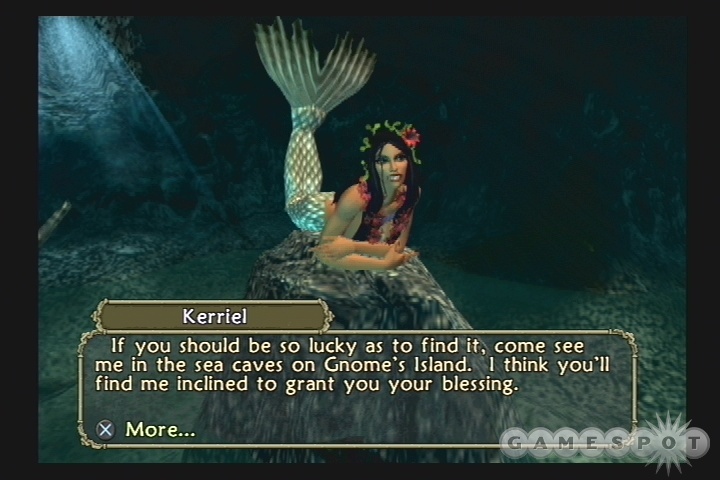
You'll need to fight your way through the cave until you reach Kerriel, who won't be able to enchant you until you return her favorite conch, which has been stolen by one of the cyclops who dwell on the other islands in the area. You'll have to use her boat to reach them.
Island of Lost Hope
The Island of Lost Hope begins with what appears to be a dead end, as you reach a broken pier that you can't get atop. If you backtrack, though, you should be able to get down into the water near the end of the pier you landed on, which will open up a set of passages through the watery backwoods of the island, filled with more mermen and some crab creatures. The crabs are going to be tough to bring down, because of their huge hitpoint totals, but they only possess a basic slash attack that's easy to block, so no troubles there.
Boss Fight: Droon
Eventually you'll reach a cave near a save point; this is Droon's Den, where the aforenamed Cyclops will await you. Now, all of these cyclopses will be tough to kill, and Droon is no exception. They all seem to have fairly similar attacks, though, so so long as you can adapt and anticipate, then you should get by without too many potions going up in smoke. You may just want to run around for a bit and go without using any potions until Droon kills you to get used to his attack pattern, since the checkpoint is set at the beginning of this fight.The first thing you'll notice about Droon is that he's fast, especially for a guy as big as he is. He'll be able to run you down no matter how fast you move, and when he catches up with you, he'll slash you in the back and knock you down, as well as doing heavy damage. If you're intent on spellcasting or using thrown weapons, then you can sometimes get a few in, run away if he staggers, throw some more, then repeat, but you won't be able to avoid melee forever.
When Droon closes to melee range, he'll rely on some pretty obvious moves, including the typical slashing attacks which are blockable. He also has a poison spit attack--this is more of a nuisance than a real threat--and a really annoying sand-kicking thing, where he'll throw up sand at your face. This seems to almost always drop your guard for a second, and he'll take advantage of this by swinging for the fences; you'll almost always take big damage here. If you can learn to run when he tries that, and block/counterattack when he does his normal swing, then you can whittle down his life over time. It's not going to be easy, though, so if you need time for a potion to activate, then feel free to run and chuck throwing weapons at him.
After Droon falls, pick up the l33t gear that he drops (which probably won't include the conch that Kerriel is looking for), then take the North Exit and fight through the firebugs and the mermen to get back to your boat.
Solitary Eyeland
There's another cyclops here, Broon, who's much like Droon, although without all the mucking-about required to get to him; as soon as you land, the cyclops will attack you. Kill him in the same manner as you killed Droon, then head out to the Isle of Deep Regret.
Isle of Deep Regret
Another island, another Cyclops. Proon is actually somewhat easier to kill than either of his siblings, mostly because he only has one strong attack. If this hits, it'll knock you down, and deal significant damage if you're not blocking, but it's easily dodgeable, and in fact doesn't seem to be able to hit you if you're standing right up against Proon's waist. So, get in close and go to town on him! It's still a good idea to block when the swing comes down, but it usually won't hit you at all, allowing you to just wail away with your weapon without fear of retaliation.
Gnome's Island

As soon as you enter Gnome's Island, you'll meet up with Babik, who'll give you a new quest: Save the Gnomes. The gnomish island has been overrun by sea monsters--the crabs you saw on the Island of Lost Hope--so you'll have to rescue them before they all get slaughtered. If you head down the sandy path a bit, you'll come to the Gnome Village, which is indeed being attacked by crabs. Babik wants you to save all eight of the gnomish villagers, but this is going to be exceedingly tough for most classes at this point in the game, as the sea monsters are egregiously tough, and the gnomes seem to enjoy scattering themselves around the town. The most gnomes we managed to save with an appropriately-levelled character was seven, so eight is theoretically probable, but you can always come back later in the game and save all eight with a super-powered character. When you do so, Babik's ship will take you to the Gothic Castle. (Check the Extra Challenges section for details on this.)
Your first stop will be the cave that you come across on the left side of the path before you hit the Gnomish village. Most of the enemies here will be acid-spitting beasts that will attempt to poison you from a distance, and annoying little buggers they are, indeed. Most characters will want to try closing in and dealing their damage from melee range, as the acid spit comes in a bit too frequently to make spellcasting viable, and it'll still poison you even if you block it, whereas they'll cease using the spit at melee range and will instead resort to normal hand attacks.
You can come across two Sea Monsters of the boss variety within the cave. These fights will be a fairly protracted affair, consisting of a lot of blocking. The Sea Monster only has a couple of attacks, but its claw slashes will be really annoying, as they can in groups of anything from one swing to six or eight, and it's very difficult to tell whether or not a group is ending by the monster's body language. There isn't a huge window of opportunity for counterattacking between these attacks, so you're going to take plenty of damage while attempting to attack, unless perhaps you're using a fast weapon. You can also attempt to cast spells in between the monster's attacks, then immediately return to your blocking position, and this might work fairly well if you have something that can deal big damage, as none of the attacks of the monster can penetrate a block. You might also find it handy to lure the Monster near one of the torches in the cave, and rotate around that while you fight it, as it seems to confuse the monster a bit, and you might get a couple of free hits in here and there. Note that both of these fights are optional, but that the Sea Monsters generally do drop some real nice loot.
Elsewhere in the cave is Kerriel. When you return her Conch to her, she'll bless you with the ability to breath underwater, which will let you travel to the Plane of Water without immediately drowning.
Plane of Water
Your mission on the Plane of Water is to plug three hollows to prevent the flooding of the Pit of Ill Omens. The upper level here is full of mermen, complete with tridents and all. They're not too tough to defeat, but they can string together attacks in variable amounts; they'll swing out anywhere from one to three times before letting you counterattack, which can make for some annoying fights when you're surrounded. Still, they're just normal mobs, so you shouldn't have an extreme amount of difficulty dealing with them. There are also three sea monsters near the three Reefs in the area; you'll need to enter the eastern, northern, and western reefs in order to plug the three hollows.
Each Reef is more or less similar in function. You'll find one of the Stones of Coirnav near the entrance; your job is to push this through the cave until you find a hole in the ground with bubbles pouring forth, then push it on top of it to plug the hole. The only enemies here are slow-moving skeletons who shouldn't pose much of a challenge to you due to their predictable attack patterns. In most cases, you can probably just run in and attack without worrying about blocking; they don't deal a huge amount of damage. After you plug the third hole in the third cave, you'll be able to retrieve your Shard from the clam that opens--no boss fight here--and return to your handler for your next assignment.
Plane of Torment
East
Your primary enemies here are lizard-like beastmen who'll attack you in small groups. They're easily dispatched singly--just block their strike, then hit them before they jump around for another hit--but can be problematic in groups due to the way that they'll often feign death before hopping back up and hitting you from behind. When you see them spasm on the ground, then you'll know they're permanently dead.More troubling are the demons in the area, although they, too, are easy to dispatch when you know their pattern. The key here is to not run away from them, as they'll quickly catch up and pound you into the ground, then swing at you while you're prone and likely kill you unless you're nearly at full health. A better option is to just go toe-to-toe and block the demon's attacks. It'll swing at you a bunch of times, then put both hands together for an overhead slam; when this last attack connects, take a swing or cast a spell, then repeat the process. You'll want to proceed slowly while moving through this zone, because if you get a demon on your case while fighting more than one or two of the lizards, you'll have a really tough time killing everything.
After moving through the plane a bit, you'll come to a cutscene that shows a broken section of the path. In order to pass, you'll need to grab the flame from the brazier nearby, then use it to ignite the small stone near the broken rocks--that will pop up the path back to working condition, letting you pass. You'll come to Gol Nazyn soon afterwards; he'll request that you bring him one of the "artifacts" that you carry. Could he be talking about the shards?
Anyway, there's another broken bridge near the portal pillar nearby, as well as another flame pedestal. Clear the area out before grabbing the flame, as you only have a second or two of leeway to get from the pedestal to the stone before the fire runs out, which means that you won't have any time to kill anything. After you raise the Bridge of Sorrow, cross over it to reach the western end of the Plane of Torment.
West
The western end of the Plane is much the same as the eastern, save for the slightly tougher enemies (of the same variety, just bumped up a notch), and the increased number of flame "puzzles." These aren't particularly taxing to figure out--if you see a flame pedestal, you know there's an ignitable stone within walking distance--so maneuver your way through the paths as best you can. The demon monsters are going to be a pain here, as they'll start to become grouped with the lizardmen, forcing you to proceed somewhat slowly. If you get surrounded, then focus on the demons first before worrying about the lizardmen, as the big guys are the more pressing threat.One of the branches near the first save point seems to be just out of reach of the nearest flame pedestal, and indeed it is; in order to get past the path there, you'll need to branch around to the "northern" path and wrap around. When you do extend the path, you'll reach the Citadel of Pain.
Citadel of Pain
The Citadel will introduce you to a new enemy, a supremely annoying ninja-dude that will spring out of the shadows and attack you with a pair of swords. They also have a tendency to turtle up precisely when you hit the block button. You can try feinting them by releasing the block button, then quickly hitting it again when they take a swing at you. If possible, try hitting them when they do their backflip, as they can't counterattack you then, obviously. They deal plenty of damage when they attack, so stay in blocking mode as often as possible. Spellcasters should be able to spot them in the shadows and hit them with ranged attacks before they pop out; the same for rangers or anyone with throwing weapons.Shortly after you enter this zone, you'll see the Shard of Torment, but you won't be able to reach it just yet. In fact, you'll have to find an exit to the northern half of the Citadel, then proceed from there and wrap around.
Citadel of Pain, North
The northern halls of the Citadel of Pain are much the same as the south, save for the inclusion of large alien creatures. These guys aren't as bad as the demons you've been facing off against, but they can steal deal some damage. Their attacks are easier to block, and if you can poison or disease them, then you should be able to run in and whack them while they're staggering with minimal risk.After a room in which you take on two aliens and two Ninjas, you'll come across the Tormentor. This guy can kill you in three hits if you're not careful, depending on your Stamina, so, well, be careful! His room is full of archers, so if you can, lure them back out to the previous room by getting their attention and putting a wall in between you and them. They should attempt to come into shooting range of you, which, if you've positioned yourself properly, will be pretty close to where you're standing, allowing you to whack them or hit them with a spell and dispatch them. Tormentor's going to be much easier to deal with when you don't have any archers gunning for you.
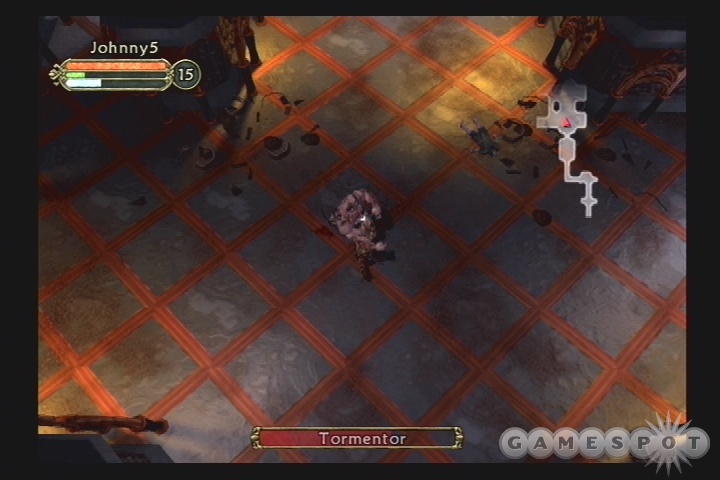
Tormentor himself isn't so bad, if you can take him on solo; he's essentially a stronger version of the demon foes you faced in the Planes outside, with more health and a more powerful attack. He'll still use the same swing-swing-swing-bash attack, so you'll want to just let him get close, block his attacks, then swing once or cast a spell when he finishes his bash. It'll take a while to kill him, but down he'll go, given patience. You may also want to back yourself into a wall so that his knockback effects can't send you anywhere, but this is risky as if he does knock you down, he'll be able to finish you off pretty quickly.
After you kill Tormentor, you'll find the path leading back to the southern portion of the Citadel, where you'll find the Shard of Torment, which is just haphazardly lying around on the ground. Take it and return to Gol Nazyn, on the Eastern Plane of Torment; he'll tell you that a certain dark Lord desires the shards so that he might resurrect some other dark Lord, or something. This is kind of a meta-quest that will span the rest of the game, so you can't do much more about it now, save return to your handler and get your next objective: an invasion of the Plane of Disease.
Plane Of Disease
Grimror
Your primary enemies here are going to be rat-men. Individually they're not much to speak of, with simple attack patterns and fairly low life totals. Their main claim to fame is the fact that they can infect you with disease, either when you walk across their bodies after killing them or when they throw little balls of...actually, you don't want to know what they're throwing at you. The disease itself is more of a nuisance than a real threat, as it's only lightly damaging. It can cause you to stagger on occasion, though, so don't go out of your way to get diseased or anything.
Plane of Disease
After you enter the Plane of Disease proper, an actual cutscene will play--imagine that! Bertoxxulous will tell his minions to guard the portals, etc., etc., evil mastermind, and so on and so forth. Your goal here is to find each of the eight portals and destroy them, but they'll each be guarded by a pair of spellcasting witches. They're not particularly difficult to kill, but they will attempt to attack with lightning attacks from afar, so you might want to get up close and engage them at range. They'll often fly away to avoid you, but you can follow them and hit them when they land to finish them off. 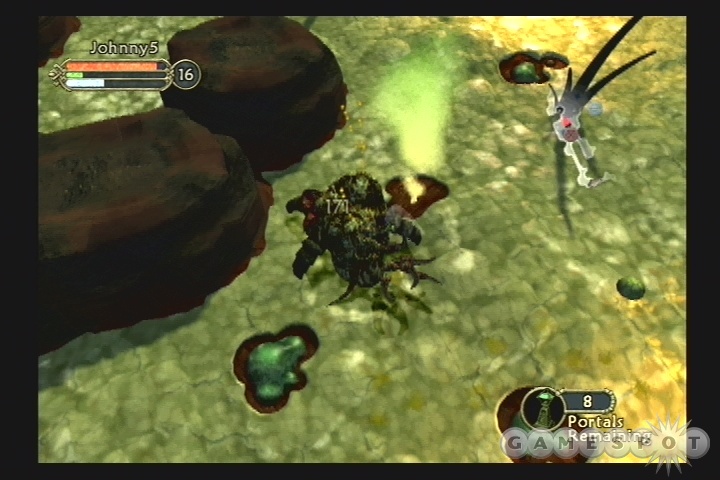
In addition, there are pus demons here that will spawn five little flying pests that'll hound you and deal minor damage. When dealing with these guys, go straight for the source, striking at the demon itself; this will prevent it from spawning more pests.
The portals here are fairly easy to find; just flesh out your minimap and make sure that no corner goes unexplored. You'll only find the spellcasting enemies near a portal, so their appearance is a good indication that one is nearby. You'll spot one portal on a raised spit of land, but you won't be able to get there yet; in order to reach it, you'll need to pass through the Arachna Caves.
Arachna Caves
The Arachna Caves are, as one might imagine, full of spiders. These guys aren't too bad to beat, although they do pack some potent poisons and other special attacks. The most notable of these are the ranged webbing attacks, which can either pull you in towards a group of spiders, or be lain across a room for you to get caught up in when you pass through. The enemies themselves aren't terribly devastating, though, so feel free to chop through them as you please. 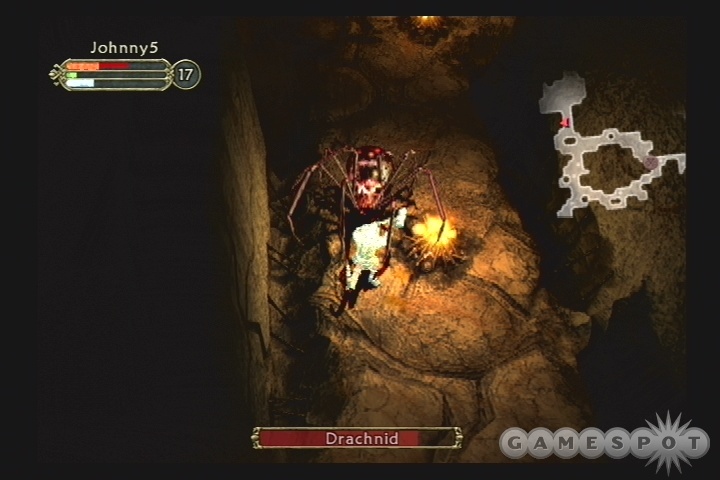
There are a pair of bosses here, the Drachnids. This big-ass spider will attempt to jump at you, and uses her poison to stagger you and drop your block to allow her powerful attacks to penetrate unheeded. If you do manage to keep your block up, though, you should be able to heal the damage via potions more quickly than the poison will hurt you. You'll want to wait for Drachnid to stop attacking before you go on the offensive, obviously. Getting one of the large, moving pillars in between you and she is a good way to disrupt her offensive rhythms and perhaps get a swing or two on her backside. She's tough, though, and can kill you quite quickly, so be sure to backtrack to a checkpoint when you see her life bar pop up on the screen.
After you kill the Drachnids (one of them is probably optional if you don't want to deal with it), find the exit back to the Plane of Disease and climb the little ladder up to the final Portal. After destroying it, you'll nab the Shard of Disease.
Plane of Valor
Your goal in the Plane of Valor is to find Mathaniel Marr and speak to him; he'll give you extra tasks to perform before he entrusts you completely. To get to him, you'll need to maneuver through a number of warboars and skeleton warriors, neither of which should threaten you too direly. The skeleton warriors can respawn unto the seventh generation, so feel free to cut through them for extra experience as long as you like, but be mindful of the fact that they respawn quite quickly, and can surround you if you don't stick to a wall or a short corridor.
When you track down Marr, he'll send you on your first task: find the Shard of Fire on the plane of the same name.
Plane of Fire
Obsidian Forest
Your first big task here is a boss fight against Threshold the Feeble--we almost missed the name the first time because the fight was over so fast! Regardless, this guy will use a pretty standard attack pattern of slashes to dish out the hurt. He can do a good amount of damage in a short period of time, but you can actually knock him down occasionally during your counterattacks; if this occurs, slash away at him before he can get up.The smaller imps here are your standard slash-and-pause enemies, so chop through them and start exploring the level. Be on the lookout for any sorcerers in the area; any enemy that glows purple likely has the ability to resurrect dead foes, so they're the ones that you're going to want to take out first.
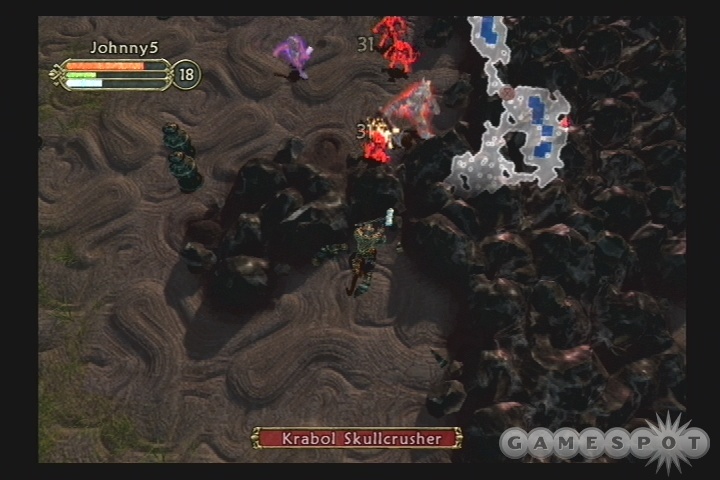
Elsewhere in the forest, you'll come up against Krabol Skullcrusher, a delightfully named flaming warrior. He's another fairly standard miniboss, with the exception of his flaming axe, which will set you alight and damage you over time, even while you block. Beyond that, he's a standard slash-and-pause enemy, so turtle up while he's hacking at you, then return the favor in kind. If you circle around his area and approach him from the north (relative to where you entered the area), you might be able to catch him up on a little ridge and fire magical attacks at him from a distance without fear of reprisal. If you can get him this way, it's obviously the best method to take him down. Another similar beasty is Grungoll, further on, who'll guard the passage to the Southern Obsidian Forest. Note that the barrels here take the form of the charred remains of the dead; cool!
Southern Obsidian Forest
The Southern Obsidian Forest is much the same as it's northern counterpart. More sorcerers, more fire beetles, more imps, and so on. There are also a number of the sword-and-shield boss monsters here, albeit normal ones without the boss health that distinguished their predecessors. Cut through everything you see until you reach a ladder leading to the Lakes of Fire.
Lakes of Fire
The Lakes are going to be home to a new kind of enemy, a molten giant; these guys will rise up out of the lava pits and attempt to chuck large pieces of magma at you. They can lead you pretty well, like all of the ranged attackers in Return to Arms, but as usual, you can usually dodge their thrown attacks by moving just before they throw or while their projectile is in the air. More troublesome are their powerful melee attacks; although they resort to a normal slash-and-pause technique, even blocked attacks will set you aflame and deal damage over time. Luckily, the molten giants seem to be reluctant to leave their lava pits, letting spellcasters pelt them with offensive spells. You can't go into the lava, so melee characters will want to flip over to a thrown weapon and use that to peck away at their health.
Unfortunately, the path to the Shard of Fire is blocked by flowing lava; you'll see the switches near the ladder that disable the lava, but you won't be able to reach them until you maneuver your way through the Lower Lakes of Fire, which should be nearby the lava-blocked ladder. In the Lower Lakes, you'll need to manuever until you find two more ladders leading back up to the Upper Lakes; when you hit the tops of these ladders, you'll come out near the two switches; hit them both to stop the flow of lava around the original ladder you passed by, then return to it and head down. After maneuvering through one more small part of the Lake of Fire, you'll come to the Lair of the Dragon.
Lair of the Dragon
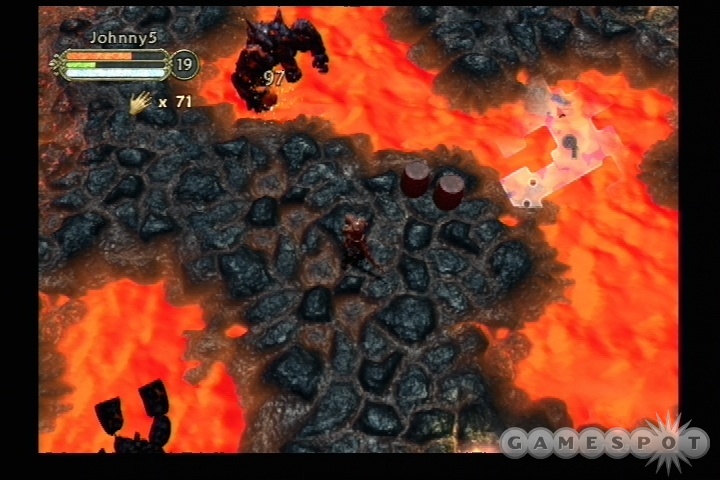
As you might expect, the Lair of the Dragon is the home of a dragon, and a rather fiercesome one at that. Dozekar hasn't seen a serious challenge in millenia, but you'll have to defeat him if you want the Shard of Fire.
As you'll probably notice over the course of your first few tries at this fight, Dozekar is a bruiser; his physical attacks can put a serious hurt on you if you're not blocking. He also has a very damaging fire-rain attack that'll call down flames from the sky; you should learn when he casts this, though (he'll spew it upwards from his mouth, and there'll be a large orange glow on the ground before it hits), and be able to run out of the area of effect before you take a huge amount of damage. Besides his spells and claw attacks, though, Dozekar also possesses a fire breath attack, and this will be the key to beating him for most classes.
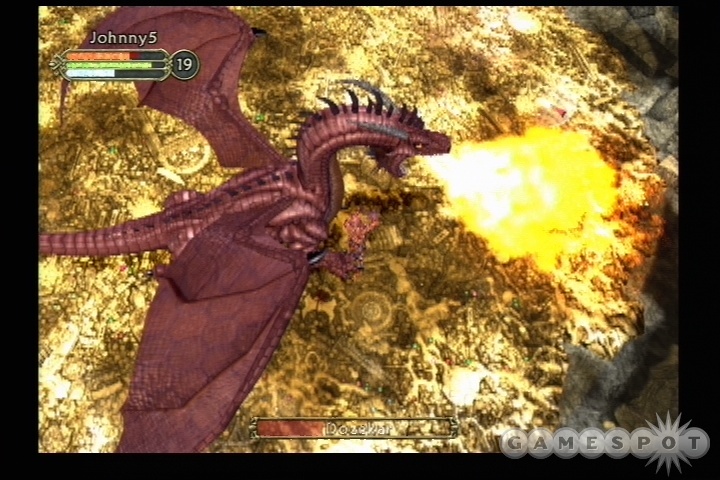
When you get up close to Dozekar, you'll note that he'll use his fire breath in one of two ways: if you're standing a bit away from him, he'll shoot it away from his body, and perhaps side to side; if you're right up close to him, though, he'll aim it directly at you. If you're not blocking, then either of these can do you in, but luckily enough, this deals only minor damage while you are blocking, meaning that you can withstand a full blast of the breath without worrying about dying. The key here is that he's got a little bit of a wind-up animation for the breath, which should allow melee characters to run around to one of his front flanks and get two or three hits in, but be careful, as after the breath stops, Doze will quickly start slashing at you again. You're going to die here--a lot--before you get the finer points of this down, and it'll still take you a while to kill him, especially if you don't have any spells to use. Damage-over-time effects will be pretty effective, as well, since Doze usually just stands in one place if you yourself don't move, and you can block most of the damage that he deals out.
Plane of Storms
The Wilderness
After you return to Mathaniel Marr (you'll probably have to wend your way through the Plane of Valor again), he'll send you on your second task--to retrieve the Shard of Storms. You can use the portal behind him to reach the Wilderness section of this plane. 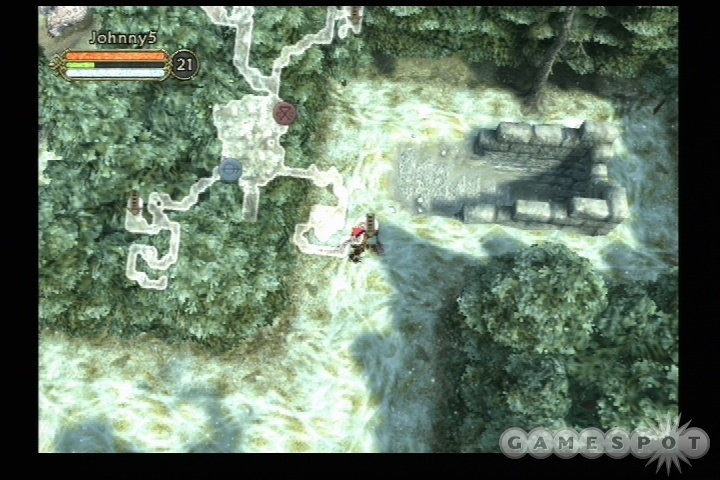
Said Wilderness is inhabited primarily by bears and ice giants. The bears are physically powerful, but have an easy one-bite attack pattern to deal with, while the ice giants are simple replicas of the molten giants from the Plane of Fire, save without the intrusive burning effect when you block their melee attacks. There are three entrances to caves here, only one of which you absolutely need to go through; check our screenshot for the location. The other two are optional, although you'll probably want to delve into both of them for the experience. The Wind Cave (the one with the bottomless pits in between the paths) also features a boss fight with Krolk the Cruel, a sorcerer boss. Like most other sorcerers, he'll run if you get too close to him, allowing you to easily run him down and give him a beating.
The Caves
Ugh--more sorcerers. You'll have to engage in another hunt-the-purple-guy fest here, as there are a lot of swordsmen and a lot of sorcerers that'll bring them back to life when they die. Complicating matters are the Yeti, which are replicas of the demons from the Plane of Torment--the same basic tactics apply. You really don't want to face off against swordsmen and the Yetis at the same time, as the Yeti will typically pound at you with a dozen swings or more at a time, on occasion, while the swordsmen hack at you from your unprotected sides. Sorcerers can also cast a blizzard spell on you that'll hurt you a lot, so proceed slowly and engage enemies in small groups.When you reach the end of the correct cave, you'll be able to return to the Wilderness area for a spell; shortly thereafter, you'll find the entrance to the Caves of Mount Grenidor.
Caves of Mount Grenidor
How do you make a Diablo clone unfun? By incorporating stealth! The enemies here in the Caves have been possessed by the power of the shard, and are able to kill you in a single hit, should they see you. Funny, you have around five of the damn things, and still get your butt kicked by lowly giants and the like.... Anyway, this whole deal is going to take a lot of sneaking, a lot of waiting around, and more than a little frustration. There's a guy near the checkpoint who'll rap at you about the cave's inhabitants; if you want to save yourself some time, go back and rehit the checkpoint after his speech, as this will prevent you from hearing it every time you die. And you're going to be dying a lot.
The glowy cave denizens are running routes; in order to bypass them, you'll need to follow them while their backs are turned to you, then stay in their blind spot while they're turning to repeat the route. This is mostly a case of memorizing their movement paths and noting where you can hide while they turn; check our video of the first half of this segment for some ideas. Note that you can actually kill these guys if you're tremendously patient; they can take a whole lot of damage, but will often get knocked down if you can cast a damaging spell on them, allowing you to swing away at them. You can also block their attacks without taking damage, so if you've got a bit of time, you can kill them that way as well. Trying to do this on more than one of them at a time is unwise, for obvious reasons. For the most part, you don't have to worry about killing them; just get through the cave to the Mountain Pass. You can come back later and kill these guys.
The Great Glacier

Although it may appear to be just another area, the Glacier is going to really annoy you. It's got the whole archers-firing-from-where-you-can't-immediately-reach-them dynamic going on, along with the presence of sorcerers, making for a rather frustrating go of it. Proceed slowly, and take out either archers or sorcerers from across the gaps with ranged weapons or spells whenever possible. The main problem here is that the white ground will obscure the arrows as they come at you, so block often. Don't hesitate to retreat, either, and use some of the walls (when they appear) as barriers to force your enemies to come to you, and smash them as they round the corner.
The Bastion of Thunder
The Bastion is another standard kill-everything-that-moves level; your primary enemies here will be yeti and bears. Fight your way through them until you reach the entrance to the Hidden Glacier, but be sure you're stocked up on health and mana potions before going in. Melee-oriented characters will also want to have at least 100 thrown weapons in their inventory.
Wenglox
Beating Wenglox is a matter of perserverance and knowing his patterns, but then again, that's true of pretty much every boss in the game. Before you even deal with Wenglox, though, you'll want to take out the four polar bears in the room with him. If you're lucky, Wenglox won't automatically be alerted to your presence when you enter his lair; this will allow you to skirt around the edges of the room and attempt to take on the bears in the area without having to deal with him as well. If you spot his health bar on your screen when you come in, try retreating into the hallway a bit; you have a good amount of space to work with before you'll automatically be returned to the Bastion of Thunder, so you may be able to lose him and focus on the bears exclusively.
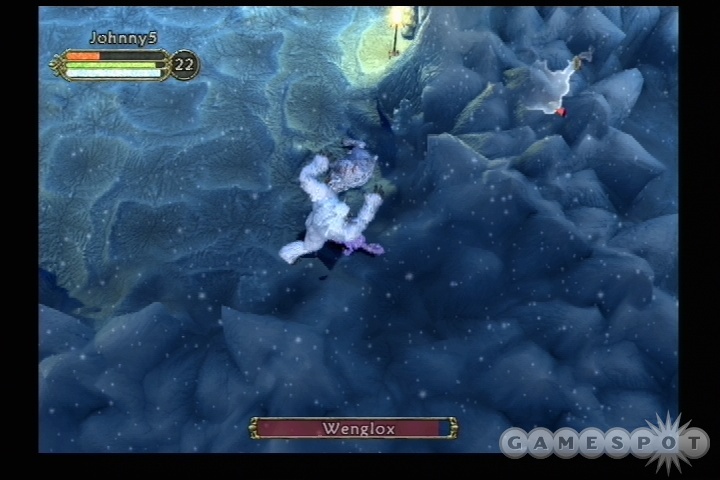
Assuming that you can get Wenglox into a one-on-one matchup, you're going to quickly learn that taking him on at melee range is a bad, bad idea. His fist attacks will turn you blue and slow you down considerably, so that the normal demon/yeti tactic of waiting for him to stop swinging, then returning fire, will be difficult to pull off, since it'll take much longer to actually swing your weapon. Luckily, you can generally outrun him, and he'll often pause while chasing you to throw out an ice bolt; this is your time to strike back. Spellcasters should dodge the bolt, then send hit him with a powerful ranged attack, with something fire-oriented being preferable. Melee characters will have to use their ranged weapons here, but Wenglox is mostly immune to them while he's in the act of throwing his bolt. A better bet is to just run directly away from him while he's throwing, then wait for him to resume his running animation and hit him once or twice before running away yourself. You should be able to hit him this way, and although it'll take a long time to kill him, you have a better chance of pulling out the win than you would going melee.
Back to the Caves
Even after killing Wenglox and retrieving the Shard of Storms, you can't return to Marr just yet; you have to return to the Caves of Grenidor and defeat the now-vulnerable interlopers. You shouldn't have any troubles here, as the cave dwellers are fairly weak, with only sorcerers around to give you much trouble. You do have to kill all of them to gain the respect of Mathaniel Marr, so be thorough in your bug hunt; you'll get a counter showing you how many remain when you clear out all but 20.
Valor, Again
When you've gotten the all-clear signal in the Caves, return to the Plane of Valor. You'll have to chop through the boars and skeletons again, but there's also a new enemy hanging around now, in the form of a minotaur. These guys are standard bash-and-pause enemies, but they will drop their shield when you do enough damage to them and start ramming at you with their horns. It's best to take them on when your back is against a wall, to avoid the knockback effects of their attacks.
When you speak to Mathaniel Marr, he'll offer to transport you to the "four corners of the Plane of Valor," so take him up on his offer.
Plane of Valor
The second area of the Plane of Valor seems similar to the first; more boar enemies, more ancient ruins, etc. Soon enough, though, you'll come across samurai enemies, who attack with fierce sword slashes. Eventually you'll run across a boss variant, who will use a string of attacks that culminates in a knock-down blow, even if you're guarding. Luckily, he has low HP, so you should be able to slash at him when he's not attacking or maneuver him around a pillar to strike at him while he moves to kill him; he'll drop a Sarcophagus Key. When you're done with him, you'll have to manuever around the area and find three more identical mini-bosses, each of which will drop another Sarcophagus Key; you'll need all of these in the next area, the Halls of Honor, so be sure you have four in your inventory before moving out.As a note, the samurai do have one of the coolest death animations in the game; if you see them hit their knees, then they'll eventually turn their swords out and commit seppiku with them. Pretty neat.
The Halls of Honor

The Halls are almost completely overrun with samurai and gladiators, to the exclusion of all other enemy types; at least you won't have to constantly adjust for a multitude of enemy attacks in here. Your goal is to find the four sarcophagi that you now have the keys for. When you unlock one, it'll spit out an incantation. When you have all four incantations, you can return to the shard's location near the checkpoint spot here and unlock it before returning to your handler.
Faydark Forest
Kelethin
Well, only two shards remain, you say? Good show. Head to Faydark and talk to Leithkorias, who'll explain that the forest is being overrun by the Crushbone Orcs. He asks you to clear the suspended village roads of orcs before he unlocks the entrance to the orcish caves and lets you crush their leaders. Sounds like a plan. 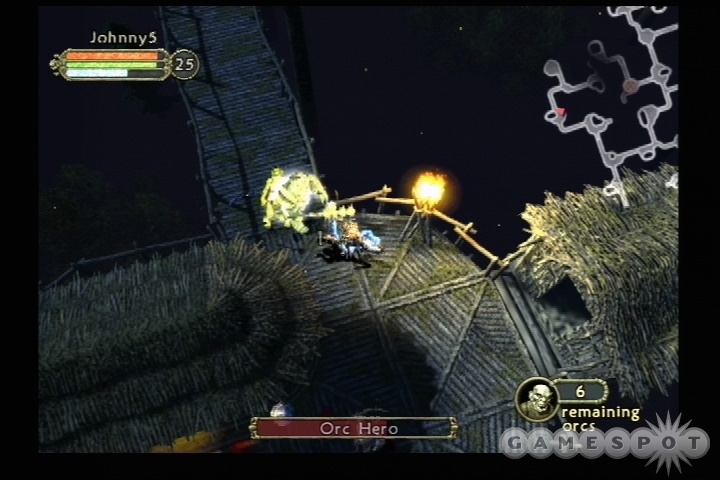
To begin with, you'll need to sweep through the village, killing orcs as you go; the goal is to rid the village of orcs altogether, so you'll need to be thorough. Luckily, the presence of NPC defenders will make things much simpler for you, as the orcs will typically be involved with killing them rather than swinging at you, letting you get in free swings towards their backsides, making it a win/win situation for everyone involved, save for the orcs. Anyway, this whole level is a lot like the Caves of Grenidor, in that you'll eventually get a counter on the screen showing you how many orcs are left in the area. One of the hundred or so baddies is the ferocious Orc Hero, who can take a pretty big beating and is enchanted with electricity. Still, he won't do any damage to you when you block, so if you can back yourself into a wall and block his attacks, then strike back when he pauses, you should be able to polish him off. He's still pretty powerful, though, so you might want to save your game when you see his health bar pop up on the screen.
When you clear out every single orc, return to Leith and take the elevator near him to the surface of the forest.
Faydark Forest
There are eight spirit anchors here, all of which you'll need to destroy. The same situation as in Kelethin applies; there are plenty of orcs hanging around, along with a number of human warriors who'll engage them, allowing you to wander up and do your bit unmolested. The spirit anchors are easy to spot, and they're also represented in the little counter on the lower-right corner, so when you spot one, whack it with your weapon to break it down.Now, after all eight of the spirit anchors are destroyed, you can return to your handler and head straight out for the Plane of Nightmares, but first, you'll probably want to venture into the Orc Caves for a bit of extra experience. Since they're optional, though, they're in the Side Quests chapter.
Plane of Nightmares
Plane of Nightmares
This entire plane is somewhat darkened, making it difficult to clearly see your enemies, especially those of the ninja variety, which last appeared in the Plane of Torment so long ago. Besides them, you'll have to deal with imps and archers; nothing too horrible, in other words. 
To begin with here, make your way to the Portal shrine and enter the garden maze nearby. It's not much of a maze when you have an automatically-generated map to help guide you. The archers here can be dangerous; although their arrows seem to impact harmlessly on the garden walls, they will occasionally bust through and hit you. Luckily, your spells and thrown attacks seem to always hover above the walls, so feel free to take down the archers from long distance rather than close to melee range.
There are two exits from the Plane of Nightmares. One is across the bridge leading over the water nar the garden maze; this leads to the Lost Tomb, an optional treasure hunt. The other leads to the Dungeon, and is off to the "west" of the garden maze; this is where you need to go to get your shard.
Lost Tomb
If you choose to enter the Lost Tomb (it's optional), you'll be confronted by a pair of conundrums: a large number of chests, all of which are sealed, and a seemingly infinite number of flying slugs, of the sort that bothered you in the Plane of Torment. These little buggers can only hurt you when they get behind you in large numbers, so chop your way through them, using any multi-target spells in your arsenal to clear them out, and work your way through the dungeon until you reach a set of four chests in close proximity to each other. Before getting too close to them, use a Gate Scroll to effect a quick save game, then return. In order to break the seal on the chests, you'll need to defeat four or five of the large slug-demons that you might also remember from the Plane of Torment. It's much easier to do so when you can force them into a chokepoint, so try to move back down the hallway and turn around before engaging them. Anything you have that will affect multiple enemies in a line is going to be handy here, but if you can force them to line up, then you should be able to melee them all effectively. Whatever you do, don't get yourself surrounded, as even a single slug on your backside and kill you in just a few hits. 
After the initial slug demons are defeated, you'll be able to retrace your steps through the level, opening all the chests, but be warned that more demons have spawned in behind you. You're not guaranteed to get anything good in any of the chests that you find; this whole exercise is mostly for extra experience. You will get a good amount of cash, as well, chests being good sources for that.
The Dungeon
The interior of the dungeon will feature more of the ninja enemies; you're going to be pretty much clueless as to when they're popping out due to the darkness of the shadows here, so be prepared to block at any time. Hopefully you have a powerful enough weapon to swing right through them, though. In addition, there are large spiders, of the Drachnid boss variety, but with normal health, and powerful shade enemies, so stay on your toes.There's also a horde of archers around on the lower (and, oddly enough, brighter) level, but since you have walls and corners to work with, it shouldn't be too difficult to draw them into melee range and dispatch them.
One of the exits from here will exit into the Bloodless Tomb, which is where the shard for this area will wind up.
Bloodless Tomb
As the presence of a non-working portal shrine (someone is "interfereing" with it, apparently) implies, there's a boss fight coming up. Vanarhost is a self-obsessed little Dracula wannabe with some fiercesome attacks, but without the HP reserves to really be a challenge, especially for hard-hitting melee characters.
In his first guise, Vanar will attempt to clamp onto your character with his wings and hurt you. This can be somewhat confusing to deal with, thanks to the way that Vanar will disappear after each successful clamping, but although you can't avoid a clamp when he locks onto you, you can avoid all damage by just blocking it. Shortly after he lets go, he'll attempt to vanish again, but you should have enough time before he does so to land a few good attacks on him. Repeating this process should be good enough to take off 80-percent of his life bar or so.
When you've hurt Vanar enough, he'll switch to his second form, in which he'll wield a red blade. He's a bit more troublesome here, but hey--he's almost dead, so just wade in and finish him off. If you guard against his attacks, he will eventually break through your block and start swinging at you directly. If you prefer a ranged attack, then it shouldn't be too difficult to outrun him and fire from a distance before running again.
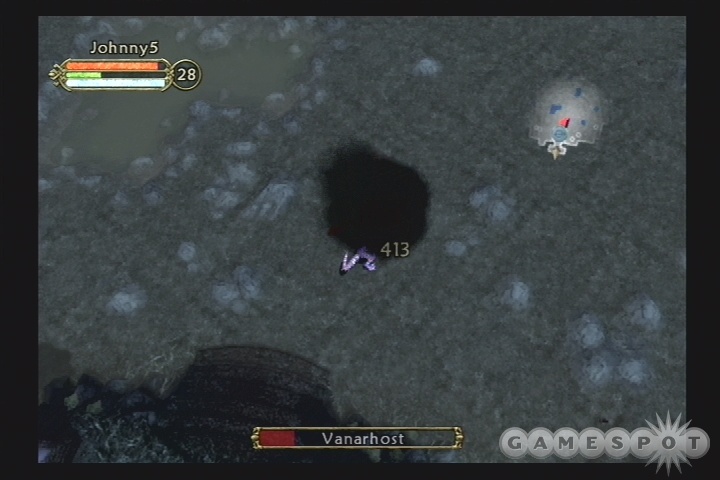
After Vanarhost is dead, he'll drop the Shard of Nightmares. Return it to your handle and learn of your final task: you must enter the Plane of Fear and defeat Cazic-Thule.
Plane of Fear
For the sake of reiteration, note that this walkthrough was written assuming that you chose the "good" option way back in the Plane of War. There's a different end boss if you happened to choose the evil path.
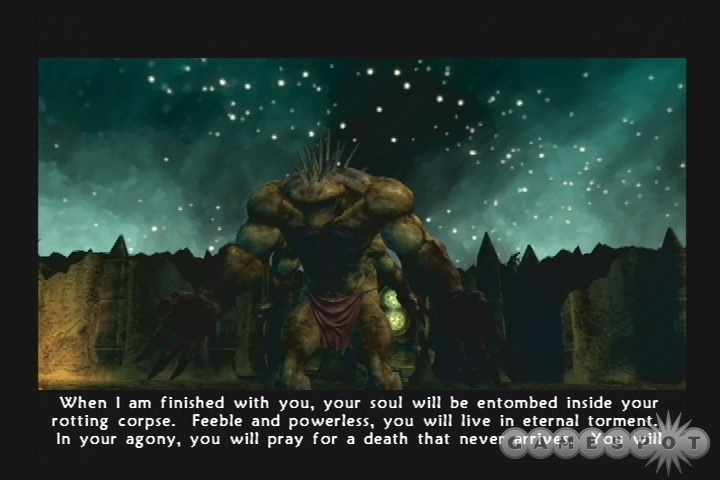
Cazic Thule
Believe it or not, old Cazic Thule isn't all that tremendously difficult to beat, although he is going to be much easier if you happen to have a good amount of life points and a powerful weapon at your hand. Although he promises endless torment, an eternal prayer for a death that never comes, etc., he's really something of a pushover.
After his little speech is over, he'll begin attacking you. His primary attacks consist of melee slashes, but these are easily avoidable due to the fact that he just plods around slowly. He'll also shoot out a frost bolt for minor damage every now and again; this can bounce off of walls or the first character it hits and hit other characters, if you happen to be playing online, but the damage is insignificant, so you shouldn't need to worry about this.
His primary annoyance factor comes in the form of two summoned skeletons which will chase you down and engage you in melee combat. Although they are a hindrance, they're also going to be your avenue to dealing big damage to Cazic. After you kill both of them off, Cazic will go into a longish casting animation and summon a couple more; during this time, he's completely vulnerable to your attacks, so run up behind him and start pounding on him until the skeletons arise, then block, as he can whip around and attack fairly quickly. Then run away, kill the skeletons (they're fairly low on HP), and repeat the process.
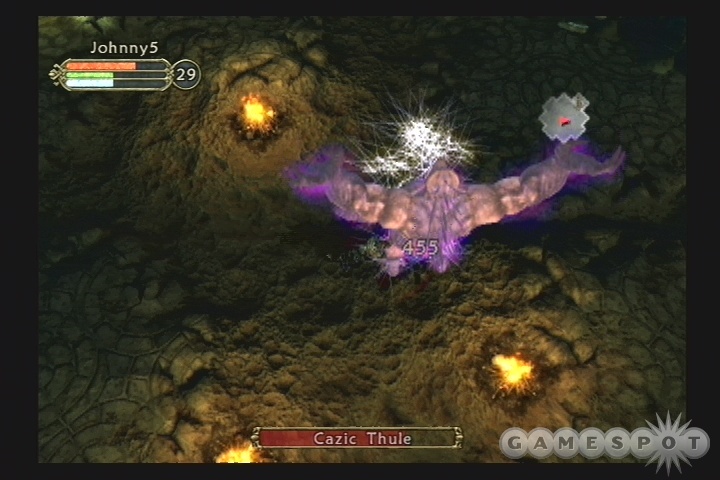
After you knock off half of his HP, Cazic will become a more standard boss, running after you, attempting to knock you down, etc. This is when you should go melee and finish him off. His standard attacks are nothing to fear, since you can block them completely; when he finishes up a volley, get a swing or two in and eventually he'll go down. He does have an overhanded clubbing move that'll knock you down and damage you, even if you're blocking, so use a healing potion as soon as it hits and get up before he polishes you off.
When Cazic is dead and you use the portal near him, the ending will play, so be sure to scoop up any loot he happened to drop before doing so.
Side Quests and Extras
Although the main story arc of Champions: Return to Arms takes place across a dozen planes, each plane also has some ancillary objectives for you; side quests that you can choose to complete, or not complete, as you wish.The first side-quest for each plane (save for the two that are part of Norrath), is the Champion's Medallion challenge. These are mini-games that will stress your non-combat and puzzle-solving skills as much as they will your prowess with the blade. If you manage to defeat the Champion's Medallion level within the set parameters, you'll earn the full Champion's Medallion for that plane, which will reward you with some stat and skill points, and also unlock the bloodstone level for the plane.
The bloodstone levels feature, like the Champion's Medallion levels, a variety of challenges, from the mundane kill-everything objectives to the odd labyrinth or gambling levels. Your main goal on these is to find the plane's Bloodstone. In addition to the Shards of Innoruuk, you can also collect the Bloodstones from each level; if you obtain all eleven (the Plane of Fear doesn't have one), you'll be able to access a hidden mini-dungeon on the Plane of Nightmare's Bloodstone level, which features five straight (difficult) boss fights. If you complete this dungeon, you'll be considered a true champion, and will be able to access an ultra-powerful weapon on the Plane of Valor.
This section of the guide will walk you through the various Champion's Medallion and Bloodstone levels. Note that the Bloodstones aren't always in an obvious spot in the Bloodstone levels; more often than not, they're hidden in an urn, or lying on the ground in a corner, or drop off an enemy, so they can be difficult to spot. If you think you missed one, then return to your vendor plane, warp to another plane, then return to the Bloodstone level to reset it and try again.
Plane of War
Blood Bath
Your task here is to get through a set number of boss fights without using more than four healing potions. If you took the dark side path in the first level of the game, then you should be familiar with these guys, although they do attack one-by-one instead of all together. Each of them will initially appear on a horse, which will force you to attack from a distance. Every time the horse rears up on its hind legs, it'll charge at you and knock you down, but you can avoid this by walking at a 90 degree angle from the horse's intended direction; if you're far enough away, it'll charge right past you, and you can either use a throwing weapon or a spell to cause some damage before repeating the process.The four horsemen themselves are going to be the tougher aspect of this whole mess. If you don't have a self-healing spell, and have unlocked this level fairly recently, then getting past these guys without using healing potions is going to be a tremendous pain in the butt; we'd recommend coming back after completing a couple more planes and then giving them a swift sendoff to the Plane of Woe or wherever it is that bad people go when they die. Their attacks aren't too difficult to avoid, if you want to give it a try--just block when they attack and get a swing or two in in the interim--but they do have a number of spells that they'll cast on you, which will often be pretty damaging if you don't have a large health total.
War will summon a fire rain, but this is easy enough to avoid if you can just run out from underneath it. Death is going to be the hardest one for most people, as he'll summon a quick-moving skeleton that'll track you down and slash at you; dealing with it and the horseman will be quite difficult if you don't have a weapon that can kill the skeleton in one or two hits. Disease shoots out a disease bolt straight ahead of him, which is again relatively easy to avoid. Pestilence will use the Shaman's homing insect spell, which is seemingly impossible to dodge, but it'll only deal light damage.
Warboar Caves
This is apparently just a way for you to get a bit more experience, albeit not a whole lot. The warboars here aren't too difficult to kill, save for the situations where you have to deal with a healer/resurrector foe. At the end of the level, there is a Warboar Guardian, who's essentially a replica of one of the four horsemen you beat earlier, save without the horse and all those pesky hitpoints. You can dispatch him easily before returning to your more important missions. You should also be able to find the Bloodstone of War in this level.
Plane of Innovation
Tick Tock, Tick Tock
This one is going to be super-annoying if you attempt to complete it just after you unlock it. Your task here is to stop eight Clockworks from reaching steam portals. They all start in one central location, but will quickly spread out and head their separate ways. If you want to kill all of them, you'll need to start at the center and attempt to get as many of them as possible to lock onto you, then kill them before chasing the rest down. Luckily, most of the clockworks here won't head straight for a portal, instead favoring some odd twists and turns in the paths around the centerpiece, but you'll still want to reliably kill these guys in one or two hits before you try taking all of them out. Even better would be to have a powerful ranged attack under your belt, which would save you transport time in the long run.
Junkyard Fights
The Junkyard Fights are a simple deathmatch system, although your character isn't the one participating in the fights; instead, you'll be betting on groups of gladiators. It's a fairly trivial matter to get to the high ranks in this fight: just look for anyone who's heavily favored (the odds will show up as something like 1-3 or 1-4 in this case), and bet on him or her or them. You're not guaranteed a win here (sometimes a group of weaker gladiators can defeat a single strong one), but you can retry the matches as often as you like. If you're just looking to get the Bloodstone of Innovation, then feel free to bet the minimum of 10 gold, although you can bet up to 1,000 if you wish. 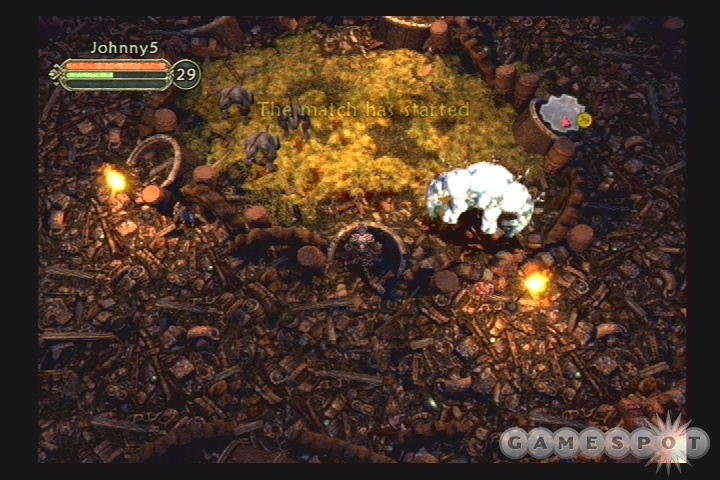
There are four divisions to the Fights, each with three fights. If you bet on the winners of at least two of the three fights, you'll move up to the higher divisions. The upper divisions are procedurally identical to the lower, save with more powerful monsters. If you're just looking for the Bloodstone of Innovation, then you can pick it up on the ground on the exterior of the arena; you may need to get up to Division Four for this to appear, though.
Pit of Ill Omen
Gothic Castle
The Gothic Castle is unlocked after you manage to rescue all eight gnomes from the sea monsters in the Gnome Village. It's your basic run-and-gun against numerous vampire enemies, but one of them will have the Bloodstone of Isles on his body. There's also some Bloodvine here; if you approach this plant without getting the referral quest, you won't be allowed to touch it, but if you free Sylea from the prisons in the Plane of Torment's extra level, she'll give you a bag and ask you to retrieve some for, in exchange for a bit of a buff.
Plane of Water
Depth Scurry
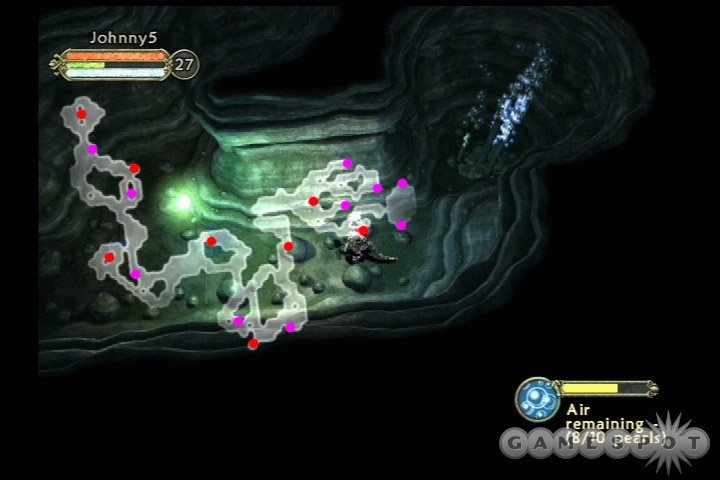
In Depth Scurry, you're going to have to travel underwater, which normally wouldn't be a problem, but unfortunately, Kerriel's blessing has run out, meaning that you are indeed going to need to breath air while you attempt to track down the ten precious pearls that are the goal of this level. Luckily, there are plenty of columns of air in the area; the problem is that they're well spread out, forcing you to run directly from one to the next in order to not die. Since you don't know where they are on the map, you're going to have problems with this. Luckily for you, we've made a little map of the area!
The basic tactic here is to get to an air column, use it to retrieve any nearby pearls (which appear inside of clams), then return to the air column and top yourself off before heading to the next column. The trick here is to wait for your breath meter to almost completely deplete before tapping the square button to fill it again; if you do so, then immediately start on your path to the next column as the breath meter is still filling up, then you should be able to boost your effective amount of air by a good three or four seconds, which will be incredibly necessary in certain spots, especially on the last few pearls. The room at the end of the level has no air column, so you'll need to grab the pearls there, then let your health run out to beat the level.
21 Leagues
Not much to say about 21 Leagues, really. In it, you'll still be underwater, and still be unable to breath said liquid, but will be able to hold your breath much longer than you could in Depth Scurry. Your goal is to run around smashing barrels and opening chests in the hunt for treasure; there aren't any enemies here, so that's pretty much all you can do. What's more, you'll get to keep any items you find when you leave the level, and can then reload it to clear out areas that you passed up before. So feel free to keep coming back as often as you like until the whole area's clear. This is where you're going to find the Bloodstone of Water.
Plane of Torment
Soul Break
Alright, Soul Break is going to be annoying in the extreme for most players, and is all but undoable when you first unlock it. Inside Soul Break, there are twenty prison cells, each with a soul. In order to get the full Champion's Medallion for this level, you'll need to rescue all twenty souls by opening the doors. The catch? You don't have any items, any weapons, or any spells. The only tools at your disposal are your fists and the numerous explosive barrels scattered around the area. You also can't block attacks due to not having any equipment, so get ready to run a lot.The first tip we have for you here is to save this level until just before you beat the end boss, if possible. It's not too difficult to get 15 or 16 souls and get the Upper Medallion, which will net you the stat and skill point bonuses from the level, but getting all 20 (which you need to do to access the Bloodstone of Torment) will be exceptionally hard before you have a large health pool, such as you will at higher levels. Since you don't have potions and won't get regeneration bonuses from passive spells or equipment, a high Stamina will be all that can help you survive here.
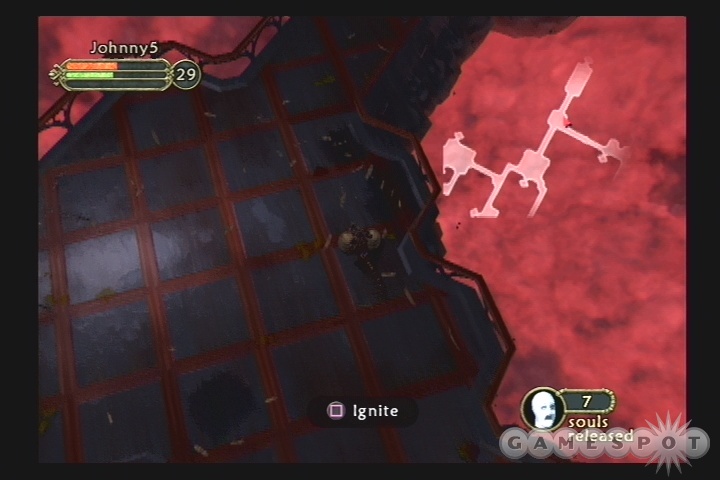
There are four different types of enemies here, each with its own particular best strategy. The most simple of them all are the small flying slugs; if you sit still for too long or take too long between soul rescues, these will spawn and start flying towards your location, mostly to prevent you from sitting around and letting your health regen while you go to the bathroom. These fellows are too quick to kill with barrels, so you'll need to use your fists on them. It's best to just look them dead-on as they come towards you and start punching when they get close. It'll take two or three swings for each slug before it dies off, but don't be fooled; these guys are slippery, and can easily bring your health down quite a bit if you don't kill them as soon as they get within fist range.
Next up are skeletons. You obviously don't want to be punching these guys, as they'll slash you to death if you attempt to do so; you'll need to use the explosive barrels in order to kill them. When they spot you, they'll start walking towards you. The fuse on a barrel will burn, coincidentally, for about the length of time it takes for a skeleton to get to your position from the edge of the screen, so a little practice will let you take them down with ease. You can also outrun them fairly easily.
Skeleton archers are going to be fairly problematic, mostly due to the fact that they deal a lot of damage with their arrows. Luckily, they're easy to kill, especially if you can take them on solo, as you can just push a barrel up to them, ignite it, then back away. The barrel will absorb their arrows, protecting you from that particular threat. If you can get up to them without getting killed, you can also use your fists to pound them into dust, since they can't attack while they're being hit. It'll take ten hits or so to drop them, but it's doable.
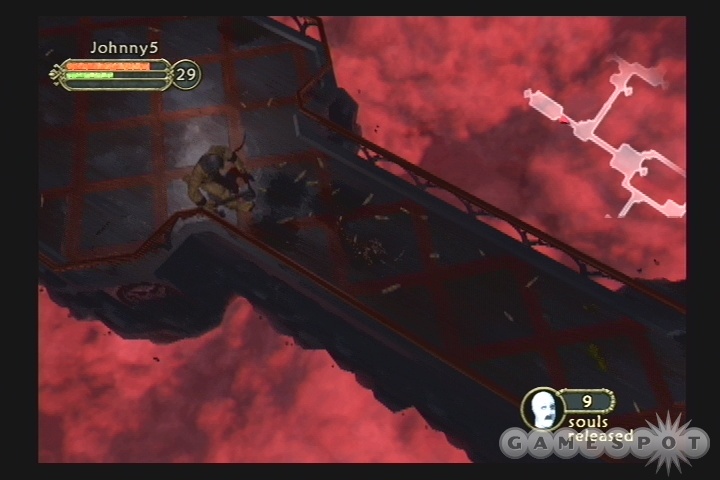
The most troublesome enemies here are going to be the ogres; these brutes wield powerful hammers and can kill you quite quickly if you let them get too close. They're also almost as fast as the slugs, making them difficult to evade. They can also withstand the effects of a close-range barrel; if you want to take them down, you'll need to pop two, and perhaps three, barrels right next to them. In the best of situations this is going to be a chore; in order to get them into position, you'll have to set up a few barrels next to each other, lure the ogre back to it, light one of the barrels, then get the ogre to swing at you before running away. If you're lucky, the ogre will use his overhand smash, which takes a second to come down and which he can't recover from quickly; if you're unlucky, he'll use his three-swipes attack, which will devastate you if they land.
The thing to remember here is that you don't have to kill the enemies; your only goal is to free the souls. You're going to have to kill some of the people on the level, though, as you won't be able to get all 20 of the souls if you have a billion enemies chasing you around. Enemies do have a set following distance, though; if you reach their point of no return, they'll turn around and return to their original positions. For this reason, it's best to clear out the first few rooms of the dungeon and make a safe spot for yourself to run to when things get hairy.
The worst sections of the dungeon are the three rooms on the opposite side of the dungeon from the room in which you start. Each of these will have one or two ogres guarding the cells. One of these is a walkway suspended over the void; two ogres guard the cell at the end. If possible, just run past them, open the door, and run back down; you should have enough room to maneuver to do so. The middle of the three hallways leads to a small corridor that opens up into a slightly larger room. The ogre here will really pound you if you attempt to go in, so it's best to save this cell until you have 19 souls freed, then run up and make a suicide run to free the last. If you can get to him and open the door, then you should be able to run inside the cell and hide out until the mission ends. The last room is in the corner of the level, and features numerous archers and yet another Ogre. There should be barrels in some of the rooms nearby, so feel free to push them along (although this can be tedious) and into the room before blowing them. The ogre here won't follow you forever, so if you can weed out a bit of his entourage, you should be able to get the two souls freed, then start backtracking until he gets off your tail.
Here are some extra tips from a helpful reader. Thanks Dave!
Corner Barrel tip: Use the corners of pathways as sites for barrels. By placing the barrel at the corner but slightly out from it, you can lead a pursuer to it and they will get delayed trying to get around it as you turned the corner. As you turn 90 degrees youare closer to them, and the pursuer will get hung up on the barrel as they try to follow to your direct location. This is usually enough to catch them on the barrel ensuring they take the explosion if you light the barrel on the way by.
Double Barrel: Most corridors leading to the Ogres are 1 square wide, so after attracting an ogre, I was able to push two barrels up the corridor to the ogre. He will be blocked from attacking by the barrels and will figit to get by them. Avoid his swing to light one and you get a double barrel hit. I found it took about 6-7 barrels to kill the ogre. The one you listed as the hardest became a sitting duck.
Hell's Cells
The Bloodstone of Torment should be in one of the barrels right next to the portal leading back to your handler, so getting it shouldn't be much trouble. In addition to that, though, there are numerous gladiator foes here, some of whom will drop Cell Keys. There are four cellblocks in all, each with seven cells. The main doors leading to the cells are locked, but the individual cell doors aren't, which means that you'll be able to open them all up and kill the inhabitants, if you wish.The only notable person here is Sylea, one of the prisoners. If you free her from her cell, she'll ask you to retrieve a plant from her castle; if you recall the thorny plant in the Gothic Castle of the Plane of Ill Omen, then that's what she's referring to. It's called Bloodvine, and she'll give you an Empty Bag to retrieve some. If you do so, then return the Bloodvine to her, she'll embue you with the ability to wear a second earring. Nice!
Plane of Disease
Frogville
Hey kids, welcome to the Namco Intellectual Property level. In Frogville, you'll have to run around stomping on frogs; there are 150 or so all told, laid out in lines scattered around a smallish level. Unfortunately, there are also four kobolds in the level, any of which can kill you with a single hit; obviously enough, you want to stay away from these fellows. Beyond the basics, there's not much to the game. The kobolds move somewhat randomly, and won't always charge at you directly, giving you a bit of time to move out of their path. You can also see them on your minimap, which you should be looking at at all times while on this level. If you have any kind of disease or stunning spell, then you definitely want to put it to use on the kobolds when they get near you, as they can run you down if you let them get too close.
Crypt of Decay
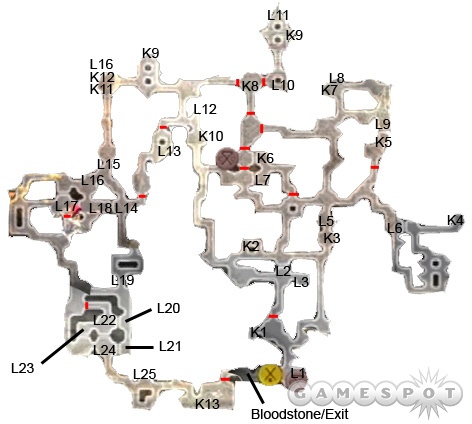
The Crypt of Decay is a looong dungeon maze, complete with keys and levers, as well as a boss monster at the end. It does hold the Bloodstone of Disease, though, so if you want that particular item, you're going to have to venture in and through. It's not a difficult maze to get through, overall, although the final boss can be rather tough, and you don't want to die after spending 20 minutes getting through the whole thing, so if you just want to get into the Bloodstone Passage, you may want to hold off on doing this quest until later in the game.
You'll have to maneuver your way through a number of locked doors in order to reach the end of the maze. The doors here are usually locked, and can be opened either with a lever or a key. The lever doors are going to be the most problematic of the bunch, as the levers and the doors can sometimes be rather far apart. We'll try to cover the location of each lever and each key on our map, and in this walkthrough, to make things a bit easier on you.
To begin with, pull lever one (L1) by the first door and head up. Walk to the end of the path and find key one (k1), which will unlock the door nearby. Head up to L2, pull it, then head east into the small room. (All of the directions in this walkthrough will be assuming that you're using our map as a reference.) Loot the chest, then flip L3 and head east and around to find K2.
Now, there's a door leading north near the chest holding K2, but in order to open it, you need to flip L2, and it's likely that the time it took you to pick up K2 will have caused the door to close. If this is the case, walk around to L4, flip it, then walk back up to L2, flip that, then walk around to the door and proceed north. Get used to doing this; there are plenty of doors that are precisely timed so that you flip a lever a good distance away and then have just enough time to get through them before they clang shut. There are also spider enemies that are likely to be standing between you and the door, so be ready to dodge their webbing attacks, which will obviously prevent you from getting to the door in time.
Head up and around to L5, which opens the door just south of it. If you flip the switch, you should be able to lure the spiders out of the room and kill them. Wait for the door to close (while you're still on the north side), then flip the switch again, enter the room, loot the chests (one of which holds K3), then return to the northern side of the room before the door closes. If you get caught in the room, no worries; you'll just have to repeat the above steps before you can return to where you were.
When you reach L6, use it to open the door to the south and proceed through, killing as many of the spiders in the room beyond as possible. You'll have to return to L6 and flip it again before you can actually pass through the door leading to K4, if only because the spiders will slow you down too much the first time through the room. More will occasionally pop up when you walk through, but try to avoid them if you can, as you only have a second or two of leeway to get through the door.
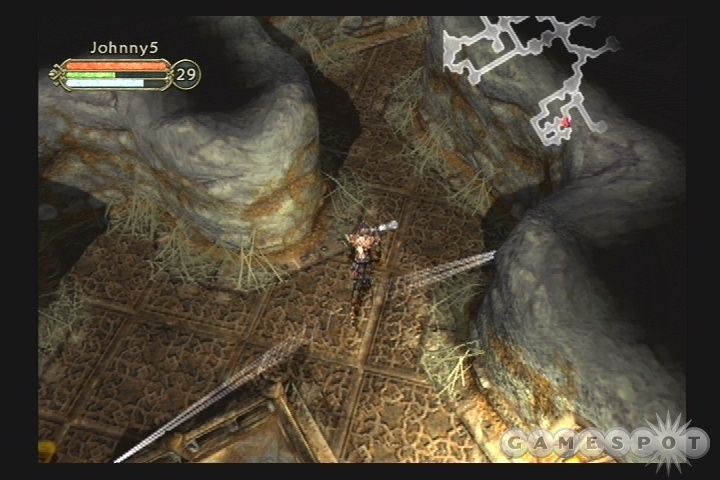
Unlock the door leading to K5 and grab it from the chest there. Since you lose a key when you unlock the door, then pick up another one, this is an optional key, but you'll get some cash from the chest. Then, walk back a bit and unlock the door leading to L7 and K6. After grabbing K6, flip L7 and walk around to the southwest, towards the save point there. Head north through the pair of locked doors until you reach a minotaur flanked by a pair of archers. Unlock the eastern door and head through until you reach K7, then pull L8 and L9 to get a bit more cash (there is another minotaur and what's likely to be an enchanted archer beyond the L8 door, so don't go through unless you're prepared for the fight).
Return to the room where you first fought a minotaur and head north. You'll find K8 in a chest here; if you wish for more gold and junk, head east from that chest and open L10 to reach K9, then open the chests in that room before pulling L11 and returning to the chest where you found K8. If you proceed to the west, you should be able to grab K10 from a chest, then circle back around to . As with K3, you should be able to pull L12, run into the room, grab K10, then run back out before the door closes.
Unlock the door leading to L13, pull it, then unlock the next door you come to L14. Using that, you'll be able to head north to L15, which will let you access K11and K12. Grab those, then return to L16 and pull it to reach the suite of rooms to the east. This is where things get a little complicated. In order to move on, you'll need to unlock the door to the south of L17, then flip L17, head through the door and reach L18, flip that, then walk back to L14 and head south from there; L18 opens the door here. Head down and use L19 to reach the last major puzzle.
Ok, this one's somewhat more complicated than the last one. To begin with, open the locked door leading to L22; you won't be able to actually reach it yet, so flip L20 and run around into the room with L22 and L23. Kill the minotaur and the archer here, just to have things clear, then run around to L21. Now, L21 opens the door south of L24, so the correct sequence of switches goes like this: L21, run up to L20, run around to L23, use L22 to get out of that room, then quickly run around to L24 and walk out through the southern door. The chest near L24 doesn't have a key in it, so if you can deal with leaving some cash behind, do so and get out the door.
L25 will lead you to the boss fight against a really tough minotaur. This guy has a coterie of archers, so if possible, try to lure him back through the lever door and take him on solo. Alternately, try using some kind of spell to dispatch the archers before going after the minotaur, as they can royally own you if given the chance; our level 36 Shaman almost died here as a result of the arrows and the smashes from the minotaur, so lower level characters will have a plenty hard time with this fight. Regardless, you'll need to beat the minotaur, grab the last bone key from his body, then unlock the door nearby to reach the warp leading back to your handler. One of the urns near the portal should be smashable to find the Bloodstone of Disease.
Plane of Valor
Warlord's Endless Honor
This is one of the simpler of the Champion levels; your only goal is to kill eight or more of the Warlords that pop up. Before you head in, be sure to load up on healing and mana potions from your handler, as you're probably going to need a few. By the time you unlock this level, though, you'll hopefully be able to dish out the big hurt in an efficient manner.There are two kinds of warlords here, an orc warlord and a cyclops warlord; you'll face off against one warlord at a time, with another warlord popping up immediately after you kill the first. The type of warlord that appears is random, but you should be crossing your fingers for a cyclops, since they're much easier to kill, at least in our experience, since they have one easily-dodgeable melee attack, which hits well away from their body, letting you get up close and wail on them at close range.
The orc warlord will be more problematic, since he'll attempt to get up close and swing away at you while his two cohorts deal damage on your flanks. Some kind of stunning effect, such as disease or poison, will be quite helpful here, especially if it affects the lesser orcs; otherwise, your best bet may be to go after the minions first, then concentrate on the warlord itself until more orcs come in to hassle you. You should get an idea for how many swings you can take before dying, and counterattack accordingly, hitting the warlord while your guard's down.
All you need to kill is eight warlords, but they'll follow on each other fairly quickly, so you'll need to heal up as soon as one goes down to be ready for the next. Note that killing a warlord will automatically kill his minions, as well, so if the warlord has just a sliver of life, press the attack and finish him off. After eight warlords are dead, you can let the next warlord kill you off to earn the Champion's Medallion.
The Isle of Dishonor
The Isle is the home of outcast warriors. There's not much to it besides some straight-up fighting and treasure finding; it's a good source of cash due to the number of chests in the area. As per usual, you'll be able to find the Bloodstone of Valor within.
Plane of Fire
Gnomish Escort
Ah, those wacky gnomes; they've gone and decided that they want to take a tour of the plane of Fire, and it's up to you to protect them. Of course, there are about a billion imps and fire beetles just waiting to rip the Gnomes apart as they travel along, so you're going to have a tough time of it. It'll be very helpful to have a melee or a ranged attack that can do over 200 damage in one shot, as that's the magic number that'll kill most of your enemies here.The first thing you need to know is that, although there are six gnomes, you don't need to keep them all alive to earn your full Champion's Medallion; we only had three of them kicking when we reached the end of the path, and we still got the full reward. So don't worry about restarting if one of them happens to fall behind and get eaten, because that's going to undoubtably happen a few times during the course of your journey, mostly because the gnomes are bad at sticking together. Whenever an enemy gets close to one, he'll start running away, usually directly into the nearest wall; they'll often run backwards, as well, causing the tightly-knit group to become quickly fractured. Dealing with this is going to be quite frustrating, but, again, only three of them need to live in order for you to get the full Champion's Medallion, so if it's a choice between going back for a straggler or sticking with a group of gnomes, leave the straggler behind and concentrate on the gnomes that are closest to you.
Torment's Furnace
This is a fairly straight level, with a bunch of fire sprites and imps waiting to pound you into dust. They're not so bad--certainly no worse than the enemies you faced off against in the normal Plane of Fire--so start chopping through them. The Twisted Key in the middle of the lake here can only be unlocked by killing the two Fiery Protectors elsewhere on the level; it unlocks the "Twisted Lock" on Syleas' cell in the Plane of Torment's Bloodstone level, "Hell's Cells". You can also nab the Bloodstone of Fire in one of the barrels here, so get smashing!
Plane of Storms
Kobold Onslaught
Your goal here is to defend three carts from incoming waves of Kobolds, with only your wits and an infinite number of exploding potions at hand. The exploding potions are going to be much more useful than your hits, however, as there are a lot of kobolds. The first few waves won't be too difficult to take down, but it's going to be difficult to dissuade the seventh and eighth waves from getting to the cart.The key here is that it requires two kobolds to simultaneously be in contact with a cart before it'll explode. The carts don't take damage, per se, so you can let a single kobold whack away at a cart for as long as you like without worrying about it, but as soon as another kobold comes along, it'll instantly be set alight. Overall, your goal should definitely be to prevent any kobolds from reaching the carts, but sometimes you might want to just let one on your right slide by while you deal with the three on the left. Your exploding potions have no effect on the carts, either, so if a kobold does happen to reach one, feel free to let slip the potions of war and blast him.
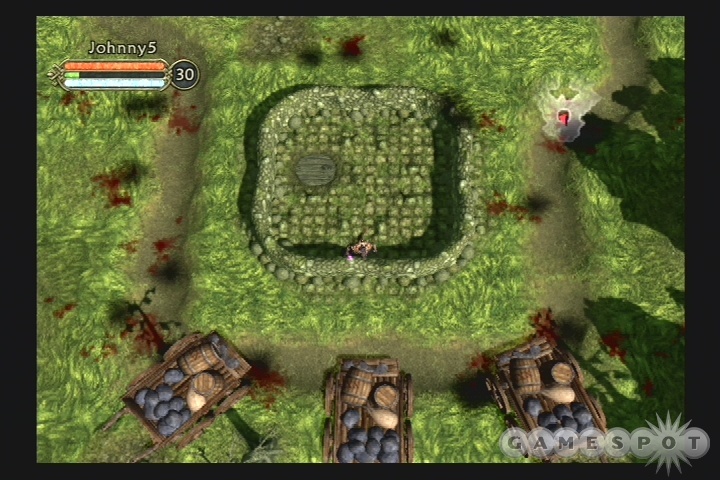
We found that the best position to be in for this game was to rub up against the bottom end of the square fortification, standing in the middle of it so as to be able to see most of the two primary lanes to the carts. This will allow you to chuck potions at either side of the fort with relative ease, although you may have to adjust your position to take down kobolds that are closer to the treeline. You can chuck potions quite rapidly, so feel free to throw out three or four at a time before switching to the other side of the fort to concentrate on the kobolds coming from that direction.
Note also that you don't necessarily need to kill all of the kobolds when you first spot them. They'll be stunned if an explosion goes off near them, so feel free to chuck a potion in the middle of a large group, then throw at the other side while the kobolds are stunned. The exception to this are the larger kobolds, who can't be stunned, and who will be able to take more damage than the smaller examples.
Once you get the basics of the game down, the most problematic aspect of it will come from the seventh and eighth waves, which have denser formations of kobolds than do the previous ones. At this point, it becomes something of a reflex game, where only the quick survive, as you'll have to dish out multiple potions to both sides of the fort. Survival here becomes a matter of split-second intervals, but so long as you manage to keep your cool, and remember that you can try the game as often as you like, you'll eventually prevail.
Frozen Wind Bunker
This level takes place on a frozen plain, on which orcs are besieging a small encampment of humans, in the direct center. If you can make your way through the orcs (you should be able to find the Bloodstone of Storms here, as well, probably in a barrel near a save point) and into the human encampment, you'll find Nenmar, who...runs a shop. That sells things. Just like your handler. He doesn't appear to have any items of exceptional value, but feel free to check his stock out nonetheless.
Faydark
Orc Caves
The caves are optional, but you can earn a little experience and find some loot within, so it'll be worth your while to go through them. You may also have noticed the Unexplored Tomb elsewhere on the Faydark Forest map; in order to get in, you'll need to have the Archaelogist's Shovel, which only drops in the Orc Caves. It appears to be just laying on the ground near a pair of tents, but it may also be a random drop off of an enemy, so we recommend that you save your game before heading into the Orc Cave and make sure that you pick it up before you leave. Go slowly and thoroughly, being sure to run around all dead enemies while tapping the square button; it's madness to try and find a single item in a whole cave after you've cleaned the place out.The only really challenging enemy in the Orc Cave is the Orc Commander, a bigger and burlier version of the Orc Hero, save for the fact that the Commander is fire-enchanted, meaning that he'll be able to damage you while you block. If you can, try to lure him back to some of the human attackers and let them take the brunt of his blows while you attack from the rear.
Unexplored Caves
Another palette-shifted enemy makes its home here, as you'll run across the lizardmen from the Plane of Torment, in addition to shades. The shades are going to be the more dangerous opponents, as they can create skeletons out of nothingness and use them to attack you, while still retaining some powerful blows themselves. The boss of the level, Slinthiss, is another of these shades, and will continually summon skeletons to deal with you; you can either attempt to flank him and hit him from the side, or just keep killing the skeletons and using his recasting time as an opportunity to get your swings in. Trying to take on both Slinthiss and the skeleton at once is risky, because the skeleton will likely get on your side and start swinging from your flank where you're not blocking.There's also a door in this tomb that's marked as being blocked by Spiritual Discord, caps and all. Now, this is going to be pretty confusing, but apparently the only way to get through here is to find the Words of Spiritual Harmony, which can apparently only be found in the Dungeon level of the Plane of Nightmares. When (if) you happen to find a set of the Words, you can return to the door and unlock it. In the tombs beyond, you'll find the Bloodstone of Faydark, as well as a boss Tomb Robber, and...not much else.
Plane of Nightmares
Death's Countdown
The goal of this mini-level is to kill as many monsters as you can in four minutes; the Champion's Medallion will only be rewarded to you if you manage to kill 75 or more. The key here is to kill quickly and efficiently; it's best to have a melee attack that can deal 300 damage or more or a ranged attack that can deal 200 damage or more, preferably one that can pass through multiple enemies and damage them all. The second aspect lies in just knowing the route. There's one main path that you can take through the level, but it has multiple offshoot rooms that will house more enemies for you. As you try the level over multiple times, you'll get a better feel for what difficulties the main path entails and how you want to proceed. 
The main sticking point here will be the minotaurs and archers; taken in combination, these guys can quickly wear down your health. If possible, it's best to withdraw the minotaurs behind a wall and take them on solo, without having to worry about constant archer fire. Dealing with the archers themselves will be a huge pain for melee characters, since they'll run away when you try to track them down. This is where a powerful ranged attack comes in. If you have a spell that can track, then the more power to you.
This challenge should be completable as soon as you unlock it, but we found it somewhat difficult to complete even with a level 30 character, so if you feel the need to push it off, feel free to try some of the other challenges and come back later.
Bloodstone Passage
The Bloodstone Passage is the culmination of your quest to unite all the Bloodstones of the Planes. The first thing to note is that the enemies here are the highest-level normal enemies in the game, which means that you can find some pretty decent stuff on them if they happen to drop anything high-level. Of course, they rarely will; we did happen to find a normal Whet Stone, though. So yay. You can also find the Bloodstone of Nightmares here, lying free underneath some trees; rotate your camera around if you don't find it by the time that you get to the portal leading back to your handler.At the end of the small level, you'll find the passage to the Twisted Nightmare level. In order to enter here, you're going to need all 11 Bloodstones, one for each of the planes, save the Plane of Fear. These are most often found in the final unlockable level for each plane, i.e. you'll need to have the complete Champion's Medallion for each level before you can find them, and they're usually either in a barrel somewhere or dropped off of a normal enemy, or even just lying around; you shouldn't expect a boss monster to be holding them, in other words.
Twisted Nightmare
The Twisted Nightmare is an optional boss gauntlet that holds the most dangerous foes in all of Return To Arms. If you can defeat five of them in a row, though, you'll be able to pick up some elite loot, and will unlock the most powerful weapon in the game.First off, though, the ground rules: after entering the Twisted Nightmare, you're unable to leave until you beat all of the bosses. If you happen to die (which is quite likely), you'll be returned to the Bloodstone Passage, having lost all of the items and whatever experienced you gained from your trip. If you manage to kill all five bosses, then you will, of course, be permitted to retain all of that junk. Actually surviving, though, is mostly a matter of having a lot of health and damaging attacks; we don't recommend you go through until you're around level 30.
Spider Queen
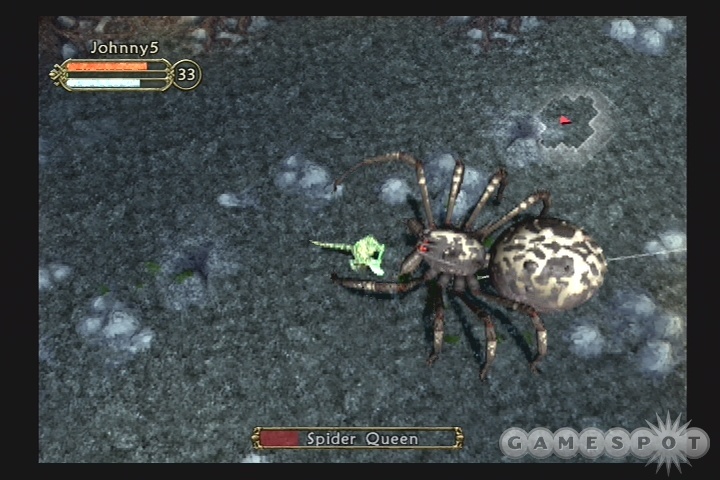
Mummy Sorceror
The Mummy Sorceror is likely the easiest of all the boss fights here. He'll summon a spellcaster and a swordsman to help him, and these are going to be his greatest weakness. If you can kill both of the lesser foes, then the Mummy will go into a spellcasting animation to bring them back; at this point, he's pretty much completely vulnerable to attacks from behind, so that's your opportunity to wail away on him. He's also fairly weak in general, healthwise, but does have some powerful attacks that can sap your health quickly, so be ready to retreat if need be.
Arena Beast
If possible, you'll want to take the Arena Beast on from range, as it has no ranged attacks and moves fairly slowly. If you have a quick-cast damage dealing spell, then a tactic of running away and casting should do the trick, although the Beast does have a lot of health. Melee characters can attempt to close in on the Beast and attack its flanks, but it does have a knockdown attack that can apparently work from any direction, so even if you're directly behind it you're still in a bit of danger of being knocked down. You should usually have enough time to get back up before it gets in attack position, so feel free to heal yourself and repeat the strategy until you finish the beast off.
Rallos Zek
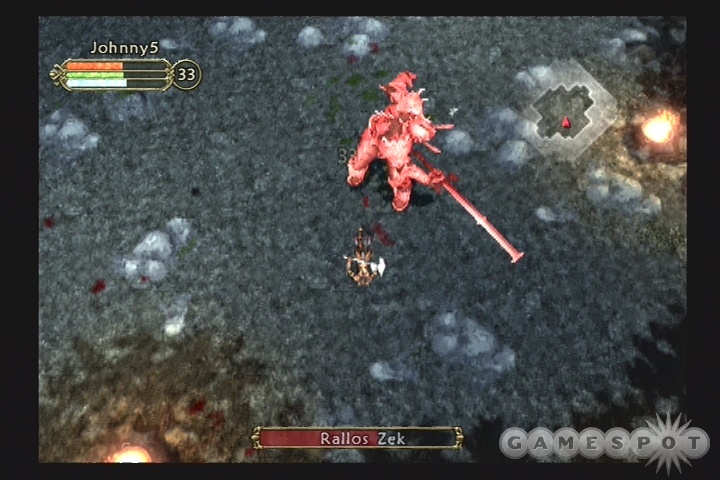
Rallos' real weakness is his swinging animation; when you get used to how he attacks, you'll see that he telegraphs each incoming swing for a second or so before he actually attacks, giving you time to block, and most if not all of his attacks are fully blockable. The most troublesome series of attacks comes when he attempts to step on you when you stand in front of him; he'll knock you down, damage you as he tramples you, then finish the sequence with a sword slash that'll likely kill you if you had less than 600 health or so before the first footstep. If you have to get close to deal damage, then you should try and stun or distract him with poison or disease, if possible, then attack from the flanks, but be careful of his sword slashes, as he can hit you from any direction when he gets back on target.
Innoruuk
If you screw around with Innoruuk, then you're dead; it's that simple. The bizarre thing is that of his two forms, one is vastly weaker than the other in terms of pure physical power. Unfortunately, he'll be in the more powerful form when you enter the ring, so you'll need to be careful.
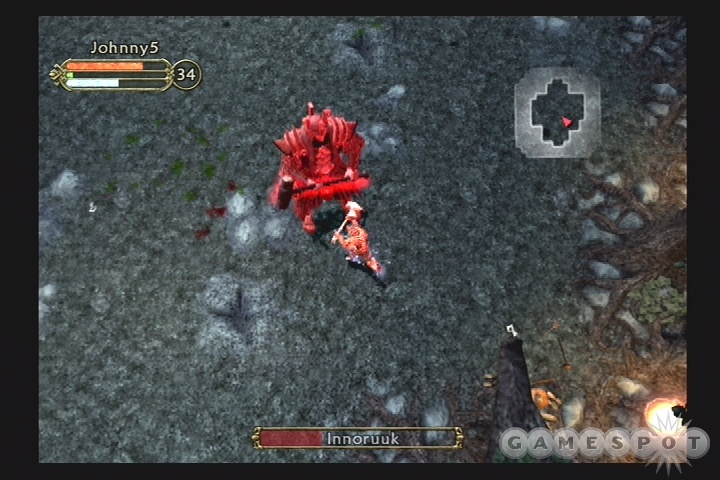
In order to really finish off Innoruuk, you're going to need to get him to drop his hammer. Every time you damage him, you seem to have a small chance of this happening; there doesn't appear to be a set amount of damage that you have to deal for this to occur, in other words. Obviously enough, though, you're going to want to be doing this damage from long range, if at all possible, meaning that distance spells and thrown weapons are the order of the day. If you absolutely have to close in, try to stay on Inno's flanks, and get used to blocking a lot, because he doesn't give you much warning before he starts swinging with his hammer.
When the hammer drops, though, your problems should be over, as his only attack appears to be some kind of health leech effect where he'll shoot red electricity at you from his hands. This seems to deal little damage, so feel free to run up to him and start unloading all of your melee damage on him. If you can't kill him quickly, he'll eventually summon his hammer up from the ground and start the whole cycle again, but eventually he will fall. Unfortunately, he isn't guaranteed to drop anything of particular import, but there are other advantages to completing this little gauntlet of bosses...
The Aftermath

First off, upon the death of Innoruuk, you'll be able to leave the Twisted Nightmare and return to the Bloodstone Passage. You'll get a little popup message indicating that you're considered to be a "true champion." Now, if you recall, there's a little sword in a stone in the Plane of Valor that says it can only be pulled out by a "true champion." So, if you wish, you can head back to the Plane of Valor and grab the mind-bogglingly good sword "The Voice of Rallos Zek." This seems like it's of a set, unique nature, and not random, so we'll share the stats with you: 235-273 damage, +50 Strength, +100% Health Regeneration, with one upgrade slot free (which is perfect for a Misty Globe or anything that'll increase its attack speed). And it's a one-handed sword. Yeah, we were pretty happy to get it, too. It's possible that it is random, of course, or that some other super-powered weapon will pop out of the stone, but whatever you get, it'll be a just reward for digging around and obtaining all of those Bloodstones.
Secondly, you may notice that, if you return to the beginning of the Twisted Nightmare, the entrance is still open, which will allow you to head through as many times as you wish. Since a single run-through will be good enough for an entire level until well into your mid-30's, you may want to use this as a quick levelling treadmill if you're trying to get uber before you hop online. The bosses all drop decent loot, which, if it's not as good as what you're wearing, can at least be sold for decent cash, making this a great place to earn 50,000 bucks or more for each run.
Got a news tip or want to contact us directly? Email news@gamespot.com
Join the conversation