Star Wars Episode III: Revenge of the Sith Walkthrough
This Walkthrough for the latest videogame adaptation of a Star Wars film gives you the goods on the game's Jedi duels, a full walkthrough, cheat codes, and all of the secret items.
Design by James Cheung
Ah, another Star Wars third-person action-adventure game. While entries into this sub-sub-genre seemingly come along every few months, Star Wars Episode III: Revenge of the Sith has a few unique aspects going for it, such as its inclusion of a good amount of footage from the still-in-theaters movie that it's adapted from, and for its inclusion of play modes that let you experiment with alternate endings to the movie, or even that let you play as the original Big Bad, Darth Vader himself.
Although Episode III: Revenge of the Sith isn't the longest game in the world, we've gone ahead and provided you with a complete walkthrough for the game's story mode and bonus missions in this guide. Also included are some tips on combat, as well as the location of each of the game's secret items, hidden throughout the missions you're sent on. Enjoy.
Combat Tactics
Combat in Revenge of the Sith is a mostly lightsaber-based affair, with a few Force powers thrown in to spice matters up a bit. Still, though, it's live by the sword, die by the sword, so far as most of the more difficult fights go, especially the lightsaber duels. You're going to need to get to know your combos and special moves if you want to succeed in the game. This chapter is intended to give you a few basic tips for succeeding in the game, but keep in mind that there's no real substitute for practice; if you want to be a master duelist, then you'll probably just have to keep trying to beat some of the Jedi opponents that you'll face. You can repeat missions as often as you like, so feel free to try missions as many times as you like until you get good at your appointed task.
Exploiting Your Skill Meter
If you want to increase your Force skills quickly, then you'll need to take advantage of the skill meter and attempt to kill as many enemies as possible while maintaining a high level of skill. Your skill meter (located near the portrait of your character in the lower-left corner of the screen) will rise as you land more blows on enemies, and drop as you take hits, or over time if you stay out of combat. Getting it up and keeping it up can be difficult, but doing so will net you much more experience than you normally would.
The number one key to getting your skill meter up is to block. In most cases, you're going to want to just keep your block up at all times. This will make it easier for you to deflect blaster shots, although enemies that fire rapidly, such as super battle droids, droidekas, and turrets, will still penetrate your block and sap your skill meter anyway; there's generally not much you can really do about this, save attempt to guard and rotate your right analog stick to reflect their shots back at them, if you have enough Force to do so. Some enemies also have attacks that penetrate your block, such as flame troopers, missile troopers, and Grapple Droids, so you'll need to adapt your strategy to the situation. We found that when dealing with these guys, it's best to just lay up off the block and go crazy with attacks.
Note that the kind of attack you perform will affect how much skill you gain when it hits. It seems like strong attacks are noticeably more skillful than light attacks; we didn't use critical attacks often enough to really get a sense for how much they added to your meter. Even if your attack doesn't deal damage - for instance, if it reflects off your opponent's lightsaber or electrical shield - you'll still gain the benefits of the skill you would've gained for it. For this reason, using strong attacks against enemies that can block your lightsaber blows, like Grapple Droids, is a great way to get your skill meter up. Unfortunately, even if you block an incoming lightsaber blow, it still registers as a hit, so you'll take a penalty to your skill meter when this occurs.
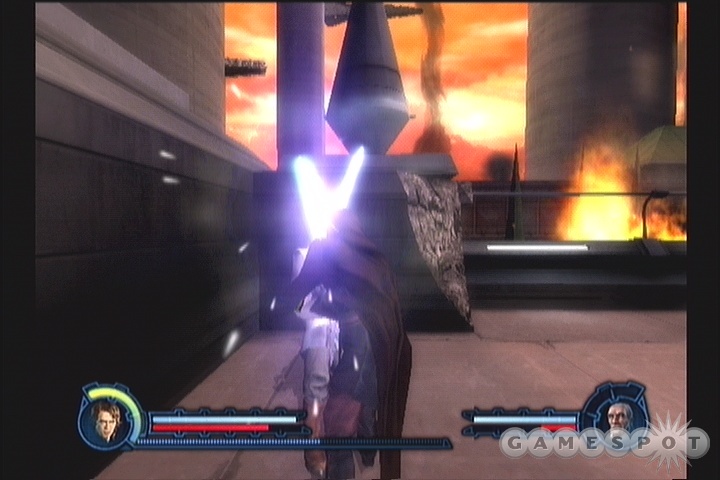
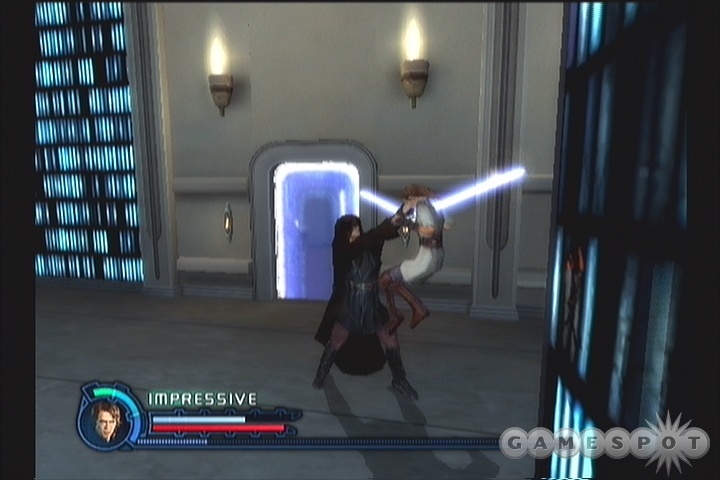
There are four zones on the skill meter. The first is the Fair zone; when you kill an enemy while you're in this zone, you'll get 100% of the experience from the kill. The second zone is the Good zone; kills here yield 150% experience. Third is the Impressive zone, which gets you 200% experience. Lastly, we have the Masterful rank, which nets you 300% experience for each kill. Unfortunately, your Masterful rank will only last for around 20 seconds, at the end of which you'll be wiped of your entire skill meter and will have to work your way back up from the bottom. This leads to some strange gameplay choices at times, when you want to save your Masterful kill for an upcoming powerful enemy; you may have to let people hit you when you're at the Impressive rank to prevent yourself from going into Masterful too early.
Rasheed Wallace, Jedi Master
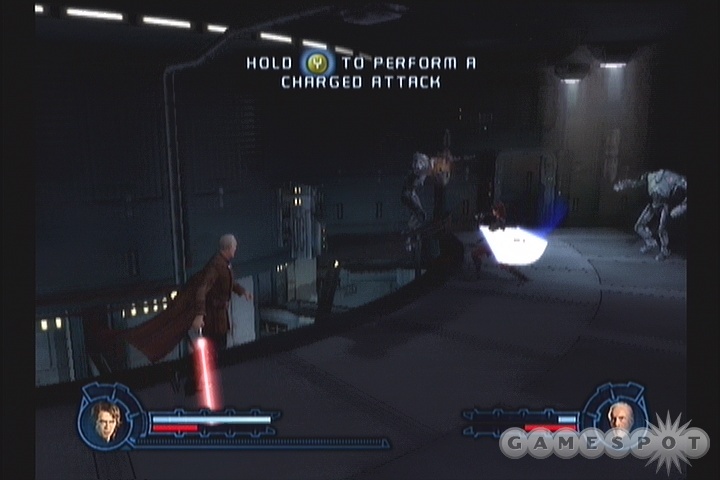
Undoubtedly your most powerful ability in the game is your blocking ability. While Anakin looks as though he's about to join a contortionist's guild when he blocks, your ability to repel incoming blaster fire and lightsaber blows is going to be critical to your success. Even when you do block, you'll still take damage from blows that come from behind or from an abundance of firepower, but blocking will mitigate the damage taken somewhat. It's especially important to block during Jedi Duels, when your foes will usually be quite fast and furious with their attacks. You can still attack with the block button depressed, mind you; you just won't be able to perform certain kind of attacks, such as dashes.
Beyond just blocking, though, we'll be honest and say that we managed to get through the entire game by just mashing on the light and strong attack buttons in random patterns. There are a number of bona fide combinations you can put together, if you want to learn them, and you may find it useful to do so when dealing with enemy Jedi, but you can still succeed in the game with nothing but the block button and a minimum amount of skill.
Force Powers
Force Stun
Force Stun allows you to lock enemies in place at low levels; if you depress the button longer, then you'll be able to either stun an enemy temporarily, until a few seconds pass or until you hit him with a weapon, or use a Jedi mind trick on them, which will force them to fight for you for a few seconds. The former is mostly used on strong-minded opponents, i.e. Jedi, and enemies without brains, like droids, while the latter ability will only be usable on weak-minded opponents like clone Troopers. After Anakin falls to the Dark Side, his Stun ability will be replaced with Force Lightning, which does direct damage to opponents.
Speaking personally, we rarely used either Force Stun or Lightning. The benefits of converting enemies to your side are marginal when compared to actually killing them, and Lightning drains your Force rather quickly, when you can usually just as easily kill an enemy with your lightsaber. Both abilities are usually blocked by your opponents in lightsaber duels, so although pure stunning them can be useful, especially to make yourself some time to heal, it's not a critical skill to have.
Saber Throw
Saber throwing is only a marginally useful technique in Episode III, and one that you probably won't need to upgrade at all unless you really want to. The main problem with it is that you can't defend yourself from incoming blaster fire while your saber's out, meaning that you'll take more damage from nearby enemies, and therefore lose some of your Skill meter. It takes a while for your saber to travel to your enemies and back to you, as well, so any enemy that decides he wants to shoot you will have a free shot.
Saber Throw will still be useful for slicing conduits that you can't reach, but most enemies can be attacked at close range with your saber if you just run up to them, making your saber throw a somewhat useless ability in those situations. It'll also be blocked almost 100% of the time when facing off against Jedi.
Force Grasp
Force Grasp allows you to pick up enemies and objects and throw them at each other. This is a fairly full-featured power, even at level one, but upgrading it seems to make it harder for living creatures to resist your Grasp power. You'll still have a hard time flinging around Jedi, but you'll have a lot of fun picking up droids and troopers and flinging them off into the void or the lava or the cliffside, or what have you.
Perhaps a better use for Force Grasp is to pick up the many haphazardly-placed explosives around the game's levels and throwing them into enemies. You can often pick off one or two enemies with these barrels, and you'll often find a few of them, or some kind of rocks or other manipulable objects scattered throughout the dueling levels, as well, which you can likewise use to pound through enemy blocks.
Force Push
Push is a useful form of crowd control. When you use a Push attack, you'll send out a blue bolt of force that will knock over any enemies in its path. At higher levels, this can easily knock down multiple foes at once; it's also useful for throwing enemies off of cliffs and railings when they're between you and the edge of a platform, resulting in multiple quick kills. It isn't quite as useful when used against Jedi foes, unless you can hit them with it while they're attacking, but even then, just knocking them down isn't going to be a good use of your Force energy in duels, as they'll usually be able to pop right back up and get back on your case.
Push does do a bit of damage, but not enough to really hurt anything above the level of a normal trooper or battle droid.
Force Heal
This should probably be the first skill you want to upgrade and max out, as it's by far the one you'll need the most during most Jedi duels, which are going to be the most challenging parts of the game. Increasing your Force Heal power will let you heal yourself more quickly and more efficiently, which is drastically important in duels, where you'll have to work in quick heals while also attempting to fend off an aggressive opponent. Since you'll only have a couple seconds at a time to heal yourself in duels, the speed at which you can perform this move will greatly affect your survivability in mano-a-mano fights, at least if you play hard and fast like we do.
Combat Skills
Critical Attacks
Critical Attacks are, for the most part, pretty cool-looking, but not quite worth an early-game upgrade. The main drawback to these talents is that they're not all going to be usable in duels, especially those that result in an instant kill on enemies (although these are pretty cool to use on normal foes, like troopers). There is, however, a Critical Sweep that can penetrate blocks and requires somewhat less time to use than the Saber Lunge from the Dash technique upgrades, so that may be worth upgrading for.
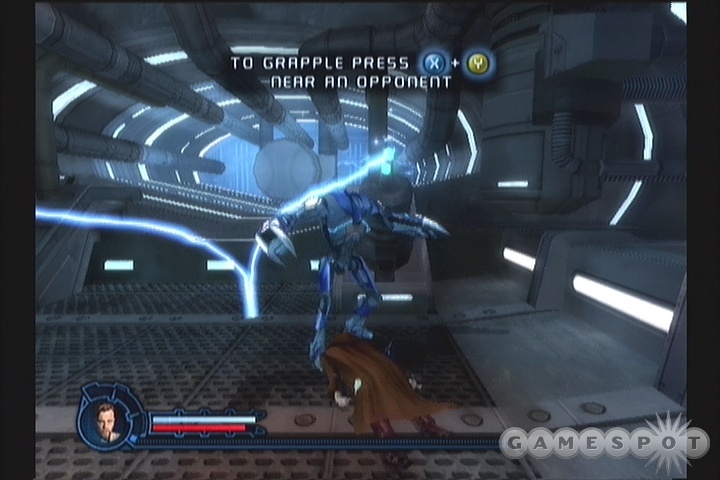
Grapples
Grapples are a decent way to get up close to an enemy and deal damage to them without using your lightsaber, and can also be useful when used against enemies that either block everything or rush forward for melee combat.
Unfortunately, grappling is something of a pain to actually perform in combat due to the way it's mapped to the controller. In order to pull it off, you'll have to hit the X+Y buttons on the Xbox controller or the Square + Triangle buttons on the PS2 controller, which isn't exactly user friendly. If you do manage to grab someone (most normal enemies will be easily grabbed, but Jedi and duel opponents will often resist your grasp), then you can tap either your light or strong attack buttons to start punching away. Increasing your ability up to the third level will allow you to perform some longer, chained attacks for extra damage.
Dash Attacks
We found dash attacks to be pretty useful during the game, as they allow you to use Force Dash to deal some extra damage, and also perform some attacks that can pierce through enemy defenses, such as Focus Lunge Strike. These are more useful for dealing damage to multiple opponents at once rather than taking on Jedi, due to the fact that they can't be interrupted by blaster fire; being hit with a lightsaber while charging up a Lunge (and it takes a second or so to charge) will interrupt the motion.
Jump Attacks
We never really spent much of our time airborne, so Jump Attacks probably weren't worth the investment for us. There are some useful attacks here, such as the easy-to-use Vault Attack and the Flip Kick. There are also some nice attacks that can be folded into attacks and combos, making it not completely useless in combat, but it's still not a class of attack that we used overmuch.
Area Attacks
Personally, we didn't really find area attacks to be worth upgrading, mostly because they take a lot of Force to use, especially when you're talking about the most useful variants, the Focus Shockwave and the Focus Sai Bomb. Both are capable of taking down groups of enemies, true, but your targets will have to be closely clumped in order to hit a bunch of them simultaneously, and Force Push can do much the same thing, albeit with less damage. Area attacks also aren't quite as useful in duels, which are going to be the hardest parts of the game, so you'll probably want to pick up on some of the more duel-friendly abilities like Dash and Force Healing before upgrading your AA abilities.
Walkthrough
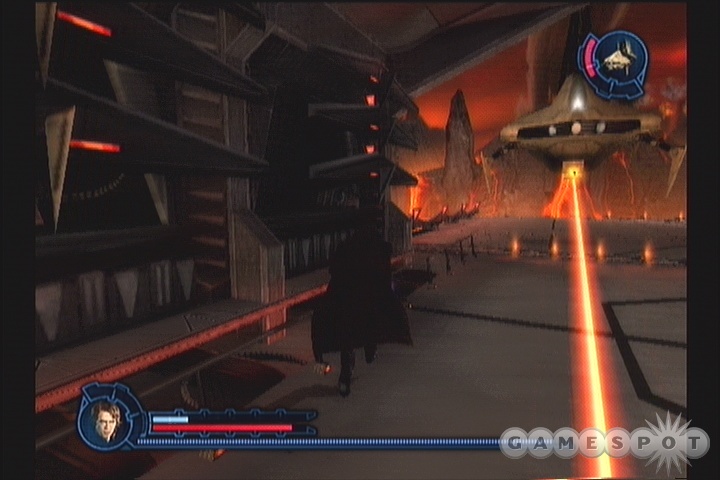
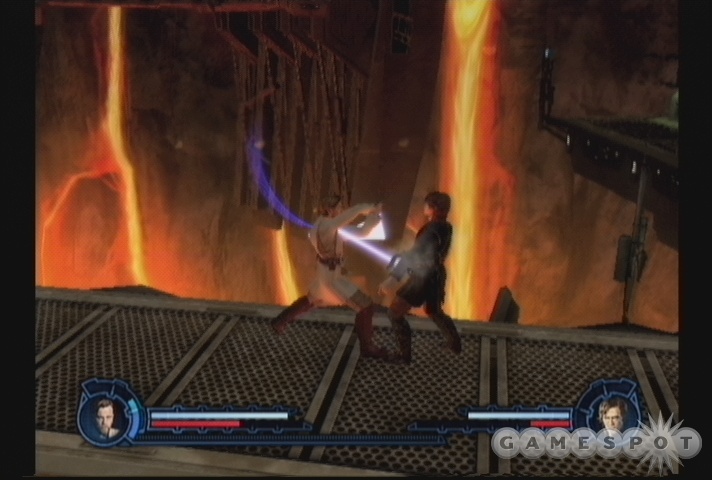
Chapter One: Rescue Over Coruscant
Senator Palpatine has been kidnapped, and it's up to Obi-Wan and Anakin to save him. To do so, they'll need to infiltrate the command ship that Ol' Palpy is being held on, cut their way through hordes of battle droids, find him, and escort him off the ship. It's not going to be easy, however...
You should treat the first hangar here as a kind of quick and dirty tutorial on the game's combat system. Whether you're playing the Xbox or the PS2 version, you should be able to execute Fast Slashes, Strong Slashes, and Critical Strikes with your saber, along with Force Pushes and Force Stuns. Hit the start button to enter the menu, then check out the Combat Chart to learn where each attack is mapped to. The battle droids that you encounter here aren't going to pose a serious threat to you, so feel free to start whipping out your saber and going crazy on them. Don't forget to practice the odd-looking block technique that will reflect their blaster bolts, as well as the Force movement technique (obtained by holding down the Force Push button) which will let you pick up explosive barrels and throw them at enemies, or vice versa.
So yeah, get crazy on the battle droids; if you start running low on health, you can click on both analog sticks to initiate Force Healing. There are also plenty of bacta tanks scattered around the level, often within the green explosive barrels, so grab them whenever possible. In order to get the most experience possible from the level, try to kill every droid you see before Obi-Wan has a chance to reach them; this is the best way to ensure that most of the experience in the level will be going to you. If Obi-Wan kills something, the experience effectively goes nowhere.
Eventually, you'll come to a locked catwalk; you'll need to watch over R2 while he extends it with his trusty scomp link. It won't take but a few moments, but more battle droids will be pouring into the area while he does so, mostly through the gap in the bottom of the screens, so set yourself up there to kill them as they approach. When it does extend, though, you'll be able to proceed on to the right, where a wrecked X-Wing is blocking your path. You'll have to use your Force Push button to raise it, after Obi-Wan gives the signal. The first Secret is in the area; after you raise the ship and move it out of your path, simply walk south a bit to find a Max Health Increase.
Further to the right, R2 will attempt to bypass another shielded door, but won't be able to do so until Anakin jumps into a landing grid and toggles an override. When you land in the pit, grab the second Secret inside, to the left of the console; this Max Force Increase will extend your Force bar permanently. After you grab it, toggle the switch, then use Force Jump to get back topside. Unfortunately, the droid snipers will still be position and firing on R2, so you'll need to Force Jump again to reach them; the blue circle on the floor will indicate the position you need to be in to get up to their platform. Destroy them and the two Super Battle Droids that appear through the door before returning to R2 and Obi-Wan.
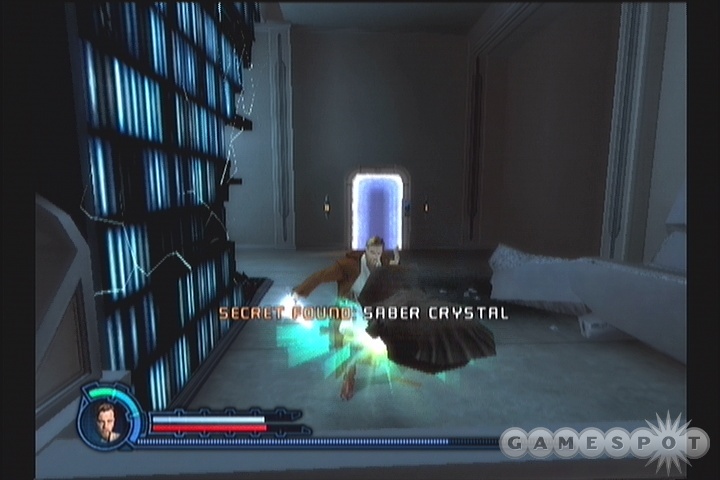
The last segment of the battle pits you and Obi-Wan versus another flood of droids, while R2 attempts to hack the shields. To help you in your battle, head to the left a bit and bust open the large explosive container in the upper-left corner of the screen, near where you jumped into the pit previously. Inside, you'll find a Secret: a Saber Crystal. These temporarily max out your saber skills, making it easier to kill everything and making every kill a Masterful one, which nets you triple experience. It won't last long, though, so quickly slice and dice everything in your path until the mission ends.
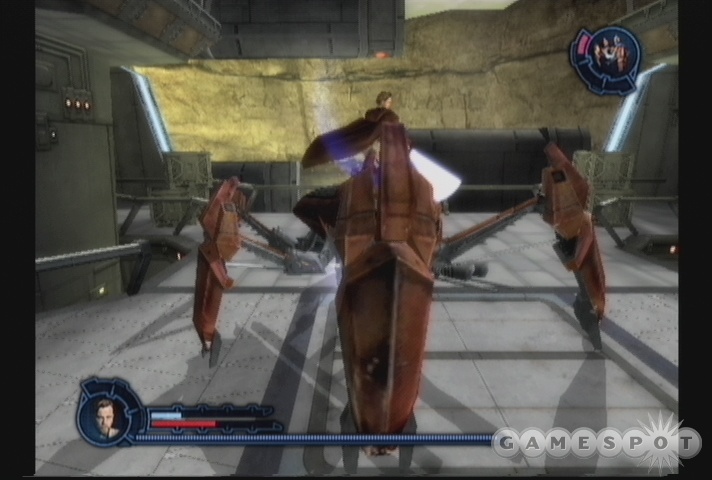
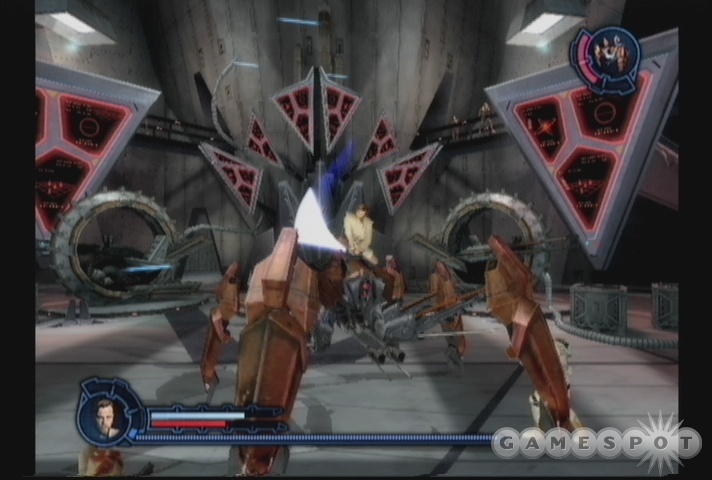
Chapter Two: An Explosive Development
Obi-Wan and Anakin still have to proceed through the ship to reach Palpatine, but the droid forces are quickly tracking them down. You'll have to deal with a new enemy at the beginning of this level: it possesses the shape and size of a Super Battle Droid, but has no ranged attacks. Instead, it uses electrical fields to protect itself from your lightsaber attacks, and will attempt to grapple you and squeeze you to death when it gets an opportunity; they are, appropriately enough, called Grapple Droids. You can use Force Grasp to pick them up, then drop them, which should prevent them from blocking your attacks momentarily. You may not want to, though, as you can quickly build up your saber skill meter by beating on them while they're shielding, then finish them off when they'll be Impressive kills.
After you cut your way through the first group of enemies, you'll reach a set of catwalks running to the right. There's no need to hurry here, so keep your blocking up and take down the battle droids as you see them while avoiding their fire as often as possible to increase your saber skill multiplier. When you reach a sparking generator, use a Lightsaber Throw to destroy it and move on to the right. There'll be another generator to destroy before you reach a platform with a console on it. If you've reached Good or Impressive saber skill due to not taking much damage, then by all means feel free to help Anakin kill off the Grapple and Battle droids that appear here; they won't keep coming forever but should there should be enough to let you grab some more high-experience kills.
After the walkway's been extended, you'll need to Throw and destroy more of the charging generators before you can move on. You'll come out to a small chamber with a turret and a Grapple Droid inside. You can do as Anakin requests and reflect the blaster fire back at the turret, or you can simply jump at the turret and use light slashes to destroy it; the downside to the latter method is that you'll likely take some damage.
When you pass through the doors behind the turret and destroy the battle droids there, you'll be able to find the first Secret of the level. The correct path here is to head up the northern ramp, but if you go down the southern ramp instead, you'll find a bunch of boxes. Slice them open to find a Max Force Increase. From there, head back up and around to meet up with Anakin again and kill the Grapple Droids that have appeared. After crossing over the gap here by using Force Grasp, you'll need to use a Saber Plunge on the door to open it, but first, kill off all of the enemies that appear for the extra experience.
After you've busted through the door, you'll wind up in a sealed room; you'll need to slash open a power conduit to move on. Before doing so, though, kill all of the enemies in the room; a Secret will appear in the middle of the floor, so grab the Max Health Increase. With that in hand, slice the green conduit, then use another Saber Plunge to bust through the next door. After walking onto the catwalk beyond the door, it will collapse, so kill the Grapple Droids, Force Jump back up, then walk to the right until you get a short cutscene revealing the presence of buzz droids. As soon as the cutscene's over, leave Anakin to fight the foes while you head back to the left to grab the third Secret: a Saber Crystal. Use it to get some Masterful kills on the buzzs, then keep heading right until you reach a door. The flow of droids should abate somewhat at this point, so use Force Heal to restore your health, if necessary, then use Force Grasp at the point indicated to blow open the door in front of you.
Inside the next room, you'll have to deal with more turrets and Grapple Droids. While fighting, hit the two consoles to open the next large door, which will lead out to more catwalks. Start walking right until you see a trio of walkways heading up; one of them will have three explosive barrels at its end, so destroy those to find the fourth and final Secret, which is another Max Health Increase. At the end of the walkways, another console will extend a bridge; destroy the electrical pylons on the bridge and head across to end the level.
Chapter Three: Peril In The Elevators
Obi-Wan and Anakin are nearing their goal. The last obstacle to reaching Palpatine is the elevators leading to the observation deck. They'll need to reach the top of those before they can effect their rescue.
Unfortunately, you'll be attacked by a pair of Destroyers immediately at the beginning of the level. Before you destroy them, though, slice through the small circular hatches on the upper end of the screen, near where the hallway expands into the elevator vestibule. One of them contains a Secret Max Force Increase. With that done, use Force Stun to overwhelm the Droidekas and temporarily disable their shields, allowing you to slice them up. Feel free to kill off as many as you like before slicing through the elevator doors with your lightsaber. To do so, just use a Critical Strike, hold the button down, then use your analog stick to slice through the outline that glows around the perimeter of the door.
When you breach the elevator door and head inside, Anakin will automatically jump on top of it to deal with more of the buzz droids. These guys are fairly easy to take down; just jam on your block button and slash at them as they crawl up the sides of the elevator. Try not to let them hit you, as you can easily build up your skill meter here, which will come in handy shortly.
After taking care of enough buzz droids, you'll automatically jump to the top of another elevator, where a few flying droids are waiting for you. These guys are similar to the Grapple Droids, in that they can shield themselves from your attacks, but, also like the Grapplers, this is a good thing, since it'll let you easily and quickly boost your skill meter. Also note that Anakin will give the verbal cue for a Secret here. When this occurs, you can apparently walk into the upper-middle section of the elevator, near the wall, to pick up a Saber Crystal as it passes down the shaft, but we've never been able to pull this off, and in fact have never been able to even see the Crystal, despite playing through the sequence half a dozen times. It's definitely there--somewhere--but it's very tough to find. You may want to try slashing the wall with your saber to see if you can't unlock it that way. If you're not a must-have-everything gamer, then you can safely skip the Crystal anyway, as you'll likely be able to get up to Masterful skill level by beating on the flying droids or the Grapple Droids that follow them. Regardless, after a bit more killing, you'll eventually meet up with Obi-Wan again to begin heading towards another elevator.
Soon enough, you'll be blocked off by ray shields as you head down the hallway. After dealing with the Droidekas, you'll need to slice into a room to your right in order to drop the shields. There'll be plenty of buzz droids in the room, so if you have a Good or Impressive skill meter, go ahead and start taking them down. There's also the third Secret in this room: across from the control console, there's an explosive barrel. Force Grasp it out of the way to reveal a Max Health Increase. With that in hand, use the console to drop the ray shields, then head back out to the hallway and return to the elevators. It'll go into freefall, so start chopping up more flying droids; eventually R2 will be able to reverse the elevator's direction, so keep chopping and try to get yourself up to an Impressive or Masterful skill rating before the level ends.
With your skill points at the end of the level, it might be worthwhile to try and get Anakin up to rank two in Force Healing, which will come in handy in the next level.
Chapter Four - Settling The Score
It's time to take on Darth Tyranus, aka Count Dooku. If you've seen the film, then you should know how this'll end - let's just say that it won't be pretty.
First Phase
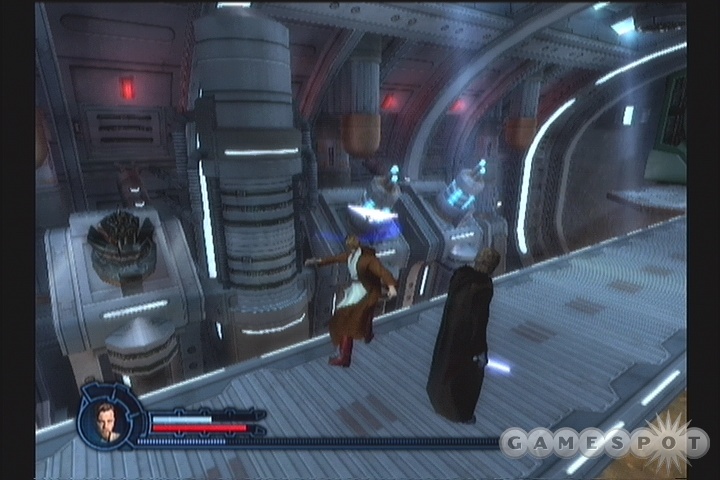
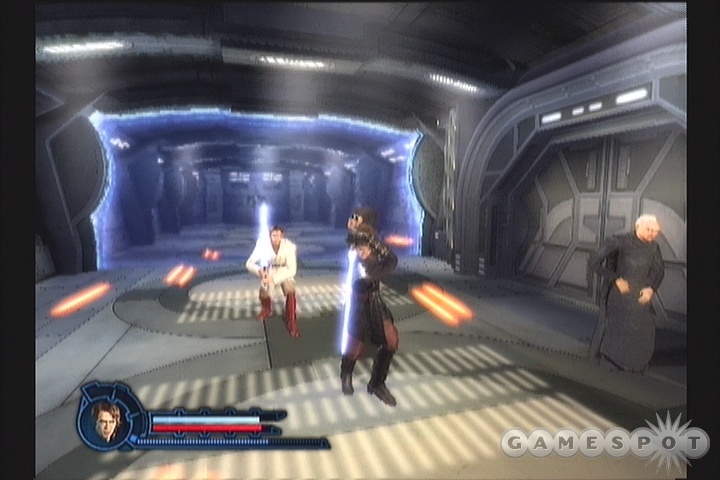
Dooku is going to be a tough match for you, and uses some powerful attacks. This should be one of the easiest sections of the fight, though, since you have Obi-Wan along for the ride, and can use him as a buffer to protect you from damage. You'll notice that Dooku's health drops only very gradually as you damage him; this is going to be a long fight.
Dooku is a master swordsman, and can block most of your attacks. To defeat him, you'll need to bypass his guard by using as many combos as possible; go ahead and check your combat chart for a readout of combo ideas, if need be, or just start spamming the buttons in as many ways as you can think of. If you did happen to upgrade your Force Healing in the last mission, then be sure to use it whenever you have a free moment. Dooku will still normally choose to attack you rather than Obi-Wan, so you may need to use your dashing dodge (locking onto him, then using the analog stick to press away) to clear up enough room for you to quickly heal.
Second Phase
After you manage to drain a bit of health from Dooku, he'll eliminate Obi-Wan from the fight and force you to take him on on the upper walkways. This is when things get a bit more difficult, as there aren't any real obstacles that you can use to distract Dooku; you'll just have to take him on as best you can and try to keep your health up. The walkways are exceedingly long, though, so if you need to escape and heal, you should be able to do so. The two platforms on either end are good locations for this, as Dooku will often be slowed by the corner of the fence.
Dooku debuts a new attack here, in which he whirls around in a tornado-esque attack, flashing red blades all around him. You can't block this attack, although you can apparently hit him with a lightsaber while he's using it to disrupt the animation. It's safest to just dodge backwards and get out of range, however. It does take off most of his Force, though, but he will quickly regenerate it.
You may want to try and engage Dooku in a saber clash here by using a strong attack on him; this will occasionally lock your sabers together, and the camera will zoom in on your characters. When this occurs, quickly move your index and middle fingers over the strong and light attack buttons and start tapping away at them. If you can quickly alternate your button presses, then you should be able to overwhelm Dooku and bust through his guard, resulting in an automatic four-hit combo.
The first Secret can also be found in this section of the fight. If you run all the way to the very left end of the walkway and onto the platform there, you'll see a computer console. Destroy it for a Max Force Increase. If possible, use your Force Healing before picking this up, as it will also fully restore your Force meter, even if it's empty.
Third Phase
After the fight on the catwalks, the action will drop down below, where Dooku will start bringing in Super Battle Droids to fight you while he continues to press the attack. The SBD's aren't all that threatening, and in fact can be used to garner the second Secret of the level. If you manage to kill one while it's standing next to the interior railing and knock it off into the chasm on the other side, you'll get a short cutscene of it falling and banging off of bars. When that's done, head all the way to the left to find a Max Health Increase. This will, of course, completely restore your health, which should pretty much put this fight out of Dooku's grasp, so grab it, then start wailing on Dooku with every combination you can make.
Fourth Phase
The last phase of the fight takes place in front of the Senator. You hopefully still have plenty of health from the Max Health Increase, and Dooku will be down to below one-quarter of his health bar at this point; if that's the case, then just go crazy and start stringing together combos. Regardless, all you have to do to take Dooku down at this point is finish off his minimal life meter. If you happen to run low on health, try to position yourself so that the table is between you and him, then use Force Healing to regenerate. Dooku will also use Force Healing from time to time, but only for a minimal amount of health regeneration, so don't worry about this overmuch. Just get your combo meter up as high as possible before finishing him off.
Chapter Five: It's Not Over Yet
Now that you've rescued Palpatine, you have to actually escape from the droid carrier before General Grievous manages to recapture you. You'll begin this level by taking control of Anakin only, so work your way down the hall until you reach another ray shield. Head into the nearby door to slice the controls, then move around and to the right to reach another ray shield. The control panel for this one is on the wall, so slice it open, then cut through the green conduits behind the panel to lower the shields.
A bit further down the hall, you'll run across R2. When you meet up with him, you'll have no choice but to reverse course back down the hall, but you'll soon find that another nearby ray shield has dropped, allowing you to pass on. There are a number of electrical discharges in the area, though, so mind your path as you walk along.
Around the first corner here, you'll see a turret pop down from the ceiling, so use your Force Grasp to pick up the green explosive barrel to its left and chuck it at the turret. If you destroy one of the boxes here, on the right side of the corridor, you'll find a Secret Saber Crystal, allowing you to get a bunch of Masterful kills on the numerous battle droids that are going to be coming at you.
Now, you'll notice another control panel on the wall near the ray shield here, but before you head through it, return to the turret location and cut through the door there to find another Secret: within the door you'll obtain a Max Force Increase.
After cutting through the control panel and slicing the conduit, you'll soon come to another ray shield; this one can be eliminated by using your Lightsaber Throw to slice the power in the nearby room. Further down the hall you'll come to yet another Ray Shield; only R2 will be able to slice through this one. Protect him while he does so, then link up with Obi-Wan and the Senator before heading into the gun battery.
Inside the battery, you'll be asked to take control of a turret and use it to fire on an enemy ship. Before you do so, though, search the room and find the sealed doorway behind the gun; this contains the level's last Secret. If you slice open the door, you'll obtain a Max Health Increase.
When you approach the turret and mount it, you'll be given three objectives to aim at, each marked out by large green circles. You can't just fire away at the green circles, though; you have to move your targeting cursor around inside of them until you obtain a smaller red circle, and then start blasting away. After you get your shoot on, the level ends.
Chapter Six: The General's Right Hand
Now that you've managed to get yourself captured, it's time to get yourself uncaptured. After you do so, it'll be time to start taking on the many droids that protect Grievous, including his formidable bodyguards. At the very outset of the level, though, you can find the first Secret. By running to the upper end of the screen, where there are two green computer screens, and slashing the right screen, you'll find a Max Force Increase.
Now, the droid bodyguards are fairly tough opponents, since they will almost always block your attacks, but they're not unstoppable. Like Dooku, a certain amount of tenacity is required to defeat them, and you'll also want to just keep your block button depressed pretty much all the time that you're fighting them, since they have numerous and quick attacks. If you've upgraded any of your attack forms, then now might be a good time to bust them out; Force Grasp or Stun can also be useful in temporarily preventing them from blocking. You'll need to kill four or five of them all told before you shift to the next part of the level, which still takes place in the control room, save for the fact that it'll have rotated 90 degrees onto its side.
The second phase just sees you facing off against more droids, including Battle and Grapple varieties. You won't have any health increases here, so keep an eye on your life meter and use Force Healing when necessary. If you manage to wail on one of the Grapple Droids, you can hopefully get yourself up to Impressive or Masterful skill rank before the Bodyguards start dropping.
After killing enough of the droids here, you'll shift to the third section of the fight, where you'll be fighting on what's actually the ceiling of the ship. The second Secret is here, inside one of the green computer panels on the right side of the room; destroy it to reveal a Max Health Increase. With that done, start wiping out the Bodyguards. When they're dead, the mission ends.
Chapter Seven: Investigating Utapau
It's time for Obi-Wan to strike out on his own and investigate Utapau, where General Grievous is believed to be hiding out. As soon as you land, you'll discover that there's definitely something going on, as the entire landing facilities of the planet have been taken over by droid soldiers.
The first Secret is immediately around the corner after you begin. After taking out the Battle droids and SBD's on the walkway, take a left towards the door sealed by a ray shield. If you get close enough to it, you should see a conduit to its left; taking this out with a well-aimed Lightsaber Throw will net you a Max Force Increase. With that in your pocket, move on to the turret, destroy it by reflecting its shots back at it, then start dealing with the tough red Grapple Droids that appear. As always, try to get your skill meter up to Good or Impressive by beating on their shields before finishing them off. They'll appear one by one until one finally comes through the door underneath the turret; head through there to move on to the next screen.
On said next screen, you'll have more catwalks to work your way down. Try to keep your skill meter up as high as possible; if it hits Masterful, then just stop shielding and start slicing through all of your opponents here. There'll be plenty of them, including a sniper on top of the vent to the rear of the droid position, so get a move on and use Force Jump in the circle to reach him. On the platform above, slice through the buzz droids, then flip the switch to lower a nearby platform, allowing you to move on. You'll need to slice through another conduit with a Lightsaber Throw to move on; don't forget to bust the crate near where the heat was venting to find a large bacta tank.
Around the corner, use the panel to activate a distant platform, then kill the droids that assault you before using a Force Jump to reach the next area. The heat vents here are periodic, so you'll need to time your movement; the last one is continuous, so again use a Lightsaber Throw to get past it. The turret beyond can be difficult to kill, due to the harrassment from the Grapple Droids; the easiest way to take it out is to hide behind the crates to the left and use a Force Grasp to throw the explosive barrel into it. On the other side of the crates is a large bacta tank, which'll come in handy while you're dealing with the continuous stream of droids. Do so, then use your lightsaber to bust through the door here.
The room beyond seems to be just a gap in the exterior action; you'll have to deal with a few SBD's and Grapple Droids to clear your path to the next door. There is, however, also a Secret here; if you slice through the metal tubes on the upper side of the room, you can reach a Max Health Increase. Do so before cutting through the next door.
The next area has a simple objective: run like the dickens before the turrets blast you to bits. They're quick enough to track you if you just run, so you'll want to use Force Run (by double-tapping the analog stick) to outpace them. You can only keep this up for so long, however, but you should be able to make it to the small gap in their coverage without a problem. The ray shielded door here can be busted open by jumping and Lightsaber Throwing the conduit above it; it contains a large bacta tank. Let your Force regenerate all the way before moving on, then dash past the second gun until you reach a Force Jump area. You can again let your Force regenerate here and Force Heal before jumping up, if you wish.
After one more bout of outrun-the-cannon, you'll come to another cannon that's apparently been abandoned. Fight off the droids, then use the console near the railings to open a path to the turret here. Heal yourself completely before hopping into it. When you do enter it, you can immediately destroy the blue nodes on either side of the ray shield, if you wish, but it's probably better to just take your time and kill off all the droids that start coming in. There are enough to probably max out your experience bar for the mission, if you've been doing good with your kills thus far. When two turrets pop up and start shooting you, though, you'll need to destroy the nodes, as the turrets are apparently indestructible.
Crab Droid
When you've gone through the door past the ray shield, you'll wind up near your final opponent: a Crab Droid. The final Secret is here, as well: you can find a Max Health Increase by destroying the crates in the lower-left corner of the screen. You may want to save this for later in the fight, though, as the Crab Droid can be pretty annoying, especially the first time you face it. You can see its health in the upper right corner of the screen after you start hitting it, so you don't have to worry about accidentally killing the droid before you pick up the secret.
In order to kill the Crab, you'll need to jump onto its back with the weirdly-configured Grapple command. Instead of something simple like mapping it to the lower-left buttons, this command is activated by pressing the upper-right buttons, meaning that you'll have to move your thumb around a bit before you can safely do it. All you need to do is run up to the Crab and grapple it, but a lot of your grapples will slide off, so you'll have to wait for the Crab to not be shielding and not firing its incredibly annoying lasers at you. Eventually, though, your grapple will hit, and you'll be able to climb up onto the Crab's back, at which point you can start to slice away at it. A few rounds of this will net you a win, and end the mission.
Chapter Eight: The Cavalry Arrives
This is a fairly lengthy level, and it starts off with a difficult fight pitting Obi-Wan against a pair of bodyguards and an infinite number of battle droids. The only way to heal yourself here is with Force Healing, which will often be interrupted or just rendered pointless by the damage you'll be taking while using it; your best bet is to just quickly go after the bodyguards and kill them before you get overwhelmed. If you've upgraded your Force Push, then you may want to try knocking the bodyguards into each other, as well. There's also a single explosive barrel to the right of the area that can be used to blast one of them for a bit of damage.
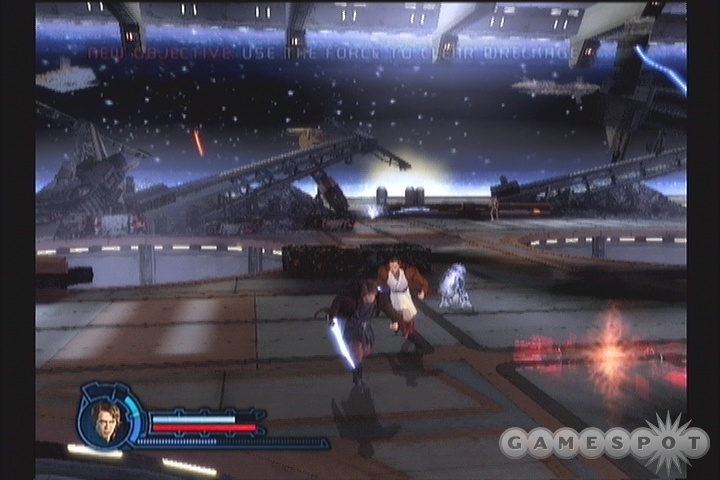
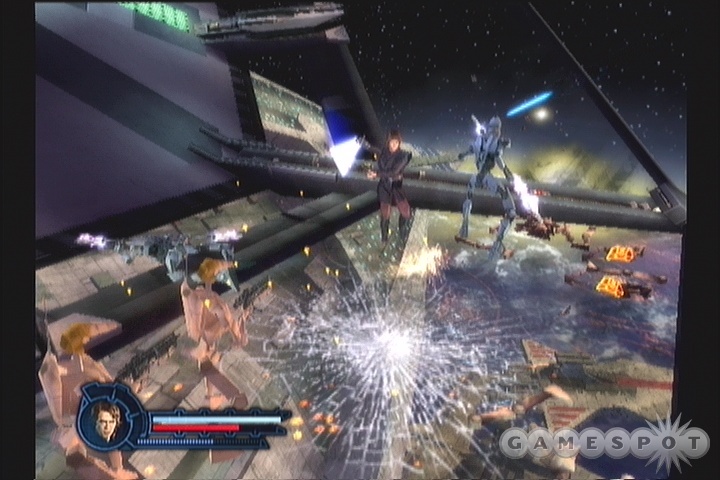
After you kill the bodyguards, you'll automatically warp up to a higher area of the level, where clone troopers will help you slice through numerous droids. The first Secret is here; by destroying the console on the upper middle portion of the screen, you'll find a Saber Crystal. After destroying a bunch of droids, you'll eventually get a cutscene revealing a ship that's being fired upon. Before you help it, though, keep on filling up your experience bar by killing droids. When they stop coming, jump up to one of the cannon control platforms via the leftmost Force Jump area.
On the left platform, start killing droids. Before you disable the cannon, though, you'll want to find the second Secret of the level. If you jump up near the ray shielded door, you'll notice a small conduit above it. Slicing this with a Lightsaber Throw will spawn a Max Health Increase on the platform. When you have it, use the console on the platform to drop the shields, then slice through the machinery there to overload the AA turret below.
With that done, jump back down to the lower area and continue to boost your experience by taking on as many droids as possible before jumping to the right platform. After disabling the second cannon, jump back down to the lower level; you'll be asked to disable the ray shields that are blocking the trooper reinforcements, so you'll have to jump down to another area, where two more bodyguards await. You can go ahead and slice the two blue glowing conduits here if you wish, but first, move to the lower right corner of the screen and destroy the orange computer console for a Secret Max Force Increase. You can also continue to slice away at the enemies for extra stats at the end of the level, or to increase your experience bar if it isn't already full. When you do slice the conduits, a pair of turrets will fall down. Do your best to keep your skill meter up as high as possible through this fight, preferably by using a reflection shield to bounce their fire back at them. When they're done for, use your Force Grasp at the indicated spot on the floor to destroy the nearby machinery, then move on to take on another Crab Droid.
This Crab Droid is defeated in the same manner as the one at the end of last level, but now you'll have battle droids coming at you at the same time. You'll also have a pair of clone troopers that'll act as a constant diversion during this portion of the fight, though, so they'll be able to divert the Crab's attention away from you from time to time. Before destroying the droid, though, find and destroy the glowing cables on the left and right side of the area with Lightsaber Throws to reveal the forth and final Secret: a Max Force Increase will appear in the upper middle portion of the area. With that picked up, destroy the Crab Droid with grapples to finish off the level.
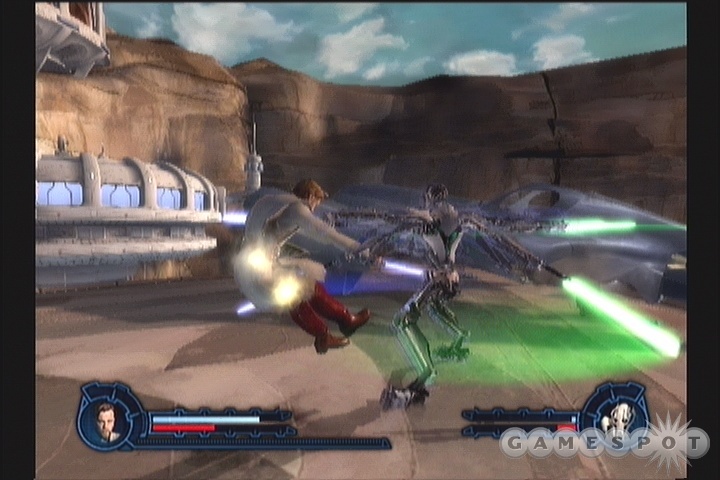
Chapter Nine: Showdown With Grievous
Another day, another hideous cyborg to destroy. Grievous can be a pain to deal with, mostly due to his often unrelenting attack pattern, where he'll just attack and attack and attack without letting up, but with a bit of practice, you should be able to penetrate his guard and damage him. As in the Dooku duel, there's a nice health increase in the middle of this fight, so if you nab it, you shouldn't have too much of a problem beating him, assuming you don't get mauled before you manage to grab it.
First Phase
It's worth taking a few minutes just to spar with Grievous at the beginning of this fight and seeing what he's capable of before restarting the level to get a fresh start on the fight. Initially, he'll only use two lightsabers, but that's still one more than you have, so you'll need to be careful. As mentioned, Grievous can string together attacks quite rapidly, and although you can block them without too much of a problem, you won't be able to do much damage against him while he's assaulting you. In order to hurt him, we found it best to just back away from him a bit while standing in the middle of the room, then run towards him and use a light-light-strong combo, or something similar. He has a hard time blocking you when you charge into him, from our experience. In point of fact, this simple charge-and-attack motion will work on Grievous throughout the fight, as you'll see in the video walkthrough for this segment.
Second Phase
After you knock Grievous' health down a bit, you'll move down to a landing platform. The Secret Max Health Increase is here, in one of the small grey explosive containers that are bolted to the floor, to the lower right of the point where you begin. Go ahead and grab it before repeating the charging action to destroy Grievous. Note that he'll start to fire his gun at you in this phase, which can do a good amount of damage and knock you down. If you're near him when he starts firing, just swing away at him to interrupt his animation; otherwise, you may want to try to jump over it.
Third Phase
The third section of the fight takes place in a cave. In the upper right corner of the cave, you can smash through some of the rock pillars to find a Secret Max Force Increase, the second and last of the level's secrets. Grievous here is similar to his previous forms, although he does add a charge attack which is prefaced by him going down on all fours and glowing blue. Again, you can just hit him while he charges to interrupt this attack and get some free attacks on him.
Fourth Phase
Now that you've sufficiently threatened Grievous, he'll go all-out and light up his four lightsabers in an attempt to polish you off. Like Dooku, he'll attempt to whip out a whirling attack that can do heavy damage to you, which is prefaced by the same crouch-and-charge animation as his other special attacks are. So, again, just hit him while he's crouching to disrupt him, and press the attack to finish him off.
Chapter Ten: The Dark Side of the Force
Through a rather convenient twist of timing, Anakin walks in on Mace Windu just as he's about to finish off Senator Palpatine once and for all. Thinking that this is a Jedi assassination attempt, Anakin prevents Mace from doing what must be done. You'll have to finish Mace off if you wish to save Padme's life.
First Phase
Windu brings a typically Jedi suite of powers to the dueling table; he'll attempt to use Force Push and Force Stun, in particular, to knock you back or prevent you from defending. Blocking can prevent these powers from working on you, which can be a big help, especially when negating Force Stun, since Windu will usually drain his entire Force stash attempting to use it on you.
Beyond that, though, Windu doesn't really have a lot of unique attacks, either here or in the later stages of the battle; this is pretty much just a brawlfest. On normal difficulty, we found it a relatively simple manner to just spam out attacks on him to prevent him from going on the offense. You're going to get a health increase at the very end of the duel, so if you can survive until then, then you should be able to finish him off without a problem.
Second Phase
You'll jump down to a walkway on the exterior of the building at this point and engage Windu in another round of dueling. Apart from the open air, this portion of the battle isn't dissimilar to the first; just press your attack and try to prevent Baldy from getting into an offensive rhythm. If you need to heal, then there's plenty of room to run with in order to try and do so.
Third Phase
The first Secret of the level can be found here; destroy the three green computer consoles on either side of the extended walkway to reveal a Max Force Increase. When you have it, start wailing on Windu with strong attacks and attempt to get your saber skill meter as high as it'll go without hitting Masterful; it's definitely possible to get an Impressive or Masterful kill on him if you manage to avoid the damage that he pumps out, but if you hit Masterful now, it's unlikely that you'll be able to keep it long enough to kill him in the next phase. This is, in a lot of ways, the most critical part of the fight; you have to ensure that you don't hit Masterful, which may entail letting Windu hit you to reduce your skill meter, but you also can't get it too far down, and you also can't let your health drop too far, or Windu may just kill you before you move on.
Fourth Phase
There are five silver cylinders in the Senator's meeting room; if you slash or destroy all of them, you'll reveal a Secret Max Health Increase, which will top off your health and make it an easy matter to just go crazy on Windu to finish him off. If possible, just use strong attacks on him until some of them break through and finish him off; those that he blocks will raise your skill meter, hopefully getting you up to Impressive or Masterful before he dies, which will net you a lot of experience.
Chapter Eleven: The Hunt Begins
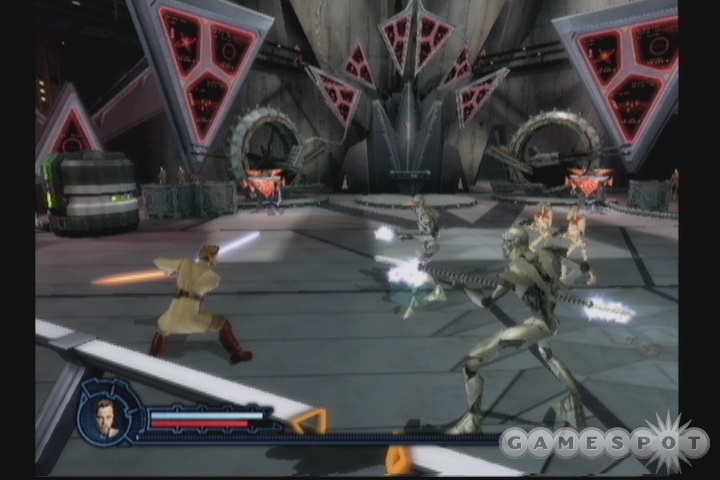
Now that Anakin is fully on the Dark Side of the Force, the time has come to hunt down and destroy the Jedi, many of which are taking refuge in the Jedi Temple. You're going to be facing off against quite a few of them in the temple, but none of them are quite as difficult as a true duelist. They can still parry your attacks, but with enough pressure, you'll slice through their defenses quickly enough, rendering them only slightly tougher than, say, Grapple Droids. '
After offing Jocasta Nu, you'll have to deal with a few waves of Jedi. Before you do so, though, find the first Secret by traveling all the way to the right end of the screen and grabbing the Max Force Increase there. With that in hand, start chopping Jedi; as per usual, use strong attacks against their blocks to get your skill level up a bit. After you kill a few Jedi, you'll notice one running into a room and locking the door; to reach him, you'll have to use a Force Jump at one of the designated spots on the floor, kill a few more Jedi, then slice through the wall panel to the right of the door and destroy the conduit to open the door. After killing the Jedi within, use the console to open the door back in the library, then jump back down and kill the remaining Jedi to move on.
The next screen contains a large statue and, you guessed it, more Jedi. These are seemingly a bit tougher than the Padawans you were facing in the library, but still shouldn't be too much trouble for you. The second Secret is here: head to the left as soon as you enter the room to pick up a Max Health Increase. With that taken, you can immediately use Force Grasp to throw the large statue into the door leading on, but you'll probably want to keep killing Jedi for a while; they flow for a good length of time and can net you a good deal of experience.
After you smash through the door, you'll wind up in the Study Hall. Kill the Padawans here, then slice through the door at the right upper end of the room to move on. You'll run into your first dual-bladed saber-wielding Jedi Brutes at this point in the level; these guys are a bit tougher than the previous enemies, and obviously have dual-wielded blades, but otherwise possess no special attacks other than an annoying knockdown blow. You can still just go crazy with offensive moves and slice through their defenses without too much of a problem. If you need help, though, try using Force Grasp to lift them up, then knock them down to prevent them from blocking momentarily.
When you reach the console at the end of this path, flip it, then return to the Study Hall. Before you slice through the now-unshielded door, kill the Jedi, then walk to the right and down, towards where you first entered the room, to find another Secret: a Max Force Increase. With that in tow, slice the door to move out onto the bridge.
There's not much to say about the fighting here: there are more Jedi to kill. The middle of the bridge will also foist a pair of skill-meter-draining turrets on you, though, so be ready to reflect their shots when they open fire, or you can just use a Lightsaber Throw to pop them. When both are killed, a Secret Saber Crystal pickup will appear between them; you may want to just ignore the Jedi here, then, and focus on the two turrets first, then use the Saber Crystal to get a bunch of Masterful kills.
When the clone troopers have busted through the door at the end of the bridge, you'll have to slice through a few more Brutes (use Force Grasp to knock them into each other if their knockdown move is aggravating you) and a turret before you can make it into the hangar bay. When you enter the bay, destroy the crate to the south of the door to find a Secret Max Health Increase, which is the final secret of the level. There are still plenty of Jedi to kill here, so if possible, work your meter all the way up to Masterful before running to the end of the walkway here and hopping into the turret. Be sure to be at maximum health before hopping in, though.
An odd bug here, at least on the Xbox version of the game, will see your skill meter stay constant throughout the battle in the turret, meaning that if you enter it with a Masterful rating, you'll be able to destroy all the Jedi coming at you and rack up a bunch of Masterful kills. The goal here, though, is to destroy the vehicles that launch from the landing bays and attempt to destroy you; there are going to be six or eight all told. They're tough to hit due to the way that they dodge around the level, and your turret will overheat quickly if you just hold down the button, but you should be able to finish off the six or eight required kills before they manage to reduce your health all the way. Doing so will finish off the level and allow you to move on.
Chapter Twelve: The Final Lesson
Before you can finally extinguish the Jedi Temple, you'll need to deal with Jedi Master Cin Drallig and his apprentice Serra Keto. You'll take on Serra first, who dual-wields sabers. She's not overly difficult to defeat if you stick to a Windu-duel strategy of just going for overwhelmingly fast strikes and attempting to keep her off her guard. You should've been able to increase your power significantly by this point, so feel free to use whatever techniques you've powered up to take her down.
The first Secret of the level comes on the second screen of the Serra duel. There'll be three holograms displaying images of past Jedi Masters in the background of the fight; if you destroy all three holograms a Saber Crystal will appear. Obviously enough, you don't want to pick this up until Serra's extremely close to death; when she is, though, grab the Crystal, quickly nab a Masterful kill, then use what remaining time you have with the Masterful ranking to wail on Cin Drallig.
Cin is definitely going to be the harder of the two duels here, or at least more annoying. He'll abuse Force Push and Grasp to throw you around like a ragdoll, but again, you'll probably want to just get up close and personal and start jamming on those attack buttons to keep the pressure on him. Luckily, the second Secret can be found here. If you destroy the segment of pillar that's fallen into the middle of the room when this duel begins, then you'll be able to grab a Max Health Increase that will completely restore your health. Actually hitting the pillar can be difficult, since it's so low to the ground; you want to use a jump and strong attack to slash it open. With that in hand, though, start going crazy on Cin Drallin until he pushes you out the window. This occurs when he's around half health, so be sure to grab the Max Health Increase before he drops down this far!
The final segment of the level will pit you against Cin again in a wide open area. There's no room to hide here, so healing yourself will be difficult; hopefully you can land down here without too much life off of your meter. We found the best tactic here to be to just, as usual, go crazy with attacks, particularly strong attacks. Although Cin can block many of your moves, you do stand a chance to work your way all the way up to Masterful rank here, which will let you finish him off with strong moves and critical strikes. It's entirely possible to get two Masterful kills here if you're sufficiently reckless, so feel free to press your attack and slice away until Cin falls.
Chapter Thirteen: Attack of the Clones
Now that the clone army has turned on its former leaders, the Jedi, Obi-Wan is trapped on Utapau with a few thousand soldiers gunning for him. You'll finally get the chance to kill a few troopers here, and even mind control them as well, if you wish (Force Stunning them will now convert them to your side). There's going to be a lot of fighting here, and it's going to be difficult to get your saber skill meter up above Good, due to all the incoming blaster fire, so just keep your health up, destroy every destructible in your way to find bacta tanks, and try not to die.
You begin the level on a landing platform, so start killing troopers! Don't forget that you can use Force Push to throw them off the side of the platform; the same goes for Force Grasp, but it takes longer to pull off. When everyone's dead, use the control panel near the rayshielded door to move on. A turret will pop down in the hallway beyond, and a few droids will appear as well, so rush in and use your Force Throw ability to chuck around some explosive barrels to finish everyone off. Troopers will also appear behind you, so may need to retrace your steps to kill them; when you're ready to move on, slice through the wall panel and destroy the conduit near the large door to open it.
The next little firefight will see you taking on more troopers and droids; kill them all, then head towards the rear door to bring up a pair of clone walkers. These AT-ST-like foes are going to wipe out your skill meter right quick, since it's difficult to block their stomping attack, and they can take heavy damage. A single good blow from the rear seems to be all you need to take them down, but since it's very difficult to get behind them, you may just have to deal with them frontally and slash at their legs until they fall over.
When you're past the AT-ST's, run out onto the walkway behind them to find another walker; kill it, then grab the first Secret of the level, a Max Health Increase that should be plainly visible on the right side of the wall. (You may need to destroy something to reveal this.) After you have it, you'll have to start dealing with flame troopers; these guys can set you alight, and can take quite a bit of damage, but don't dish out much pain, so use normal lightsaber attacks to bust a move on them until they're all dead. With them out of the way, use Force Grasp on the debris to move it away, then kill another walker and Force Jump up to the next area. Killing the remaining flame troopers will let you cut through the door, moving on to the next section of the level.
After the cutscene detailing the presence of the missile troopers, walk to the right a bit and kill the droids. The missile troopers will be firing at you here, so if possible, use a lengthy Lightsaber Throw to chop them all to pieces before proceeding to the right and slicing a wall panel. The conduit beyond can be destroyed to drop a ray shield to the left, through which you can proceed to use a console, which drops a door to the right. Confused yet? It's not as complicated as it sounds, really, although you will have to walk the hall a few times to move on.
In the next room, you'll have a couple of turrets to deal with. Kill them both, then destroy the large barrel at the right end of the room for a Secret Max Force Increase. With that out of the way, slice the four conduits on the walls to unblock the console, then use it to open the path leading on to the right.
The battle with the Trooper Gunship is annoying, and potentially deadly; luckily there's a checkpoint just before it if you happen to die. The gunship will attack with both lasers and missiles, both of which can be avoided by running from one side of the platform to the other. To hurt it, you'll have to either use Force Grasp to chuck the explosive barrels in the area at it, or use Lightsaber Throw; the latter will eventually become required when you run out of barrels. The gunship will periodically disappear beneath the platform, giving you time to heal yourself.
Eventually, though, the gunship will start pressing its attack, and firing both lasers and missiles simultaneously. You'll need to pick your lightsaber throws carefully here, as you will get pounded by fire if you chuck it when it's about to fire missiles at you.
When the gunship goes down, move to the right and take down another turret and some miscellaneous enemies. There's a Secret Saber Crystal in one of the explosive barrels here, but you won't have much of a chance to use it, unfortunately. Cut through the door to the right to find another large room with a ray shield. The large explosive barrel here contains a Secret Max Health Increase bonus, the last secret of the level. With it in hand, cut through the wall panel to reveal a hidden conduit; slice that to drop the ray shield and move on.
After killing all of the enemies on this balcony, you'll drop down on top of a Juggernaut tank. Your objective here is to destroy the two turrets, but if you're still short of a full bar of experience, a better idea is to just keep killing the troopers that appear until you've topped yourself off. You can kill one of the turrets if you wish, but save the other until you've maxed out your experience meter. When both of them are destroyed, the mission ends.
Chapter Fourteen: Assassination on Mustafar
With Sidious' grasp over the Republic now complete, it's time to finish off the Separatists and remove the last obstacle to Palpatine's complete rule over the galaxy. Anakin thus heads off to Mustafar to meet his destiny...
You begin the mission on an exterior landing pad, and have to fight off numerous Neimodian guards. These guys have shock taser staves that can temporarily stun you when they connect, meaning that you're going to be spending a lot of time shacking like a fool. Still, they're relatively low damage, so it's not too difficult to kill them. If it really bugs you, though, you may want to use Force Push to knock them around or Grasp to through them off the platform from a distance. The first Secret can be found on the platform; destroy the large red box near the first obstacle in your path to reveal a Max Force Increase. With that in hand, use Grasp to move the obstacle out of your path and cut your way into an access corridor. After destroying the enemies within, use the console to open the door leading onward.
The first of the Neimodian brutes awaits for you here. These vibroaxe-wielding foes are pretty tough, in the manner of most large enemies in the game, but here, you can easily kill them by using Force Grasp to pick them up, then throwing them off the platform. A bit more killing will net you a Force Jump point to switch to the upper platform; kill the enemies here, then move into the hallway to the left. You'll eventually reach a smelting area, so keep heading to the left until you run across two turrets. After reflecting their fire back at them, jump across the gap, work your way into the hall there, and raise the next obstacle with the console within. With that done, you'll be able to return to the main platform and move to the left; a pair of snipers will shoot down another obstacle, forcing you to jump to them to get around it. Before you do so, though, head all the way to the right side of the platform to reach the second Secret, in the form of a Saber Crystal. It'll be mostly worthless since you'll have to run back all the way to the left before you can find something to kill, but hey - it's another secret. It's probably best to kill the snipers with Force Grasp or a Lightsaber Throw, then wait for your force to completely regen before running down to grab it, as this will let you Force Run back down the platform and jump across to use the Masterful kills on all of the droids that appear. Just be sure to save enough Force for the jump.
Anyway, after jumping, charge into the small hallway and kill the droids and Neimodians there. The conduit on the wall will destroy the turret outside, allowing you to move back out and force jump around the obstacle. Keep moving left until you come to another jump, then press through the hallway there to the next area.
The next long hallway here will be filled with battle droids, so use them for saber practice before killing the brutes at the far end. When they die, a door you just passed by will open up; return there and slice the conduit to destroy the ray shield at the end of the hall. The third Secret is just past this shield; destroy the boxes in your path to reveal a Saber Crystal. Use it to chop your way to the north, then cut around to the right until you reach another exterior area. Your objective here will be to reach the magma lift controls. To do so, extend the bridge via the console, kill the enemies that come at you, then slice the conduit on the northern side of the screen with a Lightsaber Throw.
When you reach the top of the lift, you'll have to deal with four opponents and a turret, but don't kill everything until you reach the fourth Secret. To do so, head up to the rightmost force barrier and use Force Grasp on the box inside the room to destroy the conduit inside there. It's tough to do properly, but not impossible; destroying the conduits will let you grab a Max Force Increase.
After killing the enemies at the top of the lift, you'll see a cutscene, after which you'll be able to nab the fifth and final Secret of the level. When you regain control of Anakin, turn around and go back through the door behind you. Jump to the right to find a Max Health Increase. Sweet. With that done, head to the left and kill everything in your path until you reach the control room. You'll need to kill a few waves of enemies before you can finally reach the separatist leaders. These guys can't attack you, so this would be a good time to heal up if you're running low on life. Killing them all will result in a showdown with Nute Gunray and his ship.
Nute's ship can be pretty devastating, so you'd be advised to come in here with as much life as possible. It has two attacks: one which fires three fireballs at you for extreme damage, and a laser attack. You can avoid the fireballs by running left or right when you see the ship charging up, and the lasers can be dodged by running to the opposite side of the hangar and rubbing up against the wall. They'll either fire from left to right or from right to left, so to avoid the left to right laser, you'd just run up against the right wall and stay there.
To hurt the ship, you'll need to do precisely what you did against the Gunship in Obi-Wan's last level: fling explosives at it and use your Lightsaber Throw. The attacks aren't difficult to dodge, so this shouldn't be a hugely difficult proposition. When the ship is destroyed, the level ends.
Chapter Fifteen: Aftermath in the Temple
It's time to head through the last of the real missions before the climactic duel at Mustafar. Yoda and Obi-Wan have to infiltrate the Jedi Temple in order to shut down the beacon which is intended to draw in any remaining Jedi to their doom.
To begin with, start slaughtering troopers with Yoda by your side until a pair of them drop a massive pillar, which conveniently creates a walkway for you to pass over. Immediately after you cross over, destroy the small explosive box to the left of the end of the pillar to find a Secret Saber Crystal, which should let you rack up quite a few Masterful kills on the influx of enemies coming at you. To the right a bit you'll notice a large explosive; destroy the second small explosive just to its left side to find a Secret Max Force Increase.
After killing everything here, you and Yoda will split up, forcing you to take a high path through more troopers. There's not much to do here but kill everything in your path and try not to die. After you kill off all of the flametroopers, you'll notice a Force Jump circle. Jump across a kill the trooper there to meet up with Yoda again.
As soon as the next fight begins, check the upper left corner of this screen, next to the flat explosive package, and Force Grasp the rock there to reveal a Secret Saber Crystal which will let you get quite a few Masterful kills. When Yoda moves to push away the debris in your path, help him do so, then destroy the large explosive container on the right side of the path to reveal a Secret Max Health Increase. With that done, move into the library.
The lower level of the library is just another deathmatch; kill troopers until you spot a Force Jump spot leading to the upper level. More enemies will, of course, be waiting for you. Your objective here is to get through a sealed door to your right. To your left is the wall panel containing the conduit you need to cut to lower the door's shields; immediately to the south of the door itself is a rock which can be Force Grasped to reveal a Secret Saber Crystal. Grab it and nab some more Masterful kills before heading out through the door.
The last Secret is found on the long hallway leading to the next turret; there's a Max Health Increase that's easily seen as you make your way down the walkway. Kill the enemies here, then hop into the turret to take on a pair of Gunships. As per usual, your saber skill meter won't go down while you're in the turret, so try and hop in with as high a meter as possible, although you'll only have two targets to fire at.
The last segment of the level will pit Obi-Wan against Clone Assassins. These annoying characters are more, well, annoying than they are deadly, since they can dodge most of your attacks, Agent Smith-style. Still, they can't do too much damage, and can't block your jump + strong attack saber slam move, so all you'll need is a bit of time to wear them down. They also can't dodge dash attacks, such as a Saber Lunge, so if you've upgraded your Dashing abilities, feel free to use those abilities to kill these guys off.
Chapter 16: A Friendship in Flames
It's time to finish this. Although Yoda couldn't take down Emperor Palpatine, Obi-Wan still has a chance to nip the Sith in the bud by killing Anakin - er, Darth Vader. This is a straight-up duel, and one that will take a while to complete.
Phase One
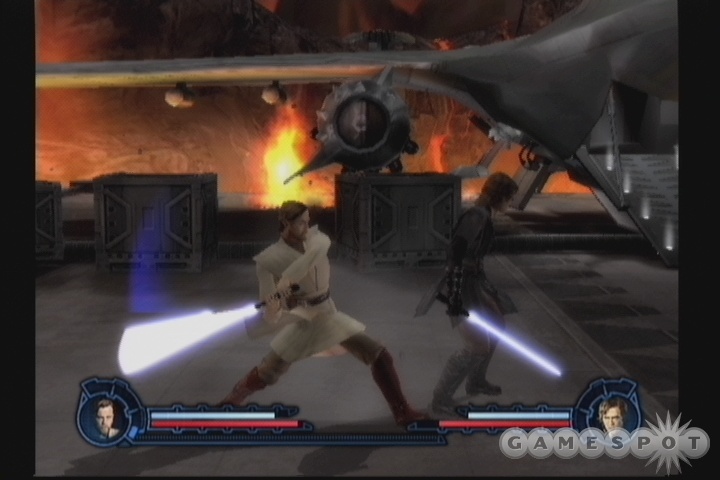
The first portion of the fight takes place on the landing pad. Anakin here has no particularly noteworthy attacks; everything he can dish out is taken straight from the normal movelist that you yourself have had access to throughout the game. Get your bearings, then, and start working your normal duel strategy. Again, there's no healing available in the forms of Max Health Increases or bacta tanks, so take advantage of any knockdowns to get yourself a couple seconds worth of Force Healing. There are plenty of explosive barrels scattered around the area; if you're quick, you can either use Force Grasp to throw them at Anakin, or just pick him up and throw him into them. Works either way.
Phase Two
Before long, you'll shift to an interior portion of the battle, where Anakin and Obi-Wan are fighting inside the Mustafar control room. There are two tables here that will provide you cover and hopefully allow you to heal if you can get Obi-Wan on the other side of them. If this occurs, all Anakin will be able to do is Push or Lightsaber Throw to block your heal, but you should be safe from his attacks for a few moments, so try to get yourself healed up as high as possible before moving on.
Phase Three
The next phase of the fight will take place on a narrow balcony, again strewn with explosive barrels. Anakin will start to use more of his Force-draining superpowers here, which will often penetrate your guard, but that can be a blessing in disguise, since he's much more susceptible to your Force Grasp, Push, and Stun while he's low on Force, so when his blue meter is near empty, try to knock him around a bit and get some time to heal yourself. This is the last of the "easy" phases of the fight, so, again, try to be as healthy as possible before attacking him and moving on.
Phase Four
Here's where things start to get a bit more difficult. The main difference between these last three phases of the fight and first three is that Anakin is much more likely to overpower you during saber clashes; we did manage to win them, but it got a lot tougher, and involved simultaneously jamming on the X and Y buttons on our controller with our index and middle fingers like a madman. Beyond that, Anakin just seems to be a bit more aggressive, and you'll be fighting on progressively smaller surfaces, giving you little time to heal up. You may want to start attempting to grapple him at this point if you find yourself having difficulty penetrating his guard; just grab him, then start tapping buttons for extra damage. This only applies if you actually boosted your grappling skills, of course.
Phase Five
The second-to-last phase is going to be pretty important; you'll, as always, want to exit from it with as much health as possible, because you're not going to have many chances to heal in the final phase. You won't have anything to hide behind in this phase, though, so any healing will have to come after you've managed to knock Anakin down or run away from him. Do your best to get your health up, then renew your attack on Anakin and attempt to force him into the final confrontation.
Phase Six
Now that you've finally managed to get Anakin on the ropes, it's time to finish him off. Unfortunately, you're both stuck on a really tiny platform that's floating in the middle of a sea of lava, so the fighting will be...intimate, to say the least. Since we had a good amount of health going into this portion of the fight, we decided to play with our patented spaz attack pattern, and just jammed on the buttons in an attempt to beat down Anakin and not give him a chance to strike back. Since that's pretty much what we did to finish off Phase Five as well, we had a decent amount of skill meter built up, allowing us to eventually work our way up to a Masterful rank and penetrate Anakin's blocks, resulting in an easy kill. If you're more of a cautious type, then by all means engage in elegant dueling, but you can beat him with an almost purely aggressive approach if you're of a mind to do so.
Chapter 17: Revenge of the Sith
Well, if you're interested in pursuing another side of the Force, then you can feel free to take on Obi-Wan in Chapter 17, which places you in the shoes of Anakin during the final battle. This is structurally identical to the duel in Chapter 16, in that you'll be going through the same rooms and phases, but we found it to be a bit more difficult; Obi-Wan appears to be a bit more adept than Anakin at feinting and counterattacking, so you're going to have a harder time landing your attacks, especially at the end of the fight. Still, though, if you can heal yourself before you go into the sixth phase, you should be able to overpower him and win control of the galaxy for yourself.
Bonus Missions
Mission One: The General's Protectors
The first bonus mission is also one of the more difficult ones that you're going to be facing, as you take on the role of one of Grievous' bodyguards in a fight to the finish against a number of Clone troopers. All of your attacks as a bodyguard are relatively unwieldy, so you're going to have to get a feel for how each of them work before you can start cutting up enemies; just run around and see what your buttons presses actually do.
Unfortunately, it's difficult to keep your health up here since you can't block blaster fire and can't heal yourself. You'll thusly have to rely on bacta tanks to keep your fleshy parts in good working order. There are seven of these all told hidden throughout the room in computer panels. Three of them are large bacta tanks and are found near the center and upper portion of the main area of the room. The other four are smaller bacta tanks, and can be found on either side of the upper large bacta tank and to the lower left and lower right of the center of the room, near the rayshielded doors that the troopers come through.
The normal blaster troopers aren't too difficult to take down, but things get more difficult when you're dealing with missile launchers and flametroopers. The flametroopers can be maneuvered past, however, but simply staying up against the lower portion of the center part of the screen; since these troopers have to get into melee range to damage you, you can simply stand near the bottom edge of the platform here and wait for them to come to you. They'll occasionally pivot around you and fly right off the edge of their own volition, and when they don't, you can usually move away from the edge a bit and knock them off with your attacks.
The final fight, against a Crab Droid, is going to be what will finally kill you in most cases, although if you still have a few bacta tanks lying around, then it can be killed. You can't grapple it, a la Obi-Wan, so you'll just have to get close and whack on it with your normal attacks; your critical strike can do the job well if you have the time to pull it off. Unfortunately it'll be difficult for you to avoid its attacks, so you're going to have to have a few bacta tanks left in reserve to pull off this fight.
Mission 2: Grievous On The Run
This is going to be another difficult mission, thanks to the fact that you, again, won't be able to heal yourself, since you're playing as Grievous. Like most of the other missions here, this is going to force you to face off against a large number of grunt enemies, but will eventually shift over to a duel with Obi-Wan after you kill enough peons.
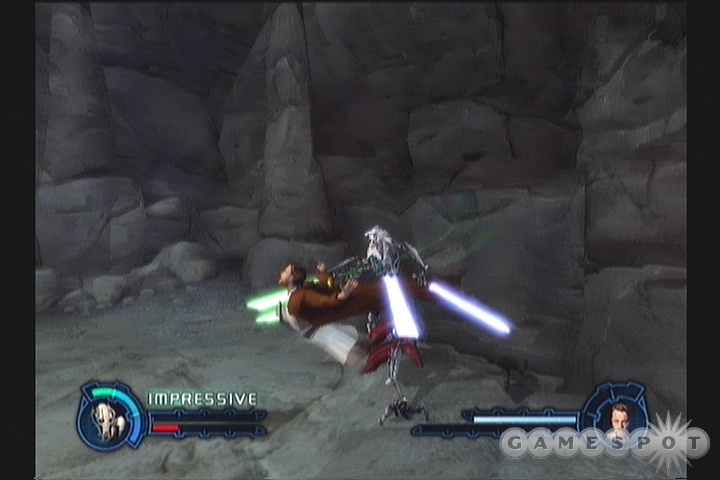
Grievous does have some special attacks to wield here, so make good use of them. The buttons for these will obviously change between the Xbox and PS2 versions, so watch for the popup hints or start pressing buttons to get a feel for what does what. One of his unique abilities allows him to fire a blaster, but this is a slow attack, and you're likely to get interrupted or hit while performing it. Secondly, he can perform the crouch-and-charge maneuver from the single-player game, albeit at a high Force cost; we found that Obi-Wan would usually hit us just as we were leaping up from this, rendering the move somewhat pointless. Arguably Grievous' best move, however, allows him to bust out with four lightsabers simultaneously. Although this quickly drains your Force, it's still going to vastly increase the amount of damage you can deal, allowing you to bust out on Obi-Wan and quickly reduce his health.
To deal with the normal grunts, though, which come in the form of troopers and, somewhat inexplicably, battle droids, you'll just have to slice and dice. We found that normal light attacks did the job on these guys fairly well. There is a single bacta tank in the opening area, near the bottom of the screen, but you'll probably run over it before you can gain its full benefit due to the fact that enemies appear near it. If you get surrounded by foes, you can attempt to use Grievous' whirlwind attack to slice a bunch of them at once, although this move can be interrupted.
When Obi-Wan appears, another bacta tank will join him, so pick it up and get a move on. We found the four-lightsaber move to be most useful in quickly damaging him; the crouch-and-leap move was, again, usually interrupted. Just normal attack patterns usually sufficed, although you do have to be careful with your blocking, as Obi-Wan is quick and will almost always manage to pick the perfect time to attack you if you don't keep your sabers up.
Chapter Three: Mustafar Lava Challenge
This one's fairly easy; your only real challenge will lie in avoiding death by lava, most of which will occur as a result of poorly-timed or aimed jumps. Sometimes it's difficult to see where you need to jump to.
Begin by jumping across the stationary platforms here until you reach one that's moving up and down. You can either jump off of this while it's at its lowest point or at its highest point; both paths lead to another platform ahead, where you can slice a power conduit on your right to raise another platform. Kill the snipers in your way, then use the console to raise another platform to reach the top of the lavafall. Here you're going to be pitted against a number of droids, both on your walkway and the one to the north. In order to pass by, you need to use Lightsaber Throw to slice the two conduits above the lava, but actually aiming at them is very difficult while there are droids around, as your saber will tend to curve towards your actual enemies instead of the conduits. So you'll probably need to finish off all of the droids with Push and Lightsaber Throw before you can slice the conduits and move on.

Two Brutes will attack you when you cross the gap, so use Grasp to throw them into the lava below you, or just slice them up as normal. Two more platform jumps will separate you from the end of the level; wait until they're well below your level before jumping, or you'll fall into the lava. When you do reach the far platform, though, all that stands between you and victory are some droids, some Neiomodians, and a pair of turrets. Kill them to finish the mission.
Chapter Four: Size Matters Not
Unlike the other bonus missions, Size Matters Not is virtually impossible to lose, which is fitting, considering you'll be playing as Yoda. Yoda doesn't have a lot of unique attacks here, but his three normal attack keys will be more than enough to deal with the onslaught of troopers that come in through the windows in the Jedi Temple. What's more, you can heal yourself, and you usually won't get interrupted by the gunfire coming your way.
After the initial troopers are dead, you'll have to deal with Clone Assassins, which can be really annoying to deal with, thanks to their defensive abilities. They'll dodge almost everything you throw at them, but don't have very powerful offensive abilities, meaning that taking them down will generally just be a matter of running around and tapping your attack buttons and waiting for something to connect. You can use Force Push and Yoda's Stun variant for guaranteed hits, but these take up an awful lot of Yoda's suspiciously small Force bar. Still, any damage you take here can easily be made good with Force Healing, so you shouldn't have a problem beating these guys down.
Chapter Five: Episode IV Death Star
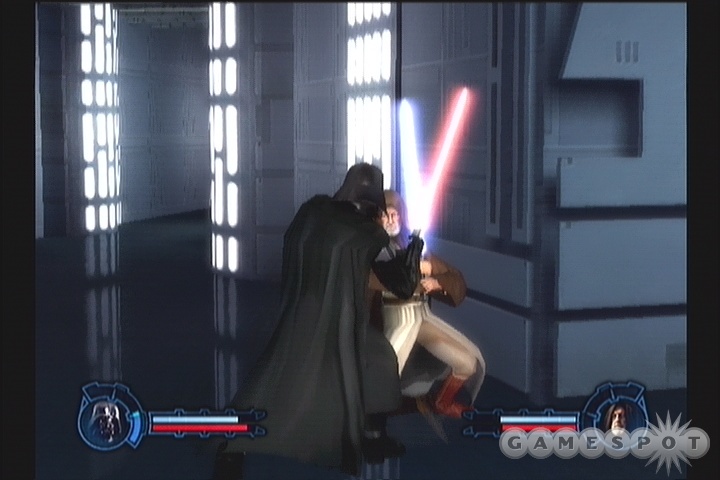
Ah, now this is cool. In the fifth and final bonus mission, you'll take on the role of Darth Vader during his duel with Obi-Wan in the Death Star in A New Hope. It can be difficult to win, as Vader has a number of slow attacks that he'll have to recover from before he can attack again, and Obi-Wan will heal himself fairly often, but it's certainly not impossible. Our general strategy of relentless assault worked fairly well, as Obi-Wan was forced to stay on the defensive and couldn't counterattack or heal. Vader does have some special moves, which you can check by examining the Combat Chart in the start menu.
Cheats
If you return to the main menu and select Settings, then Codes, you'll be able to alter your gameplay experience by entering a variety of cheat codes. Here's a list; these should be the same whether you play on Xbox or PS2.
| Cheat Code | Effect |
| NARSHADDAA | Unlocks all Bonus Missions |
| KORRIBAN | Unlocks all Story Missions |
| BELSAVIS | Your Force and Health regenerate more quickly |
| XUCPHRA | Unlimited Health |
| KAIBURR | Unlimited Force |
| TANTIVEIV | Unlocks all Duel Arenas |
| ZABRAK | Unlocks all Duelists |
| AAYLASECURA | Unlocks all Concept Art |
| COMLINK | Unlocks all Movies |
| 071779 | "Tiny Droid" mode (makes most droid enemies quite small, and thus hard to hit with lightsabers) |
| SUPERSABER | Unlocks Super Saber mode (makes some lightsabers extra-large) |
Got a news tip or want to contact us directly? Email news@gamespot.com
Join the conversation