No More Heroes 3 Beginner's Guide: Essential Tips & Tricks For Fledgling Assassins
Here are some essential tips to help you start No More Heroes 3 on the right foot.
Welcome to No More Heroes 3! Whether you're a seasoned assassin or a beam katana rookie, there’s a lot to consider and understand before going into this ultraviolent action-packed adventure. To start off on your journey to climb to #1 on the UAA charts, we've prepared some advice to help you get on your feet.
For more about how the game stacks up, be sure to read our No More Heroes 3 review. Otherwise, read on for our essential tips and tricks around the game.
PARTAKE IN THE GLORY OF SUSHI
Throughout the various areas of NMH3, you'll find sushi carts offering a variety of eat-in and take-out dishes for Travis to snarf on. Eating sushi provides various benefits depending on the type you chow down on, ranging from simple health and power restoration to boosting Slash Reel odds.

Take-out sushi can be used during battle, except for special fights where Travis dons his armor. Travis can hold up to five of each kind of sushi and snarf pieces mid-fight to get their effects. You'll always want to keep health and power restoration sushi on hand, but having a few pieces of the other types at the ready is also a good idea--having tension and attack-power boosts you can activate at any time is always great. (How does the sushi stay fresh so long? Don't ask.)
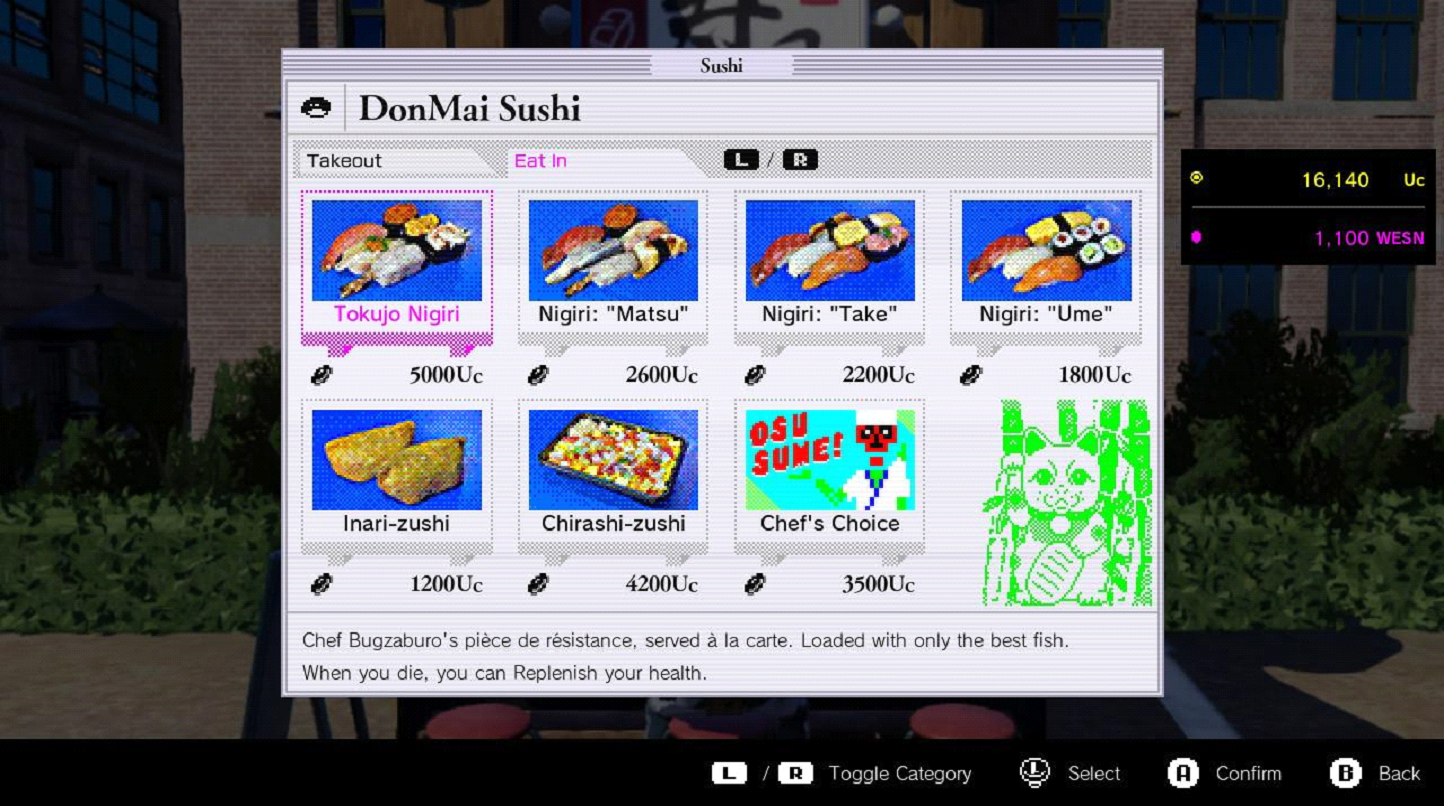
Eat-in sushi acts differently. You can't take it into battle, but eating it confers some really great boosts--reducing Death Glove skill cooldown, augmenting your health and damage output, and even granting you an on-the-spot revival should Travis die (with a few exceptions). It's expensive but worth it. Before major boss fights, you should always grab an eat-in bowl of sushi. Fortunately, most big boss fights have a sushi cart located right outside, so you can stock up on take-out and get a meal in before the big showdown.
DON’T FORGET TO GO DOWNSTAIRS
It's surprisingly easy to miss the fact that Travis's hotel room has a lab in the basement. You get there by sliding down the pole from the room with Jeane, the wardrobe, and the toilet. Here, you'll find numerous functions that will be immensely beneficial to your assassination experience.
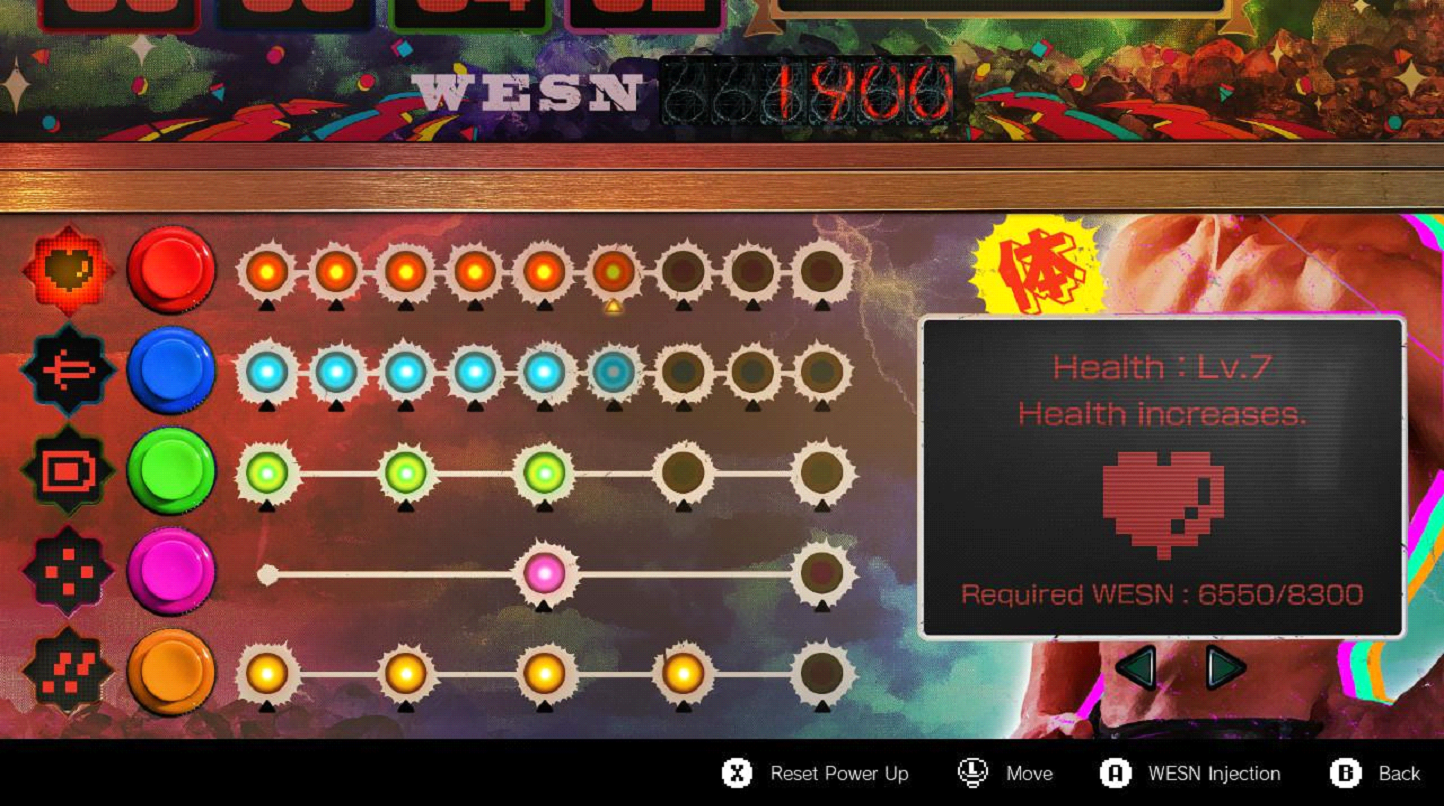
The first is the power-up machine, which lets you spend WESN to upgrade Travis's health, attack strength, beam katana power, and death skills, and even unlock new moves. Investing in Travis's stats goes a long way towards making the tougher boss encounters significantly less of a nightmare. If you want to change your build, all you have to do is press the X button to reset your current stats and get the WESN you've spent returned to allocate elsewhere. Nifty!
You'll also find a machine that makes chips for Travis's Death Glove. Making chips requires money and specific items, which can be earned through sub-quests and combat. Up to three of these chips can be equipped to customize Travis's abilities further. We recommend making the 80 chip as soon as possible, as it will assist you immensely in the item-hunting subquests by indicating when something you're looking for is nearby.

There's a time machine here, too, but its use is rather limited: You can only use it to re-fight bosses you've previously conquered. However, you can choose to fight them at higher difficulty levels for a challenge and to earn some rare loot--several chip-creation items are only available as drops from boss battles. Depending on the difficulty, you'll get some money and WESN on the side, too! Finally, there's a room where you can review various in-game tutorials if you so please. Make full use of the lab facilities to augment your assassination capabilities!
HELP THE PEOPLE OUT
Even when you've cleared enough of the Designated Matches to get access to that chapter's boss fight, you still might find yourself short on cash for the entry fee. When that happens, it's time to get to work! You'll find folks all over the various open-world areas who need a helping hand. When you enter a new area, look on the map for "?" signs--these are points of interest you have yet to visit. Some of these spots will be opportunities for volunteer work, which usually involves playing a short minigame.

The first time you encounter a minigame, you'll usually play a basic "tutorial" level to acquaint yourself with the controls. You'll get a small reward for completing this. Afterward, a small star in a circle will appear on the ground near the person asking for help. These are additional levels of the minigame at a higher difficulty, which can be completed for better rewards (and, sometimes, unlocking even tougher difficulty levels.) You don't need to talk to the quest-giver every time if you've already finished the "tutorial"--just head for the star mark and confirm. Exceptions are the item-hunting minigames (like Deathman cards and Jeane's kittens), the toilet-unclogging minigame (which opens up save points), and the highway driving battles.
There are several minigames scattered throughout, like lawn-mowing, mining, and cleaning up garbage in an alligator-infested water pit. When you find one you like, you can repeat it infinitely for extra money, WESN, and materials.
GO ON THE DEFENSIVE
But maybe you don't want to help people out. Travis Touchdown doesn't have time to mow lawns when he's got alien scum to kill, you say. Well, thankfully, you can also earn extra cash, materials, and WESN through fighting at Defense Mission points, marked with a pair of green crossed swords on your map.

During these Defense Missions, you'll take on a pre-set number of enemy waves. Defeating all the enemies from one wave summons the next until you've cleared them all. Each wave will have a different set of enemies to fight, so be prepared to change up your strategies when needed--and don't forget to bring some sushi if things go south.
Like the other minigames, Defense Missions can be repeated infinitely, so if you'd rather earn your wages through bloodshed, that's a perfectly valid option.
DEATH KICK IS YOUR RELIABLE BEST FRIEND
Travis's Death Glove gives him special abilities he can use by holding down the L button and pressing one of the face buttons. You'll fill out all four of the abilities over the course of the game, but the skill you start the game with, Death Kick, will remain amazingly useful and versatile from start to finish. This dropkick has a lot of great properties: It does a good chunk of damage, knocks an enemy down, and, with proper timing, it can interrupt enemy attacks. If you see an enemy winding up for a really damaging attack, it's good to have a Death Kick at the ready to knock them out of it.

The Death Kick, like all Death Glove skills, has a cooldown timer attached, so you'll need to wait a little bit before you can use it again. Fortunately, its timer is pretty short compared to other Death Glove skills, and the cooldown can be reduced by augmenting Death Skills with the Power-Up Machine or eating certain sushi. Having a Death Kick ready to go in a pinch is always a good plan.
KNOCK ‘EM OUT AND GO FOR THE THROW
It's a giant pain in the ass when your beam katana juice runs out, and you're forced to run away and recharge mid-fight. There are two much easier ways to replenish its juice, however! The first is to eat a power-restoring sushi, but those are limited, and you could likely run out during a particularly long battle. The second option--using Travis's wrestling moves--is a lot more fun and badass.

During a fight, you can stun enemies by hitting them with a lengthy combo. Ways to catch them off-guard and go into a long combo include executing a dodge to activate slow-mo, successfully winning a sword-clash, or simply getting to their sides or behind where they lack the ability to defend. Then go to town! Hit them with a flurry of normal and heavy strikes. When you see small stars pop off their bodies, that means that they're almost stunned, so keep at it! You'll know that they're fully stunned when you see a bunch of stars circling their head.
Once you've stunned them, stop attacking normally and go in for the throw! By performing a wrestling move on a stunned enemy, you'll recharge the beam katana power to max. If your grapple lands the killing blow, you also stand a good chance of starting up the Slash Reel. You should try to go for throws on stunned foes whenever you can to avoid having to recharge manually--feeling like a totally awesome death machine is just a nice little side benefit. Be careful, though: If you knock down an enemy that's stunned (for example, with a Death Kick), they will no longer be stunned when they get up.
CROWD CONTROL TIPS
Travis is just one guy who often finds himself up against multiple enemies at once, but fortunately, he's got a couple of nice skills to help with keeping the hordes at bay. The simplest of these is the jumping heavy attack: Travis will fall down and create a small shockwave when he hits the ground, causing enemies in the radius to stagger. It won't work on guarding enemies, though, who can retaliate as Travis recovers. For a group of attack-happy enemies, however, it works great--do the attack, focus on one enemy as they're all recovering, then work to isolate that enemy from the pack with attacks and movement for an easier kill.
Sometimes, however, you might find yourself assaulted on all sides by enemies with sturdier defenses. A good option for these situations is the Death Rain attack you will learn a little ways into the game. This opens up a small portal above an enemy, raining down energy blasts that do a constant stream of damage. It's good for both mostly stationary enemies and large groups in a small area. Finally, Death Force allows you to clear a path for Travis by knocking one or more enemies back a good distance, leaving them on the ground and vulnerable.
Got a news tip or want to contact us directly? Email news@gamespot.com
Join the conversation