Meteos Walkthrough
Our guide to Meteos will help you get the hang of this addictive puzzle game from Bandai.
Design by Randall Montanari
While every console or handheld platform ever released has probably had a few puzzle games released for it, truly classic puzzle titles are few and far between. While the past few years have given us such luminaries as WarioWare, Bejeweled, Puyo Pop, and Katamari Damacy, two of the best puzzle games to ever reach handheld systems have come out in the last few months. Lumines was a sleeper hit for the PSP when it launched, and now, a few months later, Meteos arrives on the Nintendo DS. This game, designed by the same people behind Lumines, features the age-old concept of falling blocks and a race against time to clear the screen. In Meteos, though, you're going to have the benefit of the precision of the DS stylus, giving you some abilities that can seem pretty odd when compared to games like Lumines and Tetris, namely the ability to manipulate blocks after they hit the ground and the ability to move them up and down.
GameSpot's Game Guide to Meteos isn't going to make you a master of the game - that only comes with a good amount of practice. We will, however, be able to explain some of the basic and advanced moves that the game has available to it, though, as well as give you some tips on using the various planets and items to your advantage. Enjoy!
The Basics
So what the heck's Meteos?
Meteos is a puzzle game for the DS with a curious plot structure built up around it. It seems that there's an "evil planet" named Meteo that threatens the universe; it plans to stifle all life everywhere by burying each planet it encounters with its peculiar matter, called Meteos. In order to save the universe, you'll need to take your ship, the Metamo ark, and force the Meteos to fuse together and rocket away from the threatened planets.
That's the theoretical justification for what you do in Meteos, at any rate; in reality it's just another puzzle game, albeit a fairly addicting one with some interesting conceits that lend to some replayability. Using your stylus and the DS's touchscreen, you'll have to align falling blocks into rows of three, which will then launch them towards the top of the screen. This is the basic action here, but there are lots of twists and turns as you play through a game, especially when you take a Star Trip to track down Meteo. Different playing fields will have different graphics, different Meteos varieties, and different physics and gravity to make every planet a different experience. You'll need to not only be good at the basics of the game, but also adjust to the different circumstances into which you're thrust if you want to survive. What's more, depending on the style of game, you may have to fight off the attacks of rogue planets as you attempt to make your way to Meteo!
Basic Techniques
The first thing you'll notice when you boot up a game of Meteos is that, unlike many other blocks-falling-from-the-sky games, like Tetris or Lumines, is that the blocks here fall individually, and will come down at a pretty good clip. You'll also note that you can't adjust or move them as they fall; you can only manipulate blocks after they've impacted the stack of blocks already on the ground. In order to manipulate blocks, you'll want to use your stylus to grab onto them and drag them up and down a stack. You can't move blocks horizontally; you can only move them up and down a stack.
The goal here is to eliminate blocks from your field by maneuvering them into rows of three. If you line up three blocks of the same type, then they'll fuse together and ignite, causing themselves and all blocks above them in the stack to rocket towards the top of the screen. Any blocks that reach the top edge of the screen are incinerated and removed from your playing field. (If you're playing against other players, then these blocks will be dropped on their playing field, forcing them to deal with sudden influxes of dead blocks.)
Blocks can be lined up either horizontally or vertically. If you make a horizontal line of Meteos, then you'll propel three stacks of blocks upward; if you make a vertical line, then you'll only propel one stack upwards, but since you'll be concentrating the power of all three Meteos on that one stack, you'll have much greater vertical thrust than you normally would and will be more likely to clear the Meteos from the screen. In general, however, it's better to make horizontal lines, as you'll be able to clear more Meteos when you launch multiple stacks at once. Making too many vertical lines will leave you with gaps in your playing field, which can lead to annihilation when the stacks on either side of a gap fill up and you can't quickly find three similar blocks to launch it with. This is especially true of the stacks on either end of your playing field; having a single isolated stack on one of your borders is just a recipe for trouble, since if you can't launch it, you'll have a hard time making horizontal lines with the two or three blocks at the bottom of the screen.
In addition to creating lines of matching blocks, you'll also have to deal with black, fused blocks. These are created when you make lines of blocks, or when one of your opponents in a multiplayer or Star Trip game launches their own Meteos off the screen, in which case their launched Meteos will fall down on your screen as black, inert, fused blocks. These blocks are not usable in fusions, and are essentially just dead space on your board until you either launch them off the screen or wait for them to revert to actual, colored Meteoses. (Meteoi?) The bad thing here is that inert blocks won't revert back to Meteos until they've landed on the ground; they'll remain black as long as they stay in midair, making it more difficult to attempt secondary fusions (about which see below).
As in Tetris or Lumines, you lose the game when blocks are unable to fall due to your screen having been filled, or when the time limit is up in certain game types.
Advanced Moves
In addition to simply launching Meteos, you'll need to learn some of the advanced techniques for more efficiently getting rid of the stacks on your screen. Although launching three stacks at a time will be enough for the lowest level of difficulty, you'll quickly run into some more challenging gameplay speeds when you bump the difficulty up a notch or two, and you'll have to move a bit more quickly and attempt to launch many more Meteos than you normally can if you hope to survive.
Secondary Fusions
The first advanced move that you'll likely need to know is how to fuse blocks within stacks that have already been launched. Most of the time, after you launch a set of blocks towards the top of the screen, they'll get a good burst of initial speed, then slow down and eventually start to drift back down to the bottom. If you can make another horizontal or vertical line within the stack, however, you can use the momentum generated by the secondary fusion to rocket the original stacks back up to the top of the screen. Secondary fusions will usually create a burst of acceleration far more than standard fusions will, giving you a good chance of rocketing the entire stack off the screen.
The trick here is that, depending on where in the stack you create a secondary fusion, you'll either propel the entire stack upwards, or split off the portion of the stack above the secondary fusion and propel only that portion of it, creating another stack that will take off towards the top of the screen while the lower portion of the original stack will continue to fall. The game moves a bit too quickly for us to determine precisely when you get one result and when you get the other, but if we had to bet, it seems as though you propel an entire stack only when your secondary fusion takes place within one space of a fused, inert block. Since all launched stacks will always have inert blocks at their very bottom, it thus makes sense to try and launch your secondary fusions from as low in the launched stack as possible.
Note that your ability to select and move blocks within a falling stack will largely depend on how strong the gravity is on the planet you're playing on. It's relatively easy on low-grav planets like Geolyte, but on high-gravity planets like Mekks, you'll rarely be able to pull it off, both because the speed with which the stacks fall will make it difficult to line up new lines and because the speed of the falling stacks makes it physically difficult to hit the blocks you aim for.
Luckily, however, if you can't pull off a secondary fusion before a stack falls back down to the ground, you'll usually have a few seconds before the inert blocks inside the stack revert to Meteos in which to attempt a secondary fusion. You'll have the advantage of possessing extra blocks underneath your fallen stack if you let the stack fall; these blocks can be moved above the fused blocks, or blocks above the fused blocks can be moved below.
Linked Fusions
If you launch one stack, then launch a second stack from underneath the first that happens to impact the first stack on its way up the screen, then both stacks will fuse together and essentially become one ultra-large stack. On planets where inert blocks take a long time to revert back to Meteos, you will often have linked stacks that span the entire screen. This isn't a bad thing, however; indeed, if you're good at creating secondary fusions while one of these large, ultra-stacks is floating down the screen, then you can launch some really massive amounts of Meteos simultaneously, which will help you overwhelm your opponents by dropping a huge number of Meteos on their screen at once.
Unfortunately, if you're playing smart and attemping to create your horizontal lines as low as possible on the screen, then you may have a hard time creating linked fusions while your first stack is in midair, simply because there won't be a lot of Meteos underneath it to launch upwards. Fortunately, linked fusions can also be created just after a stack hits the ground, before the inert blocks inside of it have reverted to Meteos. If at all possible, it's best to go for linked fusions when a stack hits the ground instead of a secondary fusion, just because you'll get more blocks up in the air and will have a better shot at clearing out multiple Meteos simultaneously, especially on low-gravity planets where you'll have a better shot at getting secondary fusions in mid-air that propel every floating Meteos up to the top of the screen.
Flinging
For lack of a better word, flinging is done when you put your stylus on a block in a stack and quickly move it upwards. When done correctly, the block you're aiming at will be thrown off the top of the stack and fly towards the top of the screen. You can do this with any block in a stack; if you pick one below the top, it'll just be brought up to the top of the stack as normal and then flung off.

The point of this isn't to just fling things around; even if a block thrust upward this way hits the top of the screen, it still won't be launched off without a fusion. In order to make the most of this ability, then, you'll want to fling blocks up into a falling stack after the stack gets launched; if you have a good selection of blocks from which to choose, you should be able to fling up just the block you need to create a secondary fusion in the stack above you.
Even if you can't create a secondary fusion with the blocks available to you below a floating stack, though, flinging blocks upward can give floating stacks a short burst of upward momentum, which can be enough to get their uppermost blocks up and off the top of the screen. This is easily done on slow-moving stages with low gravity, but when the blocks start falling fast, you're going to be better off attempting to set up secondary and linked fusions than trying to propel launched stacks higher with flinging.
Game Modes
There are a number of different game modes in Meteos, which should give you a bevy of options to choose from for your playing pleasure. We're not going to belabor the ins and outs of each mode - you can figure the differences between them easily enough - but we are going to give you some tips on playing them effectively.
Star Trip
A Star Trip game will take you through a string of battles until you reach Meteos itself and defeat it. You can continue as often as you like in a Star Trip, so you can't really lose, but each time you continue you'll lose around half the points you've accumulated until that point. High scores will require you to get through an entire game without annihilations.
Straight Path: A straight path game is a simple sequence of seven or eight battles that will finish off with Meteos. You can change your difficulty with the star difficulty meter before beginning a game. Your choice of home planet will also affect the difficulty of the planets you'll face.
Branching Path: A branching path will allow you to choose your path through a dense planetary field until you reach Meteos. In general, the upper path here is more difficult. Your starting planet will affect the planets you encounter, but won't affect the difficulty as much as it will in straight path play.
Multi Path: A multi-path game will give you mission objectives to complete as well as tasking you with defeating certain planets before reaching Meteos. Your choice of home planet doesn't seem to affect what planets you encounter here. Your missions are going to range from the straightforward (beat opponents within 1:30) to the seemingly impossible (clear the screen of Meteos at least once while playing). Multi-path is likely the most difficult of the games to win without continuing, as you'll have to play against three computer opponents at once at one point. Note that the missions are kind of optional; if you happen to fail at them, you'll still be allowed to proceed, you just won't be able to choose your path through the star field.
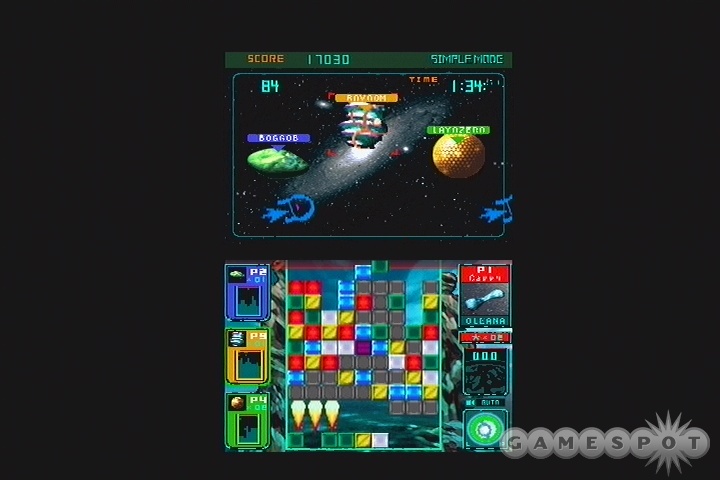
Simple
A simple-mode game will let you play on any planet that you've fused, with a variety of different rules. Simple games are arguably the best way to mine for minerals, since you'll be able to tell what Meteos are likely to occur on a planet in the planet selection screen; just set yourself up with a one-star difficulty game and give yourself a few dozen lives, then sit down for a while and start boosting Meteos. You can also play against three computer opponents, if you wish. For kicks, give yourself Geolyte or Oleana as a home planet, and assign them to tougher planets like Mekks.
Deluge
On Deluge, you're going to have one life and will be tasked with launching as many Meteos and obtaining as high a score as possible before things start moving too quickly for you to adjust to and you annihilate. On most planets, you can expect to last for around six minutes before you crash and burn, with more or less time available to you depending on your chosen difficulty level. Your high scores here are saved by planet, so you can challenge yourself on each planet that you've unlocked.
Time War
In Time War, you're going to be tasked with either launching as many Meteos as possible within a two or five-minute time frame, or launching 100 or 1,000 Meteos in as little time as possible.
Fusions
In order to use the game's Fusion menu to create new planets and items, you'll have to stockpile a good number of Meteos. You can add Meteos to your stockpile by launching them in a Star Trip, Simple, or Deluge game. Different planets will have different varieties of Meteos available on them, so if you need a specific kind of Meteos to unlock something, you'll want to pick a planet with a lot of that kind of Meteos and play through a few Simple mode games on it.
The two rarest kinds of Meteos are Life and Time. These appear only rarely, and usually only on the more advanced planets in the Star Trip mode of the game. You'll know when they appear, because they'll drop from the top of the screen and crash through an entire column of normal Meteos, coming to rest at the bottom. Since these Meteos are so rare, your first priority when they appear should be to launch them, so wait until a few Meteos are dropped on top of them, move them to the top of the column, and do your best to get them off the top of the screen. If need be, you can also fuse normal Meteos into Life and Time Meteos, but this is quite costly.
Planets

With Planet fusions, you can add to your stock of home planets that you can use for Simple and Deluge games. Every planet in the game can be fused, but many of them won't appear in this menu until you have enough Meteos in your inventory to fuse them. The exception to this is Meteo, which only appears in the fusion menu after you've watched eight different endings to the Star Trip mode.
You can get a rundown on the planets and their special features in the Planets chapter below.
Rare Metals
If you happen to need an extra Soul or Time unit for a fusion, then you can fuse one of them with this option. You'll need to burn a couple thousand normal Meteos to make a single Soul or Time Meteos.
Sounds
With the sounds menu, you can unlock music tracks to listen to in the Extras menu. So basically you're going to want to wait until you've unlocked everything else in the game.
Items
There are a number of items in Meteos. These usually help you clear blocks from the screen, although there are some drawbacks to using them. Most of these drop from the top of the screen onto a stack and sit there until their timer goes down. This is represented by flashing numbers on top of the item itself. If you want to increase the speed of this countdown, or start the countdown when an item doesn't trigger automatically (sometimes they just fall and sit there), tap on it with your stylus. You can also drag items up and down the screen, just like normal blocks, to position them where you want them before they go off.
If you want to adjust the kinds of items that drop or the frequency with which they drop, go to the Options menu and select Item Switch. You'll be able to alter your choices here. You won't be able to select an item before you've fused it in the Fusion menu, though.
It's worth noting that not all items are really worth playing with, and many of them can actually be somewhat harmful to you. Most items are going to clear blocks from your playing field by blowing them up or crushing them, or what have you, but this isn't always a good thing. Removing blocks from the field will prevent you from launching them, obviously, which will eliminate the chance that you'll launch them, which will reduce your potential for scoring and dumping blocks on your opponents. It will also prevent you from adding the Meteos that get destroyed to your stock at the end of the game; you're going to be kicking yourself the first time a Soul or Time Meteos gets eaten by a bomb.
Speaking for ourselves, the only items we use in our games are the Rocket, Super Rocket, and the Eraser. The Rockets will actually launch Meteos, negating the weaknesses of most other items, while the Eraser can be used to quickly clear a number of Meteos in an emergency. And if you don't have any particular need for the Eraser, you can move it to the bottom of the screen and set it off there, where it won't have any effect.
Bomb / Row Bomb / Cross Bomb / X Bomb
All of these bombs are fairly similar; they just disintegrate Meteos in a certain pattern around the detonation. A Bomb will disintegrate all Meteos within two or three squares, while the Row, Cross, and X bombs will disintegrate all Meteos in a line across the screen.
Smart Bomb
When the Smart Bomb goes off, your entire screen will be cleared of Meteos. This effectively gives you a way to restart if you have a full screen, but will also ensure that you won't be pressuring your opponent for a few seconds.
Driller Bomb
When a driller bomb hits, it'll burrow down to the lowest level of the screen and knock out all the blocks on the lowest horizontal row, effectively making it a Cross Bomb that always knocks out the bottom row. Woo.
Rocket / Super Rocket
These are arguably the best items in the game, as they'll let you launch Meteos without disintegrating them outright. When a Rocket goes off, it will ignite itself and two Meteos on either side of it, raising the stack up to the top of the screen, gravity permitting. This is essentially a free launch for you, without it being necessary to match up a row of Meteos, and is pretty much inherently a good thing, so long as you make sure that you don't have a Time or Soul Meteos among those that will be converted to a launcher. The Super Rocket is essentially the same thing; it just converts all Meteos in a horizontal row to rockets, which can make it relatively easy to get all of your Meteos off the screen, since they'll all be fused into one massive stack which you can use secondary fusions to boost.
War Axe / Fury Hammer
When a War Axe or a Fury Hammer drops, it will count down from three. When its timer is at the minimum, it'll disappear, then reappear at the top of the screen and axe through a good number of Meteos. It'll cut Meteos from each side of the screen in small chunks, resulting in some unpredictable removal.
Smoke Screen / Smoke Line
These are offensive items, intended to be dropped on your opponent's screen in multiplayer. When they go off, they'll release smoke around their area, obscuring the view around them and making it more difficult to line up fusions.
Mini Weight / Heavy Weight
Mini Weights and Heavy Weights will drop from the top of the screen, either crushing a single column of Meteos (mini) or three columns (Heavy). These guys are more trouble than they're worth, usually, as you'll often be left with solitary columns on either side of the crushed columns that may wind up stacking to the top of the screen before you can launch them.
Eraser
When an Eraser goes off, it'll examine the Meteos immediately below it and destroy all Meteos like it on the screen. This will greatly reduce the number of Meteos on the screen, obviously, but will also make it temporarily more easy to match up the remaining Meteos with each other.
Speeder Lock
The Speeder Lock is another offensive item. When dropped on an opponent's screen, they won't be able to use their speeder tool, which normally lets them drop Meteos more quickly from the top of the screen. This rarely works out to be much of an impediment, but it can slow them down for a few seconds while you drop a huge number of blocks on them if you coordinate it well enough.
Planets
There are a whole lot of planets in Meteos, each with its own peculiar characteristics. Most of them appear in the Branch mode of a Star Trip. You can also fuse Meteos that you've launched to unlock them for Simple mode, as well. Most of them won't appear in the Fusion menu until you've obtained enough Meteos to pay for them, so don't be alarmed if they don't all appear when you first boot up the game; you'll need to launch a few hundred fusion before the list starts to populate.
There are exceptions to this, however. Meteo cannot be fused until you've beaten Star Trip mode enough times to view eight different endings. The Metamo Ark level apparently cannot be obtained through the Fusion menu.
Anasaze
Gravity: Medium
Width: Nine
Anasaze can be a difficult planet to win on, thanks to its decent gravity. Stacks will fall relatively quickly after they're boosted, and won't get that much altitude to begin with, but inert blocks will remain inert for a good amount of time after they fall to the ground, letting you get secondary fusions relatively easily.
Bavoom
Gravity: High
Width: Ten
As with most other high-gravity planets, you'll have to work quickly on Bavoom, as you won't be able to manipulate the blocks inside of moving stacks. The width of the playing field will give you some room to maneuver, but can also force you to deal with one side of the screen instead of setting up a massive score on the other.
Boggob
Gravity: High
Width: Nine
Boggob can be a difficult planet to get past, thanks to its high gravity. When the boosters cut out on a fused stack, it'll rapidly fall back to the ground, giving you little time to set up secondary and linked fusions while they're in midair, so you'll need to try and manipulate fallen blocks to boost them again after they hit the ground. Luckily, secondary fusions will give them a much larger boost than normal, so if you can fuse the blocks underneath the inert ones before they revert to Meteos, then you shouldn't have a problem.
Brabbit
Gravity: Low
Width: Nine
Brabbit features some exceedingly low boosting thrust, meaning that when you form a fusion, you can expect the blocks on the stack to raise quite slowly. This should actually give you time to form some secondary fusions while stacks are still rising, which can be difficult to get used to. Even secondary fusions don't lend you much thrust, so you'll have to keep on making as many fusions as possible, both on the ground and in floating stacks, to get your blocks up and off the screen.
Cavious
Gravity: Low
Width: Nine
The slow-falling blocks here can sometimes be the only difference between life and death, as the computer in Star Trip mode somehow manages to find easy ways to dump tons of inert blocks on you. Try to start your horizontal fusions a few blocks up from the bottom of the screen, then give them extra boosts by starting fusions below them or flinging blocks upward from below.
Dawndus
Gravity: Medium
Width: Eight
It's difficult to clear blocks due to the small amounts of boost given to blocks from fusions, and due to the fact that inert blocks take a few seconds to flip back to their Meteos state. Try to keep your playing field below two-thirds height, or you can quickly get overwhelmed, especially in Star Trip mode.
Firim
Gravity: Low
Width: 7
Firim is a fiery planet, with a good number of red and orange blocks. Fusions here give a bit of added boost to the blocks above them, meaning that even low-level fusions will usually near the top of the screen, with vertical fusions being your best bet for clearing massively linked stacks. Gravity is fairly low, so you'll have plenty of time to manipulate stacks in midair.
Florias
Gravity: Low
Width: Ten
Not much to say here; just make your fusions and clear blocks quickly to win. There don't appear to be any special rules in play.
Forte
Gravity: Very Low
Width: Nine
Despite the rocky appearance of Forte, it possesses very low gravity, allowing you to easily set up secondary and linked fusions. The key here is that horizontal lines launch stacks that fall back to earth very slowly, while vertical lines propel the stack up like a rocket. In order to get large clearances, then, try to link together a bunch of blocks with horizontal lines, then make a vertical line somewhere within or beneath the linked stack; this should let you clear a massive number of Meteos at the same time.
Freaze
Gravity: Medium
Width: Seven
With only seven spaces to work with, Freaze can get a bit claustrophobic. Inert blocks quickly revert to Meteos when they drop, so you'll need to quickly work around the rapidly-falling blocks to set up secondary and linked fusions when they land or before.
Geolyte
Gravity: Low
Width: Nine
Geolyte is usually going to be the first planet you encounter in Star Trip mode, and is arguably the easiest planet to win on. It's got low gravity and a good distribution of elements, so make some secondary and linked fusions and go for your opponent's jugular.
Gigagush
Gravity: High
Width: Eleven
Gigagush's high gravity and odd-looking blocks can make it difficult to clear stacks, but luckily the boosting effects of a horizontal line fusion will usually clear at least a few blocks from the top of a stack. All you can really do is make a large number of fusions quickly enough to overwhelm your opponent.
Globin
Gravity: Low
Width: Ten
Nothing particularly unusual here; just make your fusions and win!
Grannest
Gravity: Medium
Width: Nine
Nothing too challenging here. Blocks float upwards rather slowly when they get fused, so you'll have a harder time clearing them if your enemies are sending inert blocks your way. You have a fairly wide playing field, though, so you should be able to get some random fusions if you stack yourself high enough.
Gravitas
Gravity: Very High
Width: Ten
Gravitas is another oddball planet. When you create a fusion here, none of the blocks will take off; they'll simply create inert blocks. In order to launch blocks, then, you'll have to create secondary fusions either in or beneath the initial fusion, which will cause it to rocket off the screen. It helps if you make your initial fusions a bit above the bottom of the screen, then use the bottom blocks to create the secondary fusion, as you'll be able to clear more blocks this way.
Hevendor
Gravity: None
Width: Eleven
Now here's a bizarre planet: on Hevendor, blocks don't get launched when you create a fusion. Rather, all blocks above a fusion are incinerated and instantly cleared from the screen. This makes for some fast-paced multiplayer games, in which small groups of blocks are constantly landing on your screen, rather than a huge number of blocks every minute or so. Secondary and linked fusions are obviously impossible here, so try to make your fusions as big as possible by lining up four or five horizontal blocks for fusions.
Hotted
Gravity: High
Width: Ten
Hotted is all about the secondary fusions. Your first fusion on a stack will only cause it to move up three or four blocks before falling back down to earth, but if you can form a secondary fusion underneath it before the inert blocks revert to Meteos, then the entire stack should rocket off the screen almost instantly.
Jeljel
Gravity: Low
Width: Nine
Jeljel is another relatively easy planet. One thing to remember here is that vertical lines don't offer much more thrust, if any, than horizontal lines, so try to stick to horizontal fusions unless you're about to lose the game.
Lastar
Gravity: Low
Width: Ten
Note that vertical fusions get barely any boost here; stick to horizontal lines and you should be fine.
Layazero
Gravity: Medium
Width: Eight
Layazero's pretty fun to play on, if only because of the extreme amounts of boost that your blocks get when you form a line. You have to move rapidly, though, especially in Star Trip mode, because your opponent will be sending massive numbers of blocks your way. Secondary fusions are the key to get big boosts here, so be sure to link them up and blast them off the screen while they're floating or just after they land.
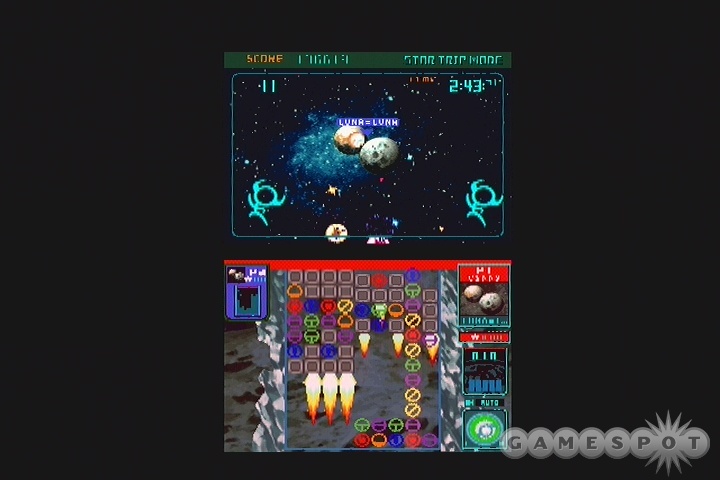
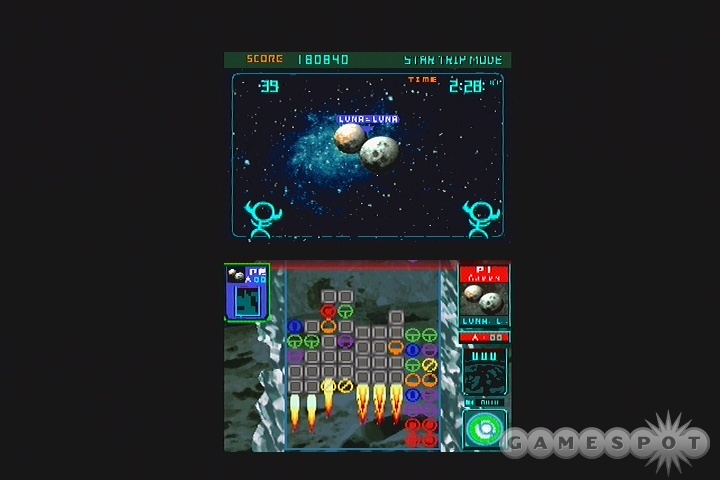
Luna=Luna
Gravity: Very Low
Width: Nine
Luna=Luna can be a difficult planet to go up against in Star Trip mode, due to the low gravity and the fact that it can dump massive amounts of inert blocks on your side of the field. You can quite easily find yourself with too few Meteos to attempt to fuse while a massive number of inert blocks are falling on your playing screen. Do your best to keep secondary fusing and launching as many Meteos as you can if you want to win this field.
Megadom
Gravity: Low
Width: Nine
A relatively easy planet, with easy-to-distinguish blocks, low gravity, and a good amount of boost from horizontal lines.
Mekks
Gravity: High
Width: Seven
Mekks can be one of the most frustrating planets out there, thanks to its annoying combination of high gravity and small width. With seven blocks of width, you'll have a good chance of isolating a single solitary vertical line of blocks if you go for low-screen three-block horizontal fusions. Do your best to make your fusions a couple blocks up from the bottom of the screen to give yourself wiggle room in case you leave a stick of blocks, and try to fuse as quickly as possible to push blocks off the screen, as they'll be dropping back rapidly after they launch.
Metamo Ark
Gravity: Very Low
Width: Eleven
The Metamo Ark level is only playable after you get past Meteo in a Star Trip game; it plays as the bottom screen underneath the credits as they roll. Gravity here is very low, but the screen is much taller than it normally is, so the blocks will have much further to travel than they normally will. Horizontal lines won't clear many blocks, but vertical lines will do so quite nicely.
The trick, then, is to just sit on the acceleration button for fifteen seconds or so after the level begins, then make some horizontal lines on the bottom of the screen, then create vertical lines within those stacks to rocket the entire thing up to the sky. Be on the lookout for Time or Soul Meteos that fall, as well, and be sure to launch them as soon as possible, as the level ends as soon as the credits get done scrolling.
Meteo
Gravity: Low
Width: Eleven
Although Meteo is the ominous final planet in any given Star Trip, it's actually not all that hard to win on. You have a lot of different elements, yes, but the gravity is very low and launched stacks will fall slowly to the ground, giving you plenty of chances to make secondary fusions and clear them from the screen. Just be sure not to leave isolated vertical stacks, or you may not be able to launch them before the blocks float down to the bottom.
Oleana
Gravity: Low
Width: Nine
This harrowing planet arrives straight from the mind of David Mamet and details the shocking results of Meteos harassment. Well, no, we made that up. In reality, Oleana is about as simple a planet as they come, barely being any harder than Geolyte.
Starrii
Gravity: Low
Width: Eight
There's nothing too exceptional to report about Starrii; just make your fusions and get the blocks off the screen.
Suburbion
Gravity: Medium
Width: Nine
Suburbion doesn't give you a lot of time to react, as initial fusion stacks will fall quickly back down to the bottom of the field. You'll need to rely on secondary fusions to give your stacks enough momentum to reach the top of the field.
Thirnova
Gravity: Low
Width: Eleven
Thirnova has low gravity, and horizontal lines get big boosts, except when you stack them a bit too high and attempt to launch from the bottom; this will cause them to launch quite slowly. You should still have enough time to make your secondary fusions, though, so move quickly.
Vubble
Gravity: Very Low
Width: Eight
Vubble can be difficult to win on, since it has some special rules that apply to it. Horizontal lines have an exceptional amount of thrust applied to them, while vertical lines have almost none at all. This makes it easy to lose when you have one vertical stack that can't be launched. Try to avoid this by keeping the sides of the screen free from vertical stacks and, of course, by attempting to launch horizontally whenever possible.
Wiral
Gravity: Low
Width: Nine
Wiral has low gravity, but boosts from fusions result in only a very small amount of thrust to the blocks, which means that you'll have to pull off three or four secondary fusions in most instances to clear blocks. If you can link blocks across the width of the screen, though, then you should be able to launch a large number of blocks simultaneously.
Yooj
Gravity: Low
Width: Eleven
Despite the fact that Yooj comes along late in a Star Trip, it's actually a relatively easy planet to do well on. Boosts are large, gravity is low, and you have a large number of blocks to play with.
Endings
There are a number of different endings to Meteos. These vary based on the specific instance of Meteo that you beat at the end of a Star Trip game. For instance, if you beat the uppermost Meteo in a Branching game, you'll receive a different ending than if you beat the lowermost one. The same goes for the three Meteos in Multi mode. If you view eight different endings, then you'll be able to fuse Meteo in the fusion menu. These are all the endings we've seen, but we haven't been able to clear all of the Multi paths, so there are bound to be more!
Invisible Bonds
The final blow to Meteo wasn't working, and the Metamo Ark was savaged. But then, deep-space laser cannons fired beams from all directions - the many races united to protect the ark! Together, they destroyed planet Meteo.
A Spiritual Legacy
The Metamo Ark transformed itself into the essence of other planets to equalize its attack power. After doing so against planet Meteo, it could not regain its shape and became the new planet Meteo. None know what will happen now.
A Miracle Reborn
The Meteo war had ended, but the universe was hurt and stars were vanishing. It turned out that the Meteos were also a resource! The Metamo Ark initiated a massive fusion with the remainders, reviving the universe.
The Final Battle
At last, planet Meteo was destroyed...be the surviving Meteos became an infinite mass. Metamo Arks came from each planet, an infinite army to fight an infinite foe. The universe was at stake. The final battle began...
The New Utopia
After planet Meteo was destroyed, fresh breezes and bountiful soil ruled. It was a utopian dream that spread forth, erasing all dark fears of the phantasmagoric Meteos. All lived in happy peace, forgetting the past...
A Sport Is Born
Planet Meteo fell before the Metamo Ark, but once peace reigned again, a new sport arose. Planets would launch Meteos at opposing planets, trying to launch the most. With total destruction at risk, it was awfully thrilling.
The Galactic Fork
Delivering the final blow to Meteo was proving difficult until the Meteos fused into a giant fork! Using all of its power, the Metamo Ark cut up the well-done Meteos like a delicious steak. Utter victory is ours! Probably.
In the Angel's Halo
The scattered Meteos encircled the entire universe, creating a ring that gave birth to all the new planets. It was a shining time, as the halo of that once-fearful civilization wrapped worlds like an embrace.
Got a news tip or want to contact us directly? Email news@gamespot.com
Join the conversation