There's no shortage of methods with which to dispose of your targets in Hitman 3's Dubai mission. From skydiving with shredded parachutes to a round of golf that ends with an explosive swing of the club, here's how you can cross two more names off of your hitlist.
Impactful Art
Taking out both Ingram and Stuyvesant can be challenging, but there is a chance to kill both of your targets at once. Grab a staff or event security disguise, and make your way down to the staff section of the Scepter. In the smoking room, use your camera to hack open the window and climb up to level 3 via the ledges and pipes.
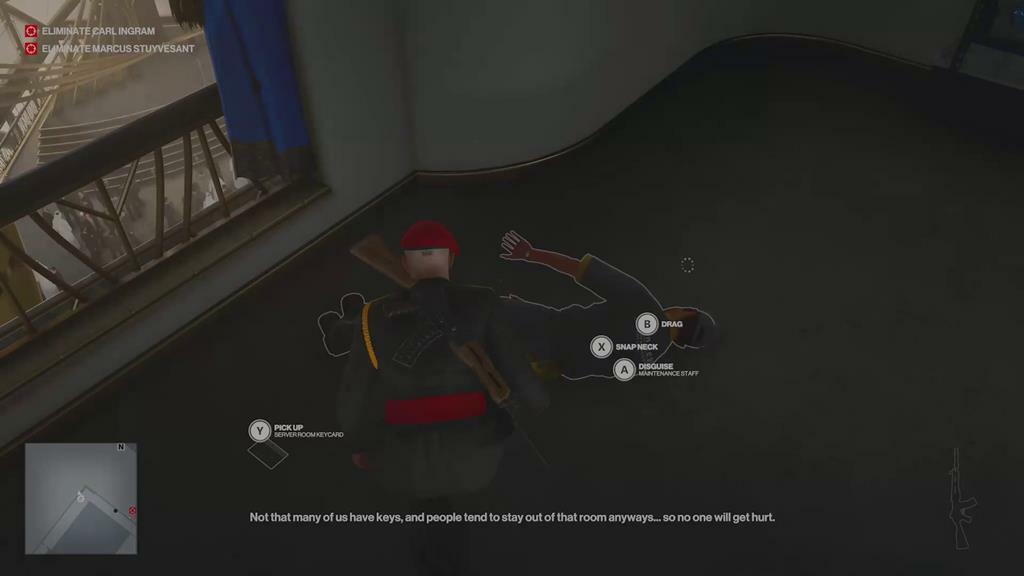
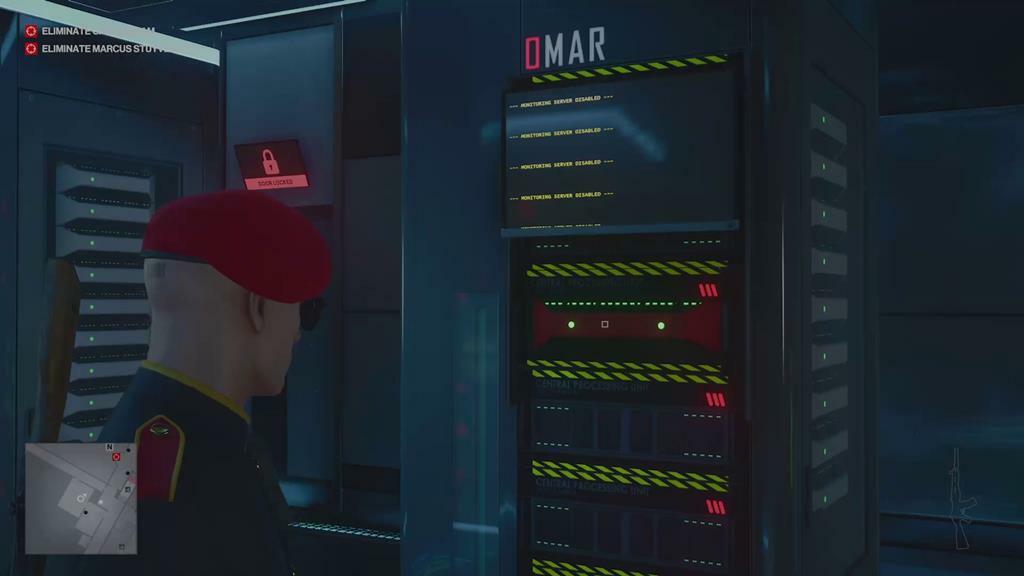
Once there, disguise yourself as maintenance or a palace guard for an easier time and head to the server room. Take the exit to the right from that room, and subdue the male maintenance worker in the corridor. He'll drop a server room keycard, which you can use to disable one of the server racks back in the server room. The right rack to interact with is the one that has a screen with "Monitor surveillance disabled" on it.
Once you're done listening to Lucas Grey's speech, you have free reign to do whatever you're capable of to your targets. They will panic and attempt to open the shutters, but you can shoot, stab, poison, or strangle them before that happens. But if you want the Impactful Art challenge, knock both men out, position them on the floor, and then drop a chandelier on them.

Black Gold Eye / Steep Task
We rounded up these two challenges together because they’re variations of the same assassination scenario during the Bird of Prey mission story. As you know, another assassin is on the prowl at The Scepter, but he's not being allowed upstairs. Once the Vulture decides to take a smoke break, follow him into the garden area. After he chastises a visitor who questions his smoking habits, Kazan will move to the garden section to the right to stare at a control panel. Activate it, hide in the bushes behind it, and wait for Kazan to switch the distraction off before pouncing on him.
Once you've assumed his identity, leave all your lethal tools of the trade behind as you're about to be frisked. Your first meeting with Ingram will be under heavy guard, and you'll be tasked with eliminating a reporter who is close to discovering that the Providence member is still alive. You'll be looking for this reporter who is mingling with the crowd:
The journalist can easily be lured to a secluded spot, where you can take care of him. Once you have evidence of his demise, you'll be allowed to meet with Ingram in his private quarters. This opportunity is still tricky, though, as Ingram is never without a security detail. If you're looking for some one-on-one time with him, you'll need to take care of his bodyguards and nearby staff on that floor. One handy way to take out the bodyguards who tail Ingram is to wait for them to pass the penthouse bathroom and distract them with an overflowing tap.
Two passes here on Ingram's route, and you'll have taken out his most dangerous security detail. Stealthily clear the way, and your private audience will allow for some creative opportunities to take him out of the picture.
This meeting will also trigger a sequence where Ingram goes to his desk and hovers over his model of an oil rig. That model happens to have a very sharp tower jutting out of it, and it'd be a shame if someone's eyeball was introduced to it at close range. It's worth emptying the room with distractions or pre-planning to get Ingram to peer at his replica model. Succeed in killing Ingram this way and you’ll accomplish the Black Gold Eye challenge.
Lastly, you can kill Ingram by pushing him over a railing, which is ideal during this particular scenario. If you hang around at the end of this story mission and don't kill him with the oil rig, he'll go out to the balcony and you can push him off. You can even loosen the railing with a screwdriver ahead of time, making it so he topples right off the moment he steps outside. Do this successfully and you’ll accomplish the Steep Task challenge.
Angry Birdy
At the top of the Scepter, Carl Ingram is busy recording his voice notes for his successor in Providence, and he has left specific instructions that noise has to be kept to a minimum. Before you can dispose of Ingram in a bizarre golf incident, you'll need a key item for the job: an explosive golf ball. On level 3 and to the far left corner of the Atrium, a maintenance worker has hidden the object in a locked storage room. If you don't have a lockpick equipped, you can open the door by subduing the employee who can be found near the room, talking to a friend about her anger management issues.
Make your way to level 4 of the Scepter, where the small golf course can be found outside the penthouse suite. Place the explosive golf ball in the bucket with the others, and then it's time to trigger Ingram into a rage that can only be quelled with a round of his favorite game. Wait for Ingram to enter two locations and switch devices on nearby that will raise his blood pressure. The first is a radio that is close to his study in the penthouse:
And the second is a vacuum cleaner outside of his room and second office:
Once those distractions have been activated, Ingram will descend to the golf course, where he'll vent his frustrations out and allow you to finish the Angry Birdy challenge.
Pick Your Poison
Two types of poison exist in Hitman: One that kills you on the spot, and another (emetic) that sends your target off to the nearest toilet so that they can vomit out their stomach contents. Ingram is a hungry and thirsty man, and there are three prime opportunities to poison his food and drink, which you’ll need to do to accomplish the Pick Your Poison challenge. The first is his favorite glass of whisky in his room:
And the second is another glass that he takes a sip from when he passes through his office:
The third alternative requires some cunning cuisine infiltration. There's an open kitchen in the penthouse guarded by a chef where you can sabotage Ingram's food. A storeroom in the back makes for a perfect area where you can subdue the chef and assume his place in the kitchen, finishing Ingram's meal, adding your poison of choice, and summoning him to come eat. If you use emetic poison, Ingram will make his way to the kitchen toilet to vomit, which results in a prime opportunity to grab the "Hold my hair" challenge.
If you have proper poison on you, which can be attained through career mastery or by stealing it from the rival assassin The Vulture, you can slip that into Ingram's meal for a quick kill. If you'd prefer to avoid going this route, you can also tamper with the food and the timer in the kitchen, when the chef and the palace guard are distracted.
Mile High Drop / Conserving Ammunition
When you're at the top of the world, there's only one escape and that involves some emergency skydiving. As a last resort, Ingram and Stuyvesant will don parachutes and drop from the Scepter. To activate this emergency protocol, you'll first need to get your hands on a crucial keycard. This can be found in the security office on level 3, which is guarded by a very sleepy palace guard and one easily distracted colleague. You will need the combination code to access the safe, which can be found on a nearby whiteboard or by listening to the Palace Guard who leaves the office to make a phone call.
If you don't have the patience for that, the code is 6927. Once you have the keycard, make your way up to the penthouse suite. You'll need to quickly activate two keycard readers, one of which can be found right here at the top of the penthouse:
And another below it next to the parachutes:
Once the emergency protocol has been activated, Stuyvesant and Ingram will make their way down to the first evacuation site, the helipad. If the helicopter pilot hasn't been dealt with, they'll fly off in the chopper. If the pilot is nowhere to be found, they'll race back to the penthouse and don their parachute gear. Both men have a heavy security contingent around them, so you'll need to find a less populated section with which to take care of the two targets.
Below the penthouse golf course is a small and unoccupied section of the Scepter you can climb down to. You'll only have 20 seconds to kill your marks after they've jumped, but all you have to do is aim for their parachutes, and they'll be dealt with permanently. If you have a sniper rifle stashed here, you can also attempt to take out both targets with a single bullet and earn the Conserving Ammunition challenge in Agent 47's list. Otherwise, successfully killing them while they parachute nets you the Mile High Drop challenge.
If you'd prefer to also avoid firing a single shot and you'd rather watch the pair of Providence agents fall directly to their doom, you can simply sabotage their parachutes before you activate the alarm. All you need is a knife, and you can quickly shred the gear, leading to two more easy assassinations, earning you the Geronimo discovery challenge.
Vertical Approach
Stuyvesant needs a new bodyguard to ensure that no harm comes to him, and Agent 47 is just the man to take advantage of that situation. This mission is easy: All you need is to disguise yourself as event security and grab the transfer papers that'll get you a private audience with Stuyvesant. Event security can be found all over the Scepter, but for a quick disguise, you can take out one of the members of the security detail on the first two floors. In the room where a security guard and a staff member are smoking, you can close the doors and grab the uniform easily.
Once you have the disguise, make your way downstairs to the staff kitchen, where the staff changing rooms are also located. When the hapless goon's back is turned, grab the papers, and make your way to the security office on level 2. With the papers presented to Stuyvesant, you'll walk with him and another security guard to an outside section where you have to pass an easy knife-throwing challenge. Once done, Stuyvesant will dismiss his bodyguard, and he'll turn his back to you while he stands precariously close to the edge of the skyscraper.
What happens next is all up to you, but if you kick him off, you’ll accomplish the Vertical Approach challenge. You can also avoid obvious temptation and escort Stuyvesant around the Scepter, steering him to a more secluded area for another assassination type of your choice.
Icarus
To celebrate the opening of the Scepter, world-renowned artist Lucy's art installation has been set up on display inside the building. The key piece of this interactive exhibit is a solar panel that Stuyvesant believes simply isn't warm enough. Time to fix that. With an engineer disguise acquired, make your way to the backstage area of the installation. You'll need to grab the fuse cell from the control center, which you can find inside an electrical box that you can pry open with the nearby crowbar.
Go to the opposite side of the installation here and install the fuse cell:
With that extra bit of power, Stuyvesant will bask in the rays of the artificial sun, and if you happen to be watching from the safety of the control panel that regulates the heat that the artwork generates, you'll be in a prime position to give the Providence agent the most lethal of sunburns. After that brutal scene, you’ll have accomplished the Icarus challenge.
Bonus: The Stuyvesants
This one is technically a Discovery challenge called The Stuyvesants, but we listed it because it’s a handy opportunity you can use to accomplish some assassination challenges. As you might’ve observed, Marcus Stuyvesant doesn't break his route around the Scepter, but there is an exception: His daughter. The Stuyvesants are due to meet in secret at a private reception next to the open bar.
The only problem is that artist Lucy Phillips has invited herself to the private affair, and Stuyvesant won't show unless she leaves the area. Getting rid of Phillips is easy enough. Disguise yourself as event staff and man the bar, where you're able to easily slip her some emetic poison in her drink. If you don't have spare poison, you can find it in the storage room behind the open bar.
With Phillips indisposed, Stuyvesant will finally appear for a reunion with his daughter. You can also poison him with his favorite drink or whisky if you happen to have a lethal toxin on you. If you haven't unlocked it in your career inventory yet, you can obtain a fatal dose of poison from the Vulture, another assassin who can be found in the observation deck garden.
Log in to comment