Grand Theft Auto: San Andreas Weekend Update: Tales From San Fierro
We get a look at GTA: San Andreas' San Francisco-inspired city. First details and exclusive screens inside.
Over the past few months, we've been bringing you lots of details on different aspects of the next entry in the juggernaut Grand Theft Auto series, Grand Theft Auto: San Andreas. To date, we've touched on the game's food system, its character-customization features, the city of Los Santos, the home-invasion "minigames," and San Andreas' expansive countryside. This week, we'll tell you all about the fine city of San Fierro, the San Francisco-inspired metropolis that will be one of three major cities in the massive game. We also have additional details on safe houses, buffing up your character's abilities, and the fun to be had in jacking yourself a train.
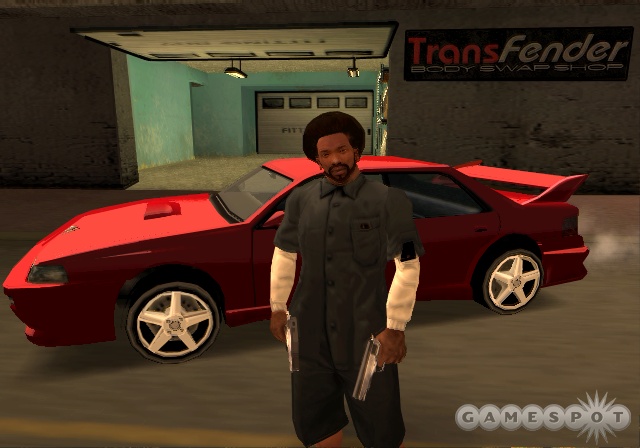
During a recent visit to Rockstar's offices, we were given a tour of San Fierro that showed off the city's rich diversity. The tour began at the Hashbury and Garcia Joint Festival, where we got to see our character, CJ, hanging out. Apparently looking to avoid any trouble from Los Santos that might catch up to him, CJ has had a makeover to better blend in with the local scene. Our streetwise antihero has chosen a mighty Afro, a handlebar moustache, and a Rockstar sweatshirt to serve as his camouflage while going about his business in San Fierro. A quick look at CJ's surroundings show the neighborhood to be a colorful place, in tune with the mellow vibe of that part of the city.
The look of the city changes dramatically as our boy gets on a nearby motorcycle and starts driving around. The colorful hues on the buildings slowly shift over to more-sedate tones as he leaves the neighborhood and heads over to the local dojo, Cobra Martial Arts. As we've mentioned previously, you'll be able to develop CJ's fighting ability by training in a variety of ways, and visiting a dojo is one of the more-formal methods. The interior of the dojo contains two major points of interest. On one side of the room you'll find a treadmill and a weight bench, which are standard issue for gyms and dojos, and in the center of the room you'll find a ring where you'll meet your sensei. The sensei at Cobra Martial Arts is cut from the old-school kung-fu-movie cloth: Curt talk, taunting, and a bit of disdain is what you'll be getting initially. After talking with him you'll have the option of training with him or declining the offer. If you take him up on it, you'll have to beat him in a fight to earn the right to be trained.

If you beat the master, you'll earn a few new moves. The moves in this dojo appeared to be more kick-oriented, with CJ earning roundhouse kicks and running front kicks. Once you learn them, you'll get tips from your sensei on the best way to use them and be able to practice on sparring partners who are near the ring. You'll notice that, after earning moves, CJ's fight animation will change to reflect his newly earned skills. In the case of the new, Cobra Martial Arts-improved CJ, we noticed new blocking techniques, as well as the aforementioned kicks. The new moves you'll learn will actually replace CJ's rawer street moves, which ends up being for the better, as the new moves are more efficient than his old-school ways. Once you progress further in the game and begin visiting new dojos, you'll find that training at a dojo when you already have a set of earned moves will present you with a choice of replacing what you already know.
Basically, the system works in the following way: When you start the game, your default moves will be the raw self-taught moves that CJ has learned on the streets of Los Santos. As you progress through the game and train at dojos, you'll be able to replace those moves for a new set. So you'll be able to make use of only one dojo's set of moves at any given time. If you find yourself pining for the moves learned in one dojo after having replaced them with another's, you'll be able to go back and relearn them, which is nice. The only moves you won't be able to get back are CJ's original moves. However, if you want to keep it good and real, you can simply choose to not learn any moves at the dojos you go to and thug it up through the entire game, which seems like it might be a fun challenge to try.
Of course, martial-arts training is just a small fraction of what San Fierro has to offer.
The City by the Bay
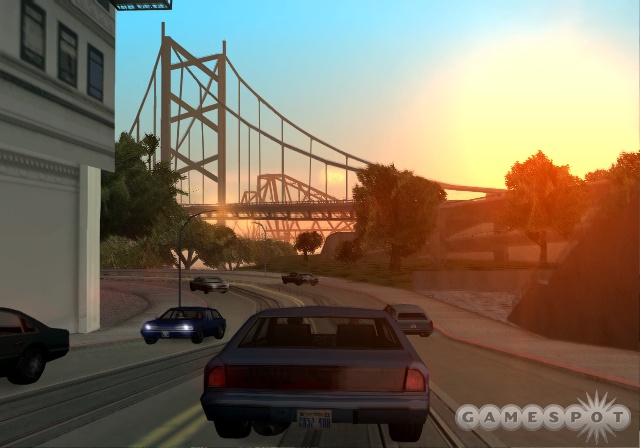
After buffing up at the dojo, CJ continues his bike tour of San Fierro with a look at the trolley tracks in the streets and a brief stop at a construction site (one of the places the city is slowly rebuilding after the great San Fierro earthquake of '89). Before heading to his next destination, CJ pulls off a pretty spectacular stunt jump to show off the return of the cinematic stunt feature from the two previous GTA games. CJ's final destination is a garage called The Hub, where he meets a friend from Los Santos named Caesar who's currently dating his sister Kendall. Caesar's love of cars has led him to partner up with CJ and start The Hub in the Doughtery section of San Fierro, which offers a good view of the Graver Bridge, the game's version of the Bay Bridge. As the pair head out on an errand, it's possible to see the San Andreas version of the Transamerica building and the Embarcadero. One thing to note as the two head out is the extensive implementation of voice-overs during travel, which provides you with information in an informal way and helps flesh out the characters.
Otto's Autos is the pair's final destination, as their "errand" is to steal themselves some import cars. A short walk from the street to the showroom lets both CJ and Caesar jack themselves a car, which they permanently borrow by driving straight through the shop window. This sequence segues nicely into a race mingame that has you trying to keep pace with Caesar as he tears through the city streets to get back to The Hub. The fast-paced sequence requires you to stay close to him or run the risk of failing the mission and throws in the additional challenge of police who are none too pleased with the pair's shenanigans.
After losing the heat, the pair arrives at The Hub with their wheels, which, unfortunately, have been damaged. Fortunately, as in previous games, you'll be able to use the garages you find to repair your vehicles. GTA: San Andreas expands on the feature in a huge way, as the garages you come to also will offer you the opportunity to customize your wheels.
You'll be able to make all manner of cosmetic changes to tweak your cars to your liking. You'll be able to alter the paint job, color, exhaust, front fender, rear fender, roof, spoilers, wheels, and hydraulics, to name just a few of the options open to you. You'll find that almost all the cars in the game are customizable and have their own unique paint jobs. In addition to these cosmetic changes, you'll be able to buy varying amounts of nitro to give your wheels a burst of speed, which can come in handy during certain missions. The only hitch to all this is that it isn't free. If you want to look stylish and have a fast car, you'd best be ready to pay for it. Once you've tweaked out your car to your liking you can store it at the garage, thus allowing you to get yourself a set of wheels for any occasion, although we're not clear on the exact number of cars you'll be able to save. Following the car tweaking, CJ headed out again with his wheels, stopping by the game's incarnation of San Francisco's twisty Lombard Street.
Our tour of San Fierro culminated in a demo of a mission that sent CJ to Chinatown to meet Wuzi Mu--Wuzi for short--a friend of his who's head of the local Triad gangs. The mission, called The Da Nang Thang, finds Wuzi asking CJ to help him rescue immigrants being held on a tanker in the bay. The pair head out by helicopter, which is theoretically a perfectly viable choice, but they run into trouble when they're shot down. The resulting water landing shows off CJ's water-treading skills. You'll use the X button to get CJ to swim and the circle button to get him to dive. As we've noted before, swimming is an upgradeable skill you improve just by doing it a lot. In fact, practice is the only way you'll develop your swimming ability, as gyms and dojos have no pools for you to splash around in. So if you're serious about buffing up your swimming skill, you'll have to find bodies of water to swim in.
CJ and Wuzi's adventures continue next, and feature a surprising addition to GTA: the stealth kill.
Cold Cuts
Once the pair got up on the tanker, we got a look at the new stealth-kill system. The system is similar to the one used in Manhunt, but it's far less rigid. You'll simply maneuver CJ behind an opponent, lock on to him or her, get close, and attack. As you'd expect, this silent method of killing, which has gun and knife variants, is very handy when trying to infiltrate a boat crawling with armed guards. However, CJ isn't a punk--once he gets his hands on a shotgun, he can go on a crazed shooting spree as well, although things can get hairy if he does. Fortunately, the game's targeting system for weapons makes smacking down punks easy. You'll use the R1 button to lock on and the R2 and L2 buttons to cycle through your enemies as you try to sort out which one to plug full of lead first. As before, crouching will help your accuracy when blowing people away. You'll also notice a new free-aim mode that features a reticle that expands and contracts based on your potential accuracy. You'll also have the added bonus of wielding two weapons at once--although, sadly, you won't be able to independently target enemies with each weapon.

As CJ's journey took him deeper into the hold, we were able to see some of the tweaks that have been made to the basic GTA move set. For example, the containers in the hold pose a series of obstacles that CJ will be able to get around by jumping up and pulling himself over. Going through the hold also shows off some of the subtle audio touches being implemented, such as the echo heard when you're in the enclosed spaces belowdecks. Once CJ finds and frees the refugees from their prison, your mission of mercy ends and a second, ass-kicking revenge mission begins.
It seems the poor 'fugees were being held captive by the decidedly unpleasant man known as Snake Head, whom CJ is more than happy to teach some manners to. When you cross paths with Snake Head, you'll see the man is holding two katanas. He taunts CJ and tosses him a sword, issuing a challenge that begs to be met. The fight between the two can go one of two ways. You can have CJ take up the katana and fight him honorably, or you can shoot him in the face or anywhere else you'd like--the choice is yours. While fighting with the katanas looked cool, we've always been fans of shooting people in the face, but to each his own.
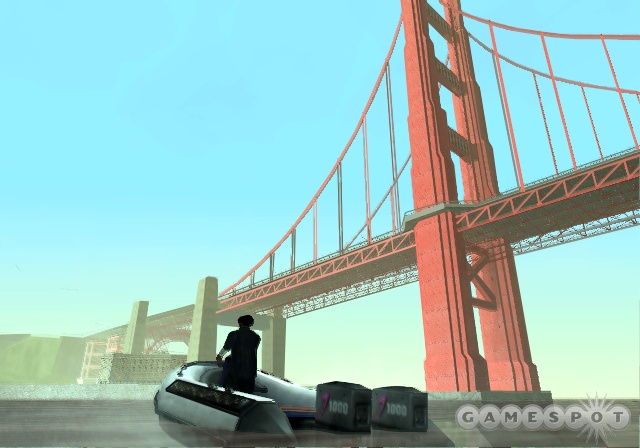
Following Snake Head's defeat, a short cinematic showed the refugees escaping in a dinghy. CJ meets up with Caesar, who takes him to the Gant Bridge, the game's version of the Golden Gate, which is where our demo ended.
But we have plenty more to tell you about the game. For even more information on GTA: San Andreas, proceed.
Safe Houses
Just like in previous Grand Theft Auto games, you'll come across safe houses throughout your game. The first safe house you'll find is CJ's old house, where his mother lived. You'll be able to hang out for a while, check out the consoles, or take the opportunity to change your clothes. Any clothes you've bought will be kept in the wardrobe of your safe house. Besides offering a place to chill, the safe houses will let you save your game. In San Andreas, you'll find that your save marker is a 3.5-inch floppy disk, the onetime pinnacle of computer storage. Anytime you want to save your game, you'll just have to find a safe house, which are spread throughout the state of San Andreas. One thing to note about them is that some are free to CJ, while others will become available as you acquire property.
Have Guns, Will Travel

As you'd expect, one of the most important attributes CJ will have is his weapon skill. CJ's ability to take down enemies quickly and accurately is often a matter of life and death. So if you'd rather not spend a whole lot of time dying, you'll need to spend some time improving your skill. If you want to be methodical about the process, you can see how proficient CJ is with different weapon types and decide where you should focus your training. Pressing L1 while holding a weapon will let you view the skill status CJ has with the weapon he is holding. The status is measured by a meter that fills in as you gain skill by using that particular weapon. CJ will start every weapon with a status of "poor," but can upgrade his skills to "gangster" or "hitman" if he works at it.
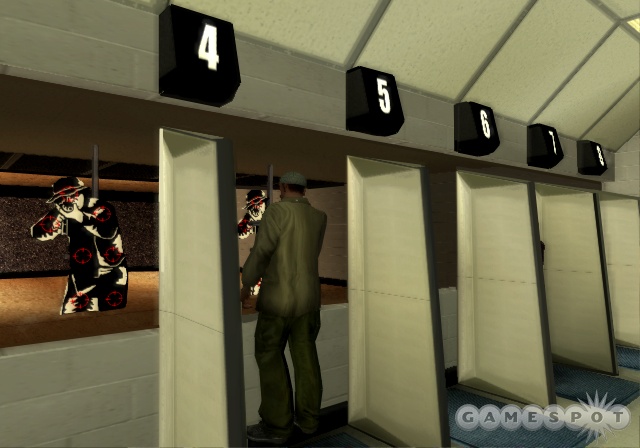
The quickest way to become proficient with a weapon is to stop by an Ammu-Nation store that has a shooting range. When you get to the range, you'll be facing off against two competitors in a race to score the most hits. The range provides three rounds for each weapon. The first round's winner is determined by who can shoot out three targets (each target has seven spots to hit) at varying distances the quickest. The next round features moving targets, and it is also a race to shoot them all first. The third round has a moving target that everyone is shooting at, the shooter with the most number of hits wins.
As you gain skill with different weapons, you'll be rewarded with different upgrades. As a general rule of thumb, reaching higher skill levels will increase the rate of fire and accuracy for all weapons. However, in some cases getting better skills will give CJ the ability to fire while moving. While GTA: San Andreas will offer a wide variety of weapons to choose from, we'd like to call one in particular to your attention: the double-barreled shotgun. This little number gives you two sawed off barrels with a hand-carved pistol grip, letting you fire off two quick shots in rapid succession. On the plus side, you'll be able to run and gun with the power of a shotgun. The only drawback is that it isn't terribly accurate. Fortunately, once you build up your skill level sufficiently, CJ can dual-wield it, meaning you'll be able to deliver four shotgun rounds at a speedy clip, which is most excellent when fighting in close quarters. Who cares about pinpoint accuracy if you're face-to-face with someone and can fire those off?
There's lots more to learn about--and learn in--San Andreas. Read on for the scoop on driving school.
School Time
While you can improve some abilities with the kind of self-schooling described above, others will require a more-formal approach. As a result, plan on getting some schooling during your time in GTA: San Andreas. Of the schools you'll find in the game, the driving school is arguably the most important one. The driving school will teach CJ new techniques that can be used in the game or enhance his existing driving skills. As you'd expect, better driving skills will improve his overall control over a vehicle, eventually enabling him to do things like make sharp turns at high speed, or quicker-than-usual stops. One thing to note is that four-wheeled vehicles in San Andreas feature in-air control, meaning you can adjust the pitch and roll of your vehicle in midair much like you could on motorcycles in Vice City, though not nearly as quickly. Gaining this skill may turn out to be pretty handy if you happen to take an accidental jump off a canyon, which could actually happen. In addition to in-air control, you'll be able to learn how to make controlled stops, how to control your car when a tire blows out, and how to execute the perfect barrel roll.

Meanwhile, the boat school will provide a variety of challenges that will help improve your boating skills. You'll earn points for time taken to complete the given goals. The catch is that there are deductions for boat or buoy damage as you go about your business. Walk up to red marker in front of the video monitor at these institutes of higher learning to set up the boat-school facility and begin the challenges. Eventually, your skills as a seafarer will allow you to control boats much more easily than you may be used to from past GTA games.
Train Jacking?
One of the notable spots in San Fierro is Cranberry Station, the local stop for San Andreas' own Brown Streak Express. While not the fastest way around the state, the Brown Streak Express offers a scenic ride that's a nice change of pace from the typical rat race. You'll be able to climb aboard, kick back, and watch the scenic countryside of San Andreas zoom by your window. But, while this novel reminder of simpler days is nice, you can spice up your trip with a special minigame. To start the game, hijack a train when it stops at any of the stations. If you're wondering how you hijack a train, we say to you: "It's GTA. How do you think?" You'll simply run up to the engine, yank the engineer out, and go! Once you're in control of the train, press R3 to begin the freight-train challenge. 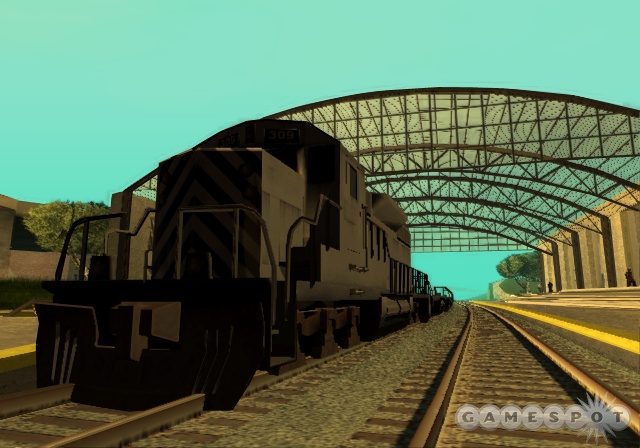
There are only two controls here: go and stop. As with real trains, it takes a very long time to reach top speed--which is also true of braking, so plan on trying to stop early, because it takes a while. When the game begins, a blip appears at the next closest station, marking the cargo-delivery location. CJ must stop the engine in the marker to complete the first stage. Sounds easy, right? You'd think so, but stopping a huge piece of metal traveling at 100mph on a small blip can be a challenge. You'll see the time limit, the distance to the next train station, and your speed displayed on the right side of the screen, which helps you gauge your action somewhat, but in the end, plan on working hard. Failure to reach the checkpoints within the time limits, or derailing the train by speeding off corners, results in mission failure. Why would you bother with any of this, incidentally? Aside from the obvious bragging rights? Money, plain and simple. If you manage to succeed at the minigame, you can expect to be showered in an impressive amount of cash.
So there you have it: A new city and more information on what is likely to be the biggest, baddest GTA yet. Rockstar North's crazy expansion of the groundbreaking gameplay elements introduced in GTAIII should be especially profound in this installment of the series. While the past few months have seen us covering all sorts of elements in the game, there's even more to it than all this. We'll continue to bring you more on GTA: San Andreas as we lead up to the game's October release and our full review of the game.
Got a news tip or want to contact us directly? Email news@gamespot.com
Join the conversation