Splinter Cell Double Agent Walkthrough
Sam Fisher has gone deep undercover in a terrorist cell in an attempt to find out who's behind a plot to destroy New York and Los Angeles. Will he find out in time? Or will he turn his back on everything he believes in? GameSpot's Walkthrough to Double Agent has all the answers.
Design: Randall Montanari
Sam Fisher’s back, and more morose than ever. Although the life of a grizzled government operative that’s sent alone into highly secured and dangerous areas was never one of peace, he certainly never thought that he would live long enough to see his offspring die. Unfortunately, when Sarah, his daughter, is killed by a drunk driver, he has no method of coping, save for the job.
The job that’s offered him, however, is scant on catharsis and long on moral haziness. After going undercover in a terrorist organization, John Brown’s Army, that’s intent on destroying New York City, Sam is forced to act alongside the terrorists in order to earn their trust. He has to balance the fact that killing an innocent or two may save the life of millions of people down the line. But is he willing to make that kind of decision?
The game is mechanically similar to most of the previous Splinter Cells, but the balancing of trust between the JBA and the NSA, his employers, adds a bit of a wrinkle to the old equations. While you’re undercover with the JBA, you have to keep their trust in you up; if they decide you’re completely untrustworthy (such as if you simply refuse to follow their orders, or if they see you picking locks in their headquarters), it’ll be a quick ride to the furnace for your body. If you go in too deep, though, you risk ruining everything you’ve ever worked for. The choice is up to you!
GameSpot’s Game Guide to Splinter Cell: Double Agent offers a rundown on disabling enemy guards, details on all the weapons and equipment you’ll be using, and a complete walkthrough for the game. Enjoy!
General Tips
Every mission that Sam is sent on will pit him against dozens of enemy soldiers. Sometimes you can kill them, sometimes you're restricted to dealing with them in a non-lethal fashion. Some missions also have civilians in them; killing these guys usually results in an instant failure for the mission. This section is just a basic primer on how to deal with guards, whether you intend to kill or disable.
Disabling Soldiers
If you're attempting to get through the game with a minimum of dead bodies left in your wake, then you'll have to either avoid or disable the numerous characters in the game without killing them. The game offers up a bevy of techniques which you can use to do so, however, so you should have a number of options for dealing with any given situation. This isn't meant to be an exhaustive list, mind; there are going to be more situation-specific takedowns based on each level's unique environment.
Note also that the changes in Double Agent’s stealth score ratings generally make the choice between disabling and killing soldiers an aesthetic one at best. The only way to get a perfect stealth score is to avoid the guards without them noticing you and without disabling or killing them. 100% stealth scores were doable in Chaos Theory with disables, but 100% scores in Double Agent are all but impossible for anyone save Splinter Cell experts. That said, on the hardest difficulty level, you’ll probably still have to use disabling moves a fair amount, since you won’t have any ammo for your pistol or rifle.
Melee Takedowns
There are two methods to incapacitate enemies at close range without killing them, both involving the alt-fire attack. The first is simple enough to use; when you get up close to an enemy, just hit your alt-fire and Sam will either punch them in the neck, or knee them in the chest, or send a fist right into their face, depending on the relative positions of he and his target. Of course, if you just attempt to run up to an enemy and hit them, they'll usually either hear you or see you, so you'll need to take care to be stealthy while you make your approach. Shooting out lights and creeping slowly along behind the guards to get into position makes both grabbing them or just punching them a lot easier. Note that the guards in Double Agent appear to be a bit more sensitive to movement and noise, so they’re not going to be as easy to sneak up on as they may have been in the past, at least in our experience.
Also, if you intend to just punch someone's face in without grabbing or interrogating them, you'll probably want to get used to just clicking the button over and over again as you get close to them. You have to be fairly close to actually start the hitting animation; if you click while you're too far away, nothing will happen, but if you don't click until you walk up behind them, you may wind up brushing up against them and alerting them. If you just keep clicking as you approach, you should be able to pull off the move as soon as you get into range. This is easier on the PC than it is on the console versions of the game, though.
Alternately, you can also attempt to grab and interrogate a soldier before disabling him. Grabbing a character can only be performed when you're immediately behind a soldier, and shows up as an interaction. While a soldier is held, you can perform a disabling action with your alt-fire, perhaps after herding the guard so that his body will fall into a shadowy spot or into a hole in the ground. If you hold down the alt-fire button after disabling the guard, then Sam will automatically pick up his body, allowing you to move it somewhere out-of-the-way.
(Keep in mind that you can injure or kill a guard by accident if you drop their unconscious body from too far of a height. E.g. if you render a foe unconscious, then pick up his body and chuck it off a building, then that'll count as a kill. Less severe heights can count as injuries, which will hurt your post-mission success rating.)
These two maneuvers, and especially the latter, will be your primary form of guard elimination if you intend to play through the game as stealthily as possible. Keep in mind, though, that an unconscious guard can be awoken by another guard if his body happens to be found; you'll always want to move bodies into the deeply shadowed spots, or in obscure spots like bathroom stalls or small rooms to reduce the chances that they'll be stumbled across.
Non-Melee Stunning Takedowns
Door Bashing: Although difficult to pull off, door bashes are among the most entertaining methods of taking opponents down. To perform one, you have to wait until an enemy is immediately on the other side of a door from you, then select the Bash Door interaction from the Interact menu. When done while your enemy is properly placed, you'll knock them out instantly. The key things to remember here is that bashing doors makes a lot of noise, and that you'll rarely just happen to stumble across an enemy standing right next to a door; you'll probably have to lure them back to you with noise or whistling, which can be difficult to do with some of the more solid doors.

The best place to do a door bash is in lockers, of which there are usually plenty scattered around the levels. When you spot one, hop inside, and the camera will automatically move to give you a good view on the surrounding area. If you whistle while you’re in the locker, you’ll bring over the nearest guard(s). When they stand directly outside your locker, bash it open to instantly knock them out.
Note that there is a flipside to this coin, and that's that Sam can be the victim of a doorbash himself. If you're on the other side of a door from a guard, and the guard has reason to believe that you're there (either because you attempted to open it and it banged into him or because of overt noise), he'll often choose to bash it open. You can tell when one of these is coming due to the fact that all of the interactions in the door menu will be greyed out, so get out of the way! Getting hit by a doorbash is an instant kill.
Falling: Although awkward and usually impractical, you can also knock out an enemy by falling down onto him from above. This involves either waiting for a soldier to run a route underneath a raised walkway and jumping or falling over the railing onto him, or doing one of the goofy-looking walljumps to get Sam suspended above a hallway and waiting for someone to come along to fall onto. (Walljumps can be automatically performed in a hallway of the correct width by pressing against one of the walls and hitting the jump key.) When you're above an enemy, you can hit the crouch key to drop from your position and cause some severe cranial injuries.
The Hang-And-Grab: If you hang from a pipe and get above an enemy soldier, you will eventually get the Grab Character interaction to pop up. Using it will cause Sam to drop down and suffocate the foe temporarily, causing him to lose consciousness.
(Note that doing this while winching performs a similar action, but it appears that a winching hang-and-grab actually performs a kill, not a stun.)
Ranged Takedowns
When you want to pop a soldier from range without killing him, then you have a few options, most of them revolving around your SC-20k. The sticky shocker, sticky camera, airfoil round, and gas grenade are all great at taking down opponents without invoking Sam's fifth freedom, but you'll need to be cautious when using them, as improper use of these weapons can lead to trouble. All of them are detailed in our weapons section below, but the common thread between them is that you want to be careful to use them only in circumstances where other soldiers won't be able to directly witness the incapacitation of your target.
If, for instance, two soldiers are engaged in a conversation, and you happen to zap one with a sticky shocker, then the other soldier will immediately be alerted to your presence in most instances. He may not know precisely where you are, but he'll come gunning for you if he happened to see a muzzle flash. Likewise, if you zap a soldier that's near a light source, and another soldier happens to have had a line-of-sight to him, then he'll go on alert and possibly sound an alarm. (Non-lethal takedowns are less likely to cause alarms than real kills, though, if it's any consolation.)
Killing Soldiers
There aren't as many lethal takedowns in the game as there are non-lethals, if only because the game generally seems to encourage you to keep as low a profile as possible.
Melee Kills
As with non-lethal takedowns, there are two kinds of lethal melee takedowns. The first involves approaching an enemy and pressing your primary attack button; if you get into the correct distance from the target, then Sam will use his knife in some sort of especially cool-looking fashion to instantly kill the enemy without him even getting the chance to utter a dying scream. If you use a lethal knife attack from behind, you can also hold down the button to automatically pick up your dead foe and move his body.
Alternately, if you first grab an opponent, then feel free to herd them somewhere nice and dark before hitting the primary fire button; this will send Sam's knee directly into your foe's spine, snapping it and killing the soldier instantly. Ouch.
Non-Melee Kills
Railing Kill!: Everyone's favorite B-movie action cliché is alive and well in Splinter Cell: Double Agent, but with a new twist. If you can get Sam to hang from the lower edge of a walkway and wait for an enemy to walk by, then you should get the Grab Character interaction choice, which will cause Sam to reach up, grab the foe, then fling them over the railing to their death at the bottom of wherever you're hanging. It's fun, but it can be difficult to get into position for this kill without being spotted. Also note that in some instances your victim will let out a yell before falling to their death, sometimes alerting nearby foes.

Ice Kill: One of the new killing maneuvers in Double Agent is the ice kill. In some of the early levels, you’ll find yourself swimming along underneath ice packs. If you can get below a thin spot in the ice, you can grab any soldiers that pass by on top of the spot, pull them under, and stab them in the chest to finish them off. It’s a pretty sweet maneuver, if we do say so ourselves, although obviously breaking the ice will prevent you from performing it again in the same spot.
Note that when you’re underneath a weak spot, you can hit the whistle button (down on your d-pad) to turn over and bang on the ice, thus hopefully luring a soldier over to you if there isn’t anyone above you.
Ranged Kills
Well, duh. If you want to kill someone from a distance away, you're going to use your guns. The primary choices here are the silenced pistol, which is best used against stationary enemies that you can get close to, and the SC-20k Rifle.
If you can get right up next to an enemy, then your pistol should be able to drop them with a single shot to the head. The good thing about using the pistol as a killing tool is that it's really quiet; although it does make some sound, it generally won't alert any other soldiers unless they're standing quite close to your target. The bad things about it are its accuracy (you're going to need to be fairly close to hit your target; a missed headshot will almost certainly cause an alarm) and a fairly small ammo loadout for it. You're going to be using your pistol a lot to shoot out lights, which can cause you to run down ammo if you also use it for headshots.
The scope for your rifle will also help when it comes to getting headshots. The benefit here is range, in that the rifle can pop off shots at a good distance away with decent accuracy, while the drawback is noise. Although the rifle is silenced, it's still noisier than the pistol, and will often alert enemies close to your targets, especially if you accidentally hold the button down longer than intended and shift into automatic fire mode. To use the scope, bust out your rifle, click the right analog stick, then hold the left trigger to hold your breath, which will further increase your aiming abilities.
Other than those, you also have the shotgun and sniper rifle attachments for the rifle. We found both of these to be a bit too noisy for our style of play, but if you want to run-and-gun and don't mind a few alarms here and there, then there's no reason not to use these powerful weapons.
Lastly, frag grenades can kill enemies at range, although it's difficult to do so. Most enemies will run as soon as they hear or see a frag bounding towards them, and the kill radius isn't substantial, so you'll usually wind up wasting frags unless you can chuck them at enemies in tight quarters.
Herding Enemies
One of the finer points of Double Agent lies in "herding" your foes; this refers to the art of luring guards away from their default positions to where you can more stealthily take them down, and also to splitting up groups of foes so that you can dispatch them one by one without having them spot you and sound an alarm. Herding requires you to utilize both aural and visual clues to get your foes interested in you, but not interested enough to sound that damn alarm.
Sound Clues
There are a bunch of ways to utilize sound clues in Double Agent. If you make a sound that's loud enough to be distinguishable from any nearby ambient noises, enemies will usually come to investigate the source of the sound. If you intentionally make a sound while in a shadowy or poorly-lit area, then you can silently move a bit, wait for your foe to investigate the spot where you made the noise, then kill them or disable them without having to worry about moving their body around.
The built-in sound feature is whistling. If you're hiding out somewhere, and you want enemies to come to your position, then you can hit the whistle button to send out a whisper or whistle sound. This is easy to do, since it's a simple button press, but isn't very flexible. The untrained soldiers early in the game will come to investigate these like the dupes they are, but as you get around to facing the more well-trained mercs and government soldiers, the whistle won't be so useful, as the experienced soldiers will recognize it for a trap and refuse to get too close to the source of the whisper.
Perhaps a better source of sound is your footsteps. If you accelerate for a second while standing in the shadows, you should be able to make footsteps that rise above any ambient sound, which will almost always attract guards to the source.
A situational form of noise maintenance comes in the form of objects that can be picked up and thrown across a room. There are plenty of varieties of these, such as plastic water bottles, soda cans, liquor bottles, etc. You need to be careful when using these objects, though, as if you accidentally hit your foe instead of throwing it near him, they'll sometimes start shooting at you right off. If you’re throwing a glass bottle, though, hitting them in the head will usually knock your foe out.
Lastly, the unlockable ultrasonic emitter is a great way to get soldiers interested in areas away from you. With it, you’ll be able to make sound originate from anywhere you can see, just by pulling a trigger. It won’t prevent soldiers from firing on you or checking out a more suspicious target, such as when they spot you moving through a lit area, but it can be great at getting soldiers away from their posts.
Visual Clues
Although getting seen is generally a Bad Thing for Sam, there is something of a twilight zone of lightedness in the first half of your light meter. If you're a good distance away from the enemy, and manage to walk into a light source so that you're only partially lit, but lit well enough to be seen, then your foe will usually decide that something's up and start walking over, but won't call in for backup or trip an alarm. This is arguably one of the best ways to lure foes in, but you'll need to make sure that you don't get too well lit, or they'll signal for help, and you'll also need to make sure that there's only one enemy that can spot you, or you may have to deal with two guards at the same time.
Weapons
Given the exceedingly dangerous nature of his missions, you can expect Sam Fisher to be given the best of the best in terms of equipment. This section will give you a little run-down on what sort of items you can lug along on missions, and what they're useful. These are the same weapons you’ve been using in the past three Splinter Cell games, but as per usual, there are a few changes.
SC Pistol
The pistol is going to be your best friend if you intend to sneak through the single-player game without killing everything in your path. It's much quieter than the SC-20K rifle you'll be packing, so you'll be able to use it while relatively close to your enemies without them noticing you.
For stealth players, you'll usually be using the pistol's fire to shoot out inconvenient lights, so that your chosen path of approach is nicely shrouded in darkness. For small targets like individual lightbulbs, you'll need to be relatively close to hit it accurately (a missed shot will be much more likely to alert the guards to your presence), but most light sources are decently large, and you can hit these anywhere along their lit portion to blow them out.
The pistol also has a unique alternate-fire mode, the EMP, which is also good for taking out light sources. When you use the EMP while aiming at a light, it will flicker out and remain cold for 20 or 30 seconds, at which point it will come back on. Although it may sound like shooting out a light is the better deal, since shot lights remain out permanently, the EMP has the benefit of being completely soundless and almost perfectly accurate, allowing you to pop out lights from a good distance away without having to worry about anyone hearing you. (There's also something to be said for the purity of completing a mission without firing off a single round. EMPing devices also doesn’t count against your stealth score, whereas shooting lights will.)
The EMP can also be used on other electronic devices, such as computers and surveillance cameras. Indeed, cameras will usually only be bypassable with your EMP; you normally can't shoot them out. A non-light device that's been afflicted by the EMP will normally produce whirring sounds that can mask your movement; these are especially acute in mechanical objects like computers.
If you need to kill someone quietly, then the pistol is a better choice than the rifle. You are going to need to be pretty close to your target to hit them accurately, though; crouching and standing still for a few moments will let you tighten your aim considerably. A missed headshot will almost certainly alert your foe to your presence, though, resulting in a return of fire and a probable alarm.
SC-20K Rifle
The SC-20K is a compact assault rifle complete with silencer and muzzle-flash suppressor for maximum stealth application. Your primary fire here is a pressure-sensitive fire that will fire off a single round if you tap the button, but which will shift to automatic fire if the button is held down. Of course, headshots are just as deadly from the rifle as from the gun, but again, if you have more than one target in sight, rifle fire is more likely to alert the friends of the guy you take out.
If you want to use the SC-20K as a semi-sniper rifle, you can do so by switching to your scope view while aiming it (click on the right analog stick). As in previous Splinter Cell games, the scope drift here is going to be fairly bad; to steady your grip for a moment, use your alt-fire button to hold Sam's breath for a moment and freeze your crosshairs.
Sticky Shocker
The shocker is arguably the single best weapon Sam has at his disposal. It's essentially a one-shot takedown on any enemy you can accurately fire it; the projectile has no dip in its arc, so far as we can tell, so it can hit enemies a good distance away so long as you wait for your targeting cursor to stabilize. When you hit an enemy with a sticky shocker, they'll go down like a lump of meat, having been shocked into submission by the massive electrical jolt carried by the projectile. In previous games, a sticky shocker could disable multiple enemies if fired into a pool of water that they were all standing in, but this situation doesn't occur too often in Chaos Theory.
Airfoil Round
Airfoils have changed since their implementation in Chaos Theory. They act somewhat like sticky shockers, but in Double Agent, the first time you hit an enemy with an airfoil round, they’ll only be woozy for a second; hitting them with another round will be required to actually knock them out. Theoretically, this allows you to fire a single round, then run up behind the soldier and interrogate him, but the length of the wooziness effect is fairly short, and there are very few cases where you’d actually prefer to interrogate someone instead of simply knocking them out.
In practice, the new version of the airfoils are more or less absolutely worse than the previous versions. The one good thing about them is that, if you’re quick, you can fire two at an enemy, then run over and pick them up before they disappear to avoid losing any of your stock. If you wait too long after firing, though, they’ll disappear from the ground and be gone for good.
Grenades
Flashbang Grenades
Flashbangs are a staple of many action games, and in Splinter Cell, you'll be able to use them to temporarily stun enemies, allowing you to close in and take them down while they're staggered. To use them, just chuck them at the feet of an enemy, turn your head until you hear it go off, then charge in and take the target down. The good thing about flashbangs is that they rarely cause enemies to run away from the grenade, as they will from frag grenades; the bad thing about them is that the stunning effect is exceedingly short, on the order of four to five seconds, leaving you precious little time to pull off your super-spy maneuver. It's going to be difficult to chuck a flashbang at a distant enemy, then run up to them and disable them before the effect wears off. Flashbangs also have large alert radii, so any soldier not affected by the flashbang will likely go into alert mode.
Perhaps the best use for flashbangs is to freeze multiple enemies in place while chucking frags, in fact. Since enemies will spot and run from frag grenades, it's tough to get large groups of them caught in a blast; if you chuck a flashbang, then immediately follow it with a frag, you can get larger groups of foes with a single frag.
Frag Grenades
These portable explosive devices can be thrown a decent distance, and will kill any nearby enemies when they explode, but if you just throw this at an enemy, they'll run out of the way, making it difficult to get kills unless your foe is already in a fairly confined space. Speaking as people who went through on maximum-stealthability mode, we never found frags to be all that useful; there are much quieter and subtler ways to kill people.
Smoke Grenades
Smoke ‘em if you got ‘em, as they say. Smoke grenades aren't going to be pandemically useful to Sam, even when you're going through the missions in pure stealth mode, but they do have their applications. When you throw them into an area, they'll "explode" and cover a small amount of space with smoke cover that prevents enemies from spotting you. You, however, can still spot enemies in the smoke by using your heatvision, allowing you to sneak up to them and quickly incapacitate them with your fists or knife. In tight quarters, you can even use them to capture a single soldier, drag him off around a corner, and interrogate him while his friend's still trying to figure out what's going on.
In most cases, though, smoke grenades are going to be unnecessary, as you can simply shoot out lights or EMP them to give you the cover that you need. When dealing with multiple enemies in rooms with numerous light sources, though, you may want to lay down a little smoke before heading in. In some situations you can even use it to avoid enemies entirely.
Sonic Grenades
As a variant on flashbangs, sonic grenades are vary narrowly useful. Like flashbangs, they'll disorient anyone near them, but the effect will literally last for only a second or two. The area of effect in which they'll alert guards, though, is much smaller than flashbangs, which makes them somewhat useful to use when attempting to bypass guards without killing or disabling them; just drop a sonic at their feet, wait for it to go off, then quickly run to the next spot of cover. The duration is so short, though, that attempting to grapple the target is unwise, at best.
Unlockable Equipment
Much of the best tech in Double Agent is available only as unlockable items. When you enter a mission, some of your objectives will be marked with a star. Completing the mission, while also completing the objective, will unlock a new weapon or piece of equipment for you, which will then automatically be added to your arsenal at the beginning of future missions, save for those that take place in the JBA headquarters.
Each star is worth one piece of equipment, and earning a star will unlock the next piece of equipment in the list. Since most missions have two stars, this means that, hypothetically speaking, if you beat mission one and earn one star, then beat mission two with two stars, you’ll unlock the first three pieces of equipment on the list. Going back and playing mission one again, and completing the second starred objective, will unlock the fourth piece of equipment, and so on. When you unlock equipment, it’ll be available for all missions, including the missions you’ve already played through.
EMP Grenade
EMP Grenades effectively perform whatever action your EMP pistol would perform, but on multiple electronic devices in a small area. Not necessarily a game-breaking device, in other words, especially since you have an unlimited number of EMP charges on your pistol. It'll also be difficult to get these to affect high lights, which is where they'd come in most handy. With that said, the "explosion" of an EMP grenade is apparently inaudible to guards, so these are all but incapable of setting off an alarm on their own. If you chuck them towards an electronic object, guards will be attracted to the sound as they roll on the floor, then get doubly interested in the devices as they get shut off or otherwise go crazy.
Explosive Sticky Camera
The sticky camera is a bit more situational than other weapons in the SC-20k arsenal, and really isn't going to be necessary for most stealth-oriented characters; you can avoid most enemies in the game, and those you can't can be dispatched with shockers and airfoils much more easily than they can with cameras. That said, if you're on some insane quest to get through the game without ever attracting any attention or hurting a single opponent, then sticky cameras might be useful. When fired at a wall or flat surface, they'll impact and start relaying video data back to Sam, allowing him to see a good area around the camera's position. While in the camera view, you can use the alt-fire button to make a clicking sound, which will attract guards to the camera (and presumably away from Sam), while the primary fire will unleash a cloud of nerve gas that will incapacitate your foe. Unfortunately, the nerve gas firing is fairly noisy in and of itself, and will likely attract the attention of other nearby foes, which can cause problems if they find the body of the guy you just knocked out.
If you fire a sticky camera and don't use the gas feature, you can walk over to its location and pick it up to re-use it. Were this a purely first-person game, they'd thus be pretty useful for scouting around corners, but since you can simply adjust your view to peek around most obstacles, their utility as purely observational devices is fairly minimal, especially with your 3D map and radar functions.
Ultrasonic Emitter
The Ultrasonic Emitter will be a fairly handy device to have, especially in the many JBA HQ missions. When equipped, you can point it at a distant surface, pull the trigger, and it’ll emit a kind of barking sound at the point you aimed it at. This is great for trying to lure guards away from their routes or posts, and can also be used in an emergency if you’ve gotten the attention of a guard that’s slowly approaching your position. This is one of the best ways to "herd" guards away from you. If you simply keep moving the origin of the sound further and further away from you, you can put a guard so far away that you can sneak past the normal route that he’ll run.
Wall Mine - Stun
This upgrade to the normal wall mine will, instead of exploding, emit a cloud of knockout gas instead. Personally, we found the wall mines in Double Agent to be a bit buggy, where occasionally they simply won’t go off. The stunning wall mine also emits a fair amount of noise when set off, which is likely to bring other soldiers around, who’ll more often as not simply wake up the soldier that set the wall mine off.
Electronic Lockpick
The electronic lockpick is a useful upgrade, as it’ll simply eliminate the lockpicking minigame altogether and automate the process. That’s...all it does! But it’s still handy.
Gas Grenade
Gas grenades were featured in Chaos Theory as a launcher option for your SC-20k (and they’ll show up in the same form later on), but you also have the option to use them as simple hand grenades in Double Agent. Unfortunately, they’re pretty terrible in this form, since they make enough noise to alert guards near where they detonate, and the cloud of gas is usually small enough to only be useful in taking down one target, unless you can spot two soldiers that are standing directly next to each other. Generally, it’ll be better to separate your targets before finding some other way to take them down, but if you have one target that’s a good distance away from friends, then these can be used to disable them.
EMP Device - Enhanced
This upgrade simply reduces the cooldown time on your pistol’s EMP device. That’s pretty useful, though, especially if you have to maneuver through a well-lit area.
Wall Mine - Flash
Wall mines are less effective in Double Agent than they have been in the past, but the flash variant is perhaps the most superfluous device in the game. Even if you somehow manage to lure a guard into an area where you’ve set one of these and make it go off, you’ll still have to manually reach them and either grab them or disable them before the effect wears off, which will be a relatively short amount of time. It’s far better to just get good at whistling soldiers into dark places and disabling them manually, without worrying about technical niceties.
Shotgun Shell - Attachment
The shotgun in this version of Splinter Cell is an unlockable upgrade for your SC-20k. On hard mode, this is going to be one of the few lethal ranged takedown measures you have, but it’s almost always going to be a poor choice for any kind of killing. It’s loud, inaccurate, and inefficient, since you’ll only be getting eight rounds for it per level. If you ever get backed up into a corner with a full alarm going off and guards coming for you, it might be your best bet to fend them off, but in most cases (at least how we play), such a situation is generally better resolved by loading a previous save.
Hacking Device - Software Upgrade
This upgrade speeds up the amount of time it takes for your hacking device to lock down possible numbers when hacking a computer. Not something you want to do without.
Smoke Grenade - Attachment
This attachment lets you fire smoke grenades with your SC-20k. There aren’t too many ways in which this varies from the regular smoke grenades that you throw by hand, but they do get to their destination more quickly.
Sonic Grenade - Attachment
As with the thrown variant of sonic grenades, the launched version probably won’t be of much use to you. The stunning effect doesn’t last very long, usually giving you barely enough time to knock someone out if you run towards them. It’s simpler and usually less risky to just lure people into the dark and deal with them there.
Hacking Device - Force Hack Upgrade
The Force Hack upgrade allows you to instantly override any hackable computer by tapping the X button, thus letting you avoid the usual minigame that accompanies hacking. This is a great way to quickly hack into a computer, with a couple of drawbacks: it’ll take points off your stealth score at the end of a mission, and it’ll cause the computer to emit a soft alarm that’ll bring over any nearby guards. Generally, this is best used on computers that are somewhat exposed to guard lines of sight, which you need to access quickly before retreating to a nearby shadowed spot.
EMP Grenade - Attachment
Same thing as a thrown EMP grenade, but launched. Still rarely ever needed to get past an obstacle; if you need to disable an electronic device at range, your pistol will be a better option.
Gas Grenade - Attachment
Launched gas grenades seem to disperse into slightly bigger clouds than the thrown variety, making them a bit better at taking down crowds if you need them to. Still a messy way to go, and just as likely to draw an alarm as it is to go off smoothly. Still, when they work, they can save you a whole lot of trouble.
Frag Grenade - Attachment
Frags launched from your SC-20k are, again, more or less the same as those thrown by hand. Enemies will still attempt to dive away from them when they hit, but since launched grenades still move more quickly than the thrown ones do, you stand a good chance of getting somebody dead. As always, though, these make a big bang and will attract a lot of attention, so they’re really only useful if you don’t mind setting off alarms.
Night Vision - Enhanced
The final upgrade unlock is enhanced night vision, which is basically your standard night vision - but with colors! That’s right, instead of a fuzzy green view, you get a fuzzy full-color view. This is more or less an aesthetic difference; you can see people moving around just fine when the nightvision is green. Enhanced night vision, then, is basically a large gamma correction to make the dark spots much brighter than they were previously. Unfortunately, this can sometimes make it difficult to tell whether or not a semi-lit spot on the ground will be green or yellow on your light meter, making it generally more necessary to flip back from NVG to regular vision before moving in a sensitive area. On the plus side, you'll be able to see the light meter on Sam's back more easily.
Walkthrough
Notes On Difficulty
Double Agent offers three levels of difficulty: easy, medium, or hard. On the easier difficulties, the loss of trust for failing an objective will be minimized, giving you more leeway when performing actions, and you’ll be able to take more damage before dying.
On hard difficulty, though, you stand to lose a lot of trust from failing to follow orders from either of the two sides, and you take less damage before dying. Oh, and you get no bullets for your SC-20k or your pistol. Fun!
This walkthrough will be written with the assumption that you’re playing through on hard difficulty, and with the further assumption that you’re trying to play as stealthily as possible. If you’re playing on a lower difficulty and don’t mind popping heads, then the game should be much easier than we let on here. With that said, though, be sure to read this next note.
Notes On Stealth Scoring
The Splinter Cell series has always been about stealth, where avoiding soldiers is generally preferable to shooting them or disabling them. With that said, the last installment of the game, Chaos Theory, made it possible for most players to get a 100% stealth score on most maps, even when playing on hard difficulty. This was mostly due to the fact that disabling guards (i.e. taking them down without killing them, such as by knocking them out) didn’t impact your stealth score, whereas killing them did. That was fun.
Alas, tis but a memory now. In Double Agent, stealth scores are going to be hard to keep above 0%, let alone at maximum. Basically, the system is the same as before, where you start a mission at 100% stealth score and then lose points based on your actions. The difference is that many more actions are capable of lopping points off of your stealth score here. Shooting out lights, for instance, will lop off some of your stealth score. The biggest change here is that disabling enemies will now also impact your stealth score, to a lesser degree than killing them, but still to the point where knocking out a single enemy will eliminate your chance at getting a perfect stealth score.
Now, stealth scores don’t really impact anything about the game; completing your objectives, especially those marked with stars, are more important. It’s mostly a matter of pride. However, unless you’re willing to spend hours and hours on each level, learning guard routes and perfecting your timing, getting 100% stealth scores are going to be almost impossible in most of the real missions.
Unfortunately, though, since there’s no point in getting 100% stealth scores except for pride, and since doing so is basically impossible for most players, you may as well be as lethal as you want to be in Double Agent. That said, your unlockable rewards are, for the most part, unlocked based on your ability to avoid alerts. Shoot everyone you want (save for civilians), but be sure not to trigger any alarms, at least on the first play-through of the game.
Iceland
03 September 2007
Ah, missiles. They have a pesky habit of being going skyward and shooting down commercial jet liners. Those pesky habits are no longer appropriate in this world of counter-terrorism, though, and it's up to Sam Fisher to stop this particular missile from hitting its target.
In a change to the normal routine of Splinter Cell, though, Sam is bringing along a special friend to the party in Iceland. This rookie is ex-Delta Force, but apparently hasn't been appropriately trained for Splinter Cell field work (at least according to Sam). Don't worry, though; the rookie is going to be controlled by the computer and will stay out of your hair for most of the mission.
At the very outset of the mission, while you're still in the plane, you can turn around and turn on the computer screen behind you. Using it will reveal an email from Sam's daughter...the last one she'll ever write. To get on with the mission, walk towards the open back door of the plane, and you'll automatically jump out.
Into The Plant
Your goal here is to infiltrate and reconnoiter an energy plant where "suspicious activity" is said to be occuring. These nefarious rascals have been TPing all the trees in the neighborhood, dropping sugar in people's gas tanks, and putting dog poop in paper bags which they put on people's porches and set on fire after ringing the doorbell. They must be stopped, at any cost.
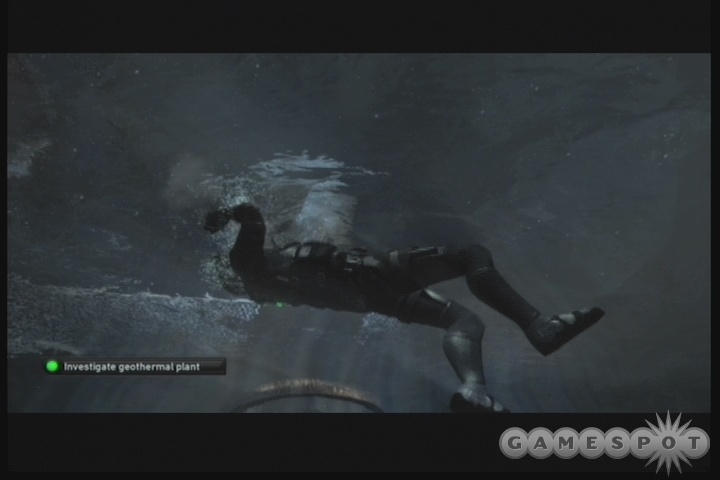
Begin by falling from the plane into the water below. You'll have to follow your teammate as he makes his way into the water intake valve. When you reach the ice above it, John will automatically kill one of the guards there by grabbing him through the ice and pulling him into the water, leaving a single guard for you to deal with. The easiest way to take him out is to glide up the water to the other weak spot in the ice (where some light is softly filtering through), then use your whistle button (the down direction on your d-pad for most console versions). You can't whistle underwater, but you will turn over and bang on the ice, causing the soldier to investigate. When he gets close enough, select the stealth kill icon and perform your own smash-and-grab operation.
When you've surfaced, listen to what Lambert has to tell you, then quietly sneak in to the outbuilding here and cut the power to the electric fence at the breaker box inside the building. Note the terrorist sleeping away the night, though; don't rouse him or he'll open fire on you. You can use the laptop if you wish, although there's nothing important on it. A sonic grenade is on the floor next to the light switch in this room.
With the fence depowered, walk out and give John a lift up and over, then climb it yourself. Maneuver around until you reach the guidewire near where John's standing, then jump up to grab hold and slide across. If all goes well, you'll wind up in the transformer station.
Transformer Station
This area's big, and there are a lot of enemies here, so take your time while moving out. Begin by dropping down to the platform below you; if the soldier there is standing in the right place, you can knock him out by dropping down onto him. From this catwalk, you'll be able to shoot out some of the lights overlooking the lower areas of the transformers. This is optional, of course, since you can disable the lights temporarily with your pistol's alt-fire. Also note that shooting out lights will also affect your stealth score at the end of the mission. There's also a searchlight that pans back and forth over the mechanical equipment below; it'll be annoying to you when you have to pass through, so you might want to wait until it pans as far as it can to the left, then shoot it. You can't shoot out the light at this point, but you can prevent it from panning.
From there, walk down the steps to overhear two soldiers conversing; ominously enough, a countdown seems to have started! You'll have to maneuver your way through the gate here to find out precisely what's going on. If you wait until the two soldiers get done with their conversation, you'll see that one of them moves down to stand in front of the shipping container below you. You can hop over the railing, drop down to the container, then drop down onto his head to knock him out.
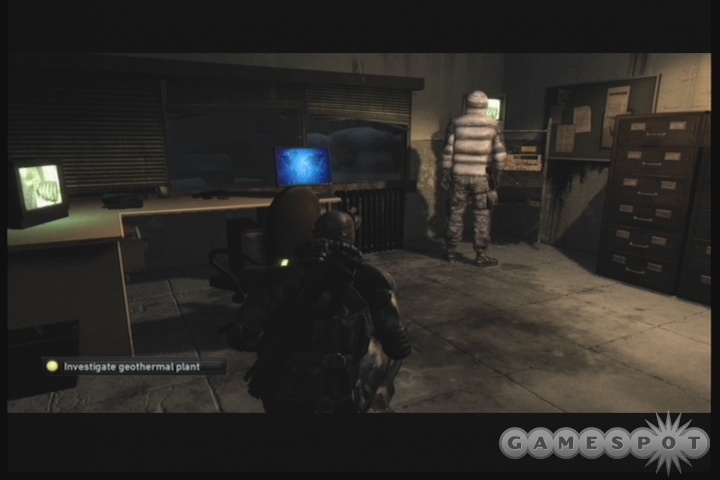
If you shoot out or disable the lights, you should be able to learn the roaming soldier's movement pattern. He has a flashlight, so it's best to just avoid him entirely, unless you want to hit him with an airfoil or sticky shocker and take him down. When he's far enough away from the small control station here, open the door and head inside. Another soldier will be monitoring the screens inside, but he won't move or turn around, allowing you to walk up to the computer on the desk, access it, and open the gate. Move quickly, though, as the soldier outside will be able to see you through the windows in the light. There's another grenade on the desk by the door if you want it.
With the gate opened, sneak your way back towards it. A guard patrols the far side of it, but if you disable both the lights here, you should be able to get past him while his back's turned. Watch out, though, for the light that pans back and forth over this area. If you didn’t shoot it before, you'll have a hard time getting a good view of it to disable it.
Lights Out
When you're inside the main transformer area, you'll have to avoid both the guard you passed by earlier (he shouldn't ever look backwards into the machinery, though) and another guard with a flashlight further down the way. You may just want to airfoil this guard, although you can avoid him by wait until he reaches the corner of the yard and looks down one of the alleyways with his flashlight. If you quickly move past him towards the ladder on the wall, you should be able to get up it before he spots you on his way back, although it'll be tight timing.
One more guard to avoid before you can hit the ventilation system. You have an option; you can either avoid him on the ground or avoid him in the air. The simplest way to get past him is to climb the ladder atop the fuel storage silo near where you are, then jump up to the pipe that runs from there to the far walkways, near the fan you have to crawl through. Otherwise, you can shoot/disable the swaying light and avoid the gaze of the guard while you climb up the steps, or just disable or shoot him.
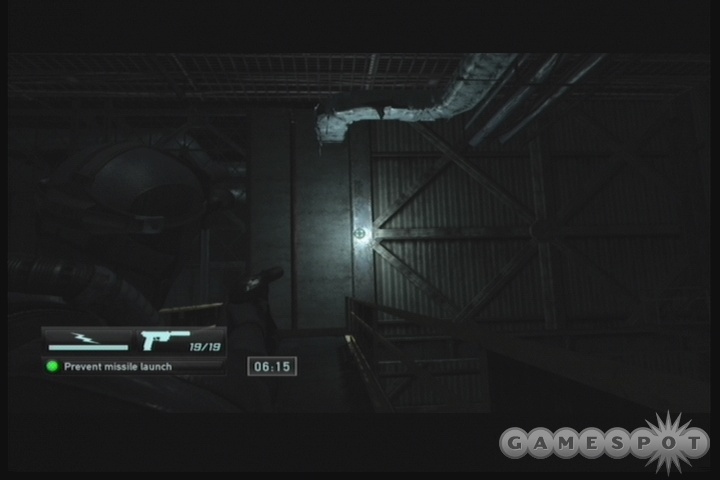
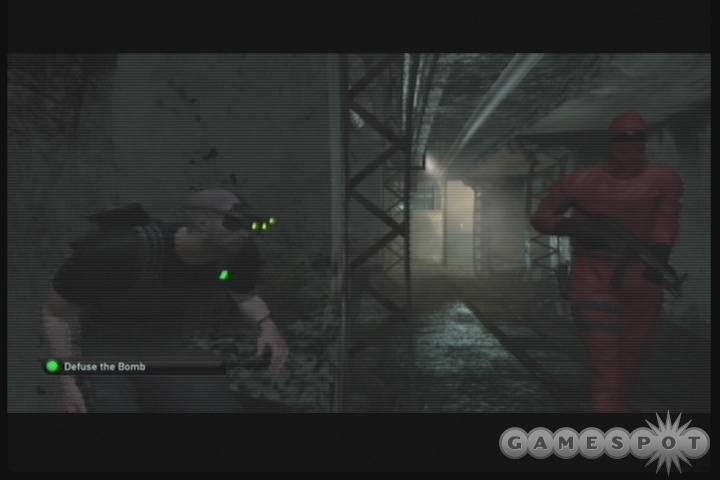
Geothermal Plant
Here's where things get mildly tricky. You have seven minutes to prevent the launch of the missile. Unfortunately, that's not enough time to actually disarm the missile, so you'll have to instead disable the launch mechanism, which will cause the missile to jam on its pad and destroy the base. Sounds like fun!
Begin by crawling through the fan, watching John get himself killed, then sneaking around to the left to reach a walkway. You can boost yourself up on top of the walkway. There are two ladders leading down, with one being close to you and one at the far end of the walkway. Either one will let you disable the missile, but the one closest to you is the easier of the two methods, although it will likely require you to kill someone.
Hard Way: If you take the farther ladder, you'll have to sneak down to the bottom floor of the area and hit the manual release on the missile itself; that'll open up the access panel and let you hack into it. To reach it, you'll need to go back up to the second floor, enter the small control room there (where a worker is located), disable the worker, and extend the bridge. That will let you get to the upper portion of the missile, hack into it, and prevent the launch. You'll have to disable both the worker and a soldier moving around to effect this method, though.
Easy Way: Take the closer path to you and head down into the crane cockpit. Flip the switch in there to start the crane, and ignore the surprised comments from below. When the crane stops moving, walk back up the steps to reach another walkway. There's a pipe on the far end of it. Disable the light with your SC pistol's alt-fire, then quickly climb the pipe and start shimmying your way across it. If you go far enough, you'll be able to winch yourself down. As you do so, a platform will extend to the missile, and a worker will come across to work on the panel inside. If you cinch down over his head, you'll be able to grab him and snap his neck. (Note that it's very difficult to take out this gentleman without killing him; the best method for doing so is to make a little noise and attempt to get him into search mode, then drop down and knock him out. If you're pressing for nonlethal missions, then the hard method listed above may be best for you.)
After disabling the worker, drop to the ground and access the missile's control panel. After hacking it, you'll be able to cancel the launch, which will give you one minute to escape the facility. To do so, wait for the ladder to approach the right side of the missile and climb up. At the top of the ladder, head left and you should see a rope hanging from the Osprey. A bit of climbing and you'll be up and out of the mission.
Kansas - Ellsworth Federal Penitentiary
01 February 2008
Skip ahead six months. Sam's daughter is dead, cut down by a drunk driver, and Sam's decided to get past his grief by going undercover and infiltrating a terrorist operation. You're going to begin by heading into prison and attempting to bust out one of the gang's members, in the hopes that this will ingratiate you to the terrorist mastermind behind the plot. Of course, as a law-abiding citizen (more or less), you'll have to decide whether or not your Fifth Freedom extends to killing guards to effect your mission.
Anyway, begin by ripping the poster in your cell after Jamie hands off your equipment, then crawl through the tunnel and ride the pipe up to the ventilation shafts. A bit of walking around will lead you to a crawlspace above a control room. Drop down behind the guard inside; feel free to immediately knock him out if you wish. If you're trying to proceed nonviolently, you can avoid his routes. First access the computer on the desk near you to learn the access code for the weapons locker here and the door down the nearby steps (1403), then open the weapons locker to pick up a few smoke grenades. They’re optional, but they'll come in helpful in escaping the jail without setting off alarms.
Guards!
Pick the lock on the door here and head on out. You have two paths here: down the stairs, and through the door across the way.
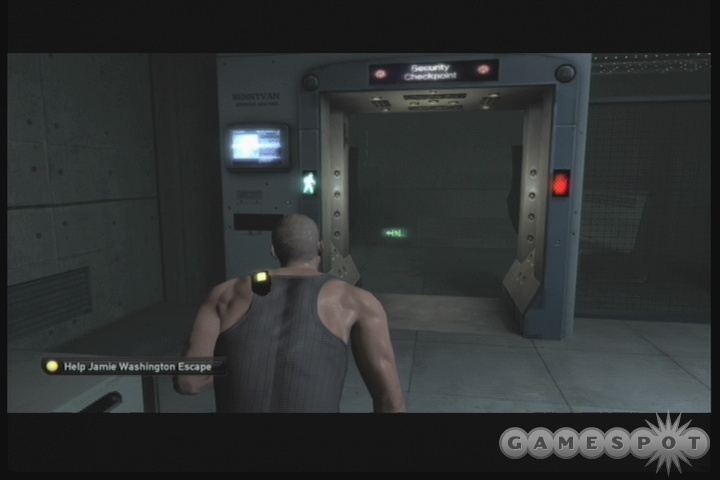
Downstairs: Heading downstairs will eventually lead you to a locked door; the 1403 code will open it. Beyond is a metal detector, along with a guard patrolling. You'll probably have to knock him out to proceed. The metal detector can be disabled either by accessing the computer on the left side or by cutting the power cables near the two doors.
At the end of the hallway nearby, switch off the lights before opening the door. There should be one or two guards in the cafeteria beyond you, firing away at the rioting inmates on the other side of the room. Luckily, they have their back turned to you, allowing you to sneak up and knock them out. If they're right on top of each other, it'll be best to just throw a smoke grenade at their feet, then run across the room to the far side, avoiding them entirely. This is risky, though, as there are guards on the walkways that might spot you.
If you can knock them out, though, do so, then hug the wall to your left, since it'll keep you in the green in terms of light exposure. When you reach a lunch table blocking your way, either sneak around it or jump over it to move on to the central tower.
The central tower isn't so difficult for this path. Just knock out the guard on the lowest level, pick the lock on the door, and start walking upwards. The second floor will have a riot (non-lethal) shotgun on a weapons rack, so grab it and the extra ammo for it before proceeding upstairs.
Locked Doorway: This is the second path you can take to reach the same area, starting all the way back where you knocked out your first guard. If you pick the lock on the door nearby, you can walk across to a locked door with a red light above it. It won't open except for guards, so go back and pick up the body of the guard you disabled previously and walk back towards the door with him in tow; that will cause the door to pop open.
At this point, you'll be on the catwalks above the cafeteria. There's likely going to be one guard just in front of you to knock out, as well as a couple further along the path, near the uppermost exit from this room. Sneaking around on the catwalks is difficult, as they'll be somewhat well-lit, and there won't be any place to hide unless you want to dive over the railings and hang on there, which will be risky due to the presence of the guards below. It's best to try and make your way around to the stairs leading down, which will lead to an unlocked door leading to the bottom of the central tower. If you do head out through the upper exit, you'll need to knock out another guard and use his body to move on. This will lead you to the third floor of the central tower, where three guards will be stationed - it'll be difficult to take them down without the riot shotgun. Smoke grenades might help.
The Central Tower
Whichever way you reach the central tower, you'll have a few different things to take care of. On the bottom floor, there'll be a guard outside the tower and a locked door to get in. On the second floor, a riot shotgun and ammo can be found. The third floor will be overwatched by guards, who will probably be difficult to bypass unless you came up from the ground floor and can fire on them with the shotgun; just be careful not to trip any alarms. It might be wiser to try throwing a smoke grenade at them and knocking them out from within the cover.
JBA Secondary Objective: Open Cells To Start Riot
The third floor also contains a computer which you can use to unlock the cells and start the full-fledged riot that Jamie was requesting. Although doing so will cause you to lose a little respect with the NSA, it's worth doing it, since you're so low on respect with the John Brown's Army faction at this point. Even the minor gain you earn here will make it less likely that you lose the game next mission due to lack of respect, so open the floodgates at the computer.
There are two ways to proceed up from here. If you take the elevator on the fourth floor, you'll come out on the fifth, although you'll have to pass through a couple of guards and some medium light to get by. On the other hand, if you manage to disable all of the guards on the third floor and check out the walkway there, you'll find a few pipes leading up directly to the fifth floor. Climb up one of them, and you'll be able to scope out the guards on patrol there and wait for your chance to sneak over the railing and knock them out.
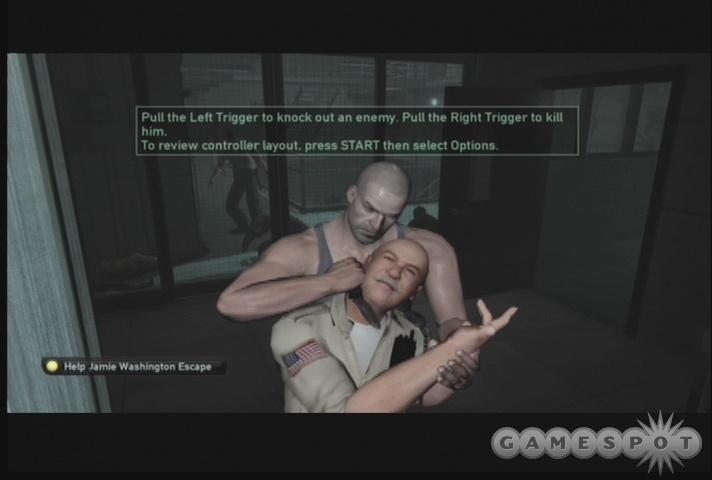
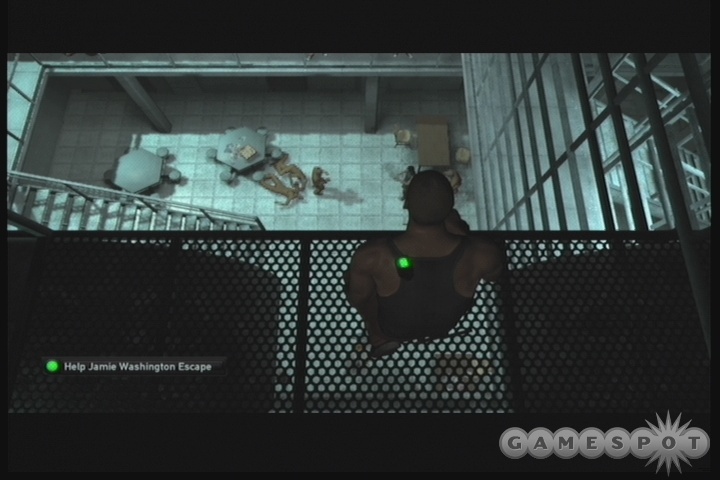
JBA Primary Objective: Rescue Jamie From Guards
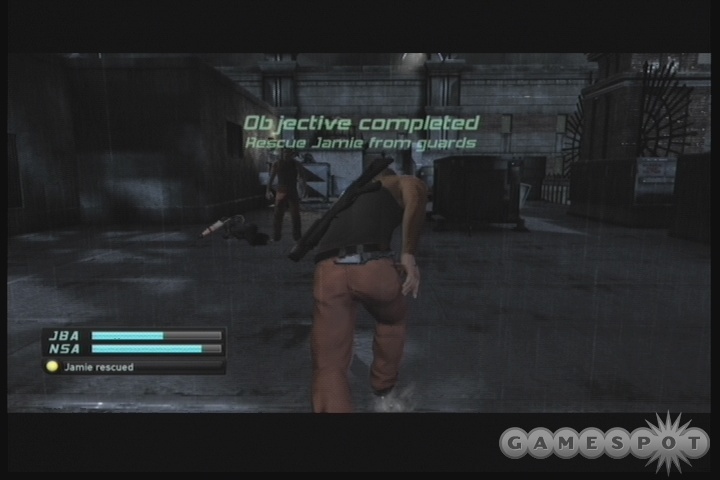
When you're on the fifth floor and ready to move on, look around for the broken glass leading to another pipe. This pipe will lead to the roof, so quickly climb it, shimmy off to the left, and head up and over the small walkway to reach Jamie, who's being led away by a guard. Tag him with your riot shotgun to free Jamie.
After that's done, a prison chopper will engage the news chopper here. To complete the mission, head down the stairs and into the small room near the prison wall. The ladder there will lead up to the roof of the building, where you'll automatically hijack the news chopper and take off.
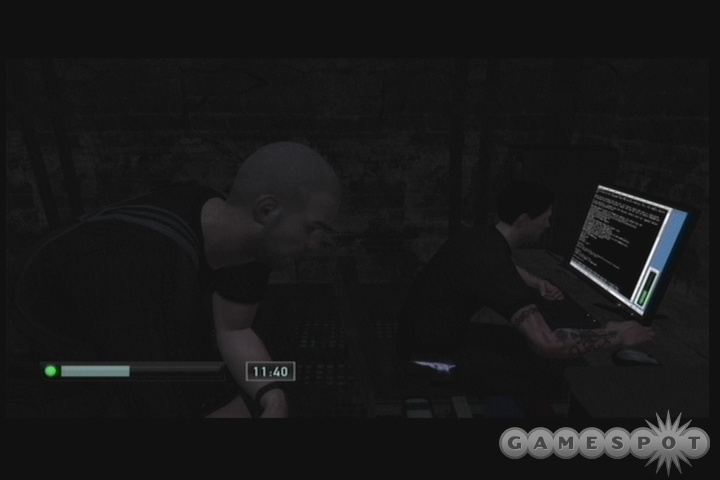
New York - JBA Headquarters, Part I
February 02, 2008
Time for your deep undercover missions to commence. At this point in the game, you'll finally be indoctrinated into the JBA - John Brown's Army. Time to invade the strongholds of the American South in the name of a fanatically abolitionist demagogue! Or not.
Anyway, while you're undercover in the JBA, you'll note that you have two trust meters going on, one for the JBA and one for the NSA. Performing actions that impress the JBA will increase your trust with them, while performing actions that impress the NSA will do likewise for that faction. On the flipside, some actions will lose you trust with the JBA, while others will lose you trust with the NSA. Lastly, some actions will lose you trust with one faction while gaining trust with the other. If you lose all trust with the JBA, then you'll lose the game.
For the purposes of this mission, you have to avoid being spotted in off-limits areas to avoid losing trust with the JBA. You also can't be seen using your ultrasonic transmitter, as it's an NSA device and being seen with it will lose the game automatically. Failing to follow orders from the JBA will likewise cause trust to be lost.
Following Time
At the start of the mission, follow Jamie, then Moss, as they lead you through the compound. You'll eventually wind up with Moss, standing outside the JBA's obstacle course. He’ll tell you to bust a move through the course, then unwisely leave you standing there, all by your lonesome. It’s now that you have to decide which course of action to take. You have a few objectives here, including three Star objective, so we’ll run them down one by one.
JBA Primary Objective: Complete Training Course
First up is the training course that leads to the safe that Moss wants you to crack. Here’s what to do, in order. (If you mess up a test or trip a laser, just backtrack until you see one of the closed doors you passed by earlier. It’ll be open, allowing you to try the section again.)
- Duck underneath the first laser tripwire.
- Stand up and wait for the second set of lasers to shut off (except for the uppermost one), then quickly walk underneath it.
- Turn the corner and pick the lock on the door.
- Wait until all of the lasers disappear, then run through the field to move on.
- Either head up the ladder around the corner and rappel down to the platform, or take the down ladder and climb up to the platform.
- Drop down and head right to squeeze between the wall and the fence.
- Drop down, turn left, and climb the rope to the top.
- Rappel down from the top, being especially careful of the lower tripwire. Time your descent so that you start moving down when it moves away from you, and you should make it.
- Turn the corner. Wait for the lower laserbeam to move away from you, then follow it to the gap between the two small enclosures. By the time you reach it, the laser up top will be behind you, so jump up and climb over the second enclosure to move on.
- Three small enclosures lie in front of you. Wait until the laser is moving away from you, then drop down in the first or second gap and duck. When it goes behind you, jump up and climb over the remaining enclosures to move on.
After all that, you’ll be facing off against a safe. The safe-cracking minigame goes like so: rotate your left analog stick, and you’ll start spinning the cylinders, beginning with the rearmost cylinder. Keep spinning it and the others will begin spinning as well, until the one in front is spinning. When the one in front is spinning, move it around slowly until the small gap in it is lined up with the rod at the top of the window. When it’s perfectly aligned, the rod will catch and the circle will turn green. Stop spinning.
At this point, when the cylinder has turned green, start spinning the stick in the opposite direction. This time, you’ll start with the rear cylinder, then move to the middle cylinder. Line that one up, then start rotating the other way for the final cylinder. You have to rotate the last cylinder extremely slowly, though, since you won’t be able to see the gap in it until it’s almost to the rod. If you manage to line it up, though, the safe pops open and you’ve completed the assignment. All told, this entire run should take you around five minutes, unless you made plenty of mistakes through the laser tripwires.
NSA Primary Objective: Bug Antenna On The Roof
Next up is the antenna on the roof. To reach it, head out to the central area of the base, and look for the ladder next to Karina’s office. Climb it, and look for the two uniformed workmen working on the large fan that’s propped up next to the wall. Wait for them to finish their conversation, then slowly walk up behind them, tapping your crouch button as you go. When you finally manage to get close enough to get into crouch mode, sneak around them into the small hallway nearby and climb up the ladder.
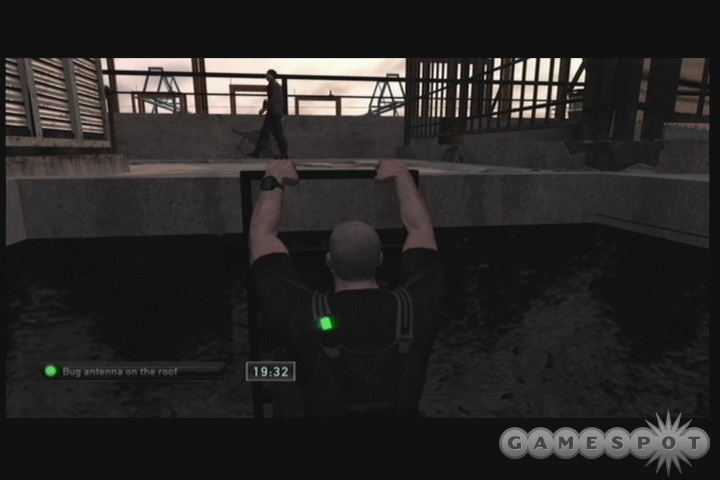
There are two soldiers on the rooftops. One will be overlooking the far edge of the rooftop and likely won’t look in towards the ladder or the roof; you can pause just before leaving the hatch to see him. When he’s clear, pull yourself up and look around for the other guy, who makes a clockwise ambit around the central skylight. If you follow the path that he makes, you should be able to sneak behind him when he’s on the far side of the skylight and walk to your right to reach the antenna. It’ll be shielded from sight, so take your time popping open the box and planting the bug.
To exit, simply watch the route of the gentleman walking around (the satellite view from the left bumper button will be helpful if you can’t spot him) until he’s walking away from you, then move out of the antenna’s gated area and open the hatch on the ground directly in front of you. Doing so will let you climb down to the unrestricted area again; you’ll come out right on top of the ladder you climbed up before.
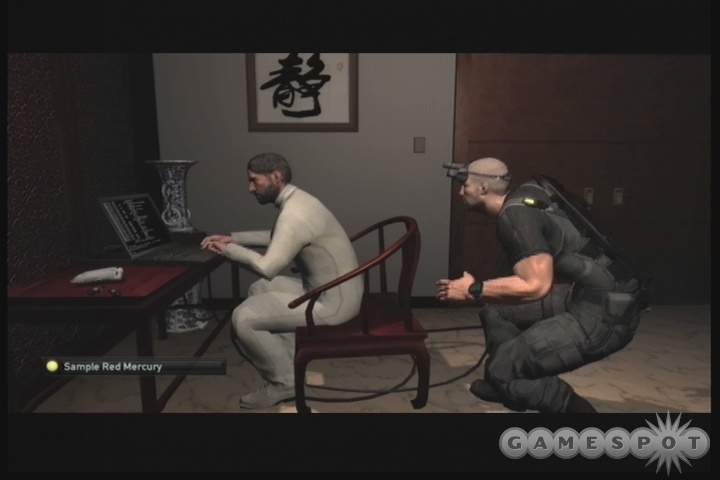
NSA Primary Objective: Upload Trojan To JBA Server
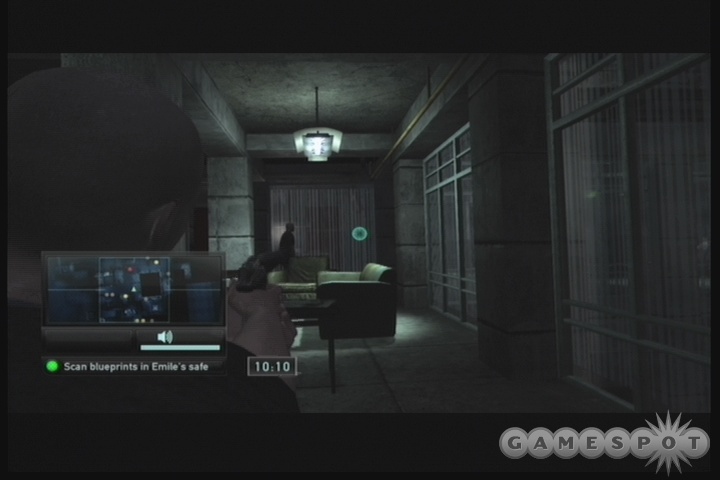
Here’s the mildly difficult one. The server room is well-protected, with a keypadded door, a camera above the inner door, and a few people walking about. Getting in and out without being detected will be tough, but it’s doable.
First all, if you want to find the code for the keypad, you’ll have to hack the computer in Enrica’s office. This is all but impossible, from what we’ve found, since she’s almost always in the office, and the computer is almost directly next to her. It’s not a big deal, though, since you can easily hack the keypad. Just be sure to turn off the light directly next to it to give yourself some shadow before doing so.
After hacking the keypad, the door will slide open. You should’ve heard the gentleman inside asking about his screwdriver. After he says he’s found it and opens the nearby door, head inside and jump up onto the crate near the stairs. From there, you can jump up to the pipe that runs along the ceiling and start sliding along it until you’re past the door and the camera that looks at the ground here. Keep going until you can go no further, and until you hear Jamie berate the people inside and leave. At this point, drop down (making sure you won’t drop where the camera can see you), then crouch and open the door.
Inside the room, you have to creep across the floor, go up the steps, take a left (heading away from the two figures here), then open the hatch near you and drop down. After the two techs finish their conversation, one will head down the pathway above your head, so be sure you’re in green shadows, or you’ll be caught immediately. Wait for him to leave the room, then creep around underneath the walkway until you reach another hatch. Popping it, standing up, and getting up onto the walkway will put you right near the JBA server, which you can then hack into and upload your trojan.
To get out, either get back into the crawlspace and crawl back that way, or simply crawl back slowly over the walkway, being sure not to make too much noise. When you reach the room with the camera, head across to the far wall and slink by the camera by hiding between the desk and the wall, then jump up to the upper platform and open the door to escape.
JBA Secondary Objective: Practice At Firing Range
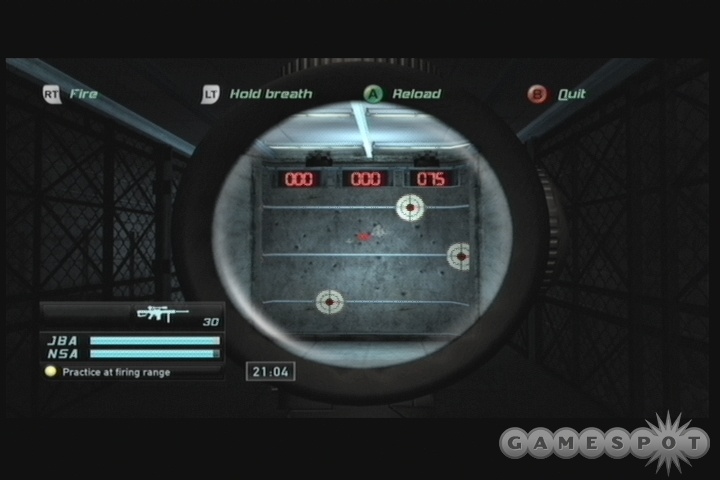
This is the least critical objective, so save it for very last if you think you may run out of time. You can find the firing range in the same room as the obstacle course, with a sniper rifle mounted across from an array of moving targets. You have 30 rounds to fire, with the objective being to earn 75 points in one go. You can reload if you like, but you have to reach 75 points within 30 rounds, with five points coming from a bullseye, three points coming from the circle around it, and one point for hitting a target on the exterior portion of the disc. And zero points for missing, obviously.
Your best bet here is to anticipate when a target will stop moving (sometimes they simply glide continuously to the left or right), hold your breath to target it (left trigger), then quickly snap a shot off at the bullseye. Getting a few five-point shots will make it much easier to get to 75 points. Again, though, you can try this as often as you like until you make it - you can’t fail permanently - and if you wait until you’re done with the other objectives, you should have plenty of time to attempt this one, so no big deal.
NSA Profile Objectives: Get JBA Member Medical Files (5)
The medical files for the JBA members are tucked away in Enrica’s locked office near the infirmary. In order to get in there, walk into the infirmary until Enrica starts talking to you. After some pleasantries she’ll walk into the office and shut the door behind her. You may want to save before approaching it.
Without switching off the lights in the infirmary (this will sometimes cause her to come back out and switch them on again, and there’s nowhere for you to hide if she does this), stand next to the door and pick the lock. You’ll occasionally be spotted in the act by someone passing by outside (which is why you want to save beforehand, unless you’re doing this right after a checkpoint). If you can pick the lock, though, you can open the door and crouch inside...very, very slowly. It’s a tiny office, but if you head across the way to the file cabinet to the right of the computer, you’ll be able to open it and get all five medical records at once. She shouldn’t turn around.
Note that you can hack the computer next to Enrica if you want, but it’s almost impossible to pull it off without having her notice you.
NSA Profile Objective: Get Professional Background Info (1)
The professional background info for Stanley Dayton is tucked away in the file cabinet next to the workstation in the server room. The only way to get it is to turn off the lights, which are located by the door leading into the server room.
The best time to do this is when you first enter the room, after hanging from the pipe and watching Jamie leave. After entering the room, immediately turn the lights off, then move as quickly as possible up the steps, into the crawlspace, and around the corner towards the other hatch. While the unnamed tech starts growsing about the diagnostics and starts to leave, pop the hatch open and hop up to the walkway above you. Stanley will start bellyaching himself for a bit, but when his speech ends, he’ll notice that the lights are off and get up to switch them back on. While he’s moving away from the desk, quickly move to it, open the cabinet, and rifle the files, then start walking back around to the server where you upload the trojan. He shouldn’t look your way after the lights are turned on, but the timings tricky here, so be sure to save before entering the room.
Objective: Kill Cole Yeager (JBA)/ Don’t Kill Cole Yeager (NSA)
When you’ve completed as many of the missions as you feel like doing or are capable of, return to the safecracking area and speak to Moss again. He’ll lead you to a room where the pilot of the helicopter is being held captive. You’ll finally meet Emile here; he’ll give you a gun with one bullet. You can guess what he wants you to do with it.
Your choice is to either kill the captive (+JBA/-NSA) or fire and miss (+NSA/-JBA). These rewards are relatively minor compared to the larger trust gains or losses you’ll earn in major missions, so don’t sweat the task one way or another. If you’ve somehow gotten extremely low with the JBA by this point, though, it’d be wise to execute the dude and recoup some of your trust losses.
Siberia - Sea of Okhotsk
February 5, 2008
JBA Assignment: Capture The Supertanker
Time to capture the oil tanker everyone’s been talking about. Why does Emile want it? Who knows. All you’re told is that your job is to go in and get in.
During your skydive in, you can press forward on the analog stick to get a burst of speed. When you’re prompted to open your chute, do so and watch it fail. Your backup chute will work, though; move your left analog stick over to the left side and rub it up and down while tapping the A button rapidly. Doing so will ensure that you hit the icon when it pops up, as it has a habit of flashing on and off when you’re trying to grab the pin.
JBA Secondary Objective: Reach the Rublev Without Alerts
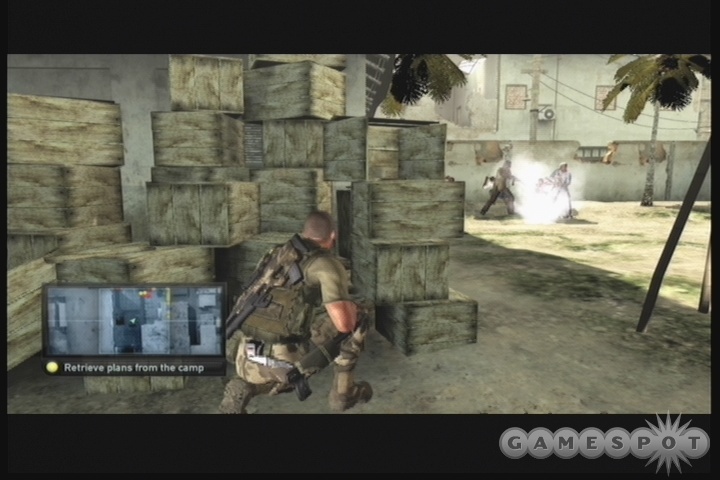
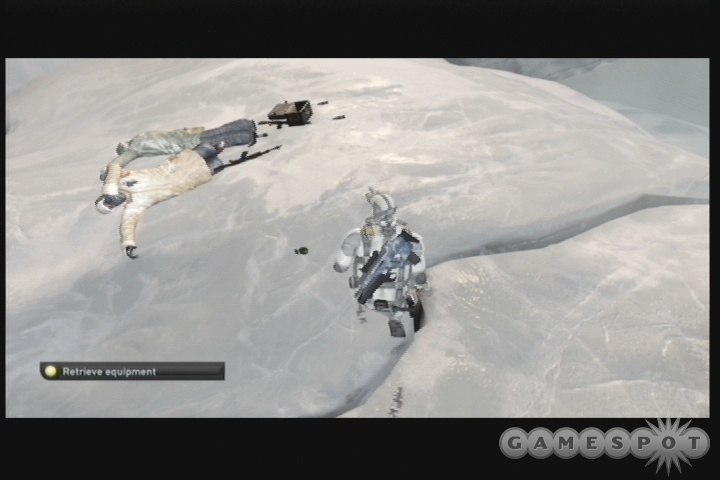
JBA Primary Objective: Retrieve Equipment
You land safely, but your equipment chest will burst open when it hits the ground a hundred yards or so from where you land. The enemies here are on top of it almost before it lands, meaning that you’ll have to avoid or disable them to retrieve it. It’s not mandatory to retrieve it, but the sticky shockers and sticky cameras are going to be really helpful in completing the mission.
Now, the easiest way to take these guys out without raising an alarm is to get them both while they’re still milling about the crashed equipment by throwing a gas grenade at them. To do so, quickly move away from your initial position and head towards the sharp little spire near the fallen equipment. Getting there without being seen will require you to stand up and run and keep the spire between you and your foes. If you can manage it, though, you’ll be able to spot the two soldiers as they mill about the box. They’ll look around for a bit, then start talking. If you scootch to your right just as one says "Maybe they belong to the scientists?" you should be able to pop off a gas grenade at their feet without being seen, which will then knock them out.
If you don’t have gas grenades, then you’ll have to be a bit more careful in your dealings. Both of the soldiers will take opposite paths from the crash site to investigate, so it’s not difficult to split them up. Actually taking them down quietly is a different matter, though, as they’re pretty sensitive to footsteps. If you can get them far enough apart, the airfoil will be a good way to knock them out. Just hit them once, run up and knock them down, then quickly grab the airfoil before it disappears. Of course, you can also try making a noise with your sonic emitter and getting them far enough away from the equipment to pick it up and dive into the water nearby before they manage to see you.
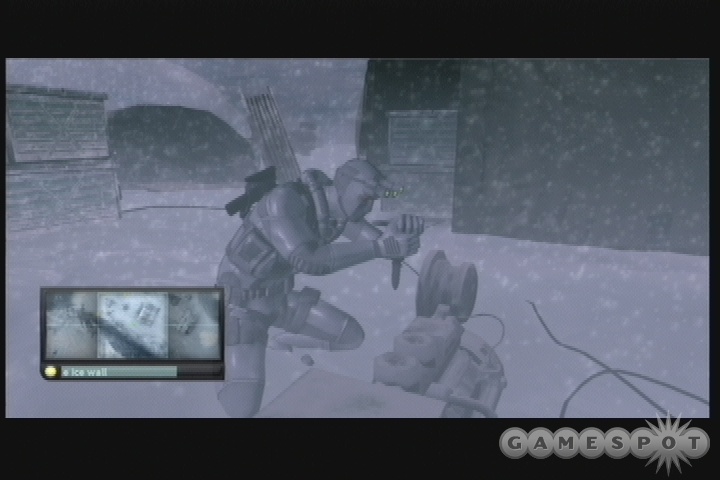
JBA Objective: Use The Detonators To Destroy The Ice Wall
Somehow this detachment of soldiers from the tanker (and since when does everyone on an oil tanker carry automatic weapons?) managed to let a wall of ice freeze up and block them from returning to the ship. Not too smart. Luckily, the bombs they’re placing to free up the ship from its ice prison will let you open a path back to it; you just have to detonate them without getting killed.
Begin by dragging the guy near the first weak spot in the ice to his death. (Some kills are apparently unavoidable in this mission, but he should eventually move away from the spot if you don’t want to harm him.) Hop up from there, but instead of heading towards the buildings in the distance, head right to find another body of water and dive in. From there, head back underneath the ice and go towardss the closest weak spot you can see. There should be another soldier milling about on top of this spot. Lure him over by beating on the ice if need be and pull him under as well.
Explosivo
In addition to the two holes in the ice you’ve made, there’s an additional hole near the second one, as well as a sole remaining weak spot near one of the tents. You have to surface from one of these holes, preferably one near the shed or tents, in order to complete your objective. If you check your map, it should denote the position of the detonator you need to use. It’ll be in the middle of the two tents and the shed, and surrounded by pools of light.
Don’t forget to keep your radar screen (left bumper button) up and running while you’re moving around here; it’ll be helpful in letting you see around blind corners. There are a couple of soldiers who will stick close to the wall that the explosives are planted in, so unless they spot you out of the corner of their eye, you shouldn’t need to worry about them. There will still be a couple of enemies roaming the area around the detonator, including one who will initially be sleeping in one of the tents.
With the radar active, it shouldn’t be overly difficult to disable the soldiers near the detonators. If you want to, you can puncture the gas tanks on the generators in the area, thus killing the lights, but since you’re going to be in constant yellow light anyway, this won’t help overmuch in terms of keeping you hidden, although it will force the enemies to be closer to you to get a positive hostile identification on you. Also of note, especially if you’re playing on Hard difficulty, are the two boxes of 5.56mm ammo in this area. One of them is in the tent with the table, on the table itself, and the other one is on a box in the shed, right near the generator there. If you want to finish the mission on Hard difficulty, pick up both of them.
When the area’s cooled down a bit, head towards the detonators and hack them to blow the ice wall. With any luck, this will kill the two soldiers over there, although if you pulled them from their position earlier by being seen, they probably will remain alive. No big deal; just avoid them and run towards the hole in the ground where the explosives went up, then dive in to move on.
Siberia - Sea of Okhotsk, Part II
JBA Assignment: Capture The Supertanker
JBA Secondary Objective: Seize The Rublev Without Alerts
After the loading screen, you’ll come back to the exterior portion of the Rublev. While you’re underwater, float up underneath the soldiers above you and wait for one of them to walk away from the ice patch. When he’s away, drag down his friend and kill him. Use your thermal vision to see through the ice if you’re having a hard time doing so.
With the first soldier down, head to the other weak spot in the ice and bang on it until the second soldier comes around, then kill him in the same manner before surfacing. There’s one last soldier in an inflatable boat on the water, so dive in, sneak up behind him, surface, then drag him off the boat and kill him as well. With everyone out of the way, head to the nearby dock, use the winch to bring down a Zodiac, then jump onto it and lift it up to reach the Rublev proper. It’s here that things get a little tough.
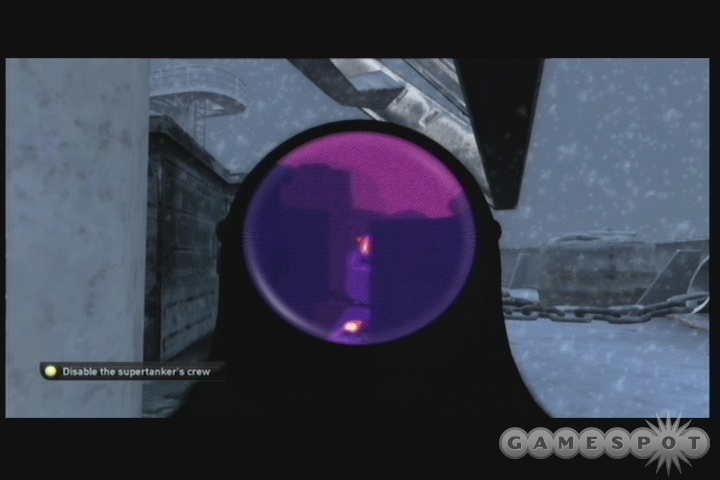
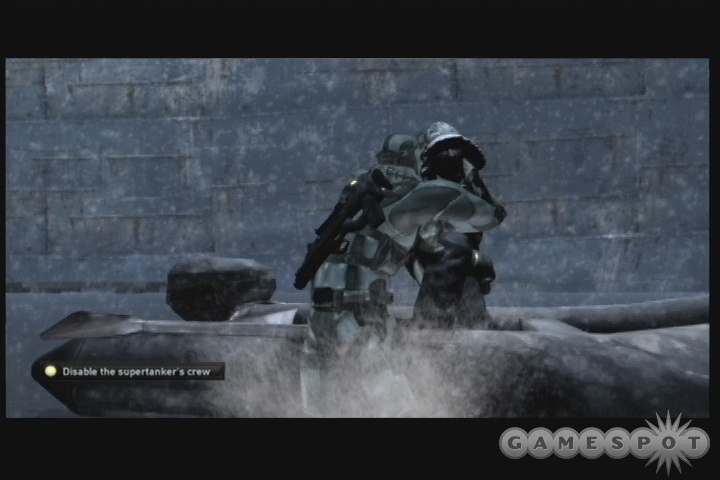
JBA Assignment: Disable The Supertanker’s Crew
According to Moss, the man who’s coming to take control of the tanker wants it to be placid when he finally arrives. This means killing around 15 or 16 crew members, again according to Moss. If you check the objective screen carefully, though, you’ll learn that you can also disable the crew members if you don’t want to actually kill them. With that many targets, though, you’re going to have a hard time being sneaky enough to knock everyone out without setting off alarms, so you’ll have to choose between making the boat a slaughterhouse, which is the easiest way of proceeding, or taking the slow way, learning the walking routes of the soldiers, and making a best effort to avoid getting kills. The latter will be difficult, to say the least, since there are so many soldiers on board the ship.
It’s easier to just kill people, using the SC-20K and its scope attachment. Equip the SC-20K. click the right analog stick to zoom out, then right on your d-pad to start thermal imaging in your scope. The thermal imaging will make it much easier for you to spot the enemies as they walk around in the blizzard, especially their deliciously unexposed heads.
There are a lot of enemies to take on, too. In the first part of the ship, it’s prow or forward poop deck or whatever it’s called, you’re going to have the two first mercs that are yelling at each other when you get aboard, at least four soldiers that roam the forward deck, and two more soldiers around to the side, on the upper walkways that you’ll have to walk a bit to reach. Any one of them will be able to spot you if they see you skulking about; there aren’t any shadows to hide in.
There’s no right or wrong way to move here; you more or less have to forge a path as best you can. Our video on this page (if you’re reading the HTML version of this guide) will give you one method to drop fools. Just try to keep them separated, and if you’re trying for nonlethal kills, this would be a good place to practice your whistling. Just keep in mind that there’s no place to hide, and that you’ll have to keep enemies out of line of sight until you’re ready to take them down. This is going to be an excellent early challenge for any nonlethal players, as sneaking up on the soldiers that roam the catwalks will be especially taxing. Be sure to stop every few seconds to let your radar update.
After moving around to the far side of the ship, start climbing up the catwalks. You can find more SC-20K ammo on one of the dead-end platforms up here, if you look around carefully.
JBA Primary Objective: Take Out Bridge Crew
NSA Primary Objective: Contact Lambert
JBA Secondary Objective: Disable Communications
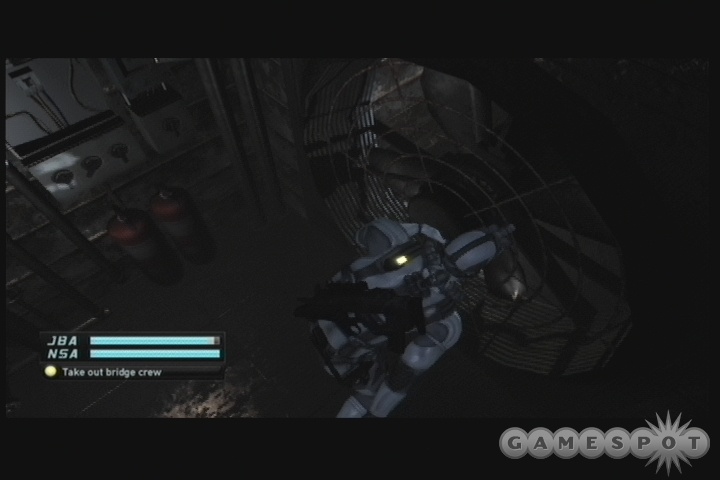
When you climb up the ladder leading to the bridge, you’ll get a slew of updated objectives. All of these can be done fairly easily. If you’re trying to play nonlethally, well...good luck. The bridge crew will be really difficult to take out without resorting heavily to your bag of tricks, such as gas grenades and sticky cameras.
Better to just off ‘em. Head up the ladder by the bridge and take a left to disable Andrei there. From his body, head up the antenna, hack it to call Lambert, then go back into the menu to shut the power down to prevent the distress signal from going out. With that done, find the chimneys near Andrei’s body, open the hatch, and rappel down to the ground there. Stand next to one of the fans here and chuck the knockout gas into the ventilation system. We’re not sure if there’s a difference between the various fans, since some move more slowly than others. It’s possible that the slowest-moving fan simply disables the bridge crew, while the moving fan will actually disperse the gas and kill them, but at any rate, throwing the gas in any of the fans will result in the crew becoming disabled.
Kill The Captain
Instead of climbing back up the rappel line, jump up above the moving fan in the ventilation system to find a vent that’ll let you bypass the bridge entirely and return above where you initially hopped on board the ship. (This is just a shortcut; you can pass through the bridge if you like, but it’ll take longer. If you're attempting the mission in a non-lethal fashion, this will let you avoid the bridge crew altogether.)
As the captain escapes past the moving crate, hop down to the ground floor and get ready for some magic. Magical detection, that is. Of your foes. Despite the snow, the soldiers here are going to be great at spotting you from their elevated positions. There’s one prowling the deck, one on the first elevated platform, and one on the highest observation post.
After disabling the deck walker (ideally after first luring him back out of sight of the other two), crawl around the large fuel tank on the deck and sneak behind it. You’ll spot some canvas you can cut through. Doing so will let you access an open shipping container (where more 5.56 ammo is to be obtained). This is the best place to disable the soldier patrolling above you; if you whistle enough, he’ll come downstairs and attempt to find you, allowing you to tag him with a sticky shocker while he steps down the stairs, or blowing him away with a wallmine attached to the exterior of the container.
The highest soldier here is going to be a hell of a problem. He can spot you from a long ways away, as mentioned, and is more than capable of causing an alarm to ring out when he sees you. If possible, you may want to use a sticky camera fired from a good distance away to take him down (ideally before you kill the soldier below him). Otherwise you may have to try for a long-distance headshot.
When you’ve taken care of business up here, find the hatch leading down to the interior of the ship. It’s not the one on the helipad, but rather one found on the deck, across the way from the area you just crossed. Check your 3D map if you need to.
Ship Interior
Your goal now is to kill the captain of the ship before he can sink the tanker. He’d rather be dead than red! Or...something like that. Anyway, there’s no timer or anything to worry about, so take your time in the next couple of rooms.
The first room features a single guard and a couple of layers of catwalks. If you don’t want to hurt him, use your pistol to blank out the lights as best you can and give yourself some freedom of movement, then try to move through the exit door while he’s on the far side of the room. The second room will have two soldiers inside. Head through the door, then immediately turn right to squeeze behind the large cylinders here. If you manage to make some distractions, such as by dimming the lights with your pistol, you should be able to get the lower of the two soldiers into search mode, allowing you to either gas grenade him or sneak up and knock him out. The uppermost soldier can be handled in a similar fashion if you lure him down with whistles.
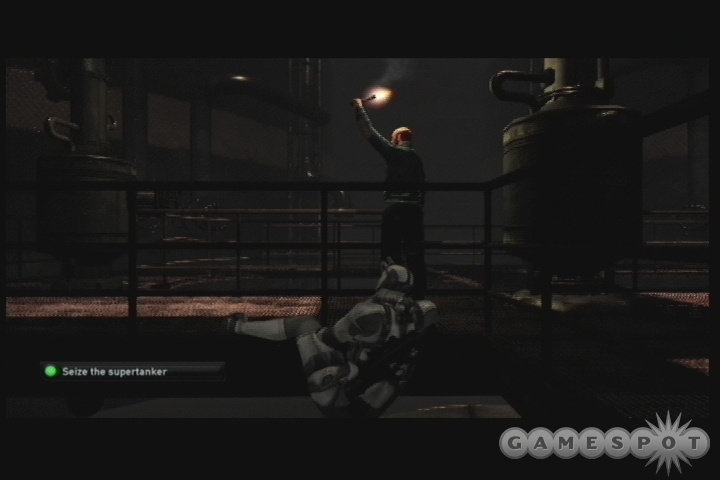
Last up is the captain. There are two ways into his little abattoir. The first is by walking up the steps in the two-man room and taking the door there into the captain’s chambers. The second is by heading through the lower door in the two-man room, disabling the fans, then jumping over the railings and dropping down into the fuel supply there. From there, you can swim into the captain’s room and climb up onto the pedestal below his position.
The catch here is that the captain’s sitting on a load of fuel with a lit flare in his hand. Shooting him or attacking him will cause his flare to fly into the fuel, thus bringing your mission to a quick end. The only way to take him out is to sneak up behind him and grab him physically, which will cause his flare to fall to the ground instead of going into the fuel. And, well, that’s not overly difficult; he’s just one guy and he makes a pretty regular route around the area. Wait until you know where he’s going, then creep up behind him and grab him. Finish him off afterwards to unlock the end of the mission. Climb the ladder and open the hatch to the helipad to ship out directly to Shanghai.
China - Shanghai
February 06, 2008At the beginning of this level, you'll have to take on the controls of the helicopter you're flying in, after the pilot suffers an acute case of CIA poisoning. Simply move the ship back on course by pressing your left analog stick to the right until the ground levels out. If you want to put the chopper into a maniacal death-spin, that's your right as well.
NSA Primary Objective: Record The Secret Meeting
NSA Secondary Objective: Infiltrate The Hotel Without Alerts
Time to get busy. When you can start moving Fisher around, move him to one of the small stacked set of pallets in order to boost yourself up to the railings above, where the guard was standing a few moments ago. He'll eventually move away a bit and start talking to the other guard on the small structure. When you're on the upper level, sneak around to the opposite side of the antenna building and climb up the pipe there to reach the roof.
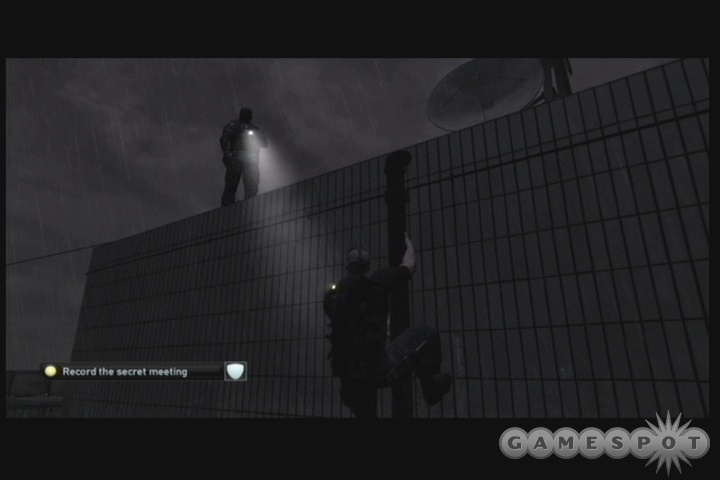
The two guards should still be busy talking when you hit the roof. If you're quiet and careful, you can stay in the green on your light meter while you sneak around and get underneath the zipwire and jump up to it, or you can zap the light on the antenna with your EMP device on your pistol if you want to be extra sure you're not spotted. Either way, get underneath the zipwire and jump up to slide across. You go across bare-handed, which would shred the flesh of most mere mortals, but hey - this is Sam Fisher we're talking about.
You'll land on another roof nearby, free of guards. Hop over the air duct near you and immediately drop down to reach another section of the same roof. A small set of wooden planks will lead you across to the top of a large container. If you head towards the lighted area nearby, you'll probably spot a couple of guards and a pair of floodlights. Your goal is to drop down and head up the set of steps leading to the crane nearby. If you zap both of the lights and monitor the guard's reactions, you should be able to find a path to the steps. It's not very far. Just remember to edge off the container so that you turn around and grab hold before you drop; otherwise you'll make a crunching sound when you hit the ground and get the attention of the guards.
When you hit the top of the steps, move over to the small control panel near the crane. (If you can't spot it right away, use your wave vision to see it.) No guards patrol up here, so take your time and hack the box so that you can extend the crane with its lights off. Immediately after you do so, though, a soldier will come up the steps and investigate, so hide behind the control box until he goes away (you can EMP the light across the way to move him more quickly), then climb up onto the crane and start rappeling down.
Time For Fireworks
The climbing section of the level begins in earnest now. When you start rappeling, go straight down until you hit the window washing platform, then move off to the left. When you hit an obstacle in the corner, drop down to hang on with your hands, then continue to the left until you can slide down the pole nearby. From there, slide to the right while hanging on until you hit an obstacle in your path.
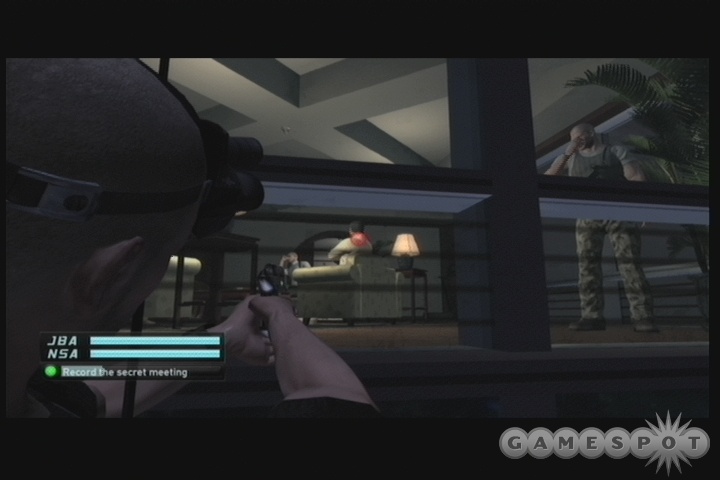
A party appears to be ongoing inside the windows here, so you'll have to be careful about your movement. Each of the two obstacles here will require you to pull yourself up to the top of the walkway and move on your feet, but each of them will also be "guarded" by a drunken civilian inside. The first obstacle is near a man who rotates his head to look inside and then look out the windows. Wait for him to look out the windows, then, when he turns back inside, quickly pull yourself up and sidle along to the right and drop back down when you can. At the second obstacle, simply wait for the gentleman in the chair on the left to get up and fall over in a stupor, then repeat the process and move off to the right. The fireworks here will occasionally light up your light meter, but that doesn't matter; if people can't see you, then it doesn't matter how lit up they are.
After the checkpoint marker, hook yourself up to rappel again and quickly go down the building; you can use your jump button to make one large leap if you like. When you reach the window into the meeting room, quickly equip your laser microphone and point it at the glass; you'll need to get there before the conversation proceeds too far if you want to have a chance to record enough to appease your NSA masters. If you jump down, though, you should be there in plenty of time.
Infiltration
With the meeting recorded, immediately stow the microphone and start hitting your jump button to rappel down as far as you can. The helicopter that you're hearing about will be coming down the building in an attempt to spot you, but if you're quick, you can completely avoid it. Just jump down the building until you're forced to disengage, then quickly move off to your left until you hit a couple of gray panels. Drop down to your hands at this point and move over to your left.
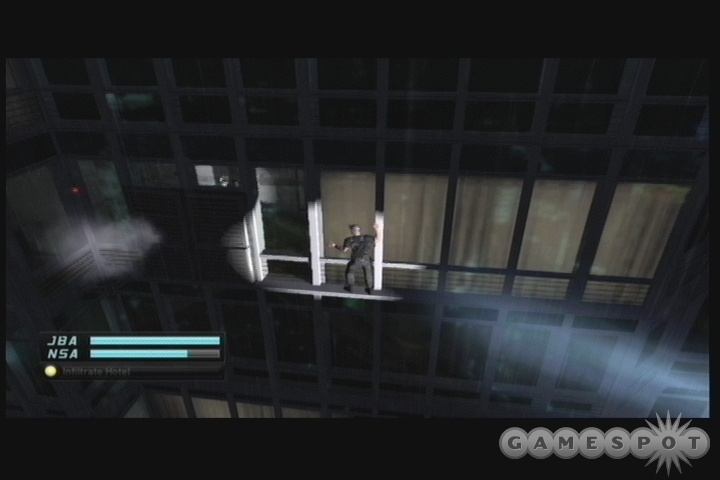
If you didn't beat the helicopter down to the bottom level here, you'll have to avoid its spotlight. It's a pretty regular rotation, where it'll move left when it's on the bottom of the ridge and right while it's on top. It's easy to avoid; just stand and move to the left when it's pacing on the bottom, then drop down when the light comes up top and move with your hands while it's on the top. When you reach the gray air conditioning casings, again, move over to the left.
You won't be able to go far, but no matter; a soldier will eventually come up to one of the casings and open up to peek outside. He can't see you, but you can pull him out if you wish, then climb up yourself. If you're going nonlethal, then whistle to alert him, then wait for him to walk away and quickly tap the jump button to climb on up. He'll move around to the side, allowing you to sneak around to the right and disable him.
NSA Primary Objective: Sample Red Mercury
NSA Secondary Objective: Don't Kill Any Civilians
Time to get busy. Now that you're inside the hotel, you have to find some way to get upstairs without causing a ruckus. You're in the laundry room, and Emile and friends are one level up. Guess where you're going?
Anyway, laundry room first. There are a few guards on this floor, but only one of them should currently be inhabiting the laundry room, although one more may join him soon. There are a few ways to proceed from here, but the simplest one will let you sneak through without getting any attention at all.
To begin with, zap the light in the air conditioning room, then open the door and peek off to your right. The soldier there shouldn't be able to see you, so creep off beyond the tables towards the red switch on the wall. There'll be an electrical line off to the left of the switch; cut it to cut the lights in the washer/dryer room. With that done, watch the soldier until he moves off a bit, then sneak behind the left row of washers to find a small gap leading to an open access port. This port has a ladder, which leads you up to a closet in Emile's hotel room. Simple!
If you want to make things more interesting, you can fool around in the laundry room (the valves on the walls cause bursts of steam to shoot out, which either disables or kills anyone it gets in contact with) or attempt to move out the other exit from the room to find the stairs. It's a far more complicated path and will probably force you to disable more enemies, so if you're looking to stay stealthy, the behind-the-washers path is definitely the best bet.
Totally Suite
When you scale the ladder behind the washers, you'll find yourself in a walk-in closet. Dim the lights here before opening the door; when you do, you'll hear a radio request for more guards in the hallways. That'll clear up most of the guards in the rooms beyond this area for you, making it easier for you to get to the safe.
When you head out the door, you can check your 3D map to note that the safe is off to your left. If you head through the door to your right, though, you'll be able to sneak behind and knock out the hacker in the chair, then use his computer to disable the security cameras on this floor. This probably isn't necessary, but it'll be helpful if only because there are two Sticky Cameras on the desk here for you to grab.
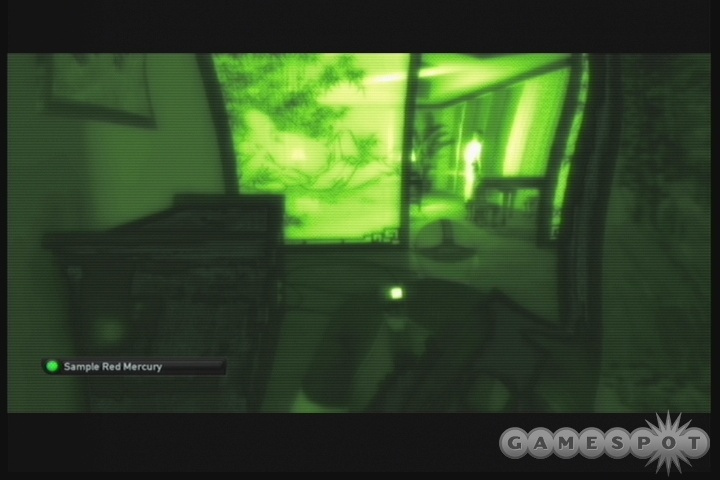
With that done, return to the larger room outside, with the dressing screen set up. One guard will be patrolling here; note his pattern and disable him. From there, the tension mounts, as you have to stick to the left wall and get behind Emile as he waits while the money is counted. Sneak through the doorway to your left (avoiding the one that Moss is planted in), and be sure not to flip any light switches. That only serves to get Moss's attention, and that's the last thing you really need right now.
Anyway, stick to the left, follow Emile through the doorways when he passes through, and keep your eyes open for a safe. When Emile goes past the safe and into the waiting room, crack the safe as quickly as possible (if you've been having trouble with the minigame, save your game just before the attempt). Occasionally the guy counting the money will get a cheap alarm if he spots you, but this shouldn’t happen, and usually won't.
When the safe is open, sample the Red Mercury, grab the 5.56mm ammo, then move off to your left and into the bathroom. There's an open hatch in the ceiling here, so jump up to it and start crawling along to move on.
JBA Assignment: Reach Aswat's Room
JBA Primary Objective: Get Aswat's Notes From His Room
At the end of the shaft, you'll come out over a server room. The only way out is to drop down, and that seems to always cause a little noise, which will bring one or both of the nearby guards over. There's a computer and a sonic grenade beneath you, but if you want to avoid trouble, just leave them be and run over to the ladder beyond you and start climbing up before you get spotted. The computer has nothing of interest on it, and the grenade is...a sonic grenade. You don't need it.
At the top of the ladder, head out into the hotel's central shaft and find the rappelling point and rappel down a bit until you hit a walkway. An elevator will come up right next to the end of the walkway. Jump onto it and ride it downwards to another walkway, then repeat the process one more time to reach the lowest walkway here. This is the level of Aswat's room, which is located between the two metal walkways which extend out to the outer circle of the hotel. Check your 3D map if you need help spotting it.
A single soldier is pacing around in front of the door to Aswat's room. He can be easily avoided if necessary, but if you want to take him down ahead of time, shoot a sticky camera in front of him and gas him, preferably in a darkened section of the corridor. Taking him out now will help you fulfill an objective later on.
Once More Unto The Breach
When you reach Aswat's door, a checkpoint pops up, the last of the level. This is where things get tough, if not borderline impossible for anyone who wants a 100% stealth ranking. There are four guards in the room, two in the bedroom to the left and two in the bedroom to the right. Over time, they'll start milling about, but you'll want to head into the room as soon as you get there if you want to take advantage of the positioning early on.
If you don't mind knocking out or killing all of the guards here (and it makes completing your objectives much, much easier), you can use any sticky shockers or sticky cameras you have to take them down. If you want to proceed individually, then quickly move inside the door and sneak into the bedroom, hiding in the corner near the bathroom. After the guards finish their talk, one will walk out of the room, leaving the one by the safe. Wait a few seconds, then sneak over and knife him or beat him in the head. From there, you can proceed through the rooms, using sticky shockers on anyone remaining, or luring them into the shadows (such as those in the bathroom of the bedroom) and knocking them down. If you're going to clean the rooms, do so before opening the safe.
NSA Objective: Kill Dr. Aswat
JBA Assignment: Escape With Emile
When you're in the clear, pop the safe open and grab the documents inside. Doing so will prompt another NSA objective to appear. They now want you to kill Dr. Aswat, who's returning to the hotel room.
The trick here is that the JBA soldiers are coming down from the meeting room in a helicopter, and intend to bust you out of the hotel room by smashing through the window with a zipline. Real subtle, that. Anyway, they'll bust through the window well before Aswat returns to the hotel room, so if you just sit around and wait for him to arrive, you'll be forced to leech off around half of your JBA trust meter, assuming it's full as can be.
The trick? Kill Aswat before he gets to the room. As soon as you crack open the safe and grab the documents, head to the door of the apartment and open it if it closed. Way across the central shaft of the hotel, you should see Aswat and a guard chatting. Quickly attach sticky cameras to your SC-20K and fire one towards the elevator. When you take over the view, make some noise with the camera until you get Aswat's attention. When he gets close to the camera, blow it up to easily off him. You need to perform these steps fairly quickly, or he'll start walking towards the hotel room and be out of sight for a few seconds, forcing you to get close to him and take him out with other means.
When Emile fires the grappling hook through the window, hop up to the zipwire and fly across to the helicopter to end your mission.
New York - JBA Headquarters, Part II
February 22, 2008
Time for another group of missions in JBA headquarters. As you might expect, these are going to be a bit more tricky than they were last time, but if you plan your movements as best you can, you should be able to complete your objectives in the allotted time. Maybe.
After you get done talking to Lambert, hop on top of the dumpster and jump over the wall. Crouch and speed your way forward until you can duck into the garage and return to a safe zone. Enrica will find you soon afterwards and start telling you your objectives for this next round of 25 minutes. Your main objectives are to complete the construction of the mines for the forthcoming operation in Kinshasa, and to infiltrate Emile's office in the HQ and analyze his files. In order to get inside, though, you'll need to record some voices.
NSA Primary Objective: Record Voice To Access Locks
NSA Profile Objective: Get JBA Member Voice Samples
As soon as Enrica moves past the voice-coded door, move back a bit and wait in the shadows. She and Emile will meet on the steps and talk. If you equip your microphone and point it at them, you'll get voice samples for both of them, which will then let you bypass the door.
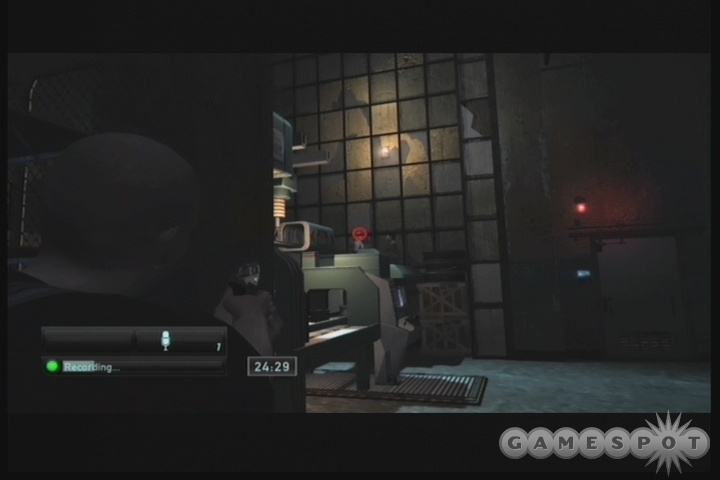
You only actually need to get one voice sample to open the door, but a profile objective in this mission is to obtain all five voice samples for the key JBA personnel. If you wish to try this out, then get the voice samples for Emile and Enrica as they talk. When you have them, stow your microphone and leave the area, letting them finish their conversation in peace. Head back to the central shaft of the building. If you recall the staircase where you first entered the building under Jamie's guard in the last HQ mission, then head there. There's a voice sampler on the fritz there, and Jamie will be heading that way to converse with the technician. Stand in the shadowed stairwell and use your mic to pick up the conversation.
A minute or so after Jamie leaves, Moss will come to the same area himself looking for a guard (at around 22:15 on your timer). Record his voice as well.
Dayton is the last guy on your list, but he won't be available until later on. When you pass through the voice-activated doors and into the Low-Security Corridor, you'll be able to pick the lock leading to Jamie and Dayton's Quarters, where Dayton is laying asleep, having a nightmare. Record his voice when he speaks to nab the last voice sample.
JBA Primary Objective: Assemble Mines for Kinshasa
Your main goal here is to assemble ten mines for the operation in Kinshasa. This isn't necessarily all that difficult, though. You can find the mine-assembly device near the door to Emile's security area.
To use it, simply walk up to it and access the computer screen. There are only two controls involved here; on the 360, they'll be your right trigger and the left analog stick. The right trigger will cause the detonators to descend into the mine itself, while the left analog stick will orient the detonator so that it heads into the core of the mine. If you descend too quickly, you'll likely have a hard time controlling the detonator's movement and crack it on the side of the mine. If you descend too slowly, you'll have a hard time lining up the detonator with the center of the mine (since the slower it moves, the less control you'll have over it).
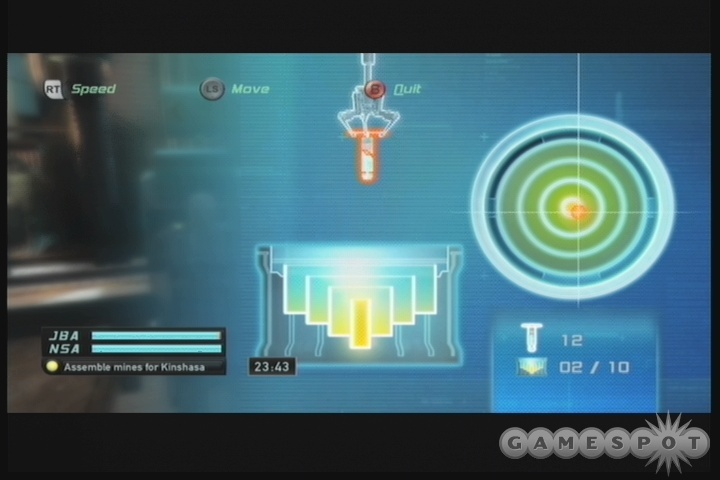
The trick, if there can be said to be one, is to go not too fast but not too slow. This is more of a touch game than anything else. We found it best to adjust our aim using the diagram in the upper-right corner of the screen to guide us, but also keeping an eye on the height of the detonator on the right. If you're in the green zone when you're just above the sweet spot, you can hit the plunger and send the detonator where it needs to be in one swift stroke.
You have fifteen detonators to work with and need to construct ten mines, so you have some leeway here. It's best to save your game before you attempt this mini-game and give it some practice before trying it for real; doing so will save you time when you actually get good at it, and you'll probably need all the minutes you can get here. Just be sure to finish them off before you head up into the restricted zone, since you might not get the chance to come back down here.
JBA Secondary Objective: Complete Training Course
JBA Secondary Objective: Practice At Firing Range
JBA Secondary Objective: Dispose Of The Pilot's Body
The first two objectives here are exactly the same as you encountered earlier. Theoretically you can earn some more JBA trust if you repeat them, although you'll be cutting things close, time-wise.
The disposal of the pilot's body is pretty easy. Just pick him up from the cot in the infirmary and drag him down near the furnace room. You'll eventually get a popup command that lets you place him on the cinderblock near the furnace; the dirty work of disposing of the body is apparently left to someone else. Don't bother doing this mission unless you need the trust, though, as it's mostly just busywork.
NSA Primary Objective: Scan Blueprints In Emile's Safe
NSA Profile Objectives: Search Quarters For Personal Info
NSA Profile Objectives: Get Professional Background Info
Once you're done with four of the five voice samples and the mine assembly (and maybe disposing of the pilot's body), you can start working on the other collection items here, as well as the main objective of scanning the blueprints in the safe.
First off is one of the professional background information files, for Dayton. His file is in the server room, next to the workstation there. You can enter the server room like you did before; hack the keypad, ride the pipe over the camera and drop down. Emile will be in the server room, though; he has a hilarious interaction with the computer there that you just have to listen to. Creep up behind him, being sure to stay in the green part of your light meter, and wait for him to walk over to the far side of the server room. When he does, creep up and rifle the cabinet there for the intel you need. He may or may not magically detect you through the bank of servers, so you'll probably want to save your game ahead of time. If he does, you'll lose a bit of trust, but you should hopefully be almost at maximum with them, so no big huge deal or anything. Just run out of the area. In any case, you may want to do this before disposing of the pilot's body or completing the mine assembly, just in case you need to make up for a trust hit here.
Enrica's Info
When you've completed all of the tasks assigned to you that you can complete outside the security zone (you should have 4/5 voice samples, 1/3 background infos, 0/4 personal infos, completed the mine assembly, and disposed of the pilots body, if you needed the trust), go up to the voice panel and use it to head inside. You should have around 15 minutes remaining on your timer, though you won't need all of it.
The path quickly splits in two, with a door on your right leading to the staff quarters, and a corridor on your left being patrolled by a camera. If you want to get all of the profile objectives done, hop onto the pipe running along the ceiling and put your legs around it before crawling to the other side.
You'll wind up outside Enrica's lab. Hack the keypad to go inside. Enrica is as sensitive to noise as ever, so creep as silently as possible by her, then hug the wall on your right to sneak by the desk. The computer here has nothing critical on it, but the file cabinet in the corner of the room will have Enrica's professional background. If you can get it without being spotted, then silently creep back out the door and ride the pipe again. The door across the way will lead further into the compound.
More Data Collection
Head through the door and up the stairs, switching off the lights before opening the door at the top. This is the low-security corridor, which is watched over by two guards. One is sleeping by the voice-activated door near where you enter, while one will patrol around and talk to Moss over the radio.
You don't have to worry about the sleeping guard, so long as you don't make much noise here. The patrolling one will be more problematic. He'll get up at least once when Moss talks to him, although you may have to sneak past the sleeping guard to trigger this. You can get past him in a number of ways, with a risky one being to wait until he's on the couch and attempting to sneak past it. An easier method, though, is to walk off to the right when you first enter the corridor and find the switch on the wall that supplies power to the lights above the sleeping guard. If you flip those off and walk forward, he'll notice them the next time he walks past you and move to shut them off. If you wait in the small little square of floor occupied by the sleeping guard, you should be able to let him bypass you, then quickly walk around where he came from. Stop by the pool room to switch off the lights above the couch, then quickly round the corner here to hit the light switch in the hallway outside the quarters.
When the lights are off in the corridor, check your map and spot where Dayton is sleeping; he's behind the door near the radio. Pop the lock and stealthily creep inside. In the sleeping area, you'll find Dayton rolling around in his bed. You can use your mic to record the last voice sample you'll need, then quietly - quietly! - sneak up next to him and check the file cabinet next to his bed for his personal records. You can also access Jamie's personal records in the cabinet next to the other bed. Just be very, very quiet when sneaking about; even though Dayton's asleep, he's still going to notice you if you make too much noise.
Lastly, walk up the hallway a bit and pop the lock to Enrica's quarters. Her personal files are in a cabinet here, as well.
Emile's Quarters
When you've gotten Enrica's files, open the door to her bathroom and drop out the window there. Across the way when you hit the ground, you'll find a small alley with a wooden crate in it. Jump onto the crate and climb the pipe there to reach Emile's balcony.
Now, important tip: do not go anywhere near the safe! If you do, a scripted event will begin that will make your life difficult. For the moment, though, there's no one in Emile's room, giving you easy access to the file drawers in his bedroom (where the personal files are located for him) and the chest of drawers near the clock in his office (where his professional files are). When you have both of them, you can hack the computer to access the keypad code for Enrica's workshop (1337).
When you attempt to hit the safe, though, you'll overhear voices from outside. Quickly head back out to the balcony and get out of sight. When Emile and Jamie come in, Emile will open the safe, show Jamie the blueprints, then return them to the safe and close it. Jamie will then leave, and Emile will sit down in his chair. You'll have to sneak in and crack the safe while Emile is sitting there, but that's no big deal, as Emile won't move while you attempt to crack it. When you've popped the safe and scanned the file, return to the balcony and leave.
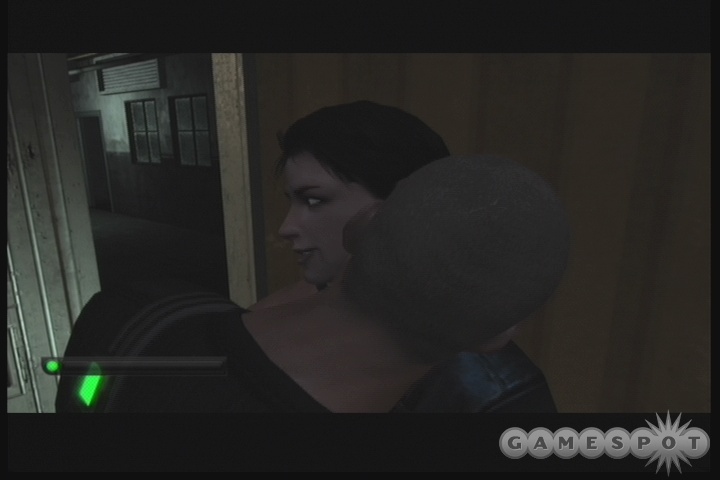
(If you didn't manage to get the personal files before opening the safe, then Emile will make things difficult, since he'll retire to his bedroom. It seems that he goes to sleep when he does, allowing you to sneak in and grab the files. This is only necessary if you triggered the safe checkpoint before grabbing this stuff, though.)
When you have the stuff from the safe, you can finish the mission by heading back out to the balcony and returning to Enrica's quarters. If you're standing up when you approach her door, you'll automatically trigger a scripted event that ends the mission. Otherwise, you'll have to exit through Emile's office door and make your way back down to the mine manufacturing machine to end the mission.
Cozumel - Cruise Ship
February 27, 2008
Time to start acting like a real, grown-up terrorist! Since you're a member of the JBA, and apparently the only one that can go on location like a big boy, it's up to you to give the bomb technology the JBA has developed a dry run. Or a wet run, as the case may be; Emile's bright idea is to plant the bomb on a cruise ship and blow it to smithereens, just to see if it'll work. Brilliant! That'll certainly keep things on the down-low.
NSA Primary Objective: Place Smoke Bomb
NSA Secondary Objective: Don't Kill Civilians
JBA Secondary Objective: Reach Pool Deck Without Alerts
Before you leave your cabin, grab the sticky shockers on the desk near the television. With those stored away, hop over the railing and start sliding out to your right. From there, climb the pole upwards and slide to your right again, until you reach a small balcony where the Mexican Coast Guard is stationed. Wait for the soldiers there to move away, then creep inside the room and hide behind the small table until the checkpoint hits.
Keep in mind that the Coast Guard here aren't bad guys; they're considered civilians, in fact. Killing them will cause a large reputation drop with the NSA. They're not your enemies, so do your best to avoid taking them out. Giving them a bump on the head? That's a-ok, as far as we're concerned.
Anyway, the casino area here is going to be the first test of your sneaking skills. Stay behind the table until Enrica hacks into the slot machines and causes a distraction. (Using your pistol's EMP device on a slot machine will recreate this effect.) When both of the nearby soldiers move to the slot machine, hug the wall to your left and move across to the shadowed area in the center of the room.
From here, try to drop down to the second half of the room, where more slot machines are located. Your goal is to get close to the small casino payout window room in the corner of this large area. It's well-lit, though, so you'll have to engage in some trickery if you want to get inside and throw a smoke grenade in the vent there. The best way to proceed is to avoid getting the attention of the guards as best you can, then watch the guard that paces by the door leading to the stairwell. He'll flash his light in your direction a few times, then turn his back and walk away. When he does, the other guard nearby should also be on the far side of the room, giving you time to get close to the door of the bank, use your pistol's EMP on the camera, then run across the room and drop a smoke grenade into the vent there.
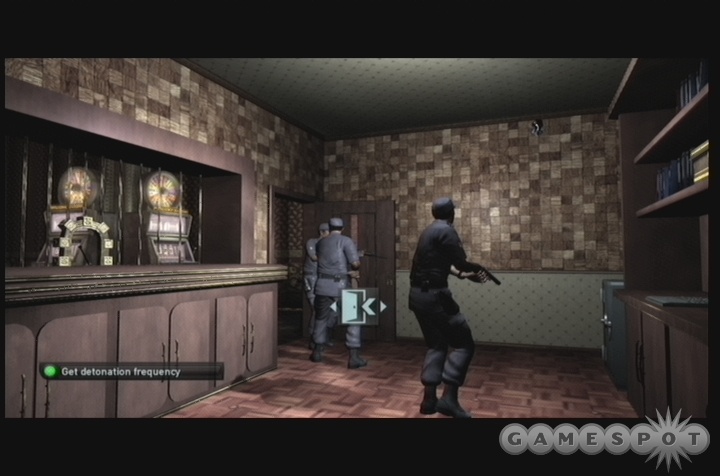
Here's the tricky part. While the camera's still out of action, move to the panel on the wall next to the vent and pop it open. Hacking into the computer hidden behind it will let you access the lights for the casino; shut them off, and everything gets taken offline. This freaks the guards in the area out! Quickly move out of the teller room (ignore the safe here; all it contains is a pair of sonic grenades, and the computer is likewise ignoreable) and back to the main floor of the casino. Since you're invisible while you're in the green light, start making some noise; shoot your EMP at slot machines to divert the guard's attention away from the teller room. You need to keep them away from it long enough for you to get to the stairwell door, pick the lock, and head inside.
Unfortunately, even with the lights shut off, you'll likely have to deal with yellow light meters when you get up close to the doors. (The door furthest to the left seems to be the best one here in terms of light exposure.) The guards won't be able to spot you and identify you until they're right on top of you, though, so use your ultrasonic emitter to shuffle them off to a far corner of the room before picking the lock and moving through the door. They don't appear to be capable of following you, no matter how noisy you were heading through, so just get through the door ASAP and shut it behind you.
Off To The Bar
Time to hit the stairs and get to the bar. Go up the first flight here until you spot the two lights on the wall. A technician with a handgun will walk over and attempt to work the breakers to light up the entire area. If you want, you can knock him out, but he's not too difficult to evade. You can try using your EMP to knock out the lights if you wish.
When you reach the entrance to the bar, you're going to have to deal with perhaps six to eight guards in the area. (We'd probably hit the bar, too, if we had to work in the Mexican Coast Guard.) Getting through here is going to be a pain, all right. If you're playing on normal or easy mode and actually have ammo for your guns, you can create some hella diversions by shooting out the aquariums; just be sure that you're far enough away from them to have plausible cover when you do so.
If you're on hard, though, that won't be an option (unless we missed an ammo pickup earlier in the level). You'll have to glide through the room based on your intangibility and skills at avoiding enemy lines of sight. The video on this page will be your best bet for getting through unscathed. Since so much of the light here is sunlight, you won't be able to either shut it off or avoid it.
Begin by opening the door to the bar and hiding behind one of the drink islands near the two guards who are conversing about the fish. Eventually they'll break off and leave the area. When they do so, wait for the guard who appeared in the middle of the three sunlit doorways to turn around and head back out to the balcony. When he does, you should be able to sneak past the doorway and hide amongst the tables near the piano stage. If someone catches a glimpse of you in the sunlight, just keep on moving and find a shadow as quickly as possible, while still keeping an eye on the noise level.
When you're snug as a bug in a rug amongst the tables, flip on your radar and zap the camera across the way with your EMP. When your radar and visual scanning makes you think that no one's watching the sunlit stretch of carpet that separates you from the hallway across the way, dash across and hide in the right side of the hallway. (The vent for a smoke grenade is near here, although it'll be in a yellow-light area.)
Wait on the right side of the hallway for the two guards near the elevator to get done with their talk. When they do, they'll head to the bar via the left side of the hallway, letting you easily move through to the elevator and hop aboard.
Cozumel - Cruise Ship, Part II
JBA Objective: Place Bombs Without Alerts
Time to get crazy. The pool deck is completely covered in light, making it a difficult place to walk around. Luckily, the concentration of guards is somewhat less dense on the far side of the pool. Now to just get there...
Before you can leave the elevator, though, you'll have to avoid the guard that comes to investigate why it's there at all. Hop up into the hatch at the top of the elevator and wait for the guard to come inside. When he does, either a Stun Wall Mine or just dropping onto his head will take him out, hopefully without alerting any other guards. Of course, you can let him investigate and leave if you're looking for a perfect stealth score.
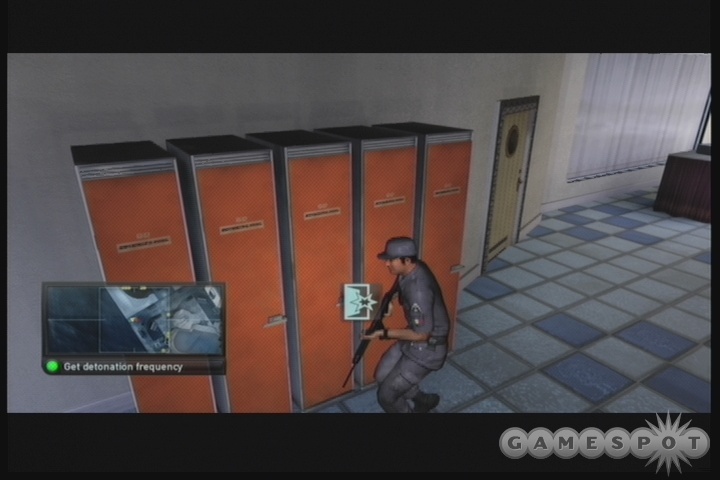
While you're in the pool, head to the opposite corner from where you entered it. Since there's no compass directions in the game, it'll be tough to know where to go, but if you orient yourself so that your back is to the elevator, then you'll want to get out of the pool on the upper-left side, near the stairs there. If you hop out of the pool and run up the stairs, you might get spotted, but even if you do, they won't be likely to find you since you're going to be hopping into the lockers here and hiding. Give it a few seconds for everyone to cool off, then wait for the soldier pacing around up here to head out the opposite way before leaving the locker and heading towards the steam room door.
Time To Relax!
Ah, steam rooms. There's only three soldiers in here, with two in the main steam room and one in the locker/massage area. Not too difficult to get past them. Simply switch off the lights by the left corridor as you enter, then take the right corridor down while the two soldiers investigate the lights. When they're both out of the steam room, move through the plastic flaps yourself and scope the place out. To move on from here, you'll have to climb one of the pipes on the outside of the arches here, then shimmy along to the north side of the room and transfer over to one of the smaller handholds there. When you're above the small ledge with the vent in it, drop down, pop the vent cover, and head through the vent to reach the crew quarters.
Crew Quarters
When you reach the end of the vent, you'll be in one of the three crew quarters, with one of the crewmembers heading inside to apparently sing badly to himself. You can get behind him and interrogate him, if you wish, or you can simply knock him out. Interrogating him will net you the code to the navigation room (2112), but don't worry too much about it, since you can also obtain it from two computers and a file cabinet in the quarters. They really didn’t want you to miss it! There's also some pistol ammo on the shelves near the soda machine.
If you don't mind knocking people out here, start opening up doors to the quarters, making noise to lure the officers back to you, then hiding in the lockers and whistling to lure them over before bashing the door open to knock them out. If you want to head through without disabling anyone, use your ultrasonic emitter to shephard them around the bridge while you avoid their line of sight by crouching behind the machines and make your way to the door. One more officer will likely be on the walkway outside, using his binoculars to look out at...the unestimable gulf of the ocean. Must be exciting viewing. Avoid him or disable him, then jump onto the zipwire to finally get to the bomb planting location.
JBA Assignment: Place The JBA's Bomb
NSA Assignment: Get Detonation Frequency
After you hit the bottom of the zipwire, you'll hit a checkpoint and the last two guards in your way. One's an officer, one's Coast Guard. If you want to disable them, doing so should be fairly easy: you can chuck a gas grenade at the door of the bomb location when the officer opens it; you can separate them and use sticky shockers to off them; you can attempt to get them both with gas from a sticky camera, and so on.
If you want to avoid the two guards and plant the bomb without knocking them out, you'll have to lure them both out of the small boiler room where the bomb is going to be planted. Wait until their conversation is done, then either use your sonic emitter to move them off to a location where they can't see the door of the boiler room, or head on top of the boiler room via the walkways and move the crane around to get their attention. Some combination of these may be required.
Anyway, when you get inside the boiler room, plant the bomb, then immediately hack it to get the detonation frequency. With that done, check your 3D map to find your extraction point, pop open the control box next to the ramp, then hack the computer to lower it and dive on out. Apparently you're swimming back home.
New York - JBA Headquarters, Part III
February 28, 2008
Time to get ready for the fireworks. Emile's on the verge of detonating the bomb you planted on the cruise ship. It'll be up to you whether or not to allow the bomb to go off.
JBA Primary Objective: Decrypt Mail Message
Your main task for this mission is to perform some busywork for Emile. He needs to know whether or not Massoud was behind the poisoning of his pilot in Shanghai; if someone's out to kill him, he'd prefer to know it before they all meet in Kinshasa. He leaves the task of decrypting the intercepted email message to you.
It can be a bit confusing to figure out what the hell's going on here at first. You've got a cube of some sort, and you can tap A to cause the quadrants to light up with buttons, but it's not really clear what the objective is. Well, it's kind of like a 3D version of Sodoku. You have eight different numbers that you can input here, and the goal is to make sure that the same number isn't repeated on the same row or column of the cube (assuming it was stretched out into 2D). Yeah, it's confusing, but if you want a quick solution, try plugging this in. Use whatever blank face you start out with for the top most block, then go from there. The important thing to get right is the central column; the two wings here can be filled in just by tapping A until you find a number that works.
| x | x | 000 | 110 | x | x |
| x | x | 001 | 111 | x | x |
| 100 | 110 | 010 | 000 | 011 | 001 |
| 111 | 101 | 011 | 001 | 000 | 010 |
| x | x | 100 | 010 | x | x |
| x | x | 101 | 011 | x | x |
| x | x | 110 | 100 | x | x |
| x | x | 111 | 101 | x | x |
NSA Primary Objective: Scan Fingerprint To Access Lock
NSA Profile Objective: Scan JBA Member Fingerprints
One of the mini-goals in this version of the JBA Headquarters is for you to find the fingerprints of all of the JBA core membership. You're going to have a new gadget here; the fingerprint scanner. If you equip and use it, you'll shoot out some UV light, letting you get all CSI up in this piece.
Fingerprints are scattered all around the compound, so there are multiple places to get the fingerprints of each member of the troupe, with most of them scattered around their personal spaces. You can begin with Emile, who left handprints all around the decryption computer at the beginning of the level.

Apart from him, here are some other locations for fingerprints:
Enrica: Microscope in the infirmary office, cabinet drawers in her quarters, keypad outside her lab.
Dayton: The keypad leading into the server room, Jamie and Dayton's quarters.
Jamie: The refrigerator in the kitchen, Jamie and Dayton's quarters.
Moss: The file cabinet in his room, probably areas in his office.
Any of these fingerprints will get you into the high security area outside the surveillance room. If you don't care about the profile objectives, though, just get Emile's fingerprints and leave it at that.
NSA Secondary Objective: Obtain Enrica's Disarm Code
If you intend to let the bomb on the ship go off, then you won't need to finish off this objective. If, however, you do intend to stop the explosion and pass the blame off on Enrica, then you'll need to grab her disarm code. It's on her computer in her lab, near the low-security corridor. You probably visited the lab the last time you were here to grab her personnel files.
Anyway, head back to the lab and sneak behind Enrica again. As you approach her computer, though, she'll be contacted by Jamie and will likely walk over near you. If you have force hacking, you can use that to quickly bust open the encryption on her folder and get the disarm code, then hide in the small corridor between the desk and the wall while she and Jamie talk. You can creep out while she's near the windows, or wait for her to return to her desk after the conversation and sneak out then.
Using The Fingerprints
A few of your goals will take you into the high-security part of the compound, which is sealed with fingerprint scanners. You should have at least one fingerprint reading by now, so feel free to sneak out back to the low-security corridor and head towards the entrance to the surveillance wing of the facility, the entrance to which is near Enrica's quarters.
Head into the low-security corridor from the entrance near Enrica's quarters. You'll note that the guards have changed positions. One will be looking right at the door that you enter from, so be sure to switch off the lights before heading through. The other will be set up to look at the door of Emile's office. If you can avoid the first guard when he gets up to move about, he'll eventually move over to the couch area and engage his cohort in a conversation about Emile's patriotism. While they're doing that, you can creep down the hallway leading to Emile's quarters, but duck into the pool room here instead of busting in on Emile. When the conversation's over, you can sneak out towards the couches, douse the lights, and quickly move down the hall towards the high-security area. If you didn't get the fingerprints from Dayton, Jamie, or Enrica, their quarters are all in this area.
NSA Objective: Search Quarters For Personal Info
You should've been able to get four out of the five instances of personal information on the JBA in the last headquarters mission. (If you didn't, they're all still in the same place that they were last time, so check back earlier in the walkthrough for details on them.) The one you're missing would be the files on Moss, which are kept hidden away in his quarters, which will be the first room you pass by when you enter the high security area. Wait for he and Jamie to get done talking before heading around and into the room.
After picking the lock, quickly scan the top of the cabinet near the door to find Moss's fingerprints. Don't actually search the cabinet, though; instead, move past it and hide inside the nearby closet. Moss, despite having just passed by his quarters, will spawn outside the door and start heading back your way, so get into the closet and wait for him to get done with his punching bag. He'll hit it for a minute or so and then leave. When he does, leave the closet, rifle the drawers for the personal files, then leave the room.
Infiltrate The Surveillance Room
At this point, you should hopefully have around half the originally allotted time left to you. You'll need a fair amount of it to complete the remaining objectives.
Three soldiers stand between you and the surveillance room. Two of them are in the planning room nearby. They're hunched over a chalkboard and talking about seeing some action. Get past them by crouching, sneaking underneath the camera in the corridor (and we mean directly underneath), and then quickly moving up the corridor nearby before the camera can lock onto you. It'll probably make the whirr-whirr sound that indicates that it's seen you, but if you move fast enough you'll be able to avoid an alarm. Don't worry if someone hears you moving (the other soldier is in the armory nearby and likely will); just keep moving until you're in a green zone near the far wall, then start silently creeping along towards the door to the surveillance room.
NSA Primary Objective: Obtain Visual Proof Of Bomb
The NSA needs to know, for sure, that the JBA has a bomb on site. In order to supply this proof, you'll have to enter the surveillance room, find a computer that has access to the camera in the bomb lab, take a peek, and then exit.
When you hack the keypad to the surveillance room door, go in a bit and then retreat until Moss gets done with his speech. The computer you're looking for (there are three or four in total) is the one to your left, on the observation balcony. It'll be obscured from your view when you first enter the room; it's located directly next to one of the security guards. Getting to it will require sneaking as quietly as possible along the server racks to your left, approaching the computer, hacking it (it'll hack within a couple of seconds automatically), then looking at the feed and immediately exiting out to the desktop. All you need is a split-second's worth of footage to prove that the bomb exists.
Now, if you wish, you can creep back to the door, but if you're a completionist, you'll probably want to grab Moss's professional info as well, which is in his office. Problem is, so is he.
NSA Profile Objective: Get Professional Background Info
From the computer where you saw the bomb, creep back towards the guard that's sitting at the desk. If you creep past his back you can squeeze past a server rack to the rear of the room, where Moss's office door is located. If you pop open the door and head inside, you'll see Moss doing one of three things: sitting at a desk, looking at boxes on a shelf, or checking out a chalkboard at the far end of the room. If you want to be risky, you can turn off the lights and attempt to sneak behind the boxes while he moves to turn them back on, but it's better to just wait for him to move to the chalkboard and then sneak behind the boxes.
When you're behind the boxes, you should be able to see the cabinet in front of you. When Moss goes to sit down at the desk, quickly move up and rifle through it, being sure that you have the right icon before you do so. Occasionally it'll confuse you with someone who cares about the contents of Moss's computer, so be sure you're actually selecting to interact with the cabinet instead of the computer.
With the files in your possession, you can start back down behind the boxes, being sure to do so only when Moss isn't looking at them. When he's got his back to you at the chalkboard, head out the door and back to the server room.
Exfiltration
Now, if you're in good standing with the JBA, then you might just want to get spotted by one of the guards and run out to a safe zone. You'll lose some trust but save yourself a bunch of time and aggravation. If not, then you'll have to sneak past the two guards in the surveillance room. Ideally this will occur when they're both in the same position they were in when you first snuck past them to watch the camera, but if they aren't, you can either wait for them to move back into that configuration, or take your chances with whatever positions they're in when you have to go back through. Don't forget that you have an ultrasonic emitter to move them around. It's a small space, though, so be sure that you're out of line of sight when you do so.
When you're outside the door, you have to maneuver back past the three other soldiers in the area before you can return to the low-security corridor. The two soldiers from the chalkboard room will have moved into a position where you can't bypass them, so you'll have to head into the armory here to avoid them via that route. From there, though, it's an easy route back to the low-security route, and hopefully from there to a safe zone.
JBA Choice Objective: Allow Cruise Ship Explosion
NSA Choice Objective: Stop Cruise Ship Explosion
NSA Choice Objective: Frame Enrica
Choices, choices. That's what it comes down to at the end of the mission. Assuming you managed to get the frequency of the bomb on the ship and Enrica's cancel code from her offices, you'll have three choices to make after Emile comes to check on your decryptions.
If you let the bomb go off, then obviously you'll be a big winner with the JBA, while the NSA's trust in you will take a large hit.
If you choose to manually stop the cruise ship bomb with your frequency override, then you'll lose a lot of trust with the JBA, but gain some with the NSA. Emile will execute Enrica.
If you get Enrica's cancellation code and use that to stop the bomb, then you've effectively framed her. Your JBA and NSA trusts will both go up, but again, Emile will kill your (possible) lover.
There's no particularly right or wrong answer; you can obviously complete the game with any of these options.
Congo - Kinshasa
March 1, 2008
Get ready for an epic three-part mission. It'll be taxing and difficult, especially if you haven't played it through at least once. Luckily...you have this guide to work from.
One note of import is that, since the mission is so long, you can cripple yourself in the later portions if you use up your special ammo too soon. Your handlers did give you five sticky shockers and five airfoil rounds, which is appreciated, but you'll want to save them until you hit critical spots in the level, where enemies are going to be very difficult to take down quietly. Of course, if you're playing on easy or normal difficulties and don't mind popping off headshots or setting off the alarms, then this shouldn't affect you overmuch.
NSA Secondary Objective: Avoid All Alerts
You start off in the basement parking garage of the hotel where Massoud, Emile, and their bankroller will meet. Hisham messages you almost immediately after Emile leaves, asking you to bug the room they're meeting in. This is going to be tricky...
Anyway, head around or over the chain-link fence in the parking garage, and hug the left wall, sliding behind the stacked boxes there. You'll come out near some trash cans with bottles on them; use the bottles, or your ultrasonic emitter, to distract the three guards here, then sneak past them to access the elevator.
Upwards And Onwards
After hopping into the elevator, step out on the upper floor and creep along until you spot two soldiers talking. They'll quickly split apart, with one of them coming towards your area. If you don't mind knocking him out, you can hide in a locker, whistle him over, then bash the door out to disable him. Otherwise, wait until right after the two soldiers split up, then watch the soldier fiddle with a lever on the wall. When he does that, creep into the room and head to the left to avoid his line of sight when he paces.
The next large room (behind the curtains) will be an abattoir for you unless you can avoid or disable the guards. If you don't mind a bit of lethality, you can try headshotting them, but the path of least resistance will be to hide in the blood-stained locker near the curtains and whistle over as many of the soldiers as you can before bashing them in the head. If you're really lucky, you can simply pass through the curtains, take an immediate right, hide behind the overturned tables, and duck out through the broken window there. That's the path you should take in any case, but you'll only be able to make it through without any alarms if you're either really lucky (as mentioned) or disable some of the guards first.
In any case, through the curtains, hang a right, out the window, then drop down to the ledge and shimmy over to the pipe across the way. Climb up, but before you get to the top, you'd be advised to save your game.
When you reach the top and shimmy off to the right, a guard will come out and stand right in front of you. You can reach up and grab him and throw him to his death, if you like, but this has a good chance of tripping an alarm, since there's another soldier behind the door to the left who'll probably hear it. Otherwise, the smart move here is to let the soldier walk off to the right, look over the balcony again, and then keep walking. When that occurs, jump up and over the railing, sneak across to the window in front of you, and jump over the windowsill to head inside. From there, flip on your radar, enter the hallway through the door, and enter the door leading to the room with two soldiers inside. Be sure to close the door after you as you walk in.
Straight To The Roof, Alice!
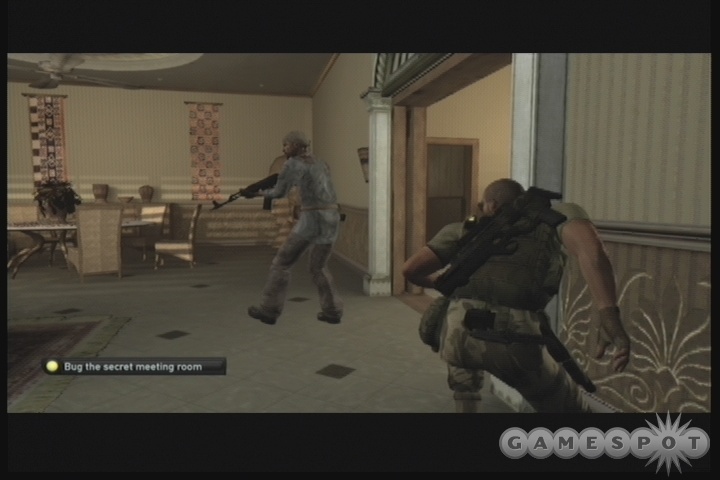
The two soldiers here aren't going to be difficult to take out. Let them talk while you hide in a closet near the door. When they split up, pop out of the closet and disable or kill the soldier near the table by you.
The second soldier will head into the bedroom. He'll be more difficult to sneak up on due to the route he takes and the way that the room is lit. If you move after him immediately after knocking out the first soldier, you should be able to reach him before he turns and disable him as well. You can also burn a sticky shocker here, if you like, or (our favorite) pick up a liquor bottle from the coffee table in the middle of the room and chuck it at his head.
When these guys are done for, head out to the balcony and jump onto the walkway nearby to reach the ledge. Move over to the sign and start climbing up it, ignoring any sniper fire that sounds like it might be close to hitting you.
Rooftop Ballet
Prepare for a heck of a hard time on the roof. Begin by shimmying over to the roof proper, then climbing up. Two frag grenades are to be found in the small area to your left; get them if you wish. When you're ready to rock, climb up the ladder to your right, pausing just before you hit the top.
Your path here will depend on the movement of one of the three soldiers; the one you saw running up the ladder when you first hit the roof. If you moved relatively quickly, then you can simply climb the ladder, wait for the soldier across the way to turn his back (which happens when he's firing in the position close to you), then hop up, take a left, and quickly maneuver around the shed on the roof to the relatively quiet corner there. If the soldier instead retreats back towards the ladder (which will happen if you dilly-dally too long down below), you have to move forward, hide behind one of the large air conditioning units until he passes you, then quickly duck to your left in between the units before the other nearby soldier turns around and spots you. Either way, get to the quiet corner and hide near the building.
The third soldier will be nearby here. He'll fire his AK off the roof for a minute, then duck down and reload. It's possibly to sneak past him while he's firing if you're exceptionally good at sneaking, but it's usually better to just disable him with a punch while he's shooting or just unload a sticky shocker on him. Disabling or killing him will eventually draw the other soldier over, but by that time you should be safely inside the shed.
When you do creep up the shed steps, head inside and hack the computer near the access hatch. Disable both the hatch door and the detonation controls to allow for safe passage, then jump up to the pipe over the hatch and winch yourself down.
NSA Assignment: Bug The Secret Meeting Room
When you land, slide down the ladder and make your way underneath the shielded room. Typically these kinds of rooms are designed to prevent any signals from escaping, but we're going to bug it anyway.
When you reach the pipe on the far side of the room, climb up it and make your way on top of the meeting location. Hack the hatch lock in one corner, then open it and drop down so that you hold on to the side. Shimmy around until you're above the pipe, then drop yourself onto the pipe and hold onto it. Start moving around to the left or right; it doesn't matter which direction you choose.
The trick in this room is to avoid being trapped by the tripwires, but they're easy to avoid. They'll flip on and off in a really simple pattern to pick up on. Watch them for a cycle to get an idea of how they rotate, then slide through them as best you can. You'll have to shimmy along the pipe, drop down to a platform, slide across a ledge, then climb up another pipe and shimmy around to the area above the door.
When you get there, move along the pipe until you're up inside the chandeliers; there's a winching spot here. Attach yourself, slide down and plant the microphone, then quickly retract yourself up into the ceiling and wait for the conversation to end.
JBA Assignment: Return To Parking Lot
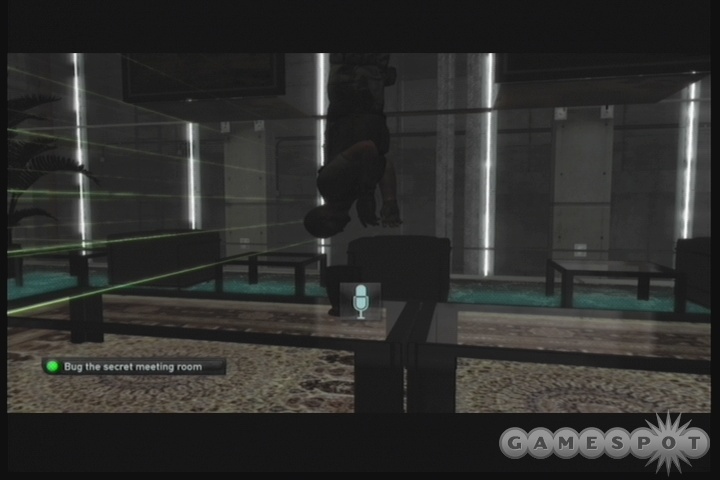
When the meeting's over, you'll have to race Emile and his friends back down to the parking lot. Don't try to go back the way you came, though, as it'll be impossible to retrace your steps. Instead, wait for everyone here to leave the room, then quickly winch yourself back down to the table and detach yourself. When the coast is clear, head out through the door and take a left. See the junky tables stacked up near the huge hole in the wall? There's a rappelling point there, so attach yourself and jump down the wall until you reach the courtyard.
In the courtyard, look behind the fallen potted plant to find a small vent. Crawl through it to reach another, larger ventilation shaft, which has a hole in it. Drop down through the hole to reach the bathroom in the basement and walk out from there to meet with Emile. He may have beaten you to the garage, but he won't be too upset if he sees you walking out of the can. Just don't be too late. When you're done talking to him, walk up the ramp towards the garage exit to begin the next section of the level.
Congo - Kinshasa - Part II
JBA Assignment: Find CIA Agent Hisham Hamza
The bad thing here is that Moss and company know that your ally Hisham is a mole for the CIA. He's making a run for the imperial palace, where he hopes to contact the U.S. Embassy and get the hell out of this mess. The good thing is that you have no more "avoid alerts" objectives here. If you don't particularly care about your stealth score (and by this point in the game it's hard to imagine you will), you can be seen by the guards as often as you like without having to worry about failing an objective. Unfortunately, that's all too likely a proposition here, since the battles between the rebels and the government have caused plenty of soldiers to flood the streets, and the mid-day lighting will afford you very few places to hide.
At the outset here, watch the two rebels destroy the government troop carrier, then wait for one of them to retreat back to the right before moving forward. The other rebel will be obscured from your vision, but not from your radar. He'll eventually start moving to the right himself, but he'll move slowly, allowing you to creep up behind him and knock him out.
NSA Secondary Objective: Prevent The Execution
Around the corner from there, you'll spot an RPG rebel up in a window, and another shirtless rebel in the street below, telling him to fire on a nearby building. Use the noise as cover for you to duck into the alleyway on your right. If you check your 3D map, you should see a concentration of five or six bodies in the area, but don't worry too much; three of these are actually hostages.
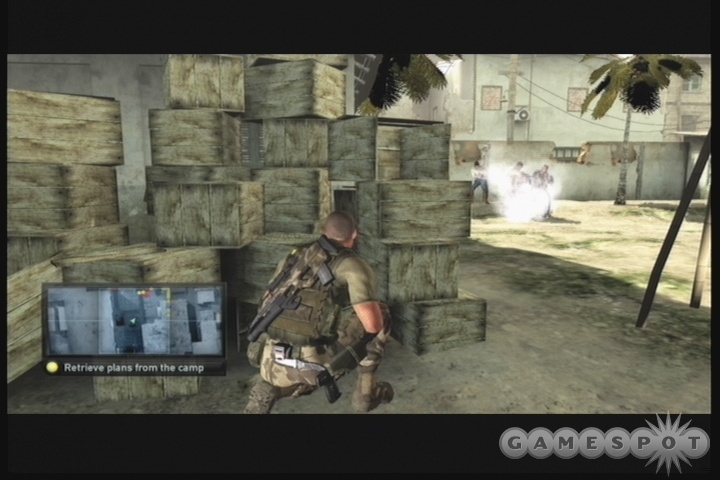
If you don't particularly care about the hostages or losing a bit of trust with the NSA, you can let the rebels off their captives, but if you're like us and would feel bad about letting them die, you can rescue them. To do so, creep around to the rear of the stack of boxes nearby. You only have a few seconds to distract, disable, or kill the rebels here. We liked to plop down a gas grenade at their feet, launching it from our SC-20k. The smoke radius is enough to disable both of the soldiers, as well as all of the civilians in most cases. If that doesn't work, then you might have to resort to sticky shockers or airfoils to stun both of them.
Stay in the relative shadows of the wall behind the hostages as you move down the alleyway; if the enemies in the street spot you, they'll give chase. Even if they do see you, you can probably run for cover and disable them as they pursue you.
Dancing In The Streets
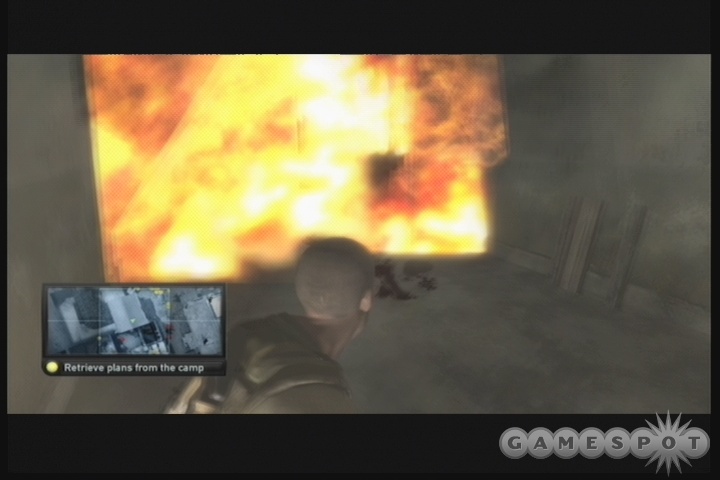
Check your 3D map. You have two paths to take here; one that leads through the street to the right of the end of the alley, and another one that'll have you jumping up to a window to move through some enclosed rooms. If you can reach the window, it's a far better option, because the street path will be overflowing with violence.
When you hop up to the window, creep around the corner until you reach the rebel with the blown-off legs. He's in a lot of pain, and he's decided to end it with a bang, as you'll be able to tell when the grenade rolls out of his hands. Immediately back up a bit until you have a wall between yourself and it, then wait for it to go off before creeping forward.
NSA Secondary Objective: Save Woman On The Bus
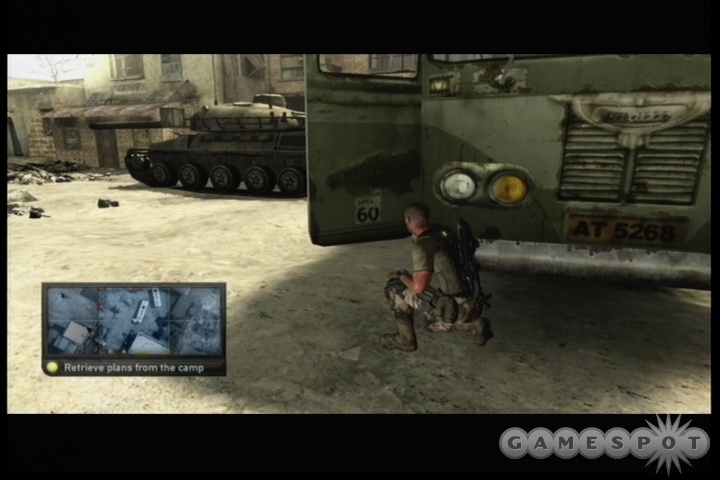
You should be overlooking a pair of buses in the street at this point, which are situated behind a government tank, which is itself supported by a group of soldiers. Another squad is down the alley across the way; this appears to be the last redoubt of these soldiers, although that tank will likely hold off the rebels for a while. You're going to have to get past them, though, which isn't going to be easy unless you're willing to expose yourself to a bit of fire.
Your ultimate goal here is to reach an exposed sewer pipe that sits kitty-corner from where you are, on the opposite side of the tank. After avoiding the grenade, flip on your radar and take a look at the signals for the soldiers around the tank. After a couple of seconds, they'll all be dead, leaving only the tanks and the rebels that it's firing on, along with the soldiers near the sewer.
Drop down, but don't bother with the hatch on the bus; just hit the top of the bus, then drop down behind it so that it's between you and the rebels. Now, the objective here is somewhat time-sensitive, so if you want to pick up some NSA trust and save the woman on the bus, you'll need to get moving.
Anyway, if you want our advice, it's to just book it and run like hell across the street. Get behind the first bus, move between the buses to get behind the tank, spot the opening of the sewer, and stand up and run like hell! It's possible - even likely - that the soldiers there are going to spot you, but if you run like hell, you should be able to duck into the ditch and move into the first covered area before they shoot you. If your light is still flashing red, pop a smoke grenade in the next uncovered section of the ditch to move on. After moving on a bit, you'll reach the end of the sewer; hop up onto the ground to your right to move on.
The soldiers here will likely spot you as you run past them towards the bus; you can pop smoke if you're worried about it. If you stand and run, though, they shouldn't be able to hurt you overmuch. Just get into the bus, free the woman from under the chair, and follow her out of the bus to the nearby street.
Reach The Camp
Hide behind the overturned car here until the two soldiers down the way move away from you. Your map will show you that you have two paths into the military camp, but one of them will be blocked by a tank, making it unlikely in the extreme that you'd be able to reach it. That's all right, though; the closer path, off to the left, will do nicely.
As you enter it, you'll find that one of the rebels that's running in front of you will get the hell blown clear out of him by a mine. That's right, the same mines you assembled back in the JBA headquarters have come back to haunt you. Without wave goggles they'll be hard to spot, but since no one's firing on you, you can take it slow and steady and watch for the round disks on the ground. Avoid them.
NSA Primary Objective: Retrieve Plans From The Camp
For some reason, the NSA wants a copy of the plans that the Presidential Forces are working with. After you hit the checkpoint here, you can get them if you act quickly enough.
One of the commanders here is going to be sitting at the computer that's marked on your map, looking at the plans. To get the plans, you need to access the computer! The easiest way to do so is to simply scamper up from the checkpoint area to the gap between the tents and the wall here while the helicopter is landing. You can cut the fabric on the tent, then either hit the commander with a sticky shocker, or shoot him in the head, then quickly hack the computer for the plans and retreat before any of the soldiers getting off the chopper notice that anything's amiss.
If you do have to wait, getting the plans will be much tougher. You can try doing it when the commander leaves his tent to brief the soldiers outside, but chances are good that one of them will spot you. You may want to try using your ultrasonic emitter off on the far wall to turn their backs before going for the hack. Force hacking it may be helpful, as well.
When you have the plans, back out of the tent through the cut you made, then head to the other tent and make an identical cut in that. If you've gone as quickly as you can, the soldiers should still be offloading from the helicopter and wondering where the commander is. Quickly duck out the front door of the tent and head left, sticking to the shadows. Move up to the electrical boxes here and hide on the side of the tower. Sneak across to the box nearest to the fence's gate and wait until the coast is clear before running over and opening it. At this point, there's not much anyone can do to stop you from climbing to the top. If you feel the need, you can wait until everyone's back is turned before making the climb, but even if they spot you, they likely won't tag you as an intruder until you're too far up to be shot down.
JBA Choice Objective: Kill Hisham
NSA Choice Objective: Do Not Kill Hisham
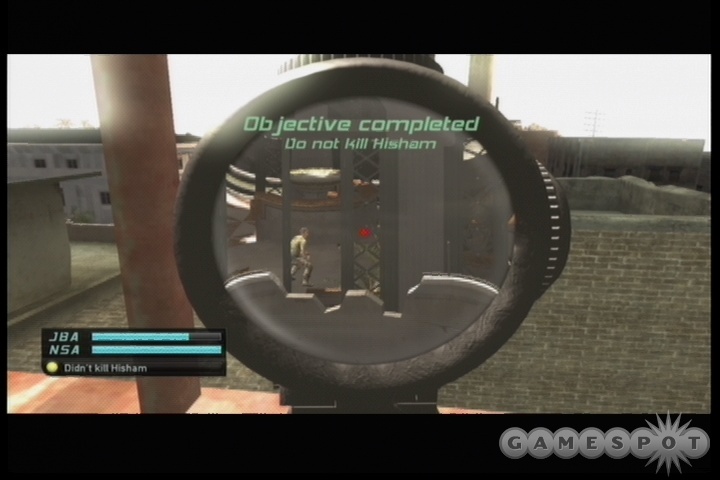
Pretty simple choice, really. If you want to save Hisham, kill the soldier with the red beret. If you want to kill Hisham, shoot him! Keep in mind that if you chose to destroy the cruise boat earlier, killing Hisham here will make the bonus mission at the end of the game unobtainable for you. You can only play the bonus mission if no more than one of three critical targets is killed. (The third of the three will be revealed in the next mission.) Basically, if you blew up the boat, and want to play the bonus mission, kill the other target in the room with Hisham. It's best to just ignore the instructions to listen and instead just blast the soldier as he reaches for the phone.
When you've shot your target, you won't be able to exit the viewfinder on the sniper rifle. In a few moments, the tower will be hit with an RPG, shunting you into the next (and smallest) phase of the mission.
Congo - Kinshasa, Part III
JBA Secondary Objective: Reach Fence To Extract
If you killed Hisham, then all you have to do here is reach Emile to extract back to New York. This is the easier of the objectives, so hopefully you'll be able to figure out a path. (Much of your travels will be described below.) Don't forget to take a look at your 3D map if you're curious about which way to go. We're going to assume that you're taking the harder path here...
NSA Assignment: Rescue Hisham
Hisham's been taken captive by the rebels that have taken control of the palace. It's up to you to get in there and free him. Sam Fisher's doesn't do too many broad-daylight rescues, but hey - there's always time for something new.
Hop up to the zipwire here and ride down to the next building. A wall will explode shortly, allowing you to move to another war-ruined street where the rebels and government soldiers will be doing battle. This is going to be a heck of a place for you to run through, so gird yourself for war. Or at least for avoiding soldiers.
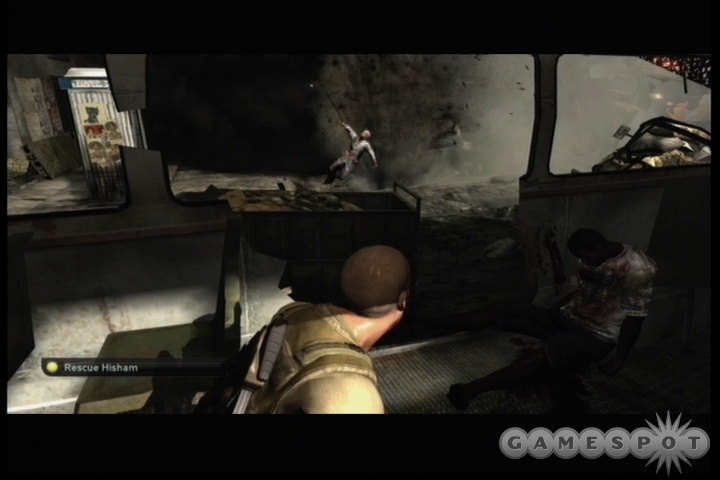
Begin by dropping down near the bus and heading into the door there. Avoid the hole in the back of the bus, and wait for a few seconds while crouching down inside. Another soldier will run towards the hole in the bus and get shot down for his troubles. When he's dead, head through the hole in the side of the bus and head right; you'll wind up behind some sandbags. There's another wrecked bus nearby, so head inside, take a left, and jump above the makeshift ramp inside to reach another pit. At the end of this pit, you'll find three smoke grenades.
Now, if you look out to your right, you'll see the tail end of a helicopter. Your goal is to get inside of it somehow. Since you have smoke grenades, you can pop a couple in the street and run for the chopper...or you can just ignore the smoke and run for it anyway. Someone will spot you, but they likely won't be able to shoot you before you reach your destination. The chopper will have some pistol ammo for you (which will be quite handy on hard difficulty).
Into The Palace
Time to take on the rebels. There are perhaps six or seven of them wandering the halls of the palace, which, all things considered, is fairly small. Now, we've been writing this walkthrough with the intent of providing a moderately non-lethal method of proceeding, but by this point (playing through the entire game on hard mode), we're going to go ahead and say that you should just start popping some heads. You can, of course, resort to sticky shocking or anything else you like, but man - if you manage to get through this part of the level without disabling or killing any guards, then you're a better man than us.
Unfortunately, causing an alert here will cause the rebels to begin executing their prisoners, a group which consists of a number of people, including Hisham. The other hostages are frankly expendable, and maybe everyone would be happier if they're dead, you ever think about that? Hisham, however, is a required save if he's still alive at this point, but luckily for you, he'll be the last hostage they kill. Just do your best to avoid setting off any alarms until you're ready to kill off pretty much everyone, and you should be fine.
They Want You To Clean Up The Place
Begin by moving up the helicopter, grabbing the pistol ammo if you need it (the sonic grenades are basically worthless, so don't bother with them), then exiting via the left side of the cockpit and immediately hiding behind the crates there. After a few moments, the government soldier will run towards the chopper, get shot down, and then the rebel soldier will come along and blast him with some automatic weapons fire. This makes for a good time to get a headshot or tag him with a gas grenade or sticky shocker or something similar. Whichever you prefer, killing him here will at least prevent him from being within the line of sight of any of the other soldiers.
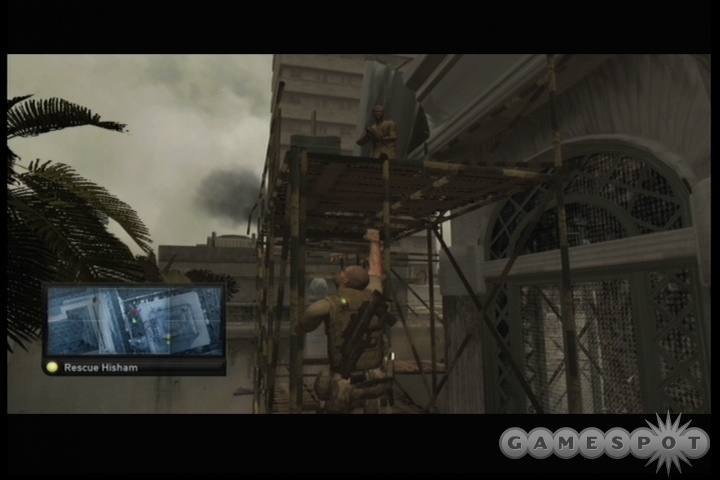
If you can then dash across the yard here towards the scaffolding adjacent to the building, you can climb the ladder there and disable another guard atop it. From the scaffold, stand up next to the building and jump straight up to ascend to the roof. (This jump might not always "take", but if you try it a few times in different positions, you should be able to make it.)
On the roof, you can either head towards the central dome and start picking soldiers off from there, or drop down into the hole near the side of the roof and use the interior scaffolding to do the same thing. Even if you want to get lethal, sticky shockers are probably going to be a better bet for taking out soldiers, since they're much easier to aim with and less likely to cause alerts in other soldiers. If you haven't used any yet in the mission, you should have five in reserve.
Anyway, we're not going to get specific here. Shoot people. Shoot them in the head. Shoot them until they're dead. Shoot them and their blood is red. Or, just stun them. Regardless, Hisham should be a-ok if you manage to disable or kill all of the guards. Even if they do cause an alarm, they likely won't shoot him.
NSA Objective: Help Hisham Escape
When you cut Hisham's wriststraps, check your 3D map for the location of your extraction point and take him there. Sometimes he won't follow you; if this occurs, check the area for more guards and disable them. When you reach the fence, throw Hisham over, then watch the fireworks and get ready for the game's last couple of missions. You're past the worst the game has to offer by this point.
New York - JBA Headquarters, Part IV
March 6, 2008
NSA Profile Objective: Scan Retinas of JBA Members
Here we go. At the beginning of this mission, Emile will give you the opportunity to shoot Lambert, who apparently had the bad sense to sneak into the compound simply because he wanted to tell you to defuse the bombs. Yeah, like we couldn't have figured that out on our own? Anyway, this is the third critical choice in the game, along with destroying the cruise ship and killing Hisham. You can do destroy or kill a maximum of one of these three options; if you destroy or kill any two of them, you won't be able to play the bonus mission after this one. If you're trying to be a total badass, then chances are you already blew up the ship and killed Hisham, so you may as well kill Lambert too.
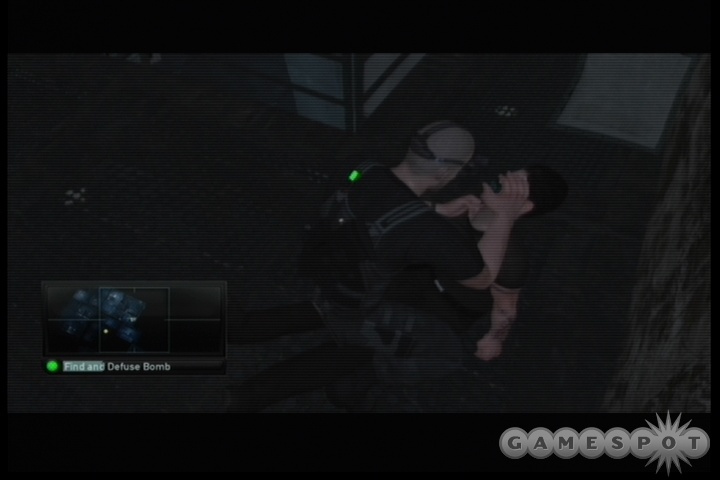
If you don't want to shoot Lambert, you have to kill Jamie instead. Shoot him in the chest and quickly, quickly move over to his body and use the retinal scanner to get his eyeball data. You only have a limited amount of time to do this before two guards come to the area and perforate you. If you find yourself constantly getting shot by the guards, then leave the room without going for the retinal scan; you can always come back later. Choosing to shoot Jamie will immediately drop your JBA trust to zero, however, which will make you a kill-on-sight target to the other JBA terrorists. Either way, your objective will remain the same.
When you're done with the optical scan (don't worry about Lambert), stand up and run out of the room, taking two right turns to get to the furnace room. Enrica's body will be here if Emile shot her earlier, so grab her optical scan as well if that's the case, then use the ladder here to return to the garage. The garage exit will put you in the hallway outside the firing range, so head in there to outfit yourself with an SC-20k and a set of night vision goggles. If you want to start taking out some terrorists, you finally have your chance.
Old Data

You can get three of the four possible retinal scans in this section of the level. The second (or third) will be Dayton, who's in the server room. Head in there, shut off the lights, wait for him to get close, then either disable or kill him before scanning his eyes.
Now, if you're missing biometric data or personnel files, this would be an ideal time to go back and rifle through cabinets or scan for fingerprints. All that stuff is around in the same places that it always was, so feel free to check the earlier sections of this walkthrough for lists of locations.
Otherwise, head back to the low security corridor and unlock the path to the surveillance office, near Moss's quarters. If you let Enrica live by blowing up the ship, she'll be here, and offer to open up the elevator to the bomb factory. If you didn't grab your weapon or goggles, she'll also supply you with those. Nice lady. Unfortunately, if you want her retinal scan, you'll have to get behind her and either disable or kill her to get her on the ground and scan her eyes.
When you’re ready to move on, take the elevator down to the lower level. You can’t come back up here, so if you want to make sure that you complete all of the profiles, be sure you have Enrica’s and Dayton’s retinal scans, as well as Jamie’s, if you shot him, as well as any other information that you may have missed. If you didn’t shoot Jamie, you’ll get his scans in the next section. The only information that should be unavailable to you at this point are retinal scans for Moss and Emile (and Jamie if you shot Lambert), and Jamie’s professional data.
New York - JBA Headquarters , Final Showdown
NSA Primary Objective: Defuse The Bomb
When you're down in the laboratory, it's time to start evading, disabling, or killing everything that moves. Begin by switching the light off in the hallway in front of you, jumping up to the pipe on the ceiling, and luring people into your little web of sin by whistling them under you. When they're there, you can grab them with the command and knock them out. You should be able to perform this at least five times on the scientists and guards, or you can of course liquidate them or disable them in other ways. Or attempt to avoid them. Avoiding them is best done by heading into the laboratory, jumping over the railing to your right, then heading into the locked door there and falling into the hole inside before maneuvering through the flooded basement. Note that the door with a keypad will contain Jamie's professional background, which should be the third-to-last piece of information you need to complete all five of the JBA inner circle's data, with Emile and Moss's retinal scans being the last.
When you hit the checkpoint at the end of the plastic tubing, wait for the cutscene to play out, then move towards the locker room, without actually going inside. Another red-suited guard will be coming your way. If you want to stealth kill him, whistle him into the darkened room and disable or distract him until you can sneak past. Two more guards will be standing watch over the ladder leading up to the bomb area proper. It shouldn't be too taxing to kill them, although doing so without alerts will be difficult (albeit pointless unless you're shooting for a high stealth score). If you really want to get past without getting noticed, use your ultrasonic emitter to lure them away from the ladder. When they're far enough away, quickly dash to the ladder and climb on up.
Emiiiilllleeee!
Alright, time for the final showdown. Emile will be seen as soon as you hit the top of the ladder here, poking around at the bomb, attempting to arm it. He has four soldiers guarding him in the room outside. Getting past them without getting noticed is difficult, but possible.
If you're going for exclusively nonlethal methodologies, first sneak out of the top of the ladder and hop over the railing in front of you. The positions of the guards will depend on the timer and their progression through their routes, but one of them will almost always be stationed in the corner of the room here, and if you're lucky, he won't have been made curious by your movements and noise. You can sneak up on him by angling yourself behind the box and sidling along the wall until you're behind him.
Unfortunately, the rest of these guys won't go down so easily. Getting their attention one by one will be difficult with your whistle or the ultrasonic emitter; the room simply isn't big enough to do so. Instead, you'll have to lure them over with your footsteps or by stepping into the light momentarily and hoping they don't call in backup. Add to that the fact that, if you're going nonlethal, they'll be able to wake up anyone they find, and you have a heck of a hard time getting out of here alive. Since the routes are likely going to shift around a bit based on when you enter the room, we can only say...good luck.
Let's Get All Commando Up In Here
On the other hand, if you just want to pop some caps, you can do so easily. Of course, as soon as you shoot one of the soldiers, the rest of them will usually be instantly alerted, so you're going to have to be sneaky.
What we found helpful was to sneak out the ladder room, duck onto the walkway outside, and pop both of our smoke grenades near the ladder leading up to the small elevated area atop the bomb housing. (You may have to give this a dry run to know where the ladder is before attempting this, as it'll be difficult to spot the ladder when it's full of smoke.) The smoke will obscure the bottom half of the ladder, but someone will almost always spot you before you get to the top. That's not such a bad thing, though.
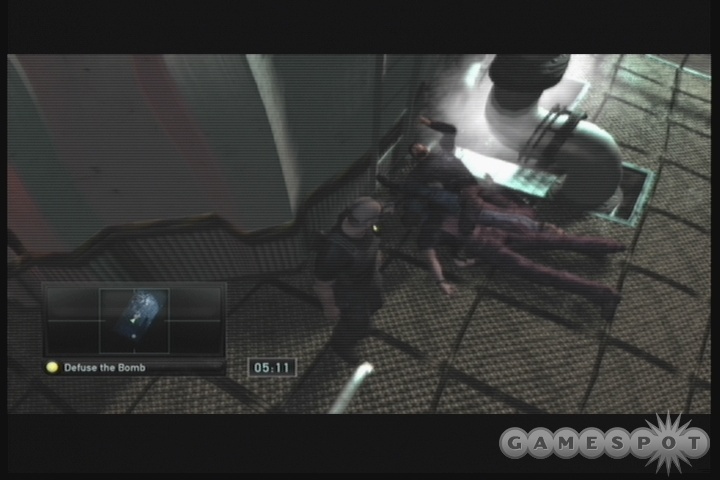
With the alert sounded, the soldiers will attempt to fire on you from below. Try to head directly across from the ladder, then scoot a bit towards the second little walkway bridge. Basically, if people are hitting you with bullets, it's obviously a bad thing, but there are a couple of dead zones in this area where you'll be able to "hide" from the bullets. This won't stop the alert, though, and instead will simply force the other soldiers in the area to climb the ladder to come get you.
When they do, unload on them with your SC-20k. You don't need to get headshots, although it helps; just squeeze the trigger until your target goes down. If you're lucky, you'll even be able to knock one of them back down the ladder, which will often knock out anyone climbing up or standing at the bottom.
Emile will likely be one of the guys coming to get you. While he won't have a chance to cackle maniacally and monologue at you, you can still pop him in the head and grab his retinal scans if you wish.
Disarming The Bomb
After picking the lock and hacking the computer in the bomb chamber, you'll have to disarm the bomb in order to complete the mission. This is essentially the same type of minigame as you experienced when you constructed the mines for Kinshasha. The right trigger will lower the grabber, and the faster you go, the more unstable you'll be. You need to slowly lower the plunger until it grabs on to the bomb core. Keep an eye on the right-hand animation to know whether or not you're in the green or are about to hit the wall or something.
When you have the core in hand, though, you have to pull it out of the bomb casing. Letting go of the trigger will retract it quickly, while depressing it a bit will cause it to slow down a bit. Again, don't let it touch the walls of the casing, or you'll have to start over.
This might sound easy, but obviously it's not quite as simple as it sounds. If you're worried about screwing up, feel free to save your game right before you access the bomb controls and try again. A successful attempt will require around 45 seconds, so you should have enough time to try it multiple times before it goes off.
The End(ings)
When the bomb is disarmed, a number of different endings can play out.
Badassery: If you blew up the cruise ship, killed Lamber, and killed Hisham, then you'll escape from the building but end the game a wanted man. This can also occur if you killed or destroyed any two of the above three individuals and your trust with the NSA was below 33% of the bar when you defused the bomb.
Escape!: If your NSA trust is below 33%, but you managed to save the lives of Hisham, Lambert, and the cruise ship, then you'll be arrested but escape before your trial. Alternately, if you destroy two of the three targets, but your NSA trust is above 33%, then this ending occurs as well.
Escape To New York: If your NSA trust is above 33%, and you managed to save at least two of the three targets listed above, or all three of them, then you'll escape to Moss's boat in the New York harbor area and be given the chance to defuse the bomb. This is the best ending, assuming you can complete the bonus mission.
Bonus Mission: New York City Harbor
March 07, 2008
NSA Objective: Disarm The Bomb
A short bonus mission here, but one that should be entertaining nonetheless. You have no weapons, however, so you won't be able to get trigger happy here.
After Moss and his soldiers get done talking, move to your left and hop over the railing to start going hand-over-hand down the edge of the ship. When you get near the rear of the boat's cabins, wait for a minute. One of the soldiers will move off to the prow, but another one will shortly pass by you, heading the same direction. (Be sure your light meter is green before he comes past you!) When you have a moment to do so, hop back over the railing and move towards the ladder that Moss went up.
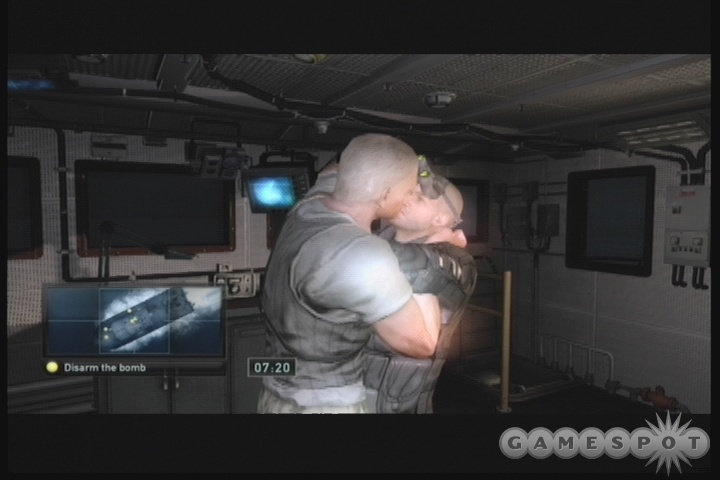
Instead of creeping up there, though, find the small vent underneath the ladder and crawl through to the crew quarters. Open the door here, and head through the door to your right; you'll be in a room with a small ladder. Climb up it and wait until Moss is steering the wheel here, then climb up and attempt to grab him from behind. He'll resist you, but you'll overpower him automatically and finish him off. Scan his eyeballs to finish up your profile objectives, if you've been doing that, then move over to the bomb. Picking the lock and hacking the computer will disarm it quickly (no need to pull the core out or anything).
Doing so, though, will alert the JBA members to your presence, and they'll attempt to self-destruct the boat rather than let you disarm the bomb. No big deal, though; just disarm it, then head out the door nearby to effect your escape automatically. You win!
Achievements
This table lists the point reward and details on how to unlock the various achievements in Double Agent. Some of these we haven't unlocked yet, but when we find out more information, we'll update this guide.
| Achievement Name | Description | Point Total |
|---|---|---|
| Iceland Assignment Completed | Complete the first level of the game. | 30 |
| Ellsworth Assignment Completed | Complete the prison level. | 30 |
| HQ1 Assignment Completed | Complete the first HQ level. | 30 |
| Okhotsk Assignment Completed | Complete the oil tanker level. | 30 |
| Shanghai Assignment Completed | Complete the Shanghai level. | 30 |
| HQ2 Assignment Completed | Complete the second HQ level. | 30 |
| Cozumel Assignment Completed | Complete the cruise ship level. | 30 |
| HQ3 Assignment Completed | Complete the third HQ level. | 30 |
| Kinshasa Assignment Completed | Complete the Kinshasa level. | 30 |
| Defeated the JBA | Complete the fourth HQ level. | 100 |
| Hero | Complete the bonus mission. | 20 |
| The Invisible Man | Complete a mission without being detected. | 20 |
| Getting Technical | Knock out five enemies in a mission with non-lethal gadgets. | 20 |
| The Human Light Switch | Toggle off 20 light sources with your pistol's EMP device. | 20 |
| The Collector | Collect all unlockable gadgets and upgrades in solo mode. | 20 |
| Agent Of The Month | Complete all profiles for the five major members of the JBA. | 20 |
| Save Hisham | Save Hisham's life in Kinshasa. | 10 |
| Save Lambert | Shoot Jamie instead of Lambert in HQ 4 mission. | 10 |
| Professional Ninja | Complete the solo mode on Hard difficulty. | 40 |
| Training Completed | Complete the training mode. | ??? |
| Teacher's Pet | Complete the extra training mode. | ??? |
| RECRUIT | Multiplayer Objective??? | ??? |
| OPERATIVE | Multiplayer Objective??? | ??? |
| FIELD AGENT | Multiplayer Objective??? | ??? |
| SPECIAL AGENT | Multiplayer Objective??? | ??? |
| OFFICER | Multiplayer Objective??? | ??? |
| COMMANDER | Multiplayer Objective??? | ??? |
| Bronze Trophy | Multiplayer Objective??? | ??? |
| Silver Trophy | Multiplayer Objective??? | ??? |
| Gold Trophy | Multiplayer Objective??? | ??? |
| BLACKWING Expert | Multiplayer Objective??? | ??? |
| MOTORWAY 90 Expert | Multiplayer Objective??? | ??? |
| TERMINUS Expert | Multiplayer Objective??? | ??? |
| SLAUGHTER HOUSE Expert | Multiplayer Objective??? | ??? |
| RED DIAMOND Expert | Multiplayer Objective??? | ??? |
| BOSS HOUSE Expert | Multiplayer Objective??? | ??? |
| DAWN WAVES Expert | Multiplayer Objective??? | ??? |
| USS WISDOM Expert | Multiplayer Objective??? | ??? |
Got a news tip or want to contact us directly? Email news@gamespot.com
Join the conversation