Hitman Walkthrough
Agent 47’s back and ready to make some more hits in Hitman: Blood Money. Check out GameSpot’s Walkthrough for a complete walkthrough of the game’s missions.
Design: Randall Montanari
Introduction
The Hitman series has been around for almost six years now, as they’ve followed the adventures of Agent 47, an uber-professional cloned hitman that’s tasked with taking out the trash on behalf of the shadowy assassin’s guild known only as The Agency. His lifestyle has its ups and down, but in the end, he gets to kill people and hide their bodies for a living, which is good work if you can find it.
Players familiar with the Hitman series will be right at home in Hitman: Blood Money, the latest installment in the series. In it, 47 is up to his old games as he throttles numerous innocents simply because he wants to steal their clothes in order to infiltrate off-limits areas and inject poison into cakes which he then places in front of large men with sweet tooths who then lick the icing and keel over dead. All in a day’s work for 47, really. Of course, the game also allows you to be as ruthlessly violent as you want; if you want to take things subtle and slow, you’re going to be able to, but if you just want to kill everything that moves with an automatic rifle, then you’ll be allowed to do that as well.
Of course, finding the "proper" way to eliminate your foes in Hitman: Blood Money can be a process of trial and error...and error...and error. If you don’t fancy the prospect of reloading your savegames multiple times just to figure out the specific path that one of your targets takes through, then GameSpot’s Game Guide for Blood Money is here to help. In it, we’re going to give you specific tips to take on each of the game’s difficult missions, so enjoy.
General Tips
Most of the game's basic mechanics are explained in the tutorial, so we're not going to discuss every little thing here. We'll just give you a few of the oddities that we've noticed while playing the game.
The Ranking and Reward Systems
The inner workings of the ranking and reward systems are a bit mysterious, even to someone who's been doing nothing but playing the game for a couple of weeks. We can say a bit about the way you'll be ranked when you finish a level, however, if you'd like to hear about it.
Rankings
When you complete a level, you'll be rewarded a rating title and bonus cash, depending on how well you performed your objectives. Although you can definitely approach each mission with a bloodthirsty vengeance, killing civilians and instigating mass slaughters on the populace of a level, the game discourages this kind of behavior by giving you less cash. On the flipside, if you manage to scoot through a level like a shadow, killing only your targets and escaping unseen, then you'll get more cash to spend on upgrades.
The smallest amount of money you can get as a Ranking Bonus is zero dollars, which is your reward for getting a body count in the dozens and leaving plenty of witnesses to your activities. (Oddly enough, if you manage to kill everyone in a level, you actually get a token $1,000 reward.) The highest amount you can get is $150,000 dollars, awarded for the coveted and difficult to obtain Silent Assassin ranking, which can apparently only be obtained if you kill only your specific targets (i.e. no bystanders or guards) in a minimum amount of time. Most of the time your ceiling will be $100,000 for the Hitman and Professional rankings.
In general, if you want to obtain high rankings, and thus obtain more money at the end of each level, you're going to need to keep your bodycount as low as possible, and definitely make sure not to be caught killing large numbers of people. Setting off a bomb that kills a dozen people is going to reduce your ranking, sure, but opening fire with an M4 and killing those same dozen people will reduce your score even further.
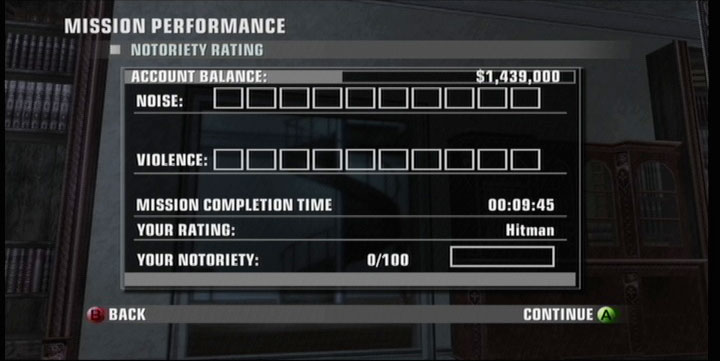
Note also that two of the primary aspects of your ranking are noise and violence. While a little violence is obviously going to be necessary to complete your mission, unneeded violence on people who aren't assigned as specific targets will reduce your ranking. Noise is self-evident: firing shotguns or high-powered assault rifles will get you noticed, which in turn will probably require you to use more violence to extricate yourself from the situation. Bombs are particularly notorious here, since they'll often cause a lot of noise, raise a lot of attention, and likely cause a bit of collateral damage. Still, sometimes they're the best way to finish off a target, so don't let the fear of a low ranking stop you from dropping da bomb.
For the most part, we've written our walkthrough below with the intent of getting as high a ranking as possible on each mission. Some of the strategies below will net you a Silent Assassin ranking (specifically the ones for Till Death Do Us Part and A House of Cards), while others will get you somewhat lesser rankings. If you think you have a better strategy than what we offer, feel free to drop us a line via the Feedback link in the table of contents.
General Tips
Rewards
In addition to your rankings, you also earn extra cash rewards based on your performance during the level. The factors include:
Objectives:Completing your objectives gets you money. Duh. This is going to be the biggest factor in your cash reward, outstripping even your ranking, so if you really manage to screw up a mission, but still complete it, then you should still be able to draw in a bit of cashola after each mission. Some missions have optional objectives that will net you extra cash. The rewards here are large enough to make it difficult to not earn money, no matter how many penalties you incur.
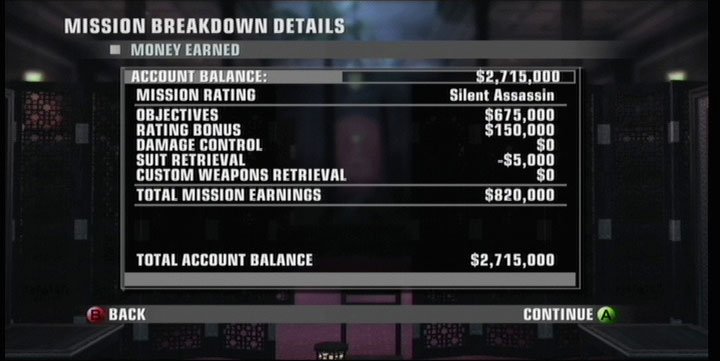
Damage Control:The more civilians you kill and the more witnesses there are to your acts, the more hush money the Agency has to pay to cover your tracks. This can only be a penalty; you start off with a blank slate, but then slowly bleed money away as you cause more mayhem. With enough damage done and enough people killed, this can eventually evolve into a hundred thousand dollar penalty or more, but if you cover your tracks fairly well, it should be a minor hit.
Custom Weapons Retrieval:If you leave behind one of your custom weapons in a mission, then the Agency will charge you five thousand dollars to retrieve it. This will be multiplied per weapon, so if you leave three weapons behind (and that’s the maximum number of weapons you can bring into a specific mission), you’ll be out fifteen thou. It’s a small hit, but it adds up over time. If you restrict yourself to the Silverballer and the Tactical SMG, then you shouldn’t have a problem here, since both are concealable.
Suit Retrieval:Either there’s something special about your suit, or they’re just really expensive to have replaced. If you exit a mission wearing anything other than your custom-made suit, then you’ll be out five grand.
Notoriety
Hitman:Blood Money has an interesting notoriety system in play. During each mission, you have a chance to earn notoriety based on your actions. The more witnesses you leave behind, the more likely the press and police are to publish your misdeeds. The more notoriety you get (and it adds up level to level), the easier it’ll be for policemen, civilians, and guards to recognize your face. Thus, when you have a high notoriety score, you can expect the guards on a level to be much less forgiving of any odd actions on your part. If you manage to max out your notoriety, then most of the guards and policemen in any given area will simply open fire when they spot you, regardless of whether you’re holding a weapon or doing anything wrong.
Here are some keys to escaping a level with little or no notoriety.
First, leave no witnesses to your crimes. Try to commit murders out of the line of sight of anyone other than yourself and your target. If someone does happen to spot you committing a murder, kill them before they can escape and alert anyone else. If you happen to knock someone out with your fists or a sedative shot, be sure to either dump their body somewhere where it won’t be found, or shoot them in the head to finish them off. If they get woken up by another person, they’ll identify you as the assailant (unless you sedated them from behind).
Second, avoid cameras and CCTV monitors. If you get caught on tape in the vicinity of a murder, regardless of whether you’re actually tape committing a crime, you’re going to attract attention. Either avoid cameras (which is difficult to do on your first time through a mission), or find the security office and steal the videotape from there to prevent anyone from checking the tapes.
If you do happen to obtain a large amount of notoriety during a game, then you’ll be able to pay for your sins, so to speak, by purchasing indulgences from the Agency. If you have a minor amount of notoriety, then a little hush money paid to the civilians at the scene of your crimes should shut them up. If you’ve been a real bad boy, then going over their heads to the police captains and officials will prevent any news about you from being disseminated. If you’ve been downright genocidal, though, you’ll need to splurge and purchase a complete identity makeover. Doing so is expensive, to the tune of 200,000 dollars, but will wipe the slate clean and allow you to resume your criminal career without a care in the world.
Weapons & Equipment
Silverballer
The Silverballer is going to be the one must-have piece of equipment during your travels as the world's most elite assassin. While the other weapons in 47's arsenal have their uses, few are as precise and deadly as the Silverballer, especially when you consider that most of your kills will be taking place at close range. Most of your emphasis here should be on silence and accuracy, so acquire silencers and aim stablizers as soon as they become available to you. Although you'll be sacrificing damage to do so, a bullet to the head will always instantly kill a target, so it shouldn't matter overmuch, and even if your target refuses to stand still, headshots are easily obtainable if you manage to walk behind them and aim in first-person mode.
Upgrades
Low Velocity Ammo: Essential. More silence, less recoil - both good things. You'll probably be using this throughout the game, so make a point of getting it early.
Silencer Type 1: A good early silencer for your weapon. Excludes Silencer Type 2 and Long Slide, but you won't have to worry about those for a while.
Extra Ammo: In most levels, you won't have to fire your Silverballer more than two or three times, but more ammo is always handy just in case.
Laser Sight: No reason not to get this. The little targeting dot on the back of your enemy's head is pretty handy when firing from medium range.
Rail Mount: Does nothing on its own, but the mount is required for scopes. Don't bother buying it until you actually unlock a scope for purchase.
Magnum Ammo: Magnum ammo is noisier and has more recoil than low velocity ammo, but does penetrate doors. If you're firing through doors, then you're probably going to want to be using something a bit more powerful than the Silverballer, but this can come in handy when you're attempting to shoot enemies that are pursuing you. In any other situation, you're unlikely to even know that there's someone on the other side of a door.
Dual Action: The ever-popular dual-wielded pistols, just to help you reenact your Hard Boiled fantasies. Unfortunately, these fire simultaneously when you depress the trigger. That's great if you need to drop someone that's aware of your presence, but if you're trying for a stealthy headshot, it simply means that one of your rounds will be missing your target, which makes it that much more likely that someone will notice either the sound or the impact of your bullet and become aware of your shooting. Which is a bad thing! All in all, stealthy assassins will want to avoid dual-wielding the Silverballers; there are much better options for high-lethality targeting solutions. You also double your reload time with this upgrade.
Long Slide: Better precision, less recoil...but you can't equip this and a silencer, making it something of a pointless upgrade.
Red Dot Sight: Gives you a small amount of zoom and better precision, but can't be used with a scope. Still, you can equip this until you unlock the scope with the last set of upgrades and use it until then.
Large Clip: Doubles the capacity of your clips. Obviously useful, even if it does make the gun look a bit wonky.
Silencer Type 2: "Max silenced" is right there in the description. Need we say more? Your bullets will sound like a raindrop falling on a still pond...
Full Auto Fire: Adds recoil and lets you choose to fire automatically. If you're using your Silverballer like a surgeon, opting for headshots and only headshots, then this is going to be overkill for you. If you're using your Silverballer as an SMG...then why not just use the real SMG?
Scope Type I: No, there isn't a Scope Type II; this is the only one you can get. It'll give you a bit more zoom than the Red Dot Sight and better precision when you're zooming. It's not going to make your Silverballer a sniper rifle or anything, but it'll let you get your headshots from a bit further away, when required.
SP12 Shotgun
Ah yes, the boomstick. Your combat shotgun here is capable of lifting a man off of his feet and rapidly propelling him backwards when fired at close range, which is pretty cool. Unfortunately, the SP12 has two strikes against it.
First, it can't be concealed under your clothing, which means that you'll have to pick it up at the ICA within the level after you arrive. Generally these are somewhere near your starting location, but as soon as you pick it up, you're going to be fired on by every guard that happens to see you running around.
Secondly, the M4 is a way, waaaay better assault weapon than the SP12. The M4, when fully upgraded, is capable of killing people in the next county, whereas the SP12 will almost always need to be fired at point-blank range to take on your enemies. The M4 will also be capable of holding much more ammo than the SP12 when upgraded, making this a marginal weapon at best.
Upgrades
Flechette Ammo: Allows you to fire in a tighter group, but for less damage. This is the way to go, however; if you manage to land most of the rounds here, you're target's going to die, "less damage" or not. The standard ammo will render you incapable of hitting targets standing more than 10 feet or so away from you.
Butt Stock: More precise and less recoil? Count me in!
Extra Ammo: Obviously worthwhile. You can pick up Shotgun ammo in some levels, but it won't add to your ammo for the SP12, so stock up here while you can.
Reload Boost: Decreases your reload time by mounting shells into a clip. Since your reloads for the shottie are initially horrendous, get this as soon as possible.
12 Gauge Slugs: Maximum damage, but that's not that big of a deal. They'll be less precise than the Flechettes, meaning that you'll often have to fire twice to kill your target, meaning you'll be taking more damage than you would if you used the less powerful ammo. This is a bit of overkill, anyway, since the Flechette ammo will be more than enough to kill most targets.
Rail Mount: Allows you to mount up the Red Dot Sight later on. Has no intrinsic use otherwise.
Short Barrel: Sawing off the end of your shotgun will let you do more damage, but will make your spread that much worse. Not really worthwhile, for the same reasons as we explained with the 12 Gauge Slugs.
Laser Sight: And here you thought the laser sight for the shotgun in Quake III was just a joke. Generally speaking, your shells will land all around the laser sight here, but still - it couldn't hurt.
Magazine: Gives you four extra slugs and a higher rate of fire, which is critical with the shotgun. Reducing the amount of time between shots will let you kill enemies more quickly and thus take less damage overall.
Red Dot Sight: Max Precision! That's relative to the other sights for the SP12, mind you, not in comparison to the sights for the other weapons; your rounds are still going to scatter all over the place, red dot or no.
Silencer Type 1: This can only be equipped if you disable the Short Barrel upgrade. It does seem to work fairly well, although it just seems...wrong, somehow, to equip a silencer to a shotgun.
SMG Tactical
The SMG Tactical is a fine little weapon, capable of dishing out fully-automatic fire that'll drop plenty of people. Its main weakness is a low ammo capacity; even after upgrading, you'll have a hard time killing more than a couple of targets before needing to reload. Still, the main advantage here is that you can conceal the SMG under your clothes, unlike the SP12 or the M4, making it the best option for mass murder if you're interested in retaining some stealthiness. In a pinch, you can single-fire a round at a target and use it either as a long-range Silverballer or a short-range sniper rifle. Or a medium-range SMG with the ability to land headshots; how does that suit you?
Upgrades
Butt Stock: Huh huh huh..."butt stock". Less recoil, more precision, buy it. Note that this upgrade and the third upgrade are apparently the same thing, with different graphics. Choose the one you like and don't bother spending the money on the other one, unless you've got cash to burn.
Low Velocity Ammo: Useful if you think you need some subtlety with this weapon. Generally, though, if you're using this instead of the Silverballer, the time for headshots and silence has already passed. We generally outfitted the SMG with the Magnum ammo and tried to quiet it up a bit with silencers, and that was usually good enough to clean up any local messes without alerting all of the guards in the level.
Butt Stock: Another one. Yay.
Extra Ammo: Two extra clips and slightly more ammo for the clips as they are. Always useful.
Rail Mount: Lets you mount a Red Dot Sight later on. Doesn't do anything by itself, though, so no need to purchase it right away.
Magnum Ammo: Penetrates doors and does more damage than normal ammo, but has more recoil. In most cases, if you're using the SMG, you're going to be firing at fairly close range, so recoil isn't a huge bother.
Rapid Fire: Supremely fast rate of fire, with the drawback of having more recoil. This is going to let you take down targets faster if you can't hit them in the head for whatever reason, but you'll definitely be chewing through ammo like no one's business and will subsequently have to reload more often, which is a Bad Thing. We generally preferred not to have this on our SMG, and just went for short bursts to the heads of our targets.
Short Barrel: Plus on damage, lowers precision. Not a big deal if you're only using the SMG for crowd-sweeping after the alarms go off, but if you need to sight in a distant target in an area where you can't bring a sniper rifle, then this is going to become a liability.
Silencer Type 1: Yep, it's a silencer. Lowers the damage of your rounds, but reduces the chance that someone will hear you.
Laser Sight: Increases precision and lets you know precisely where your bullets are going to hit. Useful and non-exclusionary, so no need to not buy this.
Double Clip: This is essentially two clips taped together, drastically cutting your reload time. Buy it, love it; it'll probably save your life once or twice if you use the SMG often enough.
Silencer Type 2: You should know what silencers do by now!
Red Dot Sight: Gives you a small amount of zoom and high precision. Requires the Rail Mount, but if you want to feel like a member of a SWAT team, then this is going to be a mandatory purchase.
M4
Like the SP12 Shotgun, the M4 is non concealable, meaning it'll be placed in an ICA at the beginning of the level, should you decide to bring it along with you. You'll have to find the ICA and retrieve the M4 if you want to use it. Unlike the SP12, however, the M4 is totally awesome. An upgraded M4 is capable of killing pretty much everyone in a single level, due to its high accuracy, high power, and huge ammo reserves. If you're looking to play Hitman less like a stealth game and more like a first-person shooter, then you've got your weapon of choice right here.
Upgrades
R.I.S. Handguard: Does nothing on its own, but is required for some of the later upgrades.
Low Velocity Ammo: Really, now, if you're looking for quiet kills, the M4 probably isn't going to be your weapon of choice. Buy it if you wish, but you'll be better off with more powerful ammo.
Butt Stock: Less recoil, more precise. Buy it already.
Extra Ammo: Two extra clips for all of your shooting needs.
Laser Sight: Useful when attempting to get headshots in your opening volley, but if you're usually just mowing down hordes of guards, this isn't going to be supremely necessary.
Rail Mount: Mount for scopes; does nothing on its own.
Armor Piercing Ammo: Does more damage and shoots right through doors. The latter function isn't all that great, but hey, did you hear the part about more damage?
Silencer Type 1: Again, if you're looking for a silent weapon, you're probably going to be using the Silverballer. Still, this doesn’t list "lower damage" as one of the attributes, so it couldn't hurt, at least in theory.
Pistol Grip: With this new grip, your aim will be somewhat more steady. You're going to have to shell out for the RIS Handguard before you can upgrade, however.
Double Clip: As with the SMG, this will reduce your reload time significantly. The Drum Magazine upgrade, which you'll unlock after the Double Clip, will render this upgrade useless, however, so it's best to save your money and wait for the better option.
Red Dot Sight: A little bit of zoom, a lot of precision. Like the Double Clip, though, this will be superseded by an upgrade on the fifth tier, so you may as well save your 150,000 bucks and wait for the Scope.
Silencer Type 2:Hey, might as well! There's just something...uncool about running around with a silenced M4, however.
Drum Magazine: Yowza. 100 rounds per drum will prevent you from having to reload for a good long time, allowing you to fill the air with lead like nobody's business. Although there's more recoil than the normal magazines, by this time you've probably already obtained a good degree of stability with other upgrades, so this won't be a big deal. If you're used to firing at long distances, though, you may want to stick with the magazines.
Scope Type 1: You get plenty of precision with a scope, but it's somewhat wasted on the M4; if you're firing at something distant, you'll probably need more zoom to land a headshot, and if you hold down the attack button, your recoil will cause you to jump up and fire over the head of your target after the first couple of shots. At close range, a scope is, of course, completely unnecessary.
W2000 Sniper Rifle
The W2000 is going to be your friend in a few missions of the game. While some missions will more or less completely preclude the use of the sniper rifle, when it can be used, you'll be able to take down your targets from a distance without anyone even knowing you fired a shot, assuming you've silenced the thing properly. What's more, it comes with a custom-made rifle case, allowing you to transport the rifle right where you need to use it without arousing the suspicion of the guards. Of course, removing the rifle from the case is a lengthy procedure, so you'll need to be in a secluded area if you want to use it; if anyone sees you constructing the rifle, they'll run and summon a guard. If you want to move with the rifle again, simply stand back over the rifle case and select it to deconstruct the rifle and pack it away again.
In general, a single shot to the body of any target should be enough to kill them with the sniper rifle.
Upgrades
Low Velocity Ammo: Less sound and recoil. This should be the only ammo that you need throughout the game.
Double Capacity Clip: Useful enough, if you're not using bolt-action. If you have to fire more than two or three times before reloading, though, you've probably already screwed up your chance for accurate sniping.
Extra Ammo: One more clip, and all your clips get bigger. On most levels, you probably won't be firing your sniper rifle more than twice altogether, so this probably isn't very necessary.
Scope Type I: Your first true love. A sniper rifle without a scope is essentially just a rifle, so get this as soon as possible.
Lightweight Frame: The only description given here is "lightweight parts". We're going to go ahead and assume that that's important. This is required for upgrading to Bolt Action.
Silencer Type I: It's fairly important that you silence the shots from your rifle; if anyone hears you shooting, they'll summon guards and/or just run directly towards your location right away. The quieter your shots are, the less likely you are to gain suspicion or guard attention when firing.
Armor Piercing Ammo: Allows your shots to penetrate doors, at the cost of extra recoil. While the recoil penalty won't be a big deal if you're using a bolt-action rifle, there's really no need to ever penetrate wood when firing your sniper rifle; most of the snipable targets will be standing free and clear, or with a pane of glass between you and them, at worst.
Extra Ammo: Another ammo upgrade. Again, if you're firing your sniper rifle more than twice per level, then you're probably going to raise an alarm and get swamped by guards, making the extra ammo mostly irrelevant.
Carbon-Fiber Barrel: Less recoil, more precision, but it does add another couple of seconds to the rifle construction time. If you're picking your spots correctly, though, that's not going to be a big deal.
Bolt Action: Gives you much more precision, which is going to be important for long-range firing, such as during the House of Cards mission. You'll have to wait a few seconds in between shots, though, so be sure to hit your target dead on with the first shot!
Silencer Type 2: This should make your shots almost completely inaudible. Don't worry about the "less damage" warning here; even with this silencer and the Low Velocity bullets, a fully-upgraded sniper rifle will kill a target instantly, even if you only hit them in the chest.
Scope Type 2:There's something about the words "max zoom" that just feels so right.
Misc. Equipment
Lockpicks, amphetamines, extra weaponry; everything that doesn't apply to a specific weapon is listed here. And even something that is tied to a specific weapon is listed here.
Upgrades
Painkillers: Buying these will unlock them for all subsequent missions. When used (all you have to do is tab over to them in your inventory; they'll be taken automatically), you'll instantly regain around half a life bar's worth of health.
7x50 Zoom Binoculars: Yeah...binoculars. Throughout the course of the game, we can't recall ever having to use these. If you're far enough to really need binoculars to see what you're looking at, chances are you already have a sniper rifle out and ready to fire. It's possible that these will attract less attention than a rifle, but even then, you can usually track the movement of your targets with your map, at least up until the hardest difficulty level.
Improved Lockpick: 25% faster lockpicking. Your standard lockpick is already pretty fast, so this upgrade isn't really all that necessary. So long as you make sure no one's looking directly at you when you pick a lock, you'll be able to survive without this.
Kevlar Vest: Absorbs 15% of the damage that you take, but you'll have to give it up when you change an outfit. Since the first thing you'll do in most levels is look for a new outfit to wear, this is of marginal use, unless you're playing as a sadistic killer that goes in guns blazing.
Enhanced Detonator: All the description for this device says is "long range detonator," without giving any specifics. We're guesstimating that it extends the range on your mines to 50 or 75 meters; it's definitely not an infinite-range device. More distance is always good if you're attempting to avert suspicion from yourself when letting loose a bomb. If you don't make use of bombs all that often, however, you can survive without this particular tool.
Adrenaline:The description on this is fairly vague: "a health boost". Apparently this can act as an emergency death-avoidance drug; we’ve noticed that occasionally it’ll automatically kick in when you’re on the verge of death, giving you a few more seconds of full-speed action, which should usually be enough to enter your inventory and pop some painkillers.
Flak Vest:Absorbs 35% of damage, but again, this is lost the first time you change an outfit. Save your money for the upgraded version later on.
Extra Mine:One extra RU-AP mine. Handy, but most levels won't require you to use more than one, if that. If you're looking to cause trouble, though, feel free to invest here.
Cratt Schultz Lockpick: At 50% extra lockpicking speed, this one's probably worth investing in if you have the extra cash. Don't forget that you can usually just shoot locks to open them up, however.
Foil Padded Suitcase: This renders your W2000 sniper rifle undetectable to x-ray machines while it's packed up. This is only really required for one level of the game, but it'll come in pretty handy at that point.
Flexible Flak Vest:Absorbs 35% of all damage, and fits underneath all of your different outfit changes. Well worth the money if you ever plan on getting in a firefight...or perhaps especially if you don't plan on getting in a firefight.
Walkthrough
This walkthrough is based on playing through the game on Expert difficulty. The primary difference between Expert and Normal difficulties is the fact that you don’t get the positions of guards or policemen on your map, and that the normal seven saves per level are cut to three.
We’re generally going to be attempting to walk through these levels with the minimum amount of bloodshed, which is the way the game encourages you to play, since you’ll earn more money and less notoriety this way. You’ll undoubtedly find more ways to complete each individual mission, from the subtle to the horrific, so feel free to treat the game as your sandbox.
Mission One: Death of a Showman
Technically, Death of a Showman is more of a tutorial than an actual mission; you won't be able to deviate much from the gameplan here, and this level won't be nearly as freeform as some of the other missions you'll undertake. Still, if this is your first time entering the Hitman universe, then you'll find it a helpful introduction to the game's mechanics, so play carefully.
When you reach the pier, pop out your map for a moment and examine it carefully. This is a fairly small level, but like most Hitman levels, there are going to be multiple levels to the main building and plenty of enemies within. To begin with, though, just climb up to the pier and walk over to the gate to take out the guard. He'll go down like a bag of rocks. Normally, you wouldn't want to leave a corpse lying around like this, but no one will be coming this way, so feel free to leave the body where it lay.
Regifting
After entering the gift shop, you'll have to equip a coin from your inventory, then aim out the open window here and throw the coin by clicking on your left stick. While they're distracted by the coin, run out the door and proceed over to the theater. Inside, you'll be able to sneak up behind the gangster and take him out with your fiber wire; doing so will let you nab his gun. There doesn't appear to be any way to interact with the lawyer, so just leave him be (or shoot him) and climb up the red trellis before jumping across the balcony.
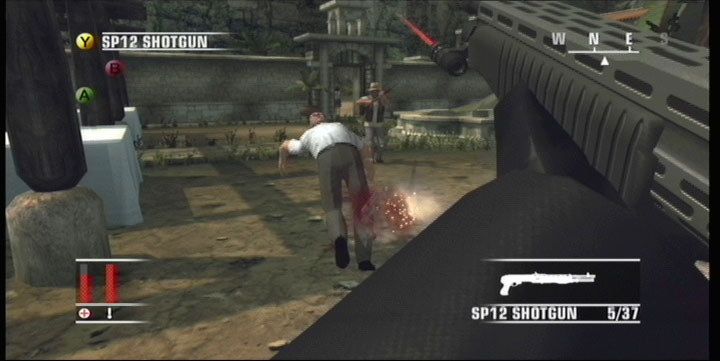
Now would be a good time to save your game, as you're about to enter a combat situation. Your task here is to take out the two gangsters in the next room, and your best bet for doing so without getting shot will be to grab the shotgun lying next to the box outside the room, ensuring that it's fully loaded, then entering first-person view mode. In first-person aiming, shoot the lock off of the door, then start unloading your boomstick at the unfortunately misguided youths. When they're good and dead, you'll be able to grab their pistols for extra ammo, then ditch their bodies in the bins elsewhere in the room.
With that out of the way, you'll have to hide in the closet; after you do so, a chemist will bust into the room. Since the bodies are out of the way, he won't be too suspicious (although the huge bloodstains on the floor might be some indication that something untoward has happened). Instead, he'll go straight for the cash on the table, allowing you to exit the closet and sneak up behind him and either knife him or use your fiberwire to take him down. Drop your shotgun at this point, as it'll draw too much suspicion to you. Keep it if you want to start blazing away at your foes, though.
With the chemist disposed of (just leave his body where it lies), take his uniform and keycard to move on. When you find the baking soda crate in the small room along the walkway in the atrium, place your pistol inside of it and pick up the crate in its entirety before proceeding along the walkway. The point of hiding your pistol like this is to avoid having it detected when frisked, as you will be when you walk down the rest of the walkway towards the guard at the end.
Frisky Business
When you hit the frisker, he'll wave his wand over you and detect any weapons you happen to be carrying. If you didn't put the pistol in the basket, he'll detect it inside your suit; if you picked up the kitchen knife from the closet you hid in, then he'll detect that as well. So long as you correctly placed the pistol in the basket, though, you can surrender any other weapons you have and still retain the pistol.
After moving through to the elevator room, drop the crate and grab the gun before hopping atop the jammed elevator nearby. You can use the fiberwire from atop the elevator to kill the guard inside the car; he'll automatically get pulled up and out of eyesight of the rest of the enemies nearby. With that done, drop down, leave the car, bust the power box, then sneak along the western side of the coke factory until you reach the toilet. Bonus points if you see one of the drug girls running headlong into a wall - that's always amusing.
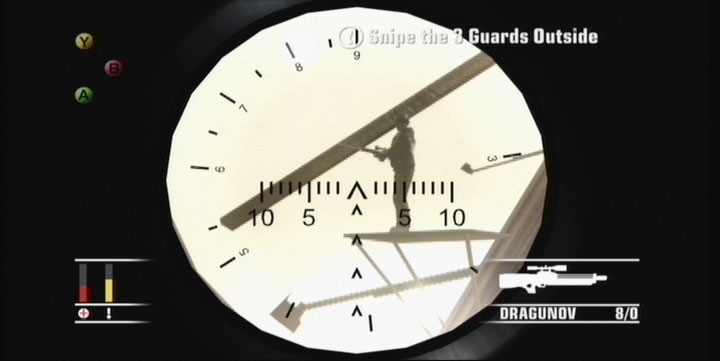
From the toilet, head through the door nearby with a gun in hand and grab the gangster at the trough to make him into a human shield. With a little organic cover, sneaking around and dropping the three other gangsters shouldn't be too big of a task. Climb the ladder from there and grab the Rifle Case.
In order to unlock the rifle from its case, you'll have to pick up the case, then select it in your inventory, which will open the case and let you use the weapon. You have a little porthole from which to snipe here; keep in mind that you'll have to hit the first-person view button twice before you get the scope view, and from there you'll have to tap up on your d-pad to fully zoom out. There are three soldiers to hit, so check your map if you're having trouble spotting them.
When you're done sniping, head out through the exit door nearby and climb down the drainpipe to reach the ground. Head into the office and grab the poison in the crate, then walk upstairs. While the secretary and the guard are talking, you might want to save your game. If you've gotten this far, then victory is all but inevitable, but you can still take the time to do things right.
The Office Party
After the bodyguard is through talking, he'll walk over to the balcony, so get behind him and shove him overboard. Immediately after doing so, equip one of the poisons in your inventory and get your crosshairs right over the bottle of water on the desk; after you've targeted it, you can "attack" it to poison it. If you hide in the closet and look out the door, you'll get a good view of Carolyn as she keels over dead.
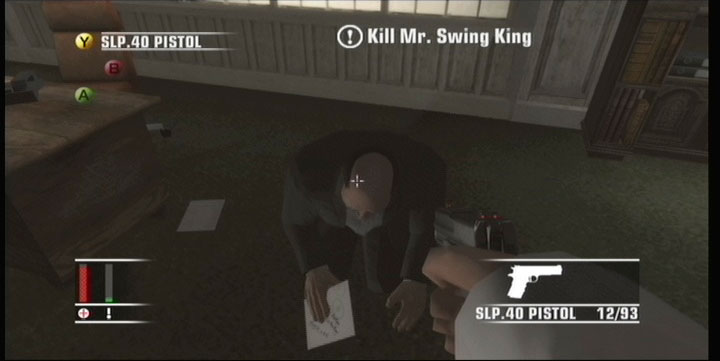
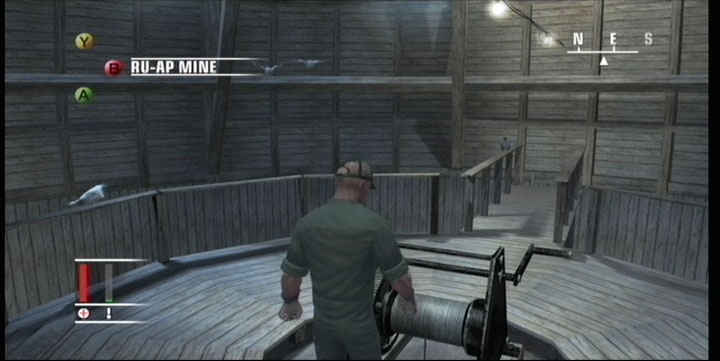
The Swing King is easy enough to kill; just walk into his office, sit through the cutscene, then pop him in the head with your pistol. With him dead, all that's left to do is exfiltrate, so climb out the window and grab the bomb and the detonator from the case outside. After climbing through the window at the end of the walkway, plant the bomb on the winch that controls the lighting arrangement, then blow it. That'll kill all of the gang members below, save for the bossman, who's armed with a Desert Eagle. Kill him, then head to the exit in the room to end the mission.
Mission Two: A Vintage Year
Objectives
- Kill Don Fernando Delgado
- Kill Manuel Delgado
- Escape the Vineyard
Intel
- The guided tour of the wine cellar might prove useful, especially when looking for potential death traps.
- We've heard that Manuel likes to entertain friends and enjoy the merchandise in the wine cellar.
- The entrance to the secret lab is hidden somewhere in the wine cellar.
- The insides are guarded by highly trained guards.
Overview
Your goal here is to kill Don Fernando Delgado, along with his son, Manuel. Both of the men are involved in drug smuggling, but are using their winery as a cover for their illicit activities. Luckily for you, their drug activities will make excellent cover for your assassination; their deaths will be played off as the result of a drug war.
Of course, drug labs and VIPs are often heavily guarded, and this hacienda is no exception. There are two levels to the security here, with camo-vested, shotgun-packing guards patrolling the perimeter and outdoor areas of the hacienda, as well as the underground wine cellars, while shirt-clad, SMG-wielding VIP guards keep an eye on the interior of the hacienda, as well as the seaplane dock.
As far as your targets go, Manuel mostly sticks to the wine cellars, which are small, enclosed, and crowded, making him a difficult target to take down silently. Don Fernando is easier to take down quietly...if you can get to him. Bypassing his VIP guards will be a difficult task, but if you can penetrate to his inner sanctum, you should be able to pop him in the head and dispose of the body. If you prefer to attack from range, you might be able to snipe him when he walks out onto his balcony, which he does every few minutes.
The Setup
Your first goal here should be to find a uniform with which to blend into the background of the estate. Although most of the guards are walking around in the middle of the estate, there are a couple that walk the perimeter, outside the walls to the west and east of the complex. You're going to start closest to the west soldier, so it's a simple matter to wait for him near the southern fence overlooking the canyon, then hang around until he leans up against the rail before sneaking up behind him with fiber wire and taking him out. Steal his outfit, dump his body over the rail, then grab his shotgun.
You'll now be permitted to walk around the courtyard of the wine cellar, the wine cellar itself, as well as the yard of the hacienda, without having to worry overmuch about being spotted. This freedom of movement will make it much more easy to kill Manuel, although Don Fernando will still be under the watch of his VIP guards, who will prevent you from entering the hacienda if they spot you attempting to do so.
Speaking of VIP guards, though, if you're willing to go the extra mile to obtain a uniform, you can find them in the seaplane hangar underneath the cliff that the hacienda lies on. You'll have to walk down the earth path from the eastern side of the hacienda, where you'll come out to the hangar. There's a worker near the bottom of the path who's a potential witness, so push him into the water to take him out, then sneak over to the elevator. Before you move to the VIP guard here, you may want to wait for the elevator to come down with another worker; he'll take a look around, then head back up. When the coast is clear, sneak up behind the other guard and push him into the water, as well, then sneak around to the VIP guard that's sleeping by the plane and steal his outfit and SMG. Doing so will allow you unfettered access to the drug lab (accessible via the elevator) and the hacienda, making it a lot easier to take out Don Fernando.
Dealing with Manuel
There are two primary methods for taking out Manuel, who hangs out in the wine cellar. The first is to construct a convenient equipment malfunction. The western edge of the wine cellar has a stairwell leading up to the courtyard; at the top of this stairwell is a winch that controls a makeshift wine barrel elevator. Luckily for you, Manuel will often either be standing in this area by himself, or attempting to bring down one of his work associates to the small area just beneath this elevator, allowing you to place a bomb on the winch, then detonate it as he lounges around underneath it.
If you want to be sure that the elevator drops as planned, you can hide behind the stacks of barrels nearby and wait for just the right moment before dropping the elevator. This explosion is generally more likely to take Manuel out if he's standing there by himself; if you wait for his friend to come down, they'll stand off to one side and will usually survive the falling wine barrels. If you don't want to stage a huge accident, though, you can just plant the bomb where they wind up standing and blow them up directly.
If you let Manuel and friend leave the area, they'll walk to the east, towards the drug lab, which is hidden behind a large, empty wine barrel. If they make it into the drug factory, then your chances of taking them down quietly dim, so you may want to just let them go, deal with Don Fernando, then come back and attempt to get a better read on Manuel when you've offed his old man. If you do, you can sometimes come back and find him simply standing around by the bottom of the stairs, allowing you to fiberwire him and hide his body with minimal troubles, assuming the wine tour isn't passing through.
Alternately, Manuel will also occasionally test his drug lab's supplies at a table near the stairs. It's somewhat secluded, in a small room with a storage bin, but there'll usually be a guard looking directly at the table, so if you want to take out Manuel here, you'll probably have to eliminate the guard first, or just plant the bomb here, instead of on the winch. Alternately, you can wait until he starts walking towards the small door here and take him down with your poison syringe. If you can manage to take him down quietly, then you can stuff him in the bin nearby and rest assured that no one will discover his body for a while.
Taking On The Don
Don Fernando doesn't move around much, thankfully, preferring to spend most of his time during this mission practicing his cello playing and enjoying the view from his balcony.
Sniping
If you're looking for a distant method of taking him down, then you can use your sniper rifle to take him on. There's a good little sniper roost near the waterfall to the east of the hacienda, but you can also wait near the chair with shotgun and SMG ammo to the west, although this angle will prevent you from seeing much of his upper body. Whichever you prefer to take, you'll have to kill or incapacitate the guard that's on patrol nearby before setting up your rifle; they'll shoot you on sight if they see you carrying it. As mentioned, the Don only appears once every few minutes, so you'll have to scope in on his balcony (the middle of the three balconies in the hacienda), and hope that your scope drift doesn't make it impossible to hit him. At this point, you won't have been able to upgrade your rifle enough to make this a sure bet, but if you have the quietest ammo, missed shots won't generally set off the alarm, allowing you to wait for him to reappear before trying again. Don't forget to crouch and stay still if you want the best accuracy for your shot.
Up Close And Personal
Apart from that, your only option is to enter the mansion itself and take the old man out at close range. You can get more or less free run of the area if you can get a VIP Guard suit, but these are difficult to come by, since most of the guards are densely situated in the hacienda or the drug lab. As mentioned in the Setup section above, your best bet to find one of these is to head down to the seaplane hangar and kill the guards there. If you can grab one, then getting up close and personal to the Don will be much simpler, although you'll still have to pick some locks in the same hallway as VIP guards on patrol, which is a risky business.
The best bet for getting to the Don with minimal trouble is to find one of the waterpipes on the side of the house. There's one to the west, which is usually overwatched by a somewhat sleepy guard, but the one on the east side of the house, which is only accessible by passing into the yard of the hacienda (and which will thus require you to be wearing at least a normal guard or worker outfit), leads directly into the Don's private quarters, where he plays cello. No lockpicks required! The main danger here is that the guard patrolling the eastern side of the estate, outside the walls, may see you either climbing the pipe or running around on the roof, neither of which are going to be necessarily neutral activities. If you have full map data, you can time your climbing for when he's facing away from you; otherwise, you'd best just take him out ahead of time.
When you're inside the room, all you need to do is wait for the Don to start playing cello, then sneak up behind him and use your poison, fiberwire, silenced pistol, or whatever else you have to kill him. Don't worry about the sound that the cello's making; breaking off a song midway through won't alert the nearby guards. You also don't have to worry so much about dumping the body, although you can feel free to throw it over the balcony if you wish; it'll land on one of the walkways leading to the seaplane hangar, where no one will ever find it.
Mission Three: Curtains Down
Objectives
- Kill Alvaro D'Alvade
- Kill Richard Delahunt
- Escape Opera
Intel
- The contents of toolboxes will not be searched when you are frisked.
- There is a lift shaft from the backstage area to the stage. It is closely observed and only actors are permitted.
- Lead Actors go to their private rooms to rehearse during breaks.
- The large chandelier is attached with bolts to the floor of the attic.
- Only actors are allowed on stage.
- Light Technicians have keycards to the Light Control Room.
- There is a light rack above the stage that might prove useful.
- The prop gun used for the execution in the opera is an exact replica of a real World War I pistol.
The Setup
As with last mission, you've got two targets to hit here, but unlike last mission, taking them out will be a linked operation; killing the first will let you more easily take out the second, especially if you plan your hit out well ahead of time. Your targets include Alvaro D'Alvade, an opera singer who's rehearsing the role of Mario Cavaradossi in the climactic third act of Tosca, and Richard Delahunt, the American ambassador to France and avid fan of opera. Both of them are involved in a child prostitution ring, which your client apparently wants to stamp out.
Alvaro will spend most of his time on stage, which is inaccessible to anyone but actors, so taking him out from there will be difficult. He does make periodic trips to his dressing room, however, if you're looking to kill him in a more mundane setting. Delahunt is going to be a messier proposition, since he's surrounded by Secret Service agents and rarely leaves his private booth. If you're not willing to go in guns blazing, there is a scaffolding surface that's reachable from the attic; you can shoot him from there when he leans over the railing while he's waiting in between rehearsals, but doing so, even with a silenced weapon, will ensure that everyone in the place comes gunning for you.
The Subtle Method
If you're looking to whack your targets without getting up close and personal, here's the sequence of events you'll need to follow:
- Exchange your ticket at the coat check to retrieve the Real WWI Pistol.
- Find an isolated worker or painter and steal his or her clothing.
- Use the disguise to penetrate to the backstage area of the first floor, where the dressing rooms are located.
- Take the stairs up to the attic and place a bomb on the chandelier supports.
- Sneak into the dressing room of the second lead actor (the room further to the east on the first floor backstage) and hide in the closet.
- Wait for the rehearsal to break, then wait for the actor to return to the room, place the pistol on the table, then leave for the restroom.
- Replace the prop WWI pistol with the real WWI pistol in your inventory.
- Escape the room, then quickly make your way to an area where you'll have a view of the main opera hall. If you can find the keycard for the lighting room above the Ambassador's booth, that would be an ideal spot.
- Wait for the rehearsals to proceed to the point where Cavaradossi is shot. When Delahunt sees this, he'll rush the stage in a panic, but will trip directly underneath the chandelier, which you can then blow with your detonator to kill him before exiting.
Getting Started
Luckily, if you plan to kill the targets in the manner outlined above, you won't actually need any of the weapons that are available to you; you'll be able to do everything with your bomb and fiberwire. You can bring along the sniper rifle or the silenced pistol if you suspect that you'd need them.
Grabbing A Uniform
Anyway, the first thing you'll want to do after gaining control of 47 is head inside and speak to the guard in the coat check; he'll walk over if he sees you standing near the rail. After getting the real WWI pistol from the coat, duck around the corner and head into the bathroom nearby. The first person to enter the room (and who may already be inside) will be a tourist, but if you wait near the garbage bin, a worker will eventually enter the room and use a urinal, allowing you to strangle him and dump his body in one convenient swoop. Just don’t forget to grab his uniform first.
With the worker's uniform in hand, you can walk outside and pick up his toolbox, into which you can place the real WWI pistol. You don't have to do so unless you plan on heading through one of the doors where you'll be searched, but it couldn't really hurt all that much.
There are a pair of ways to get backstage after you've picked up your disguise. The first is to head down the large steps in the main hallway and take a left; you'll wind up at a door with two guards outside of it. They'll frisk you, but if you've hidden the WWI pistol in your toolbox they won't find it. The other entrance is near the coat check room, and is unguarded. This secondary entrance is a bit longer, however, and will require you to pick the lock on a door in order to proceed through. Be sure to switch off the lights in the room before picking the lock, though, or you'll be spotted.
Planting The Bomb
Now that you've managed to obtain a uniform, it's time to get your ass in gear and plant the bomb. Once you've reached the basement area, find one of the stairwells up to the first floor, and you should find yourself backstage, in the hallway with the showers and the dressing rooms. Take a moment to familiarize yourself with the layout. There are four rooms on the western side of the wall, with Alvaro's room being the furthest to the south, near a bodyguard who sits outside and makes frequent trips to the bathroom. The second lead's room is nearby, and is also marked with a star. There's nothing to do there until the actors take a break, however.
The steps leading up to the attic are in the middle of this area, directly behind the stage area itself, so head through the double doors and take the steps up to the walkways above the stage. A small door here will lead you to the chandelier's anchoring, which you can attach a bomb to. The worker nearby can either be killed or avoided by waiting for him to leave the area.
Planting The Gun
Now that you have the bomb planted, it's time to make your way downstairs and plant the real WWI pistol. All you have to do is enter the secondary star's room and hide in the closet, just like R. Kelly. (Don't forget that this is the smaller of the two rooms, and is set further away from the bodyguard on the chair.) It may take a few minutes for their rehearsal to end and for the actors to return to the rooms, so just peek through the closet door towards the door of the room and kick back. You should be able to see and hear the actor when he enters the room, so if you don't want to sit staring at your TV while waiting around, feel free to crank the volume and read a magazine or something while you wait. Just keep the TV in eyeshot so that you'll see the actor moving around in the corner of your eye.
When the second lead does return to his room, he'll play around with the gun for a few moments, then set it on the counter while he goes to the bathroom. Time to implicate him in a little murder...pop out of the closet, grab the prop WWI pistol, then place the real WWI pistol on the counter in its stead. You probably won't be able to exit the room without being spotted, so hide in the closet until the actor returns, picks up the gun, and heads back to the stage.
Dropping DA BOMB
With the real gun placed in the actor's hands, you can return to the main portion of the stage and observe the action from any of the safe watching zones, such as the scaffolding beneath the chandelier anchors, the lighting room, or the audience seating area. If the Secret Service sees you attempting to enter one of the other booths, they'll usually either prevent you from doing so, or just shoot you. So don't!
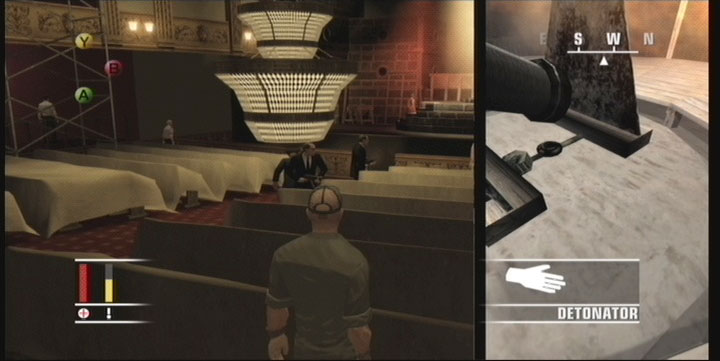
With a vantage point on the stage and the main walkway down the aisle, wait for the secondary actors to pop Alvaro in the head. When this occurs, Delahunt will rush the stage, from the direction of the main seating section, but he'll trip and fall directly underneath the chandelier, giving you a couple second's worth of time to hit your detonator and drop the chandelier to kill him off.
If Delahunt manages to make it to the stage, your only recourse will likely be to either follow him and shoot him point-blank, or attempt to snipe him from the light control room above his booth. Either way, it'll be messy and there'll be plenty of witnesses, but the sniping aspect will hopefully let you escape without being spotted.
Mission Four: Flatline
Objectives
- Find Agent
- Identify Target
- Smuggle Out Agent
- Escape
Intel
- Admission papers are required to check-in. Future patients often wait in the park outside.
- Troublesome patients are often confined to the medical wing.
- The brochure lists some interesting facilities such as a library, a gymnasium, and a large spa area.
- Therapists occasionally get contacted for private sessions.
- Some guests hide stashes of alcohol in quiet places. Let's hope they don't get alcohol poisoning.
- Weight lifting can be fatal.
- Some guests cheat on the spa's strict diet by smuggling camping stoves into their rooms. Sounds dangerous!
- Deceased patients are taken straight from the medical wing to the morgue.
The Setup
Your goal here is to infiltrate a rehabilitation spa, find out where the spa is keeping your fellow agent, learn from him the identity of the target you're supposed to hit, then kill the target and smuggle your comrade out of the facility via the oldest trick in the book: faking his death with chemicals and reviving him later. Simple!
Well, not really. The spa has surprisingly good security, mostly due to the presence of a few VIP guests. You're going to need to undergo a few costume changes to get to where you need to be, but luckily for you, you can probably get through the entire level without bringing in any of your customizable weapons. All you'll need are your poisons and fiberwire, assuming you're attempting to take a stealthy approach to the level.
Entrance
Your first goal is to enter the spa itself, which is only accessible to members, security guards, and the medical staff, of which you are none. Thus, in order to enter, you'll need to either grab a security guard or patient outfit, or steal a set of admission papers.
By far the easiest task here is to steal the admission papers. Just to the north of the security guard station, there's a little observation platform with a couple of benches on it, one of which contains the admission papers. If you can observe the movement patterns of the guards, you should be able to sneak up behind the smoker here and take the papers (while remaining crouched to prevent him from turning around), and be on your way.
(Alternately, you can attempt to kill one of the patients hiding by the dumpsters and steal his robe, or take the uniform from one of the meandering cops, but it'll be difficult to do either of these without either getting caught or being forced to leave the body in a conspicuous place.)
With the admission papers in hand, head towards the main entrance of the building and walk up to the nurse at the main counter. You'll get a prompt to place the admission papers on the desk, after which the nurse will escort you to a changing room. Trade in your suit for the patient's robe on the floor, get frisked by the guard at the door (drop any handguns or other weapons you're carrying in the changing room), and you'll be inside. Time to start causing some mayhem...
Alternate Entrance Procedure
If you don't want to go through the hullabaloo of entering the spa in this method, you can also try a more forceful approach. If you can ensure that none of the guards are watching you, you can climb one of the water pipes on the outside of the building, preferably the one further to the west, near the ICA marker on your map. You'll have to sneak underneath the ledge of the balcony above, lest someone spots you, but when you're on the north side of the building, you can drop down into the courtyard there. (you can also head through the locked doors in the middle of the extended hallway here.) Looking around will let you spot a breaker box on the wall, which is key to obtaining your security uniform here. You can either pop the box and lure the guard outside to kill him, or simply sneak into the security office and sedate him to obtain his uniform.
Inside
Now that you're inside the spa, you need to find out where the agent is being held. The main spa area features plenty of security guards, patients, nurses, doctors, and quite a few completely inconspicuous private security agents dressed up in robes and sunglasses, but none of them are who you're looking for. (Although a few of them are potential targets.)
In order to find the agent, you have to penetrate into the medical wing to the west, but doing so will be difficult while you're still in the patient robe. There are two passages, one involving a pair of keycard-locked doors, and another heading through the basement of the building. Both are going to be overwatched by security guards and white-clad orderlies, who'll order you out if they spot you roaming around. The key here lies in finding an orderly's outfit to wear; doing so will get you into the medical wing, and will thus be the last outfit that you're really required to find. Even therapists aren't allowed entrance to the white padded cell area, so the orderly uniform is key here.
Security Outfit
Anyway, we found it easiest to start with obtaining a security outfit, although if you're adept at sneaking about, you may be able to grab an orderly uniform straightaway by heading into the tunnel connecting the main building with the medical wing. You'll be escorted out if anyone spots you, but the numerous light switches will hopefully allow you to prevent that occurance.
Still, though, it's easiest if you have a security uniform to work with, and the easiest of those to obtain is of the guard at the camera station, which is recording all of the CCTV feeds for the building. To reach him, head up to the residential suites and enter your own room, labelled A. From there, exit to the balcony and jump off into the courtyard, being sure to land somewhere away from the window, or the guard might spot you. To kill the guard, you'll need to break the electrical box here, then hide on the set of small steps a bit to the northwest; when he comes out to investigate, sneak up behind him and either poison or fiberwire him to take him down. With that done, grab his uniform and dump his body in the dumpster nearby.
Orderly Outfit
Getting the orderly outfit is a bit more difficult. You can find two orderlies in the tunnel connecting the main building and the medical wing, in addition to a few more orderlies that lounge about in the medical wing itself. The orderly in the main office overlooking the padded cells is your best bet.
The orderly we’re going to be targeting is the one sitting in the chair in the orderly office here. Besides him, there’s only one other orderly on the upper floor here, and he often takes a break on the little terrace to the north, preventing him from seeing anything that goes on in the office. After the orderly on patrol comes in for some coffee, he’ll leave and head out to the terrace, allowing you to crawl over the counter here, kill the orderly at the desk, steal his uniform and keys, then dump his body in the bin near the coffee machine, all before the other orderly gets done with his break.
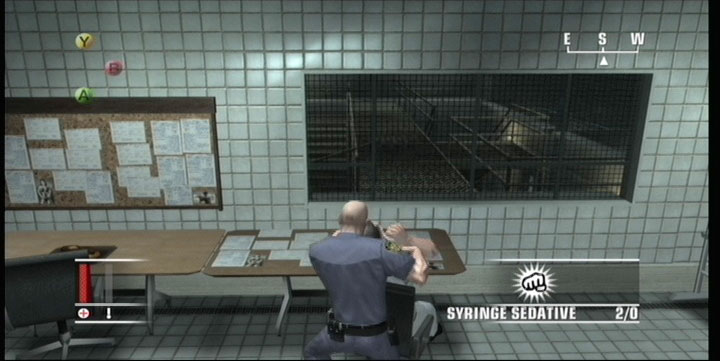
Agent Smith, I Presume
The orderly's uniform unlocks a magical world of intimate pleasures for you...or at least it lets you reach Agent Smith, who's found in the medical wing. You should have the cell key from the body of the orderly you took out, but if not, you can grab one from the orderly office overlooking the cells.
After speaking to Agent Smith, sedate him. (This is an action; you can't equip the death serum specifically.) When Smith is "dead", bust ass out of the medical ward and get back to the main building of the spa. As you heard on the telephone, you now have your target, as well as two optional targets, each of which will net you a $50,000 bonus.
Truth be told, these targets are pretty easy to kill. One of the three periodically lifts weights in the gym, one periodically cooks pasta sauce on his campire stove in his room, and one (your primary target) periodically returns to the library in an attempt to score some hooch from his stash in the globe there.

Globe Guy: There are two methods to stealthily kill the globe individual. The easiest is probably to wait until the library is clear of guests and no one's walking by in the hall, then pop the globe and dose the liquor there with poison from your syringe. He'll keel over, and no one will be the wiser. Alternately, you can head upstairs and find the chandelier that overlooks the globe in the library. Placing a charge on its anchor will allow you to detonate it and kill the subject when he passes underneath.
Stove Guy: The easiest of the three to kill, you can take out the Las Vegas Mobster by entering his room, room D, and sabotaging the gas valve on his propane stove. It's best to enter via room A, then head to the balcony and enter via the balcony door to ensure no one sees you. The next time he comes to cook something up, he'll be blown away - literally.
Stove Guy is Rudy Menzana, your primary target, so he's the only one of these three that you really need to kill. You can also take him out by walking upstairs to the western offices, opening the only unlocked door, and stealing the therapist's outfit there. With that on, you'll be able to lure Rudy up into a therapy suite for a little one-on-one counseling, then get behind him and poison him.
Weightlifting Guy: Wait until this guy starts weightlifting, then stand behind him and stand around until he’s almost done setting the weights back onto the bar. At this point, an option should come up to crush him with the bar. If no one is watching you, take advantage of the opportunity to kill him silently; no muss, no fuss.
The Great Escape
Well, not so much. All you have to do to get out of Dodge when Rudy's dead is head down to the morgue, near where you first entered the area. Head inside and revive Agent Smith, then walk over to the exit nearby to escape the level. Done and done!
Mission Five: A New Life
Objectives
- Kill Vinnie Sinistra
- Retrieve Microfilm
- Escape Suburb
Intel
- Garbage trucks can dispose of all kinds of waste.
- The surveillance team have an unhealthy appetite for donuts.
- Vinnie has complained about the neighbor's son taking pot shots into the garden with an airgun.
- Vinnie lives close to a veterinary surgeon. Sometimes a vet needs to tranquilize wild animals!
- Rumor has it that Vinnie's wife flirts with hired staff. But Vinnie trusts her completely.
- Some field agents are too nosy in teenage girls' rooms.
- A barbeque is being prepared for the party. Be careful with flammable liquids!
- Vinnie just bought a very expensive and unusual necklace for his wife.
The Setup
There's only one target here, Vinnie "Slugger" Sinistra. He's well-guarded, though, since he's in the witness protection program and is scheduled to testify in federal court in the not-too-distant future. Your hit is scheduled to take place in broad daylight, in the middle of a suburb, which further complicates matters.
Your ultimate goal here is to both kill Sinistra and retrieve the evidence that he's hiding; it's apparently on a piece of microfilm embedded in a piece of jewelry somewhere. You'll need to retrieve it before you hit the exit and get out of town.
Methodologies
There are a few different ways to get access to the Sinistra household, some of which are going to be more difficult than the others. The whole place is crawling with FBI Agents, who will take a dim view of you approaching the grounds; if they find you sneaking around in areas where you shouldn't be, they'll generally just shoot first and ask questions later, so be careful with your roaming. There are also cameras mounted on the sides of the house, both near the garage and near the garden area where the family dog is stabled, so if you get spotted, you'll probably want to make a pit stop at the surveillance van on the street outside the home to grab the video tape.
Hard Way
The hardest method for obtaining entrance to the home involves first infiltrating the veterinary clinic across the street, where you can find tranquilizer darts and ether. The tranquilizer darts are used in an air rifle, which can be found in the treehouse near the home to the northeast of the Sinistra house. If you climb up and load the air rifle, you'll be able to peg the dog in the garden with a tranq dart, thus taking him out for the rest of the mission and preventing him from barking at you when you enter the garden, which isn't guarded. There'll still be a camera mounted above the doorway entrance to the garden, so you may have to snipe it with your sniper rifle or shoot it up-close to disable it before heading through the doorway.
When you enter the garden, you'll have access to the basement, where an FBI agent will periodically make patrols. You may want to shoot out the lights to give you some shadow to hide in if you want to take him out, but he'll be difficult to kill regardless. You can also head through the garden to the backyard, where another FBI agent patrols near the door, as does the gardener/pool boy.
Medium Difficulty
A slightly less difficult way to penetrate into the house is by assuming a disguise. Before you head in, you'll probably want to grab the ether at the veterinary clinic.
There are two helpers getting ready for an upcoming birthday party in the house: a caterer, who makes periodic trips out to his van in the driveway, and a clown, who also occasionally comes out to his van, which is parked on the street.
The caterer is the more difficult of the two to kill quietly, since he's right in the driveway, where one of the FBI agents periodically patrols from around the side of the garage. He'll also be in full view of the neighborhood jogger if you don't time your kill correctly. Still, he can be killed when he stops to smoke a cigarette beside his van, if you're sure no one's watching. You may want to take him as a human shield and drag him around the hedge to the open manhole; although we haven't tried it, it seems likely that you can steal his uniform there, then use the manhole as a body dump. With the caterer's uniform, you can hide a weapon in the box of food that's in the back of his van and use that to evade the search at the door.
Clown Tears
The clown is seemingly even more dangerous, but he's actually the easier kill. When he stops at his van, he'll be out of sight of the agents at the door, and should also be out of sight of the nosy neighbor across the street, leaving only the jogger to worry about. More importantly, if you kill him near the van, you can take his uniform and dump the body in the back of the van without a problem. You probably won't be able to sneak in any weapons past the guards, but if you play your cards right, you won't need any.
Note that these two uniforms will only give you access to the foyer, the main hall, and the pool area of the house. Since Sinistra doesn't often head into any of these areas, you'll probably have to trade up to an FBI uniform. You can do so by heading to the pool area, wrapping around to the west side of the house, finding the waterpipe there, then climbing up into the second floor windows. If you can find the teenage daughter's room, you can pour your ether on her panties. When an FBI agent comes along to sniff them, he'll keel over, allowing you to take his uniform and hide his body in one of the closets nearby. There's no bin to actually stuff his body into, so you'll just have to plop it down in one of the rooms. No one should discover it, though.
Easy-Peasy
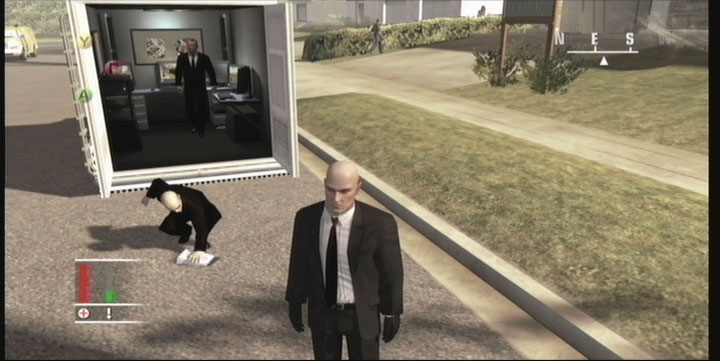
The absolute easiest way to nab an FBI agent uniform is as follows. Walk up to the caterer's van and grab the donuts in the back; just make sure the caterer isn't around to see you lifting them. With them in hand, find a quiet spot, such as around the corner near the manhole, and inject them with either poison or sedative. With that done, head to the surveillance van (the white van across the street from the locked-down house) and attempt to open up the rear door. One of the agents will actually pull his gun and intimate that the donuts don't actually belong to you!
Well, that's rude, but there's no point in antagonizing the FBI. Go ahead and drop the donuts, and the agent will pick them up and return to the van. Shortly thereafter, you'll have two dead or unconscious FBI agents on your hands, and you'll be able to easily dress yourself up to get into the house. (Note that there's also a context-sensitive command to place the donuts near the door of the car, then knock on it. Same results, but you'll be able to avoid being seen.) An FBI uniform will get you into all areas of the home, and you won't have to worry about being searched when you first enter.
Making Your Mark
Microfilm Hunting
Again, you'll need to both find the microfilm somewhere in the house as well as kill Sinistra before you can exfil. If you want to poke around a bit, feel free, but we'll give you a hint: the microfilm is actually somewhat mobile at this point.
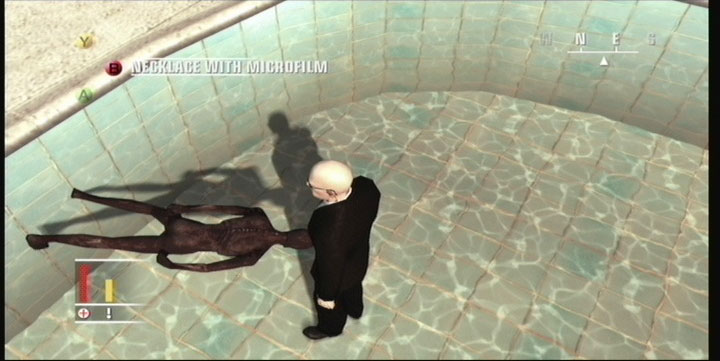
Can't find it? Well, that's not surprising; it's around the neck of Sinistra's wife, who makes her rounds around the pool and into some of the interior areas. It's probably possible to get her into one of the smaller indoor rooms by herself and kill her there, but it's much more fun to bust into the small cabin in the backyard and grab the lighter fluid there. With it, you can rig the grill near the pool with the fluid, which will then set Mrs. Sinistra alight when she tries to turn it on. This will kill her, of course, and she'll wind up in the pool, which you can enter to search her body for the microfilm, which conveniently doesn't burn up with the rest of her flesh.
Killing Sinistra
So far as Sinistra goes, there are two primary methods of taking him out. If you want to snipe him from a distance, you can enter the FBI surveillance van and use the Dial Phone (Witness) option on one of the computers there. That will give him a ring on his cell phone and force him to come to the window in the den, on the first floor. You'll be able to easily snipe him from the garage on the opposite side of the street after dialing his number, although you'll have to get into the garage without the nosy neighbor spotting you and following you inside. It'll help if you have your rifle set up and dropped on the ground before dialing the number, as he won't stay by the window forever.
Alternately, if you enter the house in an FBI uniform, you can wait in Sinistra's upstairs study, near the living areas of the house. (It's got a computer in it, as well as a picture of a large ship, if you're trying to figure out which room it is.) Every so often, Sinistra will get sick of the television channels and walk upstairs to check the sports scores, at which time he'll be alone in this room. If you hide in the little hiding spot in the room until he enters, you can sneak up behind him and fiberwire him while he's at the computer, thus finishing him off without a problem.
Note that you won't be able to hide the body, so if you're attempting to make this mission a complete success, you should save the Sinistra kill until after you've offed his wife and gotten the microfilm. That way, you can kill Sinistra, then make a break for the exit before any of the agents come looking for him.
Alternately, if you want a cleaner way of killing Sinistra, grab your FBI uniform, then head to the front of the house and pop the electrical box there. The FBI agent stationed in Sinstra's den will come outside to fix the box, allowing you to head in and poison him, then drag him into the closet nearby.
Mission Six: The Murder of Crows
Objectives
- Kill Mark Purayah, Jr.
- Kill Raymond Kulinsky
- Kill Angelina Mason
- Protect the Politician
- Escape
- Optional: Retrieve Diamonds Case
Intel
- Walkie Talkies transmit everything - even background sound and music, which could reveal someone's location.
- Clubs usually have a back entrance for the staff.
- Bookstore walls are like paper - you can overhear what's going on next door.
- Clubs in this area are known for having hat-dress codes and music themes.
- Some private apartments have a useful view.
- Pianos can kill - especially when they are dropped from the sky.
- A guy dressed as a yellow bird checked into a hotel room a couple of hours ago.
The Setup
The Secretary of the Interior is in New Orleans, stumping for the President during his campaign for reelection. He's got a price on his head, and for once, that contract hasn't gone to you. Instead, a trio of assassins are working the angles here, looking to take a shot at the Secretary, and someone's paying you to run a little counter-mission. Your goal? Assassinate the assassins before they manage to pull off the job.
Unfortunately for you, the Secret Service is doing an atrocious job of protecting their mark; there are plenty of balconies in the area from which a sniper could get an easy view of the Secretary as he wanders the streets on the float. Oh, and he's making his speech during Mardi Gras. The streets are flooded with people, any one of which could be an assassin.
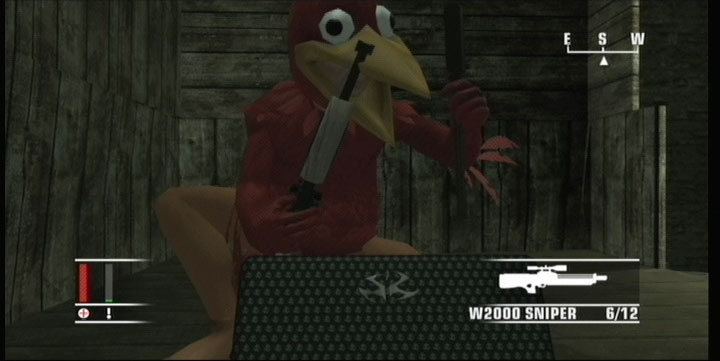
On the flipside, the prospective assassins have done you the favor of dressing up as chickens. Why? It's kind of unexplained. Anyway, there are three types of chickens roaming the streets: black chickens, which are the three assassins that you've been tasked with eliminating; yellow chickens, which guard the chicken headquarters and will defend the black chickens and each other; and a single red chicken. The red chicken is the bagman, and is delivering the payment to the black chickens to indicate that the hit is on. Their price? A case full of diamonds.
Starting Out
You're going to begin this mission in the same hotel lobby as the red chicken, who'll have a brief conversation with one of the gentlemen at the bar, then head out into the busy streets on his way to deliver the payment. If you have a rifle case, drop it somewhere in the hotel lobby here, preferably somewhere away from the normal walking paths. If you have to drop it in the streets, it'll eventually get picked up by a cop.

If you follow the red chicken closely enough, he'll eventually duck into one of the side alleys here and pause for a second, either to grab a smoke or to take a leak. His movements are randomized, but if you're lucky, he'll duck into the easternmost alley, and thus pause right next to the dumpster there. You don't necessarily have to kill him, but doing so and stealing his uniform will make your job that much easier. You'll also be able to grab the diamond suitcase, which will give you a few more options as to how to proceed.
You've got three targets here, and all of them need to be taken out before you can exit the level.
Mark Purayah, Jr.
Purayah is the brains of the operation, and dwells in an abandoned building in the far northwestern corner of the map. He doesn't leave the building, making it difficult to reach him unless you have the proper disguise.
Overhearing
If you decide not to kill the bagman before he delivers the diamonds to Purayah, then you can enter the bookstore next door to the abandoned building and head up to the second floor. If you find the boarded-over doorway leading to Purayah's little makeshift office, then you'll be able to overhear his communications with Kulinsky and Mason, during which Kulinsky should let slip his location. Mason will probably tell where she is as well, but since she moves around so much, this doesn't make much of a difference. At any rate, doing this will let you know where to go to take on Kulinsky.
Bombs Away!
Beyond that, there are two decent ways to kill Purayah. The first is to hijack the diamond briefcase, take the bagman's uniform, then slip a bomb into the briefcase and make the delivery. You'll have to place the briefcase on Purayah's desk via the command prompt that's there; if you just place it on the ground, then it'll be taken away by one of the guard chickens. With the bomb in place, wait for Purayah to sit down, then detonate it and he'll be toast. The bad part of this plan is that you'll necessarily forfeit the $100,000 bonus you get for exiting the level with the briefcase in hand.
Snipetastic
Secondly, and preferably, you can use your sniper rifle to take out Purayah from a distance. If you head into the alley to the south of the building that he's stationed in and look around, you should find a waterpipe behind a small fence. Climbing it will take you to a little sniper's roost overlooking the window of Purayah's office. He makes a circuit around his room, and periodically stops by the window. If you've upgraded your sniper rifle, then the shot should be an easy one.
Regardless of the method of death, you'll probably want to enter the building that Purayah was in and grab the walkie-talkie off of his body; this will mark the positions of both of the other assassins on your map. If you planted the bomb, then this will be a simple matter; if you sniped, then you'll have a harder time getting into the building. If you bring the diamond suitcase to the front door, they'll let you in, but if they don't have the suitcase, you'll have to find a yellow birdsuit somewhere and use that to gain entry.
The two easiest yellow suits to obtain are in the upper floor of the hotel, where one of the guard chickens has rented a room, and in the rear entrance to Purayah's building, where a guard is on semi-constant patrol. Wait for the guard smoking the cigarette in the doorway to head inside, then sneak in after him and hide in the closet. When he passes back to the door, kill him and grab his suit to gain free access to the building.
Raymond Kulinsky
Raymond is the killman here; he's set up a sniper's roost above one of the three clubs in the area, and isn't going to budge until he gets word to fire. Unfortunately, his position is generally determined at random, so far as we can tell, but he rarely chooses to take up a spot above the blues club to the south; we've most often seen him above the salsa club in the eastern part of the map.
Determining Kulinsky's location will require you to either eavesdrop on Purayah's conversations from the old bookstore or grab a walkie-talkie from the body of Purayah or Mason. The walkie-talkie is your best bet, as that'll pin down both Mason and Kulinsky.
Up Close And Personal
When you've determined Kulinsky's hideout, there are two methods to take him down. The more complicated method will be to infiltrate the club beneath him and make your way up to his roost. You can't just walk into a club, though, as they all have uniform restrictions which are difficult to get around. You can access any of the clubs, however, by obtaining a waiter's uniform. Most of the alleyways behind the clubs will have waiters stalking around on smoke breaks periodically, but the easiest way to obtain a uniform is to head into the alleyway behind the hotel where you start the level. Poking around will reveal a lattice near a plant; climb up this, and you should find an open doorway where a waiter is sleeping one off. Sneak in, grab his uniform, and you're set.
You'll need to enter the club with your uniform on, head into the rear areas, then find the room where Kulinsky is hiding before sneaking up on him and killing him. This is usually on the second or third floor of the building, and he does pace around, so be sure not to enter the room when he's looking in your direction, or he'll generally just start firing away, regardless of your outfit, although he may give you some leeway if you're wearing a guard chicken outfit.
Countersnipe
Secondly, you can attempt to countersnipe Kulinsky by finding a position from which you can see into the window of his room. If you head to the eastern set of alleyways, you can find two such positions. The blue door in the southeastern corner of the alley will lead you to an apartment from which you can snipe into the room above the salsa bar, while the waterpipe atop the raised platform will come out in a position that'll let you snipe away at Kulinsky if he happens to be in the rock bar. The blues bar is the most difficult to hit, since you'll have to snipe from the hotel room that the guard chicken has rented, and he won't give it up without a fight.
Anyway, when you have Kulinsky's position nailed down, take up a position in the countersnipe spot, get your sniper rifle out, and wait for him to walk to the window before nailing him.
Angelina Mason
Angelina is the most difficult of the three targets to take down, since she roams all around the map, making periodic stops in the alleys around the map. Once you get her position on your map after picking up a walkie-talkie, she's easier to track and kill; just get in front of her, wait in one of the alleys that she's approaching, and perform a stealth kill as best you can. If you do go this route, be sure to save her for last, as that'll give you a better chance of exiting the level without having her body be discovered.
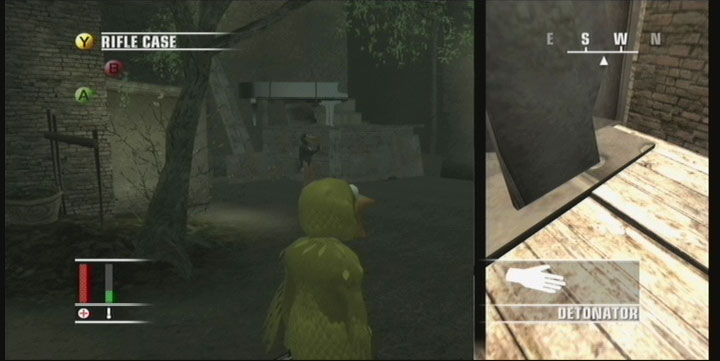
Alternately, you can try to drop a piano on her head. In the alleyway to the south of Purayah's little hovel, there's a piano suspended from a rope. You'll have to climb up via some nearby trashcans and do a little platforming to reach the winch, but doing so will let you plant a bomb on it. At that point, all you have to do is wait for her to make her rounds back to this alleyway, then detonate the bomb to get her with one suspicious-looking accident. Still, it's an accident nonetheless...
Beating The Street
When all three of your targets are dead, you're considered to have automatically "protected the secretary", so that objective is wiped off the list and you can escape. Note that, although the intelligence indicates that Kulinsky and Mason will go crazy somehow if either of them are killed, this doesn't seem to actually happen, unless perhaps we just didn't wait long enough between killing them. Also note that, again, making it to the escape point with the briefcase of diamonds will net you 100,000 extra dollars. You won't be able to escape with both the diamonds and your sniper rifle, but paying for the rifle retrieval will only set you back $5,000, so it's well worth the effort to get the diamonds instead.
Mission Seven: You Better Watch Out...
Objectives
- Kill Lorne De Havilland
- Kill Chad Bingham, Jr.
- Retrieve Video Tape
- Escape the Estate
Intel
- Don't expect any presents this year - Santa drinks too much.
- The bartender knows how to help improve performance in the grottos.
- Waiters often shower in the staff changing room.
- Even small, annoying dogs eat sausages.
- The glass-bottomed outdoor jacuzzi looks down on the pier 70 feet below.
- Among the high society, spiked drinks are all the rage.
- Heavy light rigs are installed in the Photo Studio.
- Lorne recently hired a former US Airforce helicopter pilot.
The Setup
You've been tasked with infiltrating the mountain estate of Lorne De Havilland, a well-known pornographer. Your client wants you to eliminate De Havilland, who's making a bit of a side career in blackmail, as well as Chad Bingham, Jr., whom De Havilland is blackmailing after he happened to kill a call girl. Apparently the tape is being dangled over the head of Bingham's father, a senator, with the hopes of getting money out of him during a critical reelection campaign. You also need to retrieve the videotape that's being used to blackmail Bingham.
Now, this mission looks really complicated; there are four different map levels and a lot of different areas to wander around in. Once you figure out how to kill your two targets, though, and find a spot where you can obtain a bodyguard uniform, things simplify somewhat.
Note that the loading screen for this level features a third individual in the background, marked with a question mark. This Black Widow character doesn't appear to be an optional objective, so far as we can tell, but dwells in the love grotto area of the Main House level. You'll spot her when you first walk in through the door, as she beckons you into one of the siderooms, but if you enter after her, she'll turn you around and jab you with poison. Fun! It's possible to kill her by moving away while she's getting the poison out, then turning around and returning the assassination favor, but it's best to just leave her be, as far as we can tell.
The Uniform Dance
You're going to start off here with your normal suit, which is good for wandering around the pier and the bar area at the top of the elevator, but not much else. If you want to access the grotto and the VIP lounge, you'll need to get a VIP Guest uniform.
VIP Guest
To do so, get into the elevator here, then ride to the top. (You can avoid the CCTV by walking behind one of the guards standing next to the elevator's entrance.) The elevator only ever brings people up; no one ever seems to want to go down. That's good for you, though, since you can take advantage of the ride down to climb up into the hatch and pull out your fiber wire. If you got into the elevator as soon as the level started, then the second guest in should be one of the VIPs, allowing you to strangle him and steal his suit. (You can only change clothes when the elevator has stopped, by the way.) If you miss the first VIP, then you'll have to wait around for another one to come up. The VIPs are the guests with the flashing hearts on their suits.
If you want to head straight for a Christmas Guard uniform, note also the guard office near the laser tripwires elsewhere on this first level. If you wait for the guard inside to turn around and head to the soda machine, you can sneak into his office and ice him, but you'll have to dispose of his body off of the railing nearby before the other guard that patrols through here stops and finds it.
Bodyguard
With the VIP suit on, head into the bar area and speak to the bartender to grab the aphrodisiac, which'll come in handy later on. For now, though, just grab it, then head through the guarded passageway nearby to reach the VIP lounge. The love grotto is in the northeast corner of this section, behind a pair of red doors; the first thing you'll see when you enter is a VIP canoodling with the aforementioned Black Widow character. She'll enter a room and beckon you in after her, but again, if you enter, you'll have to either kill her or be killed. You can also find the unconscious body of the prostitute she's knocked out behind the couch.
Regardless, your goal here is to head down the steps in the southeastern corner of the grotto, which lead down to a small balcony that's on the Staff Terrace section of the map. There's a bodyguard who periodically heads through the door to the upper level of the steps, but he's not all that hard to avoid. When you hit the balcony, jump over the railing onto the rock ledge along the cliff, then follow it along until you reach the terrace.
Now, in order to grab a Bodyguard uniform, you can pop open the utility box nearby and wait for one of the bodyguards to step outside to fix it. There's a small chance that you might be spotted if you use your fiberwire on him, since there's a couple of guards on patrols through the hallway nearby, so your best bet is to grab him as a human shield and drag him around the corner to the body disposal box before knocking him out and stealing his uniform.
With the bodyguard outfit on, you have unfettered access to almost every area of the map, with the exception of the helipad. You can actually reach the helipad, which is one of your exit points, but doing so will require you to be frisked, so you might have to give up some of your custom weapons to use it as an exfiltration point.
Chad Bingham, Jr.
Bingham spends pretty much all of his time in the jacuzzi on the Main House - Terrace level. He only moves if you force him to, but is fairly easy to kill anyway, depending on your bodycount preference.
Low Bodycount
Talk to the bartender in the Main House bar to grab a stock of Aphrodisiac. (You can also grab some from behind the bar if you have a waiter or security uniform.) Walk from there to Bingham's location a couple of times, and you should see a white-clad waiter ferrying drinks back and forth from the bar to the jacuzzi. After the waiter drops the drink off at the bar, walk up to it, and you'll get the prompt to add the lovejuice to the drink. This will raise some eyebrows, but shouldn't automatically make anyone start shooting at you; just back off from the bar for a bit and head to another area until things cool down.

When the waiter gives the spiked drink to Bingham, he'll get horny and head off to the grottos in the company of a lovely lass. Follow them and wait for their little tryst to end; it won't last all that long. When it's done, Bingham will walk down the steps nearby and wind up on the little balcony at the bottom for a smoke, giving you the perfect opportunity to strangle him. You can just leave his body where it is; no one else should patrol this way.
High Bodycount
The second method of taking down Bingham is much easier and is unlikely to get you caught, so it might be worth your while if you don't want to deal with luring him into the grotto and all that. Simply head into the grotto yourself, walk down the southeastern stairs to reach the small balcony there, and look up. You'll notice that the jacuzzi that Bingham is in is bottomed out with glass. Well, glass breaks when it gets shot....
That's right; a simple gunshot to the bottom of the jacuzzi will cause the water to drain, sending Bingham and the rest of his female companions to the pier 70 feet below. Needless to say, none of them will be surviving the fall. It's an inelegant method of killing, but a very efficient one.
Lorne De Havilland
While Bingham can be killed with a mere VIP Guest uniform, getting to and taking down Lorne will require at least a Christmas Guard outfit. Reaching the Studio Floor level, where Havilland spends all of his time, will require a Bodyguard outfit. Since you're going to have to reach the Studio level to retrieve the videotape as part of your objectives, go ahead and nab one as outlined above before taking him down.
Sniping
If you have a sniper rifle, or any weapon with a decent scope, you can snipe Havilland from the roof of the Main House. To get there, head to the Main House - 2nd Floor level, where all of the guards walk around on the terrace outside. At the very southern edge of this map, there's a set of double doors heading into the house, but right next to these doors are a set of stones that act as a makeshift ladder. If you can avoid anyone spotting you climbing up, they'll lead to the roof. If you sit up there for a while, you'll spot Havilland walk out onto the balcony of his personal apartment, allowing you to line up your shot and take him down from a distance.
Accidental Death
On the Studio Floor level, there is, believe it or not, a small studio set up for porn shoots. Havilland makes his rounds through here, and stops right underneath a set of lights suspended from the ceiling. If you climb up into the rafters via the ladder near the southern door, you can plant a bomb on the eastern side of the room and blow it when Havilland walks underneath, leaving you with one seriously smaller porn king.
Old-Fashioned Close Quarters Kill
As mentioned, Havilland periodically makes his rounds out to the balcony of his private apartment. If you follow him there, he'll be peaceful and alone, allowing you to snap his neck, put a bullet in his brain, push him over the railing, etc.
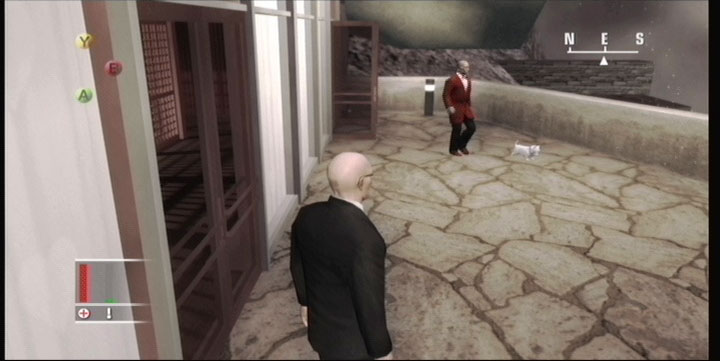
The complication here is that his little doggie that follows him around won't take too kindly to your presence, and may alert the guards by following you around after the kill. You can eliminte that possibility by heading to the kitchen on the Main House - First Floor, finding a sausage on the countertop, and dosing it with sedative or poison. If you do so, then you can bring it up to the Studio, drop it on the ground in front of Havilland's path, and wait for the dog to keel over. That'll solve that problem handily.
Odds And Ends
The Blackmail Videotape
If you want to complete all of your objectives, you'll have to obtain the blackmail videotape. It's on the Studio Floor level, in a small control room in the center of the map, lying on a table. To grab it, you can either wait until the single guard in the room walks away, or turn off the lights to force him to move. Apart from that, it's a simple snatch.
CCTV Videotape
You're going to get caught on video during this level; there appears to be no way around that. If you want to steal the videotape, you'll have to head into the guard quarters on the Main House - 2nd Floor level to retrieve them. Unfortunately, the quarters are quite small, and there's a guard on duty there at all times, with another one making periodic rounds into the room. Getting the tape without being detected is difficult, but you may be able to do so without killing anyone by snatching it as the guard moves from one table to the next, or by switching the lights off and grabbing it with perfect precision. Regardless, you might want to save your game first.
Other Uniforms If you want, you can obtain the Santa Claus outfit by heading into the kitchen area and spiking the bottle of port with poison or sedative. You'll have to wait a while for him to retrieve the bottle and drink from it, though. This doesn't give you any special clearances, though, so there's not much reason to nab this uniform.
If you go to the Staff Floor level, you can also obtain a Waiter uniform by looking around in the showers there. This may allow you to add the Aphrodisiac to Bingham's drink without arousing any extra suspicions, but it's not necessary for anything.
Mission Eight: Death On The Mississippi
Objectives
- Kill Skip Muldoon
- Kill the Gator Gang
- Retrieve Pictures
- Escape via the Rescue Boat
Intel
- The engine room is off limits to passengers - the furnace is a dangerous workplace.
- Man over board - the wild waters of the river will cause certain death.
- The captain's cake is being prepared in the galley in the rear of the 4th deck.
- Only the 1st Class Pursers are allowed in the Gators' Private area.
- The lower class kitchen prepares food for both the tourists on board as well as the Gators on the top deck. Extra flavor could be added.
- The boss has received some heavy duty hunting gear from a business alliance. The present is kept secure at the staff quarters.
The Setup
You seem to have the most altruistic clients in the world - this time they've tasked you with taking on a gang of drug smugglers that run a riverboat up and down the Mississippi. This is going to be a high-bodycount operation, with seven primary targets and a few other ancillary kills likely being necessary. Luckily, the riverboat is a fairly simple area to walk around in, at least compared to the mountain enclave shown off in the last level. There are five levels to explore, but most of them are going to be blocked off from you at the outset, at least until you obtain a new uniform.
Starting The Con
You begin this level on the lowest deck of the ship, the Engine Room level. You're not capable of entering the engine room, though, or not in your suit at any rate. You'll need to find a sailor outfit before you can head inside. You can feel free to just move on up to the upper deck, where your suit will fit in just fine, but your first of the six Gator Gang targets happens to be walking around in the engine room, so this is a good place to start.
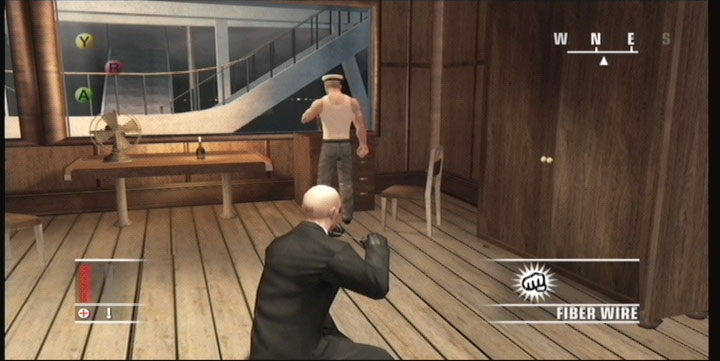
To get a sailor uniform, you can either stalk one of the sailors that walk up and down the eastern and western sides of the ships until you spot an opportunity to off one of them, or you can head up the stairs above the ICA on your map to the control room. The room is locked initially, but if you wait a while, one of the sailors that prowls around on this level will open up the door, walk through it, and head over to the radio to grab a drink. He'll stay there for a few moments, letting you follow him through and nab his uniform after snapping his neck. You don't need to worry about hiding the body, since he should be the only soldier passing through this area.
With the sailor uniform on, head back down the stairs and enter the lowest level of the engine room. As mentioned, the first Gator has a route through this area. He stops in a few different areas, but the best place to kill him is at the far southern end of the western piston, where he stops and leans over the rail. If you sneak up behind him here, you can take him down without a mess by pushing him over into the piston's recessed flooring.
Moving On Up
Head through the door on the southern end of the engine room to reach a pair of stairs leading up to the 2nd Deck, Staff Quarters. There isn't much on this level to worry about, save for a uniform change. If you head into the southwesternmost room here, you can find a Purser uniform (think fancy waiter) on one of the benches in the locker area. Take it and move on to the northern end of the area, where another set of steps leads up to 3rd Deck, Cabin Deck, where all of the passenger cabins are located.
Turning north into the hallway here will reveal a startling sight: one of the Gators is canoodling with a female guest! As soon as they spot you, they'll get startled and head into one of the cabins here, but they'll only remain inside for a short time. When the woman leaves, you can head inside the door before it closes and sneak up on the Gator to strangle him. Be sure to shut off the lights in the apartment before heading out through the door, and close it quickly, to minimize the chances of anyone seeing the body if they happen to be walking down the hall when you come out.
If you miss your opportunity to make the kill inside the room (the door locks when it shuts), you'll have to wait for the Gator to leave the apartment. He'll move down to one of the railings overlooking the water, giving you ample opportunity to take him out. Note that he can sometimes be difficult to just push over the railing; you might have to strangle or shoot him before dumping his body, so allocate the extra time needed. The benefit to this strategy is that there'll be no body to discover; if you kill him in the room, the woman will eventually come back and find him, although you can of course simply kill her as well to eliminate this possibility.
The Penguin
Your next goal is to find both a Tuxedo and a VIP Pass, which will give you access to the VIP areas of the Restaurant Deck. There are two methods of doing so. The more difficult will be to kill the drunk guest wandering around the main hallway of the Cabin Deck; he has both items in his possession. This is difficult to do, since he's in such an open area; at least one other guest makes regular patrols down the hallway.
An easier way to get the Tuxedo is to head up to the Restaurant Deck. There are three separate large areas here: the northernmost area, which is a buffet for the commonplace passengers; a more exclusive area in the middle of the level, which is accessible only to guests in eveningwear or Pursers; and a VIP area to the far south, accessible only to guests in eveningwear with VIP passes or 1st Class Pursers. At this point, you should still have on your Purser outfit, so you can get to the exclusive area. As soon as you do so, a guest off to your right will call you over, thinking you're a waiter. If you hear him out, he'll ask you to bring a bottle of champagne to his cabin, #323, and give you a keycard.
With this keycard, return to the Cabin Deck and proceed all the way to the southern end; room 323 is one of the larger, luxury cabins. Using your keycard here will gain you access, and inside you'll find a Tuxedo and a VIP Pass, both of which you'll need to obtain your next uniform.
1st Class Purser
Now, with the tux and the pass, head back up to the exclusive dining area and head south into the VIP area. The southwestern door here will lead to a small poker room with only two gentleman playing. Shortly after you bust in, both of them should leave to take a breather, allowing you to pick the lock on the southern door, which leads to a small break room. If you check around to make sure that no one's inside, you can head inside and find a 1st Class Purser uniform on the southern end.
Finishing Off The Gators
The 1st Class Purser outfit should give you access to all of the various levels of the ship, including the Gators' Private Deck atop the ship, assuming you consent to be searched. Your goal now is to take down the remaining four Gators, kill Skip Muldoon, grab the pictures from Muldoon's safe, and make it to the southern end of the lowest deck to escape. These objectives can be accomplished in any order, but we'll deal with the Gators first.
Restaurant Deck Gator
A single Gator patrols the southern end of this deck, making occasional stops into the kitchen. If you follow him long enough, he'll eventually make a stop near the ICA at the southern tip of the ship, allowing you to push him off. Otherwise, this deck is deserted enough to let you pop him from behind with a silenced weapon and dump the body overboard with no one being the wiser.
Three Gator Deck Gators
To kill the three Gators on the uppermost deck, you can start by attempting to poison them with burgers. You can pick up a tray of burgers in the common kitchen on the Restaurant Deck. Note that there are two kitchens here, including an exclusive one on the southern end of the level. The common areas of the ship are serviced by a smaller kitchen, though, which you can find near the bathrooms between the common and exclusive dining rooms. Inside, there'll be a tray of hamburgers, so grab it and head back to the southern area of the ship, near the stairs that lead up to the Gator Deck. When you have a quiet moment, drop the tray and dose it with poison. Note that there are three burgers on the tray, each of which can be dosed individually. Sedatives aren't going to be all that useful here, since as soon as a Gator goes to sleep, they'll usually be woken right back up, so you should probably use both of your poison shots here.
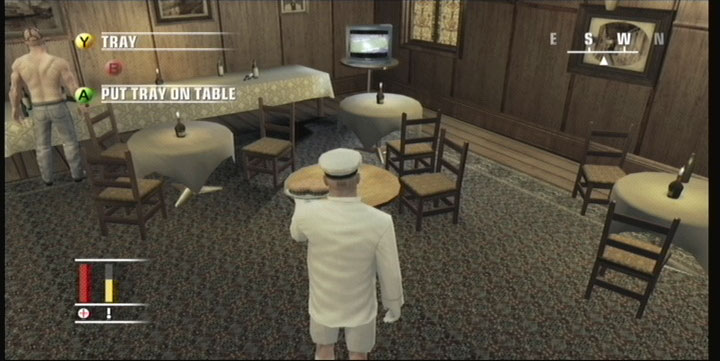
Place all of your weapons into the ICA underneath the stairs, then head up and go through the door guarded by one of the Gators. He'll frisk you, but you shouldn't have anything to worry about, since you dropped all of your weapons off...right? Anyway, head past him into the Gator break room (with the television and the pool table) and place the tray on the small table there.
It'll take a long time for all three of the Gators on this deck to grab burgers, so give it a few minutes before you start killing people the old-fashioned way.
If you miss with the burgers (however that's possible), or just want to kill off people normally, here are the routes. The guard that patrols up the eastern side of the deck here will make bathroom breaks every once in a while, so you can wait inside the restroom near the break room and strangle him when he enters. The soldier on the west will sometimes stop near Skip Muldoon's TV to catch the action, so you can kill him there if you must, or push him over the railing when he stops to look at the water. (You'll want to save the interior kill until after you've taken out Skip, obviously, and the railing kill will be simplified if you can eliminate the sailor walking around first.)
Lastly, the Gator watching the door will periodically shift positions from side to side. If you wait until he's on the eastern side of the door, you can sneak up behind him and strangle him without too many problems, assuming you wait until any passersby walk past. The only other individual who should be roaming this area is a waiter who comes by quite rarely, although of course you'll have to deal with the other Gators as well, meaning that the door-guard Gator should probably be saved for last.
Skip Muldoon And The Papers
Skip is easy to kill, luckily. Just head down to the exclusive kitchen on the southern end of the Restaurant Deck in your 1st Class Purser outfit, and you'll be told by the purser there that it's your job to deliver the cake up to Muldoon in his private quarters. Grab it and dose it with poison or sedative, then head up to the Gators' Deck and walk in past the frisker.
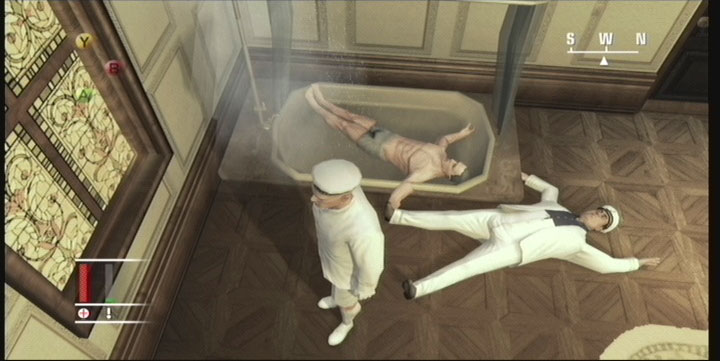
When you reach Muldoon's little lobby area, you can place the cake on the desk. Shortly thereafter, he'll take a lick of frosting and keel over dead. If you want to hide his body out of sight, then you can also take down his boytoy, showering in the next room, and drag the body into the bathroom. This is the way to go if you dosed him with sedative; drag his body into the bathroom after killing the guy in the shower, then shoot him in the head with a silenced weapon.
The papers you require are in Muldoon's bedroom, off to the west of his office. You don't have to crack the safe or anything; just open it and grab the papers. This area's off-limits, even to 1st Class Pursers, so wait until he's dead before heading inside.
Wrapping It Up
With all of your tasks completed, head down to the southern end of the Engine Room deck to grab the rescue boat to escape. The only other item of note here is the specialized rifle that can be found in a room on the Staff Quarters deck. If you grab it, you can add it to your Hideout's cache of weapons by escaping the level with it in tow.
Mission Nine: Till Death Do Us Part
Objectives
- Kill The Groom
- Kill the Bride's Father
- Ensure The Bride's Safety
- Escape
Intel
- Guns and shooting in outdoor areas don't make Rednecks panic.
- The water is home to alligators.
- The Priest rings the wedding bell to announce the ceremony.
- The father's recently deceased brother is buried at the family graveyard.
- The groom can't keep himself away from the whipped cream on the wedding cake.
The Setup
Simple enough. Take down two targets, including the bridegroom and the bride's father, but be sure to leave the bride alone.
The two targets don't keep close company, so you can take them on in any order. The bride's father is a bit eccentric, perhaps driven so by the death of Skip Muldoon, his brother, so he roams around a bit, choosing primarily to cavort in the family graveyard in between trips up to his second-floor private rooms.
The groom is a bit harder to isolate, since he spends a lot of time in the common areas of the level. Most of the time he'll be pretty close to the bride, as well, so you won't be able to casually take him down with a hidden bomb or something similar, since killing the bride results in a failed mission.
Uniforms
Guest
To get into the main house, which is a prerequisite for making decent quiet kills, you'll first need to obtain a Guest uniform and a Party Invitation. Both of these are essentially going to fall into your lap, though. If you walk up onto the mansion's lawn at the beginning of the level, you'll spot a drunken reveller staggering back to the burned-out building on the southern end of the level. When he gets there, he'll stop and lean up against the wall, well out of sight of the rest of the partygoers, allowing you to creep up and steal both his invitation and his outfit. Dude must be really drunk.
With the uniform and the pass, you'll be able to head north and enter the mansion through the main doors, no frisk required. Doing so will put you that much closer to obtaining a Gangster uniform, which is going to be what you'll probably need to pull off your hits. If you move extremely fast, you can finish this mission without getting a Gangster uniform.
Gangster
There are a couple of ways you can obtain a Gangster uniform. Well, actually, there are a huge number of gangsters walking about, but only a few will be easily killable.
The first is outdoors, on the northwestern corner of the mansion's large first-floor patio. To get there, head to the home's main staircase, where you entered the house, and look around on the western side of that room for a door marked "Washrooms". Head through there to find a window opening up onto the northern patio of the house, where a lone gangster stands, watching over the bayou. Killing him will net you the uniform, and you can drag his body to the storage box nearby to ensure that it stays safe.
Alternately, if you can pick a lock on one of the rooms leading to the two smaller stairwells on the ground floor, you can head all the way up to the attic of the house, where there's a utility box wreathed in shadows. After busting it open, hide behind some boxes, then pop the gangster when he comes to investigate. Note that the stairwells are off-limits to guests, though, so you'll have to be sure that you avoid any gangsters on the way up if you want to pull this off.
Pappy Leblanc
Pappy is a bit soft in the head now that he's entered his dotage, so he's not going to have much of a stable pattern of movement; indeed, he doesn't even manage to attend his daughter's wedding! That said, if you move quickly, you should have a few opportunities to off him without gaining much attention.
Leblanc starts the level in his second-floor den, where he sits for a while and watches television. Eventually, though, he'll leave his room, wander down to the first floor, and head out to the family graves in the northwestern corner of the exterior portion of the map.
Taking Down Pappy
Your best bets for killing him are to perform one of the following.
Quickest Method
If you manage to make it to the interior of the main house as quickly as possible after getting your guest uniform and invitation, you can sprint up to the patio on the northwestern corner of the house. This is where Leblanc exits the mansion on his way to the graves, so if you catch him on the way out, you can pop him with a silenced bullet on his way down the steps to off him. The gangster nearby shouldn't hear you if you keep it at one or two shots, and you'll be able to dump his body in the nearby storage bin with minimal trouble.

Accidents Happen
If Leblanc makes it to the family graves, then you can follow him if you happen to nab a gangster's uniform. There are two spots where you can cause an accident here. The first is over the grave of Skip Muldoon; just get up behind him and push him in. No one should be able to observe this, so it works quite well. Alternately, on his way back to the house, he'll stop and stand over the murky waters, looking out over the railing into the swamp. Pushing him in here will be just as deadly, but have a greater chance of someone spotting you.
Couch Potato
If you wait long enough (until after the wedding ceremony takes place), you can off Leblanc in his private quarters on the second floor of the mansion. He'll retire there to, again, watch some television, but he'll be alone in the room, so all you need to do is grab a gangster uniform, head into the room, let the door close, then strangle or shoot Leblanc in the head. There are going to be guards standing by the northern door, though, so be sure not to exit through that door when you leave.
Buddy Muldoon
Ol' Muldoon here is the bridegroom, and has a few specific ways in which you can take him down, from the spectacular to the mundane.
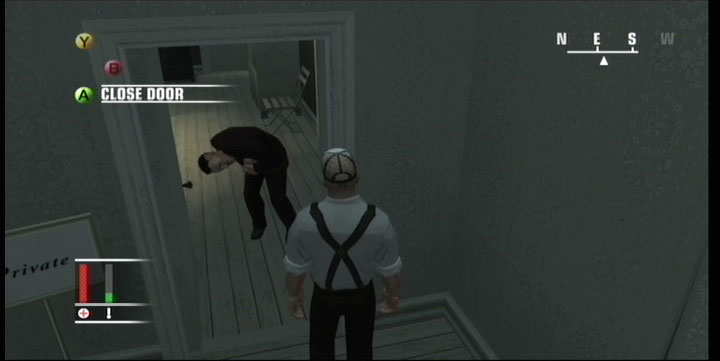
Cake Poisoning
To the east of the reception area is a small kitchen that the waiter periodically returns to for a fresh tray of drinks. Another waiter will be taking trash from here to the dock outside. If you can sneak in between their little routes (or if you have a waiter, gangster, or priest uniform to gain access to the kitchen), you should be able to quickly dose the cake with poison and slip back out without being noticed. Muldoon will occasionally waltz in for a taste of the cake's frosting, so doing this will result in a dead groom with no witnesses. Muldoon stops tasting the cake after the wedding, though, so you'll have to act fast if you want this to be your method of killing.
Bullet To The Head
Muldoon is difficult to get alone at any stage of the level; he's almost always going to be in the middle of a crowd. So if you want to take him out with gunfire, your best bet will be to snipe him from a distance during the wedding ceremony itself.
Note that, if you don't want to bring your own sniper rifle into the level, you can find an Elephant Rifle on the wall of Leblanc's second-floor den. With that or the W2000 in tow, you can set yourself up in one of the windows of the attic or on the second floor of the greenhouse to get your shot. Just be ready to run as soon as you take your shot, since you'll probably have a gaggle of gun-toting wedding guests making a beeline for your location; clear the scene before they arrive if you don't want to get gunned down.
Piano Punishment
Before and after the wedding ceremony, Muldoon will step up to the piano in the reception hall and tap out a few notes in a desperate grab for attention. There happens to be a chandelier above his head, which you can cause to fall on him by planting a bomb on its anchor in the attic. The anchors are a bit difficult to spot in the dark, but there are three in all, with one on the south end of the attic and two in the north. The one you want to plant a bomb on is in the northwestern corner of the attic. With the bomb in place, you can head back down to the first floor and off Muldoon when he tries to get musical. This method of killing does impact your rating, or so it appears, since it's difficult to pull it off without obtaining a gaggle of witnesses to the act.
The Speed Run
If you act quickly, you can polish off both of your targets within a few minutes after starting this level, and obtain a near-perfect or perfect rating on the mission. The basic steps here go something like this: wait for the drunken guest to fall asleep, then grab his outfit and invitation. Run into the mansion and wait outside the kitchen door for an opportune moment to head in and poison the cake, which will likely be just after Muldoon gets his first taste of the frosting.
When the cake is poisoned, head out to the northwestern edge of the patio and wait near the door that Leblanc leaves from. While he's heading down the steps, pop him in the head with a silenced bullet and dump his body in the bin nearby.
At this point, you've effectively won; all you have to do is wait for Muldoon to taste the poison and keel over dead. It'll probably be a minute or two, so return to the drunken guest, retrieve your suit, and stand up next to one of the riverboats on the southern edge of the level so that you can just hit a button to escape as soon as Muldoon dies. If you do all this properly, you should be able to wind up with a perfect ranking and no notoriety for the level.
Mission Ten: House Of Cards
Objectives
- Kill Sheikh Al-Khalifa
- Kill the Scientist
- Kill Hendrik Schmutz
- Escape
- Optional: Steal Diamonds
Intel
- It would be wise to check in at the reception as one of the first things you do at the Casino.
- Security is very tight in high profile casinos, so staff have keycards which only provide access to the floors they work on.
- As requested, we have left an Agency Pickup in your hotel room, #701.
- The casino has strict fire-safety procedures. Easily accessible fire alarms are located on the top floors.
- It's important to find good vantage points. Room balconies may provide this.
- The VIP Lounge has been reserved all day by the Shiekh - only waiters are allowed in this area.
- There is no cell phone coverage inside the casino to prevent cheating. Anyone receiving a call has to step outside.
- The items used in the trade are carried around in an ordinary-looking suitcase so they don't catch too much attention.
The Setup
Well, three targets...that shouldn't be all that complicated, now should it? Think again. Although two of your hits here are relatively simple, the third kill, on Sheikh Al-Khalifa, is probably going to be your most difficult of the game thus far. Regardless, you need to take on all three of them in order to complete your assignment.
The Silverballer will, as usual, be pretty handy here, but if you want to make life easier on yourself, you're going to want to pack the W2000 sniper rifle with as many accuracy upgrades as you can possibly buy. Some of the hits here are easiest to perform if you have the ability to shoot from one side of the casino to the other, which is only going to be possible with a well-scoped sniper rifle. It's by no means absolutely necessary, but like we said, it'll make life easier on you.
The first thing you'll want to do when you enter the casino is head to the registration desk, which is manned by two lovely ladies. One of them will give you your keycard, which also happens to grant you access to the seventh floor in the elevator. It's from there that you'll launch your life of crime.
The Handoff
The basic procedure for what's going down in the casino is this: Schmutz has a briefcase full of DNA samples that he wants to sell to the Sheik. The briefcase is initially being held in his room, 707, but Schmutz will eventually wind up taking it downstairs to the VIP Lounge in the casino to meet with the Sheik. He's under almost impenetrable guard there, with many bodyguards. No one can enter this area save for Schmutz or waiters, and waiters are prevented from entering if they're carrying anything that could conceal a weapon, such as a suitcase.
When Schmutz delivers the DNA, it will be taken away and replaced with the payment suitcase. The DNA goes up to the eighth floor, to room 803, which is where the Sheik's scientist, Tariq Abdul Lateef, is under heavy guard. (Lateef is also the individual that brings the payment suitcase into the hotel.) When Lateef checks out the DNA, Schmutz will presumably be free to leave, although this never seems to occur in our copy of the game.
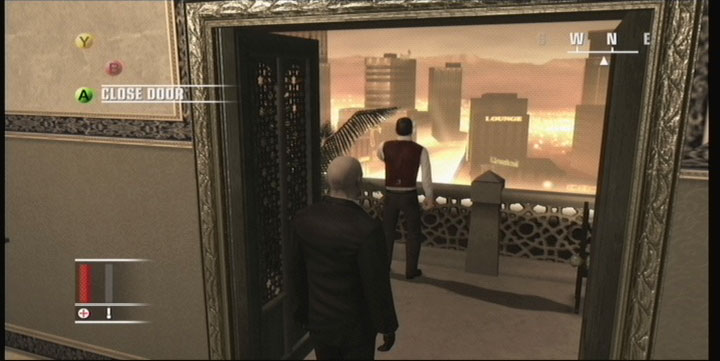
Uniforms
Uniforms aren't all that important here, honestly, but it's important to note that on the upper levels, the waiters are permitted access to all of the rooms on their floor, thanks to their all-access keycards. For instance, on the 7th floor, there's a waiter taking a smoke break on the northern balcony, just to the north of the elevators. Although cops and a guest or two will make a pass by his location on their patrols, you still have enough time to kill him, take his card and uniform, then dump his body over the balcony. The uniform isn't as important as the card, but may come in handy when you decide to kill Al-Khalifa.
Hendrik Schmutz
This white supremicist is planning on selling DNA data to the Sheik, and he's made the awkward decision to come to the hotel alone. Thus, he's going to be the easiest target to kill. Note that you're going to need his uniform to take out Al-Khalifa, so be sure not to dump it where you can't reach it or anything.
Strangulation
Schmutz spends a lot of time in the casino area, but when he returns to the seventh floor, he'll come up in the easternmost elevator. If you happen to have climbed the hatch there ahead of time, you'll have an easy time strangling Schmutz and hiding his body where no one will ever find it. You'll also gain his keycard, which you can use to access his room, 707, which is where he's keeping the DNA briefcase that he's offering to the Sheik.
Sniping
If you miss Schmutz in the elevator, then you can always catch him on one of his return trips; he'll go up and down a few times, but with some lengthy delays between trips. If you don't want to wait, though, you can snipe him while he waits in his hotel room, 707.
To get a shot on 707, though, you'll need to be in room 703, which is occupied by the portly Samantha. Getting her out of the way is a simple matter, though; just walk up to her in the hallway outside of her room, and she'll drunkenly escort you inside. When you've got her on her own, wait for around 30 seconds before she keels over drunk, then throw her body off the balcony; that'll net you one sweet sniping roost. When Schmutz returns to his hotel room, he'll stop in a couple of different spots, including the balcony and in front of his mirror, letting you easily line up your shot. (If you use your waiter's keycard to access his room and steal the DNA briefcase ahead of time, he'll simply stop and act super-panicked.)
Bombing
Lastly, you can bomb Schmutz, preferably taking both him and Al-Khalifa out at the same time. Doing so requires a good amount of waiting, but it's arguably the easiest way to proceed here. We'll go over that in more depth when we talk about the Sheik.
Tariq Abdul Lateef
Lateef is the scientist employed by Al-Khalifa to verify the integrity of the DNA that's being offered for sale. When he arrives at the casino, he'll immediately head into the western elevator and go straight to room 803. He never leaves, so if you want to take him down, you'd best do so quickly, or pack a sniper rifle to take him out.
Strangulation
As mentioned, Lateef gets into the western bank of elevators when he arrives. If you get atop the hatch there before he gets in, it's a simple matter to strangle him and steal the payment suitcase.
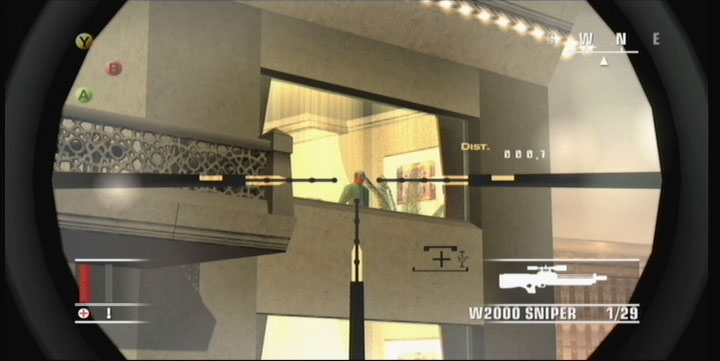
Sniping
Apart from the strangle kill, your only real chance here is to snipe Lateef from the seventh floor. Luckily for you, he never leaves his room, 803, allowing you to easily snipe him from 707, either after killing Schmutz or waiting for him to leave the room. Note that allowing Lateef access to his room in this manner, without stealing the payment briefcase from him on his way up the elevator, means that it’ll effectively be impossible for you to get, unless you’re willing to make a frontal assault against the five or six bodyguards that guard the room.
Of course, there’s a messier way to take out Lateef that may save you the trouble...
Bombing Run
You’ll note that there are plenty of fire alarms on the seventh and eighth floors of the building here. If you want to make a mess of Lateef & Co., then you can leave some kind of briefcase with a bomb in it in the lobby outside the elevator doors. Assuming that neither of the cops there make a beeline for it to pick it up, you can leave it there and and pull a fire alarm, which will send Lateef and his bodyguards streaming towards the elevators. (Don't they know you're only supposed to use the stairs?) Detonating the bomb while they're milling about will take down your target with no need to get up-close-and-personal.
Al-Khalifa
As mentioned, Al-Khalifa takes up residence in the VIP Lounge as soon as he enters the hotel, making no stops anywhere else. Getting to him will be difficult, since only Schmutz and the waitstaff are capable of getting past the guards. Waiters must be empty-handed, and will be frisked when they pass the guards, so that doesn't help much. Schmutz (or 47 when he's wearing Schmutz's outfit) can get past the guards with a suitcase (and only with a suitcase; if he shows up empty-handed he'll be turned away), but he likewise won't be able to carry any weapons under his clothes.
Thus, Al-Khalifa is one of the toughest targets to kill in the entire game, whether you're trying to do it quietly or just get it done, period. There are a few ways to kill him, however, without bringing on too much trouble on yourself.
Bombing
Schmutz is here to make a deal, and a deal will indeed be made if you let everything play out. Schmutz begins the level in the casino, then heads up to his hotel room to check on his DNA Briefcase, then returns to the casino to ensure that the sheik has arrived, then finally returns to his room to pick up the briefcase and make the exchange with the sheik. If you don't kill him or Al-Khalifa ahead of time, then you can use this pattern to your advantage and have him become the unwitting agent of a messy death.
How? Simple. Kill a seventh-floor waiter, such as the one smoking on the balcony, and grab his keycard; that'll give you access to Schmutz's room. Use the keycard to enter 707 and plant a bomb in the DNA Briefcase. When Schmutz finally does pick it up and take it down to Al-Khalifa, you can wait for him to get right up close, then blow them both straight to hell. Your suspicion ranking will likely spike all the way to the top, but this doesn't mean that any guards will start shooting at you. Just make your way to the exit as quickly as possible (assuming you've killed Tareef ahead of time) and you'll be fine.
Strangulation
If you kill Schmutz and steal the DNA Briefcase and Schmutz's outfit, then you'll be able to make the deliver of the briefcase to Al-Khalifa himself. Just dress up like Schmutz, grab the briefcase, and bring it downstairs to the VIP Lounge.
After you reach Al-Khalifa, there's a short cutscene, followed by a small pause during which he'll continually look to the south, regardless of where you look. The key thing to remember here is that none of his guards actually have eyes on him at this point, so if you act quickly, you can run behind him, bring out your fiberwire, and strangle him. With that done, get the hell out of the VIP Lounge, and if you're lucky, no one will stop you, and no one will notice the body before the courier arrives a few minutes later. This is risky, though, since you're in a hornet's nest of guards.
Al-Khalifa, Continued
Poison/Sniping
If you kill Schmutz, but keep Lateef alive, then you can grab Schmutz's briefcase (without putting a bomb in it) and make the delivery to Al-Khalifa yourself. Doing so will trigger a couple of actions. First of all, the Saudis will take your DNA sample off for testing; when it checks out, a guard will deliver the payment briefcase and take the DNA briefcase off to Lateef. After the belly dancer has been dismissed, just wait around near Al-Khalifa's position, and he'll eventually get a cell phone call.
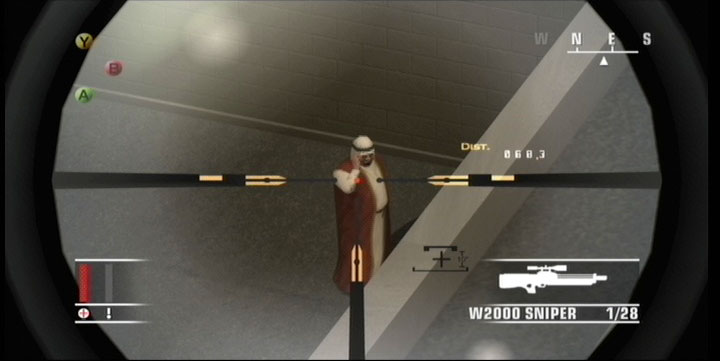
As soon as this cell phone call is made, you have two options. If you want to attempt to snipe Al-Khalifa, then as soon as he stands up to receive the call, grab the payment briefcase and run as fast as you can to room 701 or 703, where you'll preferably have your W2000 unpacked and dropped on the floor. If you make it there in as little time as possible, then you should be able to spot Al-Khalifa just as he's walking across the exterior area below you, allowing you to zoom in and pop him right in the heart. He only takes a few moments for his cell phone call, though, so you don't have any time to spare here.
Alternately, if you want to kill him up close and personal like, wait for the cell phone call to arrive, then attempt to follow Al-Khalifa out the doors leading to the exterior area. As soon as the double doors open and you step through, one of his guards will run up and detain you, so step back into the VIP Lounge. When the guard turns around to return to his post, open the doors again and follow Al-Khalifa out to the outdoors, where you can easily sneak up on him and either poison or strangle him as you see fit. After doing so, grab the payment briefcase and run.
(Note that if you kill Lateef before you deliver the briefcase, then neither of these events will actually occur; the courier simply never arrives and you're effectively stuck in the VIP Lounge unless you're willing to attempt to kill Al-Khalifa with your bare hands.)
Other Scenarios
There are a number of other ways in which this mission can play out, of which we'll attempt to elucidate a few here.
Schmutz Makes The Drop
If Schmutz makes the drop, then he and Al-Khalifa will sit down and chat while the DNA is checked out. If you placed a bomb in the DNA Briefcase, but didn't detonate it, then it'll be brought up to Lateef, where it'll detonate and kill him. This doesn't affect Schmutz's conversation, however, and indeed it appears to stretch on for quite a while, or at least until we got bored of waiting for him to leave the VIP Lounge. This also seems to occur if you killed Lateef ahead of the drop.
If you leave all of the participants alive, and don't place a bomb in the briefcase, then again, as far as we can tell, Schmutz and Al-Khalifa simply sit there after the exchange and talk for a long period of time. Booring! Al-Khalifa's cell phone call doesn't seem to ever arrive if Schmutz makes the drop, as an aside.
You Make The Drop
If you bring the suitcase to Al-Khalifa with a bomb in it, it'll be brought up to Lateef, where it will detonate. Soon afterwards, all of the shiek's bodyguards will turn on you and start firing, leading to a hasty death.
If you killed Lateef before you make the drop, then the courier never seems to arrive for the briefcase, and again, you're simply stuck here, unless you're willing to take on all of Al-Khalifa's guards by yourself.
The Bottom Line
If you're looking for the quietest, most nonviolent way to finish this mission off, then your best bet is probably to stand above the western elevator hatch as soon as the mission starts, then kill Lateef when he arrives and heads to the eighth floor. You can just leave the Payment Briefcase in the elevator, if you like; no one should ever grab it if it's just lying there. Alternately, you can take it down and drop it near the Exit on the map, which should likewise be well out of the way of any guard patrols. Be sure to grab his keycard as well.
When the Sheik arrives, get atop the eastern elevator and wait for Schmutz to take it up to floor seven. Strangle him and steal his suit and briefcase. At this point, you have two options for a Silent Assassin ranking. The first involves returning downstairs. When you reach the casino floor, divert through the restroom corridor to avoid any cameras that might spot you, then head towards the VIP Lounge. You'll be frisked by the guards, so you might want to drop any weapons you have in one of the bathroom stalls beforehand.
When you drop the suitcase in front of the Sheik, quickly run around him and strangle him, then book it back to the payment suitcase before exiting the level. If done properly, you should be able to strangle him without getting any guard attention, but if you do, you're screwed, so be sure to save your game ahead of time.
Alternately, if you want to snipe the Sheik, then head up to the eighth floor after killing Schmutz and Lateef in the elevators. If you have Lateef's keycard, then you can pull the fire alarm here to force all of the bodyguards away from the room. Enter and use the phone to call Al-Khalifa, who'll start walking towards the rear area of the hotel. If you run back down to your room and bust out your sniper rifle, you can pop him in the head and make a clean getaway.
Mission Eleven: A Dance With The Devil
Objectives
- Kill Anthony Martinez
- Kill Vaana Ketlyn
- Retrieve Information
- Escape
Intel
- Trailers arrived earlier with decorations for the parties.
- Information about who is trying to kill you might be found on a laptop on the top floor.
- Don't go for a swim in the shark tanks at the Hell Party.
- Be careful playing with pyrotechnics - they could kill someone.
- Bartenders are usually well informed.
- Look out for the singer at the Heaven Party. Looks can be deceiving.
- The devil is never to be trusted.
- There is a food elevator which might be used to transport more than just food.
The Setup
Tricky and trickier...it would appear that your Agency is all but wiped out in the wake of the events of the last year or two's worth of missions. This final mission on behalf of your employer apparently hasn't been contracted; they simply want to know who's been attacking them, and they think that this party has something to do with it. The party, or parties, to be more accurate, are being overseen by a pair of gray-market gunrunners that have something to do with the attacks on the Agency. Common sense would tell you to get as far from the place as possible, but you're getting paid to infiltrate the parties and kill the enemy, that's not an option at this point.
There are two parties going down, themed as Heaven (on the top floor) and Hell (in the basement). Each party is completely separate, with different dress codes and guards, so even if you manage to infiltrate one party, don't assume that you'll be able to get to the other one without any problems. There's only one outfit in the level that'll get you unfettered access to both parties, but it's at least relatively easy to obtain.
Note that one of your objectives here is to retrieve information on whom precisely is trying to kill you; when you do so, two more targets will be revealed to you, so the minimum bodycount here is actually four targets. In practice, it's going to be difficult to get out of here without killing twice that number of people, but hey - we can always try to keep our hands to ourselves.
Infiltration
You start outside the building here, and your suit won't net you access to anything other than the main lobby. Head inside and speak to the guard to get him to move off to a rear security office; if you want an easier time of accessing the basement, follow him into the small closet behind the main office and kill him there before stealing his uniform. You can access the garage by simply diverting him, then finding the stairs leading down, but it'll be off-limits to your suit, so you'll have to avoid getting spotted by any of the guards there, which is definitely tricky.
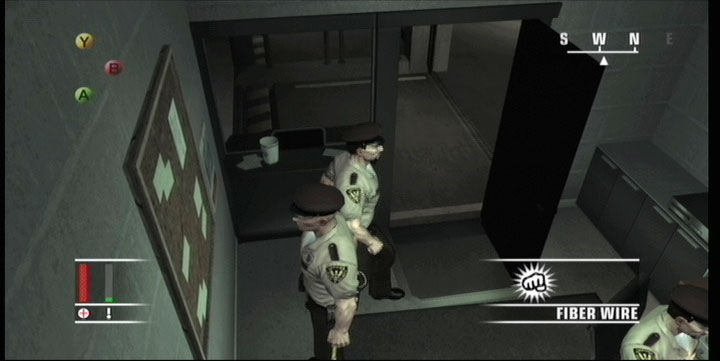
With the uniform in hand, find the steps leading down to the garage and head to the northeastern corner, where a line of trailers is set up, from Spring Valley Prop Rental. Behind one of the trailers, the one with an open rear door, you'll find a guest suit for the Heaven Party. You can also nab a Hell Party guest suit from the retching man near one of the pillars, but his body is a pain in the butt to hide, so it's best to just save that party visit for later.
Anyway, when you're in the Heaven Party guest outfit, head towards the bank of elevators. If you don't care to bring your Silverballer or other weapons up to the top floor, you can just head into the elevator straight off, but you'll be frisked if you do so. A better option is to distract or kill the security guard near the locked door by the car at the western end of the elevators, then pick the lock on the door, which will let you climb up and into the elevators themselves. The elevator to the Heaven Party is the first one you encounter, so drop down and hit the button for the top floor.
Heaven Party
You have three objectives at the Heaven Party. The first is to kill Anthony Martinez, the second is to obtain the records from a laptop here, and the third is to kill one of the currently unknown targets.
Anthony Martinez
Anthony Martinez has one of the most distinctive outfits at the party; he's actually wearing a completely gold suit, with a devilish mask of gold on his head. So he'll be easy to pick out at the party, but a bit more difficult to isolate. He does veer into the bathroom a couple of times as he walks his route, but he's difficult to kill there without leaving his body very exposed, which will render your disguise essentially useless.
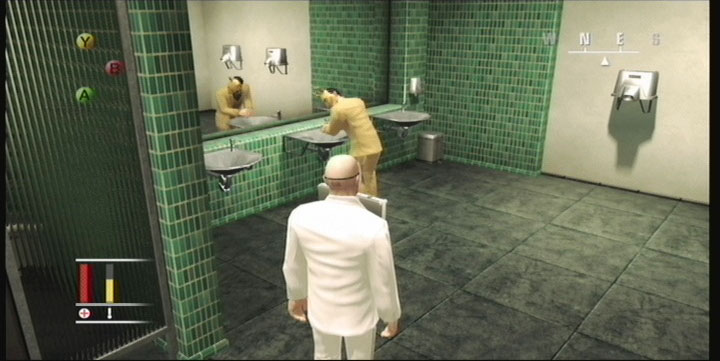
The first thing you do on this level, then, is to simply walk around and see what's what. Some of the areas are restricted to you, such as the kitchen and the backstage areas for the musical act, as well as the security office and the main office, presumably that of Vaana Ketlyn. Note also the presence of an upper-level terrace that overlooks the main dance floor, which is likewise off-limits to you.
Anyway, given enough time, Martinez will make a couple of circuits around the level, then head to the elevator to descend to the Hell Party. If you're waiting above the elevator hatch when he hops inside, it's a simple matter to strangle him to death and steal his suit. Just be sure not to drop down the elevator hatch while it's still heading down to the garage, as that will result in some serious damage. Wait for it to stop, drop down, grab the Rifle Case, and punch it back to the top floor.
The Martinez suit gives you access to pretty much all areas of the Heaven and Hell parties, so you don't have to worry about guards hassling you for the rest of the level, presuming they don't find his body, which they shouldn't if it's on top of the elevator.
Secondary Target/Retrieve Information
Now, if you want to learn who your next target on this floor is, go ahead and head to the large office in the southern end of the Top Floor level, where a laptop is waiting for you on the desk. Checking it will either simply reveal the identities of the two supplementary targets, if the singer is on the stage singing, or will cause the singer to burst in through the door, revealing her as the nefarious assassin known only as Eve.
If you don't mind engaging in a bit of close combat, then simply wait for Eve to leave the stage, then run down to the office and check the laptop; she'll burst in and start flipping around and attacking you. You can take her down fairly easily with a silenced weapon, but too much noise will result in too much guard attention, so you probably don't want to use an unsilenced weapon. Dropping her will polish off the objective right quick. Alternately, you can sneak into the room while she's singing, access the laptop, then quickly hide in the closet by the door. Shortly afterwards, she'll walk in, allowing you to stealthily sneak out and kill her from behind.
Alternately, if you access the laptop while Eve is "singing", then you'll have to take her down in a bit more difficult fashion. If you still have the FN-2000 Rifle Case from when you killed Martinez, or if you picked up the Dragunov sniper rifle case near the desk that held the laptop, then simply bring it to the upper Atrium Terrace level, which rings the dance floor. From there, if you time the guard movements correctly, you should be able to unpack the rifle and squeeze off a shot or three into Eve while the guards aren't looking. The FN-2000 is the quieter of the two rifles, although of course you can sneak in your W2000 or use the scope on an SMG Tactical if you like. It's best to fire from the far end of the terrace to reduce the likelihood of someone spotting you. Keep in mind that after you fire, people will be rushing to your position, so drop your weapon and get back to the dancefloor as soon as possible.
Hell Party
Two more targets dwell down in the Hell Party, so head back to the elevator and punch in the garage level. Instead of heading through the doors, though, climb into the hatch and head east through the little access tunnel to get atop the Hell Party elevator, then drop down and punch in for the Basement level to reach it.
Maynard John
Maynard John is the second supplementary target you have to deal with. He's dressed as the red-devil bartender here in the Hell Party, and doesn't really walk around to any secluded areas, so taking him down without making a fuss will be difficult. Luckily, if you walk anywhere near him, he'll simplify the arrangement by offering to take you into a soundproof room for a little mano-a-mano duel. So long as you still have a bit of health left, then this duel isn't so difficult to win, so take him up on the offer.
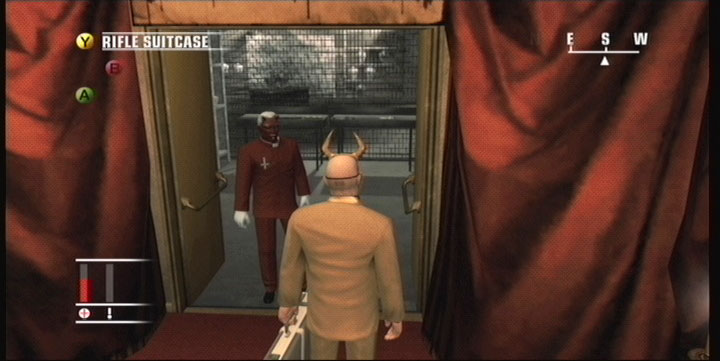
When Maynard leads you into the Torture Room, he'll leave you with a table with a Desert Eagle and an MP7, along with plenty of ammo. From here on in, it's pretty much just a Duck Hunt-esque parade of attempting to shoot Maynard whenever he pops his head up. At first he'll attempt to fire at you from behind a pillar (not too bright, this one), but then he'll move over to your right a bit. Unfortunately, he'll be obscured a bit by the dust clouds that are created when he fires through the many shelves between you and him, so you may want to hide while these clouds are still in the air, then move out and fire in first-person mode when you hear him reloading. He's not superhuman, so just a few bullets should be enough to take him out. When he's dead, grab the Storage Key off of his body to leave the area.
Vaana Ketlyn
Vaana is possibly the easiest of the targets to kill. She roams from the dance floor to the back area of the Hell Party, then eventually moves up to the pyrotechnic stage above the dance floor to show off her little fireworks display.
She's most easy to kill at the fireworks display. If you follow her into the back area of the club (only possible if you have a Hell Guard or CIA Agent outfit on), you'll notice that there's a bank of displays to the left of the door. Simply walking over to it and selecting "Rig Pyrotechnics" will ensure that Vaana will roast alive the next time she sets off the pyrotechnics. You don’t have to worry about anyone spotting you while you rig the explosives; no one regards it as a hostile act.
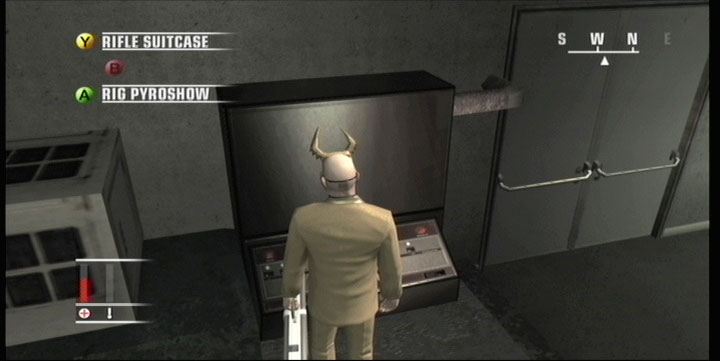
Alternately, Vaana will also pause for a few moments in front of the doors before she walks up to set off the fireworks. If you can kill off any guards that happen to be watching her as she waits, it's a simple matter to strangle her, then dump her body over the railing nearby, leaving her floating in the shark tank.
If you arrive in the Anthony Martinez CIA Agent outfit, then Vaana will also consider you to be Anthony, at least initially. If she spots you while you're walking around the upper levels of the party, she'll lead you to a private room off to the north of the dancefloor. She'll urge you to take off your mask, and will quickly get pushy about it. You can either shoot her in the back of the head while she's walking into the area, or wait for her to call for the guards, then slam her face into your knee with your barehand attacks. Oddly enough, despite her calling for the guards, none of them will actually come, and your alert level doesn't seem to rise at all because of this little altercation. After she's down, shoot her in the head to finish her off.
Note that Vaana actually doesn't arrive in the level until a couple of minutes after you do. When she arrives, she'll head to the Hell Party via the elevator in the Garage. If you wait for her above the elevator hatch as soon as you first manage to sneak into them, it's a simple matter to strangle her while she's in the elevator itself.
Mission Twelve: Amendment XXV
Objectives
- Kill Mark Parchezzi III
- Kill The Vice President
- Escape
Intel
- The guards here will open fire if weapons are detected by the metal detectors.
- Any confiscated weapons at the museum entrance will be stored away by security.
- The White House is surrounded by an iron gate - which varies in height.
- Guards will respond if the laser alarm system in the Museum is triggered.
- The First Lady has a dog, which is regularly taken out for a walk in the backyard.
- The Oval Office has been the setting for many historical meetings.
- Carpenters working in the main building have put up scaffolds for renovation purposes.
The Setup
It's time to finish this. For a large cash reward, you've agreed to infiltrate the White House and kill both Mark Parchezzi III, the notorious founder of a rival assassin agency, and Daniel Morris, the current Vice President. Both men are conspiring to kill the current President, who's back en route to the White House from Vegas. He's not scheduled to arrive for a while, so you don't have to worry about a timer or anything; just do your job and take both men out in a timely fashion.
Of course, that's no small task: it's doubtful that there's a more heavily-secured building in the world than the White House. It's patrolled not only by armed Marines, but also by plenty of Secret Service agents that'd enjoy nothing more than taking down a tango on the West Lawn. It's up to you to infiltrate the building, find your targets, and eliminate them without causing so much of a ruckus that you yourself get killed.
Starting Out
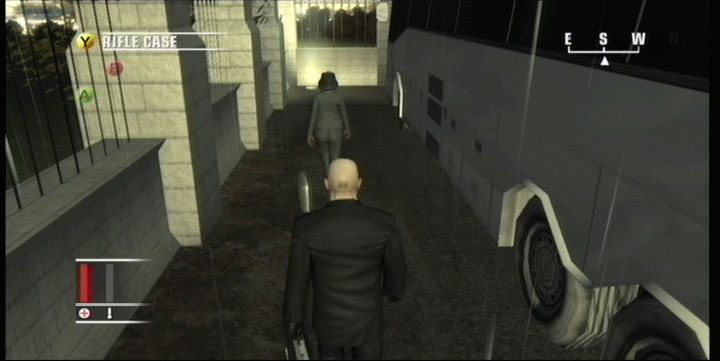
All you can feasibly sneak into the White House are the Silverballer and the W2000 sniper rifle; any other weapons are going to have to be left behind, since they'll set off the metal detector through the first door here. As soon as the Marines spot a weapon being smuggled through the detector, they'll open fire on you, so unless you're planning to wipe out more or less everyone in the level, you should only bring in the Silverballer and the W2000. If you happen to bring in any other weapons, stash them in the ICA around the corner from the front door. Note that you should probably disable the bolt-action upgrade on your sniper rifle if you've obtained it; you're going to need to crack out rapid shots with it towards the end of this level.
(Interestingly enough, if you do decide to massacre everyone in the area, the little old ladies will eventually pick up the pistols off of the dead guards and start shooting at you!)
After starting the level, note the tourist with the suitcase in her hand. She'll shortly veer around the bus here for a cancer stick, allowing you to sneak up behind her and stash the Silverballer in her suitcase. With that done, head up to the front door and place the W2000 on the conveyor belt.
When you get through the metal detector, leave your W2000 case in the receptacle for the moment, and turn around to witness the drama as the tourist comes through with her loaded weapon in the suitcase. Unfortunately, the guards here take a tempered response to the situation, and refuse to instantaneously blow her away; instead, they simply escort her to some dank cell for questioning. The point of all this, however, is to get your Silverballer into the level. One of the Marines will bring it to a nearby security office, where you'll be able to retrieve it shortly. (You can of course also put a mine in the suitcase, but it isn't detected by the metal detector, so all this lets you do is blow up a group of tourists.)
Accessing The Building
Your goal now is to obtain a Marine uniform. Doing so is a tall order, however, unless you're willing to make a kill.
Hard Method
The hardest way to get a uniform is to walk into the museum room after entering the area, preferably before the tourist group follows you. There's a single woman staring at some laser-protected artifacts at the far end of the room. Pushing her into the lasers will trigger the alarm, bringing many of the Marines near the metal detector running, which will hopefully let you get past the cordoned-off area and into either the dressing room nearby, where you can steal a Museum Guard uniform from the showering man, or into the small courtyard outside, where you can sneak up on a Marine and sedate him to steal his uniform.
There's plenty of ways that this can go wrong, however. First off, if you happen to push the woman into the lasers so that either of the cameras in this room spot you, you'll be shot by the guards when they get near you. The same applies if any of the other tourists, or the museum guide, happen to see you in the act of pushing. Secondly, even if you get away with the push, many of the Marines will come running, but a few will stay at their post, and they'll usually spot you when you enter the cordoned-off area. So this is usually a good ticket to a quick Restart of the level. (You can avoid many of these traps by throwing your rifle briefcase into the lasers instead of pushing the woman into them, but be sure to pick it up or it'll get hauled off to the security office by the guards.)
Easier Method
The easier way to proceed here is to enter the bathroom just behind the velvet rope past the metal detector. Although it's behind the rope, it's not off-limits to you, and occasionally a museum guide will stop in here to pee. Wait until he arrives and the door closes, then kill him and steal his uniform. If you can open the door and quickly close it before anyone spots the body through the open door, you should be scot-free.
With the guide uniform on, head to the north and exit the building to reach the courtyard. The guide you killed occasionally came out here for a smoke (actually, all he did was smoke and pee, so killing him was something of a service to the government), leaving only a lone Marine on patrol here. He moves exceedingly slowly, so it's a simple matter to sneak up behind him and use a sedative on him to knock him out. Note that we said sedative; you can kill him, of course, but he's just another jarhead doing his duty. Killing him would be awful mean-like.
With the Marine knocked out, grab his uniform and M14, if you like, then drag his body into the small alleyway nearby. At this point, if you did stash away a weapon in the ICA outside the main gate, you can head back and retrieve it; as a Marine you can pass through the metal detector at will.
Moving On
Now that you're decked out in a dress uniform, head to the security office near the locker room here and grab the suitcase with the Silverballer in it. Find a nice quiet place to retrieve the Silverballer from the case, then grab the Main Building keycard from the desk in the security office. (Take all of the ammo from the other desk here, as well; doing so doesn't cause any suspicion. You can also grab the CCTV videotape from the machine by the window.) Congratulations; it's time to move on to the Main Building. Be sure to head back and grab the W2000 rifle case from the metal detector before doing so, though; it'll come in handy later on.
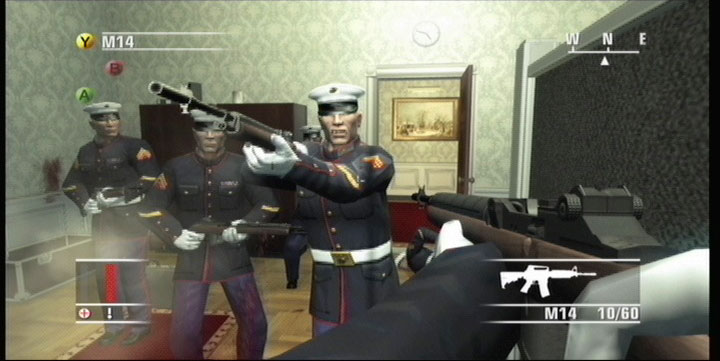
Head to the west through the hallways and you'll eventually reach a locked door with a keycard slot next to it. Guess what you do here? That's right, use your keycard, Mr. Smartypants. You'll go through a small corridor and wind up in the Main Building - 1st Floor area. Unfortunately, we hate to tell you that all the time spent on gaining the Marine uniform is going to be less valuable than you think; many of the offices here are off-limits to Marines, including the area that the Vice President is walking around in. In order to complete the rest of the level, you'll have to obtain a Secret Service uniform.
Doing so is easiest to accomplish on the West Wing - Roof level. To reach it, head up to the Main Building - 2nd Floor level, then find the westernmost room there - it should have furniture bedecked in white cloth to indicate that the painting and restoration here is ongoing. There should also be a set of scaffolding equipment which you can use to climb down to the West Wing - Roof. Just be sure the Marine in the area isn't patrolling this room before you crawl out the window.
The Roof
Climb to the bottom of the scaffolding. You have two goals on this roof: kill the Vice President, and obtain a Secret Service uniform, preferably in that order.
The Vice President makes an occasional venture into the rainy courtyard, ostensibly to walk the First Lady's dog, but what he's really doing is consulting with Mark Parchezzi, who's roaming around the Oval Office, which is visible through a window in the courtyard. If you have your W2000 in hand, then obtaining your kill is a simple matter of plugging the VP just as he walks away from the window, or indeed, at any other time during his little perambulation. If you're using your W2000, then your suspicion meter should spike red, then rapidly drop back into the green, indicating that no one knows where the shot came from. If you're forced to use an M14 for this kill, then it'll spike red and stay there, indicating that Marines are on their way to your position, which means that you should drop your weapon and book it towards the western end of the area ASAP, or climb back up the scaffolding until the heat dies down. (Note that you can't snipe Parchezzi through the window here; it's bulletproof glass.)
After that pleasant task is finished, it's time to kill or sedate a Secret Service agent. Luckily for you, one occasionally pops out of the door on the western end of the roof to smoke a cigarette, allowing you to kill him and steal his suit. Unfortunately, a janitor also comes out here to smoke, so you'll need to kill the Secret Serviceman, then drag his body to the other side of the rotunda here so that no one will be able to see it. Don't forget to also grab his MP5 and West Wing Keycard, which you'll need to access the West Wing.
Before you head into the West Wing, drop your rifle case on the western edge of the West Wing Roof, in between the two small raised portions of the roof there. You're going to need it later.
Finish It!
With all of this accomplished, head down into the West Wing's first floor and enter the Oval Office. You don't have any control over this event - it's a scripted cutscene in which Parchezzi sets off an explosive device on the door, which knocks you off your feet while he makes a break for it. Apparently it's a bit too hot for him to shoot you here, so he's going to retreat to the roof of the West Wing and lie in wait for you.
You can take your time following Parchezzi - he can't get away from you. When you do finally make it back to the roof of the West Wing, you'll find that he's hiding behind one of the small structures on the roof and will be firing away at you with a Custom 1911 handgun. This little sucker's going to be doing a crapload of damage to you when it hits, so your best bet is to unpack your W2000 (you did leave it here, right?) and attempt to pop Parchezzi right in the head from long distance, where he'll be missing most of his shots. If you can't do that, then you can close in on him by running up to one of the nearer rises, ducking behind it, and using something like an M14 or an MP5 to take him down. If you're underequipped for the fight, though, you're going to want to backtrack into the West Wing and attempt to find something with a little kick to it to deal damage to Parchezzi. (Of course, if you're having a hard time killing Parchezzi, then you can note his position, reload an earlier save game, and drop a bomb near where he stands the first time you cross the roof. Detonating it later on will kill him instantly during the firefight.)
When Parchezzi's dead, all you have to do to exit is return through all three buildings here until you can make it back to the very first parking area you started in. If you've kept your head down and haven't let anyone pick up on your various kills, then you should still be able to walk past any remaining security guards without being fired on - they won't come to interfere with your Parchezzi gunfight. With that done...you're in for a bit of a surprise.
Mission Fourteen: Requiem
Requiem is a bit of an interesting mission, in that it actually takes place as the credits roll. After the events of the previous cutscene, Agent 47 is lying dead on a slab in preparation for his own cremation. Luckily for him, he’s only playing possum, and Diana soon arrives to drop off his twin Silverballers and revive him with the Snow White-esque kiss of life.
In order to get back up off of your little pyre, you have to click them buttons as fast as you can. We had the most luck clicking both of our analog sticks and the shoulder triggers, all at once, all as fast as possible, although we hear that rotating the thumbsticks also works well. As you click away in your best Track & Field style, you should notice 47’s heartbeats getting closer and closer together; eventually you’ll achieve critical mass and will rise from the grave, Lazarus-like...if Lazarus was packing dual pistols.
At this point, your only options are to either survive or die. It’s going to be far easier to die than it will be to survive, especially on the harder difficulties. Living here is tricky, though, since you'll have to kill all of the soldiers in the area, as well as the wheelchair-bound gentleman, who packs a Custom 1911, along the lines of what Parchezzi used in the White House mission. Your best bets will be to either try ducking behind the altar and using it as cover, or grabbing the priest and using him as a human shield to protect you from the gunfire. Regardless, this is probably one of the tallest tasks in the game, but if you manage to live through the encounter, you'll be rewarded with a new cutscene featuring Diana and Agent 47 getting the Agency back in the game.
Xbox 360 Achievements
Not all of the achievements in Hitman: Blood Money are currently unlocked for our viewing; as they become updated, we’ll add to this list.
| Task | Point Reward |
| Unlock Tier 2 of Kruger Schmidt Catalogue | 5 |
| Unlock Tier 3 of Kruger Schmidt Catalogue | 15 |
| Unlock Tier 4 of Kruger Schmidt Catalogue | 20 |
| 1st Mission Complete On Any Difficulty | 25 |
| Perform One Kill That Looks Like An Accident | 20 |
| Earn a Silent Assassin Rating | 25 |
| Complete Game On Rookie Difficulty | 25 |
| Complete Game On Normal Difficulty | 50 |
| Complete Game On Expert Difficulty | 75 |
| Complete Game On Professional Difficulty (note that completing higher difficulty levels does not unlock the points for the lower difficulties) | 100 |
| Get Five Silent Assassin Rankings on Normal Difficulty | 25 |
| Get Five Silent Assassin Rankings on Expert Difficulty | 50 |
| Get Five Silent Assassin Rankings on Professional Difficulty | 100 |
| Collect All Firearms (To collect a weapon, you need to have it in your possession when you escape from a mission. When you return to your hideout, they’ll all be hanging from the walls there.) | 100 |
| Purchase All Upgrades for Silverballers | 25 |
| Purchase All Upgrades for SP12 Shotgun | 25 |
| Purchase All Upgrades for SMG Tactical | 25 |
| Purchase All Upgrades for M4 | 25 |
| Purchase All Upgrades for W2000 Sniper | 25 |
| Kill Precisely 47 People In One Mission | 20 |
| Notorious: Obtain 100 Notoriety? | 20 |
| Redemption (Beat the Requiem Mission) | 50 |
| High Roller: Accumulate $5,000,000 | 50 |
| Special Rating: Obtain A Special Rating On Any Mission | 50 |
Got a news tip or want to contact us directly? Email news@gamespot.com
Join the conversation