Like its predecessor, The Last of Us Part II contains several environmental puzzles. Among the ones you'll come across on your adventure are the combination safes. If you're having trouble with finding the safes or their corresponding clues for figuring out all of the combination codes, you've come to the right place. You'll still need to be vigilant as you explore in order to spot the safes, but using the information we provide, it will be much easier to do so.
If you just want the answer and don't care about solving the riddles, we have those listed too. Below, you'll find a full list of every safe code combination in the game. This way, you can make sure that you get all the items and supplies they have to offer. Without them, the game can get very difficult in intense battle situations. This becomes even more true as you fight some of the tougher enemies later on. You always want to stay prepared.
Just so you know, we do have to go into slight story spoilers in this guide to explain where certain safes are. We don't go into narrative developments, but we do spoil what type of locations you'll visit in the game by describing where to find certain safes and their corresponding clues. So if you want to go into The Last of Us Part II completely free of spoilers, we suggest playing through the game first and then coming back to this guide for a new game plus run or follow-up playthrough.
The Last Of Us 2: Every Safe Code Combination
Here's a quick rundown of all the safes and their combinations.
| Chapter | Safe Location | Combination |
|---|---|---|
| Jackson - Patrol | Supermarket Back Room | 07-20-13 |
| Seattle Day 1 - Downtown | Westlake Bank Vault | 60-23-06 |
| Seattle Day 1 - Downtown | West Gate 2 | 04-51 |
| Seattle Day 1 - Downtown | Courthouse Office | 86-07-22 |
| Seattle Day 1 - Capitol Hill | Thrift Store (near tripwires) | 55-01-33 |
| Seattle Day 1 - Tunnels | Subway Break Room door | 1-5-2-4-3 |
| Seattle Day 2 - Hillcrest | Garage blocked with dumpster | 30-82-65 |
| Seattle Day 2 - The Seraphites | Apartment bedroom (before dumpster puzzle) | 10-08-83 |
| Seattle Day 2 - The Seraphites | Weston's Pharmacy (after Merci building) | 38-55-23 |
| Seattle Day 3 - The Flooded City | Flooded garage (after mall) | 70-12-64 |
| Seattle Day 1 - On Foot | WLF Cache (after boat repair shop) | 17-38-07 |
| Seattle Day 1 - Hostile Territory | Jasmine Bakery | 68-96-89 |
| Seattle Day 1 - The Coast | Ferry Aft Section | 90-77-01 |
| Seattle Day 2 - The Shortcut | Apartment with D&D Stuff | 30-23-04 |
| Seattle Day 2 - The Descent | Hotel Gym Storage Room (before spores) | 12-18-79 |
You can check out more coverage in our Last Of Us 2 guides, tips, and walkthroughs roundup and our guide to all The Last of Us 2 Collectibles. In GameSpot's The Last of Us Part II spoiler-free review, Kallie Plagge writes, "At times, the pain you inflict feels so senseless that it can leave you numb. It's all messy and bleak and made me profoundly sad for myriad reasons, but the more I reflect on it, the more I appreciate the story and characters at its core. I wanted almost none of it to happen the way it did, and that's what's both beautiful and devastating about it."
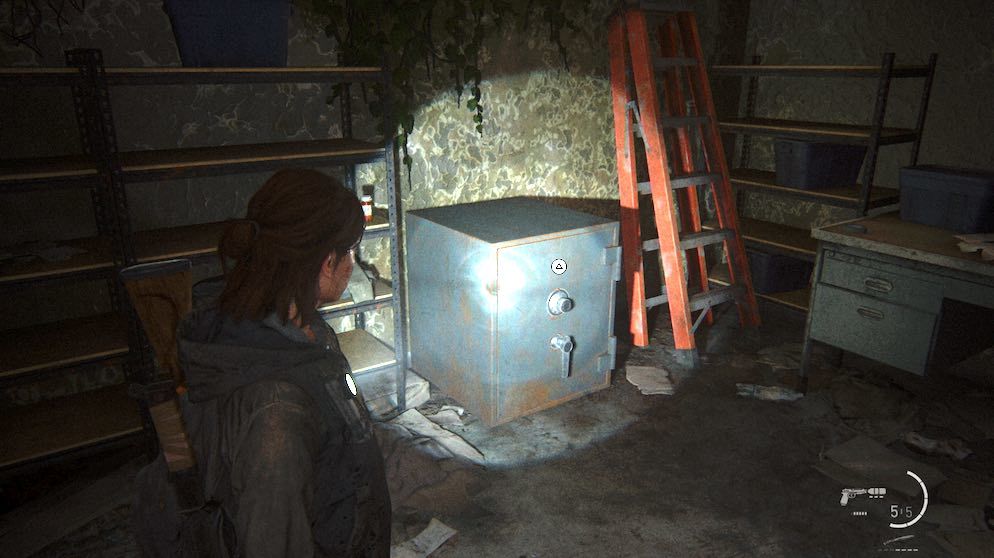
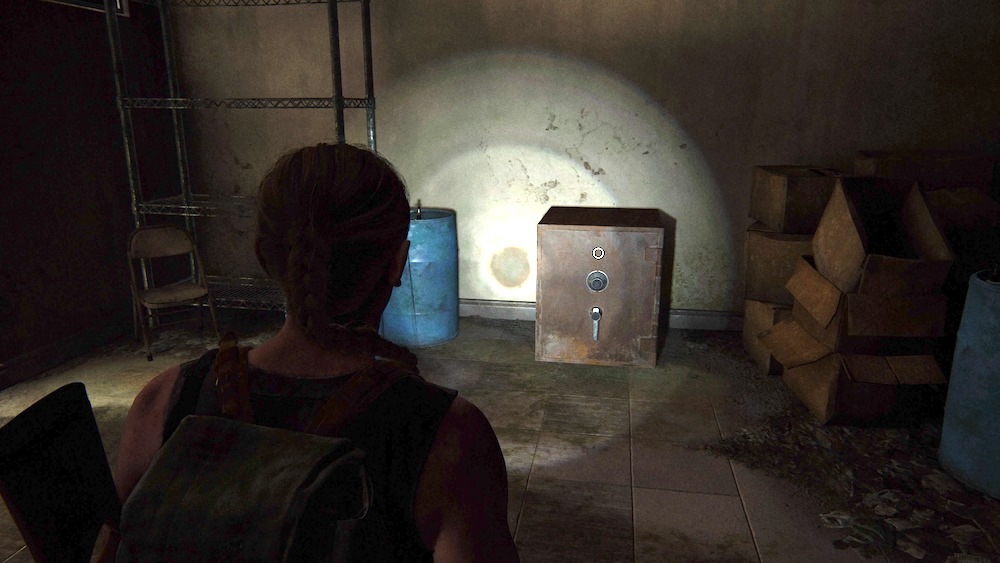
Safe No. 1: Jackson - Patrol (Supermarket Safe)
The first safe is difficult to miss--in the opening chapter of the game, Jackson, you'll find the safe inside the supermarket that's full of spores and infected. The story will lead you to this safe. Finding the clue for the combination is pretty simple too, as it's on the desk right next to the safe.
If you need help figuring out the clue, look at the pictures that are on the desk and then look at the collection of photos that are on the wall slightly behind you--they detail all the winners of the employee of the month. Still don't get it? The combination is 07-20-13.
The Last of Us Part 2 Spoiler-Free Walkthrough Part 1: Jackson
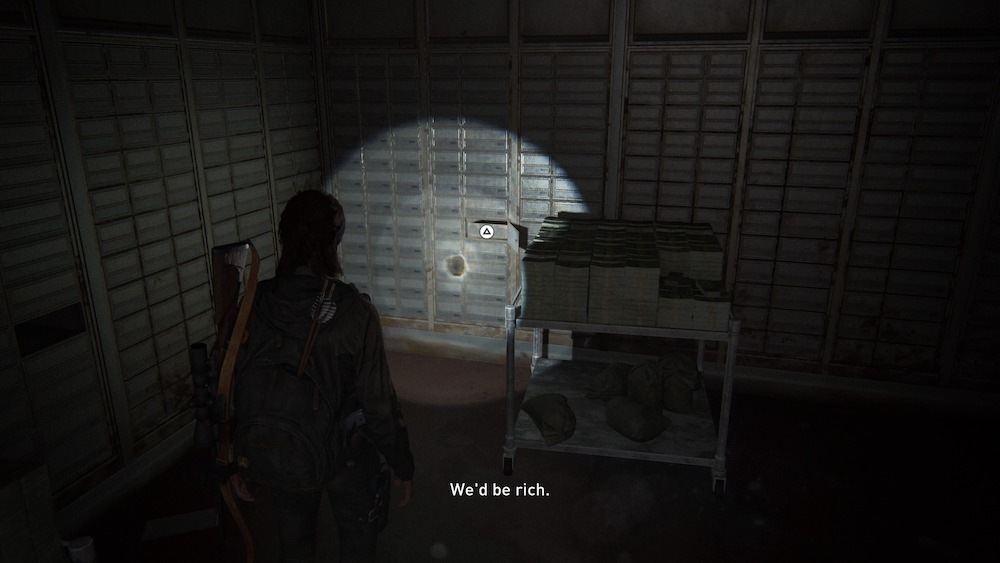
Safe No. 2: Seattle Day 1 - Downtown (Westlake Bank Vault)
You'll need to go to an actual bank to find the second safe--which you'll discover very early on in Seattle Day 1 in Seattle's Downtown region. It's technically more of a vault than a safe, but you'll need to find the clue to its combination just like the other safes in the game. The bank is in the giant open area that Ellie journeys to after The Last of Us Part II's opening chapter. It's located at 5th and James. You can miss the bank (it's optional) but you'll stumble on it eventually if you just explore the area.
Inside the bank, you'll find the remains of a heist gone wrong. Among the remains is a note that details the plan for the heist as well as the code you'll need to open the vault. The vault is on the left wall of the bank, through the safety deposit box room--it opens to the combination code 60-23-06. While you're here, be sure to open the safety deposit box in the corner. It hides the antique ring artifact, which you'll need to find to unlock the "So Great And Small" PlayStation Trophy.
The Last of Us Part 2 Spoiler-Free Walkthrough Part 2: Seattle Day 1 - Downtown
Safe No. 3: Seattle Day 1 - Downtown (West Gate 2 Safe)
You can find the third safe after slipping through the fence Downtown at Madison between 5th and 6th in the game's second chapter: Seattle Day 1. The clue for this safe is also nearby. Though you can miss this safe, like Safe #1, the story will lead you right past this spot.
The clue for this safe is pretty self-explanatory--you just need to refer back to the list of gate codes that you've been using to navigate this chapter. As the clue says, you're looking for the code used to open West Gate 2. If you're still having trouble, the combination is 04-51.
The Last of Us Part 2 Spoiler-Free Walkthrough Part 2: Seattle Day 1 - Downtown
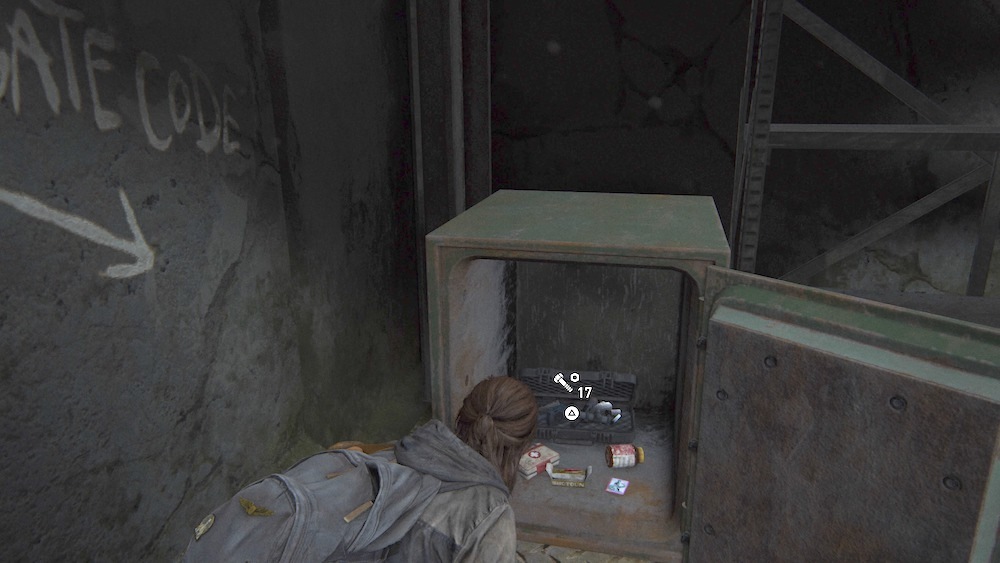
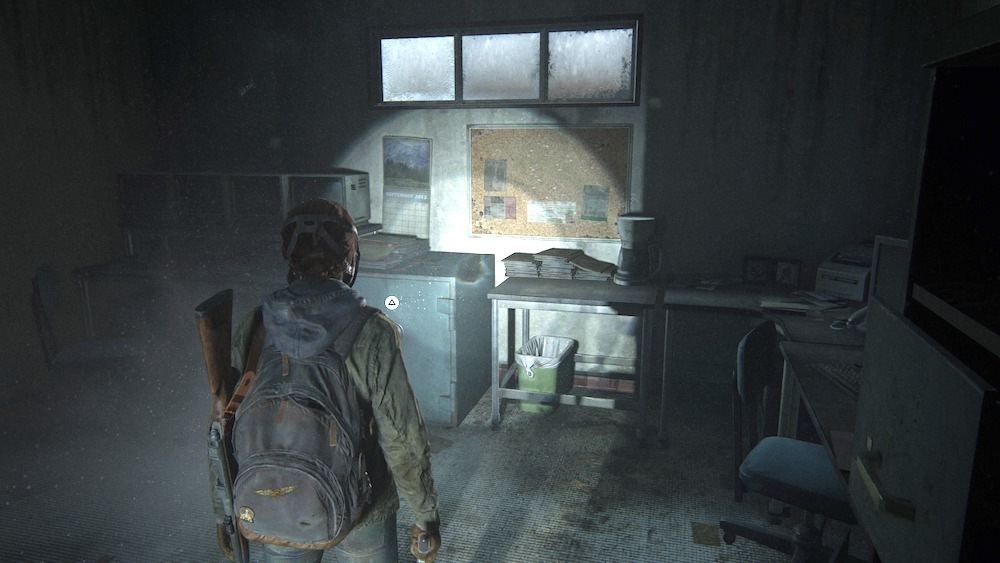
Safe No. 4: Seattle Day 1 - Downtown (Courthouse Safe)
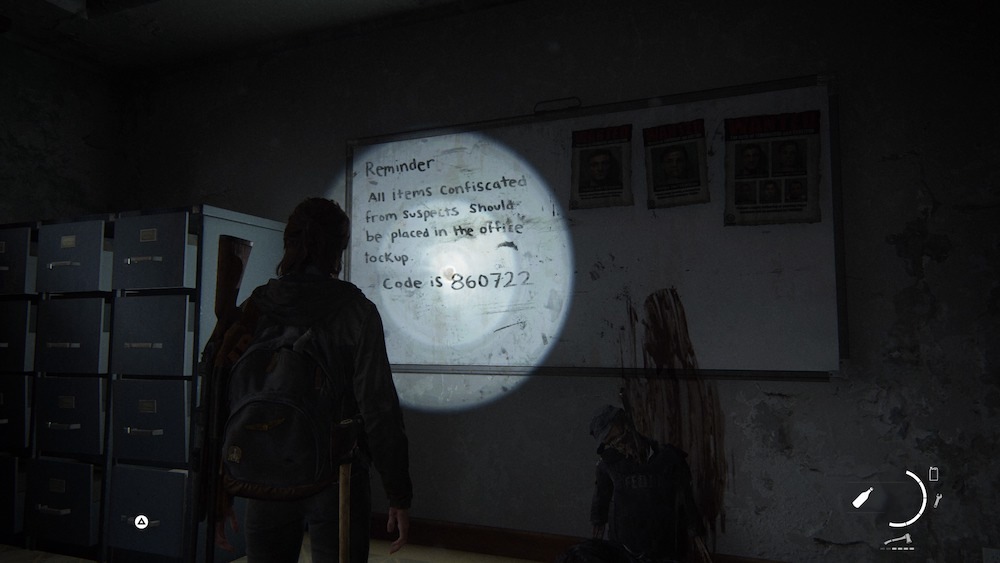
The fourth safe is also found in Seattle Day 1 in Downtown. It's hidden in the courthouse, which you will venture into for the story. That said, you can still miss this safe if you're not looking in every nook and cranny. It's under the desk that's beneath the window before you descend into the parking garage. You'll find the skeleton of a FEDRA soldier nearby with a machete sticking out of his chest.
There's no note to find for this one--you'll have to look at the environment for the combination. You're specifically looking for the code that's for office lockup. You don't have to leave the courthouse in order to find it. It's written on a white board that's fairly close by. Still can't find it? The combination is 86-07-22.
The Last of Us Part 2 Spoiler-Free Walkthrough Part 2: Seattle Day 1 - Downtown
Safe No. 5: Seattle Day 1 - Capitol Hill (Thrift Store Safe)
Yup, we're still in Seattle Day 1 but now we're in the Capitol Hill chapter. You'll find the fifth safe after you start seeing tripwires connected to explosives, in a thrift store that's just across from a gym. If you find the Bizarrebra Trading Card immediately inside, you're in the right place. The safe is located all the way in the back. You'll actually pass the two clues you need to figure out the combination on the way to the safe.
The first clue is located on the bulletin board. You'll have to do a bit more exploring to find the second half of the combination though. Similarly to Safe #4, this clue isn't on an object you pick up--instead, it's actually written out in the environment. If you're having trouble finding it, check the walls in the thrift store's bathroom. The code is 55-01-33.
The Last of Us Part 2 Spoiler-Free Walkthrough Part 3: Seattle Day 1 - Capitol Hill
Safe No. 6: Seattle Day 1 - Tunnels (Subway Breakroom Door)
Like Safe #3, Safe #6 isn't really a safe--it's an employee locker room locked with a combination lock on the door. You'll find it in a break room that's in the area where you first encounter Shamblers, one of the new infection types in The Last of Us Part II. This is the final safe that you'll find in Seattle Day 1. After this, it's onward to Day 2!
The clue to the combination is written on a piece of paper that's on one of the tables in the back. It makes mention of needing to buy a soda in order to learn the combination. And since there aren't any quarters around, you'll have to break the glass on the nearby soda machines in order to get at the sodas inside. One of them has three of the five numbers you need written on it. Where to get the other two? Here's a hint: which of the numbers have you not used in the combination yet? For those just looking for the answer, the full combination is 1-5-2-4-3.
The Last of Us Part 2 Spoiler-Free Walkthrough Part 3: Seattle Day 1 - Capitol Hill

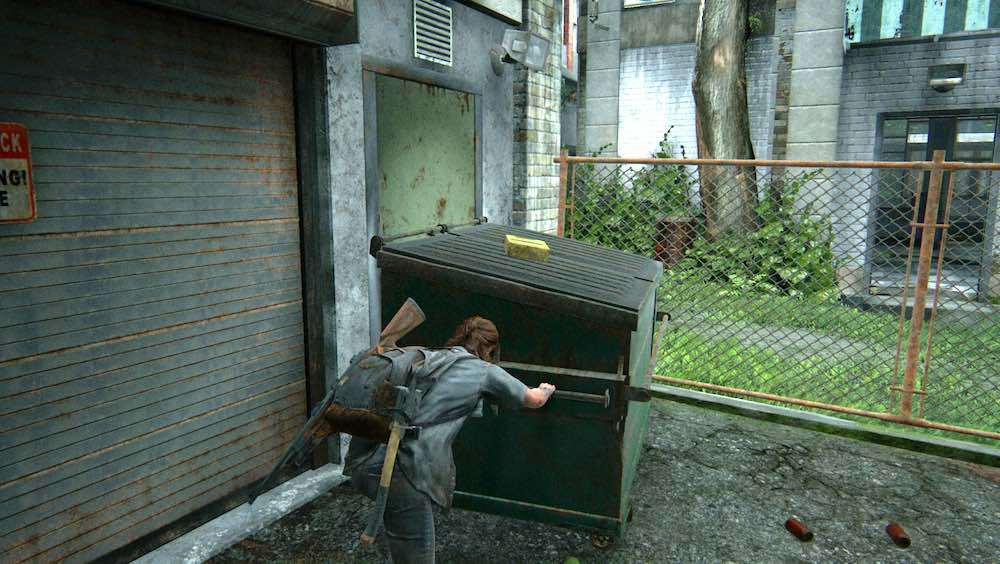
Safe No. 7: Seattle Day 2 - Hillcrest (Garage Blocked By Dumpster Safe)
At the start of Seattle Day 2, you'll start out in a small town called Hillcrest. There are lots of different stores and shops here, but the one you're specifically looking for is a tattoo parlor, which you'll find after you pass through the bike shop. Go all the way through the building to find a smaller building in the back that has a dumpster propped against the door. The safe is inside.
Oh yeah, I guess it's worth mentioning that there are quite a few infected inside. Good luck! Once you're done with the fight, you're free to open up the safe. The combination is written on a note that you'll find in one of the nearby buildings. It's worth checking out all of the buildings in Hillcrest, as it contains one of the more haunting (but still intriguing) side stories in The Last of Us Part II. But if you just want to open the safe and move on, the combination is 30-82-65.
The Last of Us Part 2 Spoiler-Free Walkthrough Part 4: Seattle Day 2 - Hillcrest
Safe #8: Seattle Day 2 - The Seraphites (Anniversary Apartment Safe)
You'll hit the eighth safe much later in Seattle Day 2: The Seraphites--when the day turns to dusk. While walking down Route 5 on your way to the hospital, you'll eventually hit a gate you can't keep open, forcing you to use a dumpster to hold up the gate. Before you do that, though, look nearby for an apartment building with a panel truck alongside that you can climb on to reach the second floor. Break the window and climb into the apartment. You'll see a brown door that leads to a bedroom--the safe is inside.
Finding the clue to the safe comes in the Evacuation Letter artifact you can find on the table. From there, search the apartment for a clue to when the 30th anniversary is. If you don't want to look, then the full combination is 10-08-83.
The Last of Us Part 2 Spoiler-Free Walkthrough Part 4: Seattle Day 2

Safe No. 9: Seattle Day 2 - The Seraphites (Weston's Pharmacy Safe)
The ninth safe is the final one found in Seattle Day 2. After passing through the Merci building, you'll drop into a pool and climb out on the other side of the road. The safe is in a pharmacy called Weston's.
On your way in, grab the pharmacy note--this will be your clue. And by clue, we mean the answer for the safe is just on the note. There's no riddle to solve. You'll find the safe itself further into the building. You'll have to crawl through a hole in one of the walls. If you somehow miss the note, the full combination is 38-55-23.
The Last of Us Part 2 Spoiler-Free Walkthrough Part 4: Seattle Day 2
Safe No. 10: Seattle Day 3 - The Flooded City (Caged Room Safe)
You'll find the 10th safe a ways into Seattle Day 3. After obtaining the speedboat, you'll leave the mall-like area and eventually reach a point where you'll take the boat through a building, but a gate will block your progress. When you get out of the boat, you'll notice a nearby caged area--that's where the safe is.
To find the combination, you'll need to climb to the upper floor. You have to go this way to proceed anyway, so it's not out of your way. On the upper floor, you'll find a stash note on a body in the corner--this will reveal the combination. To get to the cage that hides the safe, you'll have to move a cart away from a wall on the second floor, which reveals a hole. If you missed the note and already traveled back down to the boat, the combination is 70-12-64.
The Last of Us Part 2 Spoiler-Free Walkthrough Part 5: Seattle Day 3
Safe No. 11: Seattle Day 1 - On Foot (WLF Cache Safe)
You will likely find the combination for the next safe before the safe itself. During Abby's Seattle Day 1, you'll reach a hardware store. Once you're through it and the boat repair shop you'll enter next, you can break a window to get into a trailer. If you find an Indiana Coin, you're in the right place. You want to find the WLF gun cache note--that has the combination on it.
The safe is located in the concrete building across the way. You can enter the building through a hole in the wall next to where you'll drop down to the trainyard when you leave. If you want to go straight for the safe, the combination is 17-38-07.
The Last of Us Part 2 Spoiler-Free Walkthrough Part 6: Seattle Day 1
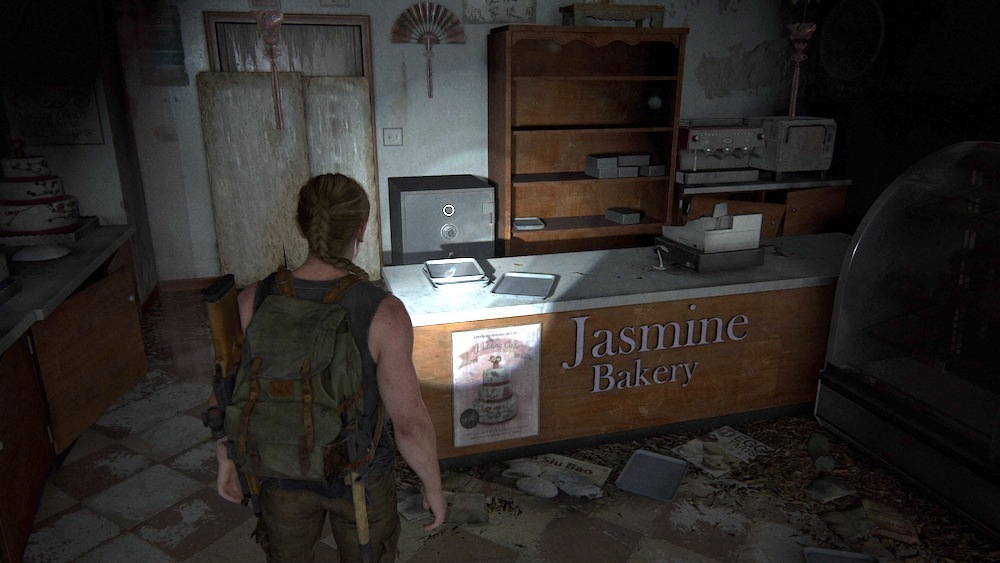
Safe No. 12: Seattle Day 1 - Hostile Territory (Jasmine Bakery Safe)
You'll find the second safe in Abby's section of the game following the discovery of the double-barrel shotgun in the Hostile Territory chapter of Seattle Day 1 (the dusk portion). Break the glass to the nearby bakery to get inside--this is where you'll find the 12th safe.
What's the code? It's across the way--you'll find the Jasmine Bakery Safe note on the second floor of the opposite building. Go through the Red Dragon Bar to find the path up to the second floor, then jump across the opposite building. The combination is just on the note, there's no riddle to solve. But if you're stuck, the combination is 68-96-89.
The Last of Us Part 2 Spoiler-Free Walkthrough Part 6: Seattle Day 1
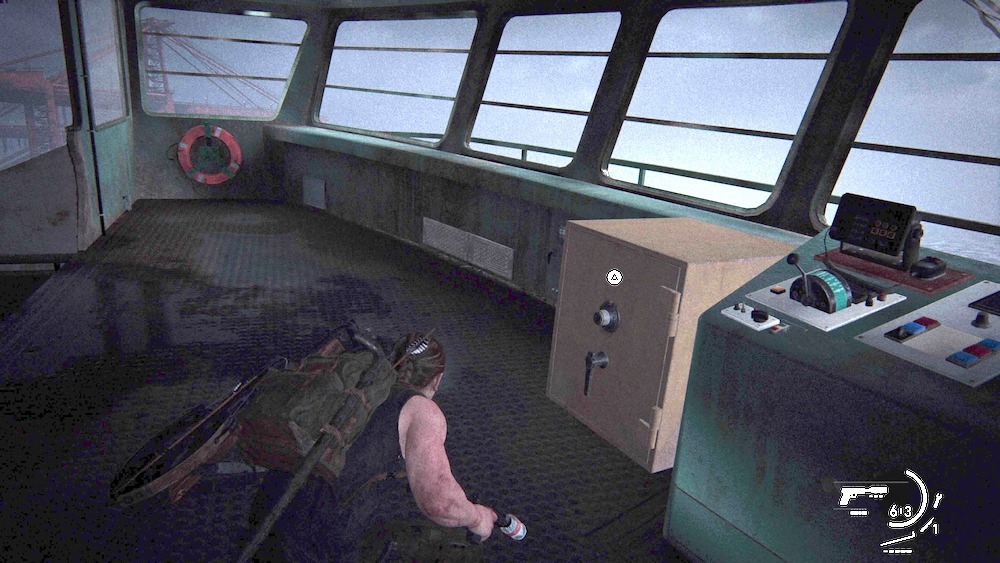
Safe No. 13: Seattle Day 1 - The Coast (Ferry Safe)
Safe #13 is the final safe found in Abby's Seattle Day 1 during the night section, during The Coast chapter. When you embark onto the crashed ship, make your way to the sundeck. Then turn left at the top of the stairs to reach the back of the boat. Here, you'll find the safe.
Where's the combination clue? You need to find the mutiny note--the combination will just be listed on it. If you have the ammo and health for it, consider clearing out the infected to make exploring the ship a little easier.If you don't have the resources to spare or you just don't want to look for the note, the full combination is 90-77-01.
The Last of Us Part 2 Spoiler-Free Walkthrough Part 6: Seattle Day 1
Safe No. 14: Seattle Day 2: The Shortcut (D&D Apartment Safe)
When you cross the highway overpass after climbing up the rapids in Abby's Seattle Day 2, you'll jump down into another apartment. The apartment houses both the safe and the Neighbor Exchange collectible, which details the clue to opening the safe.
After sobbing at the devastating end to the cute friendship between two groups of survivors, head outside the apartment and look at the apartment numbers for both the room you left and the number for the neighbors. Then consult the neighbor exchange note for the order you'll need to open the safe. If that doesn't make any sense, well, the answer is 30-23-04.
The Last of Us Part 2 Spoiler-Free Walkthrough Part 7: Seattle Day 2
Safe No. 15: Seattle Day 2 - The Descent (Hotel Gym Safe)
The final safe is found about halfway through Abby's Seattle Day 2. It's in that giant infected-filled skyscraper that you have to descend on your way to the hospital. It's in the storage room in front of the front desk at the entrance to the gym, before you get to the area with the spores. Once you find it, you no longer have to look for safes--there are no more for the rest of the game.
Check the back room of the gym for your clue to the combination--it's written on the gym safe combo artifact. It's very on the nose, yes. The answer is less so. You need to know what the wifi password is and that requires looking around the gym for a sign that details how to connect to the wifi. Chances are you passed it on the way to the safe, so just retrace your steps. Head to the juice bar if you're having trouble spotting it. If you just want the answer, it's 12-18-79.
The Last of Us Part 2 Spoiler-Free Walkthrough Part 7: Seattle Day 2
The Last of Us 2 News

