If you played through The Last Of Us, you might remember that despite all its grim post-apocalypse trappings there was still some good old video game-style collecting that you could do, picking up issues of the fictional in-world comic book, Savage Starlight. Unsurprisingly, The Last Of Us Part II hides collectibles in its environments too, one of which is trading cards.
A lot of cards can be found more or less in plain sight, but a few of them definitely take a bit more sleuthing to find. In this guide, we'll point you towards the location of every trading card in the game, divided by chapter. For some additional help, we recommend turning on the game's High Contrast mode in the accessibility options--this might make it easier for you to spot these tiny pieces of cardboard in the busy environments. Also consider turning on the Enhanced Listening Mode in the Navigation and Traversal accessibility menu, since that'll let you send out a ping that locates all items in your immediate area.
Need help with some other parts of The Last Of Us Part 2? You're in luck, because we have a bunch of guides going up for those that need a little extra helping hand in the post-apocalypse. Check back often, as we'll be posting it piece by piece gradually. We recommend bookmarking our Last of Us Part II guide roundup, which we will keep updated with the latest walkthroughs and guides as they get published.
Jackson
Waking Up
1. Seismicayla
When you begin to follow Jesse, you'll eventually head through a garden gate. Keep on the path to the left here, and then keep going around the wooden porch of the blue building to the left. You'll see a corkboard hanging on the wall, which has the Seismicayla Trading Card on it.

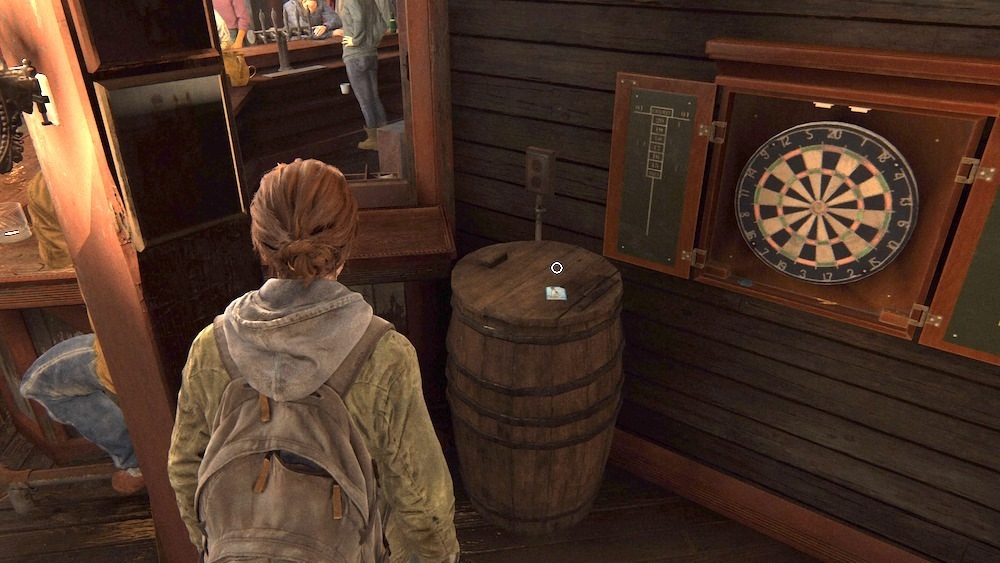
2. Keene Twins
After getting the bigot sandwich and before you leave the bar, turn left and walk to the back of the room. Look left to grab the Keene Twins Trading Card off a barrel.
Patrol
3. Tesseracter
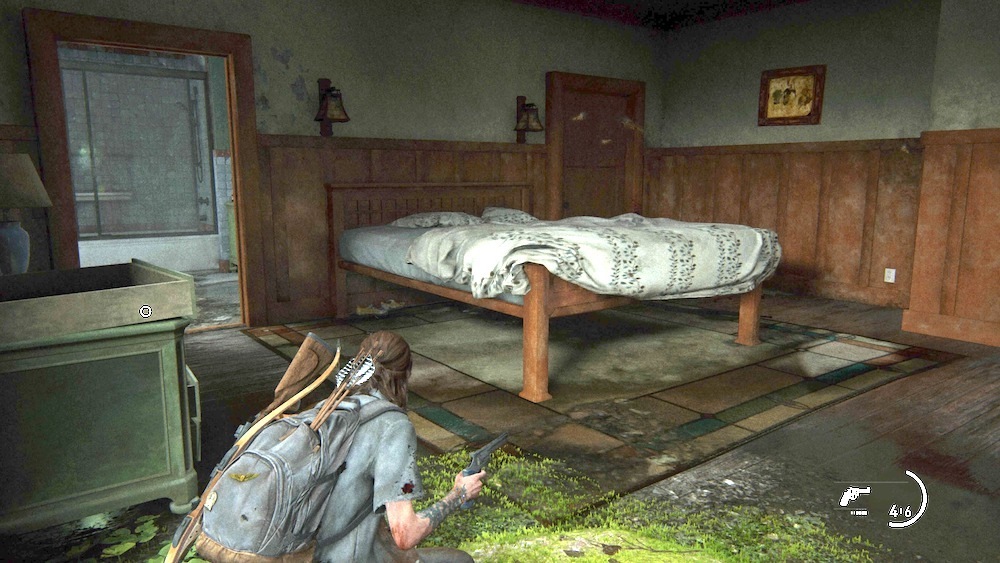
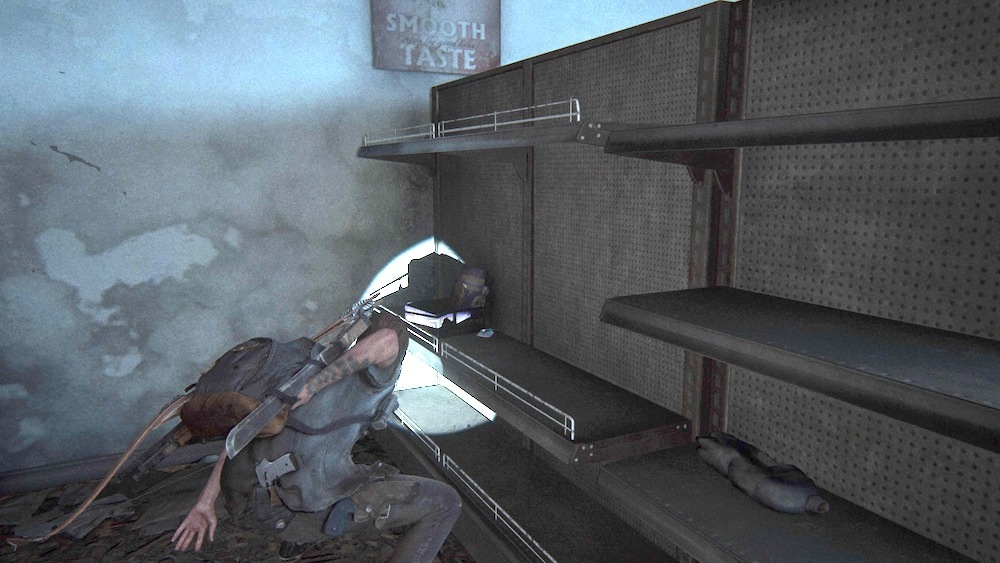
Once you leave the lookout post with Dina, you'll enter a suburban street with some houses you can explore. There will be a blue house, which you can climb to reach the second story of. Here, you'll find the Tesseracter Trading Card on the shelf in the closet.

The Library
4. Laurent Faucalt, CEO SPARK Trading Card
At some point in the library, you'll reach a children's section with a stuffed giraffe Ellie can interact with. From the giraffe, look in the storage room in the back left of the area to find the Laurent Faucalt, CEO SPARK Trading Card.

Seattle Day 1
The Gate
5. Motivator
From the beginning, ride on until you start to see cars but before you reach the full highway. You should see a bus stop on your right as you proceed. Hop off your horse and check the wall of the bus stand to find the Motivator Trading Card hanging on it.
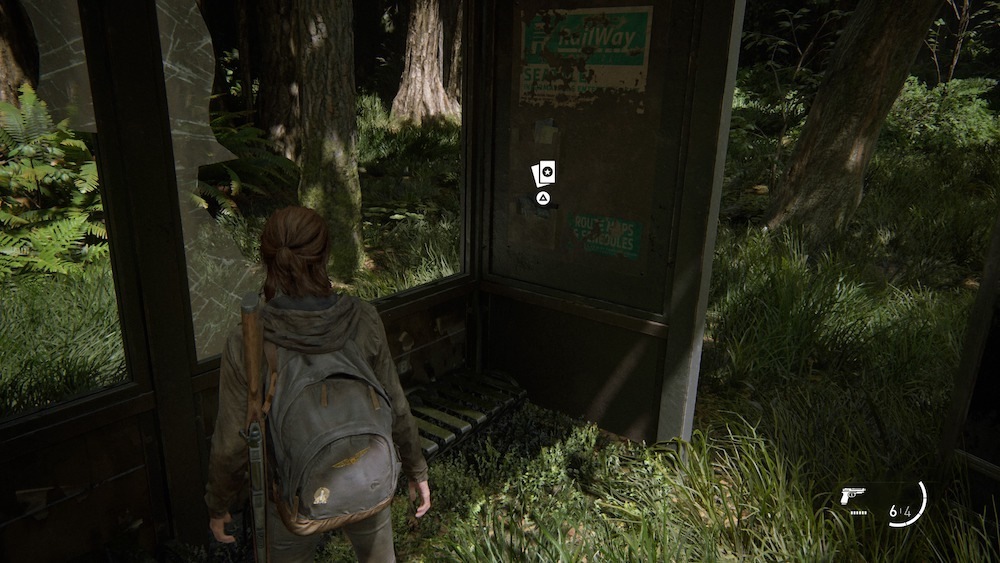
6. Starfire Kids
Once you hit the highway, look for a portable building on the left side of the road. Check the bulletin board inside for a The Starfire Kids Trading Card.

7. Chessmaster
Once you're over the wall into the QZ, walk along it until you go inside. Look to the left for a ladder. Climb up and check the table to find the Chessmaster Trading Card.

8. Oozer
Once you plug in the cord to open the gate, you can pick it up again when you're done and throw it over the top of the FEDRA trailer next to the generator. You can then use it as a rope to climb up onto the roof of the building, where you'll find the Oozer Trading Card

Downtown
This section of Seattle is actually a large open area you can explore at your leisure. We've tried to describe the locations here as best we can. Refer to your map if you feel lost!
6th and Marion St.
9. Doctor Uckmann
Look for a staircase around the back of the destroyed wall of the building. Climb it and throw a brick through the window to get outside. Continue to the top and open the cases you find there to discover some supplements and the Doctor Uckmann Trading Card.

West Gate 2 (Madison between 5th and 6th)
10. Flo
Head south from the courthouse and slip through the fence at West Gate 2. Around the back, you'll find a safe. Open it with the West Gate 2 gate code: 0451. Inside is a mess of useful supplies, including ammo, supplements, and the Flo Trading Card.

5th and Marion (Checkpoint, Music Shop)
11. Das Wort
Inside the music shop where Ellie can play the guitar, look in a drawer behind the clerk's counter on the bottom floor for the Das Wort Trading Card.

5th and Spring North Corner (Coffee Shop)
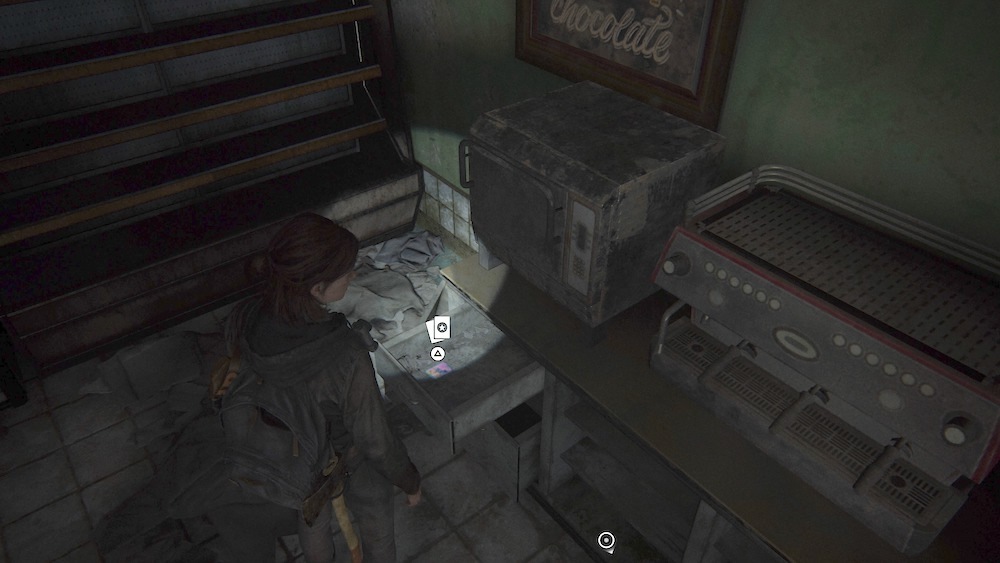
12. Big Blue
You'll have to break the window to get inside the coffee shop, but once you're in you can check the drawer in the back corner for the Big Blue Trading Card.
Severena Hotel
13. Know It All
Once you're done with the open area and make it to the Severena Hotel, head up the stairs, where you'll have access to various hotel rooms. The second bedroom has the WLF Recruiter Journal artifact in a dresser drawer, but also look in the nightstand drawer to grab the Know It All Trading Card.

Eastbrook Elementary
14. Cardio
Once you escape the school and jump across to the nearby apartment building, hop over the flipped couch (to your right as you enter) to reach the bedroom of the apartment. Open the nightstand drawer to get the Cardio Trading Card.

Capitol Hill
Though it's not as big as the Downtown area, Capitol Hill has several buildings you can enter spread out forward and to the left of where you start. If you've found the two-story building with the bagel store, you're nearing the end of this section. We'll outline what you can find in the other buildings along the way.
Apartment Complex
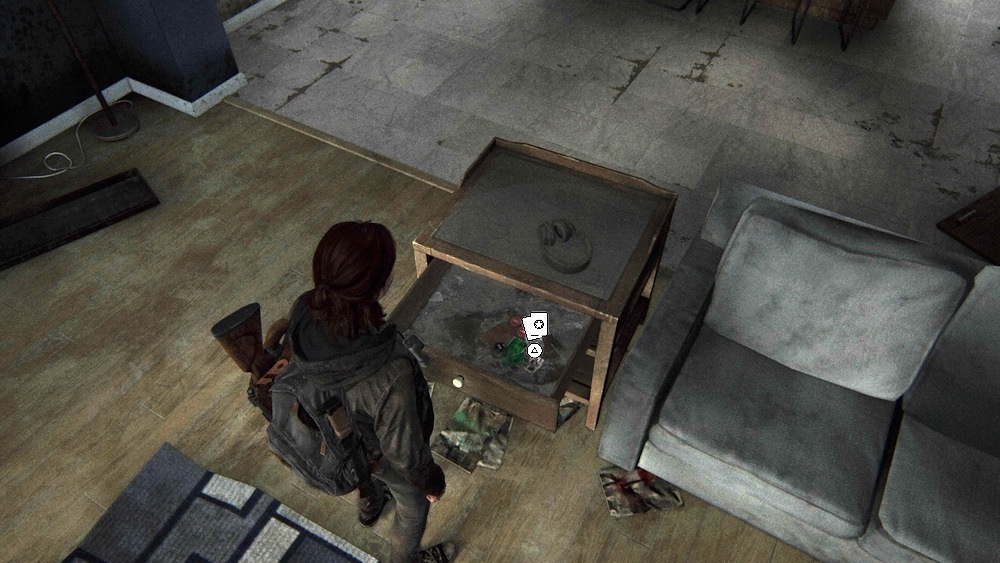
15. Kinnard, Esq.
You can check two apartments in the complex that includes the drained pool you'll see as you leave the apartment building. You can also access Apartment 3 just past Apartment 6 (the one with a trail of blood) in separate building. Look in the end table next to the couch to find the Kinnard, Esq. Trading Card.
Orange Apartment
16. Rockafella
You'll soon come into the parking lot of a motel. There are a few rooms to pillage, one of which has a locked door. To get into that one, go through the room beside it to the back and jump through the window. You'll find another window you can climb through to get into the locked room. Inside, you can get the Rockafella Trading Card from off the floor near the trash can.
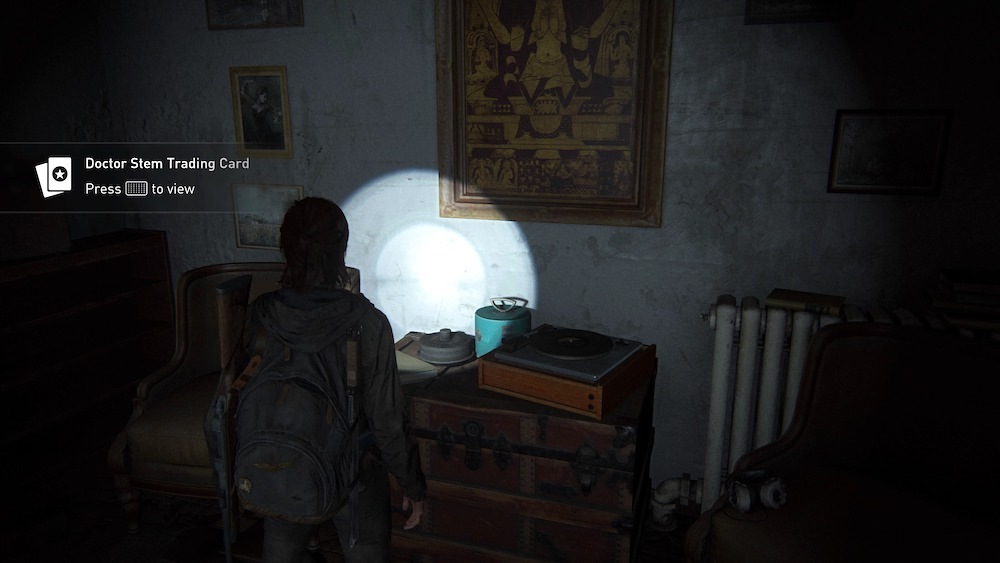
Book Store
17. Doctor Stem
Behind a closed door at the back of the bookstore is a bunch of infected. Once you get in there and clear it out, check the table near the doorway you entered, on the close side of the bathrooms, to find the Doctor Stem Trading Card.
Supermarket
18. Sergeant Frost
Once you clear the infected in the supermarket, head to the back area. Check the lockers to find the Sergeant Frost Trading Card. Head through the two-story bagel store to find the exit for this whole area.

Liquor Store
19. Candelabra
Once you're over the next gate, check the building just beyond where the clicker exploded. In the back corner is a display stand with trading card boxes, where you can find the Candelabra Trading Card.

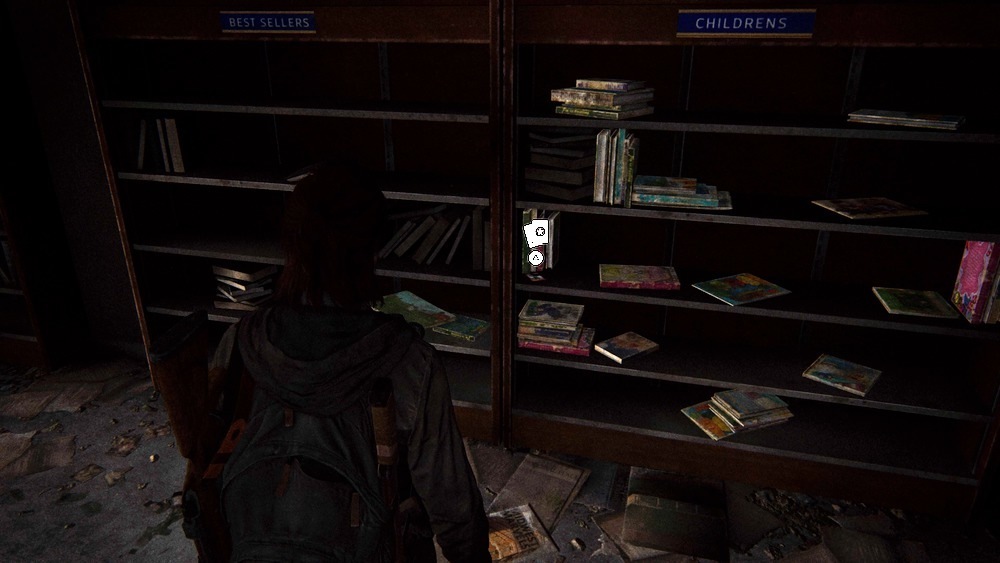
Thrift Store
20. Bizarrebra
Just past the martial arts gym is another storefront you can enter on the other side of the street. Check the left side for a shelf marked "Children's" with the Bizarrebra Trading Card on it.
Channel 13
21. Kimimela
After you shimmy along the outside of the building, you'll enter another set of offices. Go left from the door exiting to find a Kimimela Trading Card on an office desk.

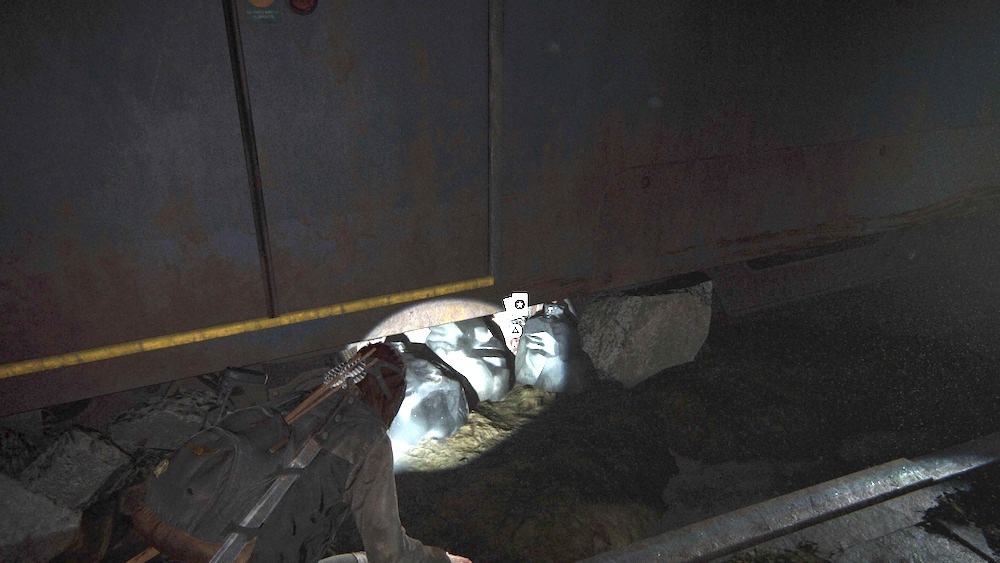
The Tunnels
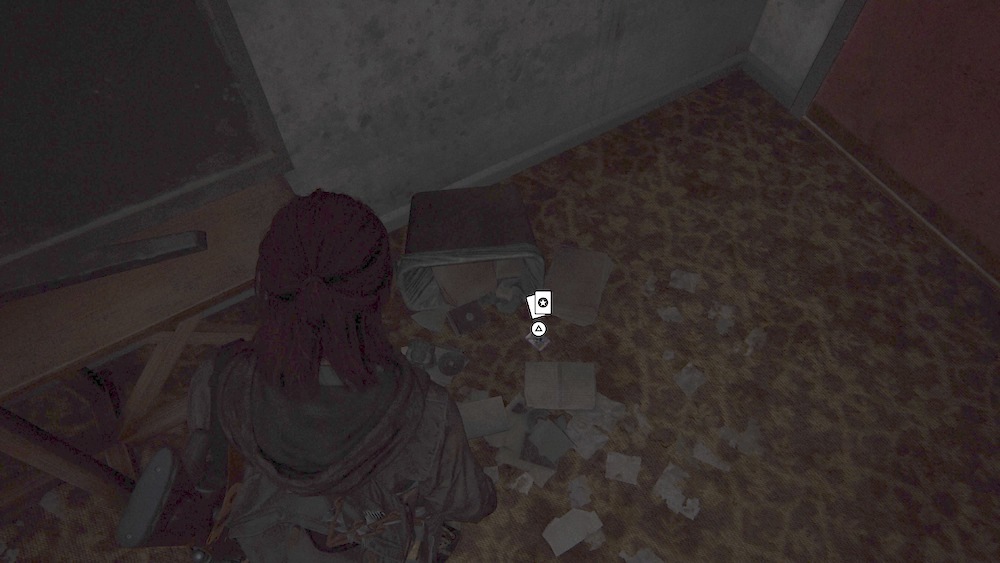
22. The Imp
When you get into the subway train cars, keep moving until you see a red-lit door on the right to go onward. But first, go past it, alongside the crashed train car just ahead. Look down beneath the car on your right to find The Imp Trading Card nestled among the trash there.
23. Dr. Daniela Star
After your first encounter with the Shamblers, you'll find an area locked with a cage. To the right of the cage is a table you can crawl under, leading to a hole you can crawl through to get inside the caged room. You'll find a Dr. Daniela Star Trading Card on the table beside the computer there.

24. Bastet
Keep moving until you hit another area with crashed train cars and flooded tracks. Head to the right through the first car, then slip through the gap between two cars. Here, turn left and look for a spot where you can crawl under and inside one of the crashed train car lying on its side. Once inside it, you'll find an open suitcase to your left with the Bastet Trading Card on top of it.
The Theater
25. Mortem
Head straight back from the entrance, over the bar to the glass cases behind it. Break the one on the right and check the bottom to uncover the Mortem Trading Card.

26. Beyond
Head upstairs to the balcony, and then follow the hallway on the second floor to the barricade to find a Beyond Trading Card in front of it.

The Birthday Gift
27. Nighthawk
In the Giants of the Earth room, look in the alcove on the right near the bathroom to find a Nighthawk Trading Card.

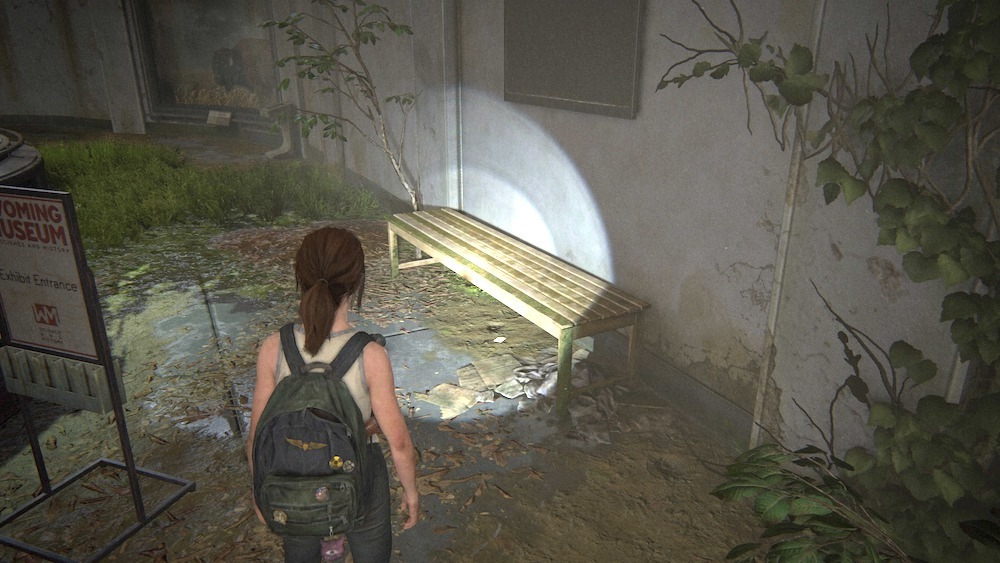
28. Saura
After crossing the water to the next building, turn right at the moose statue. You'll find the Saura Trading Card under a nearby bench.
Seattle Day 2
Hillcrest
29. Wachumero
As soon as enter the area, do a 180 and walk back toward the way Ellie came. You'll be able to drop down onto the bed of a truck. Break the back window to find the Wachumero Trading Card.
Caroline Paper Co.
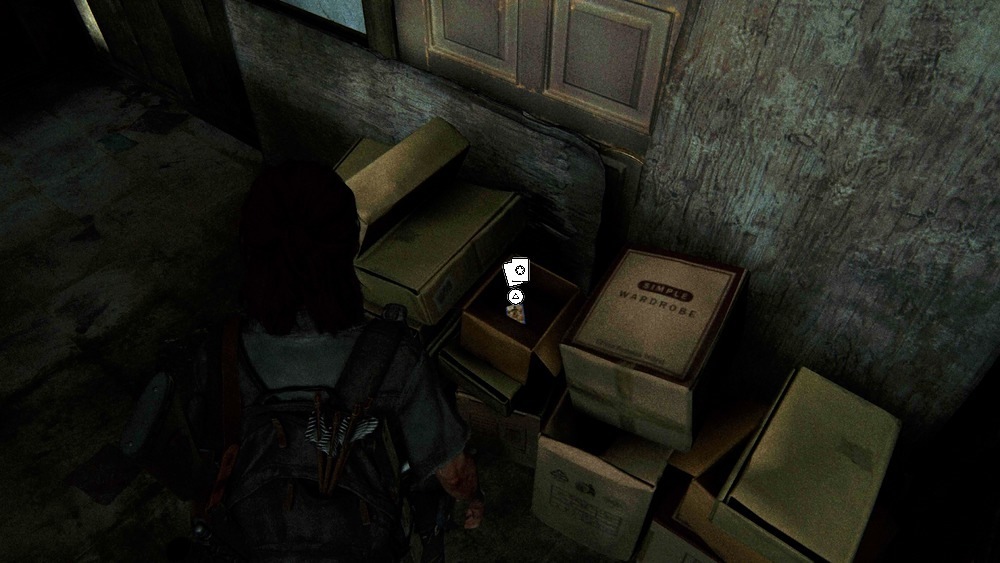
30. Sahir the Sorcerer
Once you go over the truck at the end of the area, you'll see a number of additional storefronts. First, turn left and go through the bushes to find a spot where the street has collapsed. Head through and climb up the other side to get into the stationery shop. Go to the back of the store and look in the pile of boxes to grab the Sahir the Sorcerer Trading Card.
Bike Shop
31. Naledi the Youthful
Once you make it through the next area, you'll enter the garage of a bike shop. You can't miss the Workbench just ahead. To the right, look for a bike with the Naledi the Youthful Trading Card tucked into the spokes of the back wheel.

Boris's House
32. Brainstorm
You'll eventually hop a fence and come to an open house. There's a kid's playhouse in the yard; head around the back of it to grab the Brainstorm Trading Card off the windowsill.

The Neighborhood
33. Reverb
The next area is crawling with Wolf patrols. In the two-story house at the end of the street, where a rifleman is set up, you'll find the Reverb Trading Card under the bed in the bedroom.
Finding Strings
The Hotel
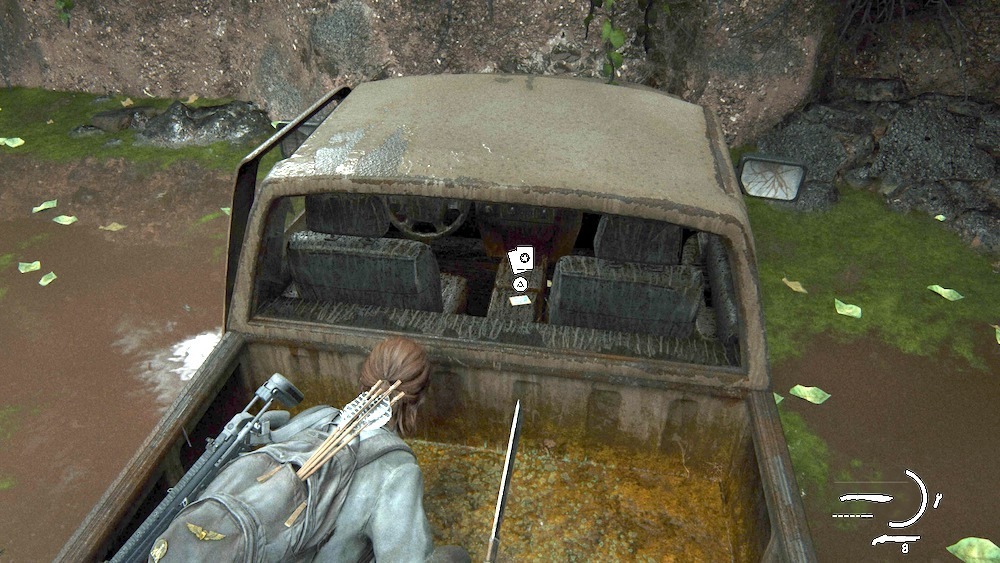
34. Austringer
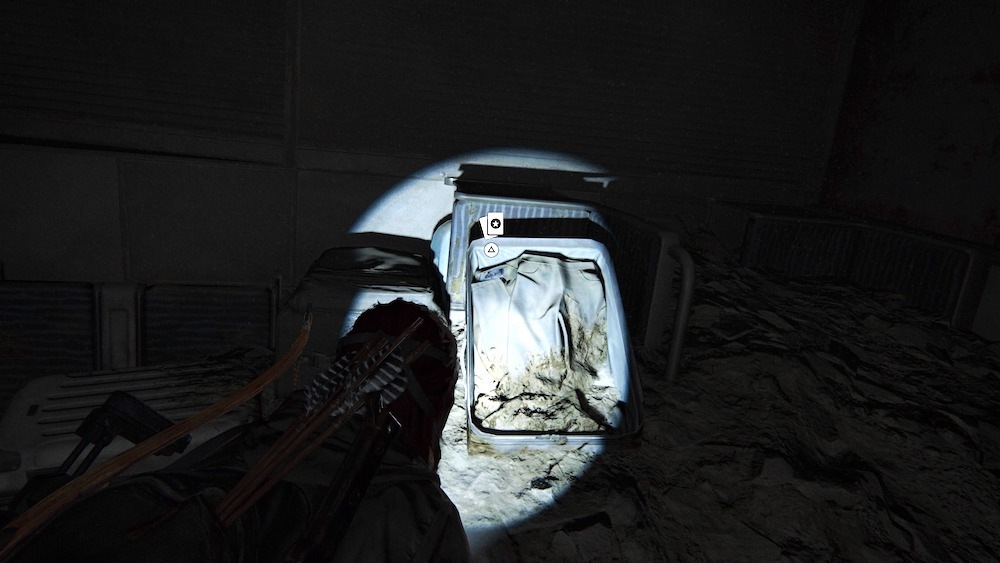
After getting off the horses, you'll hop on top of a van and its trailer--only to find the road has caved in ahead and you can't proceed. Head down into the hole and to the back of the car that's fallen in. You can get the Austringer Trading Card off the back seat.

The Seraphites
35. Randy Styles
Enter the convenience store once you're through the checkpoint. On the right wall toward the back of the store, you should find the Randy Styles Trading Card.
Convention Hall
36. Shift
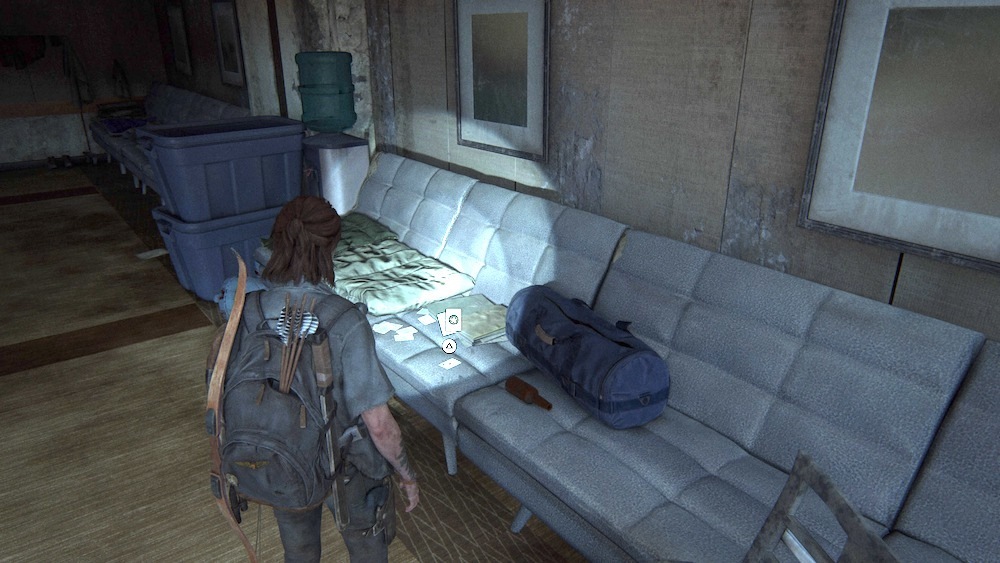
Across from the bar and next to the convenience store is another building you can enter, with a "Feel Her Love" sign to get a Journal Entry. Use the ladder in the elevator shaft to reach the second floor, then use the rope tied there to make yourself a path around the locked door outside. Break a window and part of the glass awning so you can throw the rope where you need it, then go outside, climb up, and swing to the window or nearby ledge. Head to the couch inside to find a Shift Trading Card.
37. Star Sign
Continue down Route 5 until you hit a gate you can't open. Across the street is a panel truck; climb up on top and use it to reach the second floor of that building. Break the window to get inside, where you can find the Evacuation Letter artifact. Go through the brown door to find the bedroom, which contains a safe. Open the drawer in the nightstand of the same room to find the Star Sign Trading Card.

Convention Center
38. Arch-Enemy
Once you're past the gate, you'll break back into the convention center, this time in the lobby. Drop down to the floor below using the scaffoldings, then look for a locked green-gray door near the front of the building, right near the other scaffolds. To get in, look for some high windows around the back of the room, to the left of the door. Break them and climb inside; check the file cabinet drawer to grab the Arch-Enemy Trading Card.

Garden Suites
39. Doppelganger
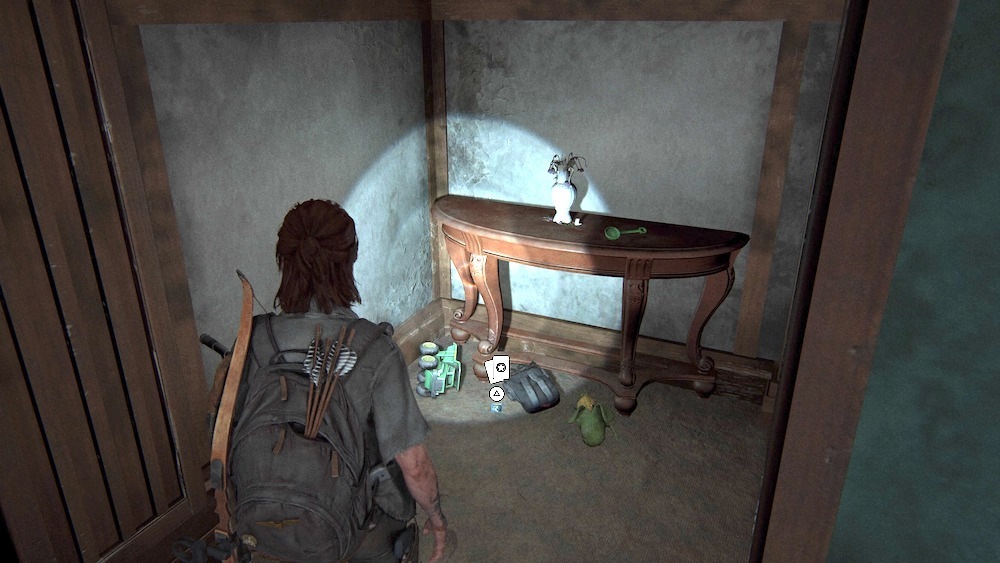
After passing through the park, you'll enter another apartment building. At the top of the stairs, loop around to the back corner of the area and check under a table to find the Doppelganger Trading Card.
Weston's Pharmacy
40. Bhat M'Andarr
Once you've passed through the Merci building, you'll drop into a pool and climb out on the other side of the road. Look for Weston's on the left side of the path forward. There's a Bhat M'Andarr Trading Card right inside the door on the shelf to the left.

Seattle Day 3
Road To The Aquarium
41. Esquire
Back in the theater, head toward the curtain to leave backstage but don't go through. Instead, turn left and check on the crate near the mannequins to find the Esquire Trading Card.

42. Tormentra
After leaving, keep moving forward until your path diverts you into a storefront. You'll open a door into the back hallways of the building. Look for a doorway that's blocked on the right, but which you can crawl under, to find a Workbench. On the other side of the room is the Tormentra Trading Card.

Bookstore
43. Tanager
Once you drop down into the bookstore, continue to the bottom where it's flooded. Look under the platform you just jumped down from. You should see bookshelves with the Tanager Trading Card.

44. Tatuaje
After some encounters with wolves and moving through a department store. You'll come across a covered bridge, and then drop down into a room where Ellie remarks, "This place is wrecked." Before you push debris out of the way to clear the doorway, look for a low wooden shelf that contains the Tatuaje Trading Card.

The Flooded City
45. Seff-L'ho'pahd
Once you obtain the boat, you'll leave the mall and travel until you hit a dead end. When you get out to find a way through, you'll eventually climb to the upper floor, drop through a hole in the rubble, which will take you to the caged area back down by the boat, where you'll find a safe. Before you leave this area, check the office to the right of the area with the cage. The drawer in the back of the room contains the Seff-L'ho'pahd Trading Card.

46. Khazakh
Once you're done fighting a Bloater, you'll lift up a gate to get into a prize area. When you're here, check the shelf on the right for the Khazakh Bright Trading Card.

That's it! You're done, you've found all the trading cards in The Last Of Us Part II! But don't worry, your days of collecting aren't behind you just yet. You'll soon find out that there is another kind of collectible item in the game, and if you need some help finding them, head over to our Last of Us Part II guide roundup.
The Last of Us 2 News

