Phasmophobia, an early access horror game from Kinetic Games, has taken Twitch and social media by storm. For the uninitiated, Phasmophobia's goal is simple, though achieving it is a little tricky. You, either alone or with a group of friends, play a ghost hunter investigating a spooky, dimly-lit location and try to determine which type of ghost is haunting the place. As you explore the area, you will need to use various tools--like a camera, a thermometer, and even a crucifix--to gather evidence before the ghost kills you and your friends.
Aside from the ghosts, the most terrifying thing about Phasmophobia in its current state is the lackluster tutorial. It teaches you the basics for a few investigation tools, but it leaves a lot for you to figure out on your own. So to help you in your efforts to track down the whereabouts and identify apparitions, I've detailed below everything you need to know about tools available to you in Phasmophobia, as well as general tips to keep you alive.
The Objective
Your job is to figure out what kind of ghost you're up against. To do that, you first need to identify which part of the building the ghost is haunting, and then you need to find three separate pieces of hard evidence to log in your journal. Once you've discovered three clues, you can identify the ghost in your journal and promptly get out. The evidence options are:
- EMF level 5
- Freezing temperatures
- Spirit box
- Ghost orbs
- Ghost writing
- Fingerprints
You'll want to make sure you have every tool you need in order to look for these pieces of evidence before you go into a job. There are also optional objectives, which you can find on the whiteboard in your van as you start a job, and some tools are good for completing these (which nets you extra cash to buy more tools). We've rounded up both the essential tools and some notable upgrades below.
Starter Tools and Essential Add-Ons
To find evidence, you need to know how the tools work and how to use them effectively. There are a few starter tools--the EMF reader, spirit box, video camera, photo camera, flashlight, UV light, and ghost writing book--as well as others you have to buy with the money you earn from ghost-hunting jobs. These tools will help you locate the room or area the ghost is haunting and find clues as to what kind of ghost it is, while there are optional tools that also can provide you with some protection against the ghost.
Most tools can be turned on or operated with a right-click, placed with F, and dropped with G. Note that you don't have to have your flashlight out to use it; you can turn the flashlight on and off with T while you have another tool out. You can only hold three tools at a time, so make sure to coordinate with your crew and plan ahead.
Flashlight and Strong Flashlight
- Related evidence: none
- Good for: seeing things
There are two flashlight options in Phasmophobia: the standard-issue flashlight that comes with your kit and the strong flashlight, which illuminates a greater area. You also have a flashlight on your shoulder automatically, but that only lights up about two inches in front of your face and isn't very useful. A flashlight should almost always take up one of your item slots.
EMF Reader
- Related evidence: EMF level 5
- Good for: locating the ghost, evidence
The EMF reader is one of the essential pieces of tech in your toolkit. Turn it on (by right-clicking) as you explore the house and monitor the levels on it while clearing rooms. High EMF readings don't necessarily mean danger or high levels of paranormal activity; it just means that a ghost could be nearby or that you could be in a haunted room. The EMF reader is handy early on as it can help you pinpoint which room is the source of paranormal activity. If the EMF reader hits level 5, you can log that as evidence in your journal when you have a minute to breathe.
Thermometer
- Related evidence: freezing temperatures
- Good for: locating the ghost, evidence
The thermometer is the only tool that isn't part of your default toolkit. We highly recommend buying and bringing one of these along, no matter the job. This is an excellent tool to use for the initial sweep of the house. If you see the temperature drop below 10 degrees Celsius, there's a good chance you are in the affected room. If it drops below zero, then you'll want to add freezing temperatures to your journal as a piece of evidence. If you forget the thermometer, which will almost certainly happen, you can still tell if a room is freezing if you can see your breath--the thermometer just makes it a lot easier.
Spirit Box
- Related evidence: spirit box
- Good for: aggravating the ghost, evidence
The spirit box is one of the creepiest tools in the game, as it often requires you to sit in a room by yourself with the lights off and try to have a conversation with the ghost using your real-world microphone. With the spirit box, your goal is to get the ghost to respond to you directly. You can do this by asking questions such as: "How old are you?", "Can you speak to me?", "Is there anyone with me?", and so on.
The ghost can respond to your questions in one of two ways. It can interact with the environment, like turning off lights or moving objects, or it can respond directly through the spirit box. If you hear it through the spirit box--it will be a word spoken in a robotic voice--you can mark that down as a clue in your journal. If the ghost moves an object, it means that the spirit is nearby, but that doesn't count as a clue to log in to your journal. Alternatively, the spirit box may say "nothing detected," in which case you should try a different room. If you don't get "nothing detected" but haven't heard a voice, keep talking.
Keep in mind that the lights need to be off for the spirit box to work, and some ghosts will only respond to you if you are alone. If you do end up with the Spirit Box, make sure you are holding down proximity chat (V) when you talk. Technically, the ghost can hear your mic inputs even if you don't push to speak, but it's helpful for your teammates to hear you and is a good failsafe.
Video Camera
- Related evidence: ghost orbs
- Good for: evidence
Since you can only carry three tools at once (flashlight included), we recommend leaving the camera in the van until you've pinpointed the haunted room. Once you know where the paranormal activity originated from, return to the van and grab a video camera (the big black one). Place the camera in the corner of the room to give you the widest field of view possible. You can hold left-click to rotate the camera, right-click to turn it on, and F to place it. Don't forget to turn it on before you bail--the last thing you want to do is to walk back to the van only to find out that you didn't turn on the camera. Oddly enough, in Phasmophobia, the green light means it's recording, and red means it's off, so make sure to check this before you go.

After you've placed the camera, you or a crew member should return to the van and look at the monitor. Left-clicking on the in-game mouse will change cameras, and clicking on the in-game keyboard will toggle night vision. Whoever is monitoring the cameras should be looking for ghost orbs. Ghost orbs look like fireflies that flutter by the camera. (Don't confuse this with someone's breath, which you'll see when the temperature drops. That looks more like exaggerated clouds.) If you see an orb, make sure to log it in your journal as a clue. If you don't see one, it's usually good to try another angle to be thorough.
Ghost Writing Book
- Related evidence: ghost writing
- Good for: evidence
Like the camera, the Ghost Writing Book is good for after you've located the haunted room. Once you know which room the ghost is camping out in, set up the journal and wait. If writing appears in the book, mark it in your journal. When you place the journal, make sure you press F to place it and not G to throw it down. Technically, a ghost can write in the journal no matter how it's positioned, but we like to keep it facing up so everyone can see it at a glance. The smart play here is to set up the journal within the video camera's view so that you can see it from the comfort of the van.
UV Flashlight
- Related evidence: fingerprints
- Good for: evidence
Like with the last few gadgets, you can probably leave the UV flashlight in the van during the early stages of a job. Typically, fingerprints don't appear until later. Once there's been a significant amount of paranormal activity, grab the UV flashlight and sweep the affected areas. The best places to find handprints and fingerprints are on doors and windows; they'll be bright green, so they're hard to miss if they're indeed there. If you see something, snap a picture for extra cash and mark it in your journal.

Photo Camera
- Related evidence: none
- Good for: extra cash, completing optional objectives
In addition to the video camera, there's also a silver camera that takes still shots (with a right-click on your mouse). At each job, you'll get optional objectives, and two of the most common ones we've seen involve photography: taking a photo of dirty water in a sink and taking a photo of the ghost itself. You can use the spirit box to aggro the ghost, who might use a nearby sink to haunt you a bit; the dirty water kind of looks like chocolate milk, so you'll know it right away. If you're brave enough, you can have the camera out while the ghost is really active to try to snap a photo of it--just be careful.
Other Tools: Safety and Upgrades
While what we detailed above are the essential tools you'll use on any given job, there are a handful of other optional tools you can take with you. These include a crucifix, which can protect you from certain ghosts, and smudge sticks that can calm a ghost for a period of time. It's also worth noting that you can make a little extra cash when you finish the job if you successfully use some of these optional tools.
While the tools below can help you on your hunt, they aren't as straightforward as the tools above. If you're new to Phasmophobia, we recommend sticking with the tools we listed earlier and slowly try out new ones as you get more comfortable with the basics. While this list isn't extensive, these are the most important add-ons we think you can get.
Crucifix
- Related evidence: none
- Good for: not dying
The crucifix works as you'd expect. As the ghost gets more aggressive, make sure you have it out and ready; you can throw it at the ghost using G to protect yourself from death. Note that it's more effective on certain types of ghosts than others.

Lighter and Smudge Sticks
- Related evidence: none
- Good for: not dying, completing optional objectives
We consider these two to be a set. The candle and the smudge sticks are the only two items that require another item to work (the lighter), so never bring either a candle or smudge sticks without a lighter to go along with them. Basically, the smudge sticks look like a giant, ahem, cigarette of sorts, and they work to "sage" the room and temporarily cleanse it of the paranormal.
To light the smudge sticks, you need them and the lighter in your inventory. Turn on the lighter with a right-click, then switch to the smudge sticks and press F to light them. Alternatively, one of your teammates can hold the lighter while you press F to ignite the smudge sticks. Then walk around the haunted area to "cleanse" it, or simply throw the smudge sticks down with G to let them do the work. This will protect you for a limited time, and it's also one of the optional objectives you might get when you start a job.
Lighter and Candle
- Related evidence: none
- Good for: seeing things when the lights go out
Like the smudge sticks, the candle is useless without the lighter. Light it the same way you would the smudge sticks (see above) when the ghost turns out the lights or starts to get more aggressive. While you can always find the breaker and fix the lights if they go off, a ghost at activity level 10 will also cause your flashlight to flicker, so a candle can be a nice safeguard. However, it's not the most essential item there is.
Sanity Pills
- Related evidence: none
- Good for: staying sane
As you hunt a ghost, your sanity will start to drop. (You can monitor everyone's sanity levels in the truck.) It's absolutely worth it on harder difficulties and larger maps to bring a bottle of sanity pills for each person so you can take them mid-job; we usually return to the truck after finding the haunted room to swap gear, and that's when we take the sanity pills.
Salt
- Related evidence: none
- Good for: not dying
Like the crucifix, the container of salt is used to temporarily protect you and your squad from a ghost. It's only effective on certain types of ghosts, but it can still be helpful if you're worried about being hunted.
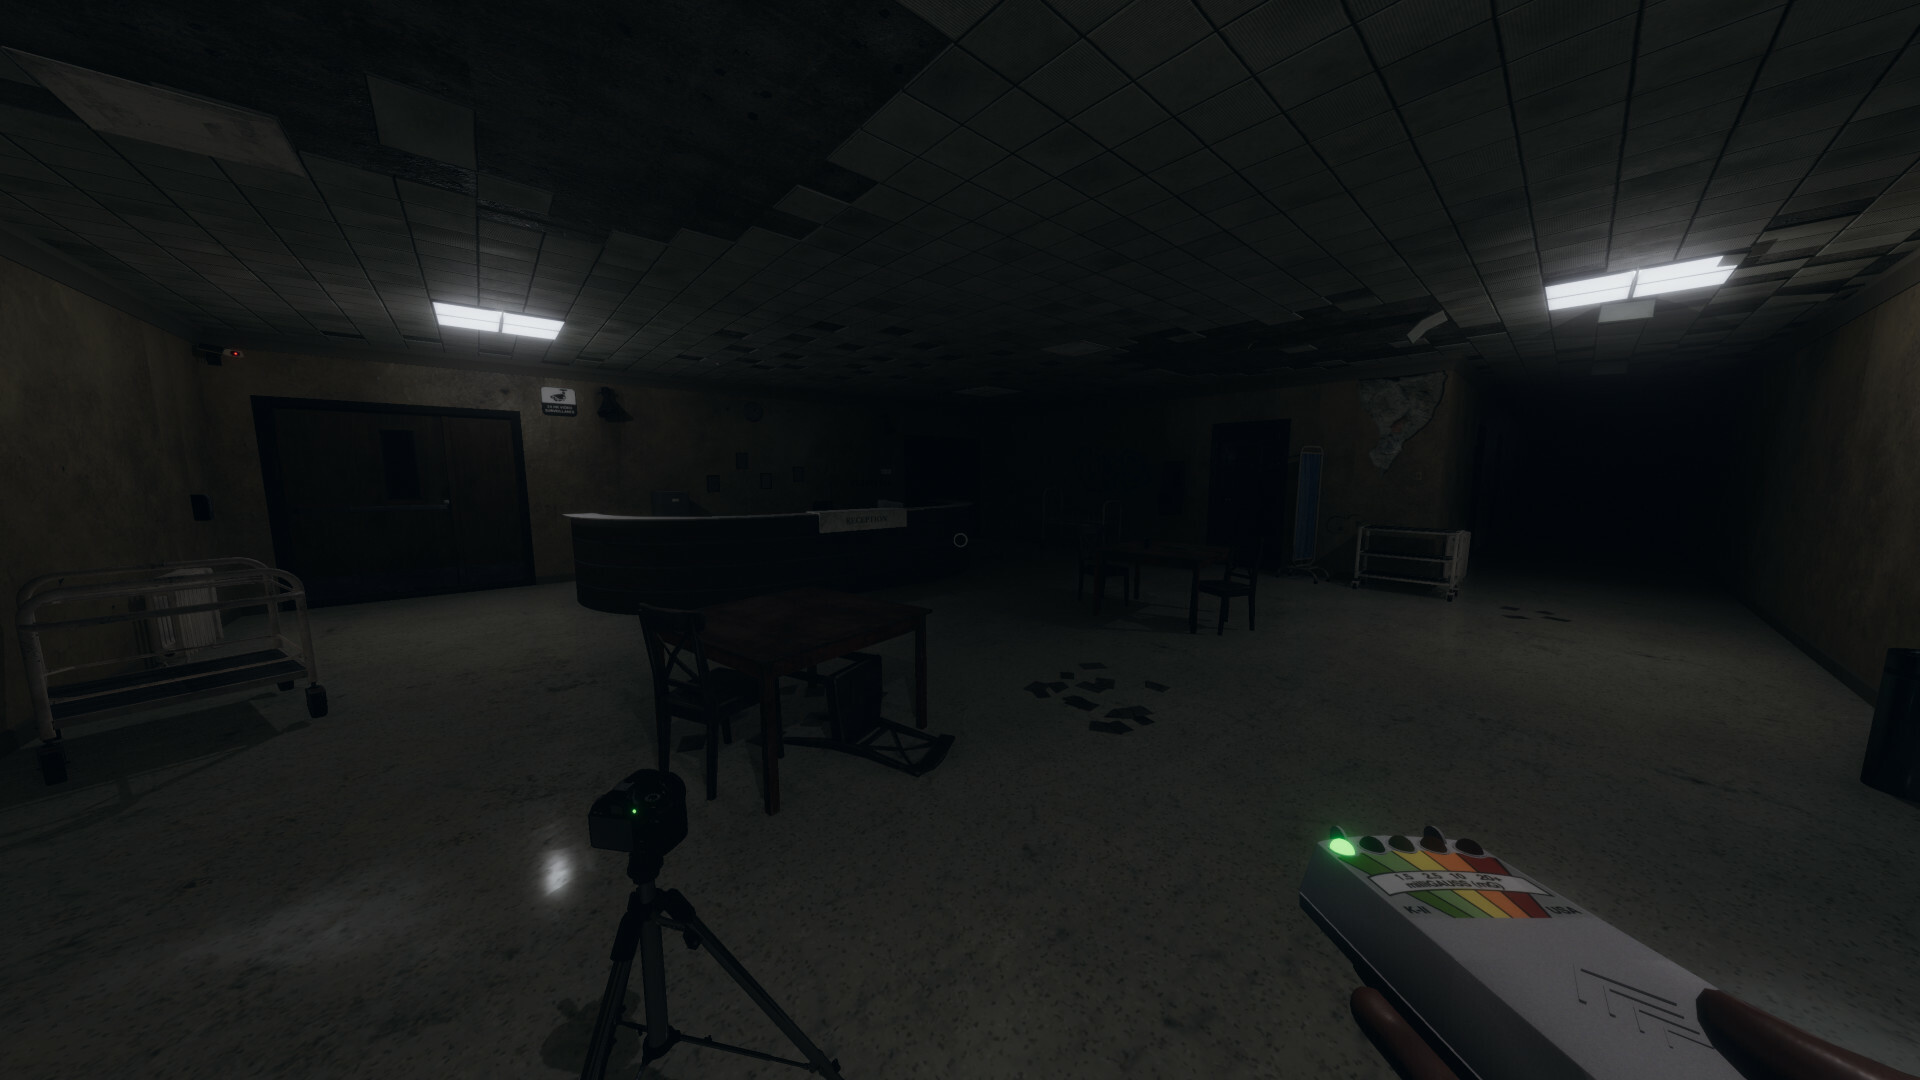
Tripod
- Related evidence: none
- Good for: mounting a camera in a weird location
Sometimes, you'll find that a ghost is camping out in a bathroom or other room with no real shelves or surfaces to speak of. In these cases, you'd have to put your video camera on the floor--unless you bring a tripod with you. While not strictly necessary, the tripod can really help you out when it comes to looking for ghost orbs.
Glowstick
- Related evidence: fingerprints
- Good for: marking a notable area, seeing things, evidence
In lieu of a UV light, you could always bring a glowstick! It both helps you see and works as a UV light if fingerprints are nearby. You can also drop it using G outside the haunted room on larger maps if you want to make sure you can find your way back after a trip to your truck.
Head-mounted Camera
- Related evidence: ghost orbs
- Good for: saving an inventory slot
As you unlock and purchase more gear, you'll find that deciding which three items to take with you gets harder and harder. The head-mounted camera is great for this; you get the benefits of a camera without taking up an inventory slot. The only downside is that the person wearing the camera will have to stand in the haunted room long enough for their teammates to look for ghost orbs on the computer in the truck, and that can get very scary very fast.
Motion Sensor
- Related evidence: none
- Good for: locating the ghost, completing optional objectives
The motion sensor can detect ghosts moving about a room, which isn't always helpful for hunting them but is very nice for an easy optional objective. All you have to do is place the motion sensor on the wall of the haunted room, and you'll hear it go off with a beep in your truck when people or ghosts walk by.
Sound Sensor
- Related evidence: none
- Good for: locating the ghost
Like the motion sensor, the sound sensor is another way to detect a ghost. It's not the most useful item since it doesn't protect you or help you find evidence, but if you want to figure out where a ghost is, the sound sensor might help.
Parabolic Microphone
- Related evidence: none
- Good for: locating the ghost, scaring yourself
Like both the motion sensor and the sound sensor, the parabolic microphone is yet another way to gain intel about a ghost. We wouldn't recommend taking this over some of the other items on this list, but hearing ghosts wandering about is spooky, at least.
Infrared Light Sensor
- Related evidence: none
- Good for: locating the ghost
Yet another item used to pinpoint a ghost's location, the infrared light sensor will light up when there's ghostly movement about.

Tip: Be Careful Using Fancy New Gear
As you complete jobs, earn money, and level up, you will unlock new maps and new gear to test out. Even consumable items like sanity pills will restock themselves after you finish a job (just make sure to re-add them to your equipment list before going on the next job), any non-starter equipment purchased and taken out into the field will be lost if you die. Be extra careful if you want to hold onto those thermometers, strong flashlights, and motion sensors. You do get an insurance payout, though, so it's not a complete loss.