Mortal Shell Boss Guide: How To Beat The Toughest Foes In Fallgrim
There are some massive, powerful creatures and warriors waiting in Mortal Shell--here's how to take them all out.
Mortal Shell is all about tough duels with deadly foes who can lay you low with only one or two massive blows. You have some serious advantages against them, however--you can change "shells," or bodies, to better suit your play style and the enemies you're facing, and you can "harden" your body to absorb their strikes and give you an opportunity to land your own.
With the many abilities of Mortal Shell at your disposal, you can fight your way through the harrowing land of Fallgrim and its three massive temples, but your greatest challenges are waiting in those dungeons. The bosses of Mortal Shell are a lot more versatile than your common enemies, and the three guarding the temples sport multiple phases that require you to adapt to an evolving fight. .
But each boss has its weaknesses to exploit, and if you know what you're up against, they can be bested. The guide below will help you face all of the toughest opponents in Mortal Shell, regardless of how huge and intimidating they are. Note that almost all of these bosses can be fought in any order, so this list is arbitrary and you might face some of these foes at different times. The fights themselves will be the same, but the order you take them on can change which weapons and upgrades you have available in each one.
We've got lots more Mortal Shell coverage to help you out as well. Check out our beginner's tips to help you survive and our item guide so you know what everything in your inventory does--and how you can make it more effective. You'll also want to check out our Mortal Shell review while you're at it.
Grisha

The first major challenge you might come across is waiting for you at the end of a short tunnel near the Tower in the center of Fallgrim. You'll know it by the carnage around it: there are bodies of brigands in the tunnel, suggesting the Grisha has been busy, and a bunch of traps near the tunnel's entrance keep the thing from making its way toward the other camps in the area. This Grisha is more of a mini-boss than a full-fledged boss fight in Mortal Shell, and you'll fave more than one of these creatures during the course of the game. You can also go after it any time, so if you're struggling, feel free to leave and try something else before returning.
This is a tough fight because the Grisha moves fast and hits hard, but the good news is that it isn't especially smart. The boss doesn't have a ton of moves for you to contend with, and because it swings its blade hands around in a pretty predictable way, you'll have some solid windows for parrying if you need to get health back. But because the Grisha is so big and hits so hard, you're going to need to use the harden ability to get a lot of your hits in--so much of this fight is about when to strategically strike and get away without making yourself vulnerable.
First, watch for the Grisha's two frontal attacks. The first is a three-swing combo that includes two horizontal slashes and a thrust; the second has an unblockable heavy strike that momentarily gets the Grisha stuck in the ground. Both are good candidates for you to harden, tank the hit, and then roll away before you take damage--your roll provides you with a ton of invincible i-frames, so you can always start an attack swing, harden, let the Grisha hit you, finish your attack, and roll away without taking any damage. This is the primary way you want to deal damage to the Grisha, while rolling clear after its attack and staying back until harden recharges, and you can risk getting close again.
The Grisha also leaves itself open to attacks on its sides and back quite a bit, and you can open it up to a strike pretty often by baiting its moves. If you avoid the first two swings and the thrust in its three-hit combo, you're almost guaranteed a big hit; the same is true if you dodge its heavy attack that can't be parried. It leaves the Grisha rooted to the ground for a second, giving you time to land an attack. If you do get behind the Grishna, you'll want to be wary of it spinning around to swing away at you, so limit your attacks to one or two strikes at most before getting clear.
The attack you should be most wary of is the Grisha's grab, which it'll do after roaring. The creature will charge you and try to snap you up and bite your head, and even hardening won't protect you. Be sure to leap clear to avoid some big damage.
The best chance of hitting the Grisha without hardening through an attack is when it charges in your direction, making it pretty easy to get out of the way--but this is also one of those moments when it'll usually spin and flail around in the other direction. Patience and smart stamina use is the key here, as it usually is in Mortal Shell boss fights. Keep your distance, bait attacks you know how to deal with, and dance away before the Grisha's reprisals and you should do fine.
Ven Noctivagu

You'll discover Ven Noctivagu in a small cave, accessible only by a hidden hole through which you'll need to crawl, on your way to the Abandoned Chamber. This area also marks the entrance to the ice-themed temple, the Enshrined Sanctum. He guards the shell of Tiel, but he's an optional fight--that said, he's not particularly difficult, and if you've already been dealing with the werewolf-like Noctesperper enemies, you'll know how to handle him.
Ven Noctivagu is pretty much exactly like the standard Nocteserpers you'll encounter when the mist rolls into Fallgrim after you complete a temple, except with a lot more health. He has a few melee strikes he'll chain together, which can poison you, and some big attacks that are tougher to deal with. The first of these sees him jump up onto your shoulders, bouncing off you to knock you to the ground. The second finds him leaping onto our chest and ripping into your throat, which can do devastating damage that you'll want to avoid at all costs.
The good news is that Ven Noctivagu's attacks are all pretty easy to deal with, and any of the heavier weapons will stagger him here and there, allowing you to take the fight to him and end it in decently speedy fashion. The trick is to stay back and watch him for telegraphs of his big attacks. He'll tense up before leaping in a pretty obvious way, giving you lots of time to sidestep and follow up with an attack of your own. With a heavy-ish weapon, you can step to him, harden through one of his strikes, and wallop him pretty well in return before stepping back.
Keep an eye on stamina and harden cooldowns and just alternate between offense and defense, smacking Ven Noctivagu whenever he makes the mistake of leaping past you. Harden can also protect you from his big attacks, so you'll mostly want to use it to protect yourself. You'll probably be able to deal with most of his moves with dodges and careful positioning, and so you shouldn't need to be using harden too often unless it's in an offensive manner. The only issue with Ven Noctivagu is that he's way more resilient than other enemies like him, so you'll need to give him space enough that he doesn't follow up with attacks. The poison can be particularly bothersome--but if you take the time to eat some Tarspores and build up your Familiarity, those mushrooms will give you poison protection that can be very helpful here.
Hadern

Hadern is more of a training boss than a full-fledged threat, but he will still kill you if you let him. You'll face him several times throughout Mortal Shell, usually at the start of a new temple, where defeating him will earn you a new weapon. As such, each time you face him, his moves will be a little different--he'll use whatever weapon it is you're trying to claim from him, which means he'll get a lot of extra range from the Smoldering Mace and the Martyr's Blade, and he'll be speedier and lay down poison damage using the Hammer and Chisel.
That said, the tricks to beating Hadern are pretty much the same all the time: stay back and don't let him bait you with his own harden attacks. He fights the same way you do, but he's somewhat more aggressive in general. But he's usually pretty deliberate, you can parry most of his attacks no matter what weapon he's using, and the arena in which you fight him is huge, providing lots of space to backstep, dodge clear, and then circle around him to keep yourself from getting boxed in.
That's pretty much the trick with Hadern--stay away, bide your time, strike when you can. He likes to come at you with harden attacks where he'll reinforce his defenses mid-strike, but these are almost always easy to predict and avoid, particularly if you're not coming at him with heavy aggression. It's better to let him make these missteps by waiting for him to waste his harden ability then hit him in its aftermath.
As usual, though, after you get in close for a hit, you'll want to dance back to avoid any more incoming attacks from Hadern. Another good way to deal with him: Bait an attack, sidestep it, then follow up with a combo set of your own with your finger on the harden button. When Hadern inevitably tries to hit you back, harden to tank the strike and instantly keep your combo going. You can get a lot of damage in that way, but be sure to roll clear before you over-commit to pummeling him and leave yourself open to another counter. You'll want to stay back for a few seconds until your harden cooldown is complete before you go after him again.
Regardless of his weapon, Hadern will use these same tactics, so just give him some distance for a bit at the start of each fight to get a sense of the moves he's bringing to bear each time. Beat him and you'll claim his weapon, which can give you some great additional options for bashing him next time around.
Enslaved Grisha
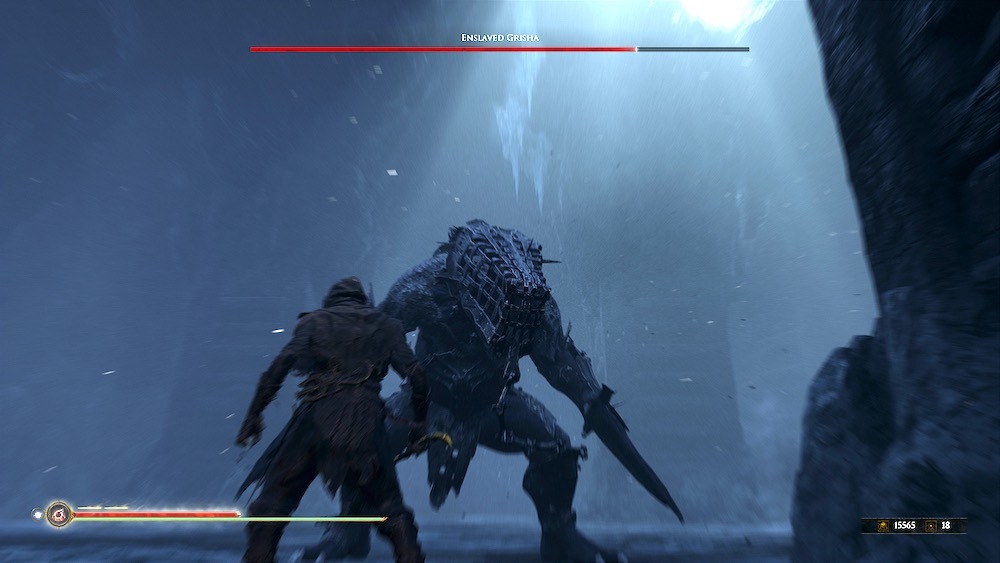
You'll discover another version of the Grisha when you make your way into the Abandoned Chamber dungeon leading to the Enshrined Sanctum. This Grisha is similar to the one you fought at the start of the game, but it's a little bigger, a little deadlier, and a little more resilient. Lucky for you, the room in which you fight it is huge, giving you plenty of opportunity to get enough space to heal up, refresh your harden, and plan your next move.
The Enslaved Grisha has similar attacks to the original, but its speed makes it hard to parry. You're often better off just hardening through its attacks, getting in a strike, and then rolling away to avoid damage. The best time to strike is always when it comes down on you with its unblockable attack, since the Grisha will get caught in the ice for a long moment, providing plenty of time for you to lay into it before dodging away. The big difference is that this attack can cause icicles to fall from the ceiling, and they're tough to see coming; the best way to deal with them is usually to get your attacks in and then back way off.
Parrying the Enslaved Grisha is tough because it's so big, so if you're building up Resolve, try to use it on your weapon abilities to deal some big damage--it seems like using these will often give you a little respite from attack if you time them well, so you can drop them after hardening to get an extra hit in before rolling clear.
You'll get the most use out of baiting the Grisha to come at you with its slam attack and hardening through it to land your own thrust or slice. When the Grisha gets stuck, you can usually hit it once or twice more before you need to dodge back. Try to keep clear of the icicles and you should do okay, and don't be afraid to make a run behind one of the big stone columns if you need a minute to collect yourself. It's a bit of a battle of attrition, but if you're methodical, the Grisha shouldn't offer too much more of a challenge than the one you found outside.
Tarsus, The First Martyr

The boss of the Enshrined Sanctum is one of the toughest and most dynamic battles in the game. Like all the temple bosses you'll face, Tarsus has two phases, and thus, two complete life bars. You'll need to completely defeat him the first time to trigger the second phase, and when you do, he'll add new moves for you to deal with.
In the first phase, Tarsus likes to use two moves that can be particularly devastating: he'll march toward you and vanish, only to appear behind you somewhere to strike you in the back; and he'll dash toward you in an icy slide, attacking along the way. Both moves are easy to dodge, but the best way to identify them is to listen for Tarsus to appear--maybe wear headphones for this fight, as it will make it easier to hear him appear behind you so you can dodge away, and he'll make a distinctive sound when he's dashing toward you that signals that you need to harden or dodge. Harden is usually pretty useful against the slide move, but note that he usually does it twice, so dodge the first and harden on the second to get a hit in.
The good news is that these moves leave Tarsus fairly open to counters, especially the slide move. A good dodge should give you an opportunity to hit him in the back. Your best opportunities to hit Tarsus are after his horizontal swings, of which he'll do two, when he does his vertical attack, which will leave him mostly open, and when he slams his sword into the ice. Tarsus is a boss fight where speed and mobility usually serve you better than trying to use harden to counter his strikes, since he's so slow in his attacks that he'll usually just hit you again after a harden.
Your best window to attack is after dodging his vertical slice, as this leaves him pretty wide-open. When he slams his sword down, that's another good chance, but don't get greedy--commit to a hit or two and then dodge well back, as Tarsus will summon an icy whirlwind around himself that'll damage and slow you. Get well back and wait for the wind to go away to avoid getting hurt, and don't head back after him too quickly, as the damage effect lingers a touch longer than the visuals.
You should get a pretty good sense of Tarsus's rhythm before long. The best way to handle this opening portion is to largely keep your distance from Tarsus to see how his attacks work so you can calculate your windows, and to get for fast dodges when he vanishes to the periphery of the arena. This area is also pretty dark, so try to stay in the light for best results.

Once you knock out Tarsus's first health bar, he'll come back with even more moves and a different approach, in which he skates toward you and commits to some big strikes. When skating toward you, he especially likes to try to bait you into an attack, slide back, and then follow up with lingering thrust attacks. Don't buy in; instead, wait for him to commit to an attack. He likes to come in fast and throw three-hit combos at you, but if you can dodge one or two strikes and harden through the third, you can hit him back without too much difficulty. Watch out also for that dash attack Tarsus was using in the first round--he'll pull it on you again, but now he'll complete one dash and then come at you a second time, so be ready to dodge again quickly.
When he's skating at you, watch for a thrusting attack, followed by a second one. These attacks aren't super fast, but they cover a lot of ground and can outlast either your harden or your ability to dodge. Evading sideways helps, but generally you just want to stay back from these strikes. If you touch Tarsus's sword while he's holding it out, even after he's slowed to a stop after coming at you with the stab, you'll still take damage, which can make it tough to time a counterattack of your own. If you do want to harden and hit him, make sure to do it on the second stab move, not the first.
There's one more move you need to watch out for in this last phase: Tarsus will swing his sword around a few times and slam it into the ice, which will cause icicles to explode up from the ground in waves. This has a pretty big area of effect, but the good news is that expansion on the outer edges is staggered, which can give you time to get well clear. If you're quick about it, you might be able to land a hit on him before he summons the ice, but it's risky.
Patience with Tarsus is key, and while he's quick and powerful, especially when he comes in with attacks you can't see coming, he generally is pretty linear in his strikes, which makes him predictable. Rely on your dodge and hit-and-run attacks to win.
Imrod, The Unrepentant

The boss of the Ashen Monument temple is a slow, tough enemy who's difficult to stagger, and who occasionally likes to add fire to the proceedings, which can catch you in a spot where it's tough to get away. This fight puts you in an arena with a few columns that you can use to give yourself some breathing room, but note that Imrod can break through them, causing them to offer less cover.
Mostly, Imrod will just walk toward you and then start swinging away at you, either with some combo moves you could potentially parry, or a big overhead strike that'll slam the ground and potentially leave you vulnerable to some area of effect damage. This is a fight where baiting an attack and blocking it with harden will give you an opportunity to strike at Imrod, but you'll also want to employ a lot of hit-and-run tactics so you don't get caught up in his attacks. Watch out also for a close-range grab move he'll try to use, which can still catch you if you're hardened.
At first, Imrod likes to set his club on fire, run toward you, then swing it low in two broad arcs. It's best to dodge these, as it's difficult to block both with a harden. If you're close enough, you can get a hit in as a follow-up, but the best opportunity is usually to harden against his overhead swing and to hit him right afterward, then get back. Be careful in general, because Imrod's attacks will set you on fire to go along with the big damage of his club.
The first portion of the fight is mostly about dancing around Imrod's attacks and hitting him right after they finish, and it's not too difficult--avoid taking as much damage as you can and you'll be fine, because the rhythm of the fight is easy to pick up. Once his first health bar is gone, Imrod will take off his mask, adding fire breath to his repertoire and creating more opportunities to set you on fire.
In the second phase, Imrod adds another quicker, closer-range club attack, where he holds it close to his body. When he finishes, you'll get another good opportunity to get in a hit or two, but be wary of staying too close to him, as he'll try to breathe fire on you. Likewise, if you dance too far away, Imrod will disengage, pick up one of the many bodies on the ground of the arena, light it on fire, and then heave it at you. You'll have a lot of time to see this coming and get a chance to dodge, but the best way to deal with the bodies is to hide behind one of the columns in the room and let it block the projectile. Note that sometimes the bodies can clip through the columns a bit, or come around their edges, so this isn't a foolproof solution--stay back from the columns and be ready to dodge in case your cover should falter.

You also want to be careful about trying to bait Imrod with harden or getting too close when you go for an attack--he'll now occasionally kick you with his right leg, which won't do a lot of damage but will send you flying. Recovering from the kick isn't usually too difficult but it will throw you off your rhythm, waste your time, and leave you vulnerable, so try to avoid it. This is Imrod's quickest move, so expect to get caught by it a few times at least, however.
Beating Imrod is mostly a battle of attrition, and the best thing you can do for yourself is keep moving around the battlefield--and get used to avoiding its walls and corners to keep from getting trapped somewhere. Imrod is mostly slow and plodding, as well as easily dodged. Keep from letting him beat up on you (and especially from setting you on fire) to take him down.
Crucix, The Twiceborn
Crucix is maybe the slowest and most deliberate fight in Mortal Shell. This spear-wielding warrior--who has a conjoined twin that wields a crossbow and shield--is found in the Eternal Narthax, and has a lot of reach and a lot of speed, as well as a relentless attitude that will keep you on the back foot. The best way to deal with him is hit-and-run strikes: harden to tank his attack, strike with your own, and roll clear to avoid any additional damage. It's a slow approach, but it's the best way to avoid Crucix's punishing spear strikes.
In the first round of the battle, Crucix wears a helmet and is aided by his conjoined twin brother. The toughest of Crucix's attacks are some horizontal swings where he hits you with both weapons a total of four times, with a short gap in between. You can parry these, but it's tough. Harden to avoid damage and dodge to keep from getting too hurt. Try to study the timing of his first swing, because this one is pretty easily parried when you get the rhythm down, giving you a great opportunity to do significant damage and get some health back.
The attack where you get the best opportunity to deal damage is the shorter combo, in which Crucix attacks horizontally twice and then thrusts with his spear--if you can dodge these strikes, you can punish him from the side without much trouble. Be sure not to overcommit, however, because Crucix is fast and will recover pretty quickly to come after you again. On occasion, Crucix will also leap into the air, fire the crossbow, then dart toward you and come down hard. Watch for it and dodge away, because you'll take a ton of damage if it hits you. You can also harden and tank it for a good chance at a couple hits.
The biggest trouble in this fight isn't the set of big attacks Crucix uses, which you should be able to avoid without too much of a struggle. It's the crossbow his little brother wields. Crucix will sometimes dodge back, take a knee, and protect himself with the shield while unloading on you with the crossbow. It's tough to deal with because he'll chip away at you with minor damage, and he won't let up until you close the gap on him. Don't try to harden through it, either, because he won't quit firing and you'll need to save your harden for slightly later.

To deal with the crossbow, try to sidestep the bolts and quickly close the distance to Crucix. When you're too close, he'll get back to his feet and swing away at you to push you back, and this is where you want to harden to avoid the damage. Look for a chance to get a hit in here, but don't expect results that are too great--this is a tough attack to deal with, and you're just trying to end it as quickly as you can.
Keep up your battle of attrition against Crucix and you shouldn't have too much trouble whittling down his health to the end of the first phase. When that happens, the smaller brother will die, ending their ability to use the shield and crossbow, but enraging the dominant brother and making him much more aggressive.
In phase two, Crucix comes at you harder and adds more attacks to his combos, but your strategy doesn't have to change much: Bait an attack, harden, hit him, and dodge as far back as you can to avoid reprisals. He'll keep coming for you almost constantly, so you'll also want to spend some time finding the edges of the arena and then sprinting past him to give yourself more room to operate. Be careful not to get boxed into a corner, because a series of Crucix combos can take you down pretty quickly.
Your big disadvantage here is that Crucix is fast and doesn't have to wait long between attacks. If you're good with the parry, this is a great time to flex that muscle--especially with his horizontal attacks. If you're not as good with that timing, hardening to score one hit and then dodge back is a slow slog of an approach to the situation, but it'll get you through.
Watch for an unblockable attack to kick off another one of Crucix's combos, where he comes at you with an upward vertical swing, then follows up with a bunch of other attacks. It's a good idea to avoid this one, as it's hard to read exactly when you might be able to get a strike in; if you go for a harden hit, make sure you do it toward the end of the combo so you don't get caught up in it. Better to protect your health, however.
Keep chipping away at Crucix whenever your harden ability comes off cooldown, and look for chances for parries to hit him hard. You mostly want to play defense and take care of your health to try to avoid getting walloped by Crucix's many powerful attacks. Keep up the pattern and keep yourself alive and you'll emerge victorious after a long, tough battle.
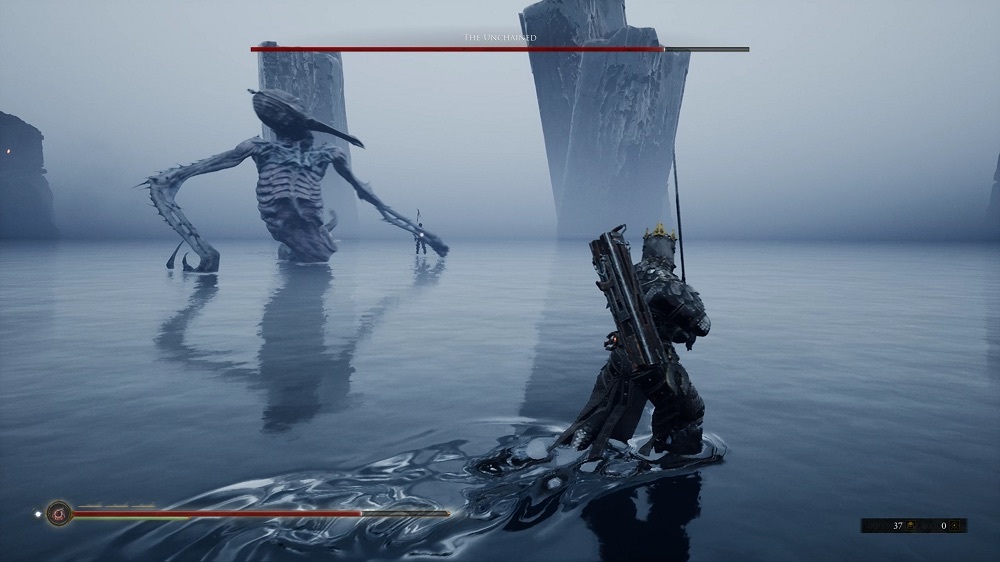
The Unchained

The final boss of Mortal Shell is the most Bloodborne-esque of all the creatures you fight--it's a giant monster with a lot of weird attacks, and dodging and managing space are key aspects of staying alive against it.
As with the other enemies, the Unchained fight is mostly about dodging attacks you can't deal with, hardening against ones you can, and scoring hits whenever you have an opportunity. The boss has a couple of close-range attacks it'll try to do to you, but this huge arena means you can dodge clear of anything that bothers you and stay well back to pick your attacks. Unfortunately, the size of the arena means there are times when the Unchained will also make use of the space in some tough, devastating ways, and you'll need to be ready for those attacks.
One of the toughest early attacks to deal with, and your best opportunity to deal damage, is when the Unchained leaps backward and then darts toward you with a dash move that ends with it striking you with a wing. When it leaps back and begins coming your way, start an attack and harden. You'll tank the dash strike no problem, giving you the start of your own three-hit combo (or thereabouts). Hit the Unchained a few times and then dodge back, because after a second, the Unchained will swing its gross unformed tail at you, and you'll want to avoid that. There's also a vertical strike the Unchained likes to throw at you that does massive damage, but leaves it open if you can dodge sideways. Just be careful to get the timing right, as the attack has a big windup.
As the fight goes on, the Unchained will add a few more elements to the situation. First, it can jump backward and trigger a tidal wave that'll roll toward you and is a complete pain to deal with. You can't harden through it, and if it catches you in the middle of something, it'll tumble your character for a small amount of damage that also knocks you off your feet and leaves you vulnerable. At the same time, the Unchained will often use its dash attack, forcing you to deal with both the attack and the wave.
To deal with the wave, do a dodge roll straight into it, the same way you would crest a wave while swimming at the beach. They usually come in pairs, so get through the first, harden to avoid damage from the Unchained's dash, and then roll through the second. It takes a second to get the hang of this rhythm, but knowing how to avoid getting bodied by those waves will help you significantly throughout the fight.
Sometimes, the Unchained will leap back and summon a bunch of ashy minion enemies to come at you. These guys all die in one hit, but they're quick and work to overwhelm you. They especially like to sprint over and execute a leaping attack. You can harden against them, which is a handy way to get an attack off and take them out, but try to save your harden ability for when they bunch up together. This whole time, you'll also have the Unchained to deal with, so you want to eliminate the ash enemies as quickly as possible. Give yourself some distance from the Unchained and focus on dealing with the little guys as quickly as you can.
Keep hammering on the Unchained whenever you can, especially after its dash attack and when it draws back its beak-like helmet to slam the ground--it'll briefly get stuck there, giving you a chance to inflict some serious pain. Keep your distance and save your harden ability as much as you can so you can use it to tank the Unchained's bigger attacks, specifically the dodge and the slow, sweeping attack it brings at you from your right. This one has staggered timing, so it's best to just tank the damage, particularly if you can close the gap a bit and get a hit in right after it. If in doubt, use the size of the arena and get well clear to protect yourself.
There's no second phase to the fight with the Unchained, but it will add more attacks and abilities to the battle as time goes on. Sometimes you'll see it dive under the water and then explode upward, flying overhead before dropping down on you. When you see it go under, listen for the Unchained to come back up, then harden and tank the damage from its drop and start a combo of three or four hits. After that, dodge clear, because the boss will start rolling around to try to hit you.

Later in the fight, the Unchained will also start adding a spinning attack after its dash, rather than the tail swipe from earlier, so you'll need to be a little more vigilant about dodging away. And it will sometimes summon a giant whirlpool in the water. You should see this coming with enough time to run for it, and you should definitely run--getting sucked in will kill you in one go. The Unchained will also summon more of the black ashen soldiers to fight you when it activates the whirlpool, so if you can skate close to it without getting sucked in, try to take them out--if they fall into the whirlpool, they'll heal the boss. It's not worth dying to try to kill them, however, since the whirlpool attack is pretty uncommon. The healing might extend the fight some, but it shouldn't make it unwinnable.
This is a tough fight that requires some patience and a lot of wherewithal to avoid getting overwhelmed, especially when the Unchained's waves are coming your way. But all its attacks are easy enough to deal with, and it's mostly a threat when you have multiple targets to deal with or elements that might throw you off your feet. Keep moving, protect your health, and strike whenever you can get an opportunity and you'll kill the Unchained and make your way to the end of Mortal Shell.
Got a news tip or want to contact us directly? Email news@gamespot.com
Join the conversation