Minecraft Potions Guide: Brewing, Modification, And All Recipes
You don't have to worry about burning up in lava if you have a Potion of Fire Resistance in your inventory.
Whether it's a mana potion in Diablo or tossing back a quick espresso in real life, sometimes the right potion makes all the difference. Minecraft is no different--there are some incredibly useful potions that you can use to save the day or get ahead. This guide will walk you through making a brewing station, the basics of potion creation and modification, and rundown the potions to pursue and avoid in Minecraft.
This guide concerns the Bedrock edition of Minecraft version 1.18, available on Windows 10, Xbox, PlayStation, Nintendo Switch, and mobile. The specifics may differ in the Java version of the game.
Make your way to the Nether
To begin brewing, you'll need to have at least made your way to the Nether, which means having a Diamond Pickaxe to mine Obsidian, which is used to make a Nether Portal, and then flint and tinder to ignite the portal.
There are a few different Nether-specific ingredients crucial to potion brewing, including Blaze Rods and Nether Wart. Mobs like Magma Cubes and Ghasts also drop materials that can be used to brew specific potions.
To start collecting Blaze Rods, you'll first want to find a Fortress. This is where enemies called Blazes spawn. These floating chandelier-looking mobs will lob fire at you. They're pretty annoying. But killing them will net you a Blaze Rod, a crucial ingredient in brewing. If you're going to really get into brewing potions, you may even want to create a Blaze Farm like this one from YouTuber JC Playz:
Nether Wart is also found in Fortresses, though with some Nether Wart and a stack of Soul Sand blocks, you can start your own simple Nether Wart farm to save yourself multiple journeys into the Nether.
Building a Brewing Station
Before you can do anything, you'll want to build a brewing station. You can find these in a Cleric's house in many inhabited villages, or you can make one yourself. The recipe is pretty simple.

You just need three cobbled blocks--cobblestone, cobbled deepslate, or cobbled black stone--and a single Blaze Rod.
That will give you one of these bad boys:

Just like in real-life brewing, you'll want to get all your ingredients ready ahead of time:
- A Water Source - This can be a cauldron filled with water or a water source block. A source block can fill unlimited potions, but a cauldron will require replenishing.
- Lots of Blaze Powder - This is created by taking Blaze Rods to your Crafting Table, and it will be used in every potion you create as fuel.
- Nether Wart - This is the first ingredient used in creating most potions, so you'll want to have plenty on hand.
- Bottles - You can find these in many places, of course, such as in the inventories of witches you've slain, but it's a lot easier to make them; three glass blocks will net you three potion bottles.
Brewing Your First Potion
First times are always awkward, and your first potions will be, too. Literally. The starting point of all potions except the Weakness Potion, is an Awkward Potion, which you'll get with a Water Bottle and Nether Wart:
This stage is easiest if you build a bunch of bottles and fill them ahead of time. Requiring only glass, water, and Nether Wort, they're pretty cheap in terms of materials; there's no harm in building a few too many.
With a bunch of Awkward Potions on hand, you're ready to start brewing some proper potions. Awkward Potions act as a base for Effect Potions. All first-stage Effect Potions have positive effects, except for Potions of Weakness. Those first-stage potions can then be enhanced or corrupted to make them more effective or to reverse their effects. We'll dive into actual recipes further into the article, but let's first talk about how to enhance and corrupt potions.
Modification: Enhancing & Corrupting Potions
To enhance a potion, you'll add one of two ingredients: glowstone or redstone dust. Redstone dust will extend the duration of a position--for example, fire resistance extends from 3:00 to 8:00. Glowstone dust will enhance a potion's level. A Potion of Healing is Level I by default and heals four hearts. Glowstone Dust will make that potion restore eight hearts. Some potions can only be enhanced by duration, while others can be enhanced by duration or level. A Potion of Healing or Harming can only be enhanced by level.
To corrupt a potion, which reverses its effect, you'll need Fermented Spider Eyes. As you've probably noticed if you spent even one evening outside of your rad Minecraft base, Spider Eyes aren't hard to find, though the Spiders they're attached to are pretty reluctant to give them up.
To ferment a Spider Eye, combine it with sugar and a brown mushroom:

You'll then combine these with first-stage potions to flip them: a Potion of Swiftness becomes a Potion of Slowness. Most of the effects are negative, though one corrupted is the Potion of Invisibility, which comes from corrupting a Potion of Night Vision.
Now we have enough information to run through the list of potions. Here's every potion you can brew in Minecraft:
Potion of Fire Resistance
- Ingredient: Magma Cream, Awkward Potion
- Effect: Immunity to damage from lava, magma blocks, campfires, blaze attacks.
- Duration: 3:00
- Enhanced: n/a
- Extended: 8:00
Potion of Harming
- Ingredient(s): Potion of Healing or Poison, Fermented Spider Eye
- Effect: 6 Damage (3 Hearts), instant
- Duration: n/a
- Enhanced: 12 Damage (6 Hearts)
- Extended: n/a
Potion of Healing
- Ingredient: Glistening Melon Slice, Awkward Potion
- Effect: Restore 4 Health (2 Hearts), instant
- Duration: n/a
- Enhanced: Restore 8 Health (4 Hearts), instant
- Extended: n/a
Potion of Invisibility
- Ingredient: Potion of Night Vision, Fermented Spider Eye
- Effect: Render player invisible, decreasing distance at which mobs can detect the player. Armor somewhat negates the effects of this potion.
- Duration: 3:00
- Enhanced: n/a
- Extended: 8:00
Potion of Leaping
- Ingredient: Rabbit's Foot, Awkward Potion
- Effect: Increase Jump height by 1/2 block
- Duration: 3:00
- Enhanced: Height increases to 1 1/4 blocks, duration decreases to 1:30
- Extended: 8:00
Potion of Night Vision
- Ingredient: Golden Carrot, Awkward Potion
- Effect: Causes everything to appear as if it is fully lit.
- Duration: 3:00
- Enhanced: n/a
- Extended: 8:00
Potion of Poison
- Ingredient: Fermented Spider Eye, Awkward Potion
- Effect: Deplete health by 1 Damage (1/2 Heart) every 1.25 Seconds
- Duration: 0:45
- Enhanced: Increases to 1 Damage every 0.4 seconds, duration decreases to 0:21 Seconds
- Extended: 1:30
Potion of Regeneration
- Ingredient: Ghast Tear, Awkward Potion
- Effect: Restore 1 Health (1/2 Heart) every 2.5 seconds
- Duration: 0:45
- Enhanced: Restore 1 Health (1/2 Heart) every 1.2 Seconds, duration decreases to 0:22 Seconds
- Extended: 1:30
Potion of Slow Falling
- Ingredient: Phantom Membrane, Awkward Potion
- Effect: Fall more slowly, avoiding damage when hitting the ground
- Duration: 1:30
- Enhanced: n/a
- Extended: 4:00
Potion of Slowness
- Ingredient: Potion of Swiftness or Leaping, Fermented Spider Eye
- Effect: Slows player to 85% Speed
- Duration: 1:30
- Enhanced: Slows player to 40% speed, duration decreases to 0:20 Seconds
- Extended: 4:00
Potion of Strength
- Ingredient: Blaze Powder, Awkward Potion
- Effect: Increase player attack by 3 Damage (1.5 Hearts)
- Duration: 3:00
- Enhanced: Increase attack by 6 Damage (3 Hearts), duration decreases to 1:30
- Extended: 8:00
Potion of Swiftness
- Ingredient: Sugar, Awkward Potion
- Effect: Increases movement speed, sprinting speed, and jumping length by 20%
- Duration: 3:00
- Enhanced: Enhances the above by 40%, duration decreases to 1:30
- Extended: 8:00
Potion of Turtle Master
- Ingredient: Turtle Shell, Awkward Potion
- Effect: Decrease movement speed by 60%, reduce damage by 60%
- Duration: 0:20
- Enhanced: Slow movement speed by 90%, reduce damage by 80%, duration remains 0:20
- Extended: 0:40
Potion of Water Breathing
- Ingredient: Pufferfish, Awkward Potion
- Effect: Halts depletion of oxygen meter while underwater.
- Duration: 3:00
- Enhanced: n/a
- Extended: 8:00
Potion of Weakness
- Ingredient: Potion of Healing or Poison, Fermented Spider Eye
- Effect: 6 Damage (3 Hearts), instant
- Duration: n/a
- Enhanced: 12 Damage (6 Hearts), instant
- Extended: n/a
Modification: Splash & Lingering
Any potion you make above can be weaponized to turn it into a Splash Potion or a Lingering Potion.
By taking the existing potion and adding gunpowder, you can turn it into an area-effect potion. On Bedrock, Splash Potion durations are decreased by 25%.
By adding Dragon's Breath to a Splash-enhanced potion, you can turn it into a Lingering Potion, which acts like a Splash potion except that it leaves a cloud that lingers in a radius of 3 blocks around the splash point. The lingering effect lasts for 30 seconds and, on Bedrock Edition, the effect is only a fraction as powerful, at just 25% of its unmodified power.
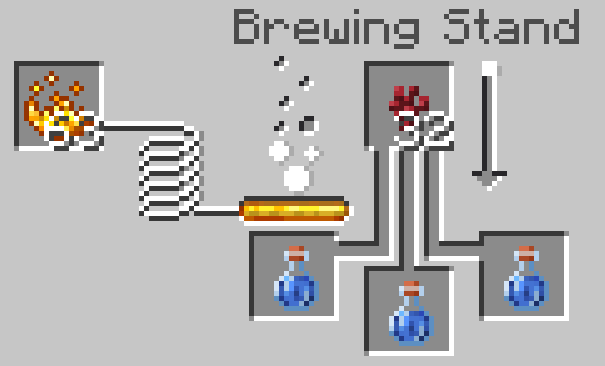
Brewing multiple potions
When talking about brewing multiple potions, this can mean one of two things: manually brewing more than one potion at a time or setting up an automated brewing system.
You can manually brew as many as 3 potions at a time by placing them in the 3 potion slots at the Brewing Stand. For example, 3 water bottles and one Nether Wart will make 3 Awkward Potions.
You can begin to automate your brewing process by feeding a hopper into the Brewing Stand. Ingredients can be fed into the top of the stand in order of ingredient application, and then fed from the Brewing Stand by hopper into a treasure chest. When you've stocked up tons of the necessary ingredients for potions, you can build a much more complex Brewing Stand operation like this one from YouTuber Silentwisperer:
Now that you know how to brew potions, make sure to enchant some armor and weapons--then you can avoid the many horrible ways to die while exploring and building your home in Minecraft, assuming you can survive the first night.
Got a news tip or want to contact us directly? Email news@gamespot.com
Join the conversation