Mario Kart: Double Dash!! Walkthrough
This walkthrough to Nintendo's multiplayer kart racer offers tips on the various tracks, strengths and weaknesses of all karts, and strategies for beating your friends in the game's multiplayer modes.
Design by Collin Oguro
Mario Kart: Double Dash!! builds on 1992's Super Mario Kart and 1997's Mario Kart 64 to create a whole new set of racing challenges, exclusively for the Nintendo GameCube.
GameSpot is proud to bring you this exclusive guide to the biggest and best Mario Kart game ever. With more content and more characters than ever before, Double Dash!! is the most complete Mario Kart experience yet created, and you'll need this guide to unlock all of the hidden characters, karts and extra racing modes that are hidden away in the recesses of the game. This guide features:
- In-depth discussions of every track, including shortcuts, obstacles, and strategy
- Lists of every character, kart, and special item in the game
- Tips for maximizing your chances of winning
- Info on the exciting array of multiplayer modes
And, of course, the proverbial more! So grab your GameCube and some friends, and get ready to powerslide your way to the top of the leaderboard!
Table of Contents
Grand Prix ModeMultiplayer Modes
Racers
Karts
Items
Unlockables
Tips and Maneuvers
Grand Prix Mode
Grand Prix is Double Dash!!'s primary racing mode, encompassing four different Cups, with 16 tracks total. When you first start the game, you'll have to take each Cup individually, but eventually you'll earn the right to put together a truly Grand Prix, consisting of all 16 courses strung together. There are three difficulties to start with: 50cc, the easiest; 100cc, a more challenging affair; and 150cc, where all of the artificial speed caps of the earlier modes are removed, thus allowing every kart to travel at full clip. You'll notice that your maximum speed increases as you move up in difficulty, but so does that of all of the other karts, meaning that the heavy racers like Donkey Kong and Wario will become quite formidable in the 150cc mode.
After you unlock it, Mirror Mode is considered to be a fourth difficulty setting. Although it's about as difficult as 150cc mode, all of the tracks in Mirror Mode are flipped, thus changing all right turns on a course into left turns, and vice versa. The main obstacles in Mirror Mode are your own habits; after playing through the tracks a dozen times or so in the normal difficulties, adjusting to the sudden shift in the cosmic equilibrium can take time, and you'll likely find yourself ramming into walls now and again before you get used to the new paradigm.
Finishing a Cup in first place unlocks a new kart, or other feature, but this is, of course, easier said than done. There are seven other karts in any given race, and the number of points you gain after each contest is based on where you finish:
1st place: 10 points
2nd place: 8 points
3rd place: 6 points
4th place: 4 points
5th place: 3 points
6th place: 2 points
7th place: 1 point
8th place: 0 points
It's obviously best to win every race, but that often isn't possible, especially in the later difficulty modes. The thing to keep in mind is that, in most Cups, you'll have one other kart that will continually challenge you for the lead, while the rest of the pack jostles around in the lower spots. If you want to win, you have to assume that this other kart (usually a heavy kart, often Donkey Kong or Wario) will come in second place every time you win a race, and will win every time you don't. In this worst-case scenario, you'll be able to grab a Gold medal in the Cup if you: win all four races (obviously); take three 1st places and anything down to 4th place; or take two 1st places and two 2nd places. These latter two options are based on the fact that a tie for first place at the end of a Cup will net you a Gold medal, just as surely as it would if you won outright. This setup allows you to have one or two "bad" races in a Cup, and still have a chance to take home the unlockable for that tournament. If you're extremely lucky, your primary competitor will run into a mishap in one of the races and finish out of second place, thus giving you a bit more leeway.
In addition to the four primary Cups, there's also an unlockable All Cup Tour, as mentioned, which consists of all 16 tracks in a row. The number of possible permutations in this race is far too many to be elucidated individually, but, suffice to say, the same rough math from the individual Cups apply. The order in which the tracks appear is random, save for the fact that Luigi Circuit is always first and Rainbow Road is always last. Luckily for you, there's a much better chance of you having two main competitors in an All Cup Tour, who will hopefully manage to shuffle between second and third place often enough for you to take a huge lead when you actually win races. By the 12th race or so, you should have a pretty good idea of whether or not it's going to be possible for you to win the Tour. If you're ever mathematically eliminated, just quit and start over; as per usual, there's no prize for a second-place finish.
Mushroom Cup
The Mushroom Cup is the most basic of all of the track groupings. This is a great place to try to learn the mechanics of the game.
Luigi Circuit
The first track in Double Dash!! is a relatively simple affair, with two banked loops on either end of a four-lane road. The road in the center of the level is unbarricaded, so as the race wears on, you'll need to be aware of other karts straying across the center line. (Note that in the 50cc mode, the track actually has a divider; the shortcut mentioned below is similarly removed.) 
The track's sole shortcut comes after the initial boost-jump from the starting line; the humongous Chain Chomp at the bottom of the hill guards both sides of a forked road. If you take the right-hand path as you head down the hill, you'll come across a pair of dual-item cubes, so you may want to jettison any low-quality items you have in your inventory before heading through the shortcut. Other than the items, though, it doesn't really save you all that much time, so if you wish to stay on the main path, feel free. Either way, you should stay away from the Chain Chomp; it has excellent reach, and can easily block the rightmost lane of the road. You'll stop dead if you hit it, so keep your distance.
Each of the two curves possesses a set of booster pads set into the banked road. These may appear tempting, but they're far enough away from the corner to actually be a wash: the extra speed you gain from the booster pads combines with the increased length of road you're traversing to basically equal the travel time of a properly-executed powerslide that cuts near the corner. Powerslides will be the preferred method of dealing with these curves, when you've gotten the controls down, but for your first few races, feel free to hit the boosters; that's what they're there for, after all.
Peach Beach
Peach Beach, again, won't bowl you over with its complexity, although it can be a remarkably more frustrating course than Luigi Circuit. Although it consists of a simple oval shape, the indigenous fauna will do their best to trip you up. 
From the starting line, you'll proceed around a curve where you'll have the opportunity to pick up an item cube. After you leave the pavement, you'll reach the Peach Beach, which splits into two paths. The leftmost path leads out to a booster pad that launches over an island; avoid it. The dual-item cubes may look tempting, but the distance is too long to make it worthwhile, and the water you need to pass through will bog you down and kill your speed. The innermost path is the correct one, but judge the water level before you decide upon a specific line; you should hug the shore as closely as possible. A straight line from the pavement to the far side of the beach is ideal, but not often available. When the opportunity does present itself, though, take advantage of it; the computer opponents appear unable to change their course, so they'll wind up making a circle when a straight path exists, allowing you to make up lost time when needed, or just extend your lead.
It all sounds easy so far, but that's only because we haven't mentioned the Cataquacks. These fellows shuffle around the beach like zombies, without even a metal detector to slightly justify their meanderings. Also like zombies, they will make a beeline for any kart that comes close, and a collision with these fellows is a first-rate catastrophe. Your kart will fly 30 feet into the air and come down without any forward momentum, forcing you to accelerate from a standstill until you're back at top speed. Luckily, the Cataquacks are fairly slow beasts, but they can be difficult to avoid if you're in second or third place; as the lead kart in a race passes near them, they'll become riled, thus making it hard to adjust to their movements for the karts that follow. A simple solution would be to just take the lead and hold it.
After the beach areas, there is one more quasi-secret on this course. As you hit the pavement again and make your way towards the starting line, you can veer to the left, around the fountain, to grab a dual-item cube. There's absolutely no need to ever do this, though, since there are item boxes on either end of the road here. You'll only wind up killing your speed on the home stretch, so just stick to the straight line and avoid any obstacles by steering around them.
Baby Park
Insofar as simplicity goes, there isn't a more basic track in all of Double Dash!! than Baby Park. It's not even really an oval; it's more like two parallel roads with a curve at either end. 
That curve, though, is going to be where you'll make your way up the leaderboard; proper turning here is going to have a large impact on your overall lap times. The proper technique for making each turn in minimum time is to approach a curve on the outside, hold down the powerslide button, then start turning, while you aim for just beyond the barrier in the middle of the track. After you've held down the powerslide button for a second or so, let it go, and start adjusting your course so that you come as close as possible to the barrier without hitting it. If done right, you should be able to traverse the least possible amount of track while making your turn, without dropping any speed. Letting go of the slide button will prevent you from getting a full speed boost at the end of the turn, but it will allow you to dodge any flotsam and jetsam that's accumulated in the far corner of the turn.
Debris accumulates fast, as items get dropped during the course of a race. Since the track is so small, there'll a correspondingly greater density of Bananas and Fake Items littering the raceway, and you can expect to see more than a few Green Shells bouncing around uncontrollably. Be forewarned that items can and will cross the center median, so you may be broadsided more than once by a Bowser's Shell. Not much you can do except pick yourself up and soldier on. You'll need to be especially careful on the final lap and the final turn; since there isn't much opportunity to separate yourself from the pack, a single misstep near the finish line can drop you three or four spots in an instant.
Dry Dry Desert
The Dry Dry Desert (as opposed to the Wet Wet Desert, perhaps?) is the first semi-challenging course, both because of its twisting turns and the natural hazards that come into play. Quicksand whirlpools, tornados, caterpillars; this level has it all.From the starting line, you'll come across a series of S-curves that serve as a speed sink. Some of these can be taken with a powerslide, but the less extreme corners can be handled with a hard turn. If you're on the second or third lap here, or heading through on a Time Trial, you can use a Mushroom item to blast through the dirt, making this section into something of a straight line. Just make sure you don't run out of steam while you're off the track, or you'll wind up negating your advantage when you take forever to get back on course.
Beyond the S-curves, there's a long right turn; stay to the left, though, to avoid the tornado that periodically swallows up the right half of the road. What's worse than the tornado, though, is the quicksand pit beyond. It's easily avoided, so long as you stay on either side of it. You can actually skirt its interior if you wish to save a split-second, but you can quickly get sucked in if you're not careful. If you do wind up getting sucked downwards, don't fight it: just hit reverse and make it as quick as possible. You'll have to get reset anyway, and attempting to drive out of the quicksand will just make the time penalty worse.
The last major area here consists of numerous Pokeys, item cubes, and a large number of dunes. The shortest route is straight down the middle, avoiding the hills; when you get airborne, your speed drops dramatically, so avoid the cubes on the dunes and take what items you can get from the cubes near the Pokeys before the finish line.
Flower Cup
The Flower Cup increases the difficulty of the game a bit, throwing things like traffic into the mix. You'll need to start incorporating powerslides into your repertoire if you want to win this cup on the harder difficulty levels.
Mushroom Bridge
Princess Peach's Mushroom Kingdom is seemingly doing well, if the Mushroom Bridge is any indication. It's unfortunate that these kinds of public works projects are funded by crippling taxes on the Toad middle classes, but, well, sometimes you just need to build a racetrack. Those Toads didn't need to go to college, anyway. The fruits of Peach's labor, however, are quite extraordinary.The first thing you'll notice about Mushroom Bridge is that there are numerous other vehicles on the road, besides you and your kart companions. Where these cars are going is a good question, since the track is a simple loop without any off-ramps, but there they are, ready to be a hindrance. Contact with any of the cars is a Bad Thing, as you'll spin out, but you should be especially mindful of the road-rage-inducing mobile bombs that wander around the city streets, just waiting for someone to knock into them. It's not much of a living, but they take an eerie satisfaction in sending people into the stratosphere. On the other hand, there are mushroom cars on the tracks, as well; if you spot a car with mushrooms in it, bump into it and a mushroom will fly out, letting you pick it up for a speed burst.
There aren't any vicious curves or maddening hairpin turns here, so you should feel free to concentrate on avoiding traffic. There are three spots of interest, though. The first comes immediately beyond the starting line: if you take a hard right as soon as the race begins, you'll come around a corner and head straight through a pipe, which will burp you up back onto the track, with a dual-item cube in hand. In truth, this isn't much of a shortcut, so you should avoid it.

Second, there's a true shortcut after the first tunnel; to your right again, you go up a dirt hill, then proceed across some pavement before taking a hard right. All of this will cut the corner here and save you a spot of time, but you'll definitely need a Mushroom before attempting to get up the hill, or the dirt will sap your speed.
Lastly, the bridge itself is home to two alternate paths, on its beams. If you travel up the side of the bridge before heading across it, you'll find yourself on a series of boost pads that will give you a tiny speed edge as you make your way across it. This route is to be avoided, though--the speed boost is negated by the extra distance you're traveling (half the circumference of an oval will always be greater than its diameter, after all), and it's far, far too easy to lose control and proceed into the drink. If you must lose control, do it back onto the track; you'll still lose some time due to the slowdown that comes from the midair travel, but nothing near the penalty you'll take from having to reset.
Mario Circuit
After the hustle and bustle of the Mushroom Bridge, Mario Circuit seems positively relaxed. The first two curves are easy, but make sure you begin your drift for the second one well ahead of time, or you'll wind up turning right into the grass on the far edge of the outside corner. From there, stick to the left to avoid the Chain Chomp, then head around the curve and into the tunnel. 
The next curve here is a long hairpin, so avoid the Piranha Plants on either end, then pre-powerslide through the turn. The item cubes here are in two rows, so if you're empty, you can hit the first row, then tap the character change button while passing through the second row to get two items, if need be. The Goombas here stick to the sides of the track, for the most part, but there is one frustrating individual who insists on occasionally traversing through the middle of the road. Avoid him and his cohorts, then round the corner to the finish line.
Daisy Cruiser
Daisy apparently shares her kartmates' rapacious greed and love of Mammon. Most autocrats make do with a large yacht or two, but Daisy apparently insisted on having her own luxury liner, no doubt built instead of much-needed infrastructure in the rural areas of Sarasaland.Like Mario Circuit, this is a fairly simple track. From the startline, head up the ramp to your right, but stick to the left side of the road, where the item cubes are located. The stairs at the end of this road make for a tough turn; instead of powersliding, you may be best off just letting go of the gas for a moment in order to let your wheels lose their grip, then turning and heading down the stairs at breakneck speed. The pool here is of little consequence, and is difficult to fall into.
After the next set of stairs, you'll head into the ship's dining room, complete with possessed tables that float across the floor. These can make life difficult for you, but at least they won't cause you to spin out. Just make sure you don't hit one head-on, or you'll come to a complete stop. Bumping into one from the side won't hurt you much, though.
The corridor beyond the dining room has four 90-degree turns in it, turns that are too close together to allow you to powerslide effectively. Your best bet, again, is to let go of the gas until you can reorient yourself along a new vector around the curve. The pit here drops you into some kind of engine room, with a dual-item cube, but it saves you little time.
As you make your way back onto deck, you'll have to pass next to a large pipe, which forms a natural chokepoint in the level, perfect for stationary items like Fake Items and Giant Bananas. Round the last corner, and you'll be home free. You can hit the life preservers before the final set of stairs, if you wish, since they don't impact your speed at all.
Waluigi Stadium
Well, here's a track that's sure to get you good and annoyed. Waluigi Stadium is filled with mud pits, speed-sucking jumps, hairpin turns, and a gauntlet of Piranha Plants. The best part about it is that it comes at the end of the Cup, so that you'll know precisely where you'll need to finish to order to take home the gold.From the top: hit the boost and try to recover from your landing quickly enough to take the inside curve of the next turn. The jumps here will slow you down, and will tend to make it difficult to make the subsequent turn, but karts with good acceleration can counteract this somewhat by laying off the gas as they go over the jumps, especially the boosted ones. You'll shorten your jump distance somewhat by doing this, giving you a bit more time to enter your powerslide. For instance, after the first turn subsequent to the start of the race, you'll be faced with a boosted jump heading into a curve around a mudpit. If you land a bit shorter than normal, you'll be able to make a powerslide around the pit, but will otherwise have a difficult time making a proper turn. You'll need to judge the effectiveness of this technique based on your chosen car, though.
Following that first jump, round the two corners until you reach the Fireball and Piranha plant gauntlet. Everything moves slowly enough here for you to be able to dodge all of the obstacles easily. As you make your way through, keep an eye on the Piranha Plants; if they start to retract their heads, cut towards them to make up some time.
After the gauntlet, you'll pass underneath a boosted jump, where a couple of smallish dirt jumps await. Going too fast over these will put you in horrible position for the following chicane, so be careful and throttle down a bit, if you can. It's easy as butter to overshoot the next turn and wind up in the dirt, so come out of your powerslide early and try to get back to the outside in time to take the subsequent left turn. If you find a Mushroom in your travels, this is the place to use it; just zoom over the dirt and head down the home stretch.
Star Cup
Star Cup is where Double Dash!! finally begins to separate those with skill from those without. Not to say that there still isn't a lot of practice and luck involved, especially on the harder difficulty levels, but you'll now be forced to use your powerslide abilities to control your kart and gain speed boosts. The threat of falling off the track becomes ever more real, especially on DK Mountain, where a slim lead can easily become a huge gap between yourself and the fellow in first place.
Sherbet Land
Every racing game has to have at least one slick level, so here's Sherbet Land, which is apparently constructed of a mixture of fruit juice, sugar, and water, if the name is to be believed. One thing's for certain: it's cold outside. 
The Land of Sherbet begins with a chicane; if you're on a lightweight cart, you can safely jump the corners here to save a fraction of a second, but be mindful of the curve ahead. There's a drop in the inside, ice-skaters astride your path, and an icy surface that makes your powerslides lose their grip easily. Avoid the red skaters near the entrance to the cave ahead; these fellows can trap you between their bodies and force you to reverse and re-accelerate.
It's extremely difficult to find a good racing line through the caves, due to the confined space and the rapid succession of turns. This also makes it a favorite spot for immobile items, so watch for Bananas, in particular.
Following the cave, there is a series of snowing curves preceding another frozen lake. The curves can be handled with powerslides, or you can use a Mushroom to blast over them, if one's available. The subsequent ice lake features protrusions of ice that, somewhat illogically, coat you with ice instantaneously if you touch them. This forces you to come almost to a stop so, needless to say, avoid the ice protuberances!
Mushroom City
Mushroom City is probably the easiest track to win in the Star Cup, especially if you have a car with good acceleration. From the starting line, there's a relatively gentle curve heading down to the lower level of the track; if you're behind a heavy-duty cart, watch out for the item they'll almost always drop after they pass through the first line of cubes. 
The layout of the lower level will force you to make at least four 90-degree angle turns before you reach the road heading back up to the upper level, but there is a shortcut that will, for once, actually save you some time. As you come around the curve from the starting line, head straight and look for the pink path on your right, after you pass up the first right turn. This little sidestreet has a severe turn, which probably makes it unsuitable for the heavy karts, since they'll bump into the wall and lose all of their momentum, but light karts can bump their way through and come out on the other side before anyone else has made it to the intersection. From there, you only have two turns to go before you reach the curve leading back to the upper highway.
The highway here is filled with your typical assortment of cars, which are traveling the wrong way, if the arrows on the ground are to be believed. Stick to the center line here, laying down any traps you have along the way, and keep a keen eye on the road for any mobile bombs that've decided to go for a nice drive.
Yoshi Circuit
After Daisy acquired her cruise ship, Yoshi's outsized ego forced him to hunker down and think of a way to top her. His eventual plan was to reshape an entire island in the shape of his own body! Everyone laughed at him when he finally realized that all Yoshis look exactly the same. 
At any rate, the Yoshi Circuit will definitely put your powersliding skills to the test, and not much else. There aren't any shortcuts to be found, although you will need to be watchful of the cliff's edges that sometimes accompany the ends of curves, especially those leading out of tunnels. Other than that, there isn't much to be said, except to learn the track and hit your powerslide button as early as possible when dealing with the more vicious turns. Watch out for the Piranha plants that grow alongside the turn near the finish line; these fellows will gladly help you snatch defeat from the jaws of victory if you let them.
DK Mountain
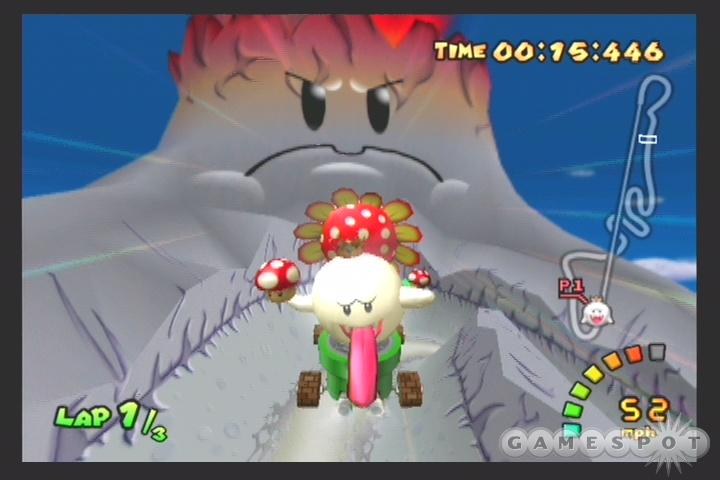
In a rather pleasant turn of events, the Volcano atop Donkey Kong mountain has a dour frown on his face as he sits, absorbed in his weltschmertz, looking down over the world and seeing, again and again, puny creatures come to deface his majestic surface with their tiresome racing about in karts. It's good to know that not everyone is happy in Mario land, where even the clouds have smiles. But maybe that's just us.
You won't see the volcano right away, though; the starting line is at the bottom of the mountain, and you'll need to round a few corners before you can enter the Donkey Cannon and get shot to the top. Said shooting is dead time, and sucks away most of your speed, so hit the gas as soon as you land and take the next little jump along the right-hand side to reduce your airtime. You can safely traverse the cooled magma alongside the main road here, and, in fact, you should do so, since you'll shave a couple of seconds off your time. You'll be in better position for the first large turn after the road changes back to green, as well.
The second turn down below the vegetation line is a killer, with two gaps in the outer fence that are specially prepared to send you to your doom. As per usual, hit your powerslide while you're on the outside edge of the incoming road, hit it early, and zoom around while hugging the inner barrier. The next hairpin has the inverse problem, with the interior, and part of the track, being void. So, again, stick to the inside, but keep a distance between yourself and the inner part of the curve. It's better to hit the wall here than to waste five seconds getting yourself reset after a fall.
There's yet another hairpin curve after this last adventure, albeit one that's securely bounded on the inside and outside. You'll have almost no time to get in position for a proper powerslide, though, so you'll have to do your best with the track you have and attempt to get back to the center of the track for the trip across the rickety wooden bridge beyond. And believe us when we say that you'll need to be in the middle of the track before you cross; if you're off-center, you're going to be taking an express trip to the bottom of the chasm below. Hit it center and stay there if you want to make it across. Note that the computer has no problems with the bridge, or avoiding smaller obstacles, like Bananas, while crossing it. Thus, you shouldn't plop down Bananas or Fake Items on it; you'll only be hurting yourself on the next lap around. Giant Bananas do work well, however. If you spot an item on the bridge, and don't believe you'll have time to avoid it, hit it head on and accept the speed penalty; if you try to juke and overshoot your free space, or hit the item and spin out, you'll be taking a much greater time penalty when you fly over the edge.
Special Cup
The Special Cup isn't available at the beginning of the game; you'll need to unlock it by beating the Star Cup on 100cc mode. By virtue of its ultimate position among the cups, you should expect to find some unique challenges here, and the Special Cup doesn't fail to deliver, with four tracks that feature twisting turns and unprotected sections of track.
Wario Colosseum
Wario's Colosseum is the sinister product of a twisted mind, bent towards evil and the wretched promise of hideous power. Or so we guess; it's actually kind of fun, if you don't mind the occasional ten-second powerslide or trips around unbarriered sections of track. Before you begin, take note that the Colosseum is a two-lap track; it's so long that you only have a pair of laps to make your way to first place.The level begins with a warmup consisting of a few right turns and a few boost-assisted jumps, before sending you over a huge jump which segues immediately into the longest powerslide in the game. It's not a simple corner, of course, but rather a downward-oriented spiral, so lock in your powerslide and adjust it as necessary to maintain your distance from the outer edge of the track; if you rub up against it, you'll lose a lot of speed, and will often see a quicker character zoom past you as you try to get back on course.
The track without outside barriers follow upon the death-spiral, so keep your wits about you and stay away from the edges, being especially wary of items that are dropped in the path. Following this little adventure, there's another hard spiral section, leading to what appears to be Wario's interpretation of the effects of a black hole's gravity on a 3D representation of the space-time continuum. Wario gets extra credit on his physics project, but you get to head around the bottomless pit, avoiding the jump in the middle. While the jump looks tasty, and may be suitable for heavyweight karts with high top speeds, it doesn't afford smaller karts much of a time bonus, and is fairly dangerous; if someone hits a Thunder Bolt while you're going over, you'll head straight for the bottom of the pit, and that's not something anyone wants to have happen.
Following the science experiment, you'll need to anticipate the hard left turn that follows; the signage is invisible until you crest the hill here, and by the time you do that, it will be too late to make a proper turn. So, begin turning before you reach the top of the rise, and you should be in good shape. The last little batch of item cubes comes in another pair of lines, so grab one from the first line, then switch drivers for another item before you hit the last boosted jump before the finish line.
Dino Dino Jungle
Welcome to Jurassic Park, sans ravenous raptors; the only dinosaurs here are of the placid, walking-in-place variety. Your primary point of frustration isn't going to be the herbivores, though; it'll be the two points at which you'll find it rather easy to fall off the track.To begin with, however, make your powerslide around the first hard turn and avoid the jumps that line the track; they'll suck away all of your speed, and you'll be able to find plenty of items later on. If you wish, you can attempt to grab a dual-item cube from underneath the Dino in the clearing, but you'll have to avoid his stomping feet, or you'll spin out.
After a very short cave, you'll come out onto a series of plank paths leading to the upper half of the level. This is the area where you're going to start throwing your controller at the screen, because none of these paths have railings to prevent you from going into the water. With proper control, you should be able to hold yourself onto the course by taking the main path, which is to say, the left-hand path at the bottom of the planks. The right-hand path leads to a booster pad, but that track is a bit narrower than the main path, and has a more severe turn at the end to get you back on course; only experts should try to hit it.
Beyond simple skill, though, you'll need to worry about immobile objects, item attacks and, far from least, getting bumped into the water by heavier karts. If you have any Bananas or Fake Items, and are close to the lead, you can use them here, and be relatively assured that they won't be around when you next pass through; this is also a perfect place to bust out any Red Shells you have waiting around, in the hopes that you can knock the next kart up the food chain into the drink. As far as the roughhousing goes, you'll obviously want to stay away from any heavier karts while you make your way through this area.
Another short interior bit follows the plank paths; hit your powerslide as soon as you make the first little left turn, and you should come out into the cave with a good line. The level's main shortcut is off to the right after you enter, but the log jump will prevent you from accessing it unless you have a Mushroom or other method of boosting your speed. Otherwise, you'll have to avoid the waterspouts on the left-hand side, while aligning yourself with the middle of the jump on the far side of the cave, which leads out to another hanging bridge area.
The Dino you passed below will occasionally swing his head out over the right-hand side of the bridge here, so stick to the left if possible.
Bowser's Castle
Bowser's labyrinthine mansion is host to numerous traps, obstacles, and barrier-free sections of track. The sharp turns, compiled with the other dangers, make this a track that you're going to need to know like the back of your hand before you can get excellent times. But thanks to one of the game's best shortcuts, you shouldn't have any problems winning races here, so long as you make an error-free run.The small bridge beyond the starting line can be dangerous for smaller karts, since everyone seems to bunch up to cross it; you'll need to be careful you don't get bumped into the lava as you cross over. Of course, if you're in a heavier kart, you might want to take the opportunity to waggle a bit from side to side, in order to knock any of the peons around you off the course.
Beyond the bridge, you enter into the castle's interior, and encounter the first of Bowser's numerous annoying traps. The Thwomps here are difficult to hit, unless you aim for them; just rub up against the wall and floor the gas pedal, and you'll be beyond them in no time. They do cause you to spin out, though, so this isn't the time to make any dangerous passes.
Past the Thwomps, you'll come across a rather annoying grated floor that leads to a boosted jump. The trick here is to avoid the fireballs that shoot up from the lava below and pass through the grates on their way back down. As you near the fireballs, aim for one that will be dropping down before you arrive, and head directly over where it sank through the grate. This should allow you to avoid any of the other fireballs, since they're all cyclic, but, as always, keep your eyes open for anything that bucks convention. Hitting one of these fireballs at top speed will almost always send you into the lava, as will getting hit with an item while you're near the ledge, so this is one area where you want to be as cautious as possible.
Following the jump, there's a longish upwards spiral that leads back into an exterior portion of the castle, adjacent from the start line. Racers that are adept at powerslides will have the upper hand here, due to the succession of hairpins. Try to initiate your slides and turn inwards before you hit any spots where the ramps level out; this will help you anticipate the loss of control that comes when you take air near these tight corners. More item cubes await near the turn back into the castle's interior; if you're quick and can race a good line, you can double up on your items with a well-timed driver switch.

Bowser's statue dominates this last, ominous section of his racecourse, but it also stands guard over a heck of a shortcut. As you race down the stairs, you'll notice that the track's barrier is missing directly ahead of you, which allows Bowser's statue to shoot his fireballs onto the road. The gap in the wall also permits you to skip an entire turn, however, which saves you an easy three or four seconds. There is a catch, of course, or rather two: first off, if you try to take the shortcut at the same time the statue shoots a fireball, you'll spin out in midair and will likely fall into the lava; and second, if you overshoot your landing on the track below, you'll go through another missing barrier area and also wind up in the lava.
In practice, though, it's not nearly as difficult as it sounds, so long as you're familiar with the turn. The key is to hit your powerslide before you make the jump, turn inwards (towards the left), then release your powerslide as soon as you hit. This should help you gain momentum in your new forward direction and avoid the second missing barrier. Of course, all of this is null and void if the timing is wrong; if you see the Bowser statue lock into place in front of the shortcut before you arrive there, you probably shouldn't attempt it. Just make the normal turn and hope for a better opportunity on the next lap.
After this shortcut, there's nothing between you and the finish line except for a few more fireballs, a boosted jump, and a right turn. If you're in a neck-and-neck race, be sure to grab one of the item boxes before the jump, and hope for either a Red Shell or a Mushroom, which you can use to blast across the dirt before the turn and zoom to the finish line.
Rainbow Road
We hope you're ready for frustration, because that is, in the end, what Rainbow Road most engenders in its hapless clients. Did we say "in the end?" Actually, it's more of a constant feeling. Perhaps more than any other, Rainbow Road is a track that will require a lot of practice before you become adapted to its peculiar rhythms and odd construction. There are more opportunities to leave the track and take a time penalty on this course than on any other.To begin the mayhem, hit the boosted jump and head on down to the two hairpins that will quickly act as a way to wean out the completely inept. The proper method for dealing with them is, as ever, to approach the first turn on the outside of the track, hit your powerslide early, and cut the interior corner as closely as possible, preferably coming out of your slide in a position where you'll be able to repeat the process for the second turn. The presence of company or items may make these awkward, but there's not much you can do about it except attempt to persevere. You can try to bump off smaller karts on these corners, but powerslides don't leave you much of an opportunity to maneuver.
The booster pads beyond lead you to a more difficult section of the track, where the road takes a spiral turn upwards. Not such a bad thing on its own, but the continued lack of barriers, the inclusion of booster pads, and the way that the track is unevenly banked will make this a rather harrowing experience. The key is to stick to the inner side of the track, and not attempt to hit every booster pad, no matter how tempting a target. Shifting from side to side on this section is asking for trouble, even when it looks safe; it's far too easy to underestimate the severity of the curve and wind up sailing off into oblivion. As you play the track more and more, though, and begin to gain increased familiarity with it, you'll be able to play a little more aggressively here, and it is a good spot to make up time, if you can control your kart with a modicum of precision.

Another difficult section follows, as the track throws a few chicanes in your way, sans barriers to help you out, as per usual. This piece of the course often becomes a favorite dropping point for immobile items, which you will, of course, need to avoid, since the rapid changes of direction necessary here make it likely that any spinout will cause you to drop off into the wild black yonder. You will also occasionally come across Stars here, just lying on the track, although you may want to consider their position before you dash for them. The sudden speed boost that they give you can ruin any touch that you've gained while practicing this portion of the course, and even a Star won't help if you fall overboard. At any rate, lighter karts should attempt to cut the interior of the turns here at top speed, while the heavier karts may want to fall back on powerslides to get them through; your mileage may vary.
After that difficult spot, you're essentially home free, although that may not be a very good thing, since it's incredibly hard to overtake anyone in front of you between now and the finish line. The prevalence of booster pads makes Mushrooms less useful than they normally are, and the gaps in the road and the tight spiral near the end reduce the efficacy of Red Shells. C'est la vie, we suppose; you'll have to do the best that you can, or hope that some spiteful individual at the back of the pack pops out a Spiny Shell and changes your luck for the better. At any rate, the final spiral here is a tight one, but luckily has a barrier that you'll be able to rub against while powersliding.
Multiplayer Modes
While Mario Kart: Double Dash!! is quite enjoyable as a single-player game, as its subtitle suggests, it's best experienced when one or more friends are playing along with you. Whether you have a two-player split-screen or a 16-player, four-Gamecube setup, you'll be able to play alongside or against each other in Grand Prix mode, head-to-head Vs. races, or in the game's three unique Battle modes.
Grand Prix
Grand Prix can be attempted either cooperatively or competitively. If you're interested in a little competition, each player grabs a kart and occupants, and you both race through a Cup or the All Cup Tour, pitting your skills against those of the computer players. The controls are identical to those of the normal, single-player game.If it's cooperation you seek, two players can share a kart and work together to win the gold. It takes a rather lengthy adjustment period to learn the controls, but, in essence, the player who's driving is responsible for steering and initiating powerslides, while the player in the back uses special items and charges up powerslides into Mini-Turbos. If you want to switch seats, both players have to hit the Z key at the same time. Co-op players also get an extra maneuver that isn't available in the single-player or VS. mode version of Grand Prix; using the Slide Attack, the character in the rear can press the shoulder buttons of the controller (normally used for Power Slides), which results in a sideways swing of the kart. Any enemy karts that are nearby will be beaten back, and the character in the rear will steal any items that they were carrying, presuming you have an open slot. Pretty handy, as you can imagine.
Versus Mode
Versus uses the same tracks as does Grand Prix, but is focused towards one-on-one duels between players. Thus, you can only pick one track at a time, and there are no computer racers on the courses. Also, some of the obstacles on the tracks have been removed, leading to a speedier, more exciting racing experience.
Battle Mode
Battle mode is the most directly competitive of Mario Kart's multiplayer modes, as players have to go head-to-head against their opponents in order to blow them to smithereens, steal precious items from them, or – dare we say it? – pop their balloons. These modes are simple enough to require little explanation, but wind up being quite fun.
Balloon Battle
In Balloon Battle, each player begins the match with three balloons tied to their kart; each time an opponent manages to peg you with a special item, you'll lose one of them. The last player with balloons wins the round. 
In two-player games, matches will often be over in less than a minute, especially on the more wide-open maps, like Tilt-A-Kart or the Nintendo Gamecube level. The player who gets the better items, like Red Shells, will often be the victor; the poor soul who finds nothing but Bananas will usually be out of luck, but at least there's a short grace period of invincibility after you lose a Balloon. Use it to evade your foe and grab an item cube!
In larger games, you can often profit by squirrelling yourself away in a corner of a level, such as on the top floor of Luigi's Castle, and waiting for the rest of the players to wear themselves down before moving in for the kill.
Shine Thief
In this Mario version of fox-and-hounds, the goal is to be the player holding the Shine icon when the timer on a round runs out. The Shine begins a round in the middle of the level, but can then be picked up by any player that moves over it. Of course, other players can knock it loose via special items and claim it for themselves. You can expect the action to get much more frenetic as time clicks down. This game works better on the more intricate maps, like Block City or Luigi's Mansion, where the Shiner actually has an opportunity to evade his or her foes.
Bob-omb Blast
In a fashion similar to Balloon Battle, the object of Bob-omb Blast is to pelt your opponents with explosives, but unlike that mode, you can actually trade hits to avoid having an outright winner. When someone is hit with a bomb, the hitter gains a star, while the hittee loses a star (if they possess any). This see-saw effect can lead to many a standoff, but keep in mind that a single bomb can impact multiple foes in larger games, leading to huge star swings in an instant. Also, be aware that each of the characters on your kart can hold up to five bombs, so if you find yourself in a lull between engagements, skirt through the item cubes in your path to load up on ammo.
Battle Mode Maps
There are six different maps for use in Battle Mode, ranging from the ridiculously simple to the moderately complex. These are focused on recreating small arenas, so you shouldn't expect to see any towering ten-level monstrosities.
Cookie Land
This little circular level, reminiscent of the old Simon memory game, features a trio of bumpers that block off the circle's interior from the outer border. The outer border makes for a useful grinding spot for powerslides; if you're trying to avoid fire, just lock in a power slide and accelerate along the wall. This will make it difficult for enemies to hit you with anything but a Red Shell, but eventually they'll wise up and place a Banana along your path, so keep your eyes open.
Block City
Block City consists of four little squares, co-existing within a larger open square. The yellow square has a path leading through its interior, while the blue square hides a dead-end at its rear. Characters on the defense can hole up here and litter the ramp leading down with Bananas and other objects from the endlessly respawning item cubes here, or just wait for someone to approach before blasting out with a Mushroom.
Luigi's Mansion
Well, perhaps there aren't any "ten-level monstrosities" in Double Dash!!, but Luigi's Mansion acquits itself fairly well with a modest three stories. The basement and first floor are where much of the action will take place, while the second floor, with its open hole to the floor below, is an excellent place to hide yourself away in a Shine Thief match. If you can position yourself in one of the corners, looking back upon the entrance to the area, you can pelt anyone who comes up with your items as they round the corner, but be aware that they'll know your position as well, due to it showing up on the minimap. If worse comes to worst, you can jet off into the hole and make your getaway. The upper floor is also an excellent spot to rack up cheap points in Bob-omb Blast, so long as you don't run out of bombs!
Nintendo Gamecube
The Nintendo Gamecube level will require all of your cerebral powers if you're to achieve a victory. Its intricacies have driven good men mad with desperate mentation! Children quail when they see it!We could only wish. In truth, the level is a flat plane, without any obstacles to separate yourself from your enemies. Basic in design, but still a lot of (chaotic) fun.
Pipe Plaza
The only complexity here is in the two sets of pipe warps, which hail all the way back to the original Super Mario Brothers game for the NES. You won't be warping to another level, or Bowser's castle, though; these pipes are connected to each other, so that the pipes up top will spit you out on the lower level, and vice versa. If you find yourself with a Red Shell on your tail, you can head through a pipe, and perhaps see it self-destruct out of the corner of your eye. There's no really good place to hide on these levels, although you may be able to confuse pursuers by heading through a pipe, then hitting reverse as soon as you land. They'll still be able to see your position on the minimap, but they'll be confused for a second or two nonetheless. This works even better if you're transported to the top level; if they don't see you on the path ahead, they'll usually drop off to look for you, and they'll be forced to either make their way back to the pipe they just came through, or head all the way to the ramps that lead up to the higher level.
Tilt-A-Kart
Tilt-A-Kart is another flat plane, except this one periodically tilts on its center axis towards one end or the other. The usual speed penalties/boosts will apply, depending on which way you're trying to move when the level tilts. Also of note is the fact that this is the only Battle Mode map without a border, meaning that you can and will be knocked off the edge if you veer near it. The white safety strip helps matters somewhat, but a lucky Red Shell will still give you enough momentum to go over the edge. If you fall off the level, you'll lose a Star, a Balloon, or the Shine if you have it in your possession.
Racers
Mario Kart: Double Dash!! features more characters than any previous game in the Mario Kart series. To add another layer of complexity, though, you'll now be asked to choose two characters before you start a race. Both characters will ride in the same kart, and each will be able to hold a special item, although only the character that's not driving will be able to use his or her item.
Light Racers
Racers that fit into the "Light" weight class can fit into light, medium, or heavy karts.
Baby Luigi
Welcome Baby Luigi to the Mario gaming fold; this is his first gaming appearance. He'll be in good hands, as he teams up with Baby Mario to rule the kart racing world. As with Baby Mario, he'll need to utilize the Chain Chomp powerup to overcome their kart's low top speed.
Bowser Jr.
Revenge burns in the heart of Bowser Jr. After his ignominious defeat at the end of Super Mario Sunshine, Bowser Jr. has been plotting his father's archrival's downfall. In Double Dash!!, he'll put lightweight karts and the formidable Bowser's Shell to good use in the furtherance of his byzantine plot.
Baby Mario
It may seem odd that Baby Mario and Mario appear contemporaneously in the same game...and it is. Best not to think about it too much; concentrate instead on the power of the mighty Chain Chomp power-up.
Diddy Kong
"His charm is in his amazing tail." That probably means something, but all you really need to worry about is using this diminutive Donkey Kong to unleash havoc with the dreaded Giant Banana. 
Toad
According to the circuitous logic of a Mario game, if you have a character that's a sentient mushroom, you name him Toad. Toad isn't available at the beginning of the game; you'll have to beat the Special Cup in 100cc mode to unlock him. His Super Mushroom special item gives you a short period of unlimited speed boosts; keep tapping the special items button while the mushroom is in the active item slot, and you'll exceed your top speed for five seconds or so.
Toadette
Toadette is probably the most egregiously cute of all of Double Dash!!'s racers, what with her little pigtails swaying from side to side as she rides behind Toad in the Toadmobile. Little cutie-pie! You are a little cutie pie, aren't--ahem. Toadette is unlocked at the same time as Toad, and uses the same special power.
Medium Racers
Medium Racers are a bit bigger than their lightweight counterparts, and thus can only fit into medium or heavy karts.
Birdo
Birdo doesn't have the most amazingly original name in the Mario canon, and she may not even be a bird, but she's more than a match for other kart racers due to her homing Egg attack. She's paired up with Yoshi, by default.
Koopa
Bowser's low wages and uncompetitive benefits package have encouraged many of his employees to moonlight in other jobs. Most of them wound up as obstacles along the Mario Kart courses, but Koopa managed to beat the odds and parlay his affinity for antique car restoration into a position as an actual driver. His Triple Shell powerup is handy for taking down multiple targets at once.
Luigi
When he's not perusing the Pipe Fitter's and Pipe Welder's Handbook, or vacuuming up ghosts, Mario's lanky brother Luigi enjoys coasting around the Double Dash!! courses in a medium kart, whirling Fireballs at random passersby. His Fireballs are green, compared to Mario's red fireballs, which is a vital distinction when you're talking about fireballs! So don't forget!
Paratroopa
Paratroopa was cashiered into service by Koopa, and is essentially the same as his fellow tortoise, save for his wings; for the purposes of Double Dash!!, that means there's no real difference. Like his brother-in-arms, he uses Triple Shells to power up his attacks.
Princess Daisy
Apart from Daisy being the ruler of Sarasaland, she and Peach may as well be identical twins; they laugh alike, they walk alike – at times they even talk alike. You could lose your mind! Maybe they're cousins. At any rate, Daisy, like Peach, trundles around the Double Dash!! world in a medium kart, channeling the Heart power to ward off the bad people.
Princess Peach
The original damsel in distress, Peach is perhaps most famous for being kidnapped by Bowser way back in Super Mario Brothers for ye olden Nintendo Entertainment System. She's the princess of the Mushroom Kingdom, which sounds like it'd result in a thorough inspection of your baggage if it pops up in your passport. She runs around courses in a medium kart, using her Heart item to protect her from harm.
Mario
Although the Mario of our world has over 20 years of gaming history in his back pocket, in Double Dash!!, the Mario character is actually "Lario," a sinister replicant sent from the 32nd century by Dr. Wyrmwood to destabilize Nintendo's most beloved franchise. It's true!Ok, that's not true. But it is true that Mario is a medium-class character who uses Fireballs as his special item-- that much we can guarantee. It's also unfortunately true that when you win a race with him, he yells, "I'm a weiner!"
Waluigi
If you thought Luigi was thin, wait until you see Waluigi, his evil twin brother; the guy is spectral. His hideous, freakish limbs wouldn't seem able to heft a Bob-omb, but heft them he does, as Wario pilots the Wario Car towards...evil!
Yoshi
Yoshi is a member of the Yoshi species, which dwells on Yoshi Island. What's the single word of the Yoshi language, you ask? "Yoshi!" Don't mistake all of this Yoshiness for mirth or dimwittedness, though: Yoshi spent three years at the Skip Barber Racing School, honing his skills until he became the most feared kart racer on the face of Yoshi Island. Too bad there are only two kart racers on Yoshi Island. Yoshi's special item is appropriately titled Yoshi's Egg.
Heavy Racers
Bowser
Bowser still gets a chuckle now and then over the whole "The princess is in another castle!" bit, but on the whole, he's pretty sore about losing every single time he's fought Mario. His heavy kart is the ideal vehicle for his rage, especially when you throw the terrible might of the Bowser's Shell special item into the mix.
Donkey Kong
One of the true titans of the videogame industry, Donkey Kong's history actually rivals that of Mario's, since they both appeared in the original Donkey Kong game way back in 1981. In Double Dash!!, he wields the supremely annoying Giant Banana powerup, and is teamed by default with Diddy Kong.
King Boo
Well, sometimes the phrase "Le Roi Est Mort" can be applied literally, as with King Boo, the most regal and eldest of all of the ghosts in Mario's universe. He and Petey Piranha don't have unique Special Items; instead, they gain the ability to use any of the Special Items available to other characters.
Petey Piranha
Petey Piranha is King Boo's personal bodyguard, palmist, and tango partner. As the only true pair of heavyweights in the game, you can expect them to use their karts to bully every other racer around.
Wario
Much like Waluigi is an even thinner version of Luigi, Wario is, well, a fatter Mario. It's a gland problem, you see, which also helps explain why there's an extra "b.o." in Bob-ombs. He's got a cool low-rider car, though.
Karts
Karts are divided into three categories, just like the characters: Light, Medium, and Heavy. No character can fit into a kart from a lighter weight class than he or she (or it) is classified in.
Starting Karts
When you first boot up Mario Kart, you'll begin with only a small number of karts to choose from. You'll need to start racking up gold medals in the different circuits and difficulty levels to unlock more!
Light Karts
Light karts accelerate more quickly than karts from the other weight classes, but they're dreadfully slow, and can be knocked aside by heavier karts with ease. They take the smallest speed hit when they go off-road, which can help them traverse shortcuts.Users of light karts will often fall behind at the beginning of a race, due to the way all of the heavier karts will dash off the line and hit their top speed immediately. Over the course of a race, though, your higher acceleration can be used to claw your way back up the leader boards, since you'll recover from attacks more quickly than your heavy-duty opponents will.
Goo-Goo Buggy
This is Baby Mario's tricked-out baby carriage. He and Baby Luigi will need to share it until you unlock Luigi's slightly speedier kart.
Acceleration: 5
Speed: 1
Weight: 2
Koopa Dasher
The two Koopas will share this kart at the beginning of the game. It trades off some of the Goo-Goo Buggy's extra acceleration for a hint of extra speed.
Acceleration: 4
Speed: 2
Weight: 2
Medium Karts
These karts were designed to be average. This isn't necessarily a bad thing, if you're looking for stability, but they're never going to be as fast as heavy karts or accelerate as quickly as light karts do.
Heart Coach
Princess Peach's kart is almost identical to some of the light-class karts, except for the slightly increased hitting power.
Acceleration: 4
Speed: 2
Weight: 3
Red Fire
Mario's default kart is a jack-of-all-trades affair. You'll need to use your special items to keep up with the heavy karts, especially in the 150cc class.
Acceleration: 3
Speed: 3
Weight: 3
Turbo Yoshi
The Lizardmobile is similar to Peach's ride, save for the slightly more masculine color.
Acceleration: 4
Speed: 2
Weight: 3
Heavy Karts
Heavy karts excel in weight, obviously, but are also the fastest karts available. They're also bogged down a bit by their heavy engines, however, which results in poor acceleration, and are also unable to traverse areas off the main tracks without drastically slowing down. Heavy Karts also don't have that turn-on-a-dime maneuverability of the lighter kart classes, but if you can handle the beast, you're going to have a huge speed advantage over the other karts on the course.
DK Jumbo
This is about as balanced as the stock Heavy Karts come, even if it is made out of wood, including the wheels. That can't be good for traction.
Acceleration: 2
Speed: 4
Weight: 4
Koopa King
Bowser's kart is heavy and fast, but is terrible at picking up speed. If you're going to use it, you'd best learn how to handle it, since you'll be dropping positions every time you hit an obstacle.
Acceleration: 1
Speed: 5
Weight: 5
Wario Car
Now this is a cool-looking car. Although it's structurally similar to the DK Jumbo, it beats it based on style points alone.
Acceleration: 2
Speed: 4
Weight: 4
Secret Karts
Although you begin Double Dash!! with only a few cars to play around with, you'll unlock another one every time you earn a Gold Medal in a cup. Before long, you'll have quite a variety of karts to play around with, and will eventually obtain a kart for every character in the game. Check the Unlockables section of the guide to match up each kart with the race you need to win it.
Light Karts
Para Wing
It's a shell! With wings! Unique!
Acceleration: 5
Speed: 1
Weight: 2
Bullet Blaster
Bowser Jr.'s kart has a much higher speed than the other light karts, but also has a fatter back end, rendering it somewhat more difficult to control than the less-aggressive light vehicles.
Acceleration: 3
Speed: 4
Weight: 2
Rattle Buggy
Baby Luigi's kart comes equipped with full ABS, which would be useful, if it wasn't a baby carriage.
Acceleration: 4
Speed: 2
Weight: 2
Toad's Kart
Oddly enough, Toad has the most traditional kart of them all; this wouldn't look too out of place on a real-world go-kart raceway.
Acceleration: 4
Speed: 2
Weight: 2
Barrel Train
Diddy Kong's barrel is just as stylish as his older relative's, perhaps moreso, considering its nice choo-choo engine design.
Acceleration: 2
Speed: 4
Weight: 3
Toadette's Kart
Toadette, being the pink Mushroom, has, of course, a pink kart.
Acceleration: 5
Speed: 1
Weight: 2
Medium Karts
Green Fire
Luigi's tricked out his kart to provide for a bit more speed, at the cost of acceleration and weight. Will his gambit pay off? Only you can decide.
Acceleration: 2
Speed: 4
Weight: 2
Bloom Coach
Daisy's version of Peach's cart. Statistically, it's worse than quite a few other cars, but if you're desperate to use Daisy, here you go.
Acceleration: 3
Speed: 3
Weight: 2
Waluigi Racer
Waluigi's dire-looking kart has only average stats, but it gets bonus points for being decorated with a handlebar mustache, just like its eerie master.
Acceleration: 3
Speed: 3
Weight: 3
Turbo Birdo
Birdo's freakish visage "graces" the front of her kart. Her nose alone accounts for enough weight to make this the heaviest medium kart there is.
Acceleration: 3
Speed: 3
Weight: 4
Heavy Karts
Pirahna Pipes
Given that Piranhas do, indeed, come from pipes, Piranha Pete has stuck together a couple of green ones and plopped some wheels underneath to serve as his noble carriage.
Acceleration: 2
Speed: 4
Weight: 5
Boo Pipes
The fact that King Boo uses pipes as a car probably has more to do with him being a relatively low priority character to design a car for than the fact that ghosts use pipes to get around. Then again, what the heck would a ghost drive? At any rate, the Boo Pipes are the slowest of any of the heavy karts but, to balance things out, have the best acceleration, which make this a good combination of light kart and heavy kart attributes.
Acceleration: 4
Speed: 2
Weight: 5
Parade Kart
If you can accomplish the most difficult task in the single-player game, that is, beating the Mirror Mode All-Cup Tour, you'll unlock the Parade Kart, a non-character-specific vehicle that has some of the better stats among the various karts. What's more, any combination of characters can pair up to use it, even light-weight or medium characters.
Acceleration: 3
Speed: 4
Weight: 4
Items
Items come along in cubes, emblazoned with question marks, which are scattered around the tracks. You never know what you're going to get in a cube, but your chance of receiving the most powerful items is proportional to how far down the leader board you are; if you're in first place, you're never going to get a character-specific Special Item, for instance. Item cubes come in either single or double configurations; single cubes will only equip the character in the rear position with an item, if he or she doesn't already have one; double cubes will give both characters an item. You can, of course, switch drivers so that a character without an item is in the back seat while driving over an item cube, then switch back so that your character with an item is ready to go while the roulette wheel is deciding what the driver's item will be. Learning to quickly switch characters like this will be quite helpful in keeping your item supply topped out.
What you get when you pick up an item cube is random, although you have a better chance of getting a Special Item that's unique to your character if you're in the 3rd through 6th spots. Karts in the 7th and 8th spots will usually wind up with Spiny Shells or Thunderbolts if they would've gotten a Special Items. Characters near the lead will rarely get anything better than a Red Shell, and will most often get Bananas, Fake Items, and Green Shells.
Banana
Characters: AllForwards/Backwards: Yes!!
You're going to see a lot of Bananas on the tracks as you proceed through any of the given cups: of all of the items that you can get from an item cube, Bananas seem to be the most likely to pop up, especially when you're in or near the lead.
Bananas are used much like any other immobile item; try to plop them down where there's maximum traffic, or where your followers will be unable to avoid it, and you're sure to see someone slide out before long. As with the other immobiles, though, you have to be careful not to hit it yourself on the next lap. If you're coming up on a Banana without any means of avoidance, your best bet is to charge through; Bananas have the smallest speed penalty of any item, so you won't lost more than a second or two if you get back to top speed quickly.
Birdo's Egg
Characters: BirdoForwards/Backwards: Yes!!
We're trying very hard not to think about how Birdo creates all of these Eggs. Suffice to say, her Egg acts something like a Red Shell, in that it homes in on a character and knocks them over. Unlike the Red Shell, though, Eggs burst upon impact, spilling out three random items onto the track. These can sometimes be advantageous items, like Mushrooms, but are more often things like Bananas or Green Shells. As with Red Shells, you can prevent the impact of an Egg with a well-timed Shell directed towards your rear.
Bob-omb
Characters: Wario / WaluigiForwards/Backwards: Yes!!
The two W's get a rather explosive special item in the form of Bob-ombs, which are probably the most powerful item in the game in terms of sheer destructive force. After a Bob-omb is thrown forwards or backwards, it will sit for a few seconds, then begin to flash red and explode. The radius of the explosion is usually going to be sufficient to cover most of the track, if the Bob-omb was well-placed, and anyone hitting it will be propelled straight up into the air and will lose a significant amount of time. While these can be thrown forwards and backwards, Wario and Waluigi should be extremely careful when throwing them forward; it's all too easy to run right into your own trap.
Bowser's Shell
Characters: Bowser / Bowser Jr.Forwards/Backwards: Yes!!
Bowser's Shell is, essentially, a larger and more powerful Green Shell, in that it heads off in a straight line, bouncing off of cars or barriers, tumbling anyone it comes into contact with. Unlike Green Shells, however, it isn't destroyed after its first enemy contact; if it hits someone, it'll pass through them, carving a path of destruction through every enemy in its way. It lasts a fair amount of time, as well, so be careful to keep an eye out for it when heading around corners; you may find yourself cut down by your own sword otherwise.
Chain Chomp
Characters: Baby Mario / Baby LuigiForwards/Backwards: No!!

The Chain Chomp can only be directed forward, which is understandable, considering that Baby Mario and Baby Luigi will be tethered to its rear end while it bursts ahead. When unleashed, the Chomp will grant the babies a speed boost, but will also steer for them for a short period of time, while knocking over any competitors that happen to be in the way. It's nice to have powerful friends.
Fake Item
Characters: AllForwards/Backwards: Yes!!
As you get to know the tracks, you'll notice that item cubes always appear in the same spot if they're immobile, and stick to the same patterns of movement if they're mobile. Fake Items are easily detectable for this reason; if you spot an item cube in an odd place, or if you notice that there are two overlapping item cubes, avoid that spot, as you'll wind up losing your speed if you hit the Fake Item. Fake Items can also be detected via their reversed question mark, and the slightly reddish tinge they possess, but this shouldn't be necessary; their position should tell you instantly whether they're real or fake.
Items - cont.
Fireballs
Characters: Mario / LuigiForwards/Backwards: Yes!!
Ha Dou Ken! Mario and Luigi possess the curious and slightly supernatural ability to shoot flames from their fingertips, in a very wide spread. Anyone the Fireballs come into contact with will, obviously, be torched and spin out, and the beautiful thing is that you can conceivably ruin three or four racers simultaneously, especially on tracks like Baby Park, where there isn't much room to avoid the fire. If you're in the lead, aiming backwards with this power can secure your position for quite a while. After the flames hit an obstacle, they'll burn out, which means that you'll never have to worry about running into your own Fireball. This also means that they don't bounce, so you'll have to use them in a straightaway or before your enemies turn out of your sight.
Giant Banana
Characters: Donkey Kong / Diddy KongForwards/Backwards: Yes!!
The Giant Banana is the sole stationary Special Item, and acts much like its name implies: it's essentially a regular Banana, albeit almost three times as wide. When an unfortunate follower impacts the Giant Banana, it spins them out, of course, but also fragments into a trio of regular-sized Bananas, which form a triangular shape that's difficult to steer through without getting tripped up. Thus, a single Giant Banana can often wind up hampering the progress of three or four different racers, giving you a pretty good value for your buck. Unfortunately, it's of most use when racers are behind you, and since you won't get it when you're in the lead, you may be better off with a more practical Special Item on the harder difficulty levels.
Green Shells
Characters: AllForwards/Backwards: Yes!!
After Bananas, Green Shells are going to be the next most numerous item. These are fired either straight ahead or straight behind your kart, and travel along a straight path in either direction, until they hit an opponent or stationary item, in which case they explode, or they hit an obstacle or barrier, which will cause them to bounce off, often resulting in numerous ricochets. Green Shells are great to keep as a backup item for your driver; if you hear the lock-on sound of a Red Shell, straighten out your path, send the Green Shell behind you, and you should be rewarded with the disappearance of the threat.
Heart
Characters: Princess Daisy / Princess PeachForwards/Backwards: No!!
In keeping with their nonviolent tendencies, Peach and Daisy have a fairly unique Special Item: the Heart shield. When activated, you'll get a rotating shield of floating hearts around your kart, which travel along with you and prevent other items from knocking you off-course, somewhat like a Star. Unlike a Star, however, any item that penetrates the Heart shield will be picked up by the rear character in the kart, and can be immediately thrown back at the kart that used it on you, if they're within range. Pretty useful, as you may imagine; be sure to activate this near areas where you stand a good chance of being knocked off of the track.
Mushroom
Characters: AllForwards/Backwards: No!!
Mushrooms are pivotal items, and can help you in many ways. Their most obvious application is on long straightaways, where their speed boost will help you pass or knock away karts in front of you; while you retain the Mushroom speed boost, you'll be able to bump karts in your path, no matter what size kart you yourself are driving. Mushrooms are also fantastic when used to take shortcuts or to cut across curves that are bounded by dirt or mud, since the item's boost prevents your kart from taking a speed hit due to poor terrain.
Red Shells
Characters: AllForwards/Backwards: Yes!!
Red Shells, while one of the less common normal items, are spectacularly useful when you're forced to play catch-up. As with Green Shells, they fire forward or backward, but when fired forward, they home in on the kart in front of you and knock them off course automatically. Of course, your target kart can block the Red Shell with a Green Shell or other item ejected from their back seat, but still, when a Red Shell connects, you'll easily make up three or four seconds' worth of distance between you and your target. It's even better if you can time it to hit before a kart goes off of one of the boost jumps that lead over nothingness, as so often appear in Special Cup races. Your target kart will usually tumble off into the void, thus compounding their misfortune and giving you the opportunity to take a huge lead.
On the other hand, when someone uses a Red Shell against you, you'll be warned both by a warning tone and a graphic that will pop up at the bottom of your screen. This will give you an opportunity to destroy the object as it homes in on you, but this is more difficult than it seems, due to the way the Red Shell curves around turns. If you're going to destroy it, you'll either need to wait until it's right on top of you, or until you've straightened out on a long, unbending stretch of track. Once the conditions are right, drop any item that you have stowed away behind you, and the Red Shell should detonate harmlessly.
Items - cont.
Spiny Shells
Characters: AllForwards/Backwards: No!!
Oh, you will come to loathe Spiny Shells as you play Double Dash!! These are the cheapest, most annoying item in the entire game, if we do say so ourselves. Spiny Shells only appear to characters in the bottom half of the race rankings. When it's let loose, the shell homes in one the lead kart, flying over everyone else's heads so as to not accidentally hit the wrong target, and detonates in a huge blue explosion, sending the lead kart and close competitors sky high. Spiny Shells are usually nothing but engines of spite, but they can be useful in some ways. If you hear one sneaking up on you, try to get as close as possible to your competition before it goes off; you'll at least have the satisfaction of slowing them down as well. Also, if you happen to go through a bad stretch and fall far enough behind to pick one of these up, save it as you climb the leader board and throw it out when you're near first place. The detonation should be enough to let you catapult into first place, if you time it right.
Star
Characters: AllForwards/Backwards: No!!
Stars are perhaps the rarest of all of the normal item pickups, and for good reason; when activated, a Star gives your kart temporary invincibility, a boost of speed, and the ability to knock other racers out of your way as if they were stuffed with straw. Needless to say, take advantage of these abilities while you can, since they don't last very long.
Super Mushroom
Characters: Toad / ToadetteForwards/Backwards: No!!
Toad and Toadette are able to acquire these items after they're unlocked; when activated, they'll get you a limited amount of time in which you'll have basically unlimited uses of a Mushroom boost. You'll need to keep tapping that Special Item button, though, because the individual speed boosts are short-lived – just like regular Mushrooms.
Thunderbolt
Characters: AllForwards/Backwards: No!!
This is usually one of the more useless special items, although it may unintentionally aid you if you're lagging behind the leader of a race. Thunderbolts are only found when you're dead last, and strike against all of the other racers on the track, making them mini-racers for a time, forcing them to drop their items, and reducing their speed to around two-thirds of its normal maximum. For some reason, though, human players usually seem to be less affected by the speed penalty as the computer players are, so take advantage of this to gain a position or two before everyone is returned to normal size.
Triple Mushrooms
Characters: AllForwards/Backwards: No!!
Triple Mushrooms are just like regular Mushrooms, except for the fact that they come in triplicate form, allowing you to triple up on their abilities. Three for the price of one is great, of course, but keep in mind that any extra mushrooms beyond the first will be lost if you spin out or hit an item, so you may wish to use the excess mushrooms as soon as you see a good opportunity.
Triple Shells (Red or Green)
Characters: Koopa / ParatroopaForwards/Backwards: Yes!!
Although getting more of a generic item might seem like a waste of a Special Item ability, the -oopas' ability to triple up on shells, especially those of the crimson variety, can come in quite handy. When you've fallen a few positions back, a single Red Shell can often gain you back a spot; three of them can rapidly get you back atop the leaderboard. Even if you get triple greens, you can still use these to spam-fire forwards or backwards, making an area of the track a minefield for a short duration.
Yoshi's Egg
Characters: YoshiForwards/Backwards: Yes!!
Yoshi's Egg is identical to Birdo's Egg, save for being a different color.
Unlockables
There are a number of different items and extra races to be unlocked in the Grand Prix mode. In order to unlock an item, you need to get first place in the given cup; there really isn't any prize for coming in second!
50cc
Mushroom Cup: Luigi's "Green Fire."Flower Cup: Daisy's "Bloom Coach."
Star Cup: Paratroopa's "Para Wing.'
Special Cup: Bowser Jr.'s "Bullet Blaster."
100cc
Mushroom Cup: Baby Luigi's "Rattle Buggy."Flower Cup: Waluigi's "Waluigi Racer."
Star Cup: Unlocks the Special Cup in all difficulty modes.
Special Cup: Unlocks Toad, Toadette, and Toad's Kart.
150cc
Mushroom Cup: Unlocks Luigi's Battle Mansion in Battle Mode.Flower Cup: Birdo's "Turbo Birdo."
Star Cup: Diddy Kong's "Barrel Train."
Special Cup: Unlocks the All Cup Tour.
All Cup Tour: Winning the All Cup Tour in 150cc mode unlocks Mirror Mode.
Mirror Mode
Mushroom Cup: Toadette's "Toadette's Kart."Flower Cup: Unlocks the Tilt-A-Kart arena for Battle mode.
Star Cup: Unlocks King Boo, Petey Piranha, and the "Piranha Pipes."
Special Cup: King Boo's "Boo Pipes."
All Cup Tour: Unlocks the "Parade Kart," and new opening and ending screens for the game.
Tips and Maneuvers
Every racer will need to keep a few cards up his sleeve in order to persevere in Double Dash!!, especially on the hardest difficulty modes. Holding down the accelerator might be all it takes to win in the bush leagues, but you'll need to master the game's more arcane maneuvers if you want to take home the gold in Mirror Mode.
Learn The Powerslide
The powerslide mechanic in Double Dash!! is an essential ingredient to eliminating excess time from your laps. Whether you use it in Grand Prix mode, or just to cut corners in a Time Trial, you're going to need to learn it and love it.The basic mechanics of a slide are easy enough to learn: hold down one of the powerslide buttons, turn into a curve, and adjust your heading as you go through in order to come out on the other side with a proper line towards the next turn. It's advantageous to be conservative with your turn in the beginning of a powerslide; you can easily steer into a slide after it's begun, but you're unable to steer towards the outside of your slide, so overturning early can cause you to hit the interior corner of a turn by mistake. You always have to start your slide early in order to begin the turn. Otherwise, you'll often find yourself sliding out to the corner of the turn, which hurts your efficiency and can sometimes find you shuttling off of the track.

The second aspect to the powerslide is the Mini-Turbo boost you can obtain by charging your slide. This only works if you've turned far enough to see yellow sparks coming from your wheels. After this occurs, turn your analog stick to the opposite direction, then return it to the center to turn the sparks red, then repeat the process one more time to turn them blue. After subsequently letting go of your powerslide button, you'll gain a temporary burst of speed, which also has the welcome effect of eliminating most of the remaining centripetal force from your turn, thus sending you off in a straight line towards wherever you were pointed when you released the button. This maneuver isn't only for curves, though; if you rub up against a railing in a wide straightaway, you can repeat the process over and over again to increase your average speed. This does require a certain touch, though, so you'll need to practice quite a bit before it becomes second nature.
Dash!!
The other primary technique in Double Dash!! is the starting-line boost you gain by timing your first press of the accelerator button to the precise moment when the starting lights turn green. The countdown is three reds, then green, but the wait for the green light is slightly longer than the gap between the red lights. You can either time it by heart, watch the little light-monster's hand and press the gas when it hits the bottom, or just try and hit the button as soon as you see the lights turn green. When done successfully, you'll immediately rocket out of the gates at a little more than top speed, then fall back to your normal maximum. Needless to say, this is a great way to start a race.If you're sharing a kart with another (human) player, you can double your speed boost from the start line if the both of you hit the gas at the precise moment. Hence the name Double Dash!!
Gas is Good, But...
Lighter karts have something of an advantage over the heavier karts with less acceleration: they can let go of the gas and hit it again without affecting their speed overmuch. This doesn't sound like much of a trick, but when you consider that you can reorient your kart while the gas is off, it can become useful, especially when you hit a tight curve for which you don't have time to set up a powerslide. Instead of hitting the powerslide button anyway, and thus ramming into the outside barrier, you can let up off the gas, turn your car inwards, then hit the pedal again, which will help you make the turn in an appropriate fashion without sacrificing too much speed. This comes in especially handy on turns that come immediately after one another, such as after the dining hall on Daisy Cruiser, or during the successive hairpins on DK Mountain.
Double Your Pleasure
If you attempt to go over an item cube when your rear character already has an item, you'll wind up just wasting the cube, which will destroy itself with no effect. On the other hand, if you have a driver without an item, you can switch your characters immediately before running over the cube; the former driver will get the item pickup, even if he or she's still in the process of being flipped around the kart. You should immediately follow this with another switch back to your character's original positions, so that the item you already possess will be available while the new one is being selected by the roulette wheel.Got a news tip or want to contact us directly? Email news@gamespot.com
Join the conversation