Ghost Of Tsushima Act 3 Walkthrough (Spoiler-Free)
Everything you need to know to defeat the Mongols and save Tsushima in Ghost of Tsushima Act 3.
Warning: We've ensured that our walkthrough contains minimal spoilers so you can still enjoy the game even if you need help completing all the story missions. However, if you want to know nothing about the game before playing, stop reading now and consult this walkthrough later.
In reaching Tsushima's northern region, you're quickly closing in on the end of Ghost of Tsushima. All that remains is seriously undermining the Mongol invasion by killing Khotun Khan himself--before he can get to the Japanese mainland. You'll need to gather your allies and more intelligence about the Mongols' plans across the last few missions of the game.
Below is the complete walkthrough for Act 3 (if you're looking for Act 1, it's right here; Act 2 is here). Check out the rest of our Ghost of Tsushima guides for rundowns on all of the Character Tales, Mythic Tales, and sidequests--as well as detailed guides for finding all of Tsushima's many collectibles and upgrades.
Ghost Of Tsushima News
- Ghost Of Tsushima Getting "Legends" Co-Op Multiplayer For Free
- Ghost Of Tsushima Review - Chaos In The Windy City
- Ghost Of Tsushima Mythic Tales Guide: How To Complete Them All
- + Show More Ghost Of Tsushima News Links (2)
- Ghost Of Tsushima Armor Guide: All Armor Sets And Locations
- Ghost Of Tsushima Walkthrough, Guides, Collectibles, And Tips (Spoiler-Free)
Wolves At the Gates
Near the fort is a Mongol outpost in White Falls Village, and if you haven't liberated it yet, you might want to stop and do so now to give yourself some breathing room in the area. It's not an especially tough outpost--you only need to eliminate all the Mongols--so clearing it while you're passing through it anyway isn't a bad idea. You'll find the Mahakala Mask Mongol Artifact in a round, open tent in the outpost if you do choose to liberate it.
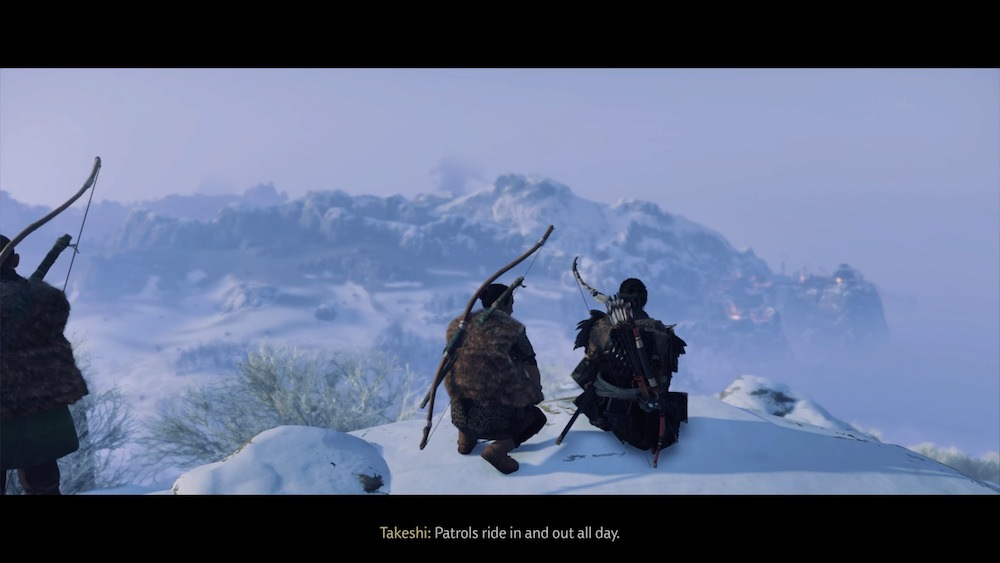
As you approach the fort, stick to the left side of the road, where you'll see tree stumps and the remains of an old logging camp. Your goal is to get onto the cliffs near the camp to get alongside the fort; use the collapsed roof of one of the buildings and your iron hook to make your way up to Takeshi. Survey the fort to allocate your forces, then head down and start taking people out. You're best off dropping the two archers on the ridge on the left to start with, as they're most likely to see you if you're trying to sneak around.
Once that's done, you're free to deal with the Mongols as you see fit--a straight fight isn't too tough a proposition thanks to the support of Takeshi's archers, but you can also pretty easily sow chaos with poison darts, arrows, and careful assassinations. Most of the enemies tend to stay together, so use the rooftops and tall grass to kill a few with poison and force everyone to start separating.

Clear this batch of Mongols and a patrol will return to the fort, giving you a chance to ambush them. After that, continue to the gate and you'll catch sight of Yuna's forces attacking the fort from the other side. You need to meet them and finish off the Mongols in the fort, but to do that, you need to cross a bridge between the fort's two main sections. That bridge is guarded by a hwacha, which makes a frontal assault tough. You can sneak under the bridge to deal with the hwacha if you prefer, but you'll be alone and greatly outnumbered.
Charging the bridge head-on, or sneaking over carefully, are both viable options. The sneaky option is probably the easier one to execute effectively. Use the iron hook to swing over to the cliffs on the other side of the bridge, and you can sneak around through the tall grass and get to the hwacha, while also finding an opportunity to slaughter a Mongol Leader. If you can get to the hwacha, you can start blasting the Mongols with it, making clearing the area for Takeshi's men pretty easy--especially because the Mongols are not very smart and seemingly won't immediately figure out that you're shooting them with their own weapon. Once you trigger fighting in this section of the fort, you can use the hwacha to eliminate Mongol reinforcements as Takeshi's men meet back up with you.
Fight down to the main gate and meet back up with Yuna. You've got plenty of allies at this point, so just finish off the Mongols to complete the tale.
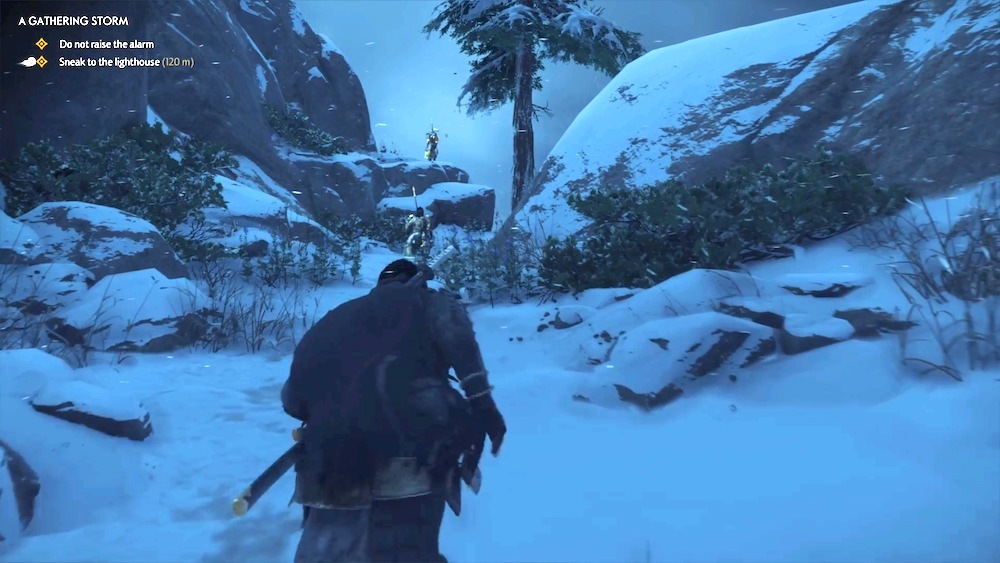
A Gathering Storm
Talk to Yuna at Jogaku Temple again to initiate the tale. You'll then be transported to Port Izumi, where your goal is to reach the lighthouse without being spotted. The path is pretty easy to handle--head through the purple flowers and bear right when you near the camp in front of the lighthouse. Sneak along the cliff, where you should find a series of enemies with their backs turned to you, who can be easily assassinated.
Things get a little dicier when you start to move through the camp, but not much. Use the slackline to get above the enemies and bypass the ones you can. Look for stands of tall grass to move through. You can assassinate enemies if you want, but make sure you're not going to get spotted when you do. Keep moving toward the back of the lighthouse--there are a good eight or 10 Mongols scattered through this area, but all of them should be facing and walking away from you, and if you happen to find more than one in a group, wait for a second out of sight and they'll separate. You can probably get all the way through here without killing anyone if you want to, but your assassinations should be almost entirely out of sight anyway. Just keep an eye out for a few guards in weird places, like the one that strolls around near the tent, or the one inside the wooden stable at the end of the ridge.
As you approach the small bonfire near the back of the lighthouse, note that you can grab the Milk Pot Mongol Artifact as you go. From here, you're pretty clear to slip in through the back of the lighthouse; eliminate the patrolling soldiers if you feel like. Once there, investigate the stuff on the ground floor, then climb to the top to survey the port and finish the tale.
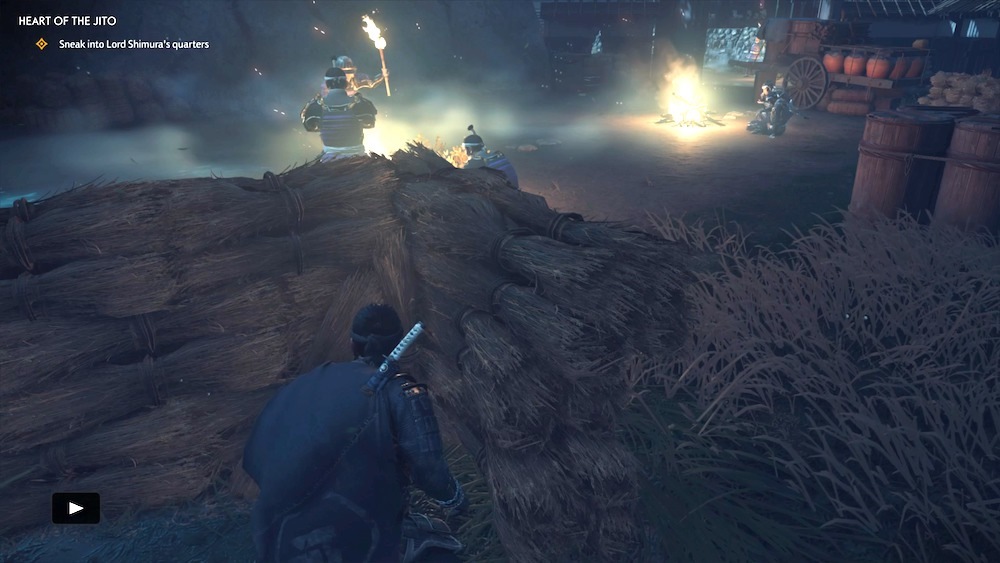
Heart of the Jito
Once again, return to Jogaku Temple and talk to Yuna again. Ride for Castle Shimura and approach it from the north, near the waterfalls, to activate a cutscene. Cross the river and climb up the cliff to get in behind the castle. Note that you can't kill any of the guards inside the castle, so you'll have to be very careful about not being seen.
Take the path left of where you enter through the gate and watch for patrolling guards. If you stay behind stuff, you can make it pretty easily to the water's edge and swim unseen under the bridge (you can use the crouch button to swim beneath the surface if you get spotted). From here, climb up on a crashed log and use the grapple hook to take the same path you did when infiltrating the castle last time.

Climb up the cliff and get to the building you find there, being careful not to alert the guard inside. You can climb up to the roof using the rock nearby, which lets you bypass the building and get to the garden path behind it. From here on, the key to this mission is patience. The guards will tend to move out of your way if you wait long enough, and further on, you'll have to wait for conversations to end before your path becomes clear.
Use the tall grass in the garden on the right side to hide yourself. As you move into the path area, the guard with the torch should move on from the bonfire where he stops, allowing you to sneak along behind the crates on the right side of the path until you can cross to another hole in the wall.
Carefully follow along the side of the keep until you can get inside. You'll want to follow Lord Shimura while staying out of sight. As he moves through the keep, guards will clear their posts to make way for him, allowing you to slip in along behind him up ladders. Keep moving with Shimura until you hit the room where he will meditate. From here, you won't be able to get to the ladder that leads to his quarters, so slip through the door at the end of the hall and climb out the window there.

You'll find two ladders that will take you up to the top of the keep--be careful of the guard running around at the very top of the building. Slip past him take the ladder inside the guard tower to get down into Lord Shimura's quarters. Drop off the note at the marked spot and you're done with the tale.

Eternal Blue Sky
One last time, you'll need to talk Yuna at Jogaku Temple. This is it--the big attack on Khotun Khan. Make sure you're ready for an extended story sequence before you commit to the tale.
After some cutscenes and checking in with your allies, you'll head to Port Izumi to kick off your attack against the Khan. Your first goal is to fight your way into the port and ambush the Khan's reinforcements. It's a standard battle with your allies, so use your tools to fight through and eliminate all the soldiers before regrouping with Norio and heading into the port.
Your path into the town itself is pretty straight and you'll need to be careful not to stray from where the game wants you to go, or archers will bombard you with arrows and kill you almost instantly. Follow the path down to the right into a frozen creek bed so you can sneak in without the Mongol soldiers noticing you. There's tall grass at the far end where you can hide yourself and get your bearings. In a general sense, you want to avoid the soldiers and get onto the rooftops of the buildings around you, while making your way to a watchtower at the end of this path. If you're careful, you should be able to largely avoid conflict, at least until you get to the base of the tower where a couple of guards are standing.
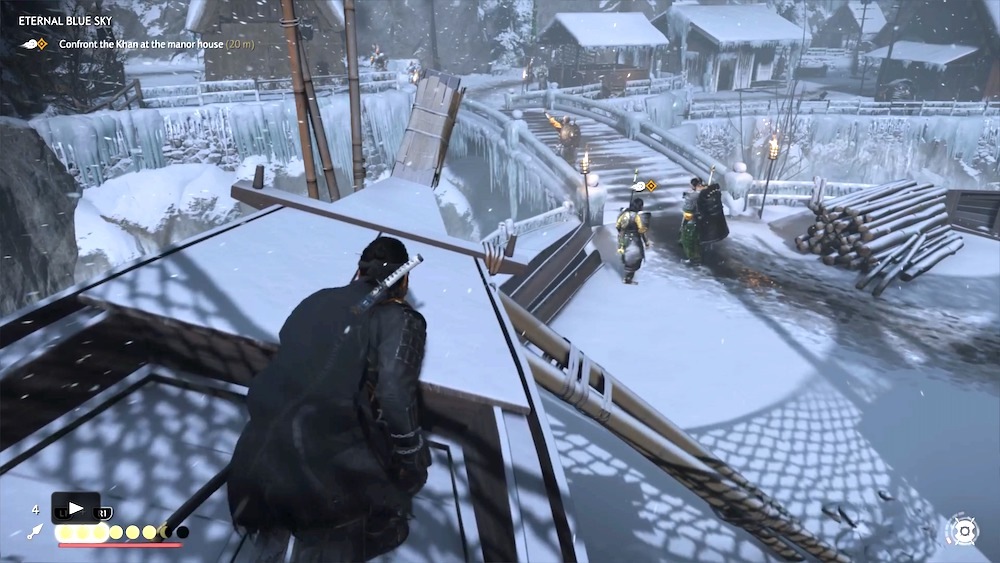
After the cutscene at the tower, make your way onto the roof of the building across from you, either by going inside and to the second floor, or by climbing up from the outside. You can use the rooftops here to bypass most of the enemies in the area, but you're going to have to fight to cross the bridge ahead. Upgraded chain assassinations are extremely useful for avoiding fights here as well. At the bridge, fight through the soldiers and continue to the right to find the gate to the manor house, and beyond it, Khotun Khan.
Duel With Khotun Khan
You've come a long way since your fight with the Khan on the bridge, but he's still not easy to deal with. He has several unblockable attacks with weird timing that can trip you up if you're not careful, and he hits hard. He's also very fast with his spear, which can make parries tough.
First, note the Khan's unblockable attacks, specifically the wide, low sweep move he likes to throw at you. This one you can jump, but he'll often follow it up with a combo of two more sweeping unblockable blows that you'll have to dodge. If you can, it might be better to just roll clear altogether, but if you can manage to dodge all three, you can get in some hits when the Khan is vulnerable afterward.
Khotun Khan also likes to come at you with a flourishing, spinning attack that ends in a vertical unblockable blow. The trouble with this one is that if you dodge early, he can adjust and hit you with it. When he starts to spin, wait until the last possible moment to side-step and you'll have a free chance to wail on him. Go too early, though, and you'll take the hit, not him.
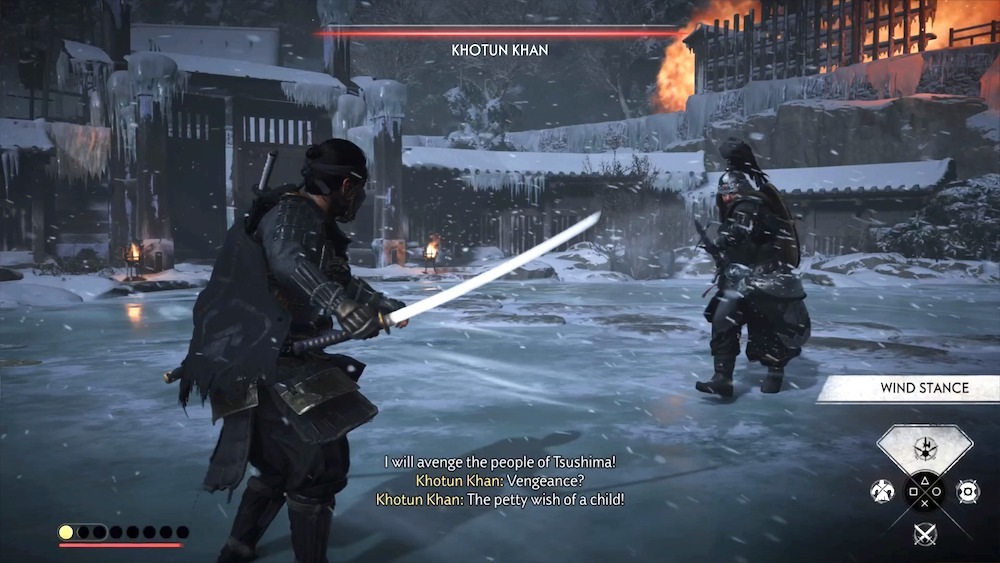
Armor is also an important consideration in this fight. If you've been using the Ghost armor to sneak through the Mongol camp, you should switch over to something that'll let you take more punishment, like the Samurai Clan Armor, Gosaku's Armor, or the Sakai Clan Armor. The Samurai Clan Armor is probably best, as it'll convert damage you take from the Khan into Resolve, so you'll have more opportunities to heal yourself.
As you progress in the fight, Khan will add some blue-tinged spear strikes that are blockable if you've upgraded your Wind Stance. Parrying these provide more solid opportunities to do damage, so watch for them. When you get Khan down to the end of his health bar, he'll make a run for it, changing up the battle significantly.
Khan's Last Stand

The Kahn retreats to his ship and you'll have to fight him again, but this time, you'll face him as if he was a Mongol Leader enemy flanked by a bunch of guards, instead of as a duel--making the situation significantly tougher, as you'll need to keep an eye on a lot of enemies at once. Fortunately, you also get access to all your Ghost tools and weapons, as well as opportunities to use the environment to your advantage. Use every trick in your arsenal to win the fight. Where Samurai Clan Armor was a good bet in the last fight, you might want to consider the Ghost Armor here. If you can rack up a few kills in a row, you can activate Ghost stance to kill even more of the soldiers flooding the fight, or to get some big hits in on the Khan without dealing with him blocking them. Defer to your preferred playstyle and make armor choices accordingly.
First, fight through the guards and chase the Khan up onto the ship. There, you'll want to prioritize dealing with his soldiers quickly. You'll have a batch of three or four tough enemies to fight to start with, including a Mongol Leader. Eventually, while you're engaged with them, Khotun Khan will come after you to take advantage of the distraction. Look for explosive barrels and other opportunities to kill lots of enemies in a hurry; there are more barrels hanging over the battlefield that you can shoot down.
After you drop the first batch of enemies, you'll fight the Khan while more enemies start to join the fray. He uses the same set of moves you saw during the duel, but now you'll have lots of space to move well away from his big attacks and more opportunity to counter him. He'll also attack more slowly, in general, giving you an opportunity to put space between you and him and hit him with your other weapons if you need to.

Keep hitting the Khan and you'll trigger a cutscene, which also sends a bunch more enemies streaming in while the Khan takes a break. Prioritize archers, as usual, as they'll be very annoying during this fight. They like to take positions higher up on the decks of the ship, but they also stand next to explosive barrels, making them easy to dispatch. You might also want to try to use arrows to snipe out the larger Brute enemies before they have a chance to irritate. Note that there are refills on all your consumables scattered around the ship's deck, so don't be afraid to make liberal use of explosives, arrows, and kunai. After you kill enough enemies, some flaming debris will fall and wreck one side of the ship's deck, so keep your eyes open to avoid it.

Continually thin out the soldiers and then focus on the Khan with parries and counterattacks. He has a ton of health, but you'll be able to whittle it down and sprint away if things get too hairy. When you hurt the Khan enough, you'll see a prompt to hit the Triangle button, which will cut his spear down into a more sword-like blade. Khotun Khan will pull his shield at that point and starting lighting his blade on fire, so change your stance and tactics accordingly. At the same time, a bunch more archers will show up--try to run clear of the Khan and take them out quickly. Try to use the archers to get your Ghost stance up, which can help you finish off the Khan once and for all.
It's cutscene time, before you wrap up some final loose ends.
The Tale Of Lord Shimura
As you might have guessed, the situation with Lord Shimura and the shogun is ongoing. Meet Lord Shimura at Omi Lake.
Most of what follows is story content, but you will have to fight one last duel. Lord Shimura utilizes all the techniques you saw from other samurai and ronin throughout the game. He moves very fast with unblockable attacks, so be wary of them--if he raises his katana above his head, he's likely about to come at you with a very fast overhead strike that starts a three-hit combo; dodge the first two and parry the third. Likewise, placing his katana in its scabbard signals a likely three-hit unblockable combo that requires fast sidesteps (but you can interrupt it with a Heavenly Strike). Shimura also likes a thrust move with slightly delayed timing, but this one is blockable, and you can parry it if you get the hang of its speed.
Keep parrying and countering and you should win the duel before too long. At that point, you'll wrap up Ghost of Tsushima's main story campaign. After some cutscenes and credits, you'll be returned to the game world to wrap up any other loose ends. Check out our Ghost of Tsushima guides to complete all the tales, find all the collectibles, and earn all the hidden Trophies in the game.
Got a news tip or want to contact us directly? Email news@gamespot.com
Join the conversation