Gears of War Walkthrough
It's time to kick some alien butt in Gears of War, and GameSpot's Walkthrough will tell you precisely how to do so.
Design: Randall Montanari
Owners of the Xbox 360 have been looking forward to Gears of War since well before the console even hit shelves. First announced way back in June of 2005, the title was one of the most promising pieces of eye candy that Microsoft had lined up for their upcoming console. With the Unreal Engine 3.0 and the power of the Xbox 360, Epic Games promised to deliver one of the most graphically impressive titles in the history of console games.
Now that Gears of War has finally hit shelves, almost a year and a half after its existance was revealed, we can definitely state that this is definitely in the running for prettiest game ever. What’s more, though, it also plays pretty well! In the game, you take on the role of Marcus Fenix, a tough-as-nails ex-con and former soldier, who’s busted out of prison to help his former squadmates defeat the Locusts, a civilization of aggressive subterranean beings that previously busted out of the ground all across the planet and started slaughtering the populace. To counter-act the threat, humanity wiped out most of their own cities in the hopes that this would contain the beasts, and now the two sides are left with little to do but fight over rubble and ash.
But fight you must! Gears is a somewhat slower-paced game than most of what Epic is known for, and you’ll find yourself quickly taken down if you attempt to fight out in the open; taking cover and firing from behind obstacles is the name of the game here. That said, there’s still plenty of gore and fireworks for the shooter fans out there; you’ll just have to be a bit more careful about how you go about obtaining them. GameSpot’s Game Guide for Gears of War will guide you through the entire single-player campaign from start to finish.
General Tips
Weapon Selection
You’ve got a number of different weapons to choose from in Gears of War, from a lowly pistol to the mighty Hammer of Dawn. You can only pick up two weapons at a time, though; you’ll be familiar with this mechanic if you’ve ever played Halo. (You will have a separate slot for pistols, though.) Here are quick descriptions of all of the major choices.
Lancer

The Lancer is the famous chainsaw-machinegun combination that we’ve seen in so many trailers and promo videos for Gears of War. It’s the one weapon you should pretty much always have in your inventory, mostly due to its accuracy when used in aimed mode; you can direct a tight stream of fire at almost any enemy you spot, with the accuracy only fading away at long distances.
The chainsaw attachment is cool, but it’ll get you into trouble if you try to use it too often, since getting shot while revving the blade will stun you momentarily and normally ensure your death. It’s best to use it on wretches, which can’t fire at you and will thus run right into you and get sliced. For other enemies, you can use it when someone is crouching on the other side of a piece of cover and jumps over to your position, or when an enemy is firing on one of your teammates and doesn’t see you coming. It’s an instant kill, obviously, but you’re locked into place while it cuts, which can let other enemies pile on the hurt.
Gnasher
Your standard shotgun. Doesn’t do anything at medium or long range, except throw a bunch of metal at everything but your target, but close up, this is capable of completely gibbing your foes. Let your foes get close, then bust a round or two into their bodies to finish them off. The reload time can be substantial, so try your best to obtain an active reload.
Torque Bow
A tricky weapon to use accurately. Much like Rambo’s famous rocket bow, the torque bow fires explosive-tipped arrows which can attach themselves to enemies, resulting in an instant kill when they detonate a second later. The trick here is that you have to prime the weapon by holding down the attack button; after a couple of seconds, the reticule will change from blue to red, indicating that the arrow is ready for impaction. (If you fire the arrow before it’s fully charged, it’ll simply bounce off of whatever it hits, but it will still detonate.)
The bow can be used as a means of indirect fire. If you know an enemy is crouching behind some cover, firing an arrow at the ground nearby can convince him to move on, or kill him. The drawback is that you’ll constantly have to be charging up arrows. You can’t just hold down the button, either; if you do so you’ll automatically launch an arrow after a few seconds.
Perfect active reloads will let you prime arrows much more quickly, so be sure to attempt them if you’re in a tight spot. This is arguably the worst weapon for close-up encounters, since even the sniper rifle can be snap-fired at close range with a good chance of hitting.
Boomshot
The Boomshot is the rocket launcher/grenade launcher that's dropped by the Boomer enemies in the game. In areas where you encounter multiple Boomers, you can accumulate a good amount of ammo for it, but normally ammo (as well as the weapon itself) will be scarce, as the only way to obtain it is off of dead Boomers. When fired, it'll launch a shell a good distance away, but these shells do have a dip in their trajectory when fired, making it sometimes difficult to hit your target accurately. (Oddly enough, when Boomers fire this weapon, their shells go perfectly straight.) Just keep in mind that launching a shell at a nearby enemy will result in you taking splash damage, as well.
Hammerburst
This is the locust machinegun, the weapon you use in the tutorial section of the single-player campaign. It’s a decent enough weapon, but its burst-fire mechanism will prevent you from quickly laying fire on enemies that leave cover. When you start Act I, you’ll have the Lancer and will likely only use the Hammerburst until you find something more suitable to pick up. It reportedly deals more damage than the Lancer, though, even when you account for the gap between bursts of fire, so it may be a better choice for use on higher difficulty levels.
Longshot
The game’s sniper rifle is named the Longshot. It’s...a sniper rifle. You can aim it with the left trigger, then zoom in by clicking on the right analog stick. BOOM headshot! The reload time on this is rather drastic, so be sure to get a perfect active reload for even more damage on your next shot.
The Hammer Of Dawn
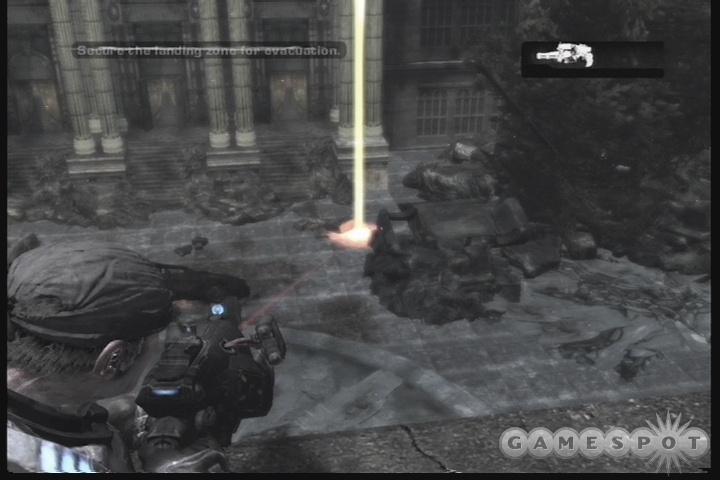
The Hammer of Dawn (sounds like it should be a ship name from Halo) is a situational weapon that you’ll use from time to time in Gears of War. You don’t fire it, so much as you paint a target with the laser pointer that pops out; a few seconds later, the military satellites will blast the area you’ve painted with pure energy, killing anything around. (You can only lock on to enemies or their immediate area; you can’t just fire at any random point on the ground.) The Hammer is required to kill some of the bigger enemies, like Seeders or Berserkers, but does a heck of a job against drones and other weak enemies, assuming you can fire it off before they kill you. It can also seal emergence holes when fired into them.
Cogtags
You may notice that there are plenty of glowing blue Cogtags scattered around the areas of the single-player game. These are the tags of fallen soldiers, and represent the game’s nod towards a collection scheme. Many of them are fairly obvious to find; all are located near the red Gears markers that you'll spot as you play through the game. Many of them are located underneath furniture, so if you're hunting for yourself, chop through desks, sofas, and other wooden items with your chainsaw or melee attacks to reveal what lies beneath.
At any rate, the Cogtags are only worth collecting if you’re interested in getting achievement points; they don’t offer up any kind of real in-game benefit to you like you might expect from collections in games like Grand Theft Auto. That said, you should be able to earn two of the achievements (out of three) by following our walkthrough. If we discover where the extra ten Cogtags are, we’ll update the guide.
Blindfiring and Blindthrowing
Getting behind cover is a basic technique in Gears of War; when you’re behind a wall or low barricade, you can tap A to duck behind it to grab some cover from the advancing alien horde. While you’re behind cover, you can hold the left analog trigger to pop up and aim your weapon at anything you like; you’ll get good accuracy, but you’ll be exposing yourself to return fire.
If you want, though, you can simply hit the right trigger to fire your weapon without popping out. This is known as blindfiring, in that you can technically fire your weapon, but will be doing so without seeing where you’re aiming at. Of course, since this is a third-person game, you can actually see where your bullets are hitting. The impact of blindfiring, though, is that your bullets will be a lot less accurate than they normally would be; the spread will be bad enough to make this only deal light damage to any enemy beyond a few meters’ distance.

That said, the Lancer will put out enough rounds to make blindfiring with it sometimes a handy course of action, especially on enemies that aren’t too far away. The Boomshot, though, can be quite powerful when blindfired if the enemy is only a short distance away. Since blindfiring can be pulled off much more quickly than regular firing, you can snap off a shotgun round into the face of anyone waiting on the other side of the cover you’re behind and stand a good chance of popping the head off of your target.
The one weapon that’s perhaps better when "fired" blind is the grenade. Aiming a grenade is a laborious process, and one that doesn’t often work out properly anyway; you’ll get a guideline indicating where the grenade will likely wind up, but more often than not, the grenade will bounce off a corpse or an enemy that runs in its path and wind up far afield of where you wanted it. If you blindthrow a grenade, though, you can launch them out way more quickly than you can when you aim them, and do so without exposing yourself to fire. They might not always kill your enemies, but if you get used to throwing in this manner, you can often chuck the grenade near an enemy or group of foes, forcing them to dive out of cover. Be sure to quickly switch over to your Lancer and finish them off while they run!
Act One: Ashes
Tutorial
There’s no lengthy cutscene at the beginning of Gears of War; you find yourself getting busted out of prison and then immediately start fighting. Well, we’re lying to you; you’re going to be able to choose between picking a combat mode or the game’s tutorial. The tutorial is only needed if you haven’t played the game before; it’ll guide you through the game’s basic mechanics, such as firing your weapon, mantling, and so forth. If you’ve already played Gears before, feel free to select the combat option and get right into the fight.
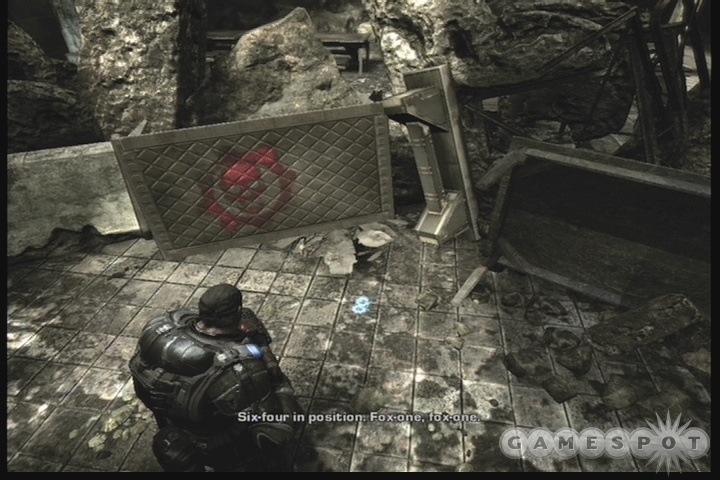
In the first room that you enter, where the helicopter flies over, you can find the first set of Cogtags near the red marker on the rubble in the area. These are items that you can pick up with the X button. They don’t do anything for you, but we’re betting that they unlock an achievement if you manage to grab all 30 of them. We’ll mark as many of them as we can; if you wander past one that we don’t mention, feel free to throw us a line at the Feedback link on the table of contents.
Whether you take the combat or tutorial route, you’ll eventually pick up some grenades and be placed inside a large room where the Locusts will cut through a door to attack you. If you aim a grenade at the door and throw it just as it comes down, you’ll be able to kill one or two of them as they come through; finish off the rest, then look around for another red Gears marker to find another set of Cogtags.
Out in the courtyard, a third Cogtags can be found if you take the stairs to the right of the exit and poke around in the corner of the small raised area there. A stronger Locust ambush will take place here, so be ready to pop some heads. It may be tempting to move along the raised area and attempt to flank the enemies, but if you’re playing on Hardcore mode, you should stick near Dom to revive him if he gets hit.
When everything’s dead, head towards the helicopter for your evac.
Trial By Fire
There are some whispers of backstory here on the chopper, but those will end soon enough when you hit the ground. You finally get your nice little chainsaw gun here, so get ready to chop some people in half.
Take cover after the cutscene ends; the chopper will finish off the locusts in the area before flying away, allowing you to charge up the stairs unhindered. Be sure to grab a locust weapon before doing so, though, since you now have an empty weapon slot.

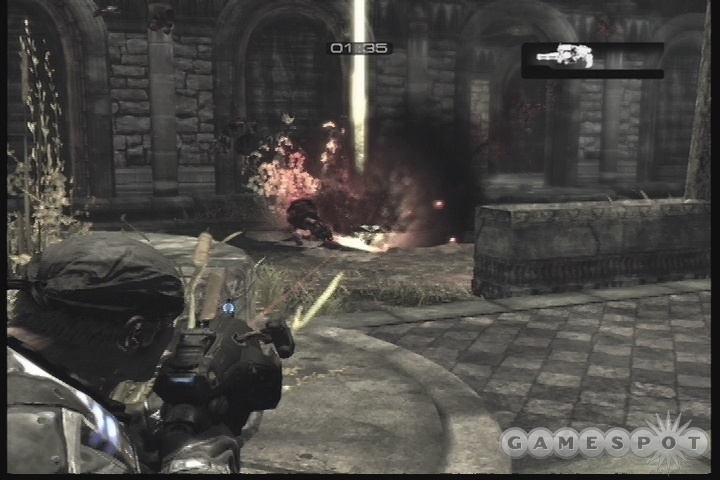
When you clear the first building and fight off your first locusts, note the appearance of the red crate; a set of Cogtags are on the ground nearby. Grab the ammo and head up the nearby steps to reach the next checkpoint. You’re going to have a lot of Locusts in front of you. Let your squadmates do the hard work of advancing forward; you can move off to the left, behind the pillars, and attempt to flank the enemies. Note that your first Emergence Hole will pop up here; when you see large holes opening up in the ground with locusts coming out of them, you have to throw grenades into them to close them up. They’ll close up eventually on their own, but fighting off the forces they disgorge before they do so can be difficult.
When you get past the church, cross the small bridge nearby to get eyes on some bodies, which are apparently the remains of Alpha Squad. Some of them, anyway; there are too few bodies to account for everyone. You’ll have to get closer to check them out, which means that you’ll have to head into the nearby church-like structure. Two emergence holes will open up here; another set of Cogtags can be found on the floor near the window by the exit from the structure.
Fish In A Barrel
When you reach the bodies, you’ll shift off into the next sub-section. When you retake control of your team, you’ll be facing off against a Troika machinegun that’s been set up nearby. Flanking it is fairly easy if you head around to the right and take it out from behind. You can flank in the same manner when you run down the street and encounter more locusts.
There’s an empty fountain at the end of the street; when you get close, emergence holes will start opening up, one after the other, until four or five of them have come up in total. There are four grenades here, with two coming inside the fountain and two appearing in one corner of the area, near the large pillar with the statue on top of it. (There’s also a set of Cogtags on the ground near these grenades.)
Fork In The Road
It doesn’t severely matter which path you take here; you’ll only be split up for a short time. If you head left, you’ll fight through some rooms, but will be able to wait for support from the team on the right if you’re playing co-op; if you head right, you’ll come to a Troika and will need to wait for the team on the left to get into flanking position to kill the gunner.
Soon after you meet up with your team again, you’ll have to take on another Troika. This one’s set up without many obvious ways to flank it, but if you head through the corridor to your right, you’ll be able to run up through the room and kick in the door leading up the stairs to where his spotter is. From there, you can proceed to lay waste to the gunner, either with a grenade or your normal weapons. Kill everything that moves, then hop into the gun and turn it back the way you came from to nail the locusts popping up from the emergence hole behind you.
Knock Knock
Make your way across the street to the large building across the way, but be sure to stick to the left side of the path as you do so. You can find a set of Cogtags near the van with the red Gears marker on it; they’re in the corner of the steps, near the large gash in the road. Stick to the left and run your way up to the leftmost set of sandbags, where you’ll be able to flank the Troika that gets set up by the locusts as they flood out of the building. You’ll still be a bit too far away to accurately hit them, but you should be close enough to drop a grenade on the gun itself.
Alternately, if you’re on a harder difficulty level, you’ll actually want to stick to the right side of the approach. Shortly after the fight is joined, the doors on the right side of the building will pop open, revealing a locust or two that’s packing the shotgun weapon. Grab it if you like, then make your way through the building to kill off the locusts inside, finishing off your journey by popping the gunner on the Troika. After that happens, you’ll need to grab the gun itself and fire away at the enemies that approach your position.
Hammer
Shortly after you enter the House of the Sovereigns, you’ll run across Augustus Cole, the one and only Cole Train, apparently some famous athlete before the war. He’s going to be in a spot of trouble at the outset, so head down the steps when the Lt. opens the doors and kill off all the locusts in the area.
The next hallway you come to, where Jack is used to pop open the doorway, will house an ambush of Wretches. Stay at the far end of the hallway, near Jack, and use your Lancer to take them down from a distance. When you hear the "multiple contacts" yell, though, turn around and use your shotgun to blast the wretches that come up out of the hole in the ground nearby. They’ll come up one at a time, allowing you to boomgun them back into the pit as they arrive. There’s another set of Cogtags at the end of the hall, near the vent through which the wretches were arriving.

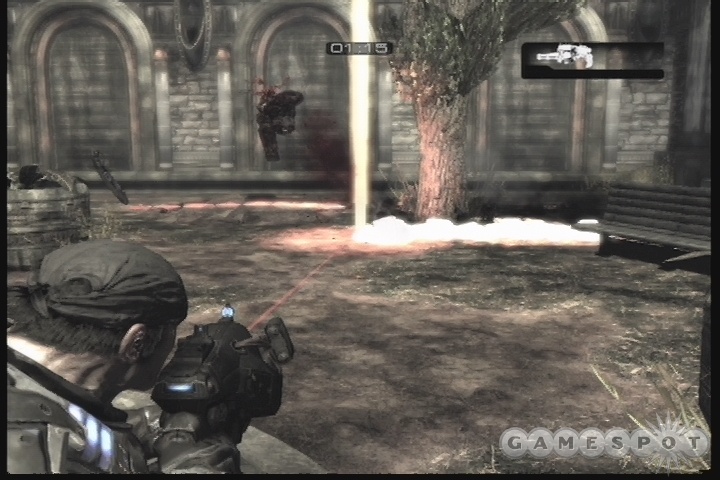
In the next room, grab a Hammer of Dawn weapon near the door’s exit, replacing it for your shotgun. It’ll come in useful when you face off against the Seeder outside. To fire it, target your enemy and hold down the attack button; it’ll take a couple seconds to prime, then it’ll fire a beam from your satellite overhead. Be sure to keep the attack button held down, or the beam will cut out before it’s finished firing! The Seeder here will require at least two fires to kill; it’ll launch drones at you while you’re attempting to kill it, so you’ll have to rely on your teammates to fire at them and knock them down. Luckily, you can also use the Hammer to pop off enemies behind cover; just fire in their direction and move the reticule until you start hearing the lock-on sound. When the weapon goes off, any locusts nearby will be blown to smithereens, even if they’re not visible to you.
After moving around the walkway here, you’ll come to another Seeder. Hang back in the doorway here and let your teammates move out first; you should be able to lock on to the Seeder and kill it without exposing yourself to fire. When it’s down, finish off the wretches and locusts, then head down the stairs and past the body of the Seeder to move on.
After fighting your way through the church and finding Rojas’ body, check the area for another set of Cogtags on the ground in one of the corners of the room.
Wrath
The third Seeder is up ahead of you. You’ll have to expose yourself to fire somewhat to get eyes on it, but there’s not much; either it dies, or you do. Don’t worry overmuch about the locusts across the way; let your soldiers deal with them. They’ll all die when the Seeder does, so it should be your primary concern.
Move back into the building and through the door that the locusts come out of. Start making your way through the corridors, killing anything that moves. Along the way, you’ll be able to trade in your pistol for a magnum, which is an upgrade in firepower but a downgrade in firing rate, as is so often the case.
Eventually you’ll come to a long corridor with another Troika in it. Flank into the right corridor that runs alongside it, and you’ll eventually come out behind the gunner, letting you kill him and take control of the gun for yourself, the better to fend off the incoming wretches. Let your teammates worry about the enemies on the ceiling; just keep firing away at the enemies on the ground. If anyone manages to get close to you on the ceiling, they’ll almost always drop directly in front of you, so lock in that target zone and hit them as they fall. From there, take the stairwells down until you reach a small meeting room that the locusts have holed up in. Keep in mind that you can flank them by following the corridor to your left.
After passing through the Parliament room, you’ll come to a set of Troikas. Go ahead and get on top of one and go crazy! There are locusts on the ground and nemacysts in the air, but you can go ahead and concentrate on the locusts; there are plenty of them to shoot. Your teammates will deal with the nemacysts effectively enough. If one of the locusts hides where you can’t shoot it, grab the Hammer of Dawn weapon on the ground, aim it as best you can near him, then fire away to blow him to smithereens.
China Shop
With the lengthy cutscene out of the way, you’ll be trapped inside a building with a Berserker. If you watched the cutscenes to their end, you’ll know that these fine ladies are immune to your weapons; you’ll have to engage in a spot of trickery to finish it off. Be sure to grab one of the Hammer of Dawn weapons near the start of this level.
Note that there are no fewer than three separate Cogtags in this area. One is in the first small hallway, where the nameless soldier gets eviscerated, one is near the second or third doorway that you have to get the Berserker to smash, and one is in the final courtyard where the Berserker gets dead. You have plenty of time to grab them, assuming you can track them down.
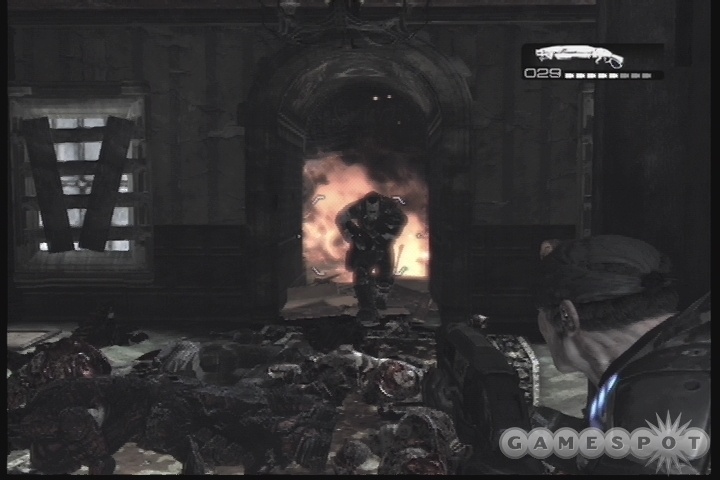
Move along the corridors until the Berserker pops out of the wall. At this point, hang a right and start running down the corridors you spot. Every so often, you’ll come to a "smashable wall". These walls aren’t smashable by you, but the Berserker is definitely tough enough to bring them down. What you need to do is stand in front of these doors (there are three in all), lure the Berserker towards you by firing at it, then quickly dive out of the way right before it gets to you. When timed properly, you’ll avoid damage (most contact with the Berserker is an instant death), and the Berserker will smash into the door, causing it to fly off its hinges, allowing you to move on.
You have to repeat this process three times in order to finally clear out of the building. Don’t worry about Dom; if he dies, he’ll come back to life when you hit daylight, and he’s not needed for the real combat here. (On Hardcore or Insane difficulties, though, the Berserker will gib Dom if he goes down, forcing you to restart. Be sure to revive him if he goes down on those difficulties.) If you do manage to make it out to the sunlight, though, equip your Hammer of Dawn and wait for it to stop moving before locking on and firing at it. Like the Seeders, the Berserker will require two hits before it goes down for the count, so roast it!
Act Two: Nightfall
Tick Tick Boom

You have to get to the Emulsion factory before you can plant your sonic device. Unfortunately, it’s around ten kilometers away; too far to walk in any kind of reasonable amount of time. Dom’s got a plan to get you there quicker, but you’ll have to ditch your Hammer of Dawn weapon; the satellites are not overhead anymore. D’oh! The weapon is useless, then; ditch it out for a shotgun near the beginning of the level.
The two paths here are going to offer up unique challenges. The left path will take you into direct contact with a pair of boomers, which are large, beefy enemy soldiers that wield rocket launchers, while the right will let you fire on them from above. The left-hand path is the more dangerous, but the boomers can be taken out if you drop enough grenades on them. You’ll also have the benefit of being able to pick up the rocket launchers before moving on. You’ll finally manage to regroup after taking out a Troika; kill the locusts manning it, then find the silver door nearby and kick it in to move on. Chainsaw the sofas in this area before heading outside to find a set of Cogtags.
Grist
As soon as you enter the exterior area here, a boomer and a number of locusts will attack you. Don’t move too quickly here; just wait for the boomer to fire his rocket at someone else, chuck a grenade at his feet, and finish him off with weapons fire. There are going to be snipers set up around the corner to your right, so proceed cautiously, using the trees for cover, until you get to the bottom of their building and then use grenades to clear them out.
Move through the warehouse here, but when you reach the stairs leading down, where you get attacked by the Wretches, head down to the bottom of the steps and check underneath the walkway for another set of Cogtags.
Around the way, another boomer and locust set will attack you, so deal with them quickly and grab the boomer’s launcher. You may not need it in the next section, but it couldn’t hurt. When you reach the bridge nearby, a Troika will immediately start firing at you. To get close enough to take it out, hit Y to scope the "pushable car", then crouch behind its trunk and start tapping x to push it along the road. You’ll stop near a piece of cover off to your right. If you’re careful, you can look around to the right and throw a grenade up onto the Troika’s little platform and blow the gunner to hell. After that’s done, start advancing down the street, but be careful, as an emergence hole will appear behind the truck down there. You can close it up with a grenade, but you’ll probably have to make a lengthy throw. Otherwise, you can just fire away at the enemies until they stop popping up.
When you move down the road a bit, you’ll come to a Stranded gatekeeper. Before talking to him, check behind the newspaper bins between the trees on the sidewalk to find some Cogtags. When you enter the compound, you’ll find Franklin, who’ll loan his vehicle to Dom in exchange for leaving some of your troopers in the encampment.
Outpost/Lethal Dusk
The "Outpost" section of this level is long enough for a conversation with Franklin, but you’ll almost immediately switch over to the "Lethal Dusk" section after that. When you kick out the door nearby, you’ll come out to an exterior area. There’s a sniper in the little shack across the way; chuck a grenade through the door to finish him off, then grab his sniper rifle if you like.

Down at the river, you’ll find a hand-cranked transporter; you need to get on board, stand near the crank, hit X to latch yourself on, then hit A to start moving across the river. The walls of the transporter and the shaft that holds the handle will keep you safe from most of the fire, and Dom will cover your ass as well.
When you get to the far side of the river, things will have changed a bit. Remember that movie Pitch Black? Well, welcome to a retread of the basic plot there: if you stay in the light, you’re fine, but if you veer off into the darkness, you instantly get cut down by the Kryll, which are essentially vicious bats. Luckily, the same holds true for the locusts. Get used to running from light source to light source.
Checkpoint 1
You’ll reach Checkpoint 1 shortly after you cross the river. Stock up on supplies, then head through the nearby building to find an emergence hole. As Dom says, you can shoot the propane tanks scattered around here to make more temporary light for you to run from. If you make a little path towards the barricades at the end of the street, you’ll have a better shot at the locusts that are coming up, and might even be able to plug the hole with a grenade. When the hole fills in, walk across it and shoot the propane tank in the shed nearby. If you run across to it, you can find a set of Cogtags.
Start making your way down the road, shooting propane tanks as needed. (If there’s a dark patch ahead of you and you can’t see a tank, usually it’s hidden beneath some rubble, so shoot around as best you can.) When you reach the first ruined car here, a Troika will open up on you. There’s no flanking here, so you’ll have to either snipe the gunner out (aiming for his legs is the best bet from this distance) or attempt to run up the right side of the alleyway and get close to him that way.
There’s a checkpoint in the building nearby. Head past it and reach the next emergence hole, which is on the other side of a patch of darkness. You’ll have to move through the tunnels nearby to flank the soldiers, although getting a grenade angle on the hole while protecting yourself from the locusts will be difficult. When you’re ready to move on, blast the propane tank in the alleyway and use it to guide your path to the next doorway.
Another pushable car is on the street outside; it has a light attached to its front, which will let you get down the street a bit and avoid the Troika fire. If you book it into the hallway nearby, you’ll be able to flank the gunner and bounce a grenade or two into his room, finishing him off. In order to move on, you have to head down the alleyway behind this area, but first, run into the corridor behind the Troika’s room and shoot the propane tank from the window there; that will light the way and let you move on.
Firefight
After the short communication with Anya, head outside and stick to the lighted areas while you take on the locusts. It may appear that there’s no way to cross the middle ground here, but there are indeed a pair of propane tanks hidden behind the chests of drawers in no-man’s land. Shoot them, then either throw a grenade in the emergence hole (it’s in the middle of the far street, if you can’t see it), or just kill off the locusts until it fills in on itself.

Move down the nearby street, checking for propane tanks behind cars, until you come to a broader thoroughfare. As Dom points out, it’ll be dark almost everywhere, but luckily, there’s a spotlight that’s powered up on one of the nearby building. Before heading off to it, though, note the Cogtags that appear off in the darkness nearby. You can’t get them yet, but you’ll be able to do so soon. Get up to the spotlight and aim it at Dom until he makes it to the building on the far side of the street. He’ll be able to turn the Chinese lights on, which will let you cross yourself, but first, aim the spotlight back at the Cogtags, then run outside and grab them. Wretches will attack on your way down, so keep your chainsaw revving while you move out.
After bypassing the next emergence hole, you’ll meet up with a drunken fool who promises to run the lights for you while you move down the street. Seems like an awful burden to place on a dude you barely know.
Dark Labyrinth
Start making your way through the house, avoiding any particularly dark areas. You’ll come to what seems like a dead end, with a dresser blocking the doorway. You can’t move the dresser, but you can shoot it till it blows up real good. Do so and move on. It won’t be too much longer before you make it through the house and hit the street again. Use your view key to take an eye on the pushable car down the way. You won’t actually be able to push it, though; if you shoot the tanks in its rear seat, it’ll blow up and start rolling on its own, so get after it; it’ll roll down the street, all the way to the gas station. Note that there's a set of Cogtags in the darkness to the right of the car here; you have to shoot the tank in the car, grab the Cogtags, then quickly follow the car down the street if you want to nab them.
Powder Keg

Speak to Chap in the gas station to get your orders: you have to hit the fuel pump in order to gas up the Junker. Doing so is easy; surviving the locust counterattack is a bit less so. You’re going to face three waves here, one of locusts, one of a boomer and wretcheds, and another one of locusts. It’s generally best to just stay inside the gas station while these attacks are going on, especially for the wretcheds; you can focus your Lancer on the front door and blast them as they come in to get you. Lack of mobility isn’t much of an issue here, but you’ll want to move outside to take down the boomer, assuming Chap doesn’t do it for you; his magnum is awful strong, it seems.
Burnt Rubber

Time to take control of Laverne for a ride through the night streets. Kryll are out in force, so you’ll have to use the Junker’s UV turret to fight them off. In single-player mode, you have to switch from the driver’s seat to the turret by hitting X, then using the right-click mode to fire; right-trigger will make you go forward when you’re actually behind the wheel.
Keep in mind that the kryll will occasionally come from behind of you, and do so almost exclusively after you get past the off-road excursion area. Just hit the switch button, rotate around quickly, and fire your UV lamp. It requires about as much charging time as it does firing time, but it flips on and off pretty quickly, and it doesn’t take long to fry your targets, so get the job done. If you sit still for too long, the kryll will fly right into the damn car and start bugging you! Make a couple of quick 360s with the UV lamp when this happens, then switch back to driving mode and move on a bit before turning around and firing at them as they follow you.
Last Stand
There’s one heck of a fight coming up here. Get up close to the Stranded bulwark and do what you can to help out. On Casual difficulty, getting into the Troika and getting all Denny Blaze on the asses of the locusts in the area. Otherwise, there are a couple of sniper rifles in the area, which will let you sit back, pop heads, and hopefully duck behind cover before anyone makes you. You should be close enough to hit most of the enemies without bothering to zoom in.
After taking out a couple dozen locusts, a trio of boomers will appear underneath the facility through an emergence hole. You can take them out the hard way if you wish, but if you look up at the wall, you’ll notice a huge fuel tank that rolls along and starts dripping fuel. Shoot out the wall beneath it to reveal some propane tanks; if you shoot them, you’ll cause the larger tank to drop down and onto the boomers, finishing them off right away.
Act Three: Belly Of The Beast
Downpour
As you’ll find when you walk into the rain towards the factory, the only entrance to it is locked, and it’s surrounded by irradiated wretches. These wretches are somewhat more hardy than their previous forms, and explode when they die; in other words, don’t use your chainsaw on them.
After a few skirmishes, you’ll come to a metal walkway, which will bend left and come out to a larger array of buildings. If you scout around a bit behind the buildings, you’ll note a dock that stretches out over the water; you can find a set of Cogtags at the end of it. Before heading into the elevator, move into the far building and switch the power on at the control panel. With that done, head back to the elevator, take it up, then move into the factory via the window.
Evolution
Find the door with the green switch near it to move on. Eventually you’ll find a room full of corpses; nearby you’ll find a Stranded. He’ll lead you on through the facility for a while until you find a room full of wooden planks. What kind of backwards-ass planet was this anyway? A generator room with a wooden floor suspended over a sewer?
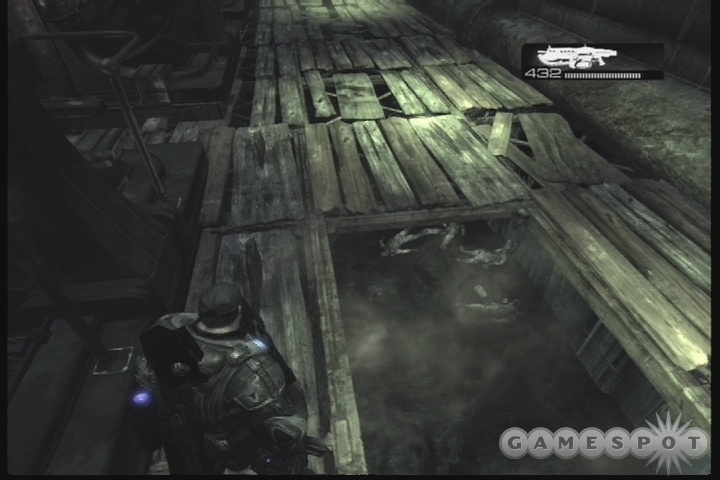
Anyway, if you walk on a weakened board here, it’ll give way beneath you and drop you into a room full of wretches. Don’t bother fighting them if this happens; look in the corners of the room for the ladder (it should be behind you and to your left, if you were facing forward up above) and climb up; the wretches can’t follow you. There’s no surefire safe way to get across the wood, but heading left or right from the doorway and moving along behind the generators is the best bet. See if you can walk along the seam in the floor, assuming you can see where the tiles match up with each other. There's another set of Cogtags in one of the corners of this room, behind the generators.
After a couple more doors, you’ll come to the cart room. After moving in a bit, a group of wretches will come out of the woodwork and attack. The easiest way to deal with them is to retreat back to the door through which you entered and shoot them as they approach or get by Dominic. A chokepoint is a valuable thing. Moving on from there, you’ll have to twist a valve to open a door, then meet up with Baird and Cole, then twist another valve to move on. Fight your way through the next large room, then defeat the boomer that appears when you attempt to open the door before moving into the cart control room.
Coalition Cargo

Head down the steps to the carts, but before you hop aboard, turn around and look at the stairs. There's a set of Cogtags to the left of them.
The cart mine game here isn’t exactly hard to describe: shoot anything that attacks you. For the most part, this will consist of wretches moving along the ceiling. For the most part, you can just ignore any locusts or larger enemies that appear.
When you get out of the carts, the path leading on is exceedingly linear, so just start heading forward. You’ll enter the core room soon enough, where you’ll have to ride a couple of mining platforms to reach the underground areas of the mine. Boomers will ride up to meet you, so be ready for them. If you have a shotgun, feel free to hop onto the platform and unload into their heads, and hide behind the driller when they reload.
Darkest Before Dawn
Into the depths you go. Move down the path here, and it’ll eventually fork into three separate paths. The one with the bright red mark at the end holds some Cogtags. The one with the barrels will be good for some ammo and a sniper rifle (although the Lancer/shotgun combo is probably the best for now). The other path, leading under the rock archway, will be the path that moves on. Take it until more wretches appear, then leave Cole and Baird behind while you and Dom scout ahead.
Move down the path until you pratfall into the waterslide. Soon enough you’ll hit a locust ambush. Kill them, then check the area near the bottom of the stairs for more Cogtags. Check the building for ammo before moving on. A sniper will overlook the path; you can shoot the bottom of the pillar nearby to off him with falling rocks.
Keep moving until you run across a Boomer. He’s easy enough to kill, since there’ll be a pillar that you can use for easy cover; simply hide behind that, then duck out after he fires and headshot him a few times to off him. He shouldn’t be able to deal any damage at all to you. Another non-avoidable trip down a hole will ensue. Be ready for a major wretch ambush here; again, a shotgun is ideal for these kinds of situations. You’ll come to a fork in the road soon enough, where you and Dom will have to split up. The right path is a bit safer here, since you get to take the high path when they cross over each other. Just be on the lookout for shotgun locusts near the end of it; they can end your trip right quick on Hardcore difficulty.
Fight your way onward. When you see the Corpser, look around for an ammo box; on a little outcropping above the nearby lava, you can find another set of Cogtags.
Angry Titan
Walking onto the fractured surface above the lava will reveal the Corpser in its full glory. The beast is out to get you, obviously, or at least prevent you from planting the resonator.
The process of beating the Corpser is simple when you get it, but until you figure it out, it can be frustrating. It protects its main body with its array of claws, except when it lifts them up and attempts to stab you with them. These attacks are fairly predictable, though, and are easily avoided if you stay to one side of the beast, away from the claw attacks, which usually hit directly in front of it. If you move too far to the side, though, it’ll unleash a breath attack that hurts you and knocks you back. Keep to around a 30-degree angle off to the side, relative to his face, and you should be all right.
To attack him, though, you have to hit him in two weak spots: his belly and his mouth. When you get an angle of attack on the underside of the Corpser, unload your weapon into it, and the beast will eventually recoil in pain, opening its mouth and shouting while moving its head from side to side. Shoot its mouth at this point, and it’ll recoil even more, and actually skitter backwards on the ground.
You need to pull this off three times in a row (the shotgun is arguably the best for these attacks) until you get the Corpser onto the metal platform at the rear of the area. When you get the signal to fire at the two supports for the platform, quickly blast both of them, and the monster will fade into Bolivian, letting you regroup with Cole and Baird.
Tip Of The Iceberg
Follow the path that Cole and Baird came from to reach a huge lake of Imulsion. When you spot the ramp leading up, follow the path to the right to find a Torque Bow, which fires explosive-tipped arrows, just like in that one Rambo movie! The more you hold down the trigger, the straighter your shot will be, allowing you to use the arrows either like grenades or like sniper rounds. It’s a difficult weapon to use, but amusing.
Despite your desire to split the teams up, you can feel free to follow Baird and Cole as they make their way around the pumping station. You’ll run into Theron Guards here, which are basically upgraded versions of the locust drones you’ve been fighting all game long. Many of them will have their own Torque Bows, so be sure to dodge away if you hear anything go *thunk* behind you!
First off, secure one of the ramps leading up to the pumping facility. The Therons will attempt to come down and chuck arrows at you; kill them as they hit the bottom, with grenades or anything else at your disposal. When you have a ramp secured, head up and start clearing out the area. Baird and Cole will eventually follow you up. When you manage to kill all of the Therons, you’ll automatically launch into the cutscene that ends the Act.
Act IV: The Long Road Home
Campus Grinder
It’s time to get to Marcus Fenix’s house. Why? Who knows! It’s never really explained what all this has to do with Fenix; all we know is that the map you found outside the mine is somehow related to him.
There’s a lengthy fight to begin this level, so get ready for some tough combat. Plenty of drones and even some Theron Guards for you to deal with. There’s plenty of cover, though, so grab it and fire at enemies from long range. Move as necessary; the enemies will come from different sectors of the zone as the combat progresses. If you look around at the area of the courtyard near where you entered, note the two small sets of steps; there's a set of Cogtags hidden behind one of these. It'd be best to clear the area out before grabbing them, though.
After you heard Baird yell "Incoming!", grab some cover and stick to it; two Boomers will be coming from the side of the courtyard opposite where you first entered it. If you recovered a Torque Bow, you’ll find that it’s ideal for popping the heads off of these guys.
After killing everything in the courtyard, you’ll be forced to choose between another left or right route. The left will lead you through the buildings, while the right will take the street. It’s basically a choice between close-quarters combat or slightly longer-range combat. The right-hand route is definitely the tougher of the two, so if you want an easier fight, take the left. You’ll have to deal with intermittent wretches, but they can be chopped through with your chainsaw without too many problems. Whichever way you go, you’ll have to use a Hammer of Dawn to take down a Seeder; keep it in hand and aim it at the emergence hole that opens up shortly thereafter to seal it as well.
After a good amount of more killing, you’ll join up with your other squad outside the entrance to the academy, where the downed chopper is being scavenged by Stranded. Shoot the propane tanks in the back of the truck to open the gate.
Bad To Worse
You’ll be without backup during this little jaunt through the Conservatory, which Anya reports as being clear of enemies. Where the hell is she getting her data from? A computer that Fenix said a bad word to once? Anyway, there’s a set of Cogtags near a burnt-out vehicle right near the beginning of this level.

When you reach the door leading into the Conservatory, it’ll be locked, so you’ll need to wait for Jack to open it before you can head inside. An emergence hole will open up behind you as he does so, so kill everything that comes out, then use the Hammer of Dawn in the area on the two Boomers that come out of the wall opposite the door.
Move into the conservatory and start poking your head around. There appear to be a few different paths to take, but most of them are dead ends. Just be sure to grab a Hammer of Dawn if you didn’t pick one up earlier, and keep moving forward until you enter the greenhouses. It’s quiet...too quiet. Sure enough, you’re about to have another fight on your hands.
Berserker
Shortly after you begin looking around, you’ll stumble across another Berserker. Again, you’ll have to use the Hammer of Dawn to destroy it, but there’s one problem: there’s no open sky inside the greenhouses. The solution? Make your own sky. If you move as far as you can down the row of greenhouses, dodging the Berserker’s attacks, you’ll come across one greenhouse with a large downed tree blocking the path and a bunch of pillars near the walls. What you need to do here is lure the Berserker over to the pillars while you stand on the opposite side of them; when it charges it’ll bust them down, thus revealing the sunlight that comes streaming through the now-smashed windows up ahead. Shephard it around the area, busting down pillars, until you manage to lure it under an area you’ve already exposed to sunlight, then Hammer of Dawn it a couple of times to kill it.
With that done, twist the valve on the wall to open the water valve and put out the fire that blocks the rest of the path here. You’ll notice that the timer on the screen didn’t stop when the Berserker went down; the remaining minutes on it are how long you have to use the Hammer of Dawn. So get a move on!
Hazing
Time to bust into the Fenix estate. When you spot the statue, bust a left into the corridor there and move out to the next small courtyard. If you still have time left on your Hammer of Dawn, use it to toast the Troika, then aim it at the emergence holes that pop up and roast them as well. If you don’t have the Hammer, then you may want to take out the Troika and run up to take control of it before the emergence holes start overflowing the area with bugs. Otherwise you can just keep running back to the doorway you enter from and use it as a chokepoint as things start coming up.
The next courtyard features a lengthier firefight, on account of there being no emergence holes to plug; there are just plenty of enemies coming at you through holes in the buildings around the area. Kill everyone, including the Boomer, and move on. After another courtyard (where you can find some grenades near the not-so-dead Seeder), find the wooden door inside the building and bust it down to move on. More fighting will ensue in the streets of the academy. You’ll be able to pick left or right paths as you like, but they’ll all converge after a while. The only noticeable secret is a hidden Torque Bow behind a wooden chest of drawers down the right corridor after you off the Boomer.
Close To Home
Another tough fight when you reach the outskirts of the Fenix Estate. Many drones will appear, as well as a couple of Theron Guards. Nothing to do but kill them, we suppose. On the far side of the large garden area, you’ll have two routes to take: one to the left, which leads through a graveyard, and one to the right, which follows the water. The one to the right will lead to an approach overlooked by Troikas, so it’s best to stick to the left side. You’ll also get resupplied on grenades if you do so. You’ll have to fight the Troikas either way, so be advised that grabbing a Torque Bow is recommended.
When you hit the statue at the end of the cemetary, you can find a Torque Bow around the corner to your right if you’re still missing one. Sticking an arrow to a Troika will generally kill the gunner, which is a good thing. Take out the first gunner across the way, then get close to the sandbags and look over to see the Troika underneath you. You should have an angle that’ll let you kill him with your Lancer without allowing him to return fire. When that’s done, kill anything that remains and check the area for ammo. There are some grenades at the very end of the broken bridge.
Imaginary Place
Time to take the fight home. You’re at the bottom of the steps leading up to the family manse, and you need to scale them. The locusts might have something to say about that. Defeat everything that comes your way until you reach the courtyard. For some reason, the locusts will fall back as soon as you decide to infiltrate the house, letting you kick down the door without any opposition.
When you reach the inside, hang a left and plug the emergence hole with a grenade before too many enemies can pop out of it. With that done, clean out the upstairs and try to pick up a shotgun if you can. It’ll be more useful to you here than a sniper rifle or a torque bow. After the top floor is clear, head back downstairs and through the door a locust opens to move on; you need to find the entrance to the basement, which is behind a portcullis which you can open by turning a lever. There should be a set of Cogtags somewhere around here, hidden under a desk; use your melee attacks or chainsaw to destroy them until you locate the tags. There’ll be a couple of enemies attempting to bang down the door of the basement, so chuck a grenade at them and get them out of the way.
Entrenched

After exploring the empty basement a bit, you may be scratching your head; there doesn’t appear to be anything there. If you walk into the flooded end room of the basement, near all the wine racks, you’ll notice that only one of them in the flooded section actually has any wine on it. Head over to it and kick it in to reveal the door to the secret lab. You’ll need to protect Jack while he rips the door, but that shouldn’t be overly difficult; all you have to deal with are drones.
While he’s working on downloading the data (don’t these people have broadband?) you need to fight your way back up to the front of the building, where Baird and Cole are waiting for you. Follow the sound of the gunfire until you reach the pair. Like good soldiers, they’ll retreat to safety while you and Dom are asked to cover their rear.
This fight can get pretty intense. If you want, feel free to use any kind of explosive or long-ranged weapon from the sniper’s roost (take out the Theron Guard if you can), but the real action is going to take place down at the doorway, which will soon get blowed open, resulting in a torrent of baddies coming your way. On casual difficulty, at least, you can staunch the flow by setting yourself up by one side of the door with a shotgun, then turning around and blasting people as they come in. (You can also use your Lancer and simply lean out, then fire when your reticule turns red; it’ll likely do so before you can see any enemies through the fire.) When you see Theron Guards and Boomers, start blindthrowing grenades every five seconds or so to hopefully weaken them or kill them off. As soon as anyone gets past you, run off into one of the side rooms and take up a new defensive position there, and hope that Dom doesn’t get taken out.
Moving Out
When you get the call to move to the back of the house, head down the steps near the main staircase and through the door there. You’ll wind up at a pair of windows overlooking the house’s interior courtyard. Plug the emergence hole, or just kill the drones, then shoot out the planks that are blocking the door across the yard. That will allow you to backtrack down the steps and head out through the doors to reach the back of the house.
Now, here’s the killer aspect of this level, and something that’s going to be what can only be called hella frustrating, especially on harder difficulty levels. When you reach the rear section of the house here, you’ll find yourself facing off against two Boomers. What you shouldn’t do, however, is kill both of them. If you kill both of them, then you’ll be faced with a 30-second timer that will automatically kill you if you don’t get to the APC at the back of the yard in time, and there’ll be an emergence hole between you and it to boot. The correct course of action seems to be to either kill one of the Boomers or leave them both alone, then pick the side of the courtyard that they’re farthest from and sprint past them. If you time this right, you should hit the rear of the area just as the emergence hole is opening up, but before the flood of enemies begins, letting you easily make it to the barrier beyond that ends the level. You can deal with the Boomers on harder difficulties, since their rockets will miss you if you sprint, but a horde of drones will quickly end your trip. Just get tolll the invisible wall, and the mission will end.
Act Five: Desperation
Special Delivery
So now that you have the data, you have to use it to plant some super-secret bomb that the military’s cooked up in order to roast the Locusts out of their underground lairs. Or something. It’s all pretty hazy, but then again, you’re just a grunt. It’s on a need-to-know basis, and, well...you know the rest.

You start out at a train station here. Snipers will appear on the bridge overhead, but your teammates should do a fair job of taking them out; you’ll probably want to grab one of their weapons if it drops down to your level, though, if possible. This is mostly just another defend-yourself-until-you-can-move-on section of the game; there’ll be three emergence holes to deal with, another sniper, and some wretches to keep you on your toes. With a full four-man squad, though, you should have plenty of people around to watch your back.
When you hear the train’s horn, you’ll notice that there are some wooden planks at the end of the train car that they’re firing at you from. You don’t need to kill anyone else here, unless they threaten to finish you off; just dash across the platform towards the planks and cross them to the other platform. Doing so will automatically get you onto the train that’s taking off and into the next chapter.
Train Wreck
Start making your way up the train. The sniper rifle will come in handy here, especially against the Theron Guards that pop up in your path, but you have more than enough cover to use for any other type of enemy that you see. When you manage get to the far door, you’ll find that your troubles have just begun: a Berserker appears.
There are a couple of ways to take this guy down, but one is far easier than the other. Begin by moving past the Berserker and moving down to the far end of the car, where you first arrived. As you move, note that there’s a green button on one of the cars, near the large fuel tank. If you can lure the Berserker down to that car, then sneak past it and hit the button, the car will detach. More likely than not, though, the Berserker will simply leap back onto the car you’re on. However, the now-detached car has left a huge gap in the rear portion of the train. If you can manage to get the beast’s attention while you’re standing in front of it, you can let it charge towards you, then dash out of the way, it’ll charge right off the end of the train into the nether regions beyond. Alternately, you can try to trap it in the small corridor near the fuel cell here and then blow the cell, but this seems awfully likely to get you blown to hell as well.
You can find a pair of Cogtags in the room that’s unlocked after the Berserker is killed. Continue moving up the train, and you’ll eventually find yourself facing off against Reavers, which are essentially nemacytes that have been modified to allow drones to ride them. The sniper rifle will be best at taking them down; you can off them by shooting at the body, but killing the rider will also instantly down them, and will be quicker to boot. When you hear Anya telling you about chain guns, check the area across from the door of that room to find more Cogtags.
Troika Central
Bust through the door and head upstairs to grab a chain gun. The difficulty of this situation will obviously depend on the difficulty setting; on casual, your only real risk of death comes from a lucky torque bow shot by one of the Therons that ride the Reavers. Other than that, you can happily hold down the chain gun button and fire away. Don’t bother zooming in, as it makes it harder for you to pivot your view. One of the Reavers might fly close to the opposite side of the car, but it shouldn’t be able to hit you from there. Keep in mind that the section of the fight isn’t over when the train cars topple away behind you; you still have a couple more Reavers to deal with after that.
On harder difficulties, you may want to simply hide behind one of the crates here and use those as cover while you use your sniper rifle to finish off the Reavers’ riders.

You’ll have wretches to deal with when you hit the bottom level of the train again. Kill the first few enemies in your path, then move along through the green doors. (A sniper rifle awaits you if you backtrack a bit on this first car.) Keep moving forward, and you’ll eventually come to a room where wretches drop from the ceiling. First they’ll drop from the front, so stand in the back and fire away at them as they drop; they’ll then move to the back, so repeat the process while standing in the front. When that’s done, you’ll have 45 seconds to move across the next train car to reach the section where the wretches are attempting to disconnect you. Bust whatever moves are required (on harder difficulties, a shotgun will help here) to get to the far side before time runs out.
Keep on moving forward. The next time you drop fuel cells off the train to create a path, you’ll notice the Gears icon on the wall; wrap around to the far side of the train and head through the door down the backtracking corridor, past the grenades, to find another set of Cogtags.
Pale Horse
As the ominous quiet and the opened weapons lockers implies here, a boss fight is about to occur, and a difficult one, at that. RAAM is the end boss of the game, after all, so he won’t be as much of a creampuff as the other bosses you’ve faced.

Your main tool here is going to be your sniper rifle, which with a little luck will let you get a bunch of headshots on RAAM while he’s otherwise occupied. To begin with, though, you have to know what you’re fighting. RAAM has got a Troika in his hands, so far as we can tell, that does heavy damage and will likely kill you in a second or two on higher difficulties; it’s a bit easier on casual, but it still packs a heck of a punch. He’s also surrounded by kryll, which prevent your gunfire from actually hitting his body while they’re rotating around. Every once in a while, though, he’ll detach the kryll from his body and tell them to attack you, and this is when you’re going to be headshotting him. Grenades are also a big help in this fight.
Basically, what you want to do is crouch behind the first little barricade that you’re standing behind when the cutscene ends. Note the lights on the ground? These are the only things that’ll save your life when RAAM sends his kryll out to get you. If you’re not standing on lights, they’ll cut you to pieces. There are a few sets of lights scattered around the zone, though, so take your time and get to know where they are. (Note that the Troika at the far end of the area isn’t lit up; using it seems to be a sure ticket to an early grave.) If you leave cover, you have to head for another one of these lighted zones as quickly as possible, or you get toasted. Moving is generally a risky proposition here anyway, as the Troikas will definitely do a number on you, but you won’t have any choice but to book it when RAAM gets onto your ass.
Technique
So, anyway, just crouch behind the barricade at the beginning of the area with your sniper rifle in hand. Dominic will probably run forward and get killed more or less immediately; don’t bother bringing him back to life until it’s safe to do so (i.e. he’s in a well-lighted zone). You’re going to have to do most of the fighting here yourself anyway. When RAAM sends his Kryll after you, start raising yourself up and nailing him with headshots, and try your darnedest to get perfect active reloads. They’ll let you fire more quickly and deal more damage to boot.
That’s basically the long and short of the strategy here; wait for the kryll barrier to recede, then nail RAAM with headshots. There are two things to be aware of, though. One is that you’ll be getting fly-bys from Reavers that run alongside the train every now and again, and these can do serious damage to you. You can pop them with sniper shots if you wish, but your helicopter will eventually take them down. The second is that grenades can penetrate the kryll shield, and that grenades will actually cause the kryll to fly away from RAAM for a few seconds. If you manage to land a grenade at RAAM’s feet, quickly switch over to your sniper rifle while you’re waiting for it to explode, then nail him with a couple of headshots. He’s slow enough to make it possible to drop a grenade in front of him, then wait for him to walk over it. Grenades will damage him through the shield, as well, making it possible that one of these will wind up being the kill shot. The Torque Bow also has a similar effect on the Kryll shield, so feel free to use those on him as well. (If you have to restart this area from the checkpoint, and get the Torque Bow in your inventory, you can grab the ammo from the closets, then wait 30 seconds or so for it to respawn.)
We’re not trying to be reductive here; this is a damn hard fight, even on casual difficulty. With enough reloading, though (you’ll be cursing Anya’s voice by the time you defeat RAAM, if you haven’t been already), you will eventually take him down. Watch the final cutscene and be sure to stick around through the credits for an awesome Augustus Cole remix song.
Achievements
As with all other Xbox 360 games, Gears of War has a long list of achievements for you to work towards. Here’s a list!
| Achievement Name | How To Earn | Point Reward |
|---|---|---|
| Completed Act 1 On Casual | ... | 10 |
| Completed Act 2 On Casual | ... | 10 |
| Completed Act 3 On Casual | ... | 10 |
| Completed Act 4 On Casual | ... | 10 |
| Completed Act 5 On Casual | ... | 10 |
| Mercenary | Complete all acts on Casual difficulty | 10 |
| Completed Act 1 On Hardcore | ... | 20 |
| Completed Act 2 On Hardcore | ... | 20 |
| Completed Act 3 On Hardcore | ... | 20 |
| Completed Act 4 On Hardcore | ... | 20 |
| Completed Act 5 On Hardcore | ... | 20 |
| Soldier | Complete all acts on Hardcore difficulty | 20 |
| Completed Act 1 On Insane | ... | 30 |
| Completed Act 2 On Insane | ... | 30 |
| Completed Act 3 On Insane | ... | 30 |
| Completed Act 4 On Insane | ... | 30 |
| Completed Act 5 On Insane | ... | 30 |
| Commando | Complete all acts on Insane Difficulty | 30 |
| Time to Remember | Recover 10 Cogtags on any difficulty | 10 |
| Honor-Bound | Find 20 Cogtags on any difficulty level | 20 |
| For The Fallen | Recover all Cogtags on any difficulty | 30 |
| Zen and the Art of Reloading | Perform 25 perfect active reloads (non-consecutively) on any difficulty | 10 |
| Zen and the Art Part 2 | Perform five perfect active reloads in a row on any difficulty | 20 |
| My Love For You Is Like A Truck | Defeat a Berserker on Hardcore difficulty | 30 |
| Broken Fingers | Defeat a Corpser on Hardcore difficulty | 30 |
| A Dish Best Served Cold | Defeat General RAAM on Hardcore difficulty | 30 |
| Clusterluck | Kill three enemies simultaneously at least ten different times on any difficulty | 20 |
| A Series of Tubes | Host and complete 50 ranked matches | 20 |
| Dom-curious | Complete one co-op chapter as Dominic Santiago on any difficulty | 10 |
| Domination | Complete ten different co-op chapter as Dominic Santiago on any difficulty | 20 |
| I Can’t Quit You Dom | Complete all acts as Dominic Santiago on any difficulty | 30 |
| Don’t You Die On Me | Revive 100 teammates in ranked matches | 10 |
| Fall Down Go Boom | Kill 100 enemies in ranked matches with the Boomshot | 20 |
| Pistolero | Kill 100 enemies in ranked matches with a pistol | 20 |
| The Nuge | Kill 100 enemies in ranked matches with a Torque Bow | 20 |
| I Spy With My Little Eye | Kill 100 enemies in ranked matches with the Longshot | 20 |
| Don’t Hurt ‘Em | Kill 100 enemies in ranked matches with the Hammer of Dawn | 20 |
| It’s a Massacre | Kill 100 enemies in ranked matches with the Chainsaw | 10 |
| Curb Appeal | Kill 100 enemies in ranked matches with the curb stomp | 20 |
| Capital Punishment | Kill 100 enemies in ranked matches with an execution | 20 |
| Is It A Spider | Kill 100 enemies in ranked matches with grenade tag | 30 |
| The Money Shot | Kill 100 enemies in ranked matches with a headshot | 20 |
| Always Remember Your First | Finish playing a ranked versus match | 10 |
| Don’t Hate The Player | Finish with the highest points in a ranked match | 10 |
| Mix It Up | Win a ranked match in every versus game type | 20 |
| Around The World | Win a ranked match on every versus map | 30 |
| Can’t Touch Me | Win 10 ranked matches without losing a round | 20 |
| Seriously... | Kill 10,000 people in versus ranked matches | 50 |
Got a news tip or want to contact us directly? Email news@gamespot.com
Join the conversation