Final Fantasy 7 Remake Chapter 2 Walkthrough: Fateful Encounters (Spoiler-Free)
Make your way through Midgar and find every chest, materia, and collectible along the way with our FF7 walkthrough.
Final Fantasy 7 Remake expands on the original game's portion of the story that takes place in Midgar, increasing the scope and adding a whole lot more to FF7's opening hours. If you're going to stop the evil Shinra Corporation, you're going to need the best weapons, armor, and materia you can get along the way. That's why we've compiled a walkthrough that'll help you find every hidden chest, complete every sidequest, and win every boss fight.
But the core of the Final Fantasy experience is the story, which is why we've taken pains to keep this walkthrough spoiler-free. We've marked out where you can find everything you need to become as powerful as possible in FF7, while finding every collectible and unlocking every secret.
- Chapter 1
- Chapter 3
- Chapter 4
- Chapter 5
- Chapter 6
- Chapter 7
- Chapter 8
- Chapter 9
- Chapter 10
- Chapter 11
- Chapter 12
- Chapter 13
- Chapter 14
- Chapter 15
- Chapter 16
- Chapter 17
- Chapter 18
Chapter 2 Walkthrough: Fateful Encounters
Up on the Plate
Start by following the path until the first corner, where you'll find a chest with two potions.
After Barret's speech, check the chest by the stairs for an ether. Jesse will give you a Healing Materia soon after; once that happens, check for a chest in front of the Mrs. Arcade building to get 50 gil. Up the stairs near the pile of rubble is another chest with another 50 gil.
Cross the debris and keep moving along the path until you take a fire escape up to a rooftop. Before heading down on the far side, open the chest by the pile of pipes to get a potion.
Keep moving until a cutscene, followed by an attack by Shinra Security Officers. Before going further, head back north toward the train station, through the alley the flower peddler took. Up the stairs on the porch beside some smashable crates is a chest with a hi-potion.
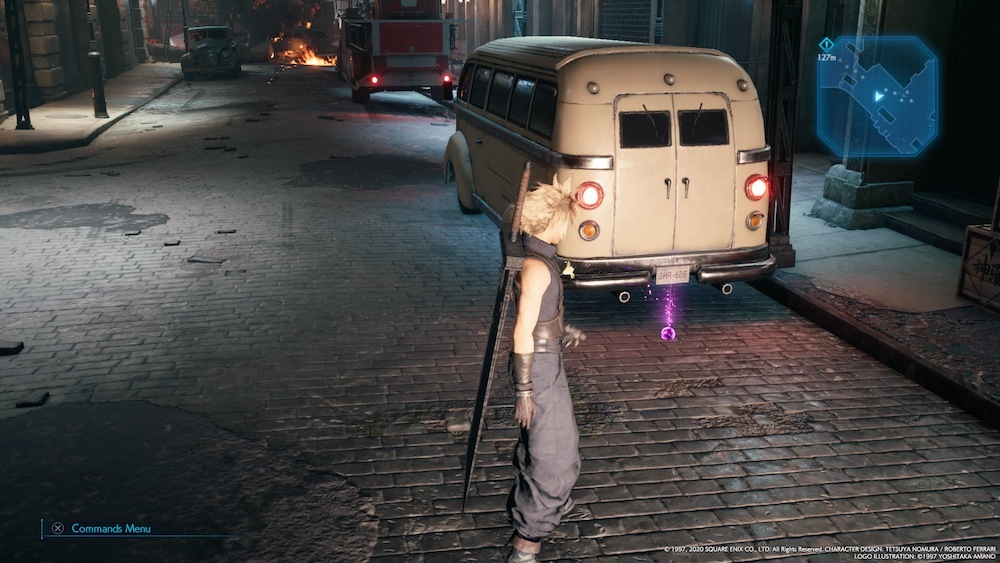
Near where you had the first fight, head east toward the Security Officer and Guard Dog to get rid of them, then grab the HP Up Materia from next to the bumper of the white van.
Continue heading south. Fight off three more troopers and check beside the car for a Deadly Dodge Materia. Take the street left, or east, and fight two guard dogs and a trooper. Ahead on the left side of the street, you'll find some Shinra crates to smash, and a chest behind them that contains a Power Wrist accessory.
In the fountain area, you'll face a number of Security Officers in waves, plus a pair of Shock Troopers and a Guard Dog. Take them all out to open the way forward. Check beside the 8th Street Cafe in the southeast corner of the area for a chest with two grenades. You'll also want to check this area for breakable crates, of which there are three groups.
Final Fantasy 7 Remake News
- Final Fantasy 7 Remake Intergrade Review - Materia Improvements
- Final Fantasy 7 Remake Dress Guide: How To Get Every Dress In Wall Market
- What Would Suit Tifa Choices: Final Fantasy 7 Remake Dress Guide
- + Show More Final Fantasy 7 Remake News Links (2)
- Final Fantasy 7 Remake Guide: Corneo's Secret Stash Locations
- Final Fantasy 7 Remake Materia Guide: Essential Materia You Might've Missed
Take the ladder up to the rooftops. Keep moving until you climb down a ladder and look toward the left wall for a chest with an Iron Bangle armor inside.
Keep heading down to the street. Two Security Officers will attack you with a new unit, the Riot Trooper. His shield will deflect your sword strikes, leaving you vulnerable, and his baton is painful, so dodge away from his attacks. He's weak against magic (Fire in particular), and barring that, use a Punisher mode counter-attack or try to get behind him to strike and knock him off-guard so you can lay in with some combos.
Continue following the street until you pass a truck on the southwest side. Loop around it to fight some Security Officers and find some breakable crates. They hide a Moogle Medal.
Keep moving down the street until you hit another alcove off to the west. Two more Security Officers wait there, along with some breakable crates.
Down the street head, you'll see the sidewalks rise as the street dips down. Kill the two Grenadiers on the ground level--they're basically Security Officers that shoot explosives, so be sure to dodge away from the bombs--then run up on the sidewalk on the left. You'll hit another Grenadier and two Riot Troopers; kill them and open the nearby chest to the left to find an ether.
Take the stairs ahead back down to the street and fight two Grenadiers and a Riot Trooper. After that, two Guard Dogs and a Riot Trooper. Hit him with magic to take him out, so you're clear to deal with the dogs.

Follow the street forward and hang a left toward where a truck is parked. On the left side of the truck are some crates; on the right is a chest with a hi-potion.
Mini-Boss Fight: The Huntsman
You'll fight the Huntsman at the end of Chapter 2, accompanied by several Shinra troopers. He's basically a Riot Trooper with more powerful attacks, higher defense, and grenades. He has a group of troops backing him up, along with a second group behind you, forcing you toward him. Clear out the other group first to take some pressure off before you go after the Huntsman himself.
When you do commit to the Hunstman's group, pull the same trick and focus on his friends, which include a Riot Trooper and several Security Officers. Start by wiping the floor with the Security Officers, then focus your attention on the Riot Troopers, which you can instantly drop with a Fire spell or a Punisher Mode guard stance counter.
When the Huntsman is alone, stay well clear of him, as he can deal severe damage and quickly punish you if your sword bounces off his shield. Watch out for his attack called Riot Shield, where he'll sprint straight at you and bowl you over; it's hard to dodge, so try to guard against it instead. He shouldn't be able to hurt you much otherwise, so remain guarded in Punisher Mode to deal damage with your instant counter-attack. Once your ATB charges up, hit him with a Fire spell to drop his defenses. That should put him on one knee; close the gap quickly and rip him apart with more Punisher Mode attacks. Repeat that process a few times, and you should down him pretty quickly.
The Train
Once you're aboard the train, follow the rest of the team until you have to slide through a narrow gap next to some boxes. On the far side, turn around and look back the way you came to find a chest that contains 100 gil.
Continue with our spoiler-free walkthrough in Chapter 3: Home Sweet Slum.
Got a news tip or want to contact us directly? Email news@gamespot.com
Join the conversation