Final Fantasy 7 Remake Chapter 1 Walkthrough: Destruction Of Mako Reactor 1 (Spoiler-Free)
Make your way through the Bombing Mission in the new FF7, best every enemy, and find every collectible along the way with our walkthrough.
Final Fantasy 7 Remake might only cover the portion of the original that takes place in Midgar, but it's still an extremely dense RPG. Fighting the battle against Shinra is going to require the best weapons, armor, and materia you can get along the way. That's why we've compiled a walkthrough that'll help you find every hidden chest, complete every sidequest, and win every boss fight.
But the core of the Final Fantasy experience is the story, which is why we've taken pains to keep this walkthrough spoiler-free. We've marked out where you can find everything you need to become as powerful as possible in FF7, while finding every collectible and unlocking every secret.
- Chapter 2
- Chapter 3
- Chapter 4
- Chapter 5
- Chapter 6
- Chapter 7
- Chapter 8
- Chapter 9
- Chapter 10
- Chapter 11
- Chapter 12
- Chapter 13
- Chapter 14
- Chapter 15
- Chapter 16
- Chapter 17
- Chapter 18
Chapter 1 Walkthrough: The Destruction of Mako Reactor 1
Bombing Run, Commence!
Final Fantasy VII Remake's intro is packed with detailed tutorials explaining its most key combat and RPG mechanics. As such, much of where you go is well-guided and straightforward, so as to facilitate teaching you the basics. We'll mostly let the game speak for itself, pointing out important things like treasure chests, which contain useful items.
Start by fighting off the two Security Officers, and then continue inside the train station to take out more soldiers. You're going to be doing this a lot. Ascend the stairs to find your first chest, which contains a potion. Head around to the northwest corner of the room, past some construction barriers, to find another chest containing two grenades.
On the walkway, you'll find some Shinra crates. Understand that you should always be on the lookout for these, as they often yield potions, Mako shards to recover MP, Moogle Medals (you'll want those later in the game), and other useful items. However, what's inside these crates is random, so you only get what the game wants to give you. Regardless, make a habit of breaking them.

In the next room, you fight the Security Officer and his Guard Dog. Check the north wall for a small alley with a chest with an ether inside.
Follow along until you get past the fence leading to a larger room with two Shinra soldiers. Fight them off and open the chest beside the exit for two potions.
When Biggs gets the door open, take out the four Shinra troopers you're trapped in the room with, then move into the next room and open the chest beside the locker to snag a Phoenix Down.
Move the game along until you get past the second set of laser defenses. You'll find a chest beside the stairs that has two potions inside. Descend the stairs, but before moving forward, turn right and move down the path leading to a dead end with another chest, which contains an ether.
Final Fantasy 7 Remake News
- Final Fantasy 7 Remake Intergrade Review - Materia Improvements
- Final Fantasy 7 Remake Dress Guide: How To Get Every Dress In Wall Market
- What Would Suit Tifa Choices: Final Fantasy 7 Remake Dress Guide
- + Show More Final Fantasy 7 Remake News Links (2)
- Final Fantasy 7 Remake Guide: Corneo's Secret Stash Locations
- Final Fantasy 7 Remake Materia Guide: Essential Materia You Might've Missed
The path ahead leads you towards the center of the Mako reactor. After descending the first ladder, follow along the walkway until you find a chest with a phoenix down inside. Keep going, fighting off enemies along the way, until you descend your first ladder and find a dead end before the third ladder with some Monodrives guarding a chest containing an ether.
Descend the third ladder, watch the cutscene, and set the timer on the bomb. Feel free to choose any time, as either 20 or 30 minutes is more than enough to escape. But wait! The first boss approaches!
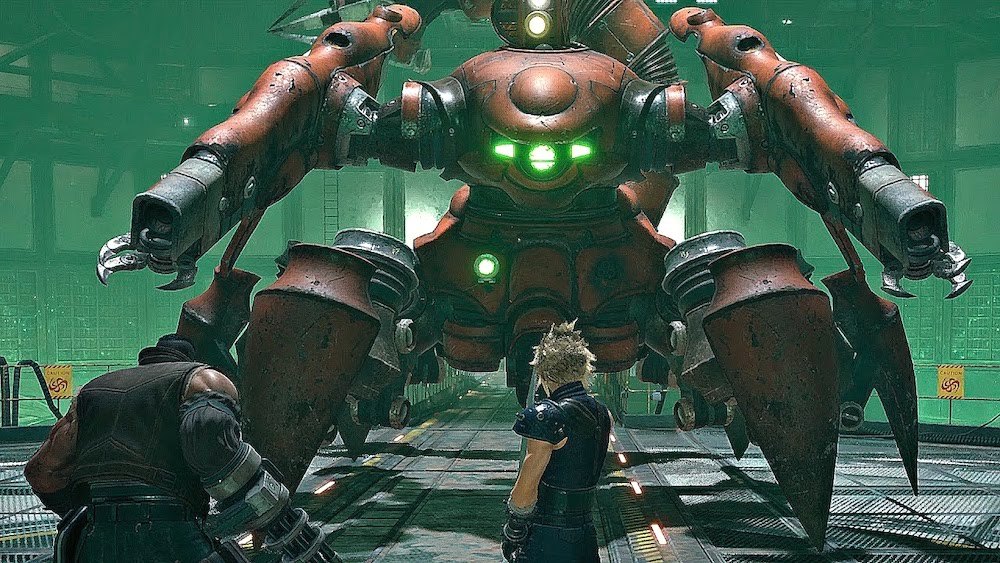
Boss Fight: Scorpion Sentinel
The Scorpion Sentinel is your first big challenge in Final Fantasy 7 Remake. As Cloud says at the start, Lightning magic is most effective against it (and robots in general). Lucky for you, Barret has some Thunder Materia handy, so switch to him and unleash that as soon as possible. As a precaution, use the Steelskin on Barret to ensure he's got all the added defense and resilience he needs to stay in the fight. For Cloud, use Punisher Mode attacks and Fire spells to pile on the damage and keep increasing the Scorpion Sentinel's stagger meter. But don't linger close; it'll swipe you with its tail or leap up and drop down onto you if you hang around too long. When it locks onto you with its targeting laser, get ready to block some missiles; you can try to dodge, but you'll probably still take a fair amount of damage.
Do enough damage and the Scorpion Sentinel will activate a barrier, hindering all incoming attacks. Circle its back and hit it in the Field Generator weak spot underneath its tail. Use Barret's Focused Shot ability to do some substantial damage to it, while having Cloud follow up with a Fire spell. You'll want to stay back as much as possible until you can drop that barrier, as the Scorpion Sentinel will smash you with an area-of-effect attack. Once the barrier is down, start hitting it again with Barret's Thunder spells and Cloud's Punisher attacks. When the Sentinel Scorpion jumps onto the wall, switch to Barret and hit it with Overcharge shots to bring it back down. If you stagger it at any point, make sure to spend ATB to unleash Cloud's Braver and Barret's Focused Shot upon it.
After you've dealt enough damage, the Sentinel Scorpion will launch a bunch of missiles that bring down debris from around the reactor. It'll then charge its Tail Laser; hide behind the debris to avoid getting hit by the attack, which is devastating. You can still use spells in the meantime, though.
During this final portion of the fight, the Sentinel Scorpion will cycle through several attacks, including an EM Blast around its body, a hail of missiles, lasers from its hands, and a machine gun attack. Dodge or block the incoming strikes and hang back until after the missile strike, when the Scorpion Sentinel is open for attack, then hit it before retreating to hide from the Tail Laser. Make use of Barret's ranged attacks as much as you can, as well as magic, because these will keep you out of range from several of the Sentinel Scorpion's abilities. Keep a consistent rate of damage, making sure to go hard when you stagger it, and you'll win in no time.
Kingdom Come: Deliverance 2 - Official Cinematic Announcement Trailer Stellar Blade - BIBI ‘Eve’ Official Music Video Trailer | PS5 Apex Legends: Urban Assault Collection Event Trailer Total War: WARHAMMER III - Elspeth von Draken Gameplay Showcase Genshin Impact - "Arlecchino: Sleep in Peace" | Official Character Teaser Potionomics: Masterwork Edition - Official Announcement Trailer Snowbreak: Containment Zone - "Gradient of Souls" Version Trailer Harold Halibut GameSpot Video Review Nancy Drew: Mystery of the Seven Keys | World Premiere Official Trailer Modern Warfare III & Warzone - Official Cheech & Chong Bundle Gameplay Trailer SteamWorld Heist II – Official Reveal Gameplay Trailer Dead Island 2 – Official SoLA Expansion Gameplay Launch Trailer
Please enter your date of birth to view this video
By clicking 'enter', you agree to GameSpot's
Terms of Use and Privacy Policy
Time To Escape
The road to escape is paved with several enemy encounters. But aside from one new enemy known as the Shock Trooper, there's nothing you'll find that you haven't faced before. Go along the path, help Jesse get free from some rubble, and follow her until you reach a ladder. Before climbing it, open the chest beside it for two more potions.
Continue until you meet up with that Shock Trooper we talked about. The turrets supporting them will be a nuisance, so switch to Barret and take those out first. Once those are dealt with, switch back to Cloud and pelt the Shock Troopers with magic, which can easily halt them in their tracks. The Punisher Mode counter attack is also effective, so if you'd rather forgo magic, put up your guard and wait for one of the Shock Troopers to strike to deliver a devastating sword swipe that'll make short work of these pesky foes.
Once that's you've wiped the floor with the Shock Troopers, keep pushing forward--killing everything that stands in your way--until you make it back to the elevator going back up to the ground floor. Push the switch and you're home free!
Continue on the with our spoiler-free walkthrough in Chapter 2: Fateful Encounters.
Got a news tip or want to contact us directly? Email news@gamespot.com
Join the conversation