FF7 Remake Summon Materia Guide: Unlocking Shiva, Leviathan, And More
Here's how to get yourself all those fancy Summon Materia orbs in FF7 Remake.
Summons are some of the most sought-after magical spells in Final Fantasy games, and this tradition continues in Final Fantasy 7 Remake. Interestingly enough, the summons you can get in the remake are mostly optional and can be easy to miss when you're not taking time to go off the beaten path of the story to find them. For most of them, you'll have to fight--and a few will test your combat capabilities. Below you can find details about every summon and how to get their associated Materia orbs throughout the game.
For more guides, check out our FF7 Remake guides and walkthrough roundup. You can also read our FF7 Remake review for our full thoughts about the game.
Ifrit

Your first Summon Materia, Ifrit, is mandatory, as it's given to you at the start of Chapter 4. This fiery slab of muscle is an aggressive fighter and great to throw out in most situations early on as you get your bearings around commanding a summon creature in battle.
Chocobo and Moogle
Location: After Ifrit, the next Summon Materia you can get appears during Chapter 6. It's pointed out to you by Tifa as you're slowly passing by some industrial ventilation fans. Unfortunately, you can't access it until after you power down two out of the three sunlamps in the area.
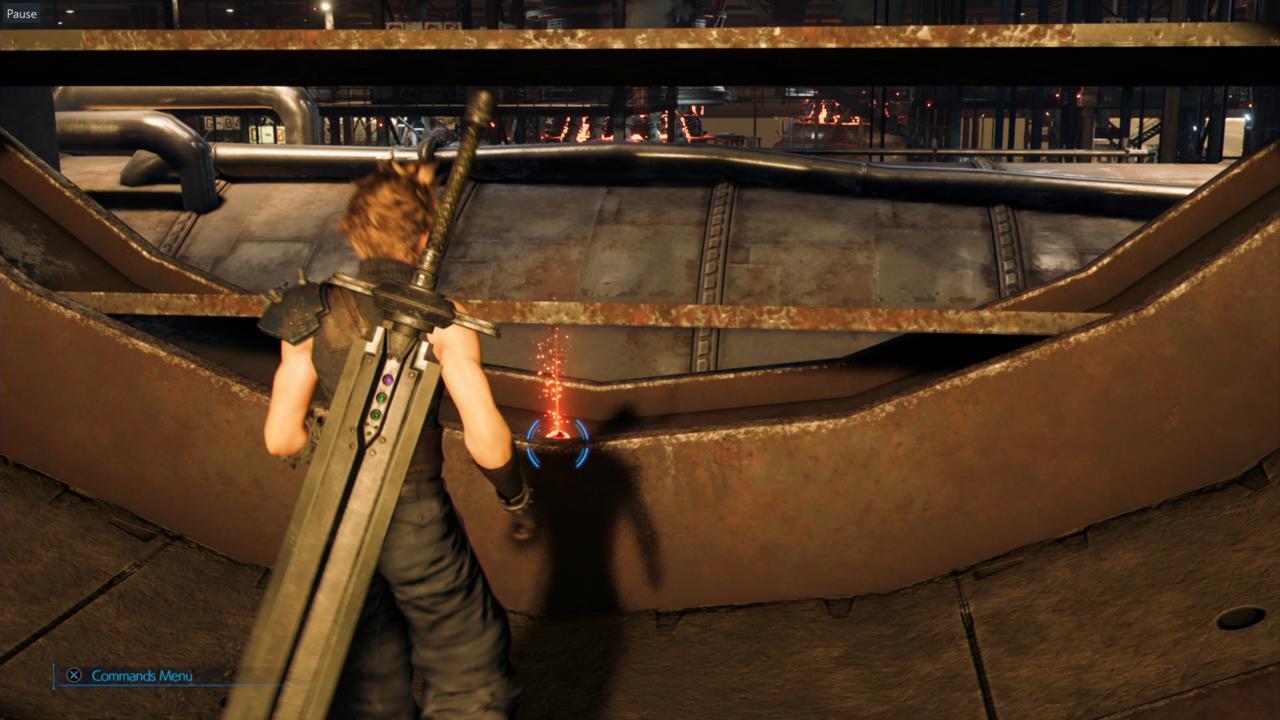
Once that deed is done, return to the H-01 section to use the gondola that will take you back toward the ventilation system. On the far side, take the ladder up to a service room where you activate a console that orders you to do some cleaning maintenance in the next room within a minute. Kill all the enemies and press the button on the console at the end of the room in time to complete the job. Don't worry if you fail to kill everything within the time limit, though. You can double back out of the room and hit the console again to start a new, easier fight with some weaker enemies.
Once you activate the other console, you can head into the fan corridor and snag the Chocobo and Moogle Summon Materia. It's a useful one to have equipped when you're up against enemies weak to the Wind element. It also has a useful maneuver called Chocobo Kick, which is essential for inflicting major stagger damage.
Shiva
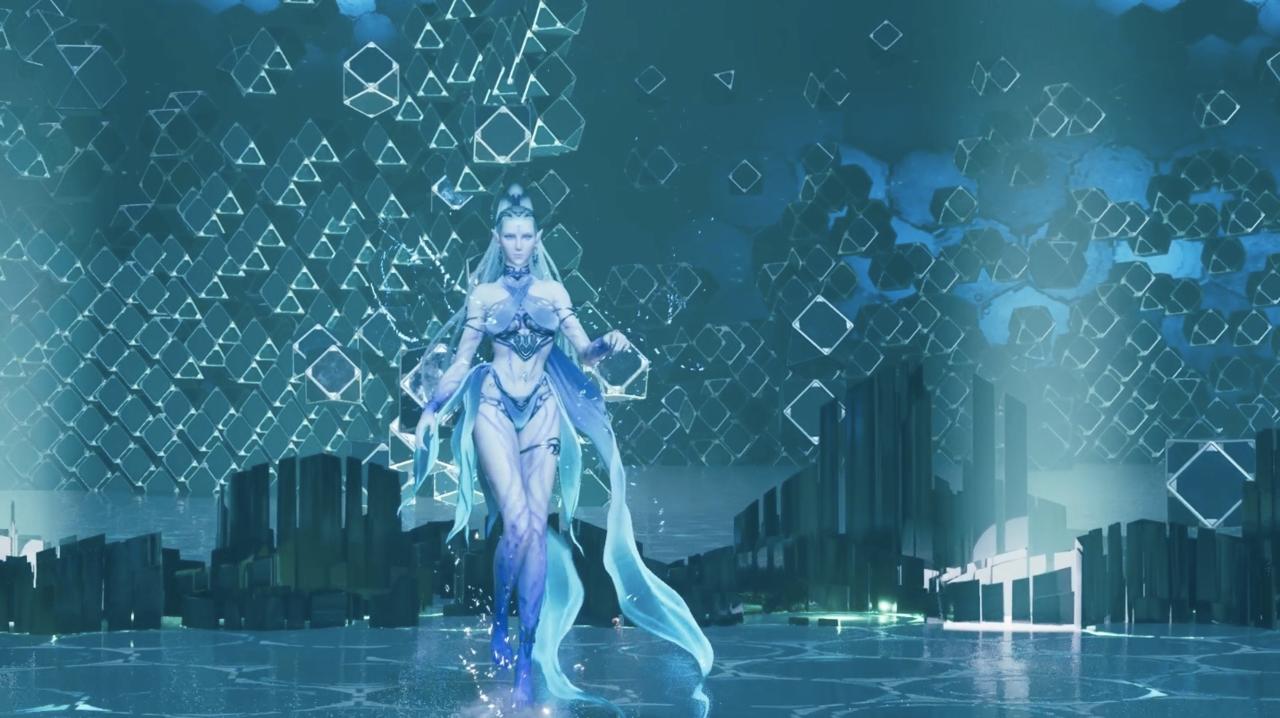
Location: If you keep in touch with Shinra intern Chadley during Chapter 8, he should provide you with a VR combat scenario that pits you against summon creature Shiva to earn its respective Materia. Chadley can be found standing between a healing bench and the Materia shop in the Sector 5 Slums.
As a note, you'll have whoever's in your party when you take on this fight, so if you try it with just Cloud, it'll be tougher than if you tackle it with Aerith in your squad. We recommend that you bring Aerith along, though.
Boss Strategy: Shiva is an Ice summon, and thus weak to Fire. Give Aerith your best Fire Materia, and make sure you have the Ifrit summon equipped, then head into the battle. Cloud can pretty much take care of himself, so you're better off controlling Aerith to run up her ATB bars as quickly as possible; the more Fire or Fira spells you can cast on Shiva, the faster you'll manage to stagger her. Make use of Aerith's Arcane Ward ability, which automatically makes you cast two spells for every ATB bar you spend, to maximize your damage. A good Fire spell will knock Shiva to the ground, offering Cloud a chance to lay down some melee attacks. Make sure you're not too close when she gets back up, though, because she'll use the Icicle Impact area attack spell around her when she's back on her feet.
You'll want to keep laying down spells on Shiva while working to keep Aerith alive. You'll need to be on top of dodging her attacks to stay clear of incoming danger, which include Blizzara spells that Shiva will shoot your way and a bunch of ice crystals to shoot at you in a group. Dodging the ice crystals attack is a losing battle because there are so many of them, so guard against it and power through.
Once you do enough damage, Shiva will get more aggressive, with spells that come faster and new Frost Familiars that protect her and increase the number of spells she casts. Keep firing away with spells to knock out the minions, but beware of the White Out attack, which will send ice crystals through the ground at you. If they hit you, you'll fall asleep, opening you up to a huge but slow magic attack from Shiva called Heavenly Strike. You'll see a massive ice crystal form above the sleeping character; quickly switch to your other character and use Smelling Salts to wake up the sleeper, then dodge away to avoid the big crystal.
As soon as you can get Ifrit in the battle, summon him and start using his abilities to do significant damage and keep Shiva off-balance. The Fire attacks should end up staggering her quickly, allowing you to do a bunch more damage. At about one-quarter health, Shiva will do her big summon attack, damaging your entire party. Make sure you're healed up before that happens, or she can take you out in one blow. After that, keep hitting her with Fire spells until she's done.
Fat Chocobo
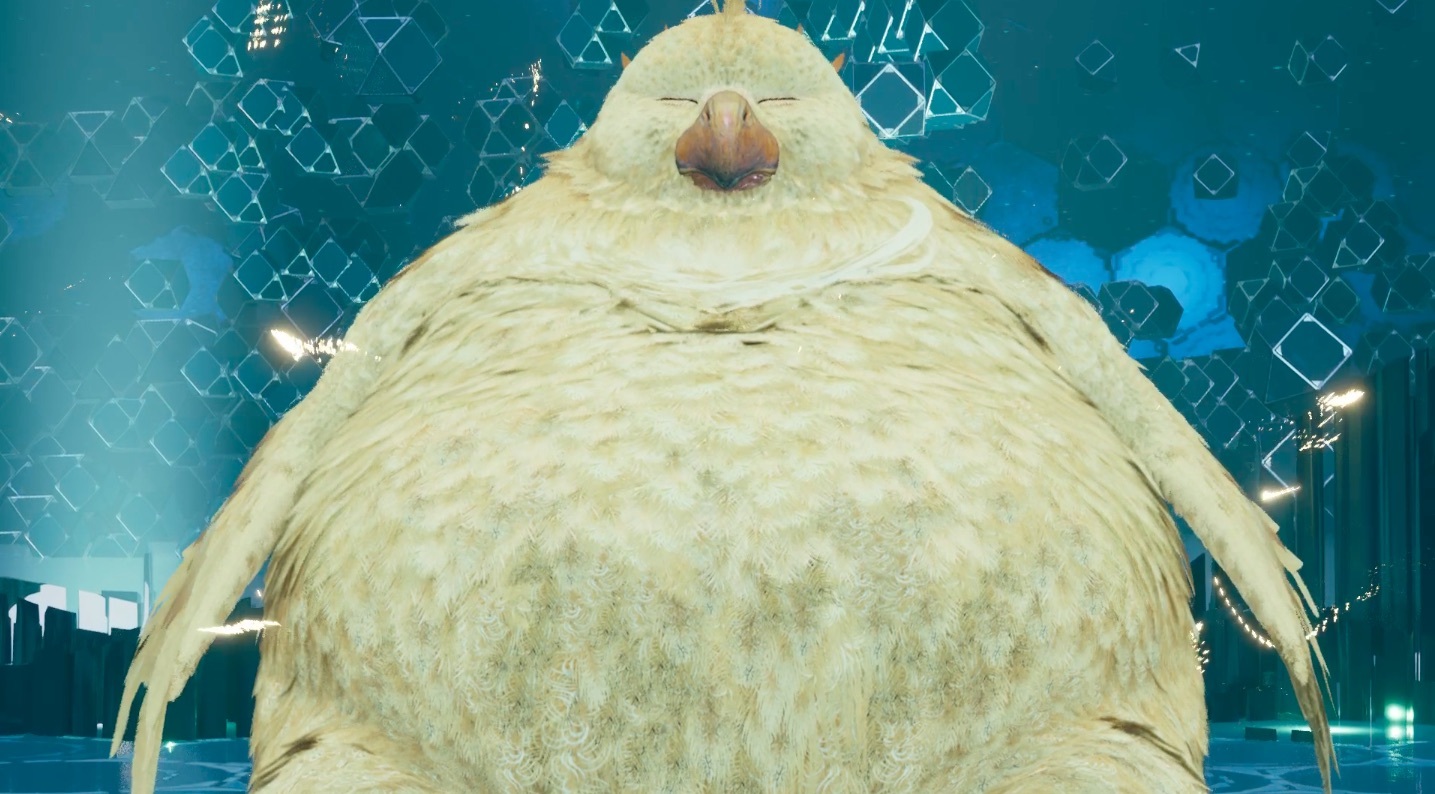
Location: Like Shiva, you can get Fat Chocobo by defeating it in a VR combat scenario. The mission is available when you talk to Chadley during Chapter 9, who you can find hanging out west of the item shop in the Wall Market.
Boss Strategy: Fighting Fat Chocobo is a whole lot easier than Shiva, but you still need to keep your wits about you. The summon creature doesn't have any significant weaknesses, so you'll just want to hit it with your toughest attacks and spells. The best way to pressure Fat Chocobo is with ATB abilities, like Cloud's Braver and Focused Thrust. Go with the ones you like best and deal the biggest damage, while having Aerith keep up a variety of spells, and keep hammering at Fat Chocobo in an attempt to stagger him.
Fat Chocobo hits back with physical attacks, so if you have Barrier Materia, use it to protect your squad. His Wark attack has him throwing random garbage at you, which you can easily avoid by dodging. When you get in close, watch out for Boom, in which he pops up into the air and drops back down for a big area-of-effect strike. After a bit, he'll start rolling around with Roly Poly, which you can dodge clear of if you're quick.
Meanwhile, the Moogle that floats around Fat Chocobo will occasionally summon spectral enemies to come after you--specifically, Bombs and Tonberries. Knock these out quickly if you can with Triple Strike, or let Aerith handle them with her magic while you keep up your assault on Fat Chocobo. You'll occasionally want to switch to Aerith to speed her ATB gain for healing spells, especially if Cloud gets walloped with a few of Fat Chocobo's major attacks.
When you get a chance, summon Ifrit or Shiva into the battle to further pressure Fat Chocobo--the further into the fight you get, the more minion enemies will get spawned in to overwhelm you. They shouldn't bother you too much, but if you're finding yourself taking a lot of damage, peel off and take a second to deal with them before returning your focus to the boss.
Leviathan
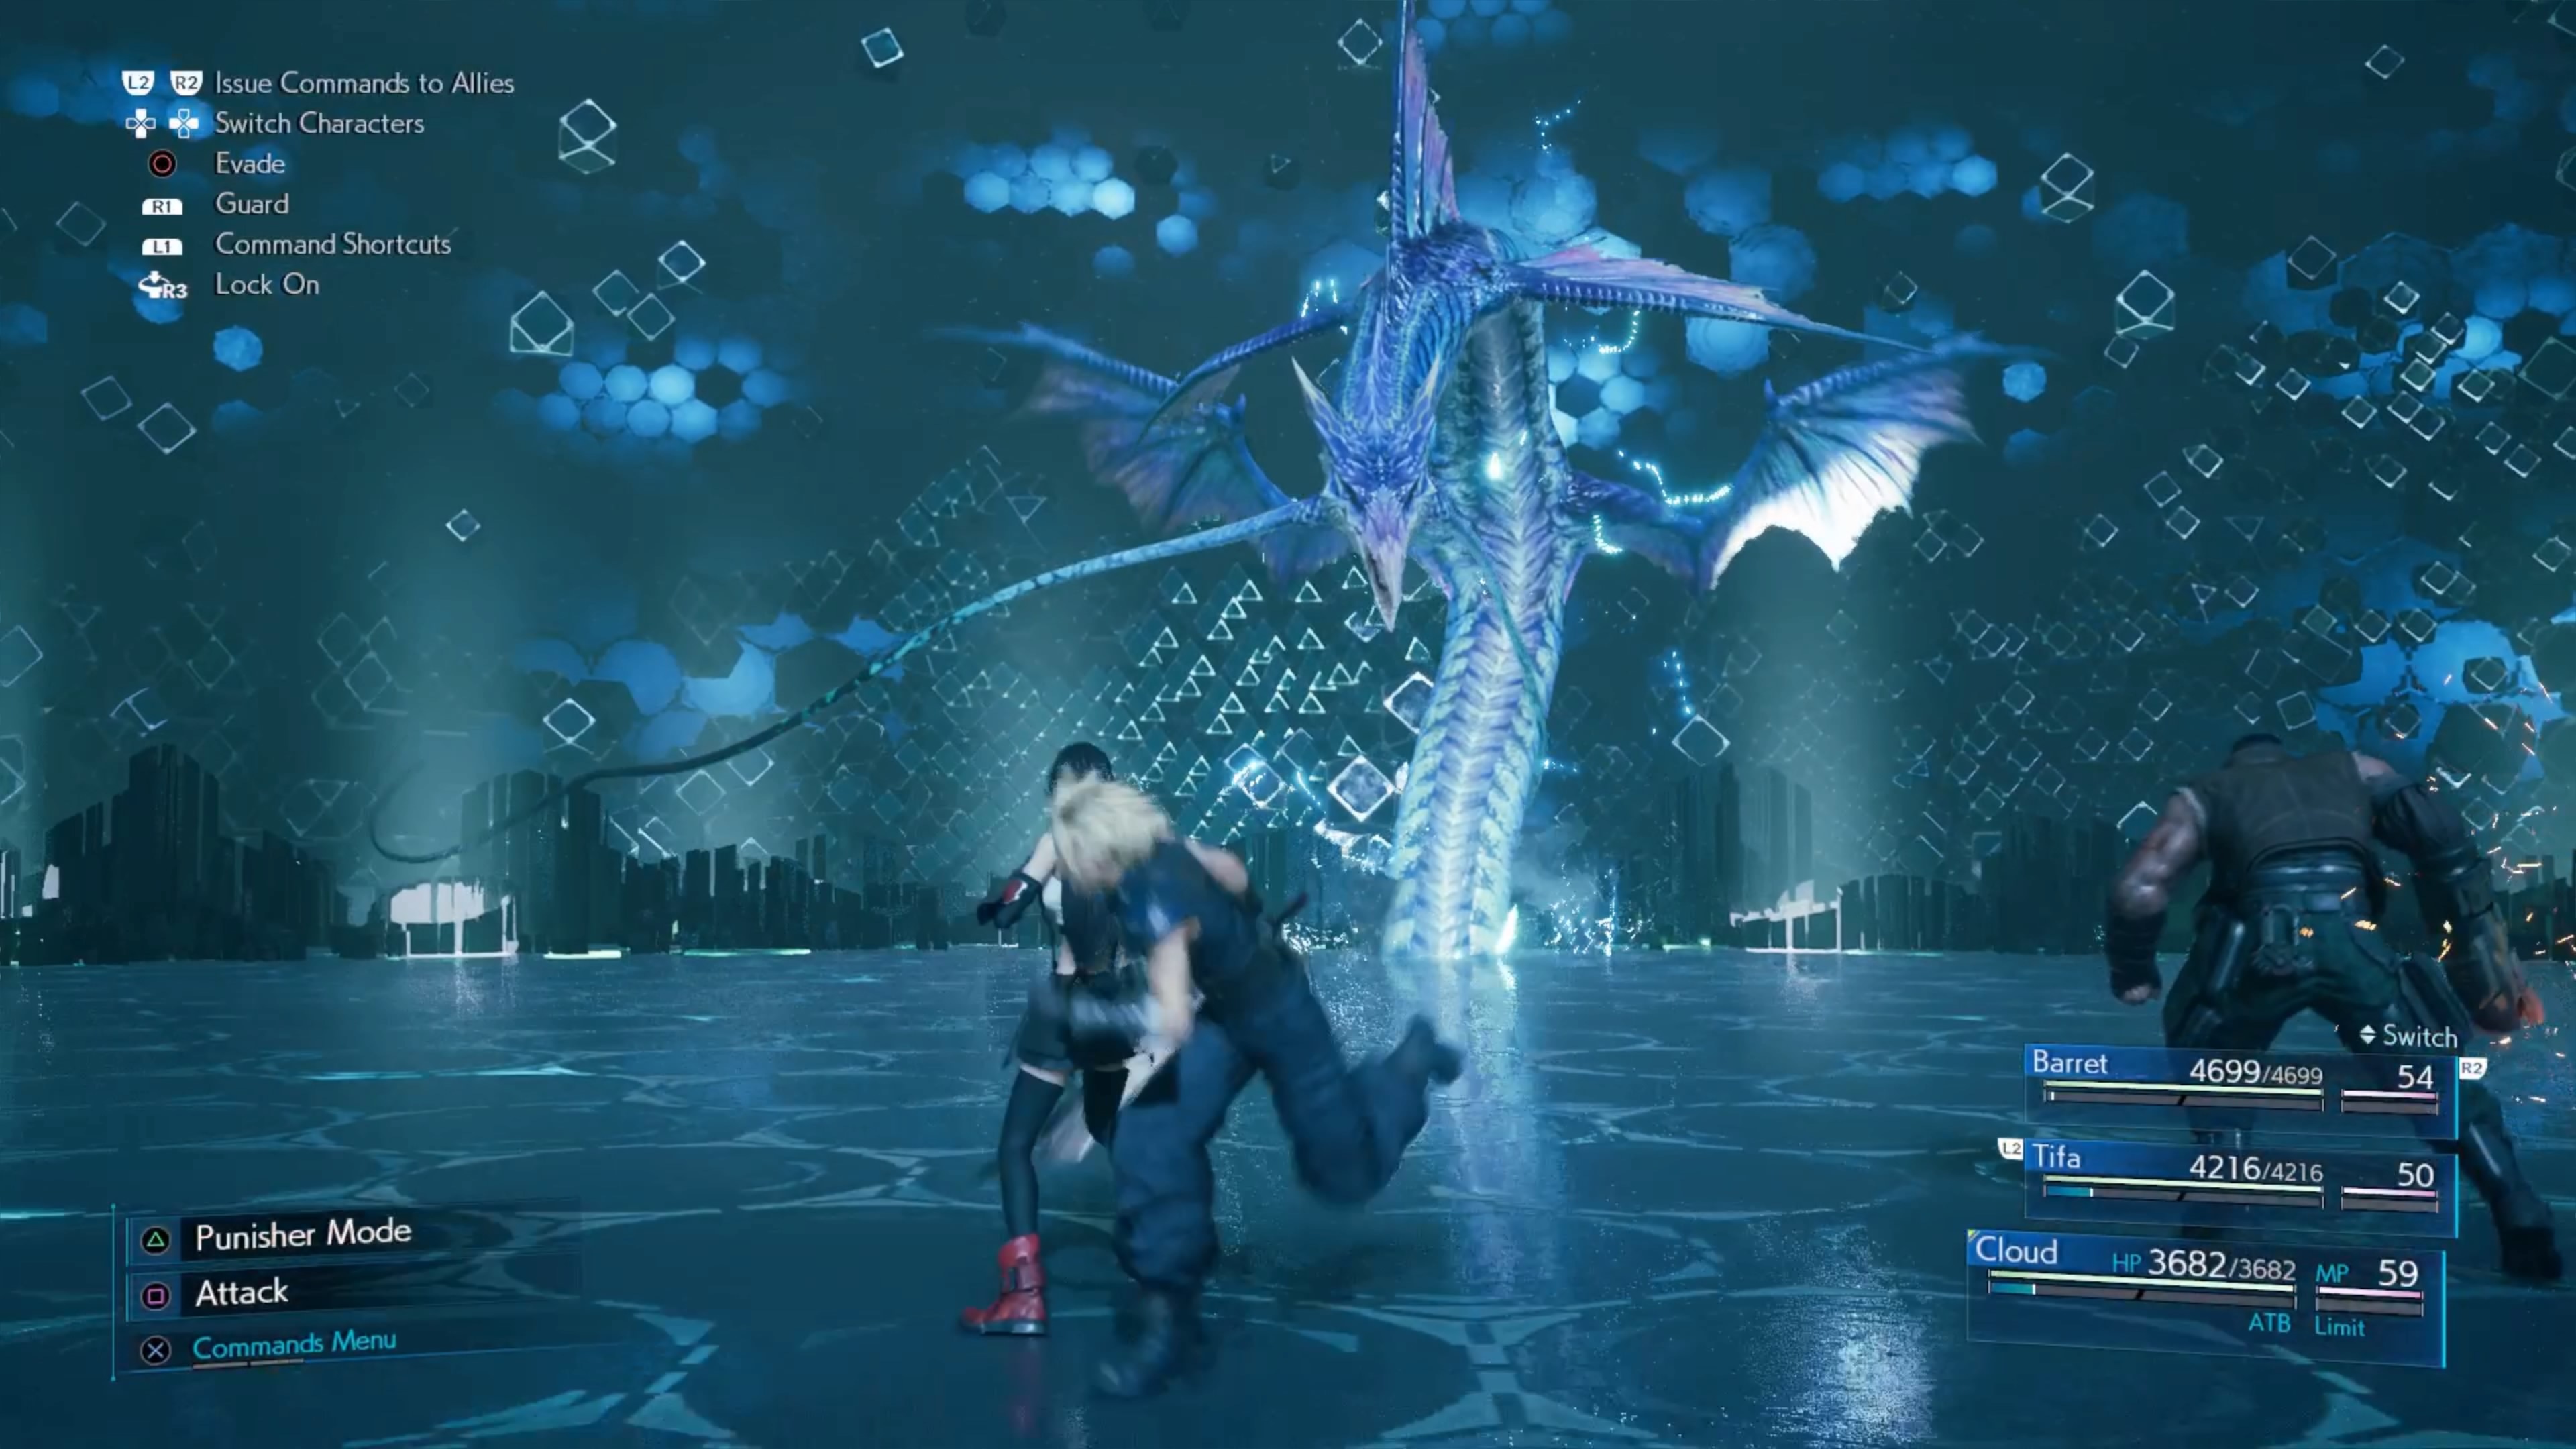
Location: Leviathan joins the list of VR combat scenarios during Chapter 14. At this point, you can talk to Chadley at any of his most recent previously-known locations, so you're free to hit him wherever.
Boss Strategy: Leviathan's abilities don't have a particular element, but it is weak against Thunder magic, so bring your best Lightning materia and outfit your team. The boss itself is tough, mostly because it's wily and difficult to hit. It'll continually reposition around the huge battlefield, requiring your melee team to run around in an attempt to catch up. You'll want to hit the Leviathan with as much Lightning as you can because of this and to make use of Barret's ranged attacks. Aim for the head whenever you can.
In the first half of the fight, you'll need to contend with Leviathan's hard-hitting attacks that require you to pay attention to positioning. Its Briny Barrage attack is a tough one to dodge, so it's usually better to Guard. Briny Bellow shoots a laser beam at you that hurts a lot, but if you're quick, you can sometimes dodge clear of it. The Leviathan will also turn its head to sweep the laser across part of the battlefield, so if you can keep moving, you can sometimes avoid it altogether. Be careful about staying too close to the Leviathan, however, because it'll activate its Gyre Spume area-of-effect attack around itself to send you flying.
You want Tifa and Cloud to wail on the Leviathan's body (marked as "Dorsal Fin" on your menus) while Barret hits it in the head as much as possible, which will drive up its stagger meter. When Leviathan lowers its head to charge attacks like Aqua Focus, hit it as hard as you can in the dome to try to pressure it and knock it out of the attacks it's charging. Focused Shot, Focused Thrust, and Focused Strike are good to push up the stagger meter further--if you can knock the Leviathan down, you can pummel it--but big damage attacks like Braver can be enough to stop the Leviathan from doing something painful to your team.
Be careful activating your powerful attacks like limit breaks, because the Leviathan likes to move around and force you to waste them. If it rears up, get ready for its big Spinning Dive attack, which is next to impossible to dodge and does massive damage as the Leviathan rams into you. Stick with Barret and keep hammering the Leviathan's head with spells and gunfire when it takes to the air, as well. You'll receive a lot of damage in the fight, so make sure to keep your team healthy with healing magic and abilities like Pray.
After you've done some damage, the Leviathan will start flying around, using its Tidal Wave attack to create water cyclones around the battlefield. These will hurt you upon contact, forcing you to keep moving, so get mobile while you keep firing on the Leviathan. Other than more things to deal with in the battle, nothing much changes, though; keep hammering the Leviathan's head as much as you can while the melee squad goes after the Dorsal Fin. We liked the Chocobo & Moogle summon for this fight as well since the Chocobo Kick attack is geared at driving up enemies' stagger meters.
Be sure to keep your health up, as eventually, the Leviathan will hit you with its big summon attack, which can seriously injure your whole team. You should be able to weather it, and by that point, a few more concentrated attacks will finish the Leviathan off.
Chadley's Secret Summon
The most powerful of Chadley's summons is also the most difficult to get. It requires completing all of his Battle Intel assignments, before taking on an extremely tough boss fight. Since it's such an arduous process, we've detailed everything you need to know about unlocking this secret summon in a separate guide. Be warned: there are potential spoilers contained within that guide if you want to discover the final summon for yourself, so proceed with caution.
DLC Summons: Choco Chick, Cactuar, And Carbuncle
There are three special summons only available as a bonus if you purchase the Digital Deluxe edition of FF7 Remake; if you bought the standard version, it's possible to upgrade your copy for an additional $20 to nab the DLC summons. As mentioned above, these extra summon creatures are Cactuar, Carbuncle, and Choco Chick. In terms of capability, they each offer some useful perks in battle, which you can use to determine if they're right for you.
- Choco Chick is the weakest of the DLC trio, only capable of casting level three Materia spells onto enemies, which isn't the most valuable trait if your party is already well-equipped with magic Materia. As this adorable baby Chocobo exits the battlefield, it sets off a powerful non-elemental magic explosion onto enemies.
- Cactuar is effective at quickly staggering enemies, which makes it handy for boss fights where staggering is critical. Its only ability is 1,000 needles, which deals fixed damage multiple times, while even potentially poisoning and slowing them down in the process. When exiting a battle, Cactuar unleashes an area-of-effect stagger attack called 10,000 Needles.
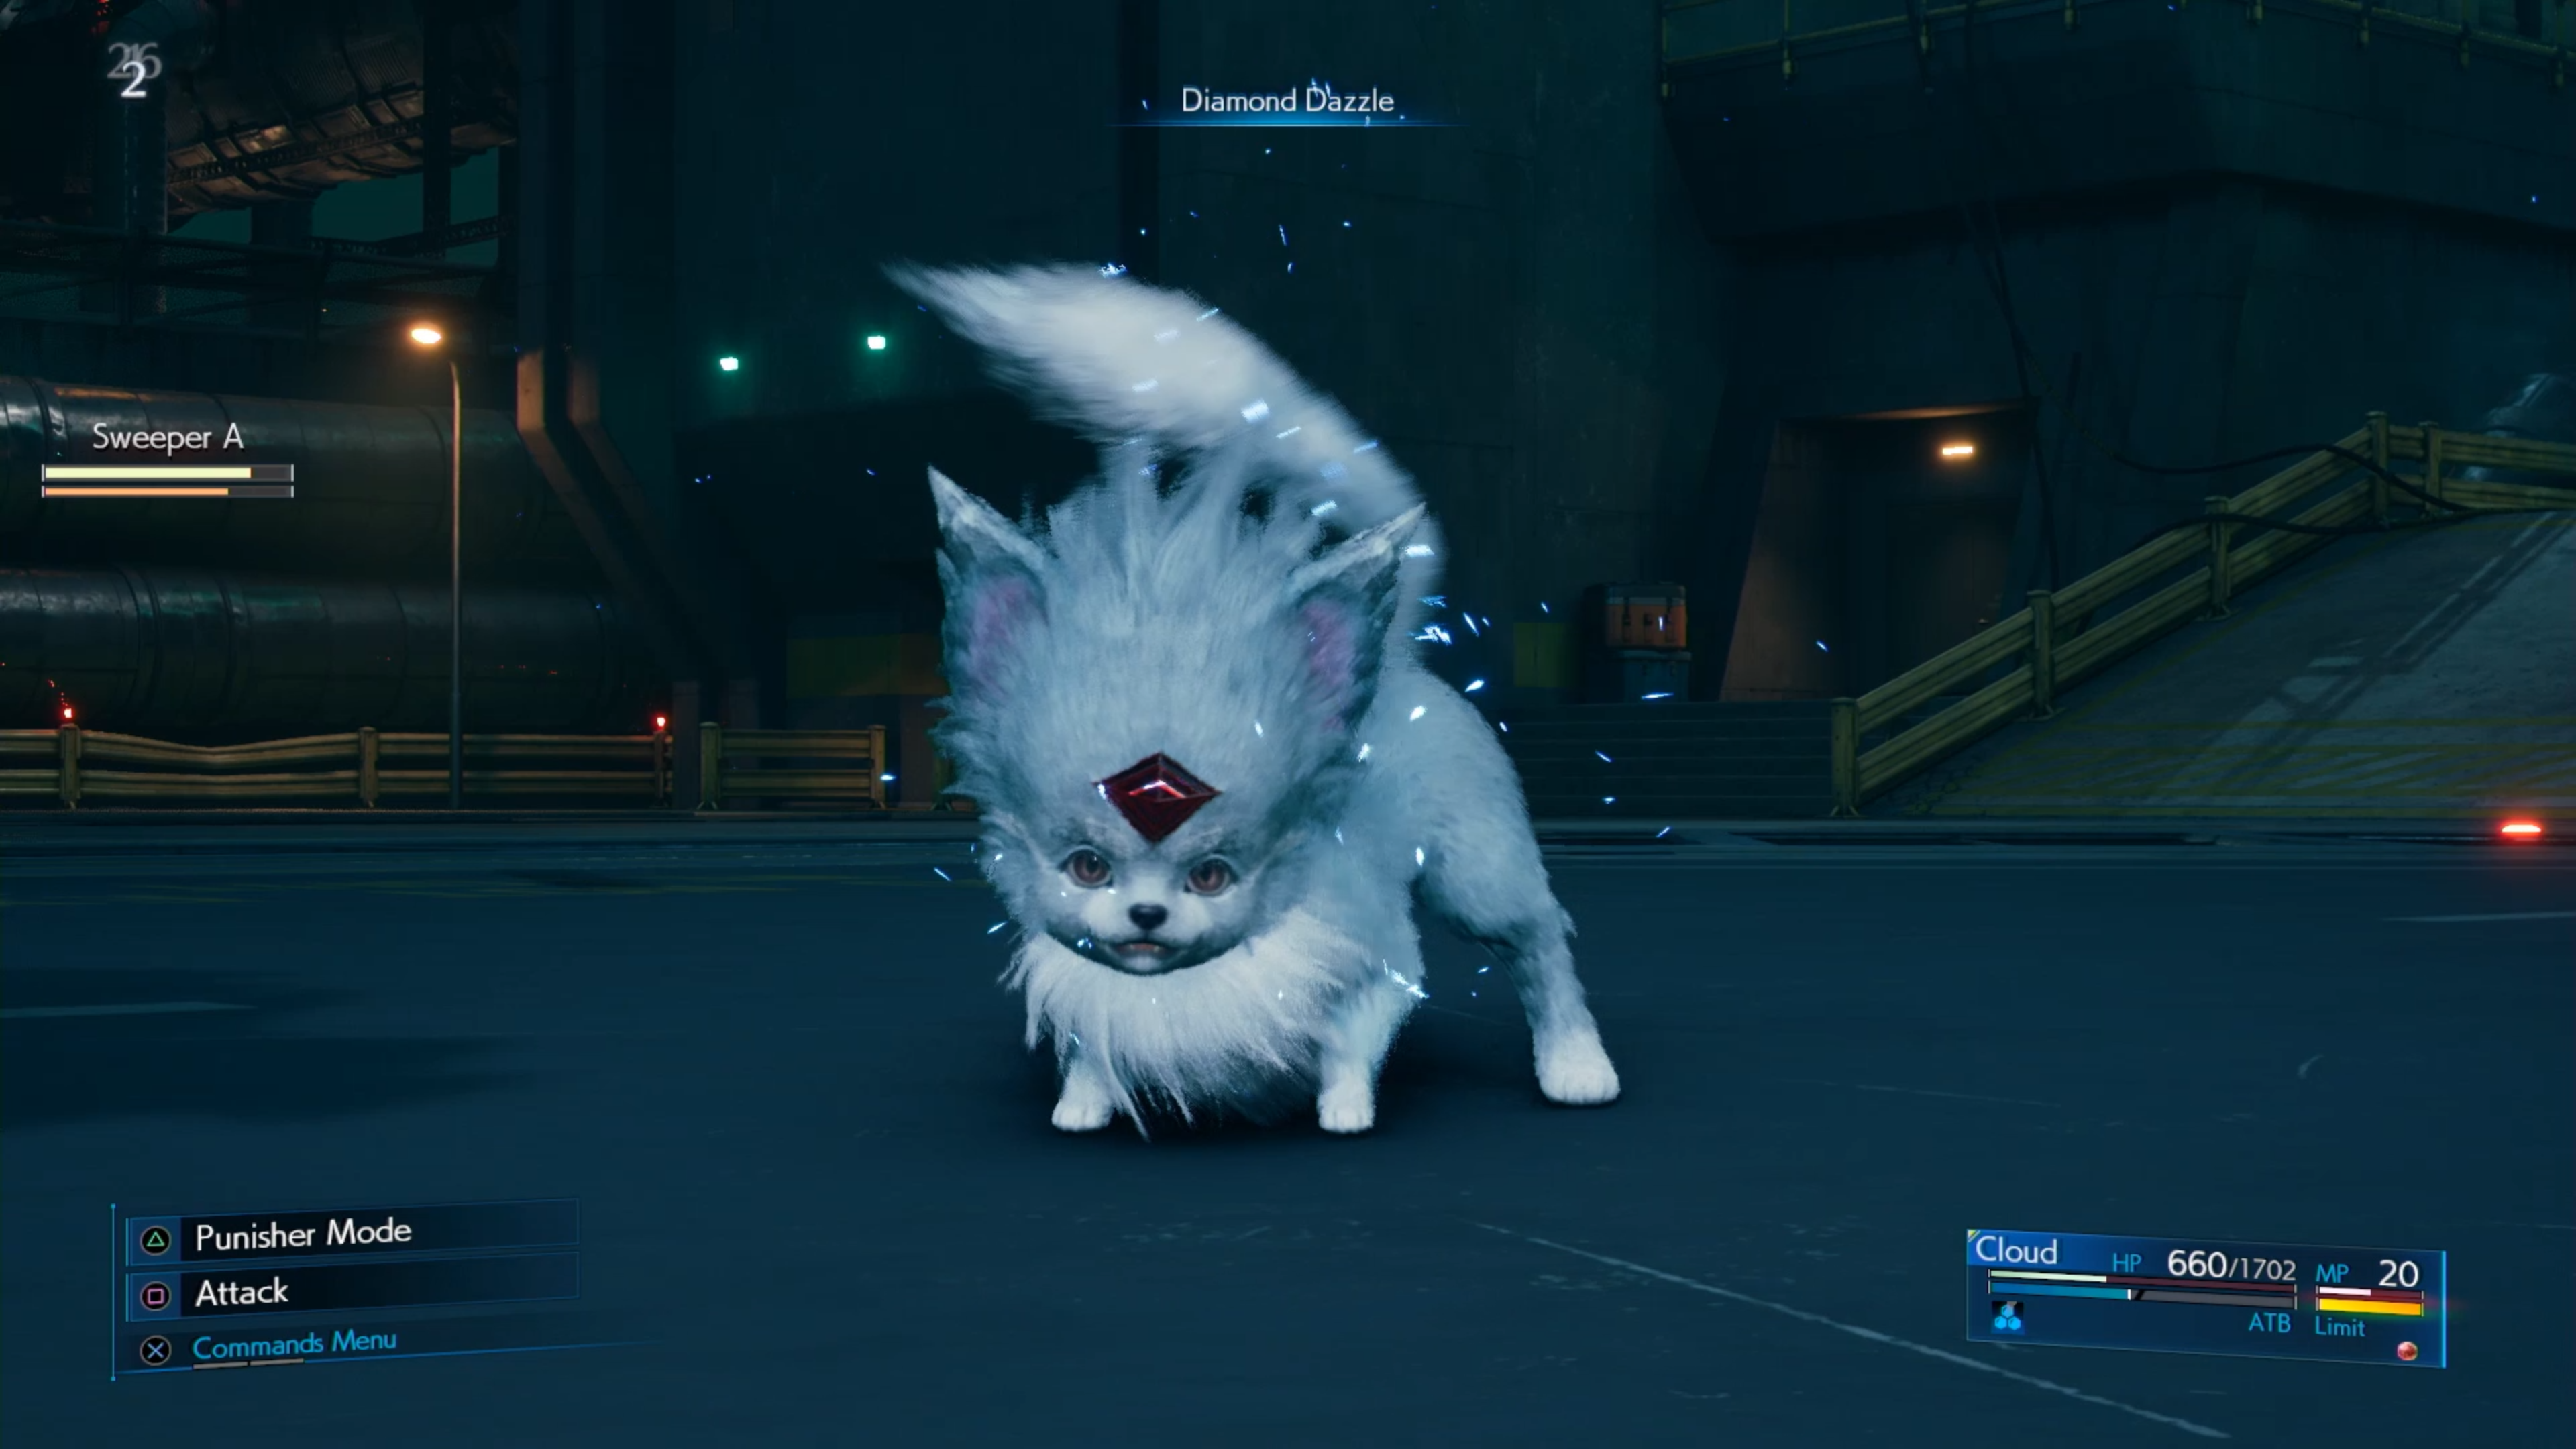
- Carbuncle is the strongest of the DLC trio with abilities that buff your party in various ways, such as increasing their ATB recharge rate or halving the damage of either physical or magic attacks. Its exit ability is called Diamond Dazzle, a clutch maneuver that heals the entire party and even revives those currently KO'd.
To access the DLC Summons after purchasing them, press pause, navigate to System, and then to DLC Content to confirm them into your inventory.
Got a news tip or want to contact us directly? Email news@gamespot.com
Join the conversation