FF7 Remake Pride & Joy Guide: Three-Person Team Vs. Top Secrets
Earn the "Ultimate Weapon" Trophy by taking down the toughest bosses in the game, including the Pride and Joy Prototype.
The best accessory in Final Fantasy 7 Remake is locked behind its toughest challenge: an optional boss gauntlet in the Shinra Combat Simulator that pits you against some of the toughest foes in the game. The Top Secrets simulator challenge is one of the last things you'll unlock in the game, and taking it on--and defeating the final boss, the Pride and Joy Prototype--is going to require all your battle skills.
We're here for you, though. Below, we've got everything you need to know to beat the Pride and Joy Prototype, along with all the bosses that come before it. If you're looking to earn Gotterdammerung and unlock the Ultimate Weapon Trophy, we've got you covered. And if you need other help, check out our other Final Fantasy 7 Remake guides and walkthroughs to deal with everything from side-quests to boss fights to collectibles.
How To Unlock The Pride And Joy Prototype Fight
There's a lot you need to do to get yourself to the toughest boss fights in Final Fantasy 7 Remake. First and foremost, you have to beat the game once, which will unlock Hard Mode, the tougher version of the game you can only access from a new Chapter Select menu. After that, you'll have to take on every other challenge the game sets for you:
- Complete the game on Normal Mode
- Complete all 20 of Chadley's Battle Intel assignments
- Complete all the Corneo's Colosseum battles in Chapter 9
- Complete all the Corneo's Colosseum battles in Chapter 14
- Complete all the Shinra Combat Simulator battles in Chapter 16
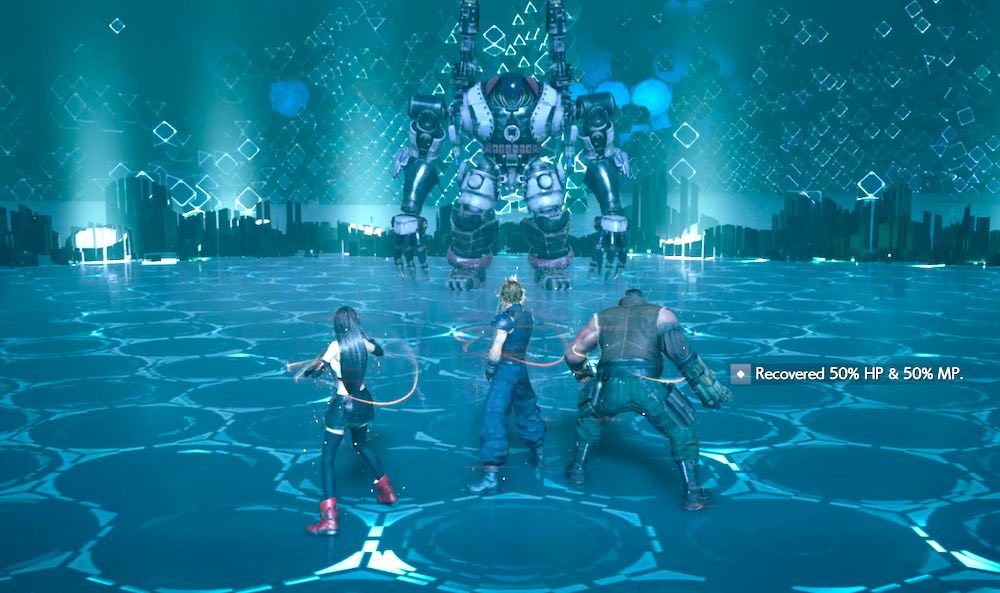
Once you've done all of that, start Chapter 17 on Hard Mode. Soon after starting the chapter, you'll run into Chadley, who will direct you to a new Combat Simulator. Complete all of the challenges there to unlock the final battle: Three-Person Team vs. Top Secrets. The fight will pit you against each of the summon creatures you fought in Chadley's Battle Intel VR challenges, including Bahamut, plus the Pride and Joy Prototype as its final boss.
Building The Right Loadout For The Gauntlet
As mentioned, Three Person Team vs. Top Secrets is a boss gauntlet, so you need to ensure you're dropping into this prepared. That means equipping your party members with the right equipment, Materia, and Limits Breaks to effectively fight all six bosses. Below, we've detailed the most important aspects of the loadout we used; wherever you have gaps, fill them in with Materia you like or boosters like HP Up and MP Up. You'll definitely want your team to have as much health as possible, particularly toward the end of the gauntlet.
If you've played Hard Mode, you know that conserving MP is an essential strategy. You get a refill of 50% HP and MP after each battle in the gauntlet, but you'll still need to be careful not to overspend, especially when you might need emergency healing in the future. Prayer Materia is essential to this task; equip as much as you can (snag an extra orb or two by revisiting Don Corneo's Secret Stash in Steel Mountain in Chapter 14). You'll also want high defenses, which is why we opted for the maxed-out Buster Sword and Leather Gloves for Cloud and Tifa; you might have other weapon preferences, but high damage output, high HP, and high defense are a must.
You might also want to reshuffle your spell Materia based on your personal play style. Make sure everyone has Healing capabilities for when things get dire; we generally treat Barret as the designated healer, while Tifa and Cloud support with occasional offensive spells. You really only need Fire (for Shiva) and Lightning (for Leviathan) for this group of bosses; bring other spells if you like them, but the hardest fights in this group don't have magical weaknesses.
Cloud
- Weapons and Armor: Buster Sword, Chain Bangle, Champion Belt
- Materia: (Weapon Section) Healing, Prayer, Steadfast Block, Revival, Barrier (Armor Section) Fire+Elemental, Lightning Bahamut
- Limit Break: Ascension
Tifa
- Weapons and Armor: Leather Gloves, Supreme Bracer, Transference Module
- Materia: (Weapon Section) Skill Master, HP Up, Lightning, Deadly Dodge, Revival, Prayer. (Armor Section) Healing, Leviathan
- Limit Break: Dolphin Flurry
Barret
- Weapons and Armor: Big Bertha, Cog Bangle, Healing Carcanet
- Materia: (Weapon Section) Healing+Magnify, Revival, Prayer, HP Up, MP Up (Armor Section) Fire+Elemental, Barrier, Ifrit
- Limit Break: Catastrophe
Stay With Barret
Keeping your team healed is essential throughout all of these fights, and for that, you'll want to rely on Barret. His attacks can fill his ATB bars quickly to get Prayer ready, and you'll want to use Materia to increase his MP pool as well. Through most of these fights, sticking with Barret is ideal, as your AI companions are pretty good at taking care of themselves. Keep them healed and dishing out ATB attacks as much as possible. You do want to switch around every now and again, as enemies will tend to focus on whatever character you're controlling--but generally, controlling Barret will help you keep his ATB up, and therefore keep your heals coming.
Shiva
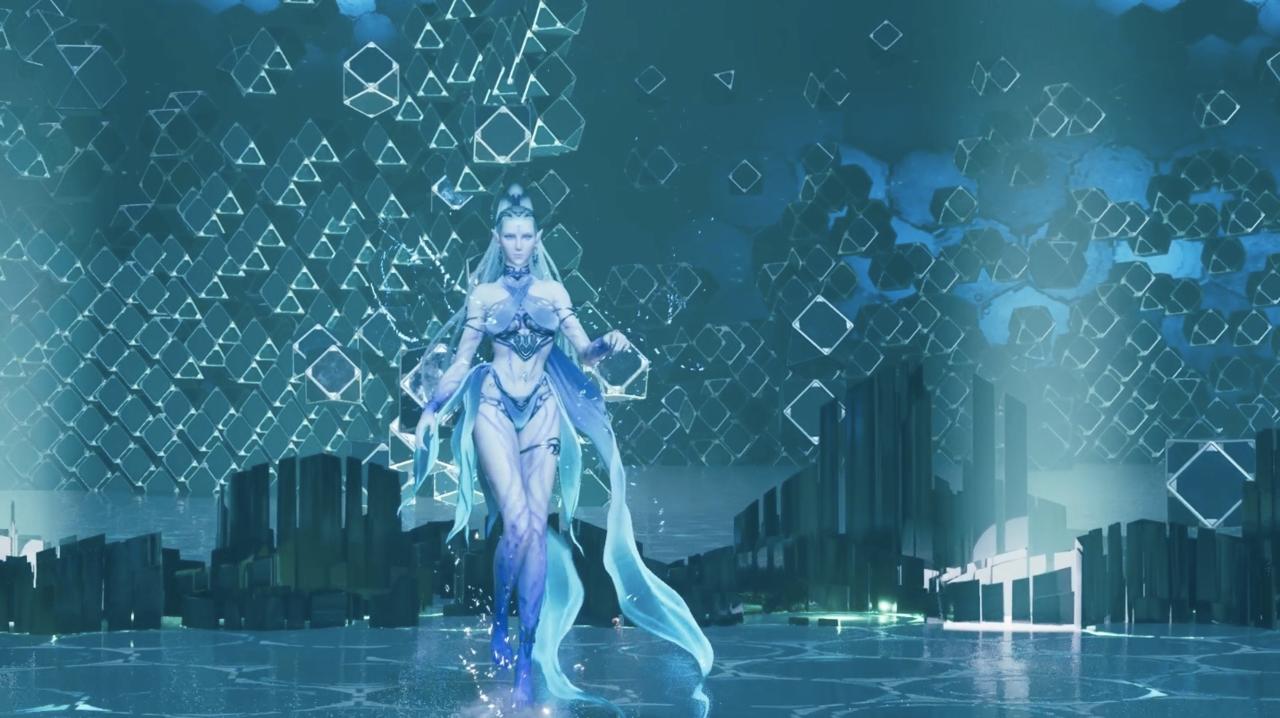
Your first challenge is Ice summon Shiva. You should have Fire Materia on-hand for this fight, although your major focus will be on sticking close to Shiva and attempting to stagger the boss. A good Fire spell can knock Shiva down, opening her up to melee strikes from Cloud and Tifa to drive up her stagger meter--use Focus Thrust and Focused Strike to take advantage when she's pressured, but don't over-commit because Shiva strikes back with some powerful moves.
Do your best to hit Shiva from behind with melee strikes to avoid using a lot of MP in fighting her. Guard your way through most of her attacks, including Blizzara and Blizzaga; you can deflect the initial blast and then dodge clear before the ice explodes, avoiding most of the damage. She'll also throw a lot of ice crystals at you, which are tough to dodge and best dealt with by guarding.
The attack you particularly want to look out for is White Out, which sends an icy burst blasting through the ground, which will stun any character it hits. Stay close to Shiva and you can usually avoid these by running behind her or dodging quickly. If you do get stunned, switch characters immediately and lay into Shiva so you can get a healing spell ready for the follow-up: an attack called Heavenly Strike that drops a big ice crystal on the stunned character. You want to stick close to Shiva to do melee damage, but be aware of her Icicle Strike attack, which creates a blast of ice all around her that will hit anybody close. Getting clear of it is possible but tough, so you're better off absorbing the hit by guarding.
Eventually, Shiva will summon Frost Familiars that will bolster her spellcasting ability and heal her periodically. Watch out, because White Out will now send three bursts of ice in succession, rather than just one, amplifying the chances of you getting stunned. Frost Familiars make Shiva immune to magic, so don't bother throwing Fire at her. Instead, keep up the melee pressure and wait until she casts Blizzaga, which will use up her Familiars. When she does, hit her with a Fire spell to drive up her stagger meter. Faster, weaker spells are generally better, since Shiva will often re-cast Frost Familiar pretty quickly, and you don't want to miss the window or waste a bunch of MP on a useless spell.
As soon as you can get Ifrit in the battle, summon him and start using his abilities to do significant damage and keep Shiva off-balance. The Fire attacks should end up staggering her quickly, allowing you to do a bunch more damage. At about one-quarter health, Shiva will do her big summon attack, damaging your entire party. Make sure you're healed up before that happens, or she can take you out in one blow. After that, keep hitting her with melee attacks and, hopefully, Limit Breaks until she's done.
Fat Chocobo
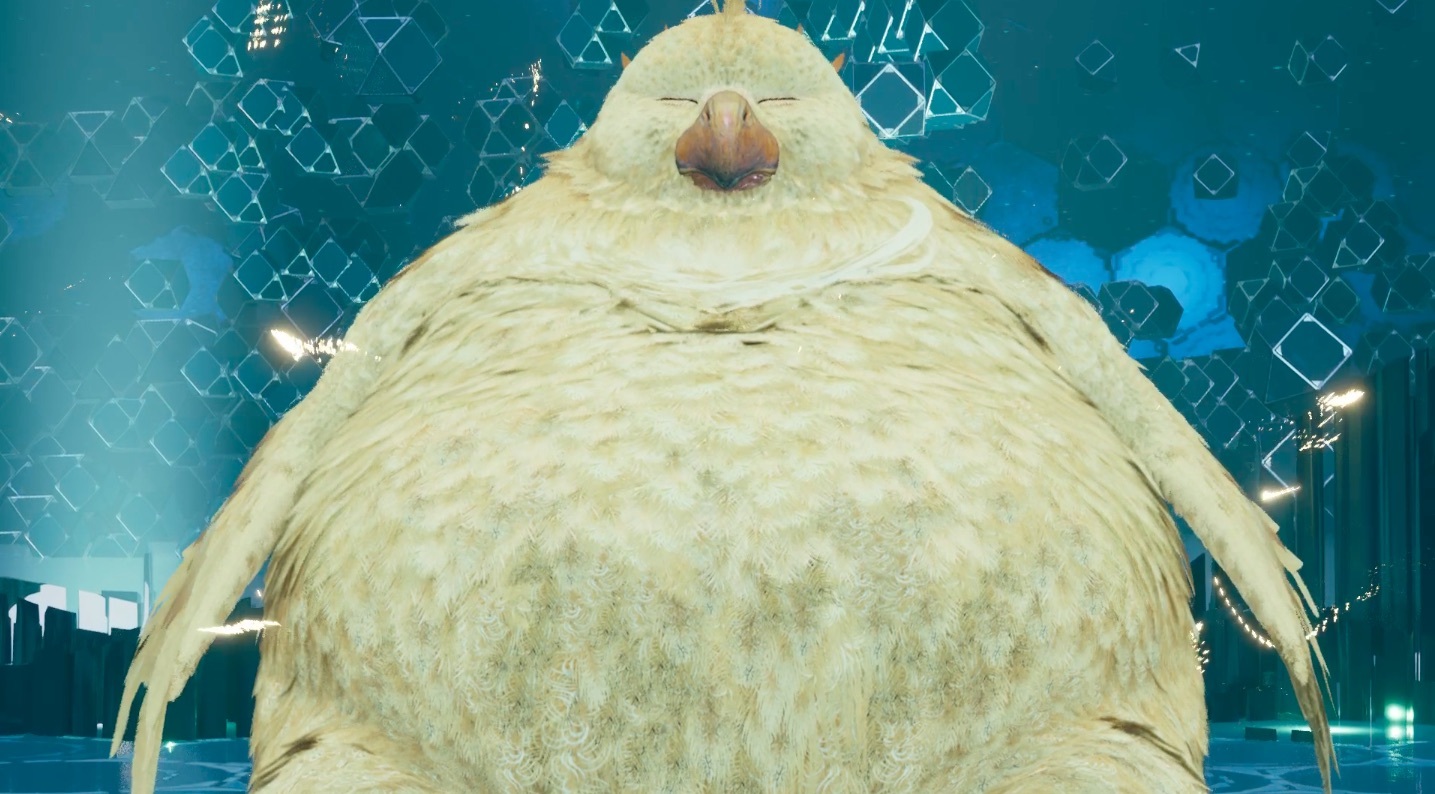
Fighting Fat Chocobo is a whole lot easier than Shiva, but you still need to keep your wits about you. The summon creature doesn't have any significant weaknesses, so you'll just want to hit it with your toughest attacks; save the MP on this one, as you don't really need to waste spells here. The best way to pressure Fat Chocobo is with ATB abilities, like Cloud's Braver and Focused Thrust and Tifa's Focused Strike and Chi Trap. Go with the ones you like best and deal the biggest damage. Meanwhile, Barret's job is to keep firing away at Fat Chocobo to keep his ATB full for Prayer infusions.
Fat Chocobo hits back with a lot of physical attacks, so if you want additional protection, Barrier can help (although it's not essential by any means). His Wark attack has him throwing random garbage at you, which you can easily avoid by dodging. When you get in close, watch out for Boom, in which he pops up into the air and drops back down for a big area-of-effect strike. After a bit, he'll start rolling around with Roly Poly, which you can dodge clear of if you're quick.
Meanwhile, the Moogle that floats around Fat Chocobo will occasionally summon spectral enemies to come after you--specifically, Bombs and Tonberries, the latter of which can kill you with one hit. Knock these out quickly if you can with Cloud's Triple Strike, or even better, wipe them out with Barret's attacks while your teammate keep up the damage. Have your team dish out ATB attacks against Fat Chocobo to do damage and pressure it, then take advantage with Focused Thrust, Focused Strike, and Focused Shot to push up the stagger meter even more.
When you get a chance, summon Ifrit or Shiva into the battle to further pressure Fat Chocobo--the further into the fight you get, the more minion enemies will get spawned in to overwhelm you. You should be able to mop them up pretty easily with Triple Strike and Barret's guns, but if you're finding yourself taking a lot of damage, peel off and take a second to deal with them before returning your focus to the boss.
Leviathan
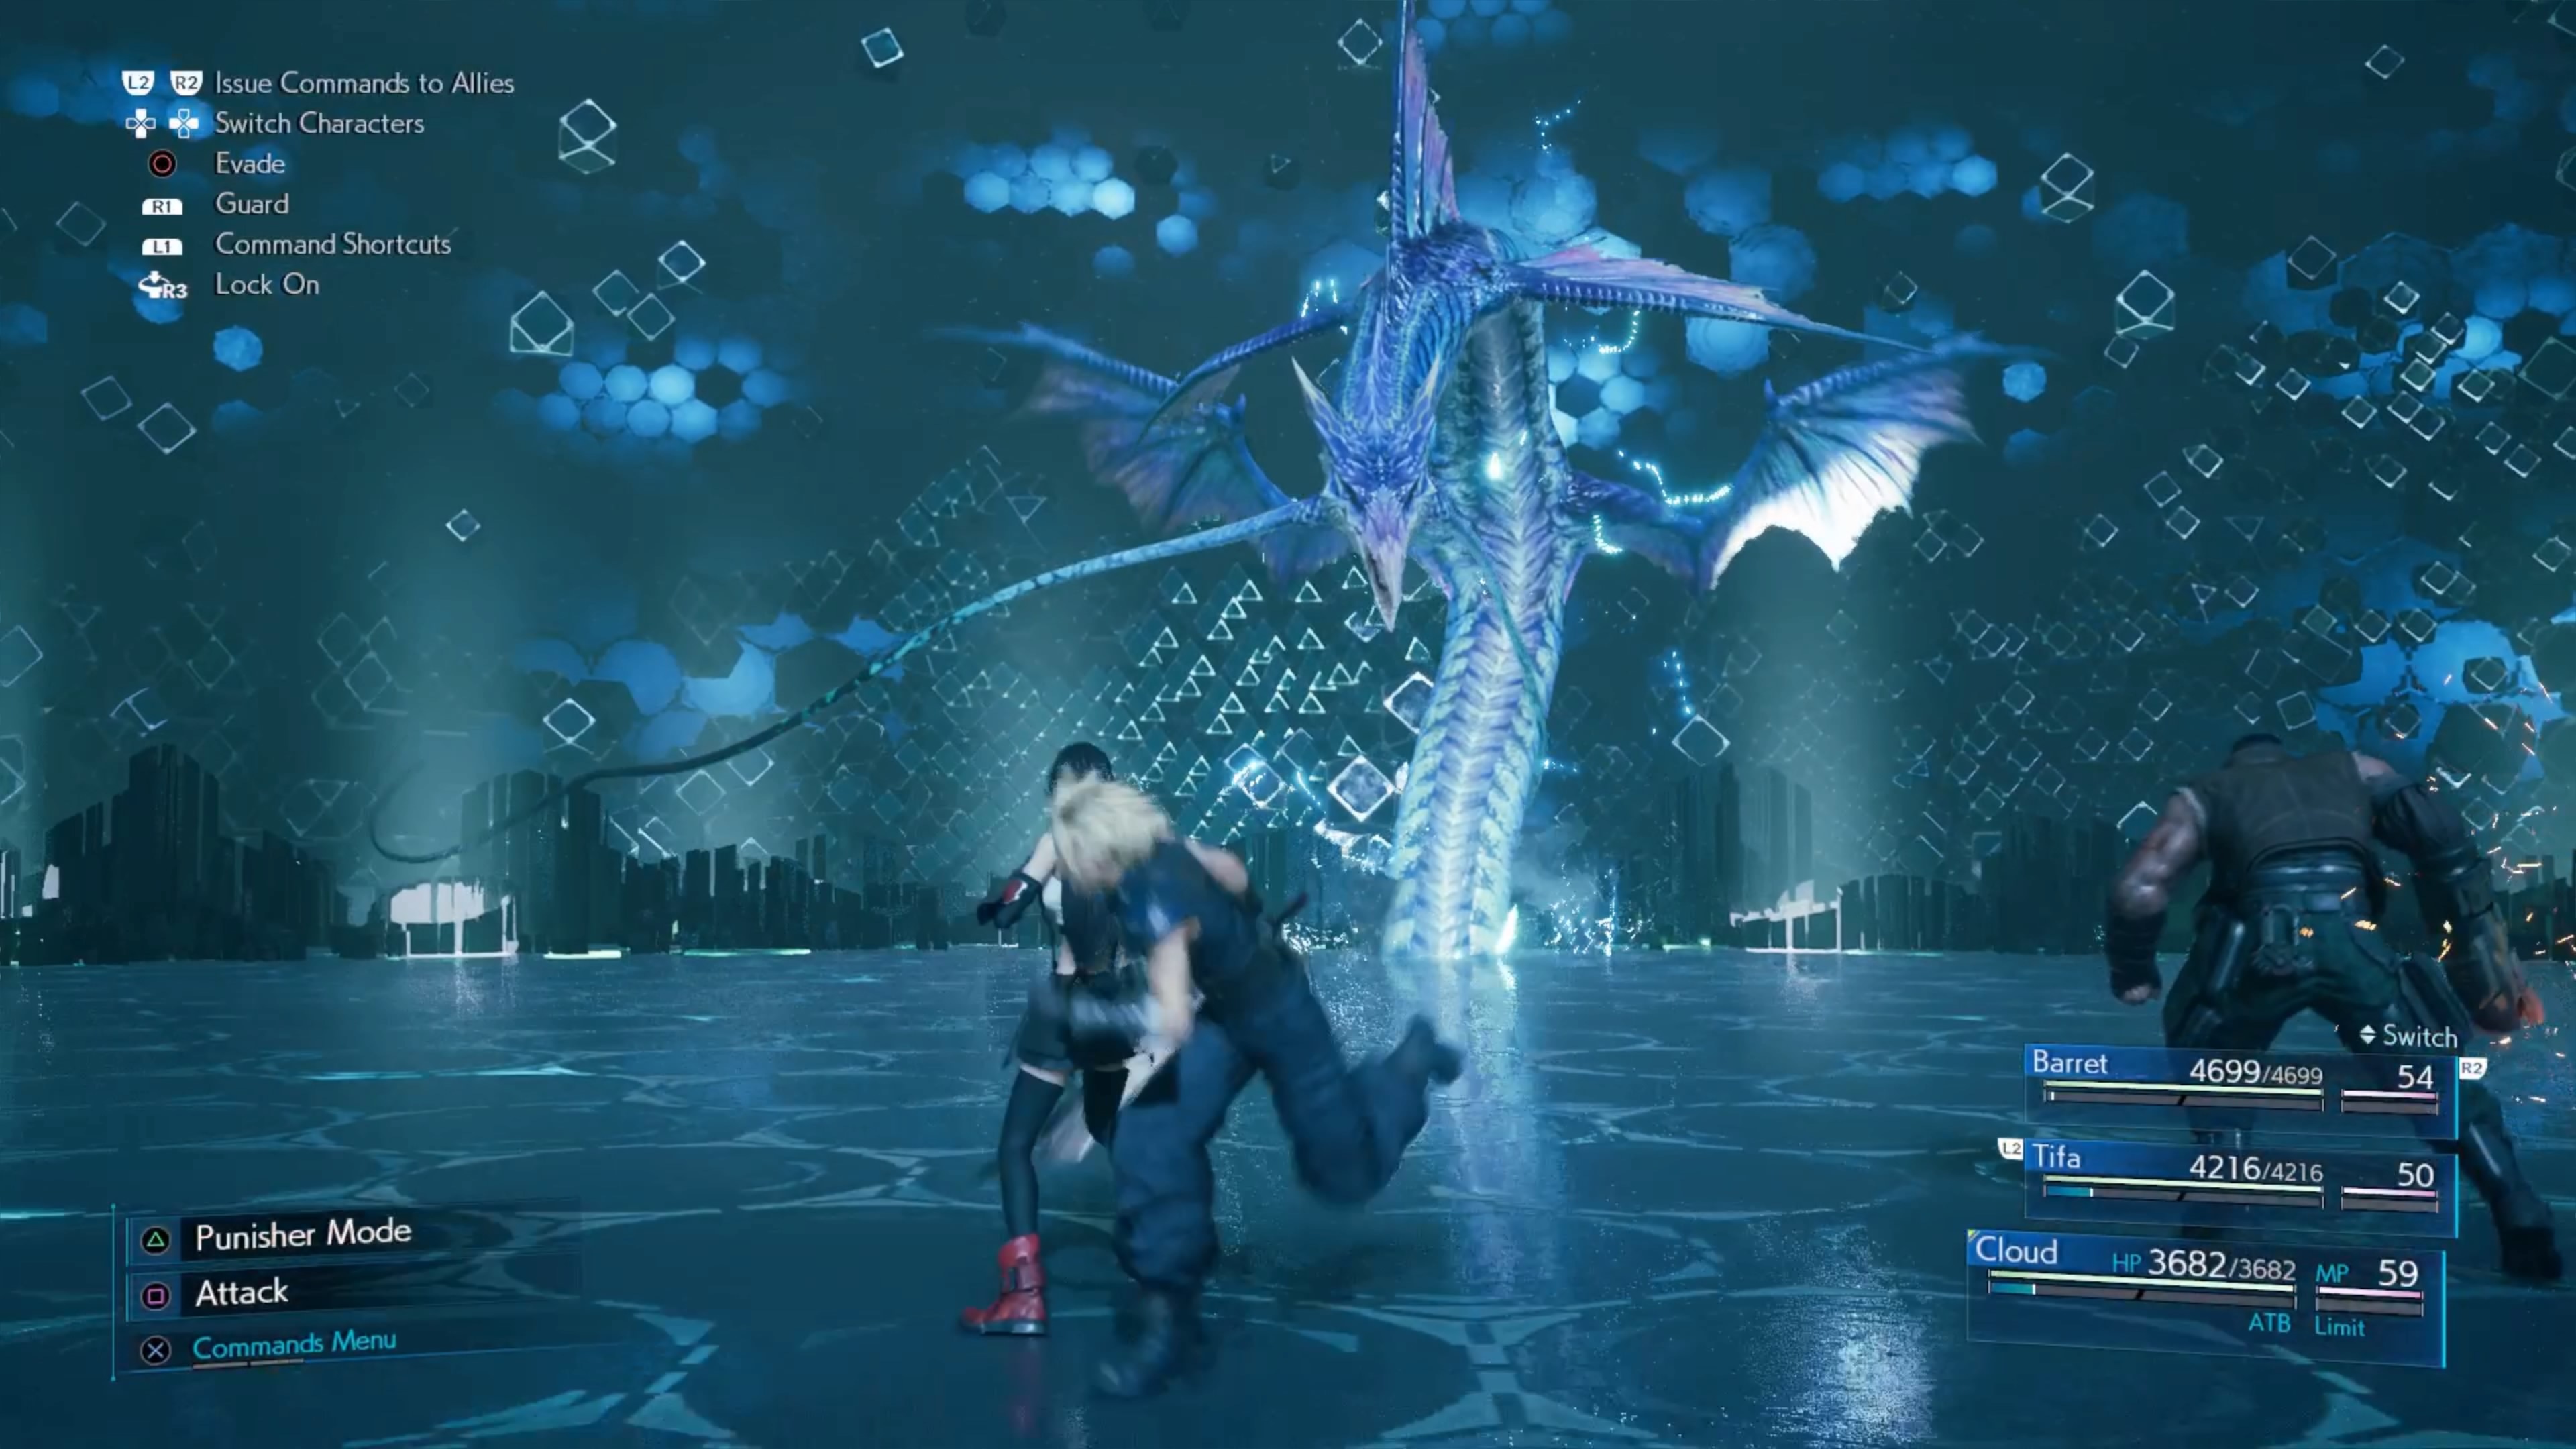
Things get tough with Leviathan. Its abilities don't have a particular element, but it is weak against Thunder magic, which is why you've got some Lightning Materia equipped. The boss itself is tough, mostly because it's wily and difficult to hit. It'll continually reposition around the huge battlefield, requiring your melee team to run around in an attempt to catch up. Stick with Barret for most of this fight (he should have the most HP, and therefore the best ability to absorb Leviathan's big attacks) to keep the heals coming and leave your melee fighters free to attack with ATB strikes.
In the first half of the fight, you'll need to contend with Leviathan's hard-hitting attacks that require you to pay attention to positioning. Keep attacking and healing with Barret and using guarding through the boss's attacks. Its Briny Barrage is a tough one to dodge, so it's usually better to guard. Briny Bellow shoots a laser beam at you that hurts a lot, but if you're quick, you can sometimes dodge clear of it. The Leviathan will also turn its head to sweep the laser across part of the battlefield, so if you can keep moving, you can sometimes avoid it altogether. Be careful about staying too close to the Leviathan, however, because it'll activate its Gyre Spume area-of-effect attack around itself to send you flying.
You want Tifa and Cloud to wail on the Leviathan's body (marked as "Dorsal Fin" on your menus) with ATB attacks, while Barret hits it in the head as much as possible, which will drive up its stagger meter. When Leviathan lowers its head to charge attacks like Aqua Focus, hit it as hard as you can to try to pressure it and knock it out of the attacks it's charging. Focused Shot, Focused Thrust, and Focused Strike are good to push up the stagger meter further--if you can knock the Leviathan down, you can pummel it--but use high-damage attacks when the beast isn't pressured.
Be careful activating your powerful attacks like limit breaks, because the Leviathan likes to move around and force you to waste them. If it rears up, get ready for its big Spinning Dive attack, which is next to impossible to dodge and does massive damage as the Leviathan rams into you if you're not guarding. Stick with Barret and keep hammering the Leviathan with gunfire when it takes to the air, as well.
After you've done some damage, the Leviathan will start flying around, using its Tidal Wave attack to create water cyclones around the battlefield. These will hurt you upon contact, forcing you to keep moving, so get mobile while you keep firing on the Leviathan. This is when the Lightning spells come into play to try to bring the Leviathan out of the air. It should come back down after you've done some damage, but Leviathan flying around is actually a pretty good opportunity to amp up your ATB and get some healing done, if you need it.
Be sure to keep your health up, as eventually, the Leviathan will hit you with its big ultimate attack, which can seriously injure your whole team. You should be able to weather it, and by that point, a few more concentrated attacks will finish the Leviathan off.
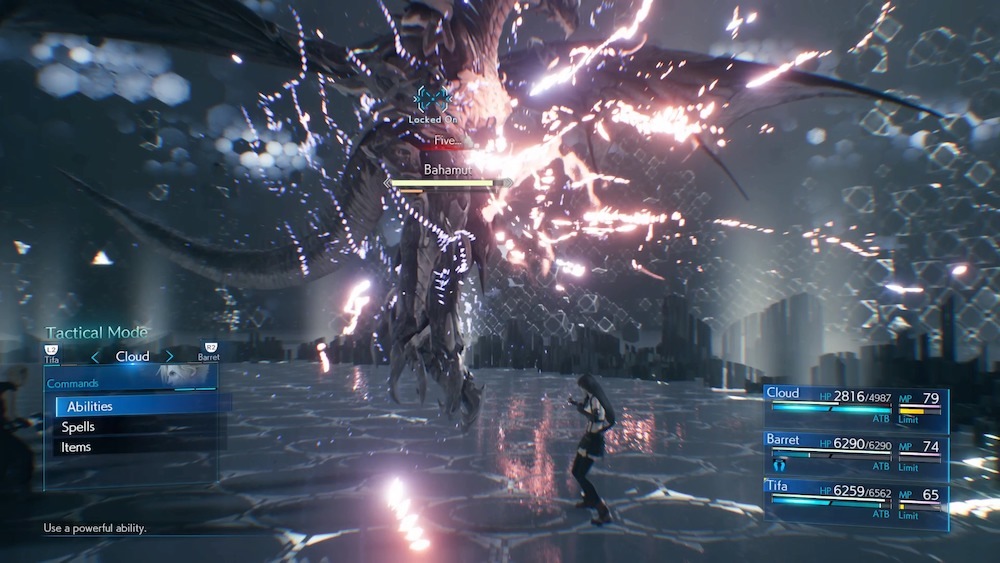
Bahamut (And Ifrit)

Bahamut is one of the toughest bosses in the game--it's fast and aggressive, with a number of powerful abilities that hit very, very hard. Crowning all of its lethal moves is Mega Flare, a final attack that will hit all your characters for so much damage that it'll likely wipe them out, even at full health and even if you're leveled all the way up to 50. Having the highest defense you can is key to dealing with Bahamut, and you'll want to rely on guard when he comes at you with attacks like his claw slashes or his spinning charge attack. You won't avoid most of these because Bahamut is so huge, so get used to blocking. With Cloud, Punisher mode and Counterstance will allow you to get in some strong counterattacks, so you're not just getting pummeled.
While defending against other attacks is important, your biggest concern is Bahamut's ultimate attack, Mega Flare. It will wipe your team under normal circumstances, and you only have two ways to deal with it: stagger the boss to prevent it, or use Manawall spells and healing to weather it. You'll know he's getting ready to use his massive attack when he starts counting down. Building Bahamut's stagger meter should be your primary focus throughout the fight, but having enough HP and defense to survive the attack should guide your loadout decisions.
You'll want to equip weapons and armor with high attack and defense. We fought our entire battle with Bahamut using no magic but healing spells; his attacks often come so fast and furious that you'll get interrupted if you stop to try to sling spells, and he's not weak to anything in particular, so you're best served by saving your MP for healing emergencies.
Your battle strategy is to block the big attacks from Bahamut, while closing in and constantly wailing on him with anything that can drive up his stagger meter. Swapping between characters quickly and frequently is essential, because Bahamut will go after whoever you're controlling hard; flipping to people who aren't currently under threat will give you time to build ATB bars and heal.
You also want to try to take advantage of openings to drive up Bahamut's stagger meter. We primarily utilized Tifa for this job with her outfitted with ATB boosters to give her a relatively constant supply of Focused Strike attacks. Using Cloud's Counterstance is a good way to pressure Bahamut, opening him up to Tifa's attacks; it's among Cloud's best abilities so don't sleep on it. When you can use ATB abilities, tend toward big damage to pressure Bahamut, then lean into Cloud's Focused Thrust, Barret's Focused Shot, and Tifa's Focused Strike to push up Bahamut's stagger meter even more. The Ascension, Dolphin Flurry, and Catastrophe Limit Breaks are also great for driving up Bahamut's stagger, but be careful to use them when the boss isn't moving, or you could waste them.
When Bahamut starts his countdown, he'll also fire up a powerful aura surrounding himself that will damage your team while they stand in it. Because of that, you're going to need to stay on top of healing spells, so make sure to constantly switch to Barret to fill his ATB bars and keep up the healing. Do your best to keep up the pressure on Bahamut, as you'll stagger him most effectively if you're able to do a lot of damage.
Tifa's constant use of ATB abilities should get her limit break up pretty quickly; make sure Bahamut isn't about to start moving before you activate it, since landing your limit breaks is essential for big stagger increases. Dolphin Flurry should give you a huge boost to Bahamut's stagger, so you absolutely need to land it.
Do your best to block and absorb Bahamut's big attacks. His Umbral Strikes are some of the most annoying, usually bouncing a teammate for two huge hits. They come from first the left, then the right, so a practiced dodge in one direction and then the other can sometimes avoid them. Bahamut will occasionally swing down and grab a teammate, so dodge that move if you can, but if not, switch to someone else and pound Bahamut with big attacks to get him to drop them (Omnistrike, in particular, seemed to work pretty well). If he pulls up into the sky for Divebomb, scatter your team so that he only hits one of them when he lands, then quickly heal that person.
Staggering Bahamut will reset the Mega Flare timer while leaving him open to huge damage, so when that happens, hit him with everything you've got. Take the opportunity to heal up if you're in trouble, as well. When Bahamut comes out of it, you'll start the process over again, but you should be able to build up Tifa's limit break relatively quickly again so you can start building stagger. If you can't stop Mega Flare, start casting Manawall spells to reduce the attack's impact on your team, and work on getting as close to fully healed as possible. If your HP is high, Manawall should allow most or all of your team to survive the attack. If anybody makes it through, the Revival spell Arise is your best bet to get your squad back up to fighting shape.
About halfway through the battle, Bahamut will summon Ifrit to back him up, making the fight even tougher. This is why you equipped that Elemental and Fire Materia on your team: if you've leveled them up, they should reduce Ifrit's damage--or even cause him to heal you. If you've been saving limit breaks, this is a great time to use them on Bahamut--Ifrit is way easier to deal with than Bahamut, and if you can hit the dragon for big damage, you might be able to take it out once and for all.
Elemental should at least give you the ability to keep up the pressure on Bahamut without worrying about Ifrit too much. Maintain your strategy and try to do as much as damage as you can, as fast as you can. If you've got a summon you can queue up, do so, as bringing your own extra fighter to the battle should help ease the pressure. With some concentrated Limit Breaks, a lot of healing, and a little luck, you should be able to best Bahamut.
Pride And Joy Prototype
The bad news is that, after Bahamut, you still have one fight left. The good news is that in comparison to what you just faced, the Pride And Joy Prototype robot is a cinch. We had almost no trouble bringing this giant robot to its knees.
The trick with the robot is to keep your distance and stay behind it. You can spend most of or all of this fight as Barret, picking away at the robot and dodging attacks. That'll keep Pride and Joy focusing mostly on Barret, opening up Tifa and Cloud to attack it at close-range most of the time. Keep your distance with Barret and lay into the boss to build up your ATB bars. While it's leaving Cloud and Tifa alone, have them use big ATB attacks to deal damage to the boss until you can attack its feet; those are your primary targets and you want to try to destroy both at the same time.
Pride and Joy has a few big attacks that can hurt you pretty badly, but you can mostly just keep away from the boss to minimize your damage, and guard when you can't. Watch out for a few big attacks: Brutal Tackle will see Pride and Joy chase your character around the battlefield before giving them a big kick, and it's pretty much impossible to avoid. Brute Force sees the boss execute a bodyslam straight down, but you can easily get clear of the blast it creates by just running for it. When the boss starts to glow, it'll shoot napalm grenades that leave damaging orange flames on the ground, and laser beams at the ground in front of it.
The other big Pride and Joy attack you need to be aware of is Beam Cannon, which the boss will charge over time as it glows. When you see it readying the beam, run: the result is a giant laser that will hit you very hard and cover a big chunk of the battlefield, but getting to either side of Pride and Joy allows you to avoid the blast. It's damaging but not especially dangerous if you're paying attention.
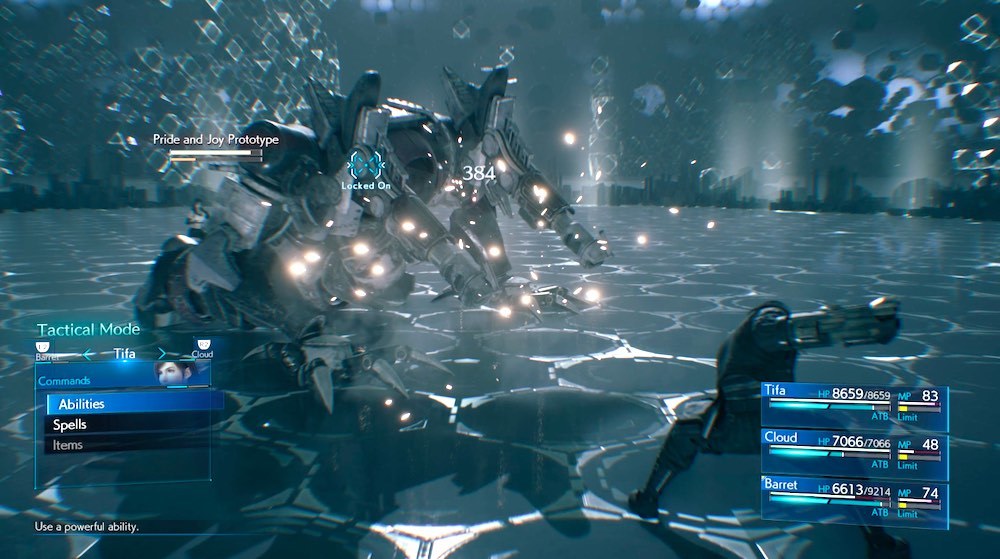
Use Barret to keep Pride and Joy's attention while Tifa and Cloud hack away at the boss's feet. Cripple one foot and the boss will fall; cripple both and you'll stagger it. When Pride and Joy goes down, you can also attack its arms to pressure it and drive up its stagger meter even more.
The rest of the battle is mostly a game of keep-away. Keep hammering Pride and Joy and healing up and you shouldn't have much difficulty, as the boss doesn't have nearly the agility of or devastating power of Bahamut. With a concerted effort and maybe a Limit Break or two, you'll come out victorious.
Winning the battle earns you the Gotterdammerung accessory, which lets you start battles with a full Limit Break meter and charges your limits over time, regardless of what actions you take. It'll also net you the Ultimate Weapon Trophy.
Got a news tip or want to contact us directly? Email news@gamespot.com
Join the conversation