Destiny 2 Treasure Beacon Guide: How To Solve The Cryptic Quatrains Pirate Riddle
Season of Plunder has a buried treasure for you to hunt down. Here's where to go to complete all of the steps.
Destiny 2's Season of Plunder features a new style of quest that involves solving pirate riddles to hunt down buried treasure. You'll need to rank up the Star Chart seasonal vendor a fair bit before you begin getting into these, but once you do, you'll receive a Small Treasure Beacon, which kicks off a quest called Cryptic Quatrains I. (Completing the Small Treasure Beacon quest is one of the Week 2 seasonal challenges, giving you even more reason to complete it.) Here's how to complete it and the following quest, Cryptic Quatrains II, which begins once you reach Rank 10 and get the Medium Treasure Beacon, and Cryptic Quatrains III, which begins at Rank 16 and you get the Large Treasure Beacon.
How pirate riddles work
For better or worse, these riddles are mostly very obvious, although a few can get tricky. Each step of the quest will present you with a riddle, but certain words in each sentence will be highlighted in yellow--those words strongly hint at where you need to go and what you need to do.
The steps will lead you from one location to another and, ultimately, the buried treasure. It's unclear at this point if the rewards are randomized at all, but in our case, the first quest provided glimmer, a Resonant version of one of the seasonal weapons (No Reprieve), five Map Fragments, and a Crude Cipher Fragment. You'll receive another of these Crude Cipher Fragments from the second Cryptic Quatrains quest but won't be able to use it until you complete the third and final of these quests.
Below, we've outlined the steps involved with solving all three treasure beacons--the Small Treasure Beacon, which is a reward for reaching Rank 7 at the Star Chart, the Medium Treasure Beacon, which you get at Rank 10, and the Large Treasure Beacon, received at Rank 16. You can increase your Star Chart rank by earning Savvy through the seasonal Ketchcrash and Expedition missions.
Cryptic Quatrains I
Step 1
After receiving the Small Treasure Beacon, you'll receive the Cryptic Quatrains I quest. The first step's riddle reads thusly (with bolded text in place of the yellow-highlighted words displayed in-game):
Me story begins as I hide from the crews
They search and will find me unless I hide soon
I'll wait on the nightfall, the cleverest ruse
And force them to hunt by the light of the moon
The solution here is simple: head to the Moon.
Step 2
Once you've arrived, the next riddle is presented:
Behind in the harbor, their sorrow was release
They lost what I'd taken, me heart filled with fear
From cruel revelation the dawn would reveal
A chest, broke and barren, and me nowhere near
Piece those words together and you're being asked to head to the Sorrow's Harbor area on the Moon, which is home to the K1 Revelation Lost Sector. Load in at the Sorrow's Harbor landing zone and make your way into the Lost Sector, which you can see labeled on your in-game map (the entrance is pictured above if you're having trouble finding it). Complete it as normal, and the chest at the end will complete this step.
Step 3
Once you've completed the Lost Sector, you'll get this riddle:
Me eyes toward the cosmos, I let out a sob
I begged to the gods and the fallen alike
By bullet or saber, I'd fall to the mob
But please, let me deal them a palpable strike
This is directing you to complete the Fallen SABER Strike in the Cosmodrome. You can boot directly into it by viewing the Cosmodrome in the Director and selecting the appropriate node, which you'll see in the upper-right corner, near the Forgotten Shore. Complete the Strike to finish this step.
Step 4

Finally, we arrive at the step that might cause some confusion. Here's the riddle:
The winds of Europa were frozen and white
And even the tides had been stopped by the cold
The hook would swing empty, I'd not die tongiht
By cranes they'd be searchin', but I'd keep me gold
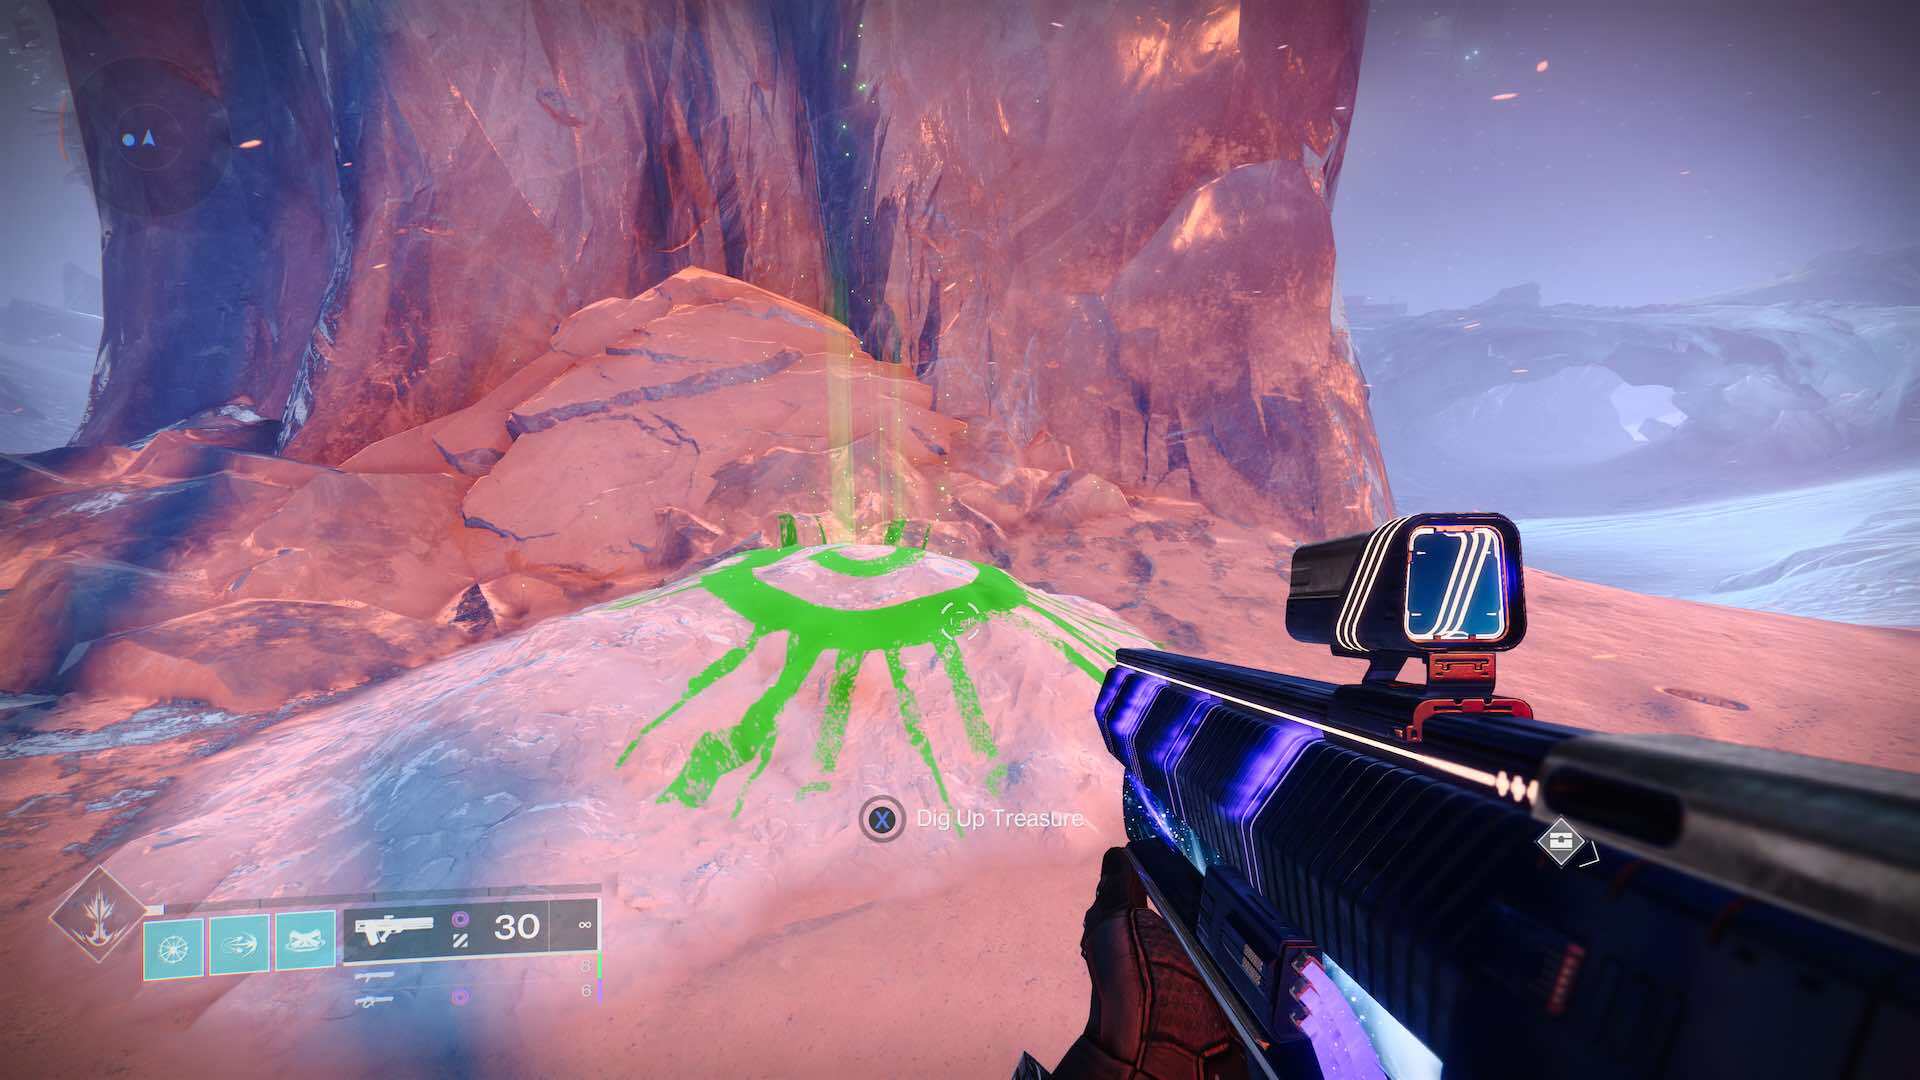
Clearly, you're being directed to Europa's Eventide Ruins area, but there are a number of cranes to be found. Fortunately, you don't need to go far. As soon as you load into the Eventide landing zone, you should see two cranes directly in front of you. The closer of the two isn't holding anything. Move to just under where the crane's hook is hanging, and you should see a lump of snow marked with a green symbol (pictured below), much like you'd see at the end of an Expedition. Dig up the treasure to complete the quest.
Cryptic Quatrains II
Step 1
Once you reach Rank 10 with the Star Chart, you can visit it to receive the Medium Treasure Beacon. That will kick off the Cryptic Quatrains II quest, which works much like the first one. Here's the first riddle:
The bay filled me chest, although drown I did not
I coughed and I shivered me way through the mist
They dreamed I was lost, my sad scarper for naught
Yet all that I wished for was tight in me fist
This is leading you to the Dreaming City, where you need to complete the Bay of Drowned Wishes Lost Sector. The entrance to this is conveniently located right next to your landing zone in Divalian Mists.
Step 2
Once the Lost Sector is completed, you get your next riddle, which is again fairly straightforward:
I swore I was dead at the shore of the lake
Their shadows stretched long as they searched the debris
But though they did strike out at me and me take
Their words found me ears, but they didn't find me
This one is directing you to the EDZ, where you need to complete the Lake of Shadows Strike. When you pick the EDZ from the Director, you can find the node for the Strike in the bottom-right corner.
Step 3
Next up is a riddle that ties into one of the new seasonal activities:
Me long expedition led to no reward
Me bones cried for rest and yet I could not yield
Lest I hear the sound of a crewmate's drawn sword
I shivered with terror at what they might wield
For this step, you need to complete an Expedition while using a sword. Simply equip any sword in your Power weapon slot, launch into an Expedition (available from the HELM's Director screen), and play through it to the end.
Step 4

Now we start to get into slightly more complex steps, as you'll need to figure out what location you're being directed to with this riddle:
The red ground of Nessus would soon be me grave
A column reached high into alien hue
Though cistern did beckon, no water it gave
At pyramid's imprint, I sought to pass through

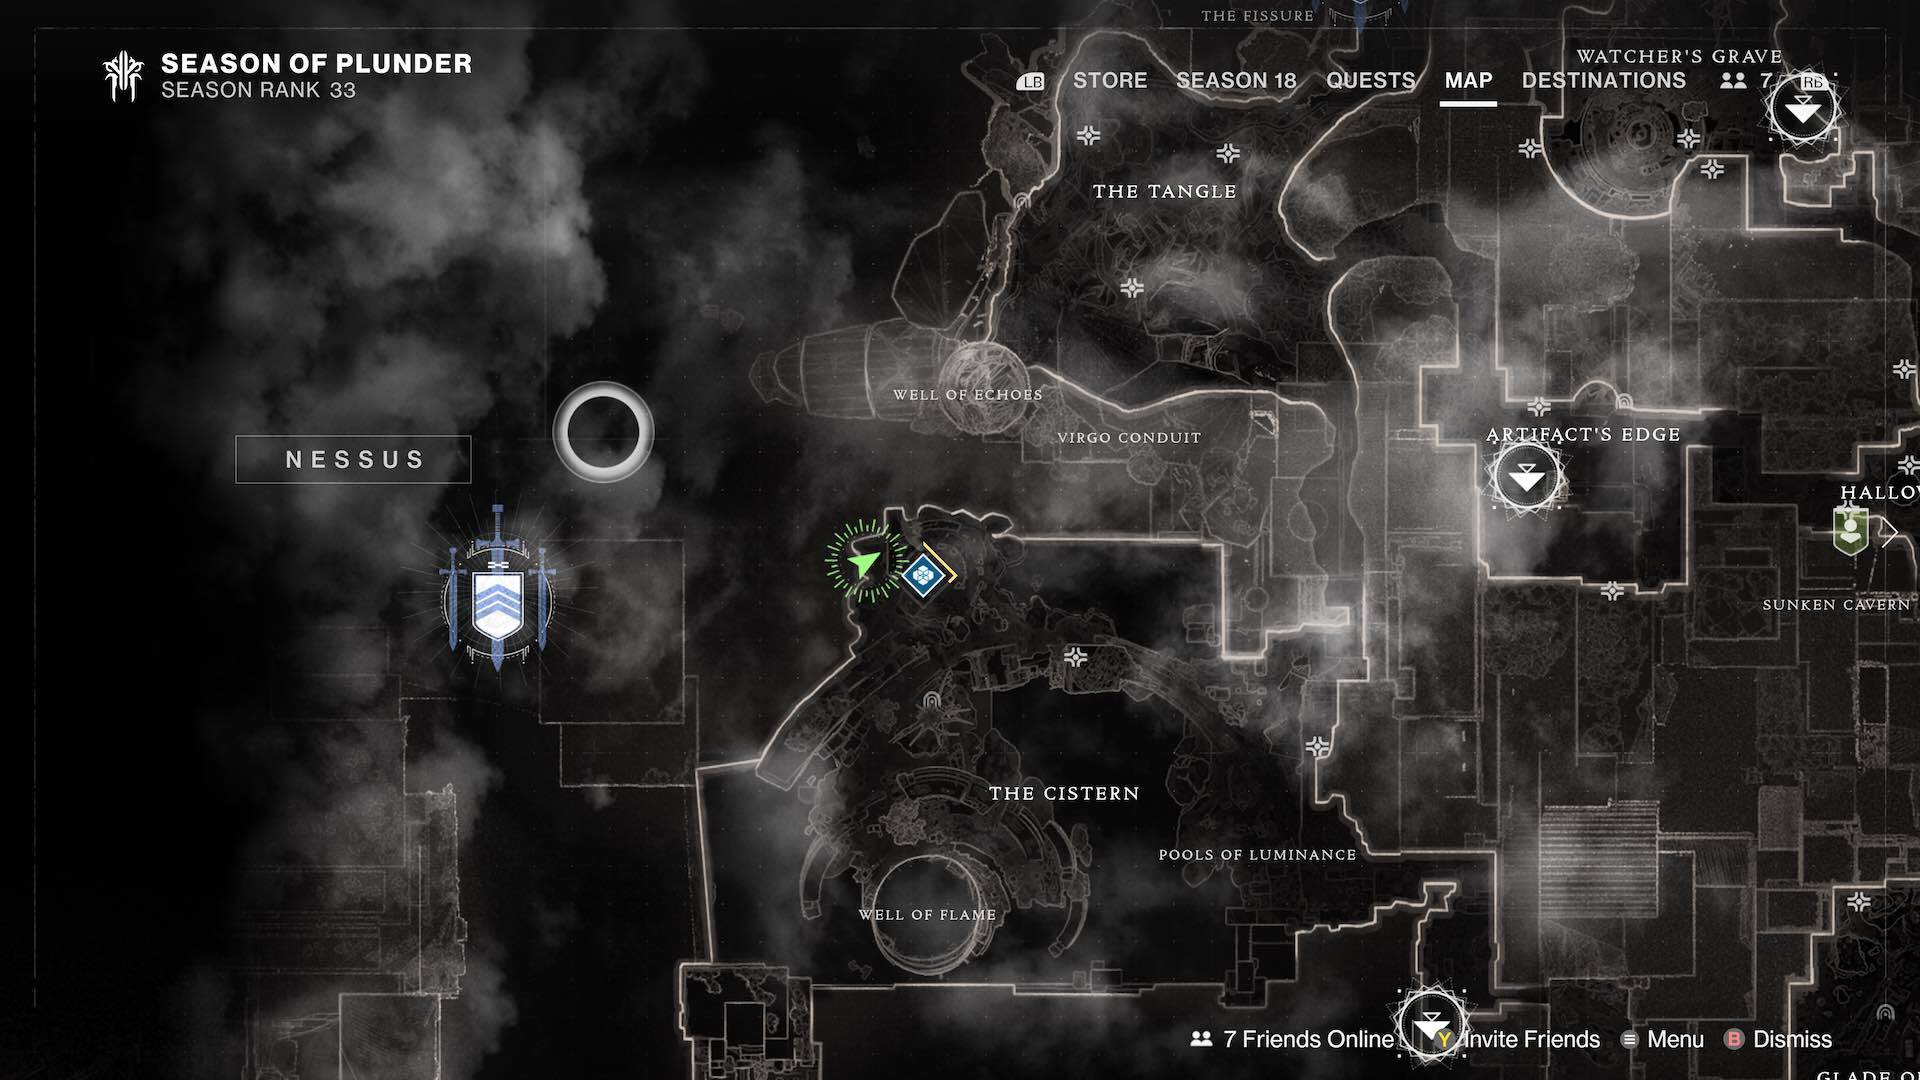
While it's clear enough you want to spawn in at the landing zone for The Cistern on Nessus, the specific location may not immediately ring a bell. Make your way to the Well of Flame (marked on your map), and along the east side (which you should approach if you're coming from the landing zone), you'll see a series of platforms that take you up and inside the structure. Make your way up, and just inside the doorway, you'll find a buried treasure spot. Dig it up, but you're not done yet.
Step 5

This is where things may get quite tough for you, thanks to this riddle:
Me crewmates were nearing, t'was just as I feared
And terrible fluid did fall from the sky
I fancied I noticed, beyond broken sphere,
A place that was safe for me treasure and I
This riddle leads you to the final treasure spot of this quest, and if you'd rather not spend literal hours searching for it (bless you for respecting your time), here's what to do: Exit the Well of Flame or otherwise make your way to The Cistern on Nessus once again, and then head to the northwestmost point of the region. Right near where the Cabal Public Event typically takes place, you'll find a small broken sphere. Just to the side of it, you'll find the hidden treasure to dig up. Among other rewards, you'll receive a second Crude Cipher Fragment, but you'll need to complete the next quest in order to actually make use of it.
Cryptic Quatrains III
Step 1
Once you've leveled up the Star Chart to Rank 16, you can get the final piece of this puzzle: the Large Treasure Beacon. This kicks off the Cryptic Quatrains III quest, which works much like the previous ones. Here's the first riddle:
...was I still alive? Still not dead, as I dreamed?
Me treasure not sunken, not lost in the deep?
They'd caught not their quarry, I would be redeemed
And bury me knife in their chests while they sleep
This is slightly less direct than some previous riddles, but the objective is still fairly easy. You want to head to the EDZ's Sunken Isles area and enter The Quarry Lost Sector. This is located just in front of you when you spawn in at the landing zone, to the left, at the base of the large cliff. Complete the Lost Sector and open the chest at the end to move on.
Step 2
After opening the Lost Sector chest, you'll get this riddle:
I waded ashore after crashin' their ship
Me takin' their treasure they'd never forgive
Me exodus doubtless curled many a lip
I'd make them forget I had one life to live
For this objective, you need to complete the Exodus Crash Strike located on Nessus. You can load right into it from the Nessus map, but as the end of the riddle suggests, you need to avoid dying. Equip whatever loadout is best-suited to survivability and complete the Strike to move on--and be careful of all those exploding shanks you'll encounter.
Step 3
After the Strike, you'll receive this riddle:
They cursed as their catch crashed away through the trees
I moved as if lightnin' did arc through me bones
I felt like the maker had answered my pleas
While handy with cannons, they left 'em back home
This again might seem vague, but all you need to do is complete a round of Ketchcrash with two things equipped: your Arc subclass and any hand cannon.
Step 4
Up next is a very quick step based on this riddle:
Alone with me atlas and treasure at last
I use me crude dagger to cut out a code
This cipher I'll place where it's held safe and fast
Two beacons will guide you if treasure you're owed
From your Quests screen, inspect your Captain's Atlas, just as you would to forge any treasure map for the Expedition activity. The previously un-craftable Crude Cipher will now be available, so select that to move on.
Step 5
This riddle is also a quick one that doesn't require you to go anywhere:
I crept out at dust, left me treasure behind
And found me old crew and the captain as well
I'm light with a blade and me right hand's unkind
They'll find their salvation dead-center in hell
After crafting the Crude Cipher, three additional boxes will pop up in the Captain's Atlas. Each of these allows you to choose from three options, and the riddle is telling you in which order to do them: Dusk goes in the left box, Salvation in the center, and Light on the right.
Step 6
The final two riddles will actually require you to hunt down specific locations and are most likely where you may get tripped up. First is this:
The cosmos had set me ashore, I was free
Forgotten at last, me heart empty of hate
On deck of the vessel that pointed to sea
I leaned on the mast and awaited me fate
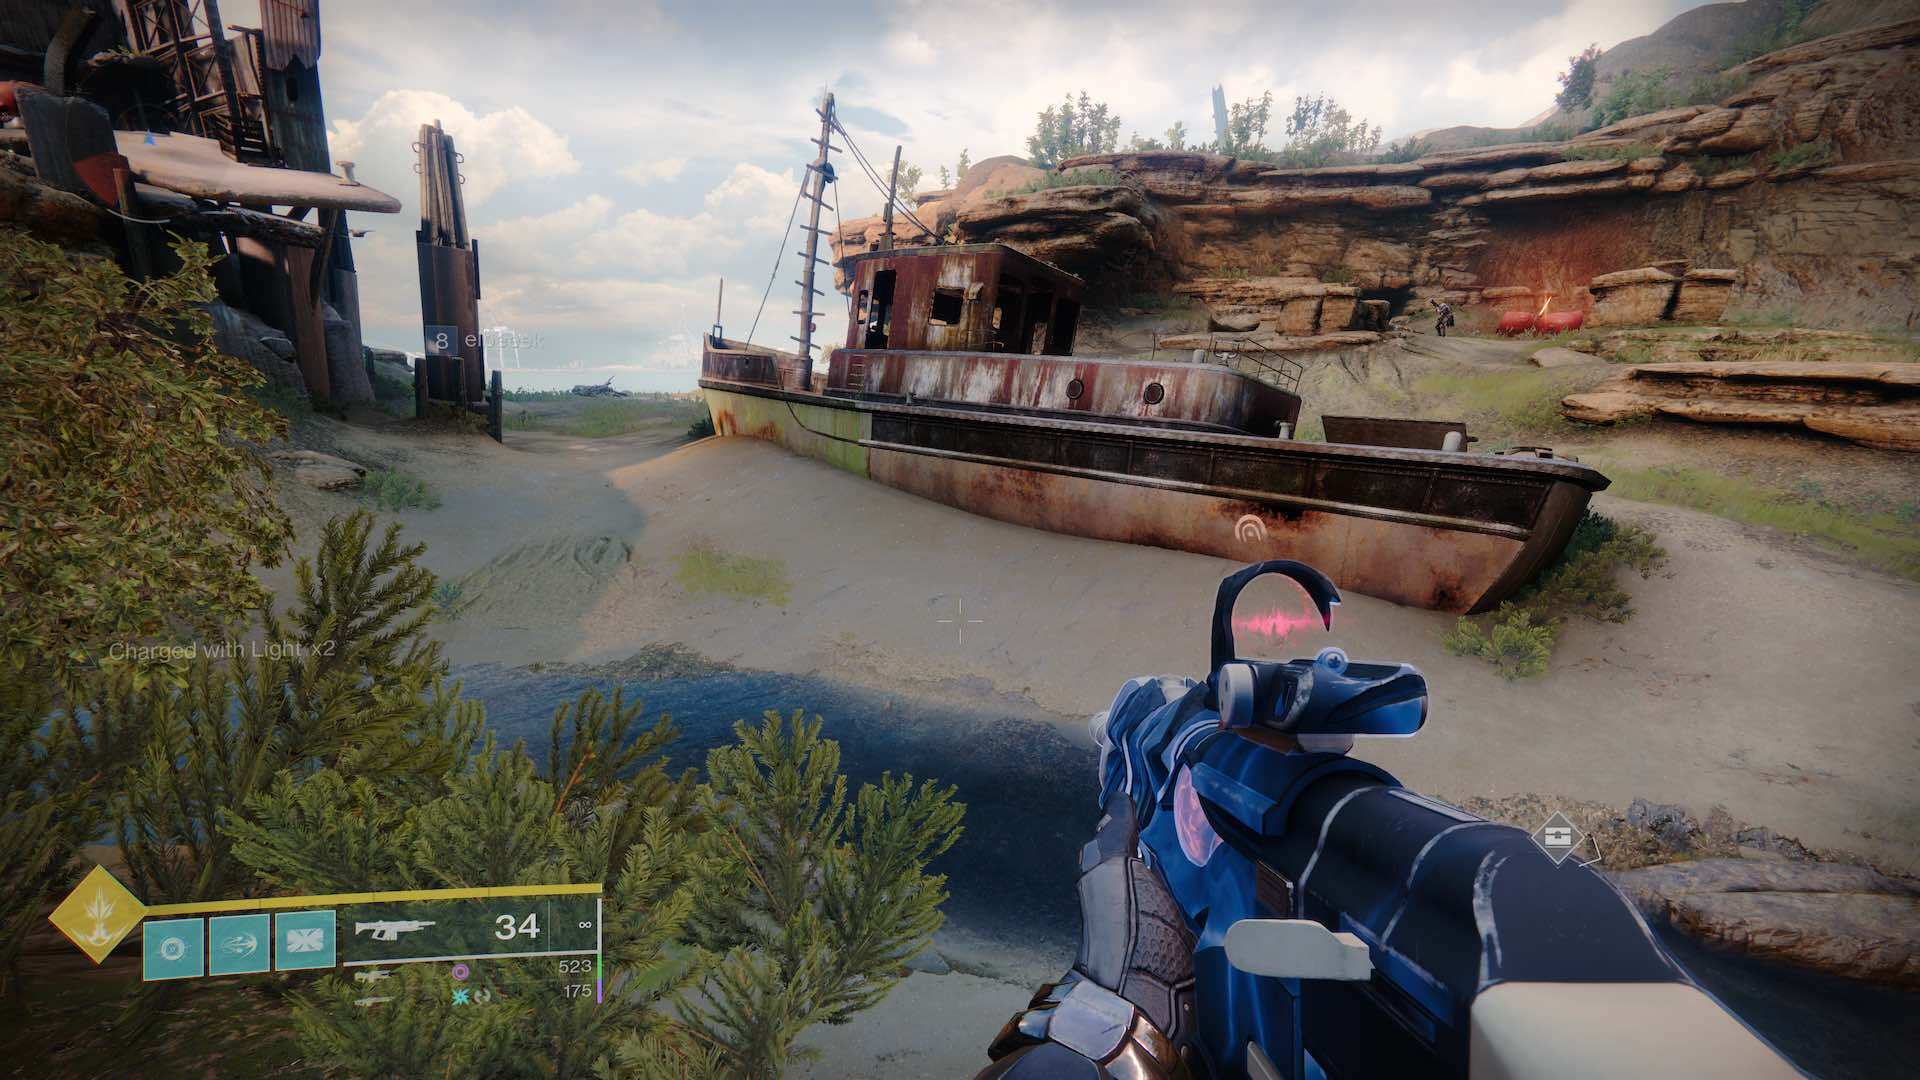
You'll need to head to the Cosmodrome's Forgotten Shore for this step. There's no landing zone here, so you'll have to make your way there from the north end of the Cosmodrome. (If you're having trouble, you can wait for a Public Event in the Forgotten Shore and then add a waypoint to it to guide you there.) When you arrive, you'll see a few prominent ships, but the one you want is at the far end of the area, near the Veles Labyrinth Lost Sector entrance. Hop aboard the small ship pictured above to find a clearly marked spot just in front of the mast.

Step 7

You're finally at the end with one final location hunt based on this riddle:
I took all I had, placed it safe in a cave
Where stream joins its mother by pillars of three
It's yours if you like, for you're clever and brave
You may find me treasure...but never find me
This riddle doesn't provide a great deal of detail, but fortunately, you don't have far to go--the treasure is nearby on the Cosmodrome. Head northwest until you see the cliff pictured above, which has three pillars located in front of it. Go inside, dig up the treasure, and you're done.

Rewards: Charge of Light Exotic Sparrow

While you'll receive assorted loot and items for completing each of these quests, the primary reward is reserved for finishing the third and final quest: the Exotic sparrow Charge of Light. This is a brand-new sparrow, and completing these quests is your only means of obtaining it.
Got a news tip or want to contact us directly? Email news@gamespot.com
Join the conversation