Battlefield Vietnam Walkthrough
This walkthrough includes detailed strategies for every map, weapon, and vehicle in the game, including a lengthy description on how to fly helicopters and make effective use of them in the battlefield. Whether you're fighting for the US and ARVN or for the NVA and Viet Cong, you'll benefit from reading our Battlefield Vietnam walkthrough.
Design by Collin Oguro
Few demos for multiplayer games have inspired quite as much online encomium as the demo for Battlefield 1942 did almost a year and a half ago. Although there had been team-based online titles before, few of them had so seamlessly integrated the components of warfare together into one coherent package. The huge maps; the ability to jump into (and out of) planes, tanks, submarines, and all manner of other vehicles; the incredibly well-designed control system: all of these factors combined to form an undisputed classic of online gaming, one that still regularly finds itself among the top three most popular online action games. And now, in an astonishingly short period of time, at least on the scale of computer games, we have the first sequel to the game: Battlefield Vietnam.
As the name implies, Battlefield Vietnam shifts the focus of the Battlefield series from World War II to the conflict in Vietnam. As a sequel, BFV retains all of the aspects of BF1942 that we know and love, but upgraded, tweaked, and rebalanced for optimal gameplay greatness. And, if its rapid rise in popularity counts for anything (within two weeks of its release, it's consistently managed to attract more online gamers than its predecessor), the future may be very bright indeed.
Although time will undoubtedly bring along expansion packs and brilliant modifications, for now, all we have is Battlefield Vietnam itself. And just in case that's not enough for you, Gamespot is proud to present an exhaustive guide to the game, featuring tips on the weapons, the vehicles, the armies, the maps, and just about everything else that DICE managed to pack into the title. Whether you're still in training or short for your first trip back home, you should find something of use here. Enjoy!
Table of Contents
Game TypesBattlefields
Fall of Lang Vei
Ho Chi Minh Trail
Hue
Ia Drang Valley
Landing Zone Albany
Operation Flaming Dart
Operation Game Warden
Operation Hastings
Operation Irving
Quang Tri--1968 and 1972
Reclaiming Hue
Siege of Khe Sanh
Weapons and Equipment
Sniper Rifles
Automatic Rifles, Submachine Guns, Machine Guns, Grenades, and Mortars
Mines, Explosives, and Anti-Vehicle Launchers
Weapons, DRV
Appendix
Game Types
Single player
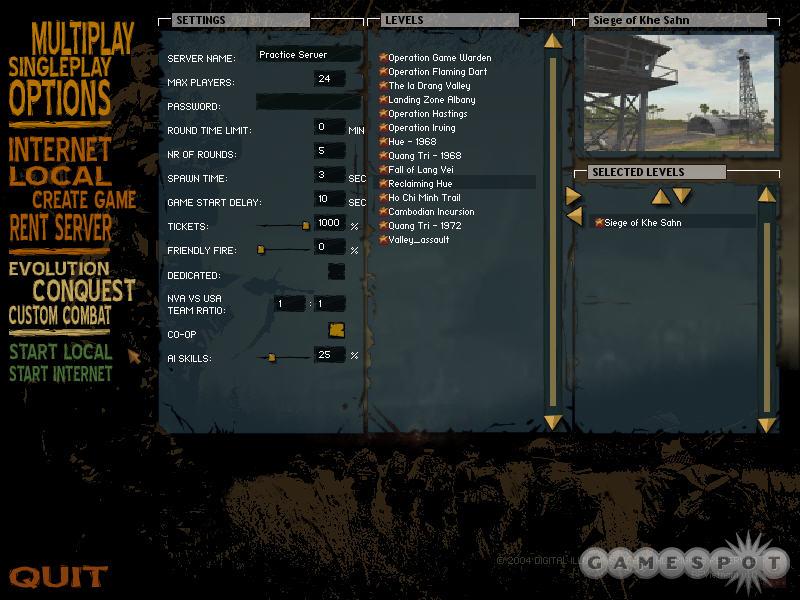
Battlefield: Vietnam includes a single-player mode. A lack of options and generally poor artificial intelligence prevents it from being very popular, however. For practice games, you are better off setting up a local server (go to Create Game, then select your options, put a tick in 'coop' if you want AI targets, choose your map, and click 'start local'. Set ticket ration to 1000% if you want a longer game.)
There are a few options within the single-player menus that are worth mentioning. Once you have clicked on Singleplay, choose Instant Battle (it is the only option). You will be presented with a menu with several options: AI Skills, Player Death Ticket Penalty, and Unit Ratio can all be set to one of four settings.
AI Skills, at least ideally, change how smart the computer-controlled enemies (bots) will be. This seems to mainly control how aware they are of their surroundings and how accurately they shoot. On 'Impossible,' you will be sniped from across the map by enemies you can barely see. On 'Easy,' you will be able to stand still a few feet from an enemy soldier firing on full auto without him being able to hit you--literally. Note that the AI Skills setting doesn't seem to have any effect on the tactics the bots will use against you, nor does it seem to affect damage.
Player Death Ticket Penalty determines how many tickets your side loses when you die. On Easy, you will lose one ticket when you die. On Impossible, you lose twenty. Unit Ratio determines how many of the bots are on your team and how many are against you. It is a 1-1 ratio on easy; this is because the human is usually so much better that one on one is easy.
Multiplayer
Conquest
Conquest is the basic gameplay style of the entire Battlefield series, although Battlefield: Vietnam brings with it a few changes to the model. The idea is simple: on every battlefield, there are certain points that represent a strategic advantage--a base, a hill, a camp, and so on. At each of these 'control points' is a flag. These flags can be controlled by either team, or by neither (a 'neutral' flag).
To give your team possession of a control point, you have to move close to the flag. When you get close enough, a meter will appear that shows you how close you are to converting the flag to your side. How long this takes depends on how many players from your team are nearby, and on how many enemies are nearby. For example, if you are the only one, the flag will turn to your side in a minute or so. If there are more people from your team nearby, it will change much faster. If you and one enemy are both nearby, the flag won't change at all, and if two people from your team and three enemies are near a flag, it will slowly change to the enemy's side. The idea is to get as many of your team near a flag, while at the same time keeping enemies away.
There are some benefits to having a flag under your control. The most obvious is that, when you are killed, you can come back to life (spawn) near any control point you own. Having control of points near the main battle can save a lot of walking, and the constant reinforcements from a point near the enemy can win a battle. Vehicles, some of them extremely valuable, will sometimes also appear near control points that you posses. If an enemy has a lot of important vehicles that come from a single spawn point (like an air base), then capturing that point will deny him those vehicles, and can turn the tide of the battle.
The second, less obvious advantage to possessing spawn points comes from Battlefield: Vietnam's scoring system. Each team starts out with a certain number of points (called 'tickets'). Whenever somebody on a team is killed, that team will lose one ticket. Whichever team runs out of tickets first loses the battle. Depending on which type of map you are playing on, having more control points in your team's possession will also cause the enemy's tickets to drain slowly away, even without them dying. In some maps, you just need to have more points under your control than the enemy; in some you will have to have all but one point under control to drain your opponent's tickets. Draining your opponent's tickets by holding control points is a much, much more efficient way to win a game than by killing the enemy.
Obviously, gaining and keeping possession of control points is extremely important; it is, in fact, the whole basis of the game. Capture neutral and enemy-held control points, and defend the ones you already have. Do that and you will win every time. Of course, if it were that easy, this guide wouldn't be necessary. 14 maps, nearly 50 weapons, land, air, and water vehicles, plus six different armies mean that this simple formula has lots and lots of complex variations.
There are three basic types of maps that you will encounter. Although all of them play with the same basic mechanics described above, there are some differences in how the control points are laid out initially, and in how scoring works.
Assault
Assault maps represent a force attacking an enemy position. One team begins with all but one control point. The other team begins with only one control point, but usually has a few extra vehicles to get them started. Teams will have their points drained if they hold only one control point. That means that the attacking team (the one that starts with only one spawn point) will already be losing tickets when the battle starts, and will continue to do so until they capture at least one enemy control point.
Head On
Head On battles are vanilla Battlefield. Each side has one control point, usually on opposite sides of the map. Between them are three or four neutral control points. Whoever controls the most points will drain their opponents' tickets.
Mission
Mission maps can vary. In general, they work like Head On battles, but there can be differences. In Siege of Khe Sanh, for instance, one particular control point counts the same as three normal ones. In Operation Flaming Dart, one side starts off with spawn points that cannot be captured. Read each individual map's section, as well as the starting screen in-game to learn about the special conditions that apply to a particular Mission map.
Coop
Coop is short for cooperative. A cooperative game means that computer controlled bots will be added to the game with the human players to make sure the server stays at full capacity and everyone has plenty of targets. Coop isn't a true game type, but rather a variation of Conquest.
Custom Combat
Custom Combat allows you to play any of the maps in the game with customized options. You can choose to change which weapons and kits are available, which armies will take part in a battle, and can switch any land/air/water vehicles with another type from the same category. You can also disable vehicles or cause them to be chosen randomly each time the battle is fought.
There are lots of interesting possibilities for Custom Combat. Some possible ideas: Disable all vehicles, and allow only scouts with sniper rifles and no pistols. Disable all weapons except for handguns (or knives, or rifles). Pick a crowded urban map, and make all of the vehicles tanks. Play without the M60. As you can see, the options are endless, and can give the same old maps a new life.
Evolution
Evolution isn't really a different type of game so much as it is a new way to play a series of battles. Many of the battles represented in Battlefield: Vietnam are related to each other in some way. Hue and Reclaiming Hue, for instance, are two historical battles for the same city that happened several months apart; in one, the North Vietnamese won. In the next, the ARVN came back and drove them out.
In an Evolution game, you play the first map of a pair. When the first battle ends, the next one starts automatically. The players will keep their scores and team assignments. How the initial control points and ticket ratios are set up will depend on how well each team did in the previous level. If both teams were neck and neck at the end of the first battle, the next one will start off balanced. If one team was losing badly on the first map, they will have an uphill battle in the second.
Battlefields
Evolution
Fall of Lang Vei
The Fall of Lang Vei is followed by The Siege of Khe Sanh
Why: Lang Vei was a small Special Forces base to the south of the Marine base at Khe Sanh. Lang Vei was attacked first (Fall of Lang Vei), after which some of the survivors made their way to Khe Sanh by the time of the battle there (The Siege of Khe Sanh).
Ho Chi Minh Trail
Ho Chi Minh Trail is followed by Cambodian Excursion.
Why: The Ho Chi Minh trail was used by the DRV to ferry supplies into South Vietnam through Cambodia (Ho Chi Minh Trail). Cambodia was later included in the war effort, and efforts were made to shut down the Ho Chi Minh trail, including some covert operations (Cambodian Excursion).
Hue
Hue is followed by Reclaiming Hue
Why: Hue was taken by the NVA during the Tet Offensive (Hue). At the end of a month's fighting, the ARVN moved in and took it back (Reclaiming Hue).
The Ia Drang Valley
The Ia Drang Valley is followed by Landing Zone Albany.
Why: The battle at LZ X-Ray was the first serious meeting of the war, resulting in a resounding victory for the Americans (Ia Drang Valley). Only a few days later and three miles away, the North Vietnamese struck back with an ambush (Landing Zone Albany).
Quang Tri--1968
Quang Tri--1968 is followed by Quang Tri--1972
Why: In 1968, the NVA attacked the city of Quang Tri as part of the Tet Offensive, but failed to take the city (Quang Tri--1968). Later in the war, Quang Tri was lost to the NVA due to a strategic blunder, and the ARVN had to go and get it back (Quang Tri--1972)
Conquest
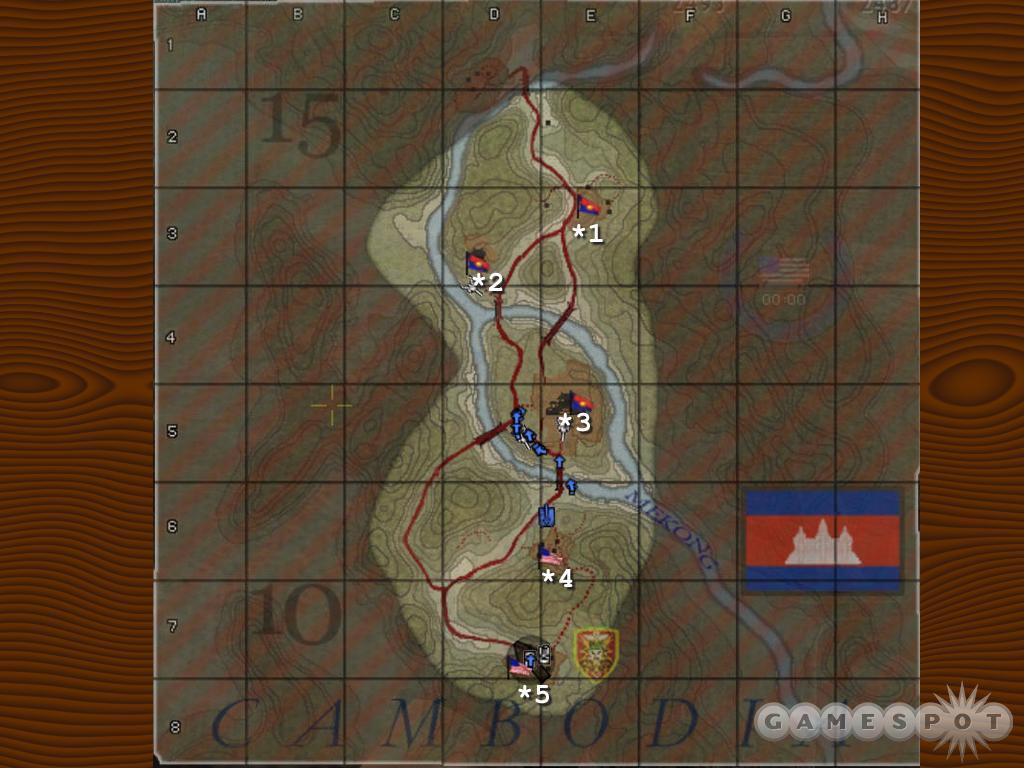
Cambodian Incursion (Assault)
MACV--Studies and Observations Group/Unidentified Viet Cong Forces
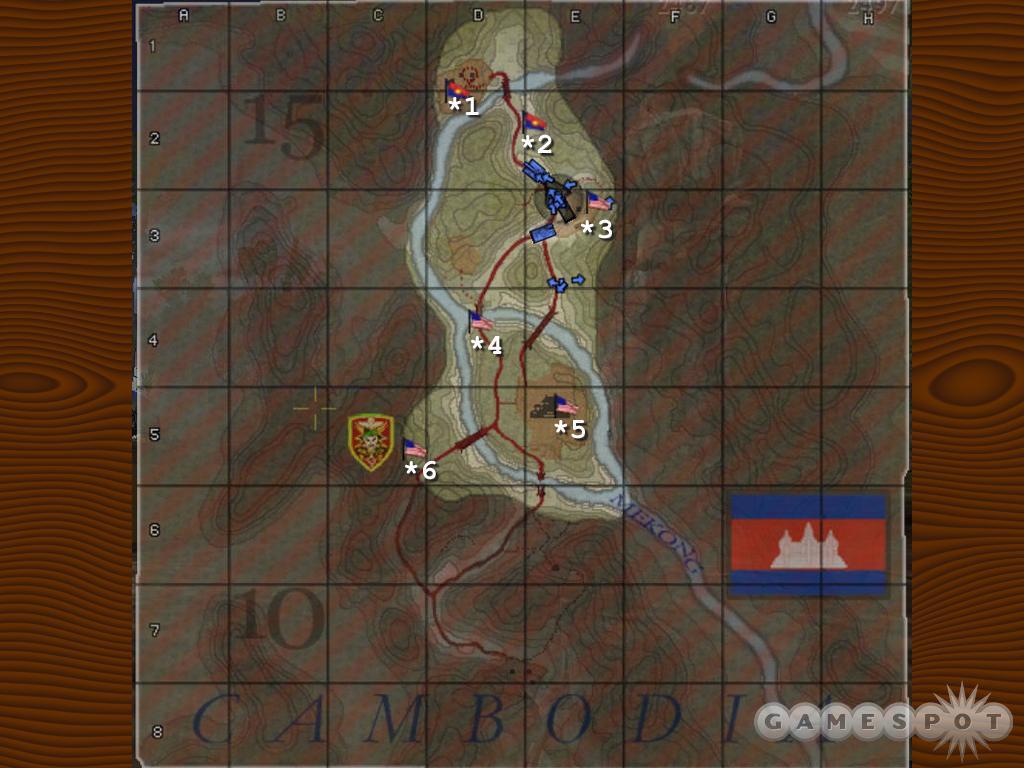
Cambodian Incursion is another Assault map, but it possesses a higher degree of difficulty for the assaulting VC than do many of the Assault maps that feature the US as the aggressors. The current trend on many servers seems to see the US forces being numerically superior, at least at the beginning of a round, which makes it very difficult for the VC to break out from their initial spawn point here. Overcoming the initial waves of M60/LAW forces can take a little while, even though the flag closest to the VC's initial spawn is only a couple hundred meters away.
US Strategy
Your chances of forcing victory grow better for each minute you can keep the VC forces holed up in their initial spawn point. At the beginning of a round, everyone on your team should be spawning at flag number 2 with an M60/LAW, and laying down fire at anyone who attempts to cross the river. The bridge here should be covered with fallen soldiers within minutes, but keep an eye on the flag itself; anyone who manages to sneak past you may try to camp out in a corner to convert it. You can also expect the tank to come rumbling over the bridge, but then again, most of your soldiers should be outfitted with LAWs, so you shouldn't have much of a problem dealing with it.
If you don't feel like joining the crowd, spawn at flag number four, and walk over the hill to the north, keeping an eye out for any VC infiltrators. If your team manages to pin them in long enough, they'll often try to swim around the river here towards flag four; if you can spot them while they're swimming, they're easy pickings. Otherwise, you can lie prone in the bushes above the VC spawn and pick them off as they run around in their base, with special emphasis on anyone attempting to man one of the M4 Field Guns. Your muzzle flash will eventually give you away, but you should be able to get a few cheap kills nonetheless.
A VC breakout is usually just a matter of time here; some enterprising guerilla will find his way behind your line and start converting a flag. If you're anywhere nearby, book it towards that flag double-time; you might not be able to prevent it from switching over, but you can at least kill the VC infiltrator and, if you're lucky, catch the first wave of enemy soldiers with their pants down as they spawn in. But, as mentioned, eventually the VC will control and fortify a base to prevent bleeding. After this occurs, the map usually devolves into a game of musical chairs, where each base will be converted multiple times. If you managed to press the VC into the initial spawn for a lengthy period of time, however, you should be operating with a marked ticket advantage.
VC Strategy
You're likely to be outmanned and outgunned at the beginning of a round on this map, so your priority should be to immediately break out, if possible. If you have a speedy computer, you may load the map quicker than other players, which means that you'll be able to spawn in before they will. If this happens, grab the tank and floor it until you reach flag number four! You'll probably get hit by a couple of LAWs as you zoom past flag number 2, but with any luck, no Marines will have spawned further south, and you'll be able to capture and hold the bridge's flag long enough for your teammates to spawn in and start metastasizing up and down the map.
If you're unable to effect the immediate break-out, you can still attempt to reach flag number four by swimming along the river to the south of your spawn point. This takes awhile, obviously; bleeding alone will account for around 20 tickets being taken away from your team while you make the trip, and even if you get there, you may still be killed by anyone who's chosen to guard that flag. Still, if you choose to go, stay in the river until you actually reach the bridge, and capture the flag by floating in the water underneath it. This will minimize the chance that you'll be spotted by an enemy soldier. After you manage to convert the flag, though, get out of the water forthwith; if a Marine comes along to convert the flag and notes that his timer isn't reducing, the first place he'll look for an enemy will be underneath the bridge. If there's a tank at the nearby temple, grab it and head back up towards the north to support the rest of your troops there.
If worse comes to worst, you'll be stuck among the grunts attempting to walk across the bridge near your initial spawn. These efforts are almost always doomed, even with the close-range artillery support, but should you manage to persevere through sheer force of will, your priorities should immediately shift towards defending your northern flags and moving your mobile spawn points (that's right, you get two!) into the hills to the south. Defending the flag is of paramount importance, but hopefully you'll have enough soldiers spawning at flag number two to prevent anyone from capturing it. If you're worried about incoming tanks, laying mines in the pools of water in the road is a great way to prevent enemy armor from approaching the northern end of the map. They can't be seen, and they still destroy any vehicle that comes up the road. A couple of log traps will also appear on top of the nearby hill when the VC control flag number two, which can be used to destroy armor, as well.
Beyond the basics of defending the northern flags, though, you'll want to move your spawn points to the south. One of them should be placed somewhere between flags two and three; these will often be converted sequentially by a single opponent who manages to sneak away from the fighting in the south, so it helps to have a quick way to take them back. The second should definitely be placed somewhere near the temple at flag number five. There are two entrances to the temple: one in front, which will generally be under the eye of whomever controls the temple, and one in the rear, which opens up underneath the temple itself. An ideal place for your second mobile spawn is in the brush at the rear of the temple; setting it here will minimize the chance that the US will stumble across it, while letting your troops flood the temple from below.
General Strategy
After the initial carnage in the north subsides and a few flags are converted, the action on this map, as on the Ho Chi Minh map, seems to revolve around the flag in the center of the temple. As such, if you're looking to kill off a few soldiers with minimal risk to yourself, you can either camp out inside the temple itself and pick off infantrymen as they come up the stairs, or head upstairs and outside onto the upper reaches of the temple and snipe from the structure's roof. Whichever you choose, you should have plenty of targets to choose from.
Flags three, four, and five generally see the bulk of the firefighting on this map due to their centrality, which is all the more reason to ensure that your team controls flags one, two, and six. Causing the other team to bleed requires your team to control five out of the six points, which is obviously difficult to do. If you're on the VC, though, and are operating on a ticket deficit due to an early-round pounding, you may want to just concede the temple to the Marines and try to box them in by capturing all of the other flags.
One aspect of the map to be noted is the multiple river crossings. These bridges, whether wide enough for vehicles or intended only for infantry, are natural choke points and thus draw a lot of campers, and also generally wind up with plenty of traps and mines. If you're not in a desperate hurry to cross a river, it's generally a bit smarter to just take a swim across the river to reach the other side. You'll be a fish in a barrel for anyone actually overlooking the water, but you may be able to avoid the attention of anyone sitting further back.
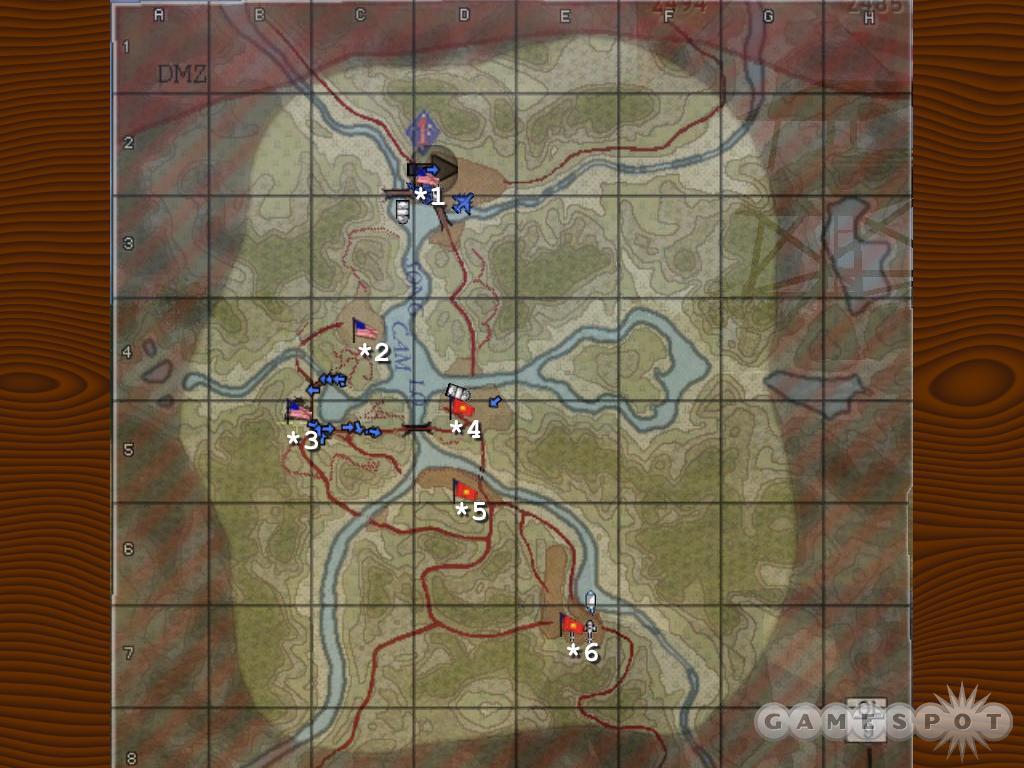
Fall of Lang Vei (Assault)
5th Special Forces Group/304th NVA Division
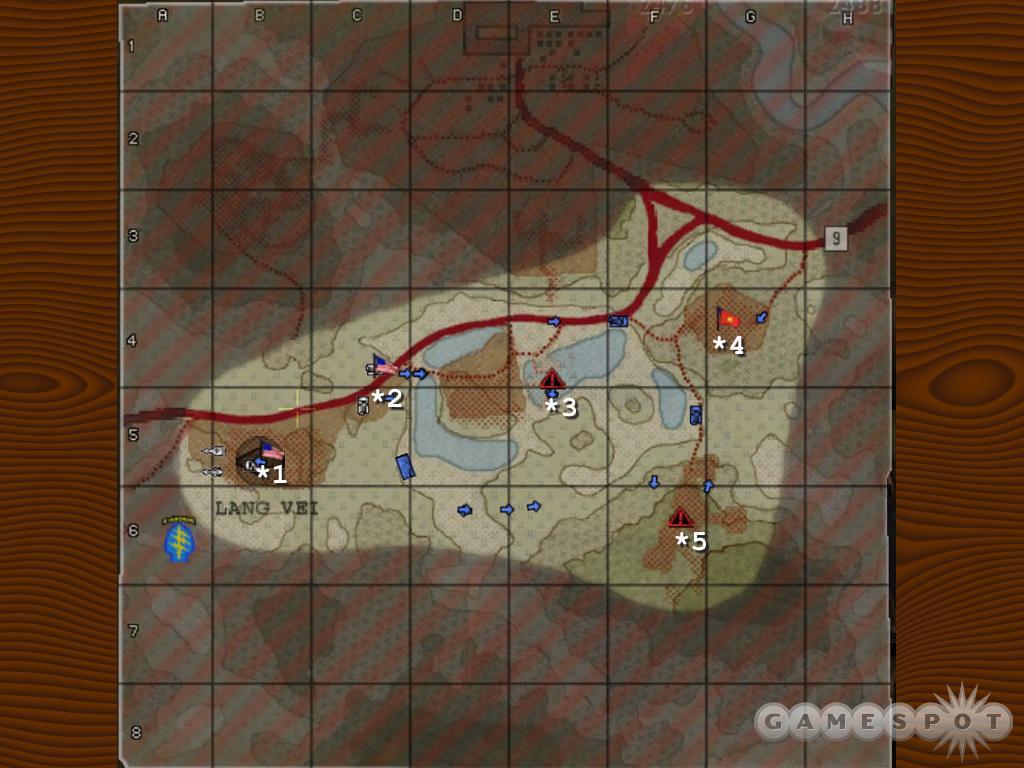
Lang Vei was a Vietnamese village located just south and west of Khe Sanh. Lang Vei was attacked at the same time that Khe Sanh was, as both a strategic attack and a diversion for the upcoming Tet Offensive. Manned by a couple dozen US Special Forces troops and some ARVN soldiers, the camp was overrun within a few hours.
This map, if you hadn't already noticed, is the southern half of the Siege of Khe Sanh map. It is set at nightfall, so don't expect a great deal of visibility.
ARVN Strategy
The ARVN begins with four control points. #1 is Lang Vei itself, complete with two MUTTs, a Sheridan, a Cobra, and a Huey slick. Control point #2 has two MUTTs (and not much else). #3 is in the middle of a rice paddy, although the village nearby has two more MUTTs. Point #4 has--you guessed it, two more MUTTs.
Focus your defenses around your chopper pads at point #1. Not only does all of your air power spawn there, your only armor does, as well. Watch out for NVA paratroopers and for their portable tunnel entrance--if NVA troops start showing up in droves, their hole is somewhere nearby. Once you have a solid defense, move out and play seek-and-destroy, killing as many of the enemy as you can, taking bases when possible, and just generally causing havoc and destruction.
NVA Strategy
The NVA start out with only one control point (#5), but they have two mobile spawns nearby--a hole and an Mi-8 transport. Also nearby are a UAZ, an Mi-8 (assault variant) and a ZSU.
Ideally, you should start by having an Engineer grab the tunnel entrance and board the Mi-8 transport. Drop him somewhere on the opposite side of the map to deploy the hole somewhere that it won't be noticed. Concentrate on defending control point #5, as it represents all of your air power. Move in small teams with at least one man carrying an RPD, and hunt the enemy, taking bases when the opportunity presents itself.
General Strategy
Lang Vei is a tough map to develop or use a particular strategy for. It is small, meaning that it doesn't take long to get from one point to another. It is also circular--most spawn points are close to several others, meaning that you never know which way an opponent is going to go, and there are no chokepoints to hold him off at. It also means that it is next to impossible to hold more than a couple of bases at a time--there just aren't enough people to go around, and all the mobile spawn points and air transports mean that any base can be attacked at any time.
When it comes right down to it, the best way to win on Lang Vei is to hold enough bases to prevent a point drain, and then kill as many of the enemy as you can manage. The only way you will win Lang Vei is by either getting lucky enough to capture every flag, or by attrition, killing so many of the enemy that they run out of tickets.
Ho Chi Minh Trail (Assault)
MACV--Studies and Observations Group/Unidentified Viet Cong Forces
The Ho Chi Minh trail was a network of roadways and paths leading from North Vietnam, through Laos and Cambodia, and into South Vietnam. Named after the North Vietnamese leader, the trail served as a route for supplies and troops for the North Vietnamese troops in the south. It was, needless to say, a thorn in the Americans' sides. The trail was bombed repeatedly throughout the course of the war, and ground operations were undertaken for the purpose of gathering intelligence.
Special Forces Strategy
The Special Forces troops start in the south at control point #5 (see the screenshot). Nearby are a Sheridan, a MUTT, and an M113.
Your first goal is to capture the nearest control point to keep your points from continuing to drain away. Take vehicles along the road to the north, and send the infantry over the hill. The vehicle crews should be cautious of the two log traps on the hill over the road. Trigger them yourself, then move through before they have respawned. Control point #4 is in a small, exposed village. Capture it as quickly as possible with brute force. As soon as you do, an M110A2 howitzer will spawn nearby.
Just to the north is control point #3. There are three ways to get to it--a foot bridge to the north, a vehicle bridge to the south, and by swimming. If you take vehicles across the bridge, you will be driving right under the muzzles of two M46 field guns--enough to chop you to shreds. The foot bridge just makes you target practice. Swimming may be your best bet for reaching the other side. Take your time first, though, to soften them up. Put a couple of snipers on the hills overlooking the river, and then have some mortars and your M110A2 fire on the field guns. Taking (and holding) the temple complex in which flag #3 is hiding is essential for a win.
VC Strategy
Viet Cong troops start out in charge of all of the control points except for #5. In the northernmost point, #1, you will find a T54 and a UAZ. Nearby is your mobile spawn. Point #4, a bit further south, has a UAZ and an M46. Look for a health station and ammo box in the alcoves to either side of the shrine. The temple around control point #3 is the most important one in the game; look for a UAZ and a pair of M46 field guns nearby. Control point #4, just to the north of the Spec Ops starting point, holds nothing but a UAZ.
Initially, there is no reason to have any troops at points #1 or #2--the enemy won't be anywhere near them. Instead, send a few of your soldiers to point #3 in case any Spec Ops players get sneaky, and send the rest down to point #4. Set traps and get ready, because the Americans are going to be coming up over the hill and along the road. They will have an advantage from their vehicles, as well as from the fact that they are fighting from higher ground, so you will eventually lose the point. Regardless, the longer you delay the inevitable, the longer the Spec Ops team will have its points draining away. It is worth sending a man or two up the hill overlooking the road. There are two log traps up there, both of which will completely block the road with big, pointy ex-trees.
Once point #4 has been lost, rally at control point #3. The temple is the key; control it, and you can control access between the northern and southern portions of the map. A few troops at a time should sneak out and try to capture the Spec Ops control points in the south. A properly-placed mobile spawn (on the hill between #4 and #5 is good, as is south of #5) can make this easier. Every time you drop them down to only one flag, they will start to lose points.
General Strategy
Ho Chi Minh Trail is a linear map. That means that the flags are placed in roughly a straight line, and you will generally encounter them in order. That does not mean, however, that you have to walk straight from one to the next. The roads are the least effective way to get anywhere on this level; you can often walk right past the enemy defenses if you move through the hills and jungle to the sides instead.
Another tendency on linear maps is for the forces to end up deadlocked at a choke point (usually a bridge). One team will end up on one side, the other team on the other, and neither side will be able to advance. This stalemate goes on until one team wins through attrition--their opponents run out of tickets due to deaths rather than through objectives. When this happens, a few things can be done to break the stalemate, or at least give your side the edge.
The first is to bypass the chokepoint. Swim the river as far away from the action as you can, or sneak through the jungle to get around the fight. Don't turn around and attack the main force from behind--you may get a couple of kills, but they'll get you right back. Instead, keep sneaking. Head all the way to one of the control points far behind their lines; with any luck, they will be so caught up in the main battle that nobody will stay behind to guard it. Capture it, or better yet, drop a mobile spawn point somewhere (and be sure to tell your team).
Secondly, use good support tactics. In a nose-to-nose battle, a couple of engineers setting up mortars behind their own lines can tip the balance of the battle. If there is artillery available, pull out those binoculars and spot! It only takes a couple of seconds, but it makes all the difference in the world. You may not break the stalemate, but once you start dishing out more damage than they do, you will be on your way to a win through attrition.
The two north and two south control points on this map are throwaways. There are no special tricks to taking them or defending them. The secret to the level is control point #3, and the temple surrounding it. This is where Ho Chi Minh Trail's chokepoint often occurs. It is easy to defend, as attackers have to go in through one of two narrow entrances and then up a single set of steps surrounded by overhanging balconies to reach the flag. On the upper levels are ammo boxes and overlooks ideal for snipers and mortars, with lots of hiding places when your fire gets returned. A clever player can even jump off of the top level, open his parachute (why'd he bring that thing to an infantry fight, anyway?) and land on one of the roofs surrounding the complex for an alternate and unexpected vantage point.
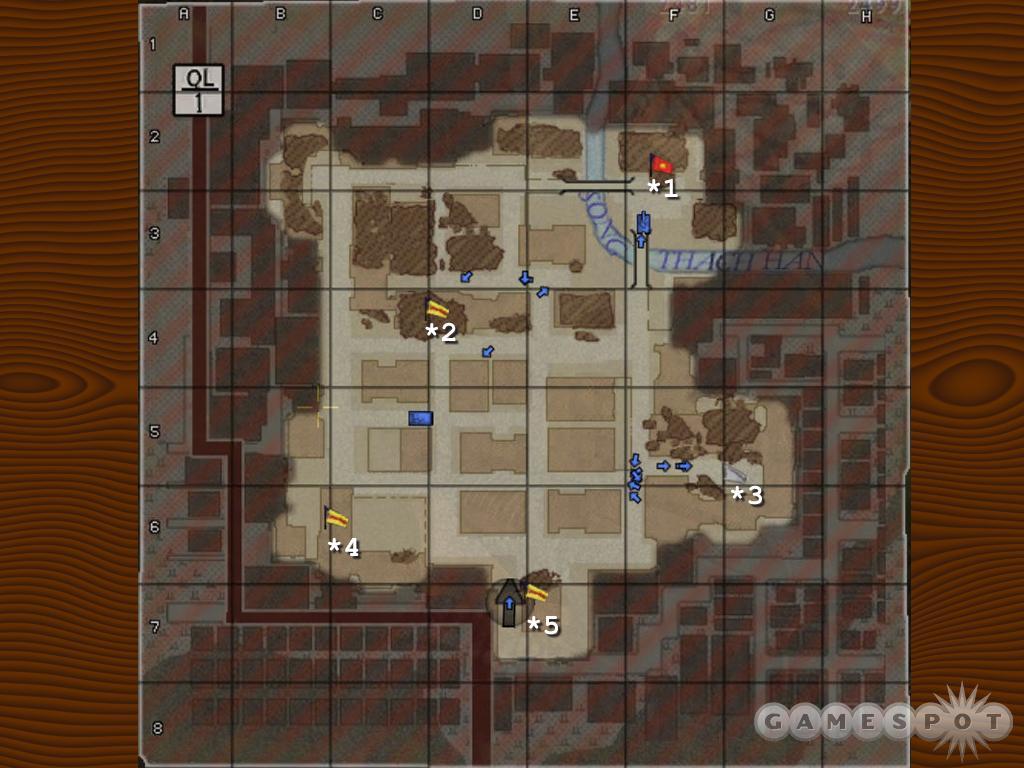
Hue (Head On)
1st ARVN Division/6th NVA Regiment
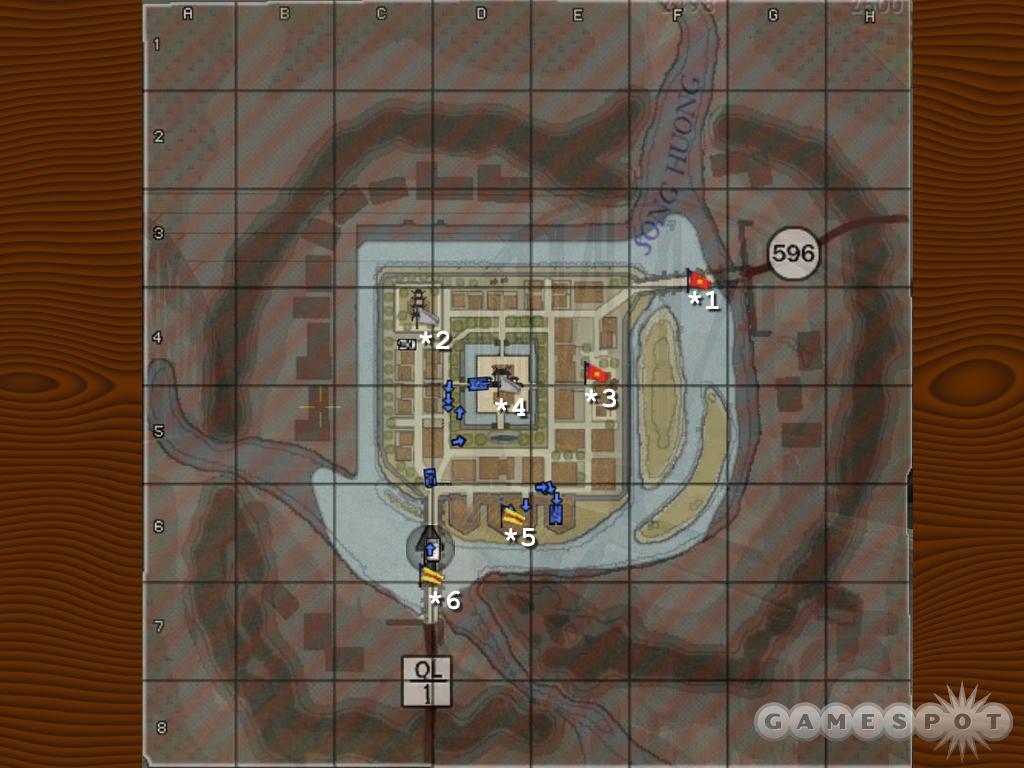
Tet is the Vietnamese New Year, a time of celebration. In 1968, a cease-fire was called to allow for the celebration. Nobody expected it to be honored, but nobody expected how badly it would be broken. On January 31st, roughly 80,000 NVA and VC soldiers launched coordinated attacks on more than 100 towns, villages, and major metropolitan centers. It was hoped that it would be the coup that would defeat the south, but the Tet Offensive (as it became known) was fought off in almost every town - all but one city--the ancient capitol of Vietnam, Hue. Because of its cultural and political significance, US soldiers had not been allowed into the city prior to the offensive, so they had to fight their way in after the NVA had begun their offensive. The fighting was some of the hardest of the war, with 25 days of battle that eventually destroyed most of the city.
Each side holds a spawn point near where they begin the battle, and four more neutral spawn points are located within the city itself. Three of them are around the edges of the city, and one is located in the center. The urban terrain is arranged around the temple in the center of town. There are lots of buildings, and a great many of them can be entered to provide a shortcut or cover. As you near the central temple, you will find numerous concentric walls and gardens that make a direct vehicular assault difficult, but give lots of cover for advancing infantry.
ARVN Strategy
The ARVN start out in the southwest with only a MUTT, an M113, and a Patton tank available.
Your initial goal is point #4 in the center of the map. The NVA have a faster vehicle available, so they will probably win the race to the center point. Your counter is to bring as much force as possible into play at point #4 before they can capture it and set up an effective defense. Load up your M113 with as many men as you can, and head for the center. Overwhelm the NVA with sheer numbers, then take the flag.
Once you control the center, you can begin to spread out. Start with control point #5. Having the NVA spawn on a wall overlooking your initial base is a bad thing.
NVA Strategy
The NVA begin the battle in the northeastern corner of the city at control point #1 (see screenshot), with a T54 tank, a BTR60, a Vespa, a UAZ, and a BM21 at their disposal. The beginning of this battle is a race to control point #4. Don't stick together--grabbing the central point early makes a good old rush a viable strategy here. If one person can grab the Vespa, and another two or three follow up in the UAZ, you can get a significant team into place to capture point #4 as quickly as the ARVN can. If this initial group isn't enough to take the flag, they should be enough to prevent your opponents from doing so until you can bring in your primary force for the capture.
Point #3, while the least defensible, is probably your easiest secondary capture due to its proximity to the initial NVA spawn point. If you get into trouble in the center, fall back here to give your units an in-town respawn point before making another attempt.
General Strategy
Additional light vehicles will spawn near control points, but don't expect to see any aircraft in Hue.
The primary goal for each side in this battle is to take and hold the central spawn point (#4). An army which holds the center can branch out in any direction to hit an unguarded peripheral flag, while the army outside of the temple has to deal with an embedded enemy overlooking most of the city. The central temple itself is built like a castle. There are only two entrances, one of them very small, which can easily be held by a handful of troops. A few Assault or Heavy Assault soldiers can defend the central point for a long time. Add in a couple of engineers with traps or explosives, and the temple becomes almost impregnable from the ground. Atop the wall that surrounds the temple is a walkway with multiple stairways for access. From here, as well as from the upper levels of the temple itself, a group of Heavy Assaults and Scouts will be able to control the routes through half of the city, as well as a direct line of fire to the flag in the northwest.
Flag #5, to the south, is located atop a long wall. This might sound ideal, but there are several sets of stairs and ramps that can allow an attacking force access to the wall. To make things worse for the defenders, two of the ramps (which come up right behind the flag) are large enough to allow a tank to drive right up onto the wall, and the sets of stairs both come up on opposite sides in the front. In other words, a coordinated force can attack from four directions at once. If you are having trouble defending the wall, or if you are planning an attack, consider positioning anti-vehicle soldiers or scouts in the building directly across the street from the flag. They will have a clear line of fire to anybody near the flag, as well as to the bottom of the ramps and steps leading upwards. Most enemies won't think to look across the street from their objective until it is too late.
The other two control points are even harder to defend. Control point #3 has cover nearby, but the flag itself is exposed and open to the street. Open buildings and multiple approaches make it a nightmare to defend by any means other than persistence and brute force. The last flag, #2, is even more exposed in the courtyard of a large tower. Since it is in a corner of the map, there are limited routes of approach, and anybody who wants to capture it from you will have to stand in the open while they do so. Do not try to defend the flag itself--it is wide open to half of the map, including the snipers in the central temple. Instead, pull back against the walls and defend the approaches to the flag. An open building nearby also provides an excellent field of fire toward the flag.
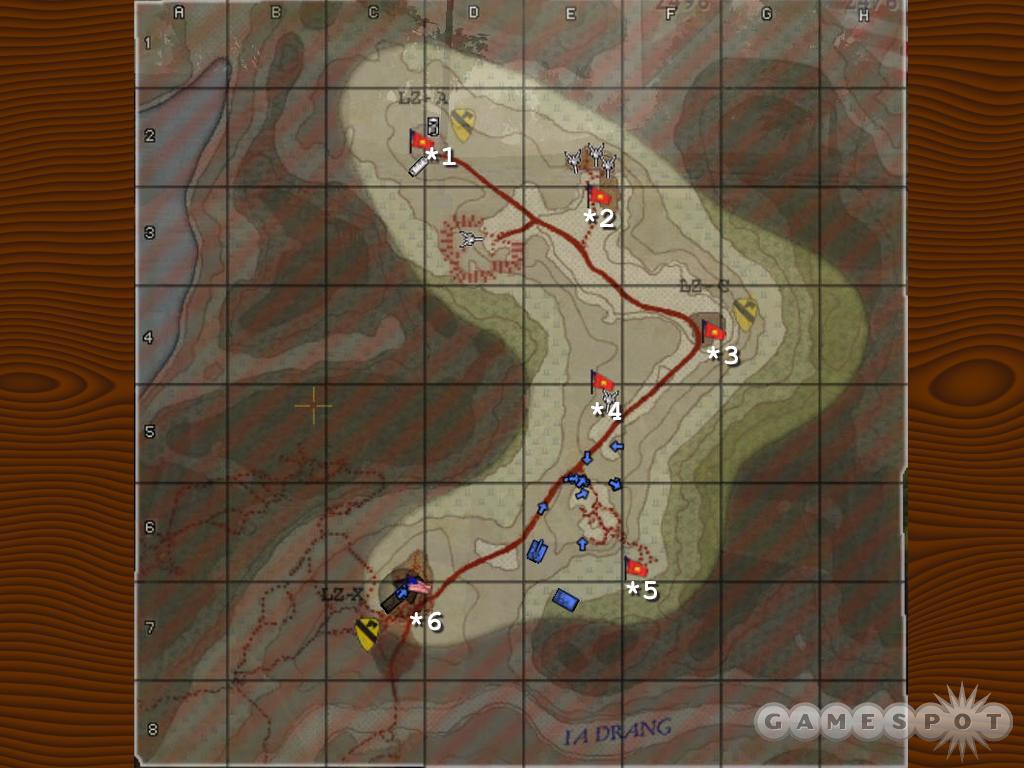
The Ia Drang Valley (Assault)
1st Battalion, 7th Cavalry/66th NVA Regiment
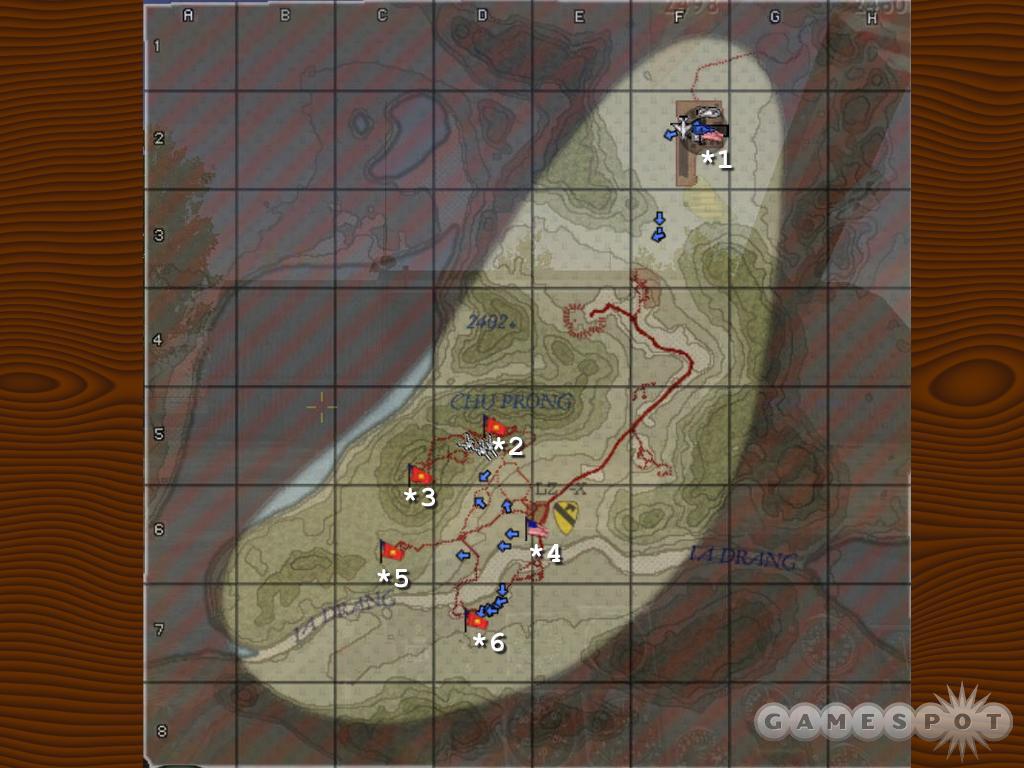
As an assault map, the Ia Drang valley will generally devolve into a straight-out attrition battle after the U.S. manages to capture one of the NVA flags. If this takes too long, however, the U.S. forces will be waging an uphill battle for the rest of the round; thus, the goal of the NVA should be to zealously guard their spawn points at the beginning of the round, until the US forces take enough bleeding damage to effectively cripple their chances for a victory. This is, of course, easier said than done; the US team needs to capture or contest only a single flag to stop their bleeding. On the other hand, the US will need to control five out of the six flags to inflict bleeding on the NVA. This balance of power usually means that matches in the Ia Drang Valley become firefights, with neither side bleeding, and each being forced to inflict heavy casualties on their opponents in order to win the round.
US Strategy:
The US begins with two secure spawn points, one in the base to the northeast of the combat zone, and one in the exposed landing zone surrounded by NVA spawns. The landing zone spawn contains no vehicles from which to safely assault one of the surrounding positions; any troops inserting themselves here will have to hoof it over relatively exposed territory to one of the nearby spawn points. Heading south across the valley towards the southernmost flag is generally a good direction for your initial thrust, but you'll probably want to stay out of the valley and the nearby road. Instead, run into the southern jungle and attempt to approach the sixth flag from the southeast, instead of charging straight at it from the landing zone. There are enough small hills in the jungle here to obscure your approach from any defenders, which should let you get a bead on any enemy forces before you charge in for the cap. The sixth flag is critical for the US to capture and hold due to the Sheridan that spawns there periodically.
If, on the other hand, you choose to spawn in the base, you will be forced to immediately head for one of the helicopters, or be left behind until another aircraft spawns, which can take quite a while. Luckily, there is space for at least a dozen soldiers on the various helicopters, so you should be able to secure a ride without a hassle, provided you're not on an extremely large server. If you do get left behind, suck it up and suicide after your teammates secure one of the southern flags. You're not helping anyone if you're just standing around waiting for a helicopter to spawn, which can take quite a while if your team's pilots are at all talented.
If you manage to grab the pilot seat in one of the helicopters, you should attempt to winch the mobile spawn point or the nearby tank if you feel confident in your abilities to do so. The mobile spawn is the more important of the two, obviously; if you manage to grab it, head towards the combat zone post-haste and drop it off near one of the three northwestern flags. The hills in C6 or D5 are ideal, provided you manage to drop it without anyone spotting you, and can place the spawn out of line-of-sight of an enemy-controlled flag.
NVA Strategy:
As mentioned, the US forces will begin a round on this map with a slow, but steady, loss of tickets. The job of the NVA is to prevent the US from gaining a flag long enough to make this attrition damage build up into a severe handicap for your opponents. Of course, this is true only depending on the number of tickets each side starts with; if it's much more than 200, the fate of each side will more likely depend on their overall ability to kill off individual enemy soldiers, rather than their ability to control flags. Unfortunately, the M60/LAW contingent of the US forces will generally make a firefight difficult to win for the NVA forces, so you should do your damnedest to keep control of as many flags as possible.
With the US's multiple helicopters, it's generally difficult to anticipate which flag they'll move on first, so it's important to grab one of the anti-aircraft vehicles in the northern spawn points and use it to harass any aircraft that get too close to a spawn point. In general, the soldiers who spawn in at the landing zone flag will move towards one of the flags to the north or south, so it's important to take up a defensive position near those flags and mow down any soldiers as they approach. As time moves on, the likelihood of a mobile spawn getting dropped near the other two flags increases, so if you're not a testosterone junkie, you can get your fair share of kills by camping out with an RPD near any of your flags.
The NVA's mobile spawn initially appears in sector D5, down the hill from the flag in that sector. A popular tactic seems to be to have an engineer grab it, then take an APC or AA vehicle and drive up to the US base. The engineer can then occasionally infiltrate the base unnoticed, then plant the spawn point inside one of the tents in the base, thus letting the NVA forces overrun the troops there, generally before the US forces are aware of what's going on. If you can take over the base and destroy the US aircraft, they won't respawn, thus rendering air superiority a moot point, but keep in mind that no aircraft will spawn at all, meaning that the NVA won't be able to grab helicopters of their own to use. Thus, placing your spawn here will usually result in having a bunch of soldiers hanging around in the base, with no method of returning to the southern battlefield save by suiciding. Even so, once captured, it's quite difficult for the US forces to retake the base, thus evening the balance of power in the southern portion of the map somewhat. Another decent location for the mobile spawn is in the hills to the northwest of the landing zone flag. The NVA mobile spawn has the benefit of being very tough to spot in the underbrush, so feel free to place it in a fairly traveled spot, such as between flags three and five.
General Strategies:
In general, the flags here will be captured by infantry, meaning that anti-infantry kits will be at a premium value. The obvious choice for the US is the M60/LAW configuration, while the NVA can use either of the Assault classes, or the RPG7/Type 56 kit in case of an incoming tank.
One basic strategy for defending flags is simply to camp. The map is spacious enough so that none of the flags has an easy line-of-sight to any of the others, meaning that, if you're successful in capturing one, you'll usually have a minute or so before enemy troops will arrive to contest it. You can take advantage of this by lying in the undergrowth near the flag and taking down infantry as they come. The undergrowth makes it difficult for opposing soldiers to spot you when you lie prone, and the terrain around most of the flags is hilly enough to let you get a good vantage point above the flag's base. If you're anywhere from 50 to 100 meters away, you should retain enough accuracy with an RPD or M60 to still kill quickly.
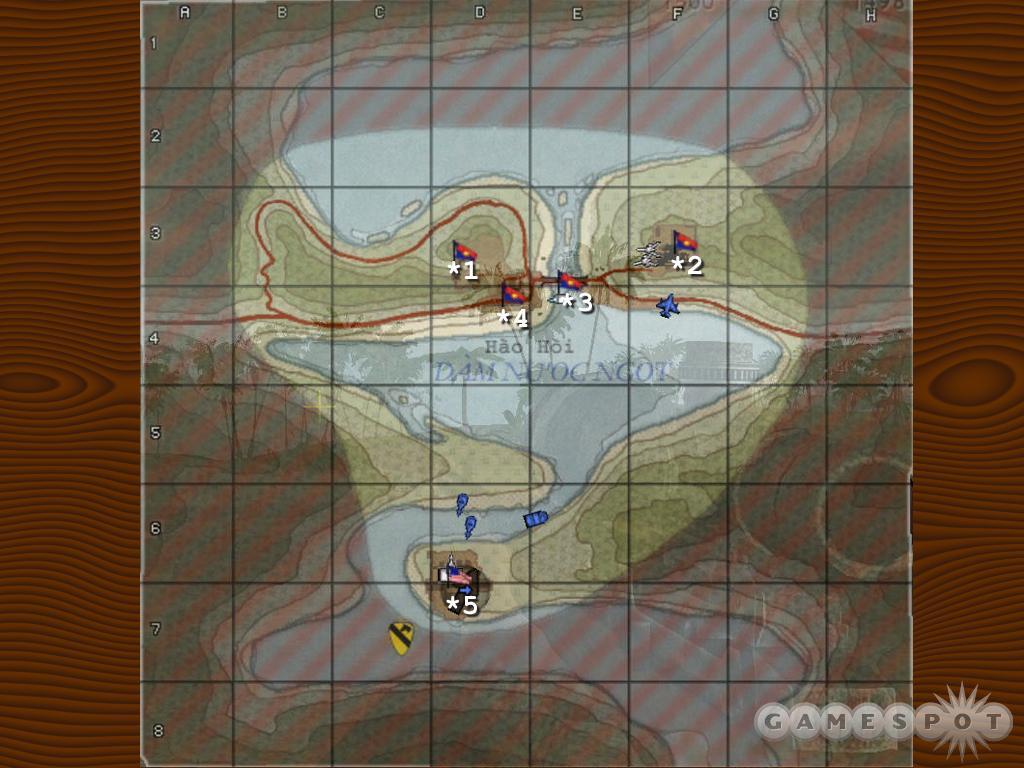
Landing Zone Albany (Mission)
2nd Battalion, 7th Cavalry/33rd NVA Regiment
If you have seen We Were Soldiers, you already have some idea of what happened in the Ia Drang Valley at LZ (Landing Zone) X-Ray. Three days later and less than three miles away at LZ Albany, a group of US soldiers had halted their column to interrogate some Vietnamese prisoners when they were ambushed, first with mortar fire, then with a hail of bullets. The battle raged overnight before the North Vietnamese were driven off and the survivors (and 155 dead) could begin evacuation.
Army Strategy
The US Army starts in the south at control point #6. Parked nearby are a MUTT, an M113, and an M110A2 self-propelled howitzer. Each time you take over a control point, additional vehicles (either MUTTs or M113s) will appear nearby.
Your southern base (control point #6) is one of the most defensible in the game. There are no hills directly overlooking the base, access is from the north only, and the map boundary surrounds it on three sides. Some of your best vehicles spawn here as well. You will not have enough manpower to defend every base you take, so your best bet is to make this the one you concentrate your defense on. A strong group of defenders here will allow the majority of your force to move out on sorties, killing the NVA and draining their tickets.
One useful starting ploy is to load as many soldiers into the M113 as you can manage and speed straight through to the northern control points (#1 and #2). A full M113 can capture a flag in just a few seconds, forcing the VC to fight their way into your new bases. If you do not, or if you try to fight the VC on the way, they will capture the northern point, and you will be the one fighting into their territory.
NVA Strategy
The NVA start just north of the Army at control point #5. Look nearby for a BTR-60 and a UAZ. Each time you take over a control point, additional UAZs or BTR-60s and, in many cases, artillery will spawn nearby.
Your initial spawn point is very difficult to defend. It is in the middle of the map, surrounded by hills and cover that the Army can use to sneak up and surround you. Abandon it early. Load as many of your troops as you can manage into the BTR-60 and speed them to control point #4, then #3, and then #2. A full BTR-60 makes for a speedy capture. Don't try to defend all of these points; just keep moving until you reach #2, and set your defense up there. Those troops that didn't fit in the BTR-60 should take the UAZ straight to control point #1, capture it, and set up a defense. Control point #1 is at the northern tip of the map, and #2 is close by with a ton of artillery. Together, these two points represent your best bet for holding a defensive line, as the attackers will all be coming from one direction. Set up your defenses here, and either let your attackers walk into your fire, or send out small groups to hunt them. Capture bases whenever you get a chance, but keep your defensive focus in the north.
General Strategy
Other than the two starting points, all of the control points begin neutral. The layout of this map makes you think it would result in a fairly linear gameplay model. The only real problem is that the valley is exceedingly wide with no choke points. All of the control points are close together, there is tons of vegetation for cover, and almost all of the hills can be climbed. The result is that it becomes virtually impossible to hold a defensive line. With so much room for enemies to break through and such a short run between points, a typical server will not have enough players for a team to hold more than one or two bases at a time.
In the end, Landing Zone Albany almost always degenerates to snipers in the hills and a deathmatch in the valleys. Bases change hands constantly, and wins are through attrition rather than strategy.
Operation Flaming Dart (Mission)
VNAF 514th Fighter Squadron "The Phoenix"/Unidentified North Vietnamese Forces
Your strategy on the Flaming Dart map will of necessity have to be flexible; different tactics are required depending on the number of tickets each team starts out with. The unique aspect of this map is the destructible radar towers near each of the airfields (which are not capturable). When a radar tower is destroyed, vehicles and soldiers will no longer be allowed to respawn there. Of course, destroying the radar towers is easier said than done; each of them can take an incredible amount of punishment before being blown away. In addition to the radar towers, there are three control points on the western land mass; the team that controls two or three of these flags will cause the other team to bleed continuously.
US Strategy:
Although you begin with fewer aircraft than your NVA opponents, your planes and helicopters have an undeniable technological advantage, particularly when it comes to the Phantom. The combination of heat-seeking missiles and napalm bombs renders the Phantom almost unstoppable in combat, so you'll want to keep them patrolling above the control points and on the lookout for enemy aircraft. Don't wander too close to the enemy airfields, though: your napalm is ineffectual against the radar towers, and each of the NVA bases has a ZSU that will surely be manned and on the lookout for targets. Instead, use your Phantoms to provide air superiority; your missiles should destroy most of the NVA planes or helicopters in one or two shots.
If you're intent on controlling the flags, the M60/LAW combo is, as ever, your best bet to counteract the threat of infantry and armor that the NVA will throw at you. Be especially watchful for SA-7 trails shooting up into the sky; you can count on a few NVA soldiers to pack the heat-seeking missiles for plane kills, which renders them easily killable, since the SA7 kit contains only a sidearm and dynamite, neither of which will help them stand up to an M60.
On the other hand, if you're intent on destroying the enemy's radar towers, your best bet is to go for the Engineer kit that packs C4. As mentioned above, radar towers can take one heck of a lot of damage before being destroyed, so your team's best bet to destroy them is either to get a Cobra and hover near one, firing away with all available weapons, or to send in a sneaky Engineer and let him do the dirty work. Although there are a lot of available explosives, ranging from LAWs to mortars, many of them are too visible and don't deal enough damage to destroy a tower in a short amount of time. C4, on the other hand, is silent until detonated, easily replenished via the ammo boxes at the base of each of the NVA radar towers, and will let you destroy a tower with just 12 or 13 sticks (compared to more than 30 rounds from a mortar or jeep-mounted rocket).
Unfortunately, you can't just lay down 15 sticks, run like hell, and detonate them all at once; you can only throw down around 10 sticks before the first ones start to disappear, which means that you'll need to make at least two trips into the radar tower before it's destroyed. The basic drill is to lie prone underneath the tower, lay down 10 sticks of C4, run out and detonate them, and then try to lay down three more to blow the tower. If no one sees you lying underneath the tower while you're laying the first ten, you should be able to completely destroy the tower before anyone comes over to check out the first explosion. If you do get killed, though, let your teammates know that you've weakened the tower, and tell them which one; one of your aerial friends can come along and finish it off.
For the US, your first tower target should probably be the helicopter or MiG-21 base, depending on your preference. The MiG-17s are not a huge threat to your forces, assuming your Phantoms are patrolling the skies.
NVA Strategy:
Although the NVA has one more aircraft at its disposal than does the US, its position on this map is made a bit more precarious due to its technological inferiority. As any given round begins, you can expect enemy Phantoms and Cobras to begin annihilating your airplanes and helicopters with their heat-seeking missiles; your first goal should be to counter their air superiority with your ground forces. The ZSUs that spawn at your bases should be manned immediately, and moved into the system of countryside roads so that they're difficult to see from the air. Infantry with SA-7's will be helpful in controlling the skies; spawning at flags two and three will ensure that you have adequate coverage and plenty of incoming targets. Don't neglect flag one, though; if taken, your enemy will begin rolling its tank out to capture the other flags, so you'll want to retain control if possible. The tank that's available there initially is an easy target for enemy Cobras, though, so defending the flag usually consists of parking someone with an RPD inside one of the buildings and waiting for the enemy paratroopers to arrive.
Destroying the enemy towers is much more difficult for the NVA than it is for the US. For one thing, actually getting to the US base without being detected is usually impossible, due to the way air battles generally take place over the western flags; any aircraft approaching the US base will be easily spotted by the ground troops there, and you can expect the appearance of an NVA helicopter to raise a few eyebrows.
If you do manage to parachute into one of the US airfields without being seen, you'll find that your ability to destroy the towers has been curtailed by the lack of an ammo box on their lower levels. While you can hide out in the bottom of one of these towers without being seen, due to their walls, you'll only be able to lay four explosives before you need to pop out and reload. While each tower has an ammo box nearby, you'll still have to risk being seen by enemy troops, and since the only NVA kit with adequate explosives to destroy a tower is the SA-7 kit, you'll only have a pistol with which to defend yourself. Fun!
As with the C4, you'll require 12 or 13 sticks of dynamite to destroy one US tower. Your first target should definitely be the tower near the airplanes, although the Cobra tower is perhaps a bit easier to infiltrate and destroy without being detected.
General Strategy:
As mentioned, your tactics here will depend on the amount of tickets that each team possesses at the beginning of a round. If it's the industry standard 200, the urge to destroy enemy towers shouldn't be given a higher priority than retaining control of the flags; if the tickets are pumped up a bit, however, the team that can destroy opponent's flags while defending their own will generally have the tools required to rout their opponents. Don't forget that destroying a tower prevents your opponents from spawning at that base; if your team somehow manages to destroy all of your opponent's towers, they'll be forced to capture the flags in order to spawn at all. It's rare that a round lasts long enough for this coup to occur, but if you have a few industrious explosives experts on your team, you may be able to pull it off.
Operation Game Warden (Head On)
Task Force 116--Mobile Riverine Force/Unidentified VC Forces
As with other head-on maps, Game Warden is a contest of speed and power; the team that can quickly expand to control nearby bases will generally be the first to cause bleeding damage to its opponent. Your team's utilization of sources of mobility will be key factors in your ability to control the map's central flags, especially the third flag, which often winds up being the most important flag on the map. Each side will have a variety of means with which to approach flags, of which helicopters are the easiest to use. The US side has a bit of an easier passage to the nearby flags with its boats, while neither side will be able to make much use of their land vehicles due to the extensive waterways that isolate the two critical flags in the center of the map.
US Strategy:
Your initial goal should be to sweep up from the western side of the map and capture the three flags nearest to your base. These can all be taken relatively safely by infantry, so long as you keep an eye on the sky for troop-bearing helicopters. M60/LAW players should be especially aware of any enemy helicopters that attempt to hover around a flag to convert it; although it isn't intended to shoot down helicopters, your LAW can damage them severely if you manage to hit one, and it's never easier to do than when they're hovering around in the air.
There are relatively few places you can park your ATC mobile spawn and have it be safe from enemy fire. A conservative parking spot would be to the east or west of your initial spawn point; this way, if an enemy manages to infiltrate and begin converting your base, your troops will have an easier time reclaiming it. On the opposite side of the coin, if you can take the ATC all the way to the enemy's base without having it be destroyed, you can expect many of your fellow soldiers to notice your proximity to their flag and begin spawning in. It's probably not necessary to try and park it near the central islands, although it's acceptable if you can manage it; these switch sides so often that your troops will probably have one or both of them as spawning locations more often than not.
If you're truly bold, and an excellent pilot, you can attempt to winch your ATC and move it back towards the enemy base, thus giving your troops an easy way to spawn nearby and hopefully capture the flag relatively quickly. Given the time it usually takes to fly across the map, you'll likely arrive there shortly after everyone on the VC team has flown or driven out of the base. An early charge can often catch the enemy with their pants down, but this works best if you fly up the eastern side of the map to avoid being spotted.
VC Strategy:
Since you need four or more flags to begin bleeding your opponent, you're going to have to expand quickly from your base. Luckily, your helicopters have a much greater troop-carrying capacity than do those of the US, so you can get your friendly soldiers to the central islands in sufficient numbers to contest them very quickly. The northeastern flag in F4 is easily taken and defended by a single soldier; the hills that surround it provide plenty of coverage for a prone soldier, so hopefully one of your teammates will convert it and park himself there. Beyond defending your base and the F4 flag, you'll need to run roughshod over the central islands to force bleeding.
Luckily for the VC, the Hi-8 mobile spawn is a much more flexible vehicle than the US's ATC. If you can avoid damage from the US helicopters, you should be able to shuttle your teammates directly to wherever they're needed on the map. The key to this is getting the heli up very, very high; high enough so that you can't even see the ground. If you don't mind going scoreless, you can fly over any contestable flags and wait for your teammates to spawn in; you can even try to fly over the enemy base and let your soldiers treat the US forces to a little death from above. Even though everyone will probably be able to hear you, not being able to actually see your aircraft will often deter American helicopters from climbing up and shooting you down, but even if they do, you should have plenty of time to bail out before getting destroyed.
You can expect the US forces to try to park their ATC somewhere and spawn from it. After you locate it, radio its location to your teammates and ask for help destroying it, if needed. If you can shoot down an incoming wave of infantrymen, you should be able to pick up one of their M60 kits and use LAWs to destroy it.
General Strategy:
Flags three and four are where much of the fighting generally occurs. Proceeding from one of these flags to another is generally hazardous, especially if you're moving from a flag you control towards one you don't; the tall grass offers plenty of cover for snipers and machine-gun troops to hide in. Try to avoid the suspended bridges, as they wedge you in and make you an easy target; instead, swim across the river and climb up the opposite beach towards the flag. By the same token, when capturing one of the central flags, find a bush or some foliage and dive in to wait. If someone saw you moving, you'll probably be shot, but if they didn't, they'll likely thrash around looking for you when the flag turns grey, thus allowing you to be the shooter.
Operation Hastings (Head On)
3rd Battalion, 5th Marines/5th Battalion, 812th Regiment
Hastings is a helicopter/infantry map that sees the US and NVA forces square off for the control of four central command points and two bases. As this is a Head-On map, the first team to control four of the six flags will cause the other to bleed tickets. Adept helicopter piloting will allow either team to hover around the flags to change their allegiance; anyone not capable of this feat should get on the ground and start capping flags the old-fashioned way.
US Strategy:
Your best helicopter pilots should immediately set out for flags three and four. Both of these flags see amphibious tanks spawn nearby, which will give your infantry a big edge on capping the other two control points, so hover near the flags until they're yours, or just drop off a few soldiers at either one until they're under your control. Keep an eye out for enemy helicopters, though; since your soldiers have no easy way of taking down choppers, you'll have to do the dirty work yourself. The Corsair that spawns at your base should be primarily concerned with shooting down enemy aircraft, but even so, chopper-on-chopper warfare will probably decide who rules the skies.
NVA Strategy:
Don't be afraid to pelt enemy flags with your Mi-8's missiles; it's a bit easier for a single pilot in an NVA chopper to do significant damage to ground forces than it is for pilots in US choppers, due to the dual-firing missiles. Your overall goals are no different than those of the US; control the central command points and spread out from there. If you are in a chopper, keep an eye on your base's flag on your map; if you see it start to convert, get back there posthaste and bail out, if necessary, to take out the enemy. Also, keep in mind that your team does have a mobile spawn, even though the US forces don't. You have a few options for this spawn. The central portion of the map is an obvious location for it; planting it between flags two and three or between flags four and five will let your infantry have easy access to either of those sets of flags. Alternatively, you can attempt to place it somewhere near the US base to cut off their access to helicopters, or simply move it into the hills around your own base, to preclude the possibility of it being captured by enemy soldiers.
General Strategy:
Bleeding the other team requires that you control at least four of the flags. Don't forget that your base counts as one of these flags, though; although a single soldier attempting to convert a base will wind up with a timer of over two minutes, you should expect some foolhardy soul to attempt to do it at some point during the round. Whichever team you're on, you'll want to keep an eye on your base's flag; if at any point it grays out, rush back there and take care of the problem.
For the central flags, you should be able to make use of the natural cover and structures to defend the flags that your team has captured, if defense is your bag. The rice patty near flag four, in particular, is a great spot to lie prone and watch for enemy soldiers, although your visibility is greatly limited. Campers, in general, have a number of spots from which to open fire on enemy soldiers on this map; the hills near the bridge in the center of the map are particularly good, giving as they do excellent views of flags two, four, and five.
Operation Irving (Assault)
1st Battalion, 5th Cavalry/2nd Viet Cong Regiment
From October 2nd through the 24th 1966, the US military acted upon information that NVA regulars with an estimated strength of two battalions were massing for an attack. The 1st Air Cavalry was sent into the mountainous region near Qui Nhon and the Binh Ninh Province to 'seek & destroy.'
Army Strategy
The US Army starts out at control point #5 to the south. Nearby are an M55A1, an F4 Phantom, two UH-1 assault choppers, and a CH-47 Chinook. Also nearby is a mobile spawn crate.
When the battle starts, you will be losing tickets. To stop this drain, you need to capture one of the four points controlled by the VC. There are two ways to do this: by luck, or by team coordination. The latter is recommended. The VC will probably have the beaches covered and SAM launchers, and you need to get a team on the ground via helicopter. Pick a beach, east or west--it doesn't matter which, although the west is a bit easier to hold in the long run. Load your Chinook completely full of Assault and Heavy Assault troops. If you send the Chinook in, it will probably be shot down before it gets close enough for the assault force to parachute out. To keep this from happening, load up both Hueys as well, and send all three helicopters in together, with the two Hueys in front and to the sides of the Chinook. The SA-7 SAMs that the VC are using will seek the nearest target, which means that the Hueys will take the hits. They will get shot down, but by then the Chinook will be over land, and the assault force can parachute out (opening their parachutes at the last second so they don't get shot out of the sky) to capture a control point. Naturally, a Phantom napalming the beach beforehand doesn't hurt.
If you have extra troops that won't fit into the choppers, have them go in by boat, aiming for the center point. Because of its unusual spawn pattern, invaders coming in through the central point can be hard to defend against.
Once you get a firm stance on one of the beaches you should bring your mobile spawn in and settle down for a more traditional ground fight. Toe to toe, the Army has an advantage over the VC, as well as significant air support. You should use that to your advantage, whittling away their tickets until you take the win.
VC Strategy
The VC start with four control points in the north. Point #1, on a hill overlooking the village, has a Vespa and two M46 field guns. Below, at control point #4, you will find a Vespa, a ZSU, and a BM-21. Control point #3, in the middle of the bridge, may send you to either bank. The only vehicle at point #3 is a T54 in the eastern village. The final flag (#2) is at the top of the eastern hill. Nearby you will find a BM-21, a Vespa, two M46 field guns, and the VC mobile spawn.
When the battle starts, the Army will be losing points. They will continue to do so until they capture a control point somewhere on your side of the map. The secret, then, is to prevent them from capturing a point for as long as possible.
The Army spawns across the bay from you, and will most likely advance by air--and in droves. If you can hold off their air units, you can usually hold the beaches for a long, long time. To do this, the vast majority of your force should begin armed with Heavy Assault (loadout 2). That means that the enemy will be flying into an army of SA-7 surface-to-air missile launchers. It can't be just a few--there have to be a lot! The Army will come with a CH-47 cargo chopper, and it could take two or three hits (or more) to bring it down. If it gets over the beaches, it will parachute an entire army down into your laps. That means that you have to shoot it down over the water by hitting it with several missiles at the same time--one or two people firing and then reloading won't be able to keep it far enough out.
There are three key points that need to be defended by troops with SA-7s. The first is the beach in front of control point #4. The second is the hilltop ruins around #2, and the final one is in the village at the east end of the bridge. Each of these three points has an ammo box nearby; use them whenever you have a spare second, as the three rounds you get for the SA-7 will go quickly. It doesn't hurt to have one launcher atop the hill above control point #1, either, as smart pilots will often use that hill as cover.
Finally, have an Assault or two at each point. If the Army gets lucky and gets some guys on the beach, you want to have something nearby that can take them, and the pistol that comes with the SA-7 just won't cut it against an M60. Keep an eye out for possible incoming boats as well, and a patient driver will sometimes try to sneak round the bay to the east side on land.
Eventually, the Army will get lucky and capture a control point. The longer you held them off, the more of them you shot down over the water, the fewer tickets they will have left when it comes time for traditional ground fighting. In a battle of attrition, the advantage you bought yourself by delaying the Army can be all you need to win the day.
General Strategy
Operation Irving will often be decided in the first few minutes. If the Army makes a concerted team effort and gets a toehold on land early, then it will have an advantage. If the VC can work together to hold them off away from land, then they will likely come out ahead.
Once the battle settles down to a land fight, the bridge around control point #3 becomes a major chokepoint between the two peninsulas. It is for this reason that point #3 can become very important, indeed. Control point #3 is in the middle of the long, narrow bridge. It is easy to defend from either bank, and anybody trying to capture it will be doing so obviously and in the open. The unusual thing about this point is that you don't actually spawn nearby--you spawn on either bank. That makes it very difficult to defend against an army that holds point #3, as you never know where they will come from. It effectively gives them a toehold on both beaches!
The village control point (#4) will be the one that changes hands most often. It is exposed to air attacks, as well as to weapons fire from above and artillery rounds from across the bridge. The fact that the flag is surrounded by huts and houses means that you can expect lots of nasty, up close and personal firefights. There is no winning strategy for holding the village, except to shoot first and heal often.
Above the village is control point #1. It can be tough to take, as the approaches involve either climbing a barren, steep hill toward the enemy, or crossing a narrow rope bridge. The position itself can be very advantageous, as the field guns at the top can hit anywhere from the base of the bridge to the ruins on the far side, and there is plenty of cover for snipers.
The final control point, #2, is within a massive ruin on top of a steep hill. Initially, it looks like a tough nut to crack. The road leading up to it is narrow and easily defended, with a log trap to add to the fun. After closer examination, however, you will find that the ruin has far too much of a perimeter for a small group of defenders to adequately cover. Forget the road; you can approach from almost any direction, and the walls are so broken and irregular that they don't provide any real defense. You can circle to the south of the hill and climb up, you can climb the hill from the beach to the north of the ruins, and there are plenty of spots to the east of the ruins to hide a mobile spawn point.
Quang Tri--1968 (Assault)
1st ARVN Division/812th NVA Regiment
Urban combat maps generally revolve around infantry movements, with the occasional tank wreaking havoc on the crowds, and Quang Tri is no exception. Each side possesses only a pair of tanks at the beginning of the round, so you can expect to be walking between flags for most of the duration of any given combat. This will leave you rather exposed, so always keep an eye on your surroundings, and strafe past alleyways to prevent yourself from being blindsided by enemy infantry. Luckily, the map is fairly compact, so the area between any two flags should see a fair amount of combat over the course of a round.
AVRN Strategy:
Your tanks are located far enough away from the NVA's spawn point to make the initial breakout difficult to contain, but with enough M60/LAW troops on the roads leading out of the northeast spawn, you may be able to take down the tanks or weaken them enough for your own armor to come along and finish the job. Still, there are enough nooks and crannies among the buildings here to make containing the NVA infantry all but impossible, so your task quickly becomes a simple matter of rushing from flag to flag as you notice them coming under assault. It's especially important to contest the southwestern pair of flags, as these are where your tanks will reappear after they're destroyed. Your M60s will give you a bit of an advantage in close-range city combat, so don't be afraid to head out on foot, but keep an ear open for tank sounds, or music, and check this with your 3D map to ensure that no enemy armor is sneaking past you.
NVA Strategy:
The situation at the beginning of a round involves some simple choices for NVA players: head south, or head west. Of the AVRN's four flags, only the one to the south of your initial spawn is easily capturable with a tank, so your armor should probably head there, but don't be reluctant to ditch your vehicle if you start getting hit with LAWs or grenades, either of which will end your excursion relatively quickly. The northwestern spawn point is only capturable by infantry, so that makes for a good first target for your ground troops.
General Strategy:
The northeastern flag can be relatively easily defended by a single tank, since the two bridges are rather easy to keep an eye on. Infantry can sometimes make it across the canal and walk up the banks to reach the flag, but you should still be able to spot them if you keep your turret rotating often enough. Even if a single infantryman manages to close in on the flag, he'll be forced to either engage you, with the slim chance to actually destroy you, or attempt to convert the flag on his own. A tank can be thrust into the building's destroyed wall far enough to contest the flag, so you shouldn't have any problems neutralizing infantry threats. Just keep an ear open for other tanks.
In point of fact, while you're on foot, listen carefully to the background noise and try to gauge where tanks are relative to your position. There are plenty of accessible buildings scattered around the map; if you hear an enemy tank coming your way (and if it doesn't appear on your 3D map, it's an enemy), head indoors and get ready with an RPG or LAW. It's best to try and hit a tank while its turret is pointed away from you, obviously, but even if you die after unleashing a single rocket, you'll still have weakened the tank enough for one of your teammates to hopefully take it down before dying himself.
Quang Tri--1972 (Assault)
258th RVN Marine Brigade, "The Divine Hawks"/101st Regiment
The Quang Tri of 1972 is a much different beast than the Quang Tri of 1968. Many of the structures in the city have been destroyed, leaving behind massive piles of detritus and wreckage which block off multiple streets and create artificial dead ends for vehicles. Soldiers will be able to bypass the roadblocks by simply walking over them, and vehicles may be able to charge over the flattest of the garbage piles, but all in all, Quang Tri 1972 is one of the most difficult maps to get around in. The multiple open buildings create innumerable hiding spots for campers, so foot soldiers will have to check their surroundings before crossing any open spaces.
AVRN Strategy:
Your primary goal here should be, of course, to break out from your solitary control point at the beginning of the round and grab one or two others to stop the constant loss of tickets. M60/LAW soldiers can hop over the barriers to the south and proceed to the flags in that direction, while anyone lucky enough to grab a tank or other vehicle can head to the northwest and attempt to overrun the flag in that corner of the city. Your initial base contains a few vehicle spawns, though, so keep an eye on it and make sure that the NVA can't overrun it. If you're of a defensive bent, camping out in one of the tents here is a good idea; just wait for enemy soldiers to approach before mowing them down.
NVA Strategy:
Although you begin with four flags, being complacent can easily lead to a rout on this city map. The M60/LAW combination may run riot on your soldiers and tanks, so your role will more often gravitate towards waiting for your opponents to approach and attacking them from cover. More to the point, your survival will depend on your ability to spot enemies before they see you; the M60 can fire accurately at almost any distance on this map, due to the short fog distance, so don't be afraid to dive into a bush or just stand still inside a building until your target comes within a comfortable firing distance. If you stand motionless in the middle of a street, you're going to die, of course, but if you manage to utilize the natural cover of the bombed-out infrastructure, you may be able to get lost in the visual background noise.
The avenue to the east of flag number three often sees a bit of vehicle traffic coming from the AVRN base to the west, as it's the only road leading south that doesn't feature a roadblock. Don't be afraid to mine it, or camp out with a mortar nearby, but be sure you warn your teammates about any imminent threats if you get killed.
General Strategy:
There isn't much to say here, except the usual: kill your enemies, and don't forget to capture flags. As an assault map, Quang Tri 1972 tends to devolve into a flat-out deathmatch when the teams are evenly balanced, since either team needs to control four of the flags to cause the other team to bleed. This kind of gameplay is more suitable for lone-wolf, solo killer operations than the Head-On gametype, so don't be afraid to wander into a shelled building and camp.
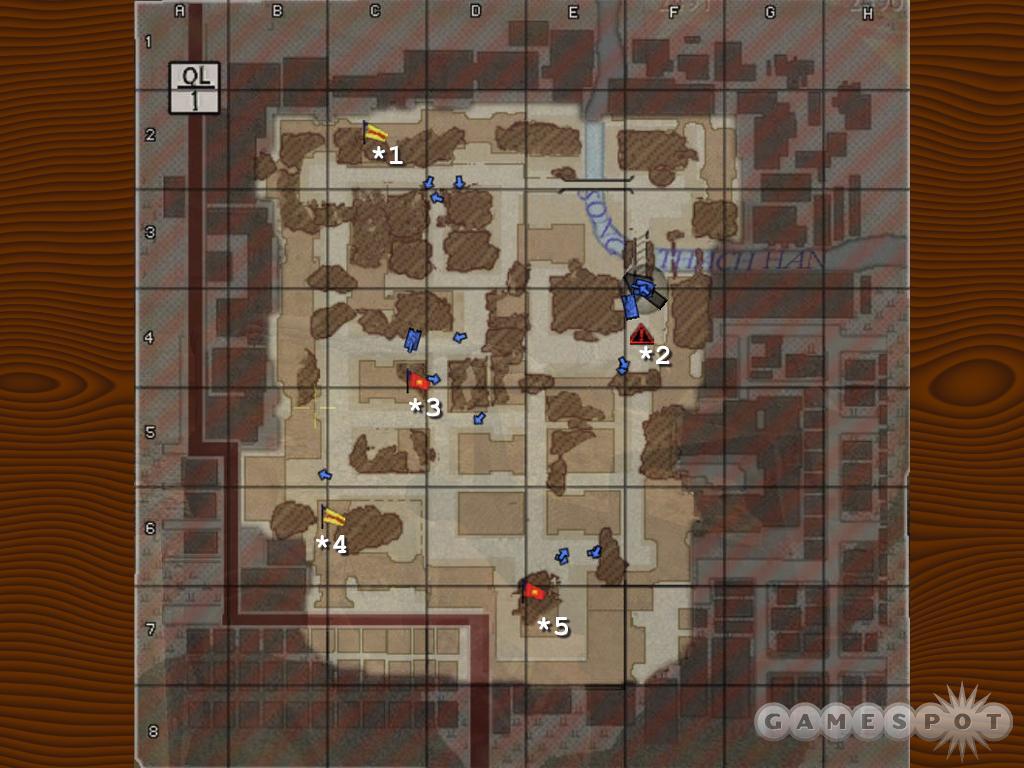
Reclaiming Hue (Assault)
2nd Battalion, 3rd Regiment ARVN Rangers/6th NVA Regiment
Reclaiming Hue is actually the conclusion of the month-long fight for the former Vietnamese capitol that began with Hue. The NVA had all but taken the city, and it was up to a combination of Army, Marine, and ARVN troops to drive them out of the city once and for all.
The physical layout of the map is identical to the earlier Hue map, although there is some obvious battle damage. The NVA have dug in, so expect to be met with sandbags and razor wire as you advance through the city.
ARVN Strategy
The ARVN begin at control point #6, on the same bridge as before. Nearby are a MUTT, an M113, and two M48 Patton tanks.
Since the NVA start out fully in control of point #2 this time, the central temple becomes much more of a challenge to take. If you charge straight in like you did in Hue, you will find yourself being attacked from every direction as you rush past multiple NVA spawn points on the way. Focus first on the two spawn points near the bridge (#3 and #4). Either one can cause you serious trouble, as enemy engineers will rush out and mine the chokepoint where the bridge enters the city, preventing you from bringing any of your vehicles into play.
One way to accomplish this is to send your tanks forward anyway, knowing they will be destroyed, but keeping the main group of NVA defenders busy. Meanwhile, have the majority of your infantry dive off of the bridge and into the water, swimming around to the wall that runs from the bridge to control point #3. There is a hole in the wall near the flag that a determined force can use to capture that point, especially if a smaller force attacks simultaneously from the bridge to draw the defenders' fire. Once you capture the flag, you can designate a few troops to cover the bridge and prevent enemy engineers from continuing their mining.
With good teamwork, you can get your tanks off of the bridge early to help with the attack. Have both tanks loaded and ready to go, but safely back from the mined area. Have a driver in each of the other two vehicles (the MUTT and M113) charge off of the bridge at full speed, one to the left of the center, one to the right. What should happen is that the two lighter vehicles will detonate the majority of the mines, giving the tanks a few seconds to get off the bridge before new ones can be laid. It is vital to have a few assaulters with the tanks to fend off enemy engineers and RPGs.
A final strategy is a risky one, but it can instantly turn the tide of the battle. A single player can try this alone, but it works best if two or three go together. Jump off the east side of the bridge all the way back by the sandbags, and swim past the island toward the wall. You want to come up on land far, far from the action. Follow the wall around to the east and then north and you will come upon the second bridge. From here, you can enter the city on the opposite corner, hopefully unprotected, and make your way to one of the unguarded rear control points (#1 or #5) and capture it before the NVA even know you are there. Just before you make the capture, let your team know so that a bunch of them will be ready to spawn in your new, behind the lines, control point.
In any case, be sure to keep a sniper on the bridge amongst the sandbags, as enterprising NVA scouts will circle around outside of the walls and go prone, picking ARVN troops off of the bridge.
NVA Strategy
The NVA have control of all of the other points on the map. Scattered around near the flags are a Vespa, a BTR-60, some UAZs, and a T54.
The initial goal for the NVA is to defend the central temple and control point #2--just in case. You can initially get by with fewer initial defenders than in the earlier Hue map. If you play your cards right, though, the enemy won't be getting anywhere near the middle of the map for awhile.
Most of the NVA troops should spawn at control points #3 or #4. Have lots of engineers and a few assaulters (some with RPGs, just in case a tank gets by the engineers). The idea is to pin the ARVN troops on the bridge. If they can't get off of the bridge, they can't capture any flags! The bridge angles down sharply as it exits. This is your kill zone--have your engineers keep it, plus the first thirty feet or so below the bridge, filled with mines and booby traps at all times. If the ARVN bring their two tanks into play, things can go badly, and fast. The enemy tanks won't dare go over the drop at the end of the bridge, knowing it is filled with mines, and their cannons and machine guns cannot aim downward. With them stuck at the top, the area along the slope is relatively safe from fire. Have a few Assault troops nearby for the inevitable rushing enemy troops that will be coming over the bridge.
Some troops will eventually start leaping from the bridge and into the water. Most will head behind the wall and toward control point #3, where they will try to make their way through the hole in the wall. Have some troops ready for them! Have some traps in and around the hole, and have guns ready to deal with the survivors. Keep it up--control point #3 is your weak spot, and if the ARVN attackers can get a foothold there, they will be hard to dislodge from the city.
Finally, be aware that enterprising ARVN troops can attempt to circle the city from outside the walls. The only place they can gain entry into the city is near the northeastern bridge, so it wouldn't hurt to have a defender in that area--just in case.
General Strategy
The central temple remains the key to the city. Take it, and you will have an easily defended spawn point, as well as clear fields of fire over much of the rest of the city. Control point #1 (near the tower) is still in the same spot as well, although a crashed UH-1 provides some effective cover near the flag.
The southern control point has been split in two and moved to each of the two buildings flanking its previous location (points #4 and #5). #4 can be reached by fire from the buildings across the street, or enterprising snipers can climb the bridge support near the ARVN starting point. The two points are slightly more defensible than the central point was, as each has only two avenues of approach.
While the eastern control point has disappeared, a new one (#3) appears on the western side of the map, just north of the bridge. It is located between two multi-story, multi-entrance houses, and is right across the street from another, so expect lots of nasty, close combat between buildings.
Siege of Khe Sanh (Mission)
26th Marines/NVA 325th C Division
The US Marine base at Khe Sanh was of vital strategic importance. Located on one of the highest areas of ground in the region, Khe Sahn overlooked the Ho Chi Minh trail just south of the demilitarized zone. On January 21, 1968, the 5,000-plus Marines at Khe Sanh were besieged by some 40,000 NVA troops. The siege lasted until early April, by which time 300 Marines had been killed. Between ten and fifteen thousand NVA soldiers died trying--and failing--to take that mountain base.
Marine Strategy
The Marines start off with two control points. The first is Khe Sanh itself (control point #1) in the north, with an F4 and an A7 on the runway. Look for a pair of MUTTs in camp, plus a Huey and Cobra on the Helipads just to the west. The second point, #5, is a village to the south with a MUTT and an M113 APC.
Hold Khe Sanh. Hold it tight--it is hard to hold the bases spread out over a map, and holding Khe Sanh is as good as holding any three of the others. You'll be in a tough position initially, as the NVA will have you essentially surrounded.
You will need two points in addition to Khe Sanh to drain your opponent's tickets. The two most beneficial positions are #3 with its nasty artillery, and #2, as it is the center of the NVA air power. Unfortunately, these two are so far separated that holding both plus Khe Sanh would be tough--they are too far apart to provide mutual support. Pick one (#2 is better--it removes their air power), and then take another point nearby.
NVA Strategy
The NVA control the other four flags to begin with. The westernmost control point, #3, contains the portable tunnel entrance spawn point, as well as three M64s, a T54, and a UAZ. If you are quick enough on the spawn, you can jump onto one of the M64s and bombard the runway before the Marines can get their planes off of the ground. Control point #2, the easternmost spawn, is the NVA airfield, where a pair of MiGs (a -17 and a -21) and an MI8 assault 'copter await for your flying pleasure. A UAZ and ZSU wait nearby for those with a fear of flying. Control point #4 has a UAZ and a T54, as does #6 (the bombed out Lang Vei base, if you hadn't noticed).
The NVA should concentrate on overrunning Khe Sanh as soon as possible, and should further concentrate on the defense of their own airfield (#2). Once you control both #1 and #2, you will only need to take one more point to drain points from your enemy.
There are several good spots around Khe Sanh to stick your mobile spawn. Directly to the west of Khe Sanh's helipads (the direction you will be bringing the spawn from anyway) are several bunkers that provide dark shadows. Nearby is a large tent with a handy ammo box. Putting the hole in the tent is a bit obvious, but it might work against inexperienced players. A better spot would be in the deep shade under the trees nearby. If you put it amongst the palm fronds, it is almost invisible. Similar shady spots are available to the east of the complex. It is, of course, possible to put the spawn inside of Khe Sanh itself, but there aren't many hiding spots that aren't obvious, and the risk of getting killed and losing the spawn is unnecessarily high.
General Strategy
Khe Sanh's layout can make defense difficult. The main camp is surrounded by a heavy fence with only two entrances--one in the west, and one in the southeast. This sounds good, except for a few flaws. First of all, the fence is barbed wire with a couple of feet of steel plating along the bottom, so enemies can shoot while standing from any point around the perimeter, then duck down and be invulnerable to bullets, until they pop up again somewhere else. Along the south perimeter are two high watch towers, each with an ammo box outside. Good for defense, right? Well, they would be, except that they are on the outside of the fence, so the ammo and sniper posts will be of more use to the attackers than the defenders. Finally, the fenced in area does not include the chopper pad and hangar, which are out in the open. Because of this, simply bunkering down and defending the two entrances will not work--you will have to defend the entire area around the chopper pad if you don't want the enemy to have a massive advantage in air power.
There is just too much perimeter to actively defend unless you have more than a dozen defenders (which is hard to pull off if you want to capture other control points as well). One effective technique is to have a small team actively defending the flag bunker itself, while the rest of the defenders worry about the perimeter. While two or three people concentrate entirely on keeping the enemy from capturing the flag, the remaining defenders spread out and move from hotspot to hotspot, preventing the attackers from doing too much damage inside the fence. With some air support to ferret out sneaky attackers and prevent vehicles from making their way in, the base can be held. It is tough, but it can be done.
To capture Khe Sanh, use the wide perimeter to your advantage. Do not try to rush a single entrance, but rather surround the base and pummel the defenders. A sniper or two can be invaluable, as can an engineer with a mortar to pound the flag bunker itself. The rest of the troops should pick positions around the fence, firing a few rounds, ducking down, moving further along the fence, and firing some more. When an opportunity presents itself (such as several defenders going down at once), then the attackers along the fence can make their rush for the entrances while snipers, mortars, and air strikes keep the defenders slowed down.
Point #2, the NVA airbase, has lots of defensive advantages. First of all, the only land route for vehicles is across a long, narrow bridge--an engineer with a supply of mines can make said bridge almost impassable. Infantry have to approach across either the bridge, or swim across the river. In either case, they will have to climb a steep, barren hill afterwards. They are easy targets at any point during the crossing, although defenders should be cautious of attackers climbing the hill further upriver from the bridge. The only real threat to the base is air attacks and people dropping in out of aircraft. The ZSU in the village should help to ameliorate the air threat, and the lack of any true transport aircraft on the map means that parachutists will have to trickle in one or two at a time--easy pickings for the defenders.
Classes
(USA)
U.S. Army
While the causes of the Vietnam War are a chaotic mix of politics and power, the fact remains that the United States Army spent close to twenty years in Vietnam. The first real battle of the Vietnam War was in the Ia Drang valley in 1965 (later recreated so well in the film "We Were Soldiers"). The North Vietnamese Army tried to stand toe-to-toe with the US Army, and got cut down by a factor of ten-to-one. Other armies would have come back with an even larger force to try again, but the North Vietnamese were smarter than that. They knew they could never beat the U.S. in battle. Instead, Ia Drang taught them to fight so close to the Americans that artillery and air support became useless. They learned to attack quickly, do as much damage as possible, and then disappear before the U.S. could organize an effective counterattack. These guerilla tactics were something that inflexible, traditional military thinkers were not prepared for. For the eight years that followed, the US Army developed new weapons, new strategies, and new philosophies that would allow them to meet the NVA and VC on equal footing--but not before suffering nearly 38,000 deaths and close to 100,000 wounded.
Assault
The two US army assault kits are essentially the same, except for the choice of primary weapons. The majority of the time, loadout 1 will be your best bet, as it will let you function well both up close and at a distance. If you are in a position when you know that you will be fighting almost entirely at close range (perhaps defending the temple on the Ho Chi Minh trail), then the Mossberg 500 can be the more effective choice.
Loadout 1
Combat knife
M1911A1
M16
Fragmentation grenades
Binoculars
Loadout 2
Combat knife
M1911A1
Mossberg 500
Fragmentation grenades
Binoculars
Engineer
Both US Army combat engineers have the necessities--a wrench and a rifle. One to fix things, and one to break them. Which you choose is largely a matter of personal preference, although loadout 1 is more suited to defensive use, and loadout 2, with its M1, is more beneficial on the front lines.
Loadout 1
Combat knife
M1911A1
M14
M18 Claymore mines
Blowtorch
Wrench
Loadout 2
Combat knife
M1911A1
M14
M1 81mm mortar
M-7A mines
Wrench
Heavy Assault
US Army Heavy Assault. Ouch. This is one of the nastiest classes in the game. As of right now, the M60 is the most powerful weapon up close or at a distance. The only real difference between the two kits is in the secondary weapon. The M60 is an anti-personnel weapon, so loadout 1, with its M79 grenade launcher, is just two of the same thing at once. It is redundant, and doesn't give you any means for dealing with armored vehicles. Loadout 2, complete with an M72 LAW, is much more versatile, as it can take any callers, on foot, on wheels, on treads, or even in the air.
Loadout 1
Combat knife
M1911A1
M60
M79
Binoculars
Loadout 2
Combat knife
M1911A1
M60
M72 LAW
Binoculars
Scout
The two scout kits are close to identical, with the exception of the primary weapon. Most of the time, loadout 1 will be your best bet. In the rare instance that you are sniping from your base and think you might end up in close contact with your enemies, consider the faster-firing, but lower damage M16 sniper in loadout 2.
Loadout 1
Combat knife
M1911A1
M21 sniper
M18 smoke grenades
Binoculars
Loadout 2
Combat knife
M1911A1
M16 sniper
M18 smoke grenades
Binoculars
U.S. Marines
First deployed to Vietnam in August of 1954, although their purpose had nothing to do with combat until 1962, the United States Marines remained in the thick of the action until the end of the war. They fought in battalion-scale (or larger) engagements, provided fire support for other forces, and provided for the defense of the cities of Vietnam.
What the Marines were best known for, though, were the CAPs (Combined Action Platoons), which merged local Vietnamese forces with Marine platoons to provide a combination of advanced training and firepower with local know-how. These small CAPs stayed in a small region, usually centered around a village, working with the locals and patrolling the area to defend against northern attacks. These CAP patrols are what much of the 'popular lore' (usually wrong) about Vietnam comes from. All in all, 13,000 United States Marines died in Vietnam, and nearly 90,000 were wounded before the war's end. That is nearly a third of the total US deaths in the war--despite the fact that the Marines represented only 10% of the military presence in Vietnam.
Assault
In most cases, the Marine kits are identical to the Army equivalents. This is the case with assault troops. Pick the M16 unless you know you are going to be fighting inside or in extremely dense jungle.
Loadout 1
Combat Knife
M1911A1
M16
Fragmentation grenades
Binoculars
Loadout 2
Combat Knife
M1911A1
Mossberg 500
Fragmentation grenades
Binoculars
Engineer
As with the Army, make your choice based on personal preference. If you are going to stay at home and defend the flag, Claymores can be your friend. If you are out supporting the troops, a mortar will be more useful.
Loadout 1
Combat Knife
M1911A1
M14
M18 Claymore mines
Blowtorch
Wrench
Loadout 2
Combat Knife
M1911A1
M14
M1 81mm Mortar
M-7A Mines
Wrench
Heavy Assault
The choice is again simple. Unless you have a very specific reason for a secondary anti-personnel weapon, grab kit 2 with the LAW.
Loadout 1
Combat Knife
M1911A1
M60
M79
Binoculars
Loadout 2
Combat Knife
M1911A1
M60
M72 LAW
Binoculars
Scout
The M40 sniper is one of the most effective sniper rifles in the game, but it is also the slowest, and has a tiny magazine. If you expect to meet the enemy up close and personal, take the more versatile M16. If you plan to keep your distance and pick them off before they see you, go with the kit #1.
Loadout 1
Combat knife
M1911A1
M40 sniper
M18 smoke grenade
Binoculars
Loadout 2
Combat knife
M1911A1
M16 sniper
M18 smoke grenade
Binoculars
Special Forces
Although they existed prior to Vietnam, the emphasis and growth of the United States Special Forces lies as much with President John F. Kennedy as it does with the military. Kennedy, a student of military history, recognized the need for "a wholly different kind of force", and was a driving force behind the formation of a small group of specialized soldiers, the Special Forces. Trained and cross trained to work in small, self-sustaining units of a dozen men, the Special Forces troops, which were nicknamed for their distinctive green berets, proved their effectiveness in Vietnam.
They weren't just tough--they were smart, educated men. Their weapons behind enemy lines were words and knowledge more often than bullets and bombs. As part of the Military Assistance Command--Vietnam, Studies and Observations Group (MACV-SOG), they performed reconnaissance and intelligence-gathering missions. They made contact with sympathetic locals, and trained them in military techniques, allowing them to defend their own homes against the communist threat, and gaining sources of intelligence. The CIDG (Montignards, South Vietnamese freedom fighters) were largely a Special Forces project. The Special Forces assisted villagers medically and practically, so that when the Viet Cong recruiters came around, the local loyalty was already firmly with the U.S.
Assault
With the Special Forces Assault class, there is no clear 'best choice.' Each kit is equally effective, and the benefits of one over the other fall to a matter of personal preference. Loadout 1 gives you a CAR-15 and hand-thrown grenades, a fairly typical Assault combo. With loadout 2, you gain the benefit of an underslung grenade launcher; grenades are always ready, so all you have to do is push a button to unleash a flaming ball of hot shrapnel at an enemy. The drawback is that you will be unable to zoom in with your alternate fire.
Loadout 1
Combat knife
.357 Magnum revolver
CAR-15
Fragmentation grenades
Binoculars
Health kit
Loadout 2
Combat knife
.357 Magnum revolver
XM148 grenade launcher (on a CAR-15)
Binoculars
Health kit
Engineer
Special Forces engineers have kits that are a bit more balanced than those of other US forces. The first kit comes with anti-vehicle mines, a defensive tool, and a mortar, an offensive support weapon. The first kit is, therefore, a great all-around choice. The second kit includes both C4 blocks and a blowtorch. It is ideal for stealthy sabotage, but the C4 can also be used very effectively in defense of a chokepoint or a flag.
Loadout 1
Combat knife
.357 Magnum revolver
M14
M-7A minesM1
81mm mortar
Wrench
Loadout 2
Combat knife
.357 Magnum revolver
M14
C4 blocks with detonators
Blowtorch
Wrench
Heavy Assault
Once again--take the LAW unless you really think you need more ways to kill enemy infantry than the M60 already provides.
Loadout 1
Combat knife
.357 Magnum revolver
M60
M79
Binoculars
Health kit
Loadout 2
Combat knife
.357 Magnum revolver
M60
M72 LAW
Binoculars
Health kit
Scout
The fast but weak M16 sniper in loadout 2 makes it an effective choice for a defensive sniper who may have to get up close and personal with attackers. If your goal is traditional sniping, however, loadout 1's M40 is the better choice.
Loadout 1
Combat Knife
.357 Magnum revolver
M40 sniper
M18 smoke grenade
Binoculars
Health kit
Loadout 2
Combat knife
.357 Magnum revolver
M16 sniper
M18 smoke grenade
Binoculars
Health kit
ARVN (Army of the Republic of Vietnam)
The ARVN was the military branch of the Republic of Vietnam, which controlled the southern half of Vietnam from 1954, after the defeat of France in the Indochina War, to 1975, when it surrendered to the forces of the National Liberation Front of North Vietnam. During the Vietnam War, the soldiers of the ARVN were much maligned by the U.S. press and, indeed, by many of their peers in the American military. Although some soldiers in the U.S. forces respected individual members of the AVRN, they were seen as being, on the whole, poorly led and poorly motivated. After the US military officially ended its participation in the Vietnam War in 1973, the AVRN were left to defend the southern portion of Vietnam by themselves, and although their American allies kept them in supply, they were unable to fend off the battle-hardened veterans of the North Vietnamese Army for long, surrendering in 1975.
Assault
The choice between the two kits here obviously revolves around your preference for either the CAR-15 or the M16. The CAR-15 has a bit less stopping power, so you'll require more bullets to kill any given target, but the M16 has a smaller clip, so you'll need to reload more often. Either weapon is a fine choice for soldiers in the field.
Loadout 1
Combat knife
M1911A1
CAR-15
Fragmentation grenades
Binoculars
Loadout 2
Combat knife
M1911A1
M16
Fragmentation grenades
Binoculars
Engineer
If you're going to be heading behind enemy lines, the second kit here should be of use, with the C4 blocks letting you cause havoc, and the blowtorch allowing you to...well, solder stuff. In truth, an engineer alone near an enemy vehicle generally has a short shelf life, although the C4 blocks do let you get fairly sneaky in a passive-aggressive kind of way, by setting charges along likely tank routes and detonating them when a hostile rolls along. Of course, the first kit gives you the same capability, although in a rather less discriminating fashion.
Loadout 1
Combat knife
M1911A1
M14
M-7A mines
M1 81mm mortar
Wrench
Loadout 2
Combat knife
M1911A1
M14
C4 blocks with detonators
Blowtorch
Wrench
Heavy Assault
As with the US Heavy Assault loadouts, the only difference between the kits here lies in the choice of M79 grenade launcher or the M72 LAW. For almost every map, the LAW is the preferable choice, mostly because of the M79's general ineffectiveness against vehicles, and because the M60 should be all you need to mow down enemy infantry in short order. The grenade launcher is an effective anti-infantry tool, but when combined with the M60, it's overkill.
Loadout 1
Combat knife
M1911A1
M60
M79
Binoculars
Loadout 2
Combat knife
M1911A1
M60
M72 LAW
Binoculars
Scout
Again, the only difference between these two kits lies in the choice of primary weapon. The M16 sniper variant possesses far more bullets than the M21 (60 rounds vs. 20 rounds), can fire a bit quicker, and has less recoil, whereas the M21 possesses a bit more power. The 20 round limitation of the M21 is quite a big one, however; very few isolated sniper spots are near ammo boxes, and running for more ammo with nothing but a sidearm will result in your death more often than not. In most cases, the flaws of the M16 are worth putting up with, solely to access its larger amount of ammo.
Loadout 1
Combat knife
M1911A1
M21 sniper
M18 smoke grenades
Binoculars
Loadout 2
Combat knife
M1911A1
M16 sniper
M18 smoke grenades
Binoculars
(DRV)
North Vietnamese Army (N.V.A.)
The NVA was formed during the late 1950's, after the division of the country subsequent to the withdrawal of the French forces. Initially, it was a poorly-armed group consisting overwhelmingly of infantry; it wasn't until the U.S. became involved in the South Vietnamese conflict that the Communist powers of Soviet Russia and China began to send munitions and materiel in great numbers. The army's dated weaponry was replaced with modern supplies; new tanks, aircraft, and artillery were sent to support the N.V.A.'s ability to fight against the technologically superior US forces.
Although the N.V.A.'s equipment, even with the support of China and the Soviet Union, was never quite on par with that of the U.S., it did have an advantage when it came to manpower. Each soldier in the army, no matter what his specialty, was trained to act as infantry, meaning that any group of soldiers, no matter how specialized, could always be given AK-47's and sent to the front lines. All told, the NVA would reach a maximum strength of nearly half a million soldiers; conscription forced large numbers of men into two-year terms of service, after which a soldier would usually be shunted into the People's Armed Militia, a kind of home guard, from which he could be recalled to the Army if necessary.
Assault
The NVA's Assault class is fairly unique in that one kit possesses an assault rifle while the other packs a light machine gun. It's important to remember this when switching sides after a fight; the US and AVRN forces have their light machine guns in the Heavy Assault class, while the NVA and the Viet Cong reserve that class for rocket launchers. So, if you're interested in mowing down infantry, you'll need to pick up one of the Assault kits; only this class and the Engineers possess automatic weapons.
Loadout 1
Machete
Tokarev TT-33
AK-47
Stick grenades
Binoculars
Loadout 2
Machete
Tokarev TT-33
RPD
Stick grenades
Binoculars
Engineer
The most important thing to consider here is that only the second kit is able to pick up and relocate mobile spawns. On maps with mobile spawns, this is a critical skill for someone on your team to have, so if you notice that the mobile spawn isn't moving from its starting point, load out with the second kit and move it near an enemy spawn point. Of course, the other kit possesses mortars, which can be incredibly deadly when operated correctly.
Loadout 1
Machete
Tokarev TT-33
MAT-49 (modified)
Booby trap
Type 63 60mm mortar
Wrench
Loadout 2
Machete
Tokarev TT-33
MAT-49 (modified)
Land mines
Shovel
Wrench
Heavy Assault
The NVA Heavy Assault class is critical for your team's ability to ward off armor and aircraft threats, but their ability to bring down mechanical foes is balanced by their relative ineffectiveness against infantry. The second kit is noticeably specialized, with nothing but a set of three heat-seeking rockets and a sidearm to defend itself with. Heat-seekers are great for taking down planes and helicopters, but barely dent most tanks, which generally means that this kit is forced to camp by an ammo box and hope no ground forces come near. This isn't always a terrible thing, since you will get your share of kills on busy maps like Khe Sahn and Flaming Dart, but is hardly a model of excitement. Still, if you're itching to be a human anti-air defense, there aren't many other options available.
Loadout 1
Machete
Tokarev TT-33
Type 56
RPG7V
Stick grenades
Binoculars
Loadout 2
Machete
Tokarev TT-33
SA7
Explosives pack
Binoculars
Scout
If you've grown accustomed to thinking of the Scout class as being synonymous with "Sniper," then grab the first kit here. The second kit possesses only a Type 56 rifle, which has no scope. Although the T56 is a decent-enough gun, able to quickly snap off shots, it has a torturously slow reload time, and, well, isn't really a sniper rifle. The secondary weapons for this kit aren't particularly overwhelming, either, although the Bouncing Betty can be fun to place near choke points, such as the narrow suspension bridges on maps like Cambodia Excursion.
Loadout 1
Machete
Tokarev TT-33
SVD sniper
Caltrops
Binoculars
Loadout 2
Machete
Tokarev TT-33
Type 56
M-16 mine ("Bouncing Betty")
Time bomb
Binoculars
Viet Cong (VC)
The Viet Cong was an appellation used to refer to the forces of National Front for the Liberation of Vietnam, which attempted to destabilize and overthrow the government of South Vietnam via assassinations of village leaders and other types of guerrilla warfare shortly before the onset of the Vietnam War. As the conflict with the US gained momentum, the Viet Cong troops, many of whom had been trained in the North, fragmented their operations and began a campaign of harassment. The VC operated on many scales, ranging from single operatives setting booby traps or sniping, and proceeding in severity all the way up to organized troop movements that were virtually indistinguishable from those of a conventional army.
The Viet Cong's most notorious method of attack, however, was the ambush. Small VC units would pick a spot along a well-traveled road, wait for a sizable group of soldiers to come along, and begin attacking from cover. Each member of the ambush party would, theoretically, have a different task: one would be instructed to aim for officers, one would take an RPG and use it to destroy the leading vehicle, one would approach any armored vehicles and attempt to disable them with grenades, and so on. After their victory or retreat, the ambush party would generally move into a nearby town, to hide in preconstructed tunnels underneath the village, or simply to blend in with the populace. This form of hit-and-run attack was more of a nuisance than a serious threat to the US war machine, but forced the US and AVRN troops to spread themselves thin throughout the southern portion of the country instead of concentrating on the NVA forces to the north.
Assault
As with the NVA, the VC have a choice between an assault rifle and a light machine gun, although neither are as powerful as the weapons that are available to the other sides. The AKMS is essentially a less-accurate AK-47, while the Type 53 possesses fewer than half the rounds per clip than the M60 or the RPD. Still, so far as firefights go, these kits are the VC's best options, so pick your poison and hope that you can pick up an M60 off of a corpse.
Loadout 1
Plantation knife
Tokarev TT-33
AKMS
Stick grenade
Binoculars
Loadout 2
Plantation knife
Tokarev TT-33
Type 53
Stick grenade
Binoculars
Engineer
To shovel, or not to shovel: that is the question. Regardless of your choice, you'll be fairly well-off in terms of armament; the MAT-49 isn't going to take down anyone at long range, but it's decent enough in a firefight. Your decision between Pungi Sticks or Landmines should take the map into consideration; Pungi Sticks are always effective against infantry, but Landmines can often be used to neutralize enemy armor before it reaches the front lines.
Loadout 1
Plantation knife
Tokarev TT-33
MAT-49 (modified)
Pungi sticks
Type 63 60mm mortar
Wrench
Loadout 2
Plantation knife
Tokarev TT-33
MAT-49 (modified)
Landmines
Shovel
Wrench
Heavy Assault
The kits here are almost identical to those of the NVA. Again, taking the SA7 heat-seeking missiles will leave you almost completely defenseless against anything that can actually threaten you, so consider the map carefully before taking that kit. The combination of the Type 56 and RPG7V will almost always be useful in one way or another, so that's a better general choice for maps with less air activity.
Loadout 1
Plantation knife
Tokarev TT-33
Type 56
RPG7V
Binoculars
Loadout 2
Plantation knife
Tokarev TT-33
SA7 Explosives
Binoculars
Scout
In terms of sniping capability, the Viet Cong definitely get the short end of the stick: the M91/30 is by far the worst sniper rifle that appears in the game. This is mostly due to its incredibly slow reloading time, both in-between shots and when you run out of bullets. You can still deal some damage with it, but you'd better be real good at making headshots, because if you merely wound your target, he'll probably be on the move before you can get another shot off.
Loadout 1
Plantation knife
Tokarev TT-33
Moison-Nagant M91/30 sniper
Caltrops
Binoculars
Loadout 2
Plantation knife
Tokarev TT-33
Type 56
M-16 mine ("Bouncing Betty")
Time bomb
Weapons & Equipment
General Weapon Strategies
Although there are nearly fifty different weapons and pieces of equipment available in Battlefield: Vietnam, most of them are variations of a few simple types. An M16, CAR-15, and AK-47 may all be different weapons, but they all work very similarly, and require similar strategies to be used effectively. Instead of making you read the same strategies for each and every one of them, this section will describe the best tactics, tips, and techniques for each general group. The next section will point out the strengths and weaknesses of each individual weapon where appropriate.
Knives
Machete, Plantation knife, Combat knife
Knives are dangerous--they will kill in a just a couple of good hits. Let's be honest here, though. This is a gun fight--don't bring a knife. The chances of you living long enough to run out of ammunition in every other weapon and not being able to find a replacement or an ammo box are rather slim. About the only time a knife is really useful is when you find an enemy not paying attention (such as a sniper who stays zoomed in) and want to embarrass him in front of the entire server.
Sidearms
M1911, .357 Magnum, TT-33
Sidearms were issued as a backup if you ran out of weapon for your main weapon, or for those troops who weren't expected to see heavy combat. Look at them the same way--they are meant as a backup only, to give you an edge until you can get more ammunition for your primary weapon. Every class has a serviceable primary weapon that serves better in combat, except, perhaps, for the scouts with a sniper rifle; they may need to switch to a pistol if an enemy gets too close.
Keep this in mind when forced to use a sidearm: if you have to face a properly-armed enemy with only a pistol, you have probably already lost. At the very least, you are at a severe disadvantage. If you get into a dance--running back and forth, strafing and dodging, then his superior firepower will win out, and you will die. Your best bet with a pistol is to drop to a crouch the instant you see an enemy, put the sights on his head, and pull the trigger as quickly as you can. The pistol's accuracy makes it easy to hit at close range, and your opponent will be expecting you to run around. When you don't, many opponents will pause before adjusting to your tactics. By that time, he will hopefully be dead.
Rifles
M14, Type 56 Carbine
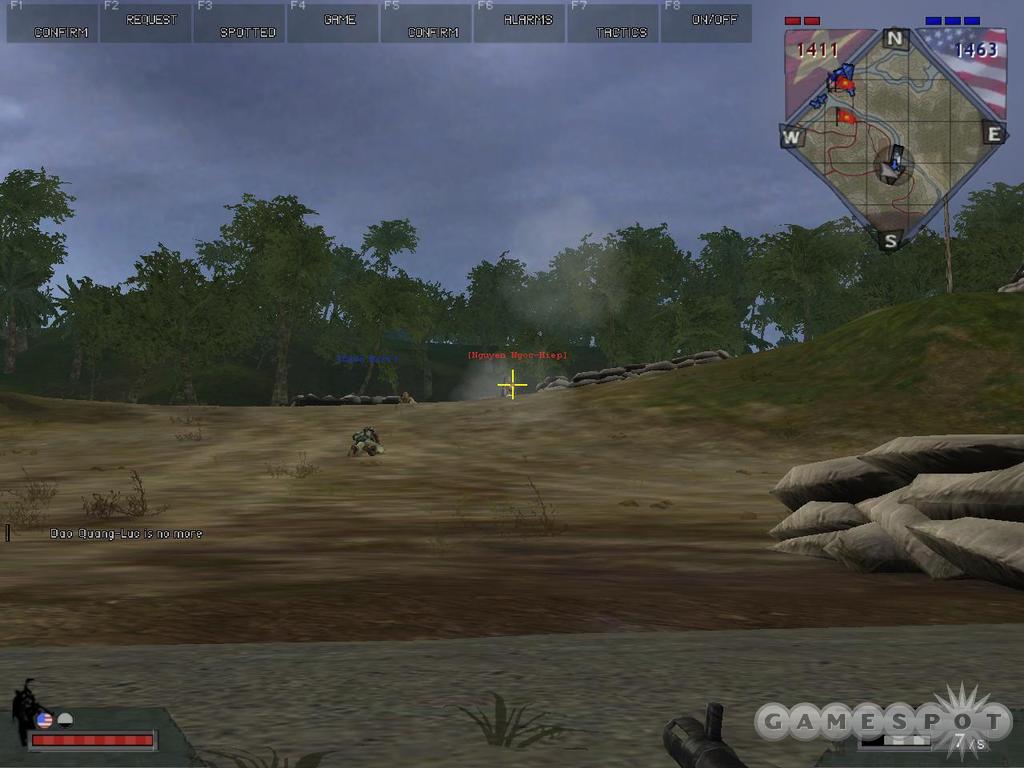
Rifles are long-barreled, single shot weapons. You pull the trigger once, one bullet comes out. If you want three bullets, you have to fire three times. Rifles are, generally, extremely accurate weapons. You may not be able to fire as fast as you can with an M16, but you can put every round on target! They also regain their highest accuracy rating extremely quickly, especially if you are crouched or prone. As long as you move your aim down a bit between shots, you should be able to fire as quickly as the gun can manage with full accuracy.
If you see an enemy at a distance, you have an advantage second only to the sniper. Go prone (or at least crouch), and aim at the upper body unless you are close enough to guarantee a headshot. Fire, lower your aim a smidge, and fire again. You should always plan on firing your rifle at least twice, as only a headshot will kill a healthy enemy with one bullet.
If you are close enough that you don't have the time to choose your shot, treat the rifle like a handgun. Drop to a crouch and fire as quickly as you can, right at their head, and keep firing until somebody falls down.
Sniper Rifles
M21 sniper, M16 sniper, M40 sniper, SVD sniper
Sniper rifles tend to be extremely powerful. Most of them will kill in one headshot or two shots to the body. They are amazingly accurate at extreme ranges. With a sniper rifle, you can accurately put a bullet between the eyes of an opponent that you would have trouble even seeing with a normal gun. The real drawback of sniper rifles is that they are slow; if an enemy gets close to you, you will usually get one shot. If that misses, you will have to rely on your pistol for defense, as you will be killed before you can get off a second shot.
Firing a sniper rifle in Battlefield: Vietnam is easy. You put the dot on the target and click the mouse. Being an effective sniper is a much, much more difficult proposition. You have to take into account a number of factors, such as location, positioning and cover, situational awareness, and choosing the right targets.
Location: You need to be someplace where you can see prospective targets, but where wandering enemy soldiers won't step on you. Nothing makes a grunt happier than finding a sniper looking the other way! Most of the time, your location will be higher than the surrounding terrain, like a hill or a building. Avoid guard towers. They are great locations, but they are obvious; everybody checks them for snipers! The best locations are around the edges of the map on a hill overlooking multiple control points. If you are in the middle of the map, the chance of being discovered by an Assault soldier wandering between control points is much greater.
Positioning and Cover: Snipers are effective because nobody knows where they are. The way you stay hidden is through proper positioning. The worst spots are in the middle of a rooftop or on the top of a hill. Terrain is composed of straight lines. The top of a hill, for instance, is a straight, flat line. If you are on the top of that hill, you will be a big, sniper-shaped bump on that straight line, and as obvious as if you waving a flag. The same thing holds true with architecture--windows don't normally have human-shaped structures in the middle of them!
The way you avoid being seen is by combining your little bump with something else's bigger bump. Lying right next to a tree, for instance, or in a pile of rubble will make your silhouette indistinguishable at a distance from the terrain. If nothing like that is available, than you are better off partway down a hill so that you don't create a bump against the skyline. In buildings, crouch next to a window and aim through it at an angle, or move back a few yards and aim through it from a distance. On a rooftop, position yourself next to some three-dimensional feature, such as a chimney or a bit of rubble.
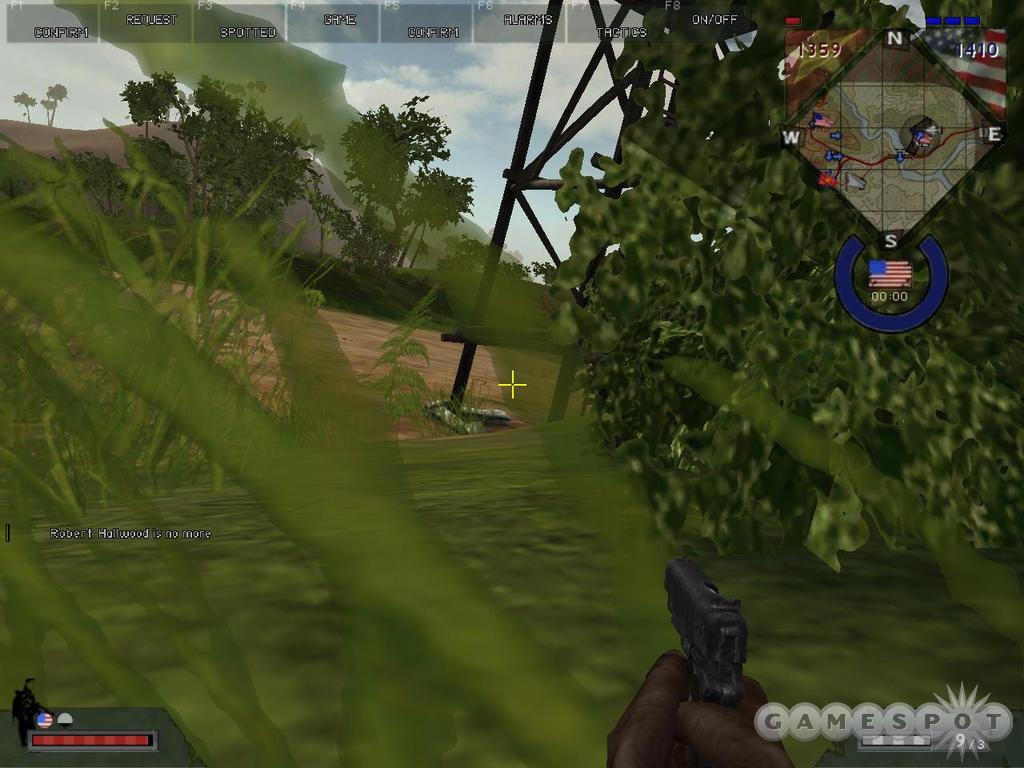
There is one obvious form of cover that does not work, however--the grass. Most of the terrain in Battlefield: Vietnam is covered in knee-high grass that seems like ideal cover. If you pay attention, however, you will note that the grass is only visible in a small circle around you. That means that the nifty clump of grass you are hiding in is invisible to anyone further than about fifty feet from you, and you are actually fully exposed to the enemy. Not all vegetation disappears, though, and there is an easy way to check. Go prone. The grass nearby should go partially transparent to allow you to see what is around you. Foliage that remains solid in appearance when you are prone (many ferns and bushes do) will be visible to anyone, and makes great cover.
Situational Awareness: Snipers are exceedingly vulnerable to attacks from other soldiers that they don't see. When you are zoomed in with your rifle, you will only be looking at a tiny, tiny piece of the battlefield. With that kind of tunnel vision, a tank could sneak up on you. The point of this example is that it is a bad, bad idea to stay zoomed in. Keep your rifle down and look around without the scope. If you see something that looks like a potential target, zoom in to take a closer look, and then zoom right back out. If it is a target, take the shot and hold just long enough to make sure the target is dead before zooming back out. Look around, and pay attention!
Choosing Targets: When playing as a sniper, you will usually be far away from the nearest ammunition box, and you will have a very limited number of rounds. If the server you are playing on has the death camera enabled (always check if you plan on being a sniper), then as soon as you kill someone, their camera will automatically turn and center on you, giving away your position and forcing you to move after every couple of kills. All of this means that a good sniper must work for his kills, and must therefore make those kills count. That means choosing your targets, sometimes letting an easy kill go so that you don't give away your position (or your ammo) too soon. If you snipe a lone soldier at his spawn, you just cost the enemy--nothing. One ticket and a seven-second wait. That isn't going to make any difference in the battle at all. Leave the wandering soldiers alone, and save your precious shots for vital targets. Engineers laying mines or manning mortars, people in vehicles with their heads exposed, people manning fixed weapons, enemies near a flag waiting for it to turn--these kinds of targets can make a big difference in the course of a battle!
Automatic Rifles & Submachine Guns
M16, CAR-15, AK-47, AKMS, MAT-49 (modified)
Automatic rifles and submachine guns are the meat & potatoes of an army. They are not as accurate as a single-shot rifle, especially at long range, but they make up for it with their high rate of fire. This allows them to be useful at long range as well as in close confrontations. Submachine guns (like the AKMS and MAT-49) lie at the end of the spectrum--they are more accurate than their larger cousins when extremely close to a target, but don't have as much range. From a crouch or in close quarters, though, they can dominate a fight.
The longer you fire at full automatic, the more your accuracy drops. At all but extremely short range, therefore, automatics should be fired in brief bursts. Line up your target, hold the button down just long enough for three or four bullets to fire, then stop and wait for the crosshairs to move together again before firing off another burst. A single burst like this will usually kill a target, and any rounds fired after the first three or four will probably be so inaccurate that they will miss and be wasted. You can use a slightly longer burst when crouched, and much longer bursts when prone.
If you get extremely close to an enemy, spinning and turning, don't worry about counting bursts. Whenever you manage to get your crosshairs near the enemy, fire, and keep firing until you can't hit them. It is a bad idea to fire nonstop while dancing with an enemy, as you may run out of ammunition before killing them. A reloading soldier is an easy kill.
Machine Guns
M60, RPD, Type 53
In real life, machine guns are heavy weapons, the use of which involves unique strategies and skills. In the game, however, they function more or less as a type of automatic rifle. They have some real drawbacks as opposed to regular automatic rifles. First of all, they are not as accurate, and regain their accuracy more slowly. This is more than made up for by their rate of fire--while an M16 puts three rounds in a three inch circle, the M60 puts ten in a one foot circle--either one of which is bad for a man with an 18-inch wide chest!
You can use a machine gun much like you use an automatic rifle, firing short bursts at specific targets. It is also useful to stay back as more lightly armed troops move in, and lay down heavy fire into the area they are advancing on. This may result in wounded enemies, a few kills, or just overly cautious enemies who are paying more attention to you than to the three other guys coming in from the side.
Hand Grenades
Fragmentation Grenade, Stick grenades

While they may seem simple - small, hand-thrown bombs with a timed fuse--hand grenades have a great many uses. To begin with, there are two ways to throw hand grenades. If you use your primary fire, you will throw them as hard and as fast as you can. If you use secondary fire, however, you will see a small grey meter in the lower right corner of your screen charge up. This is your throwing power. Release it when it is low for a light toss, or wait until it is full for a full power throw (the same as primary fire).
Grenades are not all that useful in direct, head-to-head confrontations. It is tough to time things well enough to ensure that your opponent is near the grenade when it goes off. They are more useful, however, against enemies that have not seen you yet, and against enemies that are out of sight. Did a VC just fire at you and duck back behind a corner? Don't chase him--toss him a grenade! There is a bunker nearby that you want to be in--don't go in hoping to shoot first; lead with a frag, then go in.
Hand grenades are also useful against material targets like tanks and mobile spawns. Even the largest tank can be taken out if multiple grenades go off underneath (in real life, soldiers would stuff a grenade into the treads hoping to disable a tank). Keep moving, as the turret of a tank (or most other vehicles) can't track a running soldier, and keep throwing grenades, aiming right where the vehicle's treads or wheels touch the ground.
Mortars
M1 81mm mortar, Type 63 60mm mortar
Mortars are simple weapons--they are basically a tube with a firing pin. When you drop a shell in the front, it hits the pin and launches like a miniature rocket. When it lands, it explodes like a massive grenade. To use a mortar, ready it like a weapon. Pressing your primary fire button assembles it on the ground beneath you. Point your crosshairs at the mortar and hit the same key you would use to mount a vehicle. To pick the mortar back up later, use your 'Pick Up Item' key.
Mortars are best thought of as man-portable artillery. They launch in a high, arching trajectory just like artillery, and are aimed the same way. The higher you aim, the further away the shell will land. Assume that the first two shots will miss; pick a point near your target, and use the first shots to figure out where you need to aim to hit that spot. Once you hit your target, memorize where your crosshairs are at in relation to the background scenery. That point will be your reference for all later shots. If you see something you want to hit that is closer to you and to the left of your original reference target, then put your crosshairs in the reference position and move them down and left a bit.
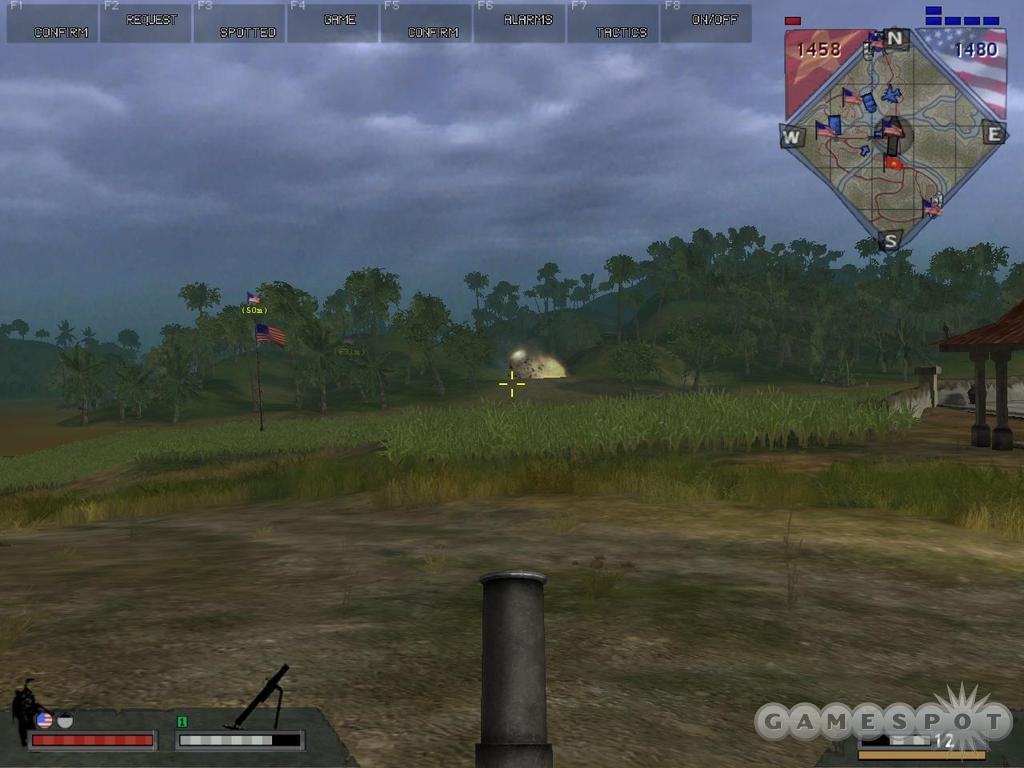
Good mortar targets include doorways, choke points, and vehicles. Turn on your 3D map and keep an aye out for muzzle flashes that are not yours; these are prime targets. If you are just providing general support for your side, or if you are fighting defensively, then wait for targets before wasting your ammunition. If your troops are about to move in on a target location, feel free bombard the heck out of it. Don't fire all your rounds in the same place--fire one at the reference, then one a bit to the left, then one a bit closer, then one a bit to the right, and so on--move them around within the target zone. Be sure to cease fire a few seconds before your troops arrive, as that last mortar shell will take a while to land, and you don't want to blow your buddy across the map.
Mines & Explosives
M-7A mine, C4 block w/ remote detonator, M18 Claymore mine, Explosives pack, Land mines, Bouncing Betty mine
The number one, first thing to do if you want to play with mines is to find out whether friendly fire is on or off. If it is on, you will have to exercise extreme caution; an anti-vehicle mine in the middle of the road will take out your tank as readily as theirs. You will have to place them only in places that you know your own troops or vehicles will not be, and you should clearly state over the team chat channel that 'Bridge is mined!"
If friendly fire is off, however, your own side's vehicles and personnel will not be affected by the mines; be free with them. Use them defensively around your base and along roads.
Many drivers will be wary of mines in obvious chokepoints, and foot soldiers may see mines sitting in the open. Make sure that, if you can, you place mines in clumps of grass to disguise them. If there is no grass nearby, place them in patches of dirt colored similarly to your mines. If your mine is off by a few inches, pick it back up (with the 'Pick Up Item' key) and place it again. If you are mining a road, pay as much attention to the shoulders as to the road itself. If one vehicle gets blown up, the guy behind him will know about the danger and will probably try to go around through the 'safe' grass.
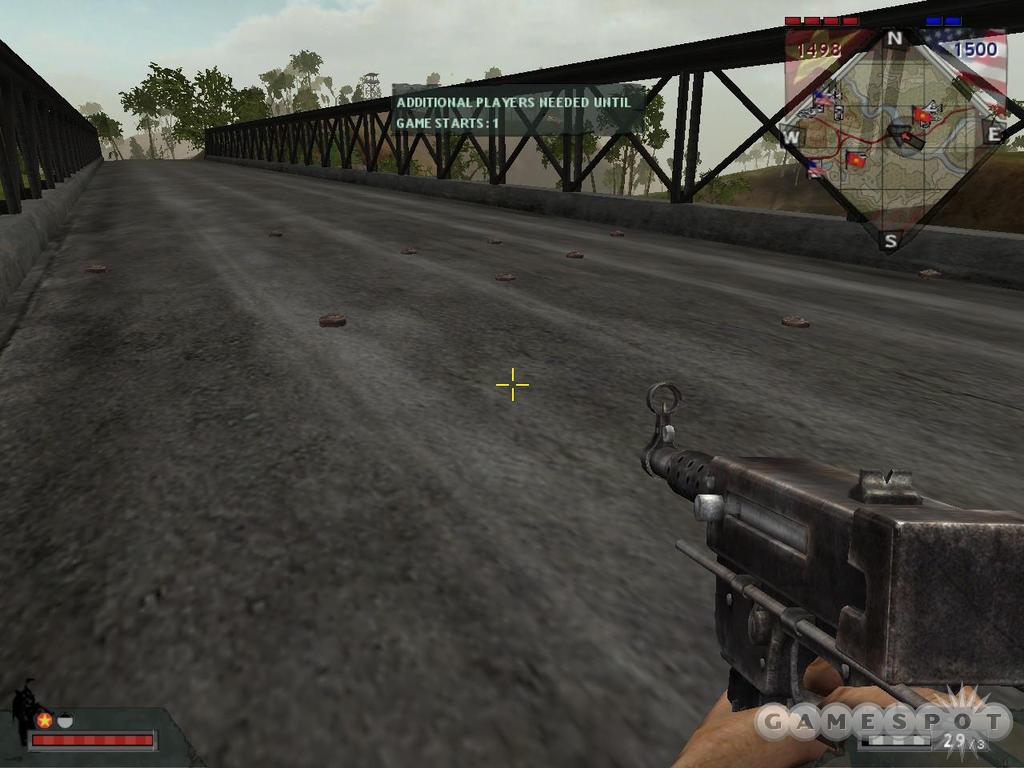
Don't place your mines all in one big clump; spread them out in an unpredictable pattern. If they are all in one small spot, a single vehicle might trigger all of them at once, wasting them. If they are spread out, the same number of mines can be used against several vehicles.
Note that mines under vehicles will not cause an empty vehicle to explode. You can use this fact to create booby traps by sneaking into an enemy's base and putting mines underneath his empty vehicles. As soon as somebody gets in, boom! If you drop a mine directly under a vehicle (like a tank) that is already occupied, it will explode immediately, probably taking you with it. Although it is a bit cheesy, you can also use this trick to get rid of a dangerous tank when there are no Heavy Assault troops around.
Remote explosives (C4, Claymores, explosives packs) can be used similarly to mines. The only difference is that you will need to be nearby to set them off yourself.
Anti-Vehicle Launchers
SA-7, RPG-7V, RPG-2, M72 LAW
These weapons usually consist of a simple tube launcher designed to aim a rocket toward an enemy vehicle. At its heart, the concept is simple; line up the crosshairs and shoot the vehicle. In practice, it is quite a bit more complex, and takes a good bit of practice.
Launchers don't work like guns. First of all, the projectile runs out of power quickly. That means that while they may start out flying in a straight line, they will quickly arc toward the ground. How soon the shot arcs and by how much depends upon the individual weapon. An RPG-7V will fly straight for quite a long distance before it begins to fall. An RPG-2, on the other hand, will only fly straight if you are launching it straight down from a cliff. With practice you will be able to learn to judge how far away you have to be from a target before you have to start compensating by aiming high. Start a solo game and fire at distant trees with a launcher until this becomes second nature.
The other thing to be aware of is that rockets are very slow. To hit a moving target, you have to lead it by a good distance. If the target is far away, you will have to lead it even more.
This brings us to the secret of effective anti-vehicle rocketry--choosing your target. Some targets will be very, very difficult to hit because you will have to aim high to account for the rocket dropping, plus aim ahead to account for the projectile's slow movement. You have to get both estimates exactly right to score a hit on a moving tank from a distance! If the target is armored, it will probably take two shots to destroy it. That means that you will not only have to guess right, but you will have to survive long enough to reload and guess right a second time.
What is the answer? Don't engage that tank. Get closer or wait for a different target. When you do find a viable target, aim, fire, and duck for cover. Don't wait to see if the rocket hit. Once you have reloaded, stick your head out and fire again. If you can, move to a different location for each and every shot. In a city this is easy--fire once, then go to a different window, or around the other side of the building to finish the tank off.
Weapons, USA/ARVN
Sidearms
M1911
The M1911, or, more properly, the M1911A1, is a fantastic weapon. Look at the name--1911. This is the same handgun that was carried by US military personnel in World War I, World War II, and Korea, until it was replaced in 1985. That is 74 years in an army that loves to modernize--talk about standing the test of time! This .45 caliber pistol was famed for its reliability, durability, and sheer killing power.
Army, Marine, and ARVN forces are armed with the M1911A1 as their sidearm.
.357 Magnum
The .357 Magnum revolver saw limited use in Vietnam (typically in the form of the M27), but a few people did choose to carry them. They are powerful, accurate weapons, and not prone to jamming or the kind of mechanical malfunctions that sometimes plague automatics.
Special Forces troops carry .357 revolvers as their sidearms.
Primary Weapons
M16
Replacing the M14 as the standard-issue US military rifle, the M16 earned an early reputation for being unreliable. Later improvements to the design increased its reliability, but the reputation stuck. Firing a 5.56mm bullet (about the size of a .22 rifle), the original could be fired single-shot or in full automatic mode. The weapon is still the primary weapon of the US Army, and its variants, such as the CAR-15 and the M4 remain in use, as well.
Army and Marine Assault troops (loadout #1) plus ARVN Assaults (loadout #2) carry the M16.
The standard US assault rifle, the M16 is accurate and powerful with a respectable range.
CAR-15
Also called the XM-177E2, and nicknamed the 'Shorty 16,' the CAR-15 is a shortened version of the M16. The shorter barrel and telescoping stock make the weapon lighter and more maneuverable, but decrease its accuracy at long ranges. Because of this, it has been popular with Special Forces, but is not well accepted amongst frontline troops.
Special Forces Assault troops carry the CAR-15, as do ARVN Assaults (loadout #1).
The CAR-15 is a bit less accurate than the M16, but it is suppressed, so it is immensely useful behind enemy lines or from hiding when you'd rather not give away your position with loud gunfire.
M14
A successor the Second World War's M1 Garand, the M14 was adopted by the Army in 1957, only to be replaced a few years later by the M16. It was, nonetheless, an extremely effective, reliable weapon, with a good range and little recoil.
All Army, Marine, Special Forces, and ARVN engineers are armed with M14s.
Beware of misusing the M14. It isn't as powerful or accurate as the Type 56 Carbine, but it can hold its own. Its biggest drawback is a nasty recoil. Compensate by using this rifle while crouched and zoomed.
M21 sniper
The M21 sniper rifle (called the XM21 early in the war) was a tweaked and adjusted M14 rifle mounted with an ART (Adjustable Ranging Telescope). This resulted in a light, powerful sniper rifle, accurate to over 700 yards. It remained the primary sniper rifle throughout the conflict.
ARVN and Army Scouts (loadout #2) are equipped with M21 sniper rifles.
A ten-round magazine and a high rate of fire are the strengths of the M21. It is a good all-around sniper rifle.
M16 sniper
Although rare and usually considered experimental, a few versions of M16s mounted with telescopic sights were used during the war. They never became popular, as they didn't have the power or long-range accuracy necessary to be truly effective in the sniper role.
All US and ARVN Scouts with loadout #2 have an M16 sniper rifle.
The M16 sniper is essentially a single-shot M16 with a scope. The scope doesn't zoom in as far as the other sniper rifles do, and the M16 sniper does the least damage of any of them. The one advantage is that the M16 sniper remains effective as a regular rifle. A 20-round magazine and high from-the-hip accuracy lets the sniper use it to defend himself from enemies that get too close.
M40 sniper
The M16 sniper is an assault rifle with a scope, and the M21 is a medium-range sniper rifle for the troops. The M40, on the other hand, is a specialized long ranged marksman's weapon. They are heavy, weighing almost twice as much as the M21, with a small, 5-round magazine and a manual bolt action. Each one is built by hand to exacting standards that other sniper rifles could not hope to match. They were rare in Vietnam, but when they showed up, the enemy knew it (but not until it was too late!)
Only the US Marines and Special Forces Scouts (loadout #1) have access to the M40 sniper rifle.
The M40 sniper rifle is for the elite sniper. It matches the power of any other sniper rifle in the game, but fires slowly and has a tiny five-round magazine. Don't miss!
Mossberg 500
The Mossberg 500 shotgun was one of several shotguns used in Vietnam. The guns were loaded with large gauge shot (although experienced soldiers often emptied the shot out and filled the shells with dimes), making them fairly effective at close range. In the dense jungles, a great many combat encounters were at well under 100 yards, making the shotgun's limited range less of a factor. The shotgun was often carried by the point man who could use its spread and immediate firepower to put a dent in an enemy surprise attack.
Army and Marine Assault troops (loadout #2) carry Mossberg 500 pump action shotguns.
If employed properly, the Mossberg 500 can be an extremely effective weapon. If your target is close enough that they won't fit inside of the crosshair, then it becomes an ideal one shot, one kill weapon. It is extremely effective close up in the hands of a skilled soldier, especially in close-contact areas like buildings, dense jungles, or urban settings.
M60
The M60 7.62mm machine gun, nicknamed the 'pig' by troops in Vietnam, has been in use as an infantry support weapon since shortly after World War II. It was designed to fulfill a dual role as both a squad weapon (carried into firefights and used without having to be reassembled first) and as an emplaced weapon when mounted on a tripod. It was a crew served weapon, with one man carrying the gun itself, and another man carrying the ammunition and spare barrel (the barrels had to occasionally be swapped out, as they could reach 500 degrees Fahrenheit after sustained fire.)
All US and ARVN Heavy Assault soldiers carry the M60.
At the time of this writing, the M60 is the most effective weapon in the game. While it doesn't have an amazing base accuracy, if used while crouched, it loses its accuracy (and gains it back) almost as well as an assault rifle. Combine that with an ungodly rate of fire and a 100-round magazine and you have a weapon that simply cannot be matched.
M79
The M79 40mm grenade launcher, nicknamed the 'blooper' or 'bloop gun' for its distinctive sound, was introduced in Vietnam. It filled a hole--mortars couldn't fire within a minimum distance, and hand grenades couldn't be thrown very far. The M79 was designed to lob a variety of types of grenades into this zone that was otherwise unreachable by explosive weapons.
All US and ARVN Assault troops with loadout #1 will carry an M79 grenade launcher.
The bloop gun is an effective general weapon. It works just about like a normal hand grenade, except that it fires further than you can throw and explodes on impact. It is good for flushing enemies out of cover, clearing out buildings, or taking out light vehicles. The only real problem is that it is always carried with an M60; the M60 can do all of these things better, so there is rarely any reason to use the blooper.
XM148
The XM148 was not a rifle--it was an underslung grenade attachment for a rifle. As shown by the "X" designation, it was an experimental design, and it was one that was not popular. The weapon was hard to use, inaccurate, and easily damaged. Most squads decided that they preferred the M79. The XM148 that appears in the game comes mounted on a CAR-15 rifle.
Only Special Forces Assaults (loadout #2) have access to the XM148.
The XM148 grenade launcher is roughly the equivalent of the M79, but attached to a CAR-15. It is fired with the secondary fire button, but takes away the CAR-15's ability to zoom in. The real advantage here is versatility. It is sometimes hard to change back and forth between grenades and primary weapons in the heat of battle, but the XM148 lets you throw lead, push a single button to send a grenade into the group of NVA that just came around the corner, and then go right back to spraying lead.
M72 LAW
The M72 LAW (Light Anti-armor Weapon) was the US military's man-portable anti-armor weapon during Vietnam. Although capable of piercing more than twelve inches of hardened steel, the LAW didn't have as much of an effective range as comparable enemy antitank weapons, but was much lighter, weighing in at only five pounds (as compared the RPG7V at about 20).
All US and ARVN Heavy Assaults (loadout #2) carry M72 LAWs.
The LAW is the US and ARVN forces' only anti-vehicle launcher. It carries a lot of ammunition, has a fairly flat trajectory, and reloads extremely quickly.
Other Weapons & Equipment
Fragmentation Grenade
A number of fragmentation grenades were used by US forces during Vietnam, although most are variations on a theme. They are typically composed of a heavy iron body with a crisscross pattern dividing them up into half-inch squares (which is why they were sometimes called 'pineapples'). They are filled with explosive with a three to seven second fuse mechanism activated by releasing a metal 'spoon' on the top. When the explosive goes off, each of the iron squares (called fragments or shrapnel) flies off in a different direction, like a swarm of razor-edged bullets.
All US and ARVN Assault soldiers carry fragmentation grenades.
Combat knife
A number of different knives were used by US troops in Vietnam. They were used for utility work, cooking, and of course, for combat.
All US and ARVN troops carry combat knives.
Health kit
Although field medics were a specialized group of soldiers (and the unsung heroes of any war), troops on the frontlines typically carried a small first aid kit with basic bandages, antiseptics, and other necessities for treating wounds until better treatment could be obtained.
All Special Forces Assaults, Heavy Assaults, and Scouts carry health kits.
Walk up to an ally with a health kit in hand and heal them, or use it without an ally to heal yourself.
M18 Smoke grenade
M18 smoke grenades were used throughout Vietnam. They could be used to provide cover for troops, but were more frequently used for marking positions for aircraft. By 'popping smoke' of a certain color, you could tell incoming aircraft where you were and where the enemy was--handy to know when you are dropping napalm! You could also mark a safe landing zone for incoming helicopters, with the smoke serving the additional purpose of showing the pilot the direction and speed of the wind. M18 smoke grenades originally came in yellow, red, violet, and green.
All US and ARVN Scouts carry M18 smoke grenades (yellow only).
M18 smoke grenades, ideally, have a couple of uses. You could use it to mark a significant location, such as a VC spawn hole or a location to be targeted by napalm. You could also use its smoke to provide cover for a quick getaway. Unfortunately, it only lasts five or six seconds, making it all but useless in the game.
Binoculars
Binoculars. There are two of them. One for each of your oculars. They make distant things appear closer.
All US and ARVN forces except for engineers have binoculars.
Binoculars are one of the most valuable tools in the game, yet they are often ignored because they don't produce immediate, flashy results. When you pull out your binoculars and push primary fire, or zoom first with alternate fire and then use primary fire, you request an artillery strike. What that means is that any player manning an artillery piece can use his own alternate fire to see where your binoculars were pointed at when you 'fired.' They can use this camera for two full minutes before another one needs to be placed. This allows artillery to fire directly at that point. Without it, artillery users are firing blindly, often unable to see exactly where their shells are hitting.
Whenever you see an enemy strongpoint or stationary manned vehicle that is causing problems, take the five seconds necessary to pull out your binoculars and set an artillery camera. If you and some teammates are getting ready to hit an enemy base, do the same. The reason that artillery is usually so ineffective is that nobody ever bothers to call in coordinates!
M18 Claymore mine
In a classic example of idiot-proof instructions, the M18 Claymore is clearly branded across the case: "Front--Toward Enemy". While it may seem humorous at first, anybody who has seen what a Claymore can do is glad it is there. The Claymore is a thin, curved sheet of explosive, in front of which are nearly 800 steel balls. Think of it as a shotgun with a muzzle the size of a hardback novel. It is lethal to 50 meters, and close enough to lethal out to 100. It is detonated with a hand-squeezed detonator (called a 'clacker'), although it has been used with a trip-wire as well.
Army and Marine engineers (loadout #1) carry the M18 Claymore.
M1 81mm mortar
Mortars were sometimes called 'pocket artillery,' and that is just what they are. Delivering explosive shells on a distant enemy can be fantastically effective, but regular artillery is big and hard to move. A mortar team could be placed out of sight to rain down explosives on an enemy position while completely protected from enemy fire. They could also launch white phosphorous, smoke, or illumination shells. The M1 mortar was large--136 pounds, and could launch an explosive shell over 3,000 yards at around 20 rounds per minute.
All US and ARVN engineers with loadout #2 are equipped with M1 81mm mortars.
Blowtorch
Pressurized flammable gasses, a nozzle, and a lighter make for a hot, hot flame, and an easy way to cut through important bits of metal.
Blowtorches are supplied to engineers with the Army and Marines (loadout #1), as well as with the Special Forces and ARVN (loadout #2)
Blowtorches are the opposite of wrenches--they damage vehicles. When you walk up to a vehicle with a blowtorch and 'fire' it, you will see a bar appear in the lower right corner of the screen showing the vehicle's health. As you hold the fire button down, the vehicle's health will decrease; when it reaches zero, it will explode (often taking you with it). It is usually ineffective to blow up an enemy's untended vehicles, as they will just spawn again a few seconds later. Instead, blowtorch them until they have only a sliver of health left. You want them to be smoking, but not flaming. When the enemy gets in, they will have only a tiny bit of health left. A single grenade or hitting a bump too hard will then finish the vehicle off. Damaging vehicles this way denies them to the enemy.
Wrench
I know this is a wrenching statement, but wrenches are made for fixing things.
All US and ARVN engineers carry wrenches.
Wrenches are used to repair vehicles and some structures. Ready your wrench, then walk up to a damaged vehicle and press your primary fire key to repair it. If you are riding in a vehicle that allows you to have your hands free, like the passenger seat in a MUTT or the back of a troop chopper, you can repair while you ride, an invaluable ability that is too often ignored.
M-7A mine
The M-7A mine is an anti-vehicle mine. It works in much the same way as a normal anti-personnel mine, but requires a good deal more weight to set off (this particular mine has a metal guard that must be bent down before it can be triggered).
All US and ARVN engineers with loadout #2 have M-7A mines.
C4 block w/ remote detonator
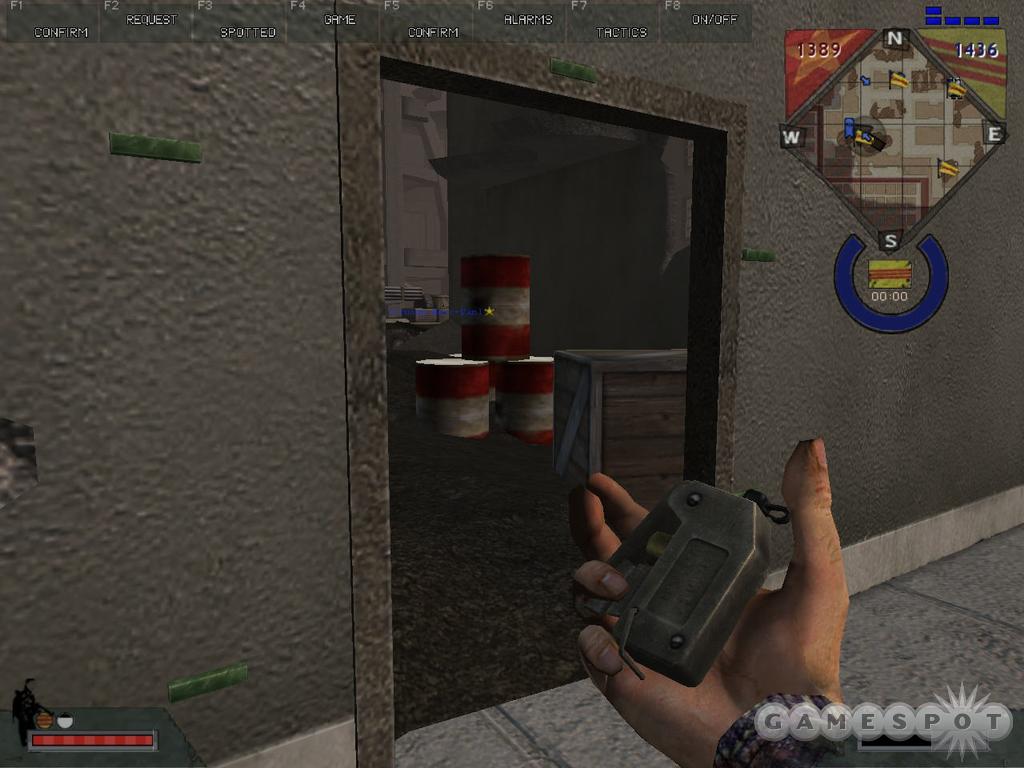
C4 (more accurately, Composition C4) is the US military's name for its plastic explosive. Think of it as a kind of thick silly-putty that blows up. It is a secondary explosive - you can cut it up, pound on it, even set it on fire and nothing will happen, but put a primary explosive in it (like a detonator), and look out! C4 is considered a high-brisance 'cutting charge.' That means that it blows up so fast that it can cut or shatter hard materials (like steel or concrete), but isn't nearly as effective against softer materials like sand or personnel--good old TNT works better for that!
Special Forces and ARVN engineers (loadout #2) carry C4 blocks with a remote detonator.
C4 blocks have adhesive, allowing them to be stuck to almost any surface. They are the ultimate 'sticky bomb.' You can place them around a flag, on walls, or on a vehicle, then sit back and wait for an enemy to come close. They are small and dark, so they are hard to notice once they are in place.
Weapons, DRV
Sidearms
TT-33
Created by arms designer Fedor Tokarev at the Soviet Tula weapons plant in 1933, the Tula Tokarev Model 1933 (or TT-33 for short) became a staple sidearm of the Soviet military until the mid 1970s. The TT-33 was later manufactured throughout other communist countries, including China (who called it the Type 51). From there the TT-33 spread into Vietnam as one of the preeminent small arms of the communist forces.
The TT-33 is the sidearm carried by all VC and NVA forces.
Primary Weapons
AK-47
The AK-47 has been one of the world's most prevalent military rifles for more than fifty years. Adopted by the Soviet Army as its standard issue rifle in 1949 (replacing the SKS), the Kalashnikov model 1947, firing a 7.62mm cartridge, has become a familiar sight throughout the world. Designed to be light, easy to use, exceptionally reliable, and, most of all, inexpensive to manufacture, the AK-47 was seen throughout Vietnam.
The NVA Assault kit (loadout #1) carries an AK-47.
The AK-47 is an effective assault rifle, although it is not quite as accurate as its US counterpart, the M16.
AKMS
In 1961, the Soviet Army replaced the AK-47 with the AKM. It wasn't much different from the AK-47; other than a few tweaks, and some lighter materials to further reduce the weight, they were identical. The AKMS was identical in every way to the AKM, except that it had a folding stock, making it an ideal choice for tankers and paratroopers for whom the longer weapon is unwieldy.
The Viet Cong Assault kit (loadout #1) carries an AKMS.
Think of the AKMS as a submachine gun rather than as a rifle. It is best used at close range, where its relative inaccuracy and fast recovery are beneficial.
MAT-49 (modified)
Adopted by the French army in 1949, the MAT-49 (Manufacture d'Armes de Tulle, 1949) 9mm submachine gun eventually found its way into Chinese, and later, Vietnamese hands. The Vietnamese modified the MAT-49 with a longer barrel and the ability to use 7.62mm ammunition, as well as increasing its rate of fire by 50%. The short wire stock could be slid into the weapon for easier carrying.
All NVA and Viet Cong Engineer kits come with MAT-49s.
The MAT-49 is what makes DRV engineers special; as a short-range defensive weapon, it has no peer. Its high rate of fire and relative accuracy while moving make it more effective than most assault rifles against an enemy that is extremely close, although it is much less useful at range. If you are firing at a distant enemy, crouch for more accuracy.
Type 56 Carbine
For those confused historians amongst you, note that there were two weapons in use by the Northern Vietnamese called the Type 56. The first is the "Type 56," a folding-stock modification of the AK-47 (essentially an earlier version of the AKMS). The second is the "Type 56 Carbine," The Type 56 Carbine was the Chinese version of the SKS, and is the rifle portrayed in the game.
The Chicom (Chinese Communist) Type 56 Carbines were manufactured in China with the help of Soviet "Technical Advisors," They were essentially identical to the Simonov SKS then in use in Russia. After being replaced by the AK-47, surplus SKS/Type 56 Carbines became the main weapon of many small armies and militias around the world, including the North Vietnamese.
Type 56 Carbines are carried by NVA Heavy Assault kits (loadout #1), Scouts (loadout #2), by both Viet Cong Heavy Assault troops, and by Viet Cong Scouts (loadout #2).
The Type 56 Carbine is an extremely effective rifle. It does as much damage as the M14, but is more accurate and has much less recoil. One caveat: The Type 56 has an extremely long reload time. If you run empty during a firefight, consider switching to your pistol and reloading the rifle later on.
SVD sniper
The SVD (Sniperskaya Vintovka Dragunov) sniper rifle, sometimes also called the Dragunov, was one of the world's first rifles designed explicitly for sniping. Designed to replace the M91/30 in the Soviet army, the weapon soon earned a reputation as a superior piece of military hardware. While the M91/30 remained the primary sniping weapon of the NVA, there were a few Soviet supplied SVDs in the war as well.
The NVA Scout kit (loadout #1) includes an SVD sniper.
The SVD balances a large magazine and high rate of fire with a big, nasty recoil. It matches any sniper rifle for sheer power, and it packs an extremely powerful zoom. It is a true sniper's weapon.
M91/30 Sniper
Designed all the way back in 1891 (and upgraded a bit in 1930), the Mosin-Nagant M91/30 (usually called the K44 by the NVA) was the main rifle of the Soviet army until it was replaced by the SKS, and saw use in virtually every war in the 20th century. Fitted with a high-powered scope, the M91/30 was the most commonly seen Viet Cong sniper rifle.
Only the Viet Cong Scout (loadout #1) carries the M91/30 sniper rifle.
The M91/30 is the poor man's sniper rifle. By the time of the Vietnam War, the guns were already more than 70 years old. The zoom is mediocre, and the gun itself is bolt-action, meaning a slow rate of fire and a lengthy reload.
Type 53
This is another historian-confusing weapon brought about by the chaotic naming conventions of the North Vietnamese. In Russia, where it was built, it was called the Degtyarev DPM RP-46; the Chinese version was the Type 58. The Soviets and Chinese phased them out in the early '60s in favor of the PK, and the surplus fell into the hands of the Viet Cong, who apparently called it the Type 53, despite them already having another rifle with the same name. Designed as an early squad support light machine gun, the DPM saw plenty of action in World War II. An unusual 47-round pan magazine supplied the gun, which could put those bullets out at the rate of 600 per minute.
The Viet Cong Assault kit (loadout #2) is equipped with a Type 53.
Think of the Type 53 as a cross between an automatic rifle and a machine gun. It works like a machine gun with moderate inaccuracy while moving and a relatively large magazine (although still only about half of what the regular machine guns have). On the other hand, it is extremely quick to reload, and can be fired almost continuously without losing accuracy if you have braced it (crouch or go prone).
RPD
Firing at a rate of 150 RPM (Rounds Per Minute), with an effective range of close to 800 meters, the Soviet-made RPD quickly became the North Vietnamese Army's infantry support weapon. The RPD was typically mounted on a bipod and belt-fed from an underslung barrel magazine. Historically, the RPD was usually considered a crew-served weapon, with one man carrying the gun and a second man carrying extra ammunition.
The NVA Assault kit (loadout #2) carries an RPD.
While not nearly as effective as the M60, the RPD is still a powerful machine gun. Use it prone or in a crouch for optimal accuracy, but be wary of the very, very long reload time.
SA-7
The SA-7 GRAIL was an early Soviet man-portable SAM (Surface to Air Missile). The heat-seeking technology had yet to be perfected, and the SA-7 was less perfect than most. The seeker head had a tendency to be fooled by anything giving off heat (like the sun, the ground, cattle...), and was only useful against very low-flying aircraft.
The SA-7 is carried by the Viet Cong and N.V.A/ Heavy Assaults (loadout #2).
The SA-7 is a heat-seeking missile, intended primarily to bring down enemy planes. It can be effective, but it isn't perfect. It was a technological breakthrough for its time, but was nowhere near as effective as modern heat-seekers. First of all, it will seek the nearest heat source, be it friendly or enemy. If you launch it at a US Huey and a MiG flies by closer, guess which one is going to take the hit?
The SA-7 is limited in its turn radius. That means that if you fire it past a fast-moving target, it will take it a long time to turn around and follow them. It also has a limited range, which means that it will run out of juice after a few seconds and tumble harmlessly to the ground. If you fire it at the rear of a fast-moving jet, the missile will not catch up before it gives out. If it has to turn too far in its flight, it may again run out of power before it hits its target. The most effective way of overcoming this weakness is to choose your shots. If you are firing at a jet flying past you in the distance, fire a good distance ahead of it. It will turn to seek the jet, and the plane will fly right into its path. If the plane is flying back and forth directly above you, either fire almost instantly as it passes you so the rocket will have time to catch up, or wait until the jet is flying straight toward you before firing. Slow-moving helicopters are much, much easier to hit.
RPG-7V

The Soviet RPG-7V antitank grenade launcher was an extremely prolific weapon during the conflict. Using a shaped charge, the resulting impact of an RPG-7V projectile was occasionally sufficient to not only punch a hole into an armored vehicle, but to make that hole go in one side and right out the other. When hitting, the projectile punches a hole in the armored target, spraying the inside with shrapnel and molten metal, with the purpose of either killing the crew or disabling the delicate internal equipment.
NVA Heavy Assault troops (loadout #1) are equipped with RPG-7Vs.
RPG-7Vs are about the equivalent of the US's LAW. They have a good trajectory and lots of power.
RPG-2
The RPG-2 was one of the predecessors of the RPG7V. It fired a smaller projectile, had less penetration, and about a third of the range of its successor. The surplus of RPG-2s that came about through their replacement resulted in an abundance of them becoming available to the Viet Cong.
The Viet Cong Heavy Assault (loadout #1) is equipped with an RPG-2.
RPG-2s are obsolete weapons, and the least effective anti-vehicle launchers in the game. While their damage is adequate, their horrible trajectory means that they are only truly effective at extremely short range.
Other Weapons & Equipment
Machete
The machete is a utilitarian knife found, in variants, throughout the world. Although famed for its use in cutting a path through dense vegetation, it was more often used for clearing potential agricultural land. Typically, a machete is a long, sharp blade affixed to a short handle.
All NVA kits carry machetes.
Plantation Knife
An agricultural implement, the 'plantation knife' was used in rice harvesting much like a sickle would be used in the west, or to clear land. The sharp, curved blade makes an effective weapon as well.
All Viet Cong kits carry plantation knives as melee weapons.
Stick grenades
There were a number of types of stick grenades in use by the northern Vietnamese forces during the war. The type you will see in the game are traditional 'potato masher' grenades. The long handle made them easier to throw, but added extra weight. To use them, the soldier would unscrew a cap at the bottom of the handle and yank on a string hidden inside, thus arming them. They rarely had effective fragmentation, relying instead on the force of the explosion for their offensive potential.
All Viet Cong and NVA Assault kits include stick grenades, as well as NVA Heavy Assault (loadout #1).
Caltrops
Caltrops have been around for centuries in many different forms. Essentially, they are a set of spikes connected in such a way that, when dropped, one point is always up. Used initially to disable horses (the spikes would severely injure their hooves), caltrops were found to be effective against humans or vehicle tires, as well.
NVA Scouts (loadout #1) carry caltrops.
Caltrops are a lot like pungi sticks. Drop them on the ground. If an enemy soldier or wheeled vehicle ends up on top of them, they will take lots of damage. It is best to place them strategically; around flags, in doorways, and so on. Caltrops are hard to see, but it still doesn't hurt to try and put them in grass or a shadow. Be extremely cautious of caltrops if friendly fire is enabled, as they can cause lots of same-team fatalities.
Bouncing Betty mine
There have been several land mines that have been nicknamed the 'Bouncing Betty,' but all worked on the same principle (the one modeled in the game is the M16 mine). Mines that exploded under the victim's feet were likely to kill or disable the person who had stepped on it, and possibly other people very close to him. Bouncing Betty mines, however, 'bounce' straight up about three feet when triggered before exploding in a shower of fragments at waist level. If it went off in the midst of a group of people, a number of them were likely to be struck, and the chances of fatal wounds were greatly increased.
Both NVA and Viet Cong Scouts (loadout #2) have Bouncing Betty mines available.
Time bomb
Time bombs, for game purposes, are essentially a bundle of high explosives attached to an electrical detonator and a timer.
Both NVA and Viet Cong Scouts (loadout #2) carry time bombs.
When thrown with the primary fire key, time bombs are set for ten seconds. By holding the secondary fire key, you can charge up a small gauge in the lower right corner of your screen. At full charge it is set for ten seconds, and with no charge, it goes off immediately (not really a good idea).
Booby trap
The North Vietnamese troops did not have technological superiority. They did not have numerical superiority. Their advantage was their ingenuity. Their booby traps were designed to make every action a deadly risk--from starting your jeep to eating a candy bar. Dying VC soldiers were even known to booby trap themselves by lying on an armed grenade as they died so that the spoon would be released when they were rolled over by the victors! The purpose of all of the traps was not to decimate the enemy, but to damage his morale, to make him constantly afraid to the point of exhaustion.
NVA engineers (loadout #1) are equipped with booby traps.
Booby traps can be a lot of fun, but in practice, you will rarely have the chance to use them. If you walk up to an unoccupied vehicle and pull out your booby trap, you will see a pair of pliers in your hand. Use your primary fire on the vehicle and a small bundle of explosives will appear on it. The instant somebody attempts to use that vehicle, it will explode, killing them. Try to place the trap where the explosives won't be visible, or your victim may think twice before boarding. Naturally, this requires sneaking into an enemy base and playing with their toys without anyone noticing.
Shovel
One would hope that you already know what a shovel is. What it represents, however, is the North Vietnamese tunnel network. The entire country of Vietnam was honeycombed with a vast network of narrow tunnels and bunkers (including underground hospitals, barracks, and mess halls), with new tunnels and new entrances being constantly constructed. A squad of soldiers might pass over a patch of ground, only to have a half-dozen Viet Cong pop up behind them to fire a few bursts, and then disappear back into the tunnels. It wasn't unheard of for tunnels to be opened in the middle of US bases, letting in massive numbers of enemies during the night for a surprise attack. It would have been a tough task to model these tunnels on each map, so the game uses a shovel to let an Engineer open a tunnel 'entrance' (spawn point) somewhere on the map.
Both NVA and Viet Cong engineers (loadout #2) carry shovels.
Shovels, tiny, insignificant little shovels, are the DRV forces' ace in the hole, and using them is an art. You don't even need to have your shovel in your hand to begin using it. Go to your portable spawn point (it looks like a small mound of dirt with a shovel handle sticking up). It is easily found by looking at the spawn interface and finding two spawn points extremely close together; one will be your mobile spawn. When you find it, point your crosshairs at it and hit your 'Pick Up Item' key. The spawn point will disappear. To put it back down, pull out your shovel, point it at a patch of dirt, and dig. It might be tempting to waltz over and drop it into the middle of an enemy base, but be careful; the hole, if found by the enemy, is fairly easy to destroy. The hole is also destroyed if the soldier carrying it is killed. Take all of this into account before you run away with the team's spawn point.
The first thing to do after you grab it is to avoid the enemy. You do not want to get shot! Decide where you are going to want the hole, and make your way there, being careful to avoid all of the roads, bases, and busy areas. If you aren't seen, you won't be killed. Sneak in, and err on the side of caution. If you are severely injured, drop the hole out of sight and let yourself get killed (or suicide, if you don't mind losing points), then respawn at the hole and grab it again.
Take it someplace near the enemy's base so that your troops won't have far to run, but--big but here--don't drop it too close. Put it back, and preferably in such a place that your troops will be coming from a direction that they would naturally be coming from. A bunch of Viet Cong popping out of the back end of the map is a pretty sure clue to the enemy that there is a mobile spawn nearby! The mound of dirt and shovel handle can really stand out in the middle of an open field, so either drop the hole in a deep, dark shadow under a tree or in some tall palm fronds (the kind that don't go transparent when you're prone). It is even better if there is a hill between your hole and their base.
Never, ever leave your spawn where it starts the game at, not even for a little while. Most of the US players have played the NVA or VC as well, and will know where to look for it. If they can kill an engineer with a shovel, they may steal your hole and drag it off to some dark, useless corner of the map, or they may carry it around for the rest of the game to keep you from using it. It is also worth mentioning that engineers can use their wrenches to repair damaged mobile spawns. If you see smoke coming from your hole, get a wrench!
Type 63 60mm mortar
The Chicom Type 63 (or Type 1963) mortar was common amongst North Vietnamese forces. It was designed to be light and easily erected, folding rather than needing to be disassembled. While it had a relatively short range for a mortar, it was ideal for the hit-and-run tactics of the NVA and VC forces; an experienced operator could erect the mortar, fire two shots, and have the mortar packed back up before the first round hit the target.
Viet Cong and NVA engineers (loadout #1) are equipped with Type 63 mortars.
Land mines
The term 'land mines' describes a variety of explosive traps. Typically buried under a thin layer of soil, land mines are activated when a significant amount of weight is placed upon them (although some actually detonate when the weight is removed, rather than when it is first placed on the mine). Some are designed for either vehicles or infantry, while larger, more expensive anti-vehicular mines require a large amount of weight (much more than a man) before going off.
NVA engineers (loadout #2) carry a supply of land mines.
Wrench
Wrenches wrench... things. They are handy tools for fixing broken equipment, and that is what they are in Battlefield: Vietnam; a general representation of an Engineer's ability to repair damaged machinery.
All NVA and Viet Cong engineers carry wrenches.
Wrenches are used to repair vehicles. Ready your wrench, then walk up to a damaged vehicle and press your primary fire key to repair it. If you are riding in a vehicle that allows you to have your hands free, like the passenger seat in a MUTT or the back of a troop chopper, you can repair while you ride, an invaluable ability that is too often ignored.
Pungi sticks
Pungi sticks are one of the most basic examples of biological warfare. Essentially, pungi sticks are stakes of bamboo sharpened to a needle point (and sometimes barbed), then smeared with human or animal feces. They were employed in many, many ways. Pits were dug and filled with them, smaller pits (just big enough for a human foot) were likewise employed. They were embedded in the ground under brush where soldiers might dive for cover. There are dozens more examples of how pungi sticks were employed. Stepping on one was bad enough--they would pierce right through a boot sole or leather upper, piercing the victim's foot or calf. If that victim was several days walk out into the jungle, then the nasty infection that would set in from the fecal matter in the wound could be much, much worse--and quite often deadly.
Viet Cong engineers (loadout 1) carry pungi sticks.
Pungi sticks can be a great boon if used properly; they can almost instantly kill any soldier that stumbles into them. Unfortunately, they are fairly visible once laid, so you will have to use some discretion in where you put them. Tall grass works well. Choke points, such as doorways and the ends of bridges, or around the flag when there is sufficient vegetation, make for fantastic pungi spots. Be extremely cautious, however, of using pungi sticks on servers where friendly fire is enabled!
Binoculars
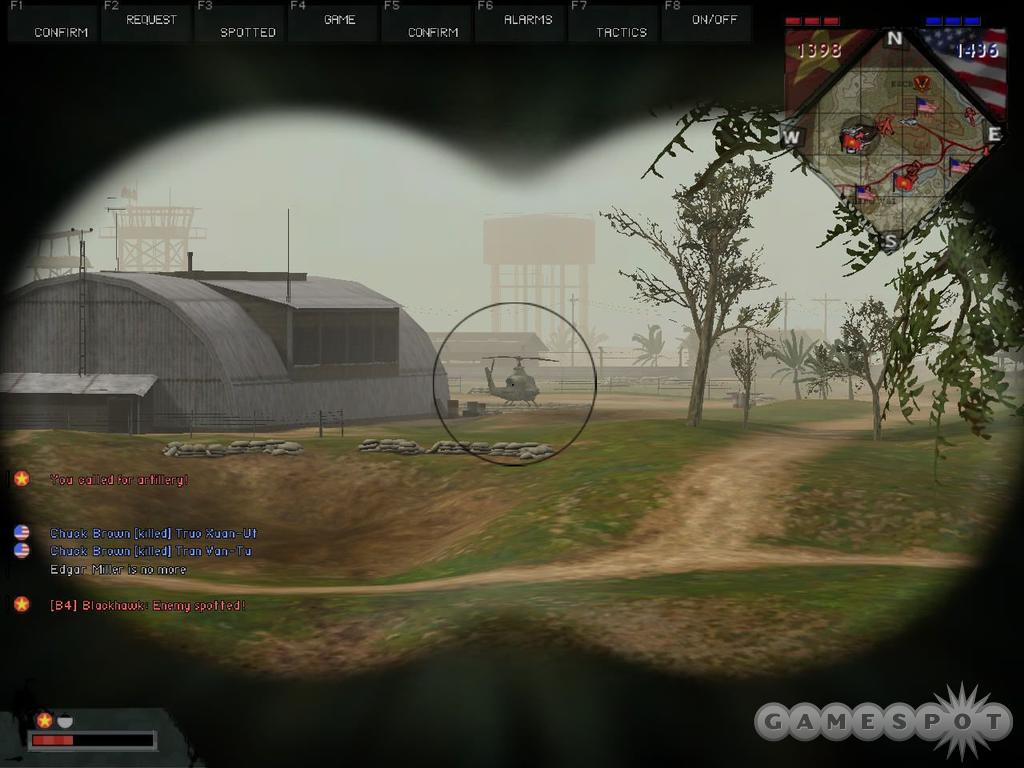
I am sure you already know what binoculars are, so I will spare you the clever comment.
All US and ARVN forces except for engineers have binoculars.
Binoculars are one of the most valuable tools in the game, yet they are often ignored because they don't produce immediate, flashy results. When you pull out your binoculars and push primary fire, or zoom first with alternate fire and then use primary fire, you request an artillery strike. What that means is that any player manning an artillery piece can use his own alternate fire to see where your binoculars were pointed at when you 'fired.' They can use this camera for one full minute before another one needs to be placed. This allow artillery to fire directly at that point. Without it, artillery users are firing blindly, often unable to see exactly where their shells are hitting.
Whenever you see an enemy strongpoint or stationary manned vehicle that is causing problems, take the five seconds necessary to pull out your binoculars and set an artillery camera. If you and some teammates are getting ready to hit an enemy base, do the same. The reason that artillery is usually so ineffective is that nobody ever bothers to call in coordinates!
Explosives pack
A simple bundle of high-explosives, combined with a plunger detonator. Drop the explosives, run the line, and push the plunger--boom!
NVA engineers (loadout #2) are equipped with explosives packs.
Vehicles
Flying Helicopters
The question many Battlefield 1942 grognards approached BF:V with wasn't whether or not the helicopters would be difficult to fly, it was how difficult they were going to be to fly. Anyone who experimented with the choppers in either the Desert Combat or Eve of Destruction mods probably has fond memories of spiraling into mountainsides so often that people on your team started to very politely request that you cease from piloting the helicopters. Luckily for us, DICE has included a helicopter flight model that requires practice, but is actually relatively usable with a simple mouse and keyboard configuration.
Simple Flight
If you want to be a helicopter ace, the first thing you'll need to do is to practice. Don't do this online, however; you'll wind up killing your passengers, getting cursed out by your teammates, and probably getting kicked off the server if you persist in captaining your doomed death-flights. No, the best place to try out helicopters is in a single-player, local multiplayer game. This sounds like a contradiction in terms, but what you're doing is essentially setting up a multiplayer server on your PC, except for the fact that you'll be the only player on it.
To do this, boot up Battlefield Vietnam, click on Multiplayer, then select Create Game. A number of options will become available. Set the Spawn Time and Game Start Delay to three seconds each, and make sure the options for Dedicated and Co-op aren't selected (there should be black squares next to them). After all this is set up, pick a map with helicopters, such as Operation Flaming Dart or Operation Hastings, add it into the levels menu via the orange arrows, and then select the Start Local option to begin the game. After it launches, you'll find yourself as the only person on the battlefield. Without bots or online opponents, you'll have ample opportunity to try out the helicopters without worrying about getting shot down.
Before you take your chopper up, though, you'll want to make sure that your control scheme is workable. If you've been using the default controls that the game originally set for you, then you shouldn't have any problems working a helicopter, but if you modified your movement keys at all, you'll want to make sure that the Speed Up / Speed Down keys in the Air tab of your Controls section correspond to the keys that you use to move forward and backwards for infantry and vehicles. The Rudder Left / Rudder Right controls should match up with your strafing keys for infantry, as well. After you have the controls set up properly, feel free to hop into a helicopter.
The first thing you'll need to do is get off the ground. The Speed Up key acts as a vertical boost for helicopters, so hold down your button until your chopper takes off. If you're not pressing anything else, and not moving your mouse around, it should shoot straight up into the air. After you're off the ground, let go of the button; your helicopter should hover in midair, with perhaps a slight amount of downward pull towards the ground. Luckily for you, though, this ability to hover is built into the helicopter physics; you don't need to press any buttons to activate it.
Of course, a helicopter wouldn't be any good if it couldn't move along the ground. There are two ways in which to move a helicopter forward. First, if you move your mouse forward just a tad, you should notice your chopper start to creep along the ground very slowly, while also losing a bit of altitude. This kind of coasting won't get you anywhere fast, but can let you center yourself above an object, which is helpful for winching tanks and hovering over flags. The quickest way to move, however, is to tilt the mouse forward and hold down your Speed Up button. Since you should be tilted off of the horizontal plane, your helicopter will essentially be using its altitude-increasing power to move forward. Experiment with this until you get the hang of speeding forward. In particular, you'll want to note how difficult it is to pull up after you've pointed your helicopter's nose too far forward; this effect alone should convince you to try and keep your helicopter on an even keel as often as possible, as it's very easy to wind up running into a tree or hill after you overexert your chopper in an attempt to strafe a tank or other ground target.
Rotating and Turning
Rotating your helicopter on its vertical axis is a fairly simple task; your strafe keys should perform this function admirably, letting you reorient your chopper towards a new objective. Rotating alone won't help you get to where you're going, however; you'll need to combine rotation with your mouse to eliminate the inertia that your chopper holds over from its previous path. These two forces act together in sometimes dangerous ways, so that it's easy to inadvertently hold down the wrong button for too long and wind up head over heels.
To begin with, though, take a helicopter up from the ground and let it hover, then hold down one of your Rudder Left or Rudder Right keys and notice what happens. The rotation of your chopper has a negligible impact on its altitude, and doesn't necessarily destabilize your flight. After you're done whirling around, try moving your mouse left and right; this causes your helicopter to bank in either direction.
Banking isn't very useful in and of itself, but it can help you stabilize your craft when rotating, especially when you attempt to rotate while moving forward. If you find yourself needing to quickly turn about, you can do so with the Rudder keys, but if you're zooming along with the Speed Up key, you should try to keep your helicopter on an even plane by moving the mouse to the opposite direction of the direction in which you're rotating. E.g., if you want to rotate towards a target on your left, move your mouse to the right. This should counteract the built-in banking that comes along with rotating at speed, thus letting you keep your chopper nice and level.
In the end, it'll be your handling of your mouse that will make or break your proficiency as a helicopter pilot; it's all too easy to panic when coming out of a turn and flip your chopper into the ground. Again, practice is the only way you'll ever get the hang of piloting, so keep trying!
Firing at Ground Targets
Most helicopters have built-in weaponry, usually in the form of dummy-firing missiles when you're in the pilot's seat. These missiles can be tremendously useful when attempting to take down enemy planes before they take off, or to destroy a sniper in the hills. Accurately aiming them requires, again, a bit of practice, but is one of the easier tasks to perform in a helicopter.
First off, you'll generally want to be a comfortable distance off the ground before firing your missiles, but not so high up that your viewing distance starts to retract in from the horizon. If you're flying along at a level altitude, moving your view so that you're aiming at an object moving along the ground shouldn't be very difficult, but if you're at a high altitude, or attempt to aim at something that's too close to you, you'll usually have to tilt your helicopter at an extreme angle, which generally leads to an unrecoverable, one-way trip straight into the ground. As a general rule of thumb, if a target is in the bottom third of your screen, you're probably better off ignoring it, or flying past it and rotating to come back over.
Try flying around one of the empty multiplayer levels and shooting at objects on the ground. You'll notice that you don't necessarily have to have something in your aiming reticule to hit it. In the same fashion that you have to lead an airplane when trying to hit it with shells from a flak cannon, you're going to have to lead objects that you want to hit when you're moving around, except that, in the case of firing from a helicopter, its your momentum that you have to account for, not the targets'. In either case, you'll want to aim a bit ahead of your target in order to compensate for the momentum that your helicopter will impart to your missiles as they travel towards their objective.
Hovering Over Flags
One of the things that separates the men from the boys when it comes to piloting a chopper is the ability to hover over a flag so that you can convert it without ever setting foot on the ground. One of the best places to practice this technique is on the Operation Hastings map, with the Temple flag (flag number three on our annotated map). This flag is set into a stone temple, and is well off the ground, making it a natural choice for hovering practice.
Before you can actually recover from a high-speed trip and enter into a hover, you'll need to learn techniques to sap your forward momentum. First and foremost, get in the habit of pulling your mouse backwards so that your ship faces above the horizon. You don't want to keep this up for too long, or pull your mouse so far back that your helicopter starts to tilt over backwards; as with all things, practice will inform your ability to bleed off forward momentum. You can combine this with the Speed Down button for extra control, but this will also reduce your altitude, which can sometimes require additional corrections later on, which isn't a good thing.
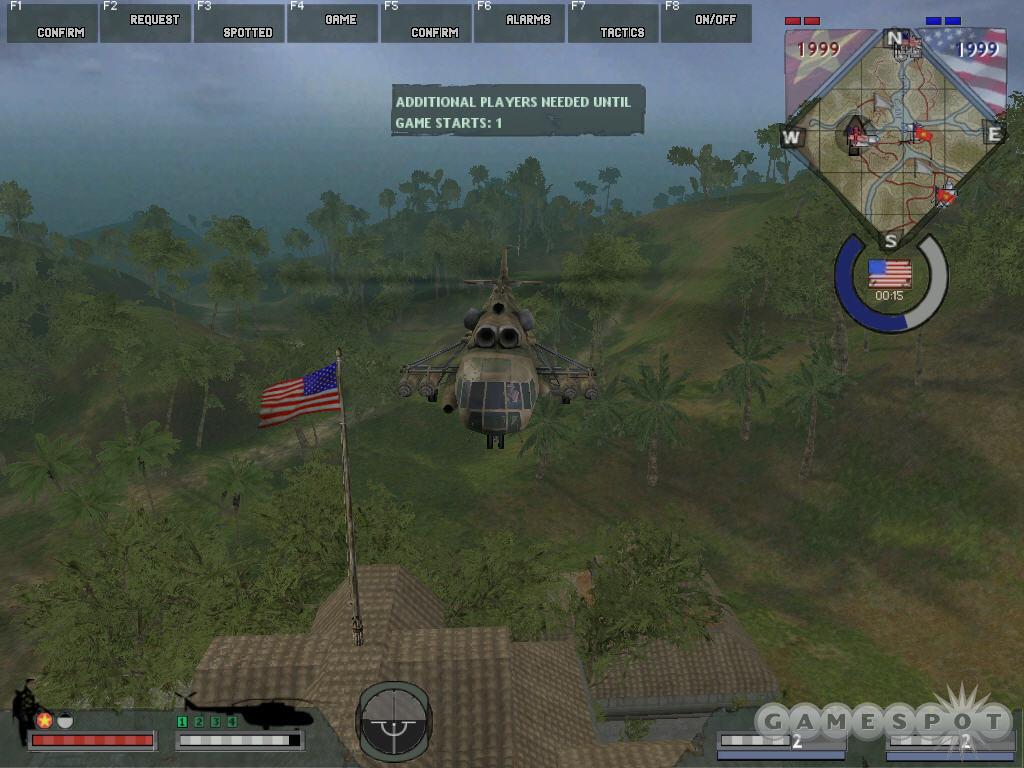
At any rate, after you sap off a bit of speed, your goal is to enter into a flat hover near the flag. Entering into a flat hover anywhere nearby is a good first step towards actually hovering over the flag; after you manage to hover, you can try to very gently tilt your mouse in the direction of the flag. Touch is key; hovering on a target requires precision and the ability to recognize that you've overshot your mark even before you've reached it. In particular, try to lay off the Speed Up button while you're moving in on a flag. Instead, just rock back and forth with the mouse until you're in position, increasing altitude only when necessary. The Temple flag on Hastings is more forgiving than most, since its well out in midair without many obstacles around it. If you can manage to convert it, though, you're well on your way towards being able to convert any flag in the game.
After you manage to convert the Temple, you should attempt to control one of the ground-based flags on the map. Hovering near the ground is a bit more dangerous than attempting to control one in mid-air, mostly due to the increased likelihood that an enemy soldier will start taking potshots at you, but you also have the ability to just land your chopper and sit inside of it while the flag converts. This is obviously a bit easier than maintaining a hover, and doesn't increase your risk of damage too greatly. The one thing you have to worry about is "special" attacks; if someone notices a helicopter sitting next to a flag, you can bet they'll put their Dynamite or C4 to use, if they have any. To counter this particular threat, you can land your chopper to stabilize it, then take off without moving the mouse so that you obtain a perfect hover. Go as high as you can without moving out of the flag control zone, and stay there, rotating around to spot any incoming enemies. This should prevent enemy infantry from mining your helicopter.
Winching Objects
The last, and most difficult skill that a helicopter pilot will need to learn is that of winching objects and airlifting them to distant locations. Only US choppers (except for the Cobra) are able to do this, via the secondary fire button in the pilot's seat.
If you've learned how to hover around a flag so that you can control it, you're well on your way to learning how to winch an object, although winching requires an even greater degree of technical precision than hovering does. To begin with, you'll need to enter into a perfect hover and align your helicopter so that forward motion will take you directly over the center of whatever object you're attempting to winch. (Sheridan and Patton tanks, PBR Boats, and mobile spawn points are all winchable.) Hit your secondary fire button to release the winch, and, while holding the button down, glide slowly over the top of your target. If you're moving slowly enough, you should see the red bar underneath your secondary weapon indicator start to change from red to yellow. After it's completely full, and you hear the winch lock on, you can let go of the winch button and start increasing your altitude. Whatever object you latched onto will be dragged along on the winch underneath your helicopter, but be forewarned that towing along anything extremely heavy, like a Patton tank, will prevent you from getting much altitude.
After you reach the location where you'd like to drop off your winched object, hit your secondary fire button again and it'll fall to the ground. A fall from a severe height will greatly damage a tank, mind you, so you'll want to hover down to the ground before unlatching. That's assuming you want the tank to survive its impact; it can be a lot of fun to try and bullseye infantry or enemy vehicles on the ground with random falling vehicles.
Repairing and Rearming
Since helicopters move so slowly, you're undoubtedly going to take more than your fair share of fire from the ground, which, in the case of fire from automatic weapons, is rarely immediately life-threatening, but can add up quickly, especially when a bunch of soldiers get in on the act. If you find yourself running below 50% health, you'll probably want to return to a helicopter pad to get yourself refitted.
On most maps, you can get repaired simply by returning to wherever you took off from. For the US forces, repair pads are generally small squares of pavement; landing on one of these will repair you quite quickly, and will refill your weapons to boot. For the NVA and VC forces, finding a repair pad is a bit trickier, as they're not obviously marked. If you remember where you took off from, that should be good enough; if not, look for a small, helicopter-shaped square of dirt that's surrounded by sandbags. If you can land inside one of these, you'll get all of the benefits of a normal repair pad.
Last, but not least, the helipad on the Tango ATC has all the capabilities of a normal repair pad. Of course, actually landing on it is nearly impossible, but in a pinch, you can attempt to merely hover above it; you don't actually have to land to get the benefits of repair.
Driving Tanks
Tanks are generally the simplest vehicles to use in Battlefield Vietnam, as they were in BF: 1942. If you've managed to map your keys so that your vehicle controls mirror those for your infantry setup, you should easily be able to hop into a tank and become an infantry-killing machine without any trouble whatsoever.
In terms of armament, a single driver in a tank is well-suited to take on any opponent in the game. The primary fire button activates your main cannon, which fires out a shell that lobs towards your target. You'll need to practice a bit to anticipate the effects of gravity on your shells, since tank duels are often decided before they even begin, especially those that occur at a distance; a tank driver who's able to correct his firing for elevation and the speed of his vehicle and that of his targets will usually make short work of someone who's just shooting off rounds at the precise location of his opponent on the screen. If your target is moving, you'll need to both lead him and aim above him to correct for the fall of your shell, so that, in general, you'll be aiming at a point well away from wherever your target actually appears on your screen. Practicing tank fire is better done on multiplayer servers than in single-player games; the bots in single-player matches tend to stand perfectly still when they spot a tank, thus eliminating the nasty variables of movement inherent in online contests.
Your secondary fire key will let you access your tank's built-in machine gun; this, obviously, is your weapon of choice for dealing with nearby infantrymen. A couple seconds' worth of machine gun fire will generally be sufficient to take down any given foot soldier, although you are unable to tilt your machine gun up and down very much, thus making it problematic to shoot soldiers at higher or lower elevations than your tank.
Last, but not least, most tanks possess a secondary machine gun, located atop the main turret of the vehicle. This machine gun can't be fired by the driver of a tank; you'll need to have another passenger riding atop your vehicle before it can be used. Unfortunately, said passenger is completely unable to move while he's in the tank, thus making him an easy target for enemy snipers or riflemen. In general, if you're looking for a ride to the front lines, you can hop into the turret section of tank, but when you hear gunfire or start to get hit, you should jump out of the vehicle as soon as possible.
Flying Airplanes
With the inclusion of helicopters on many of the maps in Battlefield Vietnam, the use of planes has taken something of a back seat to their newer, more versatile competition. While planes might not be as useful for assaulting ground forces or capturing flags as the helicopters are, they can still be vicious when used by the right pilot.
The controls of a plane are more closely linked to those of ground vehicles than they are to that of helicopters, although you shouldn't necessarily think that familiarity with the way a tank moves is adequate preparation for flying a plane. At the most fundamental level, however, all you really need to know about flying a plane is how to depress whatever button makes it go forward on your keyboard; the rest of your movement will primarily be controlled with your mouse. Or, at least, it should be; you can try to fly with your keyboard, and might even get decent results, but the precision of a mouse will generally be your best bet. Of course, if you own a trackball or joystick with a handle that can twist, you'll be in even better shape.
After you manage to take off (by simply moving forward until your plane has enough lift to come up off the ground), you'll find that the seemingly simple act of turning your plane will be one of the most difficult aspects of flying around. You have a limited amount of turning control via your strafing keys, but this won't be enough to turn you more than a few degrees per second; in most cases, you'll need to turn the old-fashioned way. To make an extreme turn, you'll have to use your mouse to tilt your plane's wings to the left or right, and then pull your mouse down. This will, in essence, make your plane turn upwards while it's flying sideways, relative to the ground. After you reach your desired heading, level off with the mouse and resume your course.
Of course, this is a simplification of a rather intricate process; even players who have been piloting planes since the launch of Battlefield 1942 will still wind up running into one of those pesky mountains now and again. The likelihood of an accident is proportional to your proximity to the ground; at high altitudes, you'll be able to recover from a bad turn fairly easily, but if you fly along the treetops all of the time, your folks back home are going to wind up with a nice government life insurance check before too long. Although you're probably somewhat tired of reading this by now, it still applies: you'll need to practice before you're able to safely control a plane, especially on maps where dogfights occur with any frequency.
Firing Weapons
Depending on the make of your plane, you're likely to have two of the five kinds of armament: machine guns, dummy-fire missiles, heat-seeking missiles, conventional bombs, or napalm bombs. The US F4 Phantom is the only plane to possess the powerful heat-seeking missiles or the napalm bombs; the other planes in the game are forced to make due with the less-powerful weaponry.
Machine guns: These are the simplest of the airplane weaponry, but can be among the most difficult to use. Although machine guns produce a steady stream of projectiles, getting your plane in position relative to your target can be difficult, especially when your target is another airplane or helicopter. Don't forget to throttle back (via the move backwards key) when you've gotten a bead on your target; this will give you a few more seconds to fire away before you shoot by. Machine guns work wonders against infantry, if you can manage to put together a strafing run, or helicopters, which are much easier to target than other airplanes.
Missiles: The dummy-fire missiles on a few of the planes act in much the same fashion as those aboard helicopters; you fire them, and they stream ahead of your airplane. As with machine guns, you'll need to lead your target a bit to hit, but since missiles travel more slowly than bullets do, you'll have a hard time actually leading anything except for the slowest-moving targets. Thus, hovering helicopters are an ideal test bed for your missile-aiming skills.
Heat-seeking missiles: The F4 Phantom's heat-seeking missiles are part of what make it the most feared vehicle in the game. Firing them is fairly simple, in that they're of the fire-and-forget variety; after their launch, they'll automatically home in on the nearest heat source and detonate. They aren't magic, and they won't distinguish between friend and foe, so you'll need to be extra careful when there are a lot of ships in the sky. These work best against helicopters, which are slow movers, but they can be used to shoot down enemy fighters, as well. If you just snap off a shot as soon as you spot a bogey, though, they'll usually fly past the enemy and off into the wild blue yonder; it's best to wait until you get behind your target to fire.
Heat-seeking missiles can also be of use against ground targets. If you're on a map without any enemy air targets, such as Ia Drang, don't be afraid to use your heat-seekers against enemy tanks on the ground; they'll seek in just as well against ground vehicles, and will actually be less likely to miss due to the slow movement speed of most tanks.
Conventional bombs: The MiG-17 and the Corsair both pack a few bombs underneath their wings. These can't be used against air targets, obviously; they're only good for pummeling objects on the ground. As with napalm, you'll need to drop conventional bombs well ahead of your target. Gauging the required distance is never easy, but it becomes a bit more doable if you try to tilt your plane downwards towards the ground before releasing your payload.
Napalm: In terms of sheer destructive potential, no weapon in the game is quite as superlative as the F4 Phantom's napalm bombs. These are released like conventional bombs, which means that you'll have to let them go before you fly over your target, but you have a much, much greater margin for error with napalm due to the way the explosion spreads across the landscape after the bomb detonates. You can expect total destruction for at least a couple hundred yards beyond the detonation zone; any infantry in this zone will almost certainly be killed. On busy servers, you can expect to rack up a few kills with each bombing run, and when the enemy have been squeezed into a single spawn point, you should find yourself racking up kills left and right. Vehicles are less affected by napalm than are infantry, unfortunately.
Repairing and Rearming
Airplanes generally run out of weaponry fairly quickly, especially in the case of the F4 Phantom. Luckily, rearming is a fairly simple procedure: just take your plane back to the airfield where you took off, and fly over it at a low altitude. If you manage to fly over it lengthwise, you should be able to get all of the ammo you've expended back.
Repairing a plane is a much trickier task. Well, generally speaking, it's impossible, unless you're willing to land your plane at an airstrip (itself a difficult feat to manage), roll it into the hangar, get it repaired, somehow turn it around, and then take off again. It's better to just bail out after you've taken near-fatal damage, and wait for the plane to spawn again.
USA/ARVN Vehicles
Water vehicles
PBR Mk II (Patrol Boat Riverine)
The Patrol Boat Riverines were intended for, obviously enough, river and bay patrols. The boats normally held a four-person crew, consisting of a captain, an engineer, and two gunners.
On river or bay maps in BF:V, the PBRs can act as quick transportation for the troops unlucky enough to miss a wave of helicopter take-offs. As with many of the other vehicles, the PBR works best if there are at least two passengers aboard; one to drive, and one to man either of the machine gun positions on the front and rear of the boat. The primary gunner's position has twin .50 caliber machine gun mount, and works well in a pinch for firing upon incoming helicopters, and will of course make short work of any infantry that you spot. The rear position contains a single .30 cal machine gun, and the fourth passenger on the boat can use whatever handheld weapons he possesses.
Tango Boat ATC (Armored Troop Carrier)
These ATCs were generally deployed in Vietnam as part of the Mobile Riverine Force, initially designed as a joint operation of the Navy and Army to deploy troops of the 9th Infantry Division into the area of the Mekong Delta. The ATCs could also be fitted with a small landing pad for helicopters, usually to aid in the speedy retrieval of wounded soldiers.
In BF:V, ATCs act as the US version of a vehicular mobile spawn, to correspond with the NVA's Mi-8 Transport. Of course, it can't fly around like the Mi-8, it being a boat, but it can be winched underneath a helicopter to transport it around the map, without sacrificing its ability to let soldiers spawn inside. On water maps where it appears, like Hastings, it can be a profitable strategy to just pick it up and drag it over to the NVA base, which will automatically place your opponents on the defensive; some of them will likely even suicide to spawn back at their base and defend it.
Whether you take the ATC out by land or by air, it possesses two machine gun emplacements on either side and a cannon in the rear. It can take a fair amount of damage, but its weakness is its inability to fire at anything directly in front of it. If you're steering an ATC around, be sure to keep clear water ahead of you, and steer away from anyone who's shooting at you; this will let your machine gunners deal with the threat.
Land vehicles
M110A2 Self-Propelled Howitzer
This artillery vehicle mounts a 203-millimeter Howitzer cannon, capable of firing a 200-pound shell at targets almost 20 miles distant. Its massive firepower is held in check, however, by its almost nonexistent ability to safely aim at nearby targets, rendering it virtually helpless against tanks or anti-armor infantry.
As with Battlefield 1942, Battlefield Vietnam sees the US pitting a mobile artillery capable of a single, massive shell against an enemy artillery vehicle that opts for rapid-firing smaller rockets. On paper, this seems like a poor bargain, but the M110 holds its own, mostly due to its increased firepower; while multiple shells from the BM-21 will usually be required to destroy armored targets, the Howitzer mounted on the M110 can make short work of almost any vehicle that comes into range.
Like the BTR-60, however, the M110 is a weak vehicle, and cannot withstand much damage before it's destroyed. It's particularly dangerous to let enemy infantry near the vehicle, as both the driver and artillerist positions are exposed to fire. If a rifle-wielding soldier manages to close on the M110, a few shots are generally all it takes to eliminate the passengers and free up the vehicle. Grenades are also a concern; a single well-placed grenade can kill both passengers without damaging the vehicle enough to destroy it, letting the enemy take control. For all of these reasons, it's best to stay behind your front-line soldiers and ask them to scout locations for fire.
M113A1 'Gavin' Armored Personnel Carrier
The M113A1 was the US counterpart to the BTR-60, and as such functioned in an almost identical fashion to that vehicle. Its function is unglamorous, but vital, as it ferried troops towards the front line and returned wounded soldiers to field hospitals in rear areas. As with the BTR-60, it was fully capable of switching from land-based to water-based modes as needed.
Unlike the BTR-60, the M113A1 has no interior hatches, meaning that its sole armament consists of the mounted turret. In the game, though, this is rarely a liability, as most gamers will prefer to beat their feet to a destination rather than ride in the back of an APC.
M151 MUTT (Multi-Utility Tactical Truck) Jeep
Although the M151 appears to be just an average Jeep, the Multi-Utility Tactical Truck has a few unique features. First, to ensure its relevance in the jungles of Vietnam, the M151 was designed primarily for off-road usage. Unfortunately, it also had a tendency towards tipping or roll-overs when used by untrained drivers. For this reason, and because of its ability to cause injuries to its passengers due to the extreme vibrations of the vehicle, the M151 is actually not street-legal for use in the United States.
Although the MUTT is capable of mounting a variety of weapons on its rear in the real world, the M151 in Battlefield Vietnam is available in only one flavor, containing a tube-launched, optically-tracked, wire-guided (TOW) missile. Although this is technically an antitank missile, a single soldier attempting to use this weapon against enemy armor will be quickly brought down, either by the tank itself, or by enemy infantry fire. Wound-and-run tactics are viable with at least one driver and a gunner, however. If you can't find someone to drive or man the TOW for you, you can still use it while the jeep is immobile, but it's best to be a distance away from your targets before opening fire. In its favor, the TOW missile has very little dip in its trajectory, rendering it an effective anti-personnel weapon at medium range. Spawn camping is especially effective with the TOW, as you can sometimes lock on to enemy soldiers and hit them with a missile before they start moving after they spawn. Keep an eye on your ammo, however; although the 30-missile load will usually last longer than your life will after you begin using them, it isn't restocked when it runs out. If you run dry of missiles, abandoning the vehicle is usually a good idea.
M48 Patton
The M48 Patton was originally designed as a counterpart to Soviet tanks, and was intended for use in a European ground war should the Cold War ever turn hot. Its intricate aiming mechanism allowed for automatic range finding via a series of mechanical computers, giving it excellent accuracy at ranges measured in the thousands of yards, but it was difficult to adequately utilize this accuracy in the close quarters of Vietnam. To counter the threat of rocket-propelled grenades, many Patton crews in Vietnam would dress their tanks in a variety of materials, including sections of chain-link fence, to detonate the grenades before they could impact the tank's armor.
The M48 in Battlefield Vietnam possesses no such protection from enemy rockets, but even so, a soldier inside of one of these tanks is immeasurably better off than an infantryman on foot. The driver is able to rotate the turret to manually aim a 90 millimeter cannon, and can also fire a machine gun with the alt-fire. The secondary passenger position is more exposed, as he mans the turret atop the tank, and since anyone in the turret can't really move, he becomes a prime target for enemy infantry. In other words, if you're in a tank, you shouldn't necessarily expect people to get in line to hop in your turret; most semi-experienced players recognize the secondary position on a tank as a pure death-trap.
M551A1 'Sheridan'
Although the Sheridan is lightly armored for a tank, it possessed one of the largest cannons of any armored vehicle in the Vietnam conflict, with a barrel sized at 152 millimeters. The Sheridan was initially intended to be capable of firing Shillelagh anti-tank missiles, but this type of ammunition was never actually used in the Vietnam conflict due to technical problems.
The Sheridan is distinctive in Battlefield Vietnam primarily due to its light weight, which enables it to be easily airlifted by American helicopters. The Patton can be picked up by helicopters, as well, but its weight reduces their maximum altitude so greatly that this usually endangers the helicopter crew more than it helps the overall team effort. Winching a tank isn't easy, but it's worth pointing out that winched tanks retain their full firepower capacity, even while flying around in midair. This is a bit less useful than it sounds--it's wickedly difficult to actually hit anything while in a flying tank--but it's amusing to try out on a busy server.
Air Vehicles
CH-47 Chinook
The CH-47 Chinook is a tandem-rotor helicopter designated for medium transport operations. Three variants were produced during the Vietnam conflict, with the third model, the CH-47C, being the most robust. Although primarily used as a troop transport, the Chinook is quite capable of transporting vehicles (primarily tanks) via its cargo hook.
In Battlefield Vietnam, the Chinook is the slowest and largest of the US helicopters, and is therefore a ripe target for the DRV's heat-seeking SAMs. If you've got a few passengers on board, you can feel relatively safe at low altitudes, since the second, third, and fourth passenger seats contain missiles, a grenade launcher, and two machine guns, which should be more than enough to lock onto and destroy any infantry daring enough to take a shot at you. The lower the better, in general; it's much easier for your passengers to spot and take down targets when you're close to the ground, but stay high enough to let your friends open their chutes should they need to bail. If you just happened to grab a Chinook with the intent to bail out behind enemy lines, it's important to get high enough to reduce the chance of being spotted by enemy infantry on the ground. If you can get above the fog distance, and turn off the music, you should be able to get to your destination and parachute out without having anyone notice you.
AH-1G Cobra
One of the world's first attack helicopters, the AH-1G was the product of an Army initiative towards a class of helicopter that could act as a fast escort or scout. Although its primary mission in the Vietnam war was to act as an escort to UH-1 transport helicopters, its speed and firepower was such that it wound up being used in a variety of capacities, from reconnaissance to fire support.
The Cobra is one of the speediest and most deadly aircraft in Battlefield Vietnam, with a loadout of weaponry that makes it ideal for killing off infantry, armor, and other helicopters, especially when both passenger slots are filled. The pilot's dual dummy-fire missiles are ideal for destroying tanks and enemy aircraft on the ground, while the co-pilot possesses a machine gun for ground forces and heat-seeking missiles which are especially deadly when targeted towards enemy choppers, but can also hit aircraft when well-aimed (or when you get lucky). The Cobra's unmentioned weapon, however, is its speed; it's definitely the fastest helicopter in the game, which gives it a great degree of maneuverability when attempting to evade fire or drop a two-man crew at an exposed spawn point.
UH-1 'Huey' Assault
Introduced into Vietnam in 1963, the UH-1 'Huey' has seen more use than almost any other helicopter design in history. Its versatility is key to its popularity; it was used in the southeast Asia conflict for medical evacuations, troop transport, and as a gunship.
The gunship version of the Huey in BF:V is a formidable attack vehicle, although it does come with its own peculiar weaknesses. The pilot controls rockets and a secondary winch system, while the optional passenger controls dual machine guns and a grenade launcher, all of which is quite destructive when used on strafing runs. The Huey's Achilles' heel lies in the fact that none of the weapons are able to deviate much more than 30 degrees from the front of the helicopter; any infantry to the rear or the side of the chopper will have a free shot at you if you overshoot them. Of course, with the hovering capabilities of a chopper, you can remedy this situation by "parking" your craft in front of oncoming troops and letting your co-pilot bomb the heck out of them, but if you do come under fire from unseen troops, you should quickly rotate your craft and check for muzzle flares on the ground before picking an attack vector.
UH-1 'Huey' Transport variant
Although this modified Huey is intended to shuttle infantry to the front lines, it can also be used as a mobile machine gun platform, thanks to the dual M60s mounted on either side. In addition to the two machine gunner positions, two more infantry can sit near the open window and fire their weapons from above the battlefield.
The troop transport Huey has an inverted version of the assault Huey's problem; while its dual M60s can lay down fire over impressive arcs on either side of the ship, it's unable to fire upon targets directly in front of it. If, as the pilot, you spot a concentration of infantry ahead of the ship, it's usually best to twist the ship to the left or right and let one of your passengers get on the machine gun to mow them down. This is especially worthwhile when you're passing by an enemy spawn point; if you notice one on your map, try to pass it to one side, instead of going directly above. Your teammates will be able to cover the spawn with the M60s, while any soldiers that bail will be able to recon before moving in to cap the flag.
F4 Phantom II
This fighter-bomber was originally designed for naval fleet defense, but after analyzing its overall effectiveness, the Air Force asked for a version of their own. The F4 provided air superiority and close air support as needed, and was also capable of general interdiction missions behind enemy lines, making it a versatile and long-lived aircraft. Over 5,000 F4s were produced between 1958 and 1979, with many still in service in the militaries of other countries.
The Phantom's claim to fame in Battlefield Vietnam comes in the form of three napalm bombs that are strapped to its undercarriage. Although it's no slouch in air-to-air combat, possessing heat-seeking missiles that make short work of enemy planes, the napalm's pure destructiveness can destroy many enemies at a stroke. Using it properly, however, requires a great deal of practice, and its area of effect is such that you're likely to rack up a few friendly fire kills when you drop it on a particularly busy section of the map.
The first thing to keep in mind is that napalm must be dropped well before your plane is physically above your target zone. Your bombs are carried forward by your plane's momentum well beyond the point above which they're dropped, so you'll have to practice in solo games until you can accurately judge how the combination of altitude and distance affect the timing of your bombing runs. You can cheat a bit by skirting the ground as you make your approach; higher altitudes require you to drop your load much sooner than you would otherwise. You can also experiment with dive-bombing by reaching extremely high altitudes and attempting to aim the nose of your ship directly at your target when you're nearly perpendicular to the ground. This is extremely difficult to pull off, however, especially on the smaller maps, so your best bet is to practice, practice, and practice some more in single-player matches, or in one-man multiplayer games, until you get the hang of it.
A-7 Corsair II
The stout A-7 Corsair II is a single-seat, tactical close-air support aircraft, capable of a variety of missions, from search and surveillance to standard attack. Its 15,000-pound payload was usually spread out among six wing pylons and two fuselage launch stations, the latter usually containing air-to-air missiles.
In the game, the Corsair acts as something like the Phantom's poor sister, in that it's somewhat less adept at taking down either air or ground targets. It still has appreciable firepower, but the machine guns are obviously less preferable than the heat-seeking rockets that the Phantom possesses, and while the dummy bombs are powerful, they lack the pure area-of-effect destructiveness of napalm. On the busier servers, a Corsair pilot's easiest kills will usually come in the form of enemy helicopters, which move slowly enough to track and lock onto with the machine guns.
NVA/VC Vehicles
Water Vehicles
Sampan
The term "sampan" refers to a variety of river boats and skiffs of various sizes seen in the rivers of Vietnam. These were sometimes used to transport Viet Cong or to smuggle supplies to the forces in the south.
In BF:V, sampans contain room for up to five soldiers, with one acting as a driver and the rest as passengers. There are no mounted weapons on the boat, which renders its occupants especially vulnerable to attack from shoreside tanks and infantry. On the plus side, all of the passengers can use their handheld weapons to fire upon any targets of opportunity as they make their way to their destination.
Land Vehicles
BM-21 Grad
The NVA's primary artillery vehicle is the BM-21, a Soviet-developed 122 millimeter MRL (multiple rocket launcher). The real vehicle is capable of firing up to 40 rockets at a time, and can achieve decent grouping at ranges of up to 16 kilometers.
If you're familiar with the Soviet Katyusha artillery vehicle from Battlefield 1942, you should have the basic tenets of using the BM-21 down. The driver slot is tasked with steering the vehicle into position, while the second slot aims and fires the rockets. You can switch rather easily between the two positions if you're going solo, but it's definitely advantageous to have a teammate along, mainly due to the fragility of the vehicle. A stationary BM-21 is an easy target for enemies with LAWs or M60s.
Another factor to consider is the BM-21's inability to fire at nearby targets. Although the individual rockets have an appreciable dip in their trajectories, the launcher cannot be tilted low enough to hit anything within 20 meters or so of the truck when it's on a level surface. You can ameliorate this situation somewhat by driving the truck partway up a slope; when aiming away from the hill, the launcher should now be able to point directly at nearby objects, allowing you to pick off infantry and tanks with ease.
BTR-60
The BTR-60 is a Soviet-built troop transport used by the NVA. It was rather unique in its amphibious capabilities, as it was able to shift from land-based wheel propulsion to water-based waterjet propulsion with a minimum of fuss.
Although Battlefield Vietnam's BTR-60 is somewhat less powerful than its real-world counterpart, with fewer passenger slots (six in all), and only a single embedded weapon (an MG turret atop the vehicle), it does allow two of the interior passengers to fire out through hatches. When you're riding along in a BTR, consider whether or not you have appropriate weaponry before hogging one of these slots; if all you're packing is a sniper rifle, considering sliding over for a teammate that has a machine gun or rocket launcher.
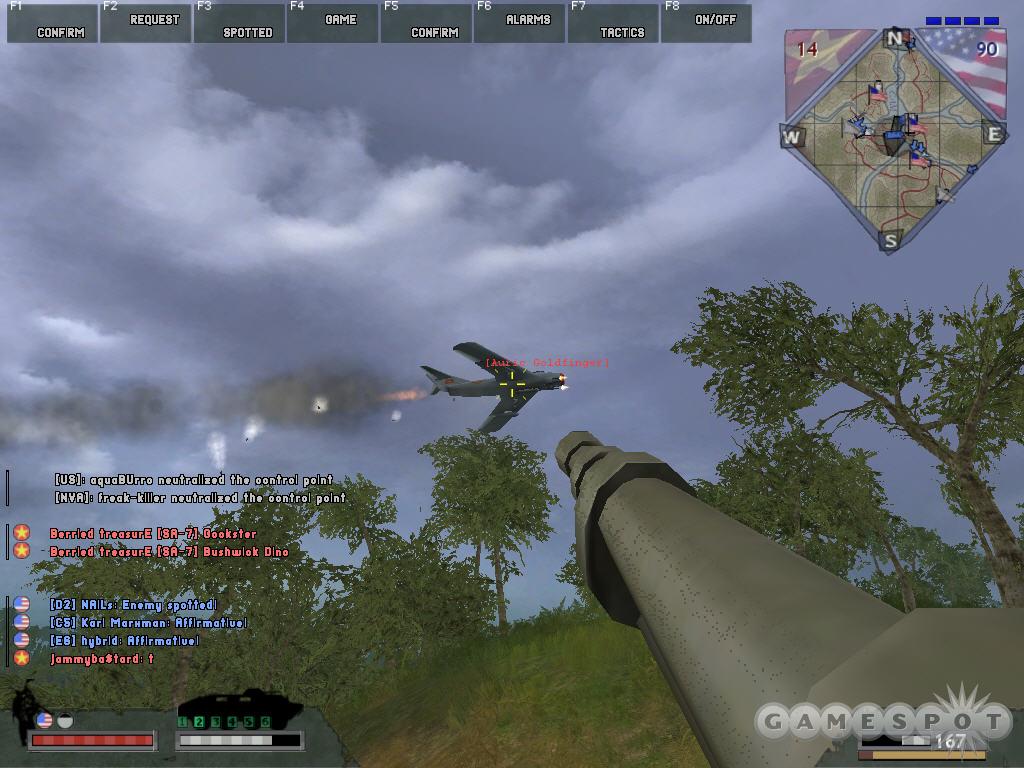
As a note, if you're riding around in a BTR-60 by yourself, be aware that the turret atop the carrier can be a wicked anti-aircraft gun, particularly when aimed at planes. You don't want to sit around alone in the carrier for too long - even though you can't be shot, it's relatively easy for something to throw a few grenades under the vehicle and destroy it--but when you're off in a secluded part of the map, you may find yourself getting some unexpected kills if you keep an eye on the sky.
PT-76 Amphibious Tank
As the name implies, the PT-76 is one of the few tank designs ever produced that is fully capable of traveling across water obstacles. Its ability to cross rivers and streams was a boon in the Vietnam conflict, but its combat ability suffered for this versatility. It put forth a mere 76 millimeter cannon and was lightly armored when compared to other, land-only tanks.
The ability to take a tank into a river is mildly useful in BF:V, especially on maps with heavy infantry populations, which, well, is pretty much every map in the game. Firing your cannon accurately becomes difficult when swimming around at high speeds, but your machine gun should be able to mow through a few US soldiers as they attempt to hit you with a LAW. The reduced profile of your tank also aids you defensively; since you present a smaller target when viewed from the ground, hitting you with either a rocket launcher or tank's cannon will be much more difficult for any given enemy soldier.
T54
The series T54 tank and its successor, the T55, were produced in larger numbers than any other tank in history. Befitting its popularity, the T54 is an excellent tank, with a 100 millimeter cannon and more armor than either the PT-76 or the BM-21.
For most maps, the T54 will be the NVA's primary assault vehicle, acting as a foil to the US' Patton. Like that vehicle, the driver controls the primary cannon and a machine gun, while a passenger can opt to control the independently-rotating machine gun atop the tank.
UAZ
The UAZ is essentially a Russian counterpart to the American Jeep. There are few substantial differences between the two vehicles, except for the fact that the UAZ has a machine gun mount, instead of a rocket launcher, thus rendering it slightly more effective against infantry, but which drastically hurts its ability to hurt armored vehicles.
Vespa
Given the third-world economy of Vietnam in the 1960's, most city dwellers could not afford an automobile, even had they been available for sale. What were sometimes available were low-powered scooters, like the Vespa.
The Vespa is usually only available in the city maps in the game, and even then is rarely preferable to foot travel. The only real benefit to using a Vespa is its speed, both in terms of how you'll reach a destination faster, and will be less likely to be hit by enemy fire. Both the driver and an optional passenger will be fully exposed to gunfire, however, rendering turns a deadly exercise in hostile zones.
ZSU-57-2
With its two slender 57 millimeter cannons, the ZSU is hard to mistake for a tank, even though it is mounted on a modified T54 chassis. Indeed, its primary purpose is not to fire upon other vehicles or infantry, but to deliver proximity-fused flak shells towards enemy aircraft. The ZSU-57-2 was succeeded in service by the ZSU-23-4 "Schilka," one of the AA vehicles in the BF:1942 modification Desert Combat.
In Battlefield Vietnam, however, we have to settle for the Schilka's predecessor, but this shouldn't be a problem, because the ZSU here is quite a monster when targeted at enemy aircraft. This is especially true when you're aiming at helicopters; although each individual flak shell does less damage than, say, a heat-seeking rocket, you'll be firing much more rapidly than a rocket launcher is capable, which means that the damage adds up pretty quickly.
The ZSU is able to pick off almost anything that flies, including jets, but it's probably best for harassing helicopters. It's important to consider that a few TOWs are all it takes to end your party right quick while you're manning the ZSU, though, so it's generally best to wait for a helicopter to bank away from you before opening up.
Air Vehicles
Mi-8 Assault
The Mi-8 was the Soviet counterpart to the UH-1, and, as with that aircraft, could be outfitted for a variety of purposes. The assault helicopter version was outfitted with wings, which would contain rockets and anti-tank missiles.
In terms of pure firepower, the "Assault" version of the Mi-8 compares quite poorly with the armament of any given US helicopter, as it only possesses dual sets of missile launchers. These will do a decent job of taking out infantry or tanks on the ground when aimed properly, and are better than nothing, but overall, the Mi-8 doesn't have the sheer killing power of the more heavily-armed US choppers. Still, this fits with the philosophy of the game, wherein the US forces maintain air superiority, while the DRV troops have an easier time shooting down air vehicles from the ground.
Mi-8 Transport
The cargo variant of the Mi-8 is primarily intended for transporting troops. Its rear door was often removed, allowing troops aboard to provide a modicum of fire support for ground troops until they themselves were deposited in a combat zone.
The Mi-8 Transport holds no embedded weaponry, making it little more than a taxi for your troops. Luckily, it acts as a mobile spawn point, allowing your troops to spawn inside of it while it flies, whether it's landed or in the air. A skilled tactician will use this to his team's advantage by taking the chopper behind an enemy spawn point, preferably to a location close enough to hoof it from, yet far enough away to be out of sight. Your teammates should note the new spawn point on their map, and will be able to spawn directly into the helicopter and easily jump out.
MiG-17
The MiG-17 was the oldest and possibly the least effective fighter plane operated by the North Vietnamese during the Vietnam conflict. First produced in the early 1950s, its afterburning jet engine was an improvement over the engine in the earlier MiG-15, but the 17 was still less speedy than the US fighters. The Mig-17's were therefore usually used in a defensive posture, to patrol air routes used by incoming US strike fighters, and to defend North Vietnamese air bases.
The MiG-17 is, to be blunt, the least effective plane in the game, with only machine guns to protect it in dogfights. Its four dummy bombs can be useful when dropped rapidly, allowing you to spread explosives across a fairly wide area, but the plane is perhaps best used by simply ditching it above an enemy spawn point and parachuting in for the cap.
MiG-21
Whereas the MiG-17 was often too slow to act aggressively against US fighters, the MiG-21 benefited from its youth; it was designed and built a full decade after the first MiG-17s rolled off the assembly line, and was therefore a much more capable all-around fighter jet for the North Vietnamese forces. The MiG-21 was outfitted at first only with cannon armament, rendering them generally useful for dogfighting, but a combination of poor tactics and poor weaponry initially led to a loss of four MiGs for each US aircraft shot down. Eventually, however, the North Vietnamese pilots learned how to use the MiG-21's high speed and climbing capabilities in hit-and-run assaults on American strike forces, thus reducing their overall casualty rate.
In terms of air superiority, the US rules the skies over Battlefield Vietnam, but the Mig-21 can even the scales a bit. Although it doesn't possess homing missiles to match the Phantom, it does pack a machine gun and a set of dumbfire missiles that can easily be used to take down enemy helicopters as they perform a bank or hover over a flag. If you've played a lot of Desert Combat, you may be able to make use of the missiles against enemy planes, but you're better off attempting to engage aircraft, especially Phantoms, in dogfights, to avoid the heat-seeking missiles until you can whittle away at their armor with your guns.
Stationary Weapons
One of the most telling differences between Battlefield:Vietnam and Battlefield 1942 is the paucity of stationary weapons in the former. While BF1942 featured a decent array of stationary AA, machine guns, and artillery, the formula for Vietnam has been simplified, with many maps not containing any stationary weapons at all. Both sides are capable of using any stationary weapons on the map.
Log Trap
Although a bit low-tech, a log trap can be an effective anti-tank and anti-personnel device, but they're unwieldy and are necessarily useless much of the time, since you're unable to aim or move them, meaning that you'll need to wait for a target to cross the kill zone before triggering one. If you pull it off, though, killing someone with a log trap is practically guaranteed to satiate the animal desires of your inner Ewok.
The log trap is generally perched atop a hill, which gives the spiked logs a bit of inertia as they travel towards their target. It's unclear at first how to trigger the trap, but if you look closely, you'll notice a single wooden stake on the front side of the trap, which holds the logs in place. When you're certain that you're clear of the path of the logs, you can shoot the stake and watch the mayhem. In fact, you can do this from quite a distance away; if you've got a sniper rifle, feel free to keep tabs on a log trap when you're not actively searching for targets. A precision shot from a quarter-mile away might net you a few kills if you manage to hit an APC or tank with the logs.
The logs from a log trap will disappear quickly after the trap is triggered, usually within ten to fifteen seconds. On the plus side, though, log traps magically replenish themselves at short intervals. You should be good to go with another log load within 30 seconds after triggering one.
M46 Field Gun
The M46 field gun has a long history of battlefield deployment, stretching all the way back to its birth in 1954. This towed artillery piece has a 130 millimeter barrel, a maximum range of almost 28 kilometers, and is still employed by the armed forces of many nations, including Iraq's Republican Guard in the 1994 Iraq war.
When the M46 does appear on a map, it will generally be seen in groups of two or three, and will be clustered around one of the NVA's initial spawn points. Any infantryman can use an M46; simply step up to it and enter it as you would any normal vehicle. (Regretfully, there's no radio to keep you company during your extended artillery exercises.) You are completely exposed to enemy fire, though, so exit the field gun as soon as you take damage or hear bullets; snipers, especially, will be capable of blowing you away without a moment's notice.
On the plus side, an M46 has more pure destructive capabilities than any other weapon in the game, with the possible exception of napalm. Although you won't be able to fire more than once every two seconds or so, the explosive damage of the shells should be enough to make short work of any infantry near the detonation; tanks and armored vehicles are also highly prone to violent ends when they come under artillery fire. Over short distances, you can fire manually; at long range, however, you're better off asking for a spot from one of your teammates. See the "Firing Artillery" section in the Tips and Hints chapter for more info.
Appendix
Skip the Opening Cinemas
If you use Battlefield Vietnam's in-game browser, but loathe having to sit through the logos and movies that start up after you click on the game's shortcut, then we can help. If you want to skip past the logos, then right-click on your shortcut to Battlefield Vietnam, and select the Properties tab. Click on the Shortcut tab of the resulting window, and in the "Target" box, add the term "+restart 1" to the end of the path to the program. Thus,
H:\bfv\bfvietnam.exe
would become:
H:\bfv\bfvietnam.exe +restart 1
After you change your shortcut in this manner, clicking on it will bring you right to the game's main menu.
Using Artillery
Most kills in Battlefield Vietnam will come at fairly close range; you stumble across a VC sapper mining a road, say, and put a few dozen bullets from your M60 into him; or you partake in a battle between two tanks before getting blown away by a LAW from a soldier a dozen feet off your rear end. In other words, it's generally taken for granted that you should be able to look a man in the eye before he's able to shoot you. Aside from sniping, though, artillery is the one form of death-dealing in BFV that actually gets better and safer as you increase the amount of distance between yourself and your target.
Artillery in Battlefield Vietnam comes in a few different guises. It's represented in vehicular form by the BM-21 GRAD and the M110A2 Self-Propelled Howitzer; it's available as a stationary emplacement, the M46 Field Gun; and engineers can even get in on the act by plopping down mortars. Each form of artillery is linked by its ability to access and use the spotting system that's built into BFV as a way for artillery weapons well behind the line of fire to access what frontline soldiers are able to see. If a soldier near an enemy spawn point uses his binoculars to call for artillery, soldiers manning an artillery weapon anywhere else on the map will be able to use their secondary fire key to bring up the view from those binoculars (for two minutes or until your spotter is killed; whichever comes first). By using the artillery interface, you'll be able to home in on distant targets via a process of trial and error.
First off, though, as with many of the more advanced techniques in the game, it's worth pointing out that using artillery is difficult, and requires a bit of practice. As with learning to fly a helicopter, it's best if you do this in a solo game; it's no fun to be the teammates of someone who decides he's going to learn how to fire off artillery by shooting into a war zone. A good place to practice is on Operation Irving, by spawning as a VC soldier at the flag in the northwestern corner of the map. Spawn as a soldier or a scout, so that you're able to use binoculars to set up your own artillery spotting system. (Engineers don't have binoculars precisely so that they can't spot their own mortar fire.)
When you've spawned into the level, stand by one of the M46 Field Guns on the mountain and whip out your binoculars. It's always useful to have something to shoot at, so look down towards the bridge connecting the two land masses here. In the village on the far side of the bridge, you should see a tank; center it in the binoculars and hit your fire button to call for artillery. Since you're the only one on the map, you'll have to answer your own call, so hop into one of the field guns and get ready to unleash hell.
The M46, along with the other artillery pieces, is perfectly capable of hitting a target without needing someone to spot for them, but doing it manually can be quite tricky due to the effects of gravity on your shells. When aiming at a distant object by sight, you'll often have to tilt your gun up and down in order to see how close you're coming to your target. At extremely close range, this isn't such a big deal, but when shooting at something as far away as the tank, or something far enough away that you can't even see it, it definitely helps to have a second set of eyes on the ground.
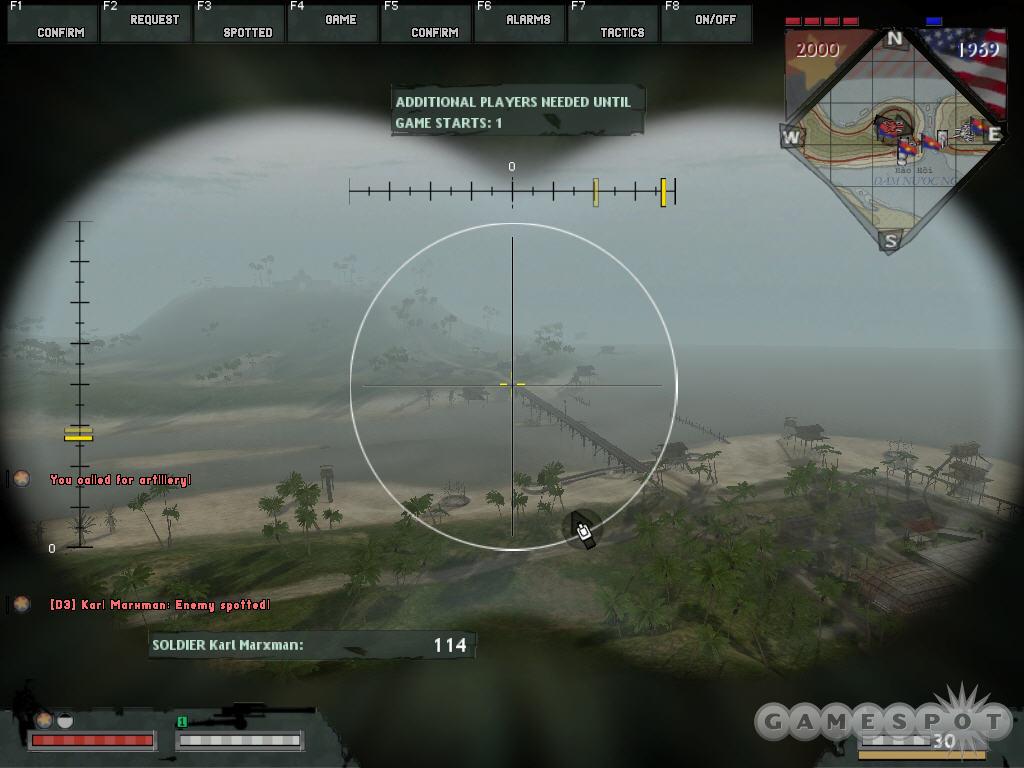
Anyway, if you're in the M46, feel free to spin it around and fire off a few shots. You'll note that the shells, as mentioned, have quite a bit of a curve to their trajectories, particularly at long ranges. When you get a handle for how the M46 works, hit your secondary fire button to open up the artillery interface. This interface is more or less identical to what you see when you look through a set of binoculars, except for the timer on the bottom half of the screen (to show you when you'll need to call for another spot), and the bars that indicate the pitch and yaw of your weapon. Manipulating the small yellow tabs above these bars is what will allow you home in on your target after getting a few test fires out of the way.
First, though, go ahead and fire off a shot or two. After you hit your primary fire key, the camera will cut away from the binoculars view to give you a parabolic shot of your projectile in flight. Besides looking pretty, this view will give you an idea of how close you are to hitting your target, and whether or not the shell is hitting any obstacles during its flight path. After you get a shell or two off, then, you should be able to gauge how badly off the mark you are. Don't worry too much about early accuracy; everyone misses with their first shot. What distinguishes good gunners from poor gunners is how many shots it requires them to home in on what they want to hit.
After your first shot, you should've marked where the explosion occurred on the screen, relative to what you actually wanted to hit. The yellow tabs on the artillery screen leave ghosts behind them after every shot; these mark the pitch and yaw of your last attempt to hit your target. If the explosion on the screen appeared to occur below and to the left of your target, you'll want to move these marks up and to the right with your mouse. When you've locked onto your target, you can fire repeatedly without worrying about missing, or make minor adjustments by touch, rather than have to resort to your guides. And that, in short, is the basic essence of firing artillery; a few missed shots are all it usually takes to lock onto a target.
Miscellaneous Tips
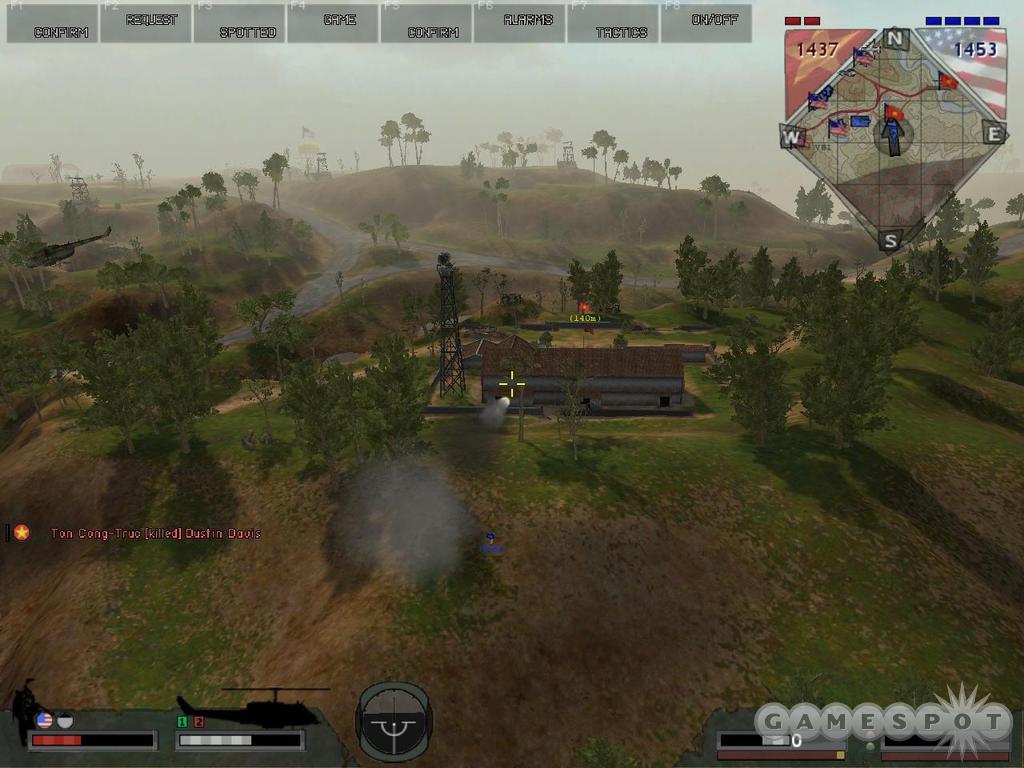
Bind the '3D Map' control to a key that is easy to reach while playing. It can be distracting to have it on all the time, but being able to flick it quickly on and off will let you identify enemies much more quickly.
Always use the 3D Map while attacking from the air or with artillery so that you can avoid friendly fire incidents while accurately blasting the enemy.
If you decide to specialize in only one side (US/ARVN or NVA/VC), that's fine, but take the time to play as the other side occasionally. There are times that you will need to pick up an enemy's weapon, and it is beneficial to know their individual strengths and weaknesses.
Six Jerks in a Jeep: A vehicle loaded with troops is the fastest way of capturing flags. One opening gambit in Head-On maps is to pack an APC, MUTT, or UAZ with teammates and capture two or three flags in the first minute or so.
If you are sitting in the seat of a vehicle, be it land, sea or air, and you can see your hands, take advantage of them. Pull out a weapon and fire while moving, or pull out a wrench and repair the vehicle.
If the enemy are overrunning your position from the middle of nowhere, the key to defense lies in watching where they are coming from and destroying their mobile spawn!
Soldier-speak
Being in a war is a difficult experience. Groups of soldiers become totally reliant upon one another for both practical and emotional support. In time, they become closer than family. As any close group of people does, they develop their own, specialized slang and jargon, and no slang is as distinctive as that developed during the Vietnam War. Below is a brief selection of some of these terms. They probably won't help you be a better player, but they will make some of the radio chatter you overhear make sense, give some meaning to some of the names in the game, and may let you get a little bit more enjoyment out of Battlefield: Vietnam.
A-Team: A squad of 12 Special Forces soldiers
APC: Armored Personnel Carrier
Arty: Artillery
ARVN: Army of the Republic of Vietnam
Ban-aid box: An M113 (which often carried medical supplies or personnel)
Bring smoke: To call in heavy artillery fire
Blooper: M79 grenade launcher Chopper: Helicopter
Clacker: The detonator for remote explosives such as Claymores.
Diddy bopping: Not watching where you are going when walking in the jungle - making noise, not watching for traps.
DRV: Democratic Republic of Vietnam. The North Vietnamese, including the NVA and the VC.
Egg beater: Helicopter
Fox four: F4 Phantom
Frag: Fragmentation grenade
Fragging, to frag: This means 'accidentally' killing an incompetent superior officer before he gets the squad killed, usually by not throwing a grenade quite far enough during a battle. Yes, this is where the gaming term came from. G.I.: Government Issue, a term marked on US military equipment and later applied to the soldiers themselves
Gunship: A helicopter with lots and lots of weapons
Hawkeye: An American sniper
Hook: A nickname for the CH-47 Chinook
Hot: An area receiving enemy fire
Indian Country: An area under North Vietnamese control
KBA: Killed by Artillery
Lay chilly: To go prone and hold extremely still.
Leatherneck: A US Marine
Lefty lemon: A nickname for yellow smoke grenades
Lock and load: Lock a magazine into place, and load a round into the chamber. In other words, get your gun ready to fire.
LZ: Landing Zone
Mad Minute: An order for defensive positions to fire their weapons randomly into the jungle for one minute. This was intended to discourage sneaky enemies.
Nape: Napalm (napalm was, quite simply, gasoline with a thickener. Imagine a cross between syrup and gelatin that was sticky and burned.)
Pig: M60
Pop smoke: Toss out a smoke grenade to mark a location
Red legs: Artilleryman
Rock n' roll: To fire at full auto, especially with an M16 or M60
Sky soldier: A paratrooper
Slick: A UH1 Huey transport with no mounted weapons
Snake: An AH-1 Cobra helicopter
Stack trooper: A top-notch soldier
Tango Charlie: Alpha code for Tank Commander
Tea Party: An ambush
VC: Viet Cong
Zippo: A flamethrower
Zoo: The jungle
Some of the terms listed above (such as Tango Charlie and LZ) are 'brevity codes.' Brevity codes let soldiers transmit long messages over the radio with only a few words. Similar to brevity codes are 'alpha codes.' Everyone has heard them, but most don't know why they are used. Imagine a shouted message from the battlefield. A soldier calls for an immediate air strike at coordinates N9. With the static from the radio and the gunfire in the background, it is hard to hear. Did he say N9? M9? N1? They all sound similar, and lives are on the line. Alpha codes are words substituted for letters. The secret is that each and every word sounds different from all of the others. When that soldier calls for a strike on "November-Niner," there is no mistaking it for "Mike-One!" Below are the alpha codes as they were used in the military during Vietnam.
A Alpha
B Bravo
C Charlie
D Delta
E Echo
F Foxtrot
G Golf
H Hotel
I India
J Juliet
K Kilo
L Lima
M Mike
N November
O Oscar
P Papa
Q Quebec
R Romeo
S Sierra
T Tango
U Uniform
V Victor
W Whiskey
X X-Ray
Y Yankee
Z Zulu
Got a news tip or want to contact us directly? Email news@gamespot.com
Join the conversation