Saints Row 2 Walkthrough
Retaking the city of Stilwater has never been this fun or easy with our complete Saints Row 2 walkthrough.
Retaking the city of Stilwater has never been this fun. Saints Row 2 once again puts you in command of the Saints, one of Stilwater’s gangs battling for control of the city. We’ve included everything you need to get the most out of Volition’s massive open-world game, including a complete walk-through of the story missions, full coverage of activities, diversions, and minigames, and lists of cheat codes and achievements.
This GameSpot Saints Row 2 game guide features:
- Story Walk-through:This section provides strategies for all Saints Row 2 story missions.
- Stronghold Missions: Conquer every neighborhood of Saints Row with these stronghold mission walk-throughs.
- Activities: Earn cash and respect by completing activities, such as Mayhem, Trail Blazing, and Fight Club. This section provides proven tips for completing all levels of all activities and reveals the rewards for each.
- Diversions, Minigames, and Secrets: Saints Row 2 features tons of optional things to do. Look here for a list!
- Cheat Codes: Check here for Saints Row 2 phone cheat codes.
- Xbox 360 Achievements: A full list of Saints Row 2 Xbox 360 achievements, including the secret achievements.
Chapter 1 - Story Walk-through
This section features a complete walkthrough for the Saints Row 2 story missions. Once you complete the 3rd Street Saints prologue, you can then start to play any of the gang-related missions. We’ve organized this walkthrough in a linear fashion completing each gang in turn.
Jailbreak (3rd Street Saints)
You’ve just woken up after a long explosion-induced slumber. You have just made friends with another on the inside when the word "escape" comes up. Time to get moving!
Objective: Kill the doctor.
You’ll receive a brief tutorial on melee attacks just as you spot the doctor ahead of your start position. Sneak up on the doctor and unleash a melee combination attack to put him on the ground. Your new friend suggests either sneaking out via the roof or to just muscling out the front. Select to play or skip the tutorial; for the purposes of this walkthrough, we’re going to play the tutorial. Walk up to the marked door and kick it open and continue through a second door.
Objective: Kill the guards.
A couple guards are in the wrong place at the wrong time. Assist Carlos in taking down a couple prison guards using your melee combination attacks. After eliminating a guard, walk over their corpse to grab a nightstick and add it to your inventory. You can also use the improvised weapon nearby: a concrete block.
Objective: Follow Carlos up to the roof.
Proceed into the next area and climb up the pipes as instructed. You’ll jump and pull up on a variety of ledges and vents while traversing narrow pipes and walkways. Crouch underneath the vent when instructed as you converse with Carlos.
Objective: Kill the guard and take their gun.
Sneak up behind the rooftop guard and pummel him with the nightstick. Grab the dropped firearm and add it to your inventory.
Objective: Make your way across the roof.
A couple of guards patrol the rooftop; plus, a set of searchlights scans the rooftop for would-be escape artists. Avoid the searchlights; if detected, expect the guards to investigate. Sneak up on the guards and eliminate with your nightstick or if a searchlight spots you, hang low and wait for the guard to investigate. When the guard gets close, jump him and beat him down with the nightstick. Grab a second pistol off of a slain guard.
Follow the marked location on the mini-map, through the opening in the fence, and down some stairs until you spot more guards and lights. Eliminate the guard on the right side using the nightstick and keep moving to the right to find the marked exit. Descend another staircase toward freedom. Oops! Not so fast--a police helicopter appears on the other side of the fence. Fire on its occupants and keep moving down the staircase.
Objective: Get to the docks.
Watch out for a couple of guards--one wielding a shotgun--at the bottom of the stairs. Grab the discarded weapons and ammunition. Continue down another staircase--it’s on the left side--and find a door at the bottom. Kick the door open and proceed through a second door. Walk around the mine cart and proceed down the tracks. As you approach the end, shoot the explosive barrel with your pistols. Go through the opening and back outside.
Jump into the water and ignore the helicopter overhead. Swim to the left--it’s a long way but if you just keep moving along the shore you will eventually reach the dock. You’ll locate the marked dock up ahead as well as the army of cops you avoided by taking the swim. Pull up onto the dock and reach the checkpoint, which causes you to automatically enter the boat.
Objective: Defend the boat.
Now here’s a weapon! Blast every helicopter and police boat in pursuit. Keep scanning the air and water for incoming enemies; keep an eye on the mini-map as well. Obliterate all targets while keeping the boat intact. Carlos will drive to the next checkpoint, which completes the mission.
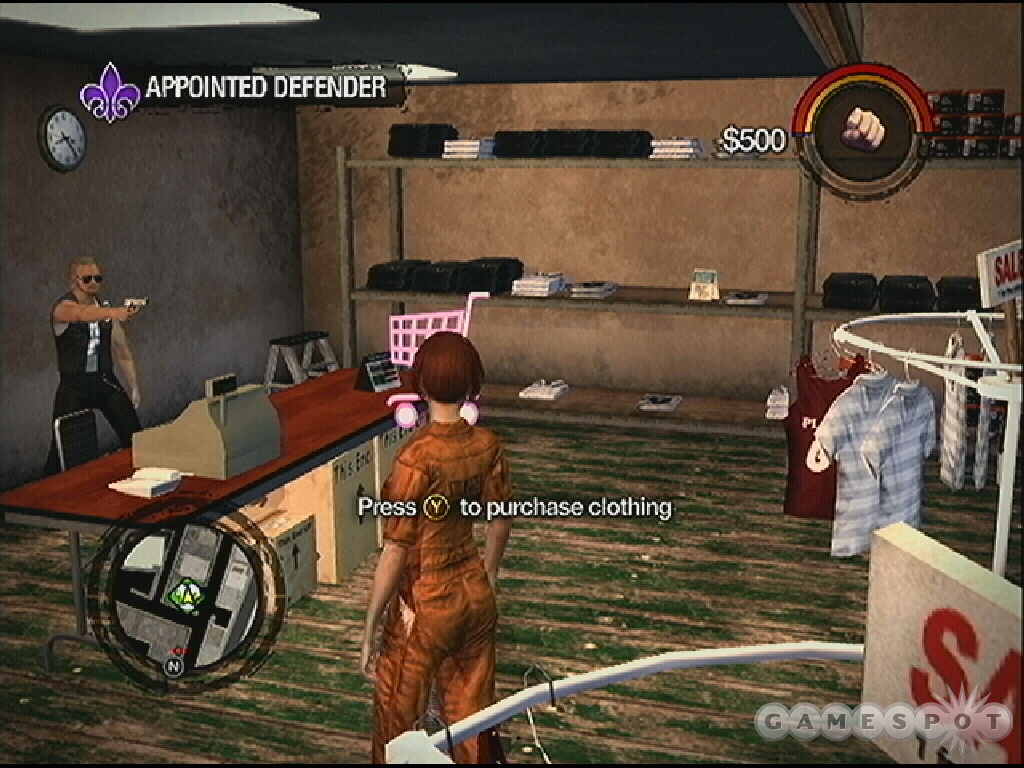
Appointed Defender (3rd Street Saints)
Objective: Buy some new clothes at Sloppy Seconds
Move out onto the road and jack a vehicle. Drive your newly acquired vehicle along the marked route toward the Sloppy Second store. Park the car outside and approach the store. Open the door into the store and walk onto the shopping cart symbol to begin your shopping spree! Select whichever clothes that you want, taking note of each purchase’s style points. The more style, the better!
Objective: Head to TeeNay.
Follow the marked route over to TeeNay. Park your car in the adjacent lot and proceed to the marked entrance. You automatically enter and sit down for a drink.
Objective: Get to the courthouse.
Equip a weapon and eliminate the two thugs that attack. Quickly exit TeeNay, which prompts a couple more uninvited guests from the entrance. Bust your way through and emerge back outside--doing so triggers a four-minute timer. Quickly run toward the marked vehicle in the parking lot and ignore anything shooting your way. Get into the car and quickly drive along the marked route to the destination. Park your car at the front of the courthouse, exit the car, and sprint up to the entrance.
Objective: Find the courtroom where Gat is located.
Keep your weapons holstered. Ascend the staircase on the left side and follow it up toward the right. Continue down the hall on this right side and find the marked location to trigger the next cut scene.
Objective: Escape with Gat.
Equip your double pistols and prepare to shoot your way out of the courthouse. Enemy guards will crowd the exit route so get ready to start firing. Eliminate the hostiles quickly while protecting Gat; he can withstand a good amount of damage but you don’t want to leave him alone to absorb significant enemy fire. Continue down the hall blasting everything in your path. When you can look over the railing on the left side, fire on the guards in the lobby below. Continue through the offices and blast the shotgun-wielding judge. Actually, just blast everything!
Continue downstairs to the lobby and clear it out with your pistols. Make sure you gather all of the discarded weapons to keep your weapon supplied with ammunition. Proceed to the marked entrance to trigger the next objective.
Objective: Go to Forgive and Forget
Sprint out to your abandoned vehicle and get inside. Drive quickly away and avoid the pursuing cops. No need to get into a firefight because you’re headed to a Forgive and Forget! Keep moving while listening to the conversation. Sure there are cops on your tail but just keep moving as quickly as possible. Follow the marked route to the Forgive and Forget. Drive inside. Even if there are cops right on your tail, just ignore them. The Forgive and Forget will allow you to remove all notoriety for a price--as soon as you move through, the pursuing police give up their chase.
Objective: Take Gat to Aisha’s house.
Drive Gat along the marked route to Aisha’s house. Park your vehicle on the marked spot to complete the mission.
Down Payment (3rd Street Saints)
Objective: Drive Gat to the Abandoned Mission.
Grab a vehicle and follow the marked route to the destination. Park the car on the marked spot and equip a weapon. Time to clear out the current residents of the mission so you can take over the structure as your base of operations.
Objective: Make your way underground
Follow the markers inside the mission and descend the staircases until you reach the next objective.
Objective: Kill the Samedi,
Time to evict the current tenants. The Samedi appear on your mini-map as hostile targets. Work carefully through the rooms and eliminate every enemy encountered. Search the corpses for new weaponry and discarded ammunition to keep your current firearms supplied. If you’re under heavy fire, retreat and regroup--just realize that you must continue to assist Gat so he isn’t under heavy fire without support.
Objective: Destroy the shanties.
Follow the mini-map to the shanties. When you reach them you are provided a tip about the human shields--which is essentially a tip on how to destroy the shanties. Grab someone close to the shanties using the human shield and then throw that person into it to destroy it. You can tap the human shield button to quickly toss the bum into the structure. You can also grab items and throw them into the structures. Balance killing hostile enemies with tossing people into the shanties.
Objective: Kill all the remaining bums.
This one is simple enough--just eliminate all of the remaining enemies to complete the mission.
Three Kings (3rd Street Saints)
Objective: Go to the Suburbs.
Exit the Saints’ hideout and get into a vehicle. Follow the marked route to the Suburbs. As you near the destination, you receive a new objective.
Objective: Recruit Lieutenants for the Saints.
Three markers appear on your mini-map. The markers represent the location of potential Lieutenants to recruit. To complete the mission you must visit each and complete their requested task; however, you can visit the possible Lieutenant candidates in any order you wish. For the purposes of this walkthrough, proceed to the marker next to the Rim Jobs store.
Objective: Use the tow truck to tow the car.
Visit Carlos, your friend from prison, who’s standing outside Rim Jobs. Get inside the tow truck and drive to the cemetery at the marked location. Spot the Hearst when you reach the cemetery. Back the tow truck up against the Hearst (just ignore those people nearby, I guess they’re paying their respects). Follow the instructions to hitch the Hearst onto the tow truck. Once it’s attached, start driving--which is easier said than done. Maneuvering the tow truck with a Hearst is challenging; just drive slowly and carefully. Return to the marked location at Rim Jobs.
Objective: Carlos is satisfied. Find another Lieutenant.
Drive to the closest Lieutenant marker on the mini-map. You discover that his name is Pierce and he wants you to eliminate some Ronin.
Objective: Kill the Ronin.
This objective is simple enough: just drive to the marked Ronin enemies and obliterate them with your favorite weapon. Attack from long-range or close quarters; it doesn’t matter, just make sure you defeat every enemy to complete Pierce’s objective.
Objective: Pierce is satisfied. Find another Lieutenant.
There’s one marked Lieutenant candidate left on the mini-map. Grab a vehicle and drive to the marked location and find Shaundi. She must be an adrenaline junkie because she wants you to perform some stunt jumps.
Objective: Hit the jumps.
Take one of the cars from Shaundi’s driveway unless you happen to be inside a particularly fast vehicle. There are three marked jumps. Instead of driving all out at each one, take a moment to survey the area so you know the best way to line it up and perform a successful jump. Grab a car from Shaundi’s driveway and hit all three of the marked jumps. This is particularly important at the first jump because it’s over water and if you miss, you will lose the vehicle. Hit all three to recruit Shaundi and, as long as the other two Lieutenants are satisfied, complete the mission.
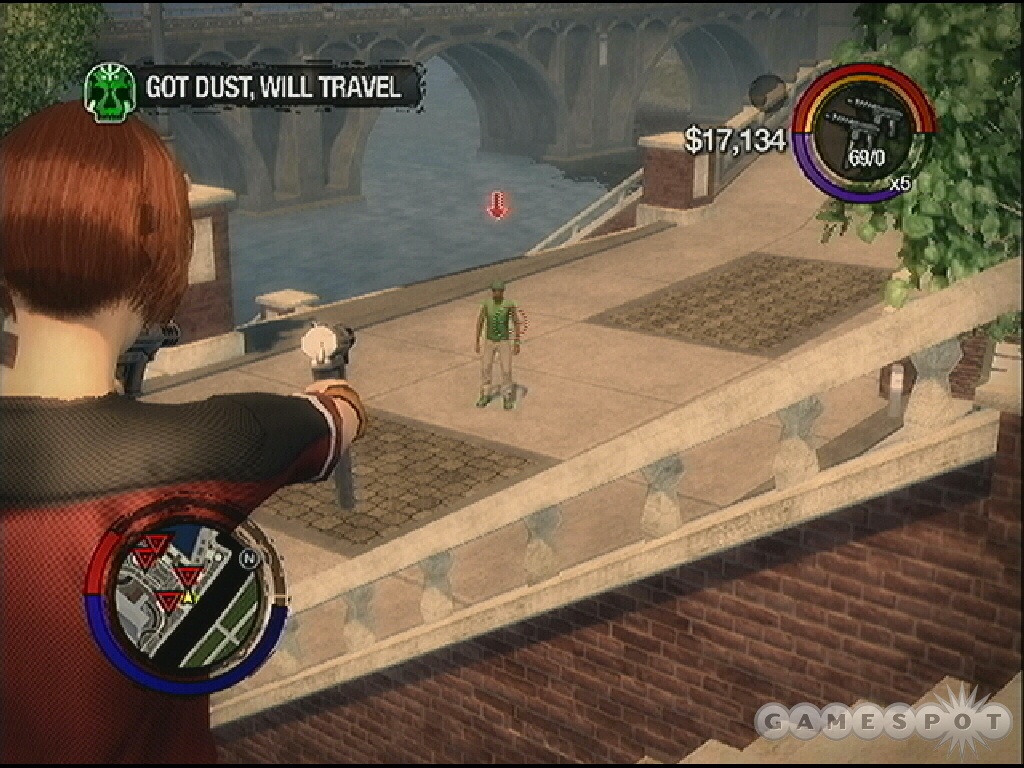
Got Dust, Will Travel (Sons of Samedi)
Shaundi introduces you to the Sons of Samedi product--it’s all over the university campus. If you can get some of the stuff, Shaundi can figure out how to make it and make it cheaper. Nothing like undercutting your competition!
Objective: Drive to the University.
Get inside a vehicle and follow the marked route to the university campus. Shaundi rings your cell phone along the way to warn you to be careful--the Samedi aren’t going to be pleased with your acquisition of their goods.
Objective: Kill the dealers.
Once you’ve entered the university campus, a new objective appears. Check the mini-map and follow the marked route to find the dealers.
Objective: Get a sample of what they’re selling.
Get out of the vehicle and equip your favorite weapon. Check the mini-map for the position of hostiles. You’ll need to eliminate the Samedi in the area; they aren’t pleased that you’ve invaded their turf. Continue to eliminate the marked dealers until one drops the Loa Dust.
Objective: Pick up the Loa Dust.
Walk over to the marked Loa Dust and grab the dropped product.
Objective: Grab the next package from the dealers hanging out in the parking lot.
Get back into a vehicle and drive to the marked parking lot. You’ll encounter another Samedi gang. Shoot every gang member and pick up the dropped Loa Dust.
Objective: Find Mr. Gabby
Locate a vehicle and get inside. Drive to marked location to find Mr. Gabby.
Objective: Kill Mr. Gabby
Mr. Gabby isn’t going to make it easy. He’s in a vehicle so you will have to pursue and shoot his vehicle and force him to stop (or just blow the vehicle apart). Drive as close to Mr. Gabby’s vehicle as possible and aim for the tires or driver to force the vehicle to stop. You can destroy the vehicle or if it’s forced to stop and Mr. Gabby gets out, track him and eliminate him.
Objective: Pick up the Loa Dust.
Don’t forget what you came for! Locate the discarded product (marked by the green arrow) and grab it.
Objective: Meet Shaundi.
Grab a car and drive it along the marked route and find your Lieutenant. This completes the mission successfully.
File in the Cake (Sons of Samedi)
Shaundi says, "Science is hard!" because she can’t figure out the ingredient for the Samedi’s Loa Dust. But there is someone who might know--problem is, that person is locked away in Stilwater Prison. You broke out of prison now it’s time to break in. You’re supplied with a bomb to destroy the prison generator. Unfortunately, the bomb is already set--better get moving!
Objective: Get to the prison before the bomb detonates.
Take note of the countdown in the corner: that’s the bomb! Hop into the boat and quickly start driving. Follow the marked route toward the objective. Look for the marked alcove. Drive up close, get out of the boat, and step onto the dock. Quickly proceed into the tunnel.
Objective: Plant the bomb on the generator.
Sprint through the tunnel! This area should be familiar ground if you swam your way to freedom in the first mission. Ascend the stairs and eliminate the guard patrolling this underground area. Go through the door and onto the marker. Use the onscreen instructions to plant the bomb.
Objective: Get clear before the bomb explodes.
Sprint back down the stairs to avoid the bomb’s explosion. Just get clear of the blast radius marked on the mini-map. The detonation destroys the prison generator and kills the power. Time to make your move!
Objective: Get inside the main cellblock.
Ascend the stairs and open the door--you’re back outside. Expect the cops to attempt to block the exit. Eliminate the resistance and either sprint along the marked route on foot or just steal the abandoned police car.
Follow the marked route to the entrance. Drive the car inside or get out and sprint. You can eliminate cops as you move or just keep running. Follow the marked route inside the prison. Terminate the guards that attempt to block your path.
You’ll soon encounter the prison riot. Ignore the rioting inmates and focus your weapon on any remaining prison guards. Move through to the marked door, which completes the current objective.
Objective: Find Shaundi’s drug expert.
Go through the door and toward the staircase.
Objective: Get to the cellblocks on the third floor.
Ascend the staircases while eliminating any prison guards attempting to impede your progress. At the top, find the marked drug expert (look for the area above her head). Eliminate the surrounding guards and approach the expert.
Objective: Get out of the prison.
Retrace your steps back to the staircase and descend. There are likely more guards here so eliminate them before you press forward. Continue down and retrace your route through the prison riot. Follow the markers until you near the prison entrance.
Objective: Head back to the city.
Exit the prison to the right side--the same way you came in. There may be more resistance on your departure so just eliminate those cops with your favorite weapon. Once through the entrance, proceed to the right and spot the helicopter pad in the distance. Continue onto the pad and into the chopper. Fly the chopper back toward the city to finish the mission.
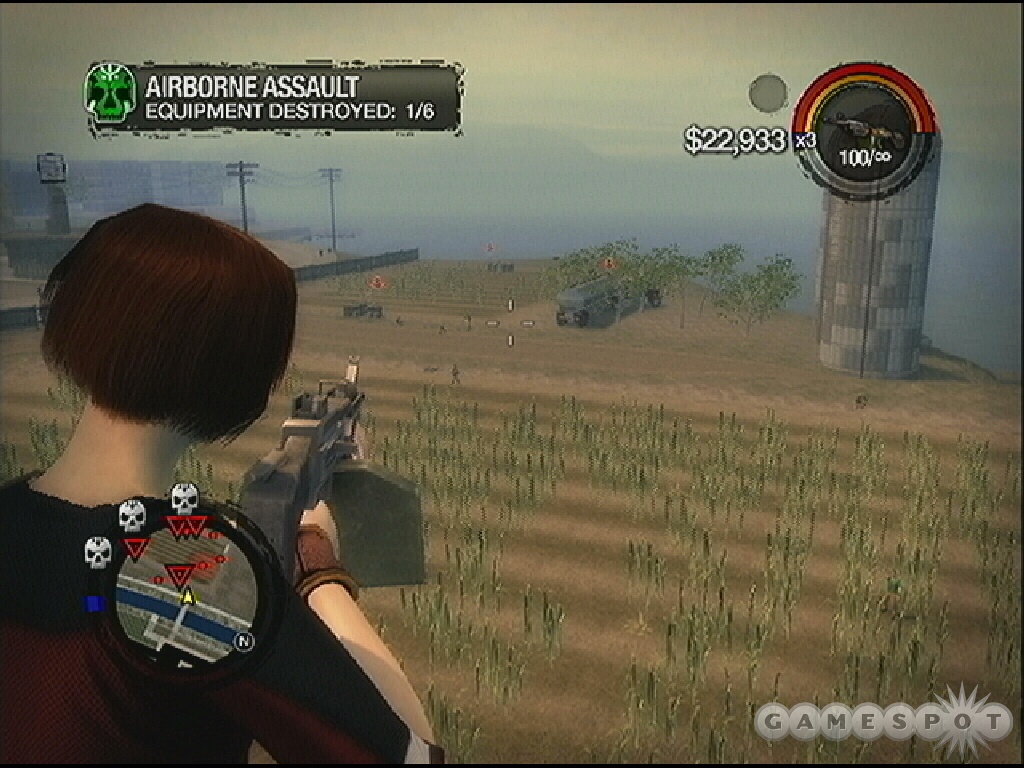
Airborne Assault (Sons of Samedi)
Shaundi’s drug expert hands over some Saints’ made Loa Dust. Apparently making the dust won’t be a problem but there’s still one issue: stopping the competition. When you gain control, you’re riding in the helicopter armed with a heavy machine gun--let the party begin!
Objective: Destroy the farm equipment.
This mission is pretty self-explanatory: just aim your big heavy machine gun at the marked Samedi equipment and blow it apart. There are some Samedi gang members on the ground too; conveniently many of them are standing near explosive barrels. Target the gang members in between shots on the Samedi farming equipment. Don’t fret if you happen to miss a piece of equipment; the chopper will come back around for multiple passes allowing for ample opportunity to destroy the targets.
Objective: Kill the Samedi Lieutenants before they get away.
The Samedi Lieutenants are fleeing in four vehicles. This is just like blasting farm equipment just the targets are now on the move. The chopper provides good line of sight on the targets. Go after the lead car first; once it’s destroyed, target the next in line.
The only real danger is if you happen to destroy a car that moves underneath the chopper when the chopper is at its lowest point, you might get taken down in the blast. It’s not something to worry much about, however; just keep firing at the Samedi Lieutenant vehicles and destroy them all.
Veteran Child (Sons of Samedi)
Shaundi is in trouble! One of Samedi’s minions--Veteran Child--infiltrated the Saints’ hideout and managed to get Shaundi out. You receive a phone call as the mission begins.
Objective: Look for Veteran Child at Cocks.
Grab a car outside the hideout and drive along the marked route to Cocks.
Objective: Kill the Samedi protecting Veteran Child.
Walk to the marker outside Cocks and arm your favorite weapon. Go inside and start blasting the Samedi henchmen. Make sure you target the guy on the upper floor. Take cover around corners or retreat if you’re under heavy fire and allow your health to regenerate (or use a food item). Clear out the room and you automatically give Pierce a call.
It was a trap after all--big surprise. But Pierce has news: Veteran Child is due to spin some tracks at On Track tonight. That’s where he is and Shaundi is surely with him.
Objective: Go to On Track.
The Samedi aren’t going to make it an easy trip! The carnage you just caused has the Samedi on alert so you will have pursuing hostiles. You can attempt to take them down with a weapon but it’s likely better to just keep driving as fast as possible. If you happen to drive near a cop, the fuzz may provide some ironic assistance by slowing down the Samedi. Once at On Track, you may need to clear out any Samedi that get out of their pursuing cars. Walk to the marker in front of On Track.
Objective: Kill Veteran Child.
Open the door into On Track and start firing at the Samedi opposition. Get through the bar and into the dance floor area. Clear the area before approaching the marked location at the bottom of the steps. When you reach this spot, a cut scene interrupts the action.
Objective: Find a way to separate Shaundi and Veteran Child.
Veteran Child is using Shaundi as a human shield. If you attempt to shoot Veteran Child, your bullets will harm Shaundi--and if she dies, the mission ends in failure. Fortunately there is an item scattered around the dance floor to assist your efforts. Look for the green arrows marking the location of flashbang grenades. Run over to a flashbang and pick it up. If you have a satchel charge in inventory then you must switch out; also note that you can only pick up one flashbang at a time.
Once you’ve acquired a flashbang, equip it and toss it close to Veteran Child and Shaundi. When it detonates, the disorientation forces Veteran Child to let go of Shaundi--this is your chance. Shoot him! Make sure Shaundi isn’t in your line of fire because you can still inflict damage on her if she’s in the way.
The secondary problem is the Samedi--more arrive throughout the mission. Monitor the mini-map so you know when more Samedi gang members are coming onto the dance floor. Eliminate these threats as soon as you spot them. Grab another flashbang and repeat the strategy; toss it near Veteran Child then shoot him once he’s let Shaundi go.
You may be under a lot of fire during the mission--between Veteran Child and the arriving Samedi gang. Take cover behind the columns and wait for your health to regenerate or use the opportunity to replenish health with a food item. The mission ends successfully once you have depleted Veteran Child’s health bar completely.
Burning Down the House (Sons of Samedi)
Shaundi is enjoying herself at a local frat party. She’s got an ex-boyfriend with some information. Apparently he spotted Samedi wheeling chemicals into a building: time to blow up some dust labs!
Objective: Head to the first location.
Get into a car and follow the marked route to the first location.
Objective: Destroy the dust labs.
Equip your favorite weapon and eliminate the Samedi guards protecting this first dust lab. Attack and retreat as necessary. Gather up the discarded ammunition and switch out any weapons you find. Go to the marked dust lab and destroy the two tanks to complete the objective. Keep your distance from the tanks so you aren’t caught up in the fiery explosion.
Objective: Head to the second location.
Same deal: get inside a vehicle and drive along the marked route to discover the second Samedi dust lab location.
Objective: Destroy the dust labs.

There are plenty of Samedi guards inside this second location. Search both the downstairs and the upstairs and eliminate the targets. Locate the marked dust lab upstairs. Destroy it to complete the objective.
Objective: Head to the third location.
There’s another dust lab to destroy. Get back inside a car and drive it along the designated route to find the third location. Your actions have likely stirred up plenty of Samedi anger so expect pursuing hostiles on the way to this location. Outrun them to the third location; once there, get out and eliminate them.
Objective: Destroy the dust labs.
Enter the last location and blast all of the defending Samedi. When you reach the room containing the dust labs, you discover the door is locked. A new objective appears.
Objective: The door is locked, find a way to flush them out.
Go to the control panel on window’s right side. Follow the onscreen instructions to shut off the ventilation system. Return by the door and eliminate the fleeing Samedi. Destroy the lab inside to complete the objective.
Objective: Drive to the fourth location
Grab a vehicle and drive along the designated route to the fourth location. A new objective appears upon your arrival.
Objective: Kill the lab technicians.
Clear out some of the guards using your vehicle or just get out and pick out your favorite weapon. Eliminate the exterior guards then approach and open the door into the structure. Search the rooms and find the marked technicians. Eliminate each technician; one drops a key.
Objective: Get the key.
Pick up discarded key. Go to the marked door; find it at the bottom of a staircase. Unlock the door with your newly acquired key.
Objective: Destroy the dust labs.
Blast the defending Samedi and destroy this final dust lab.
Objective: Chase down the lead technician.
Don’t return up the staircase. Continue through a route inside this room to find the exit door. Bust outside to trigger the cut scene.
When you regain control, shoot the technician’s car with a shotgun or explosive before he drives away. Should the technician get away, get into a car and begin the chase. Shoot the car’s tires or the driver. If the technician gets out, track him and eliminate him.
Bad Trip (Sons of Samedi)
A couple Samedi henchmen ambush you--moments later you’re inside the Samedi limo with the Samedi leader, The General. And there’s something not right about the airflow in this limo. The Samedi special blend turns an ordinary mission into a bad trip--literally.
Objective: Get back to the hideout. Rescue Shaundi.
Shaundi’s health bar appears at the top of the screen. You must get back to the hideout and save her before the health bar depletes--or it’s mission failure. Get into the nearest car and drive back to the hideout as quickly as possible. Exit the vehicle at the marker, open the door, and push through the hideout.
If you have a shotgun, equip it. The one-shot kill potential is ideal so you can eliminate fast and keep moving toward Shaundi. She’s at the bottom of the stairs--with a couple Samedi overlooking with weapons drawn. Kill them and approach Shaundi’s position.
Objective: Kill the Samedi.
Retrace your steps back to the hideout’s front entrance. Blast every Samedi gang member that comes through. You may discover Samedi have already entered so eliminate them before you reach the entrance.
Objective: Help Pierce.
Pierce is outside the hideout and under attack from a large Samedi mob. Exit the hideout and charge Pierce’s position. Eliminate all of the Samedi surrounding him as quickly as possible.
Samedi arrive and attack from all sides! The objective should be perfectly clear: kill them all! That kill meter in the upper left corner of the screen will be over 60 by the time you’re through with the mission. Don’t move too far away from the hideout or a message appears forcing you to get back. Eliminate every single Samedi attacker to complete the mission.
Bonding Experience (Sons of Samedi)
Pierce is itching to get his hands dirty. Shaundi reports helicopters are dropping Samedi product--looks like Pierce is going to get his wish! Time to destroy some helicopters!
Objective: Destroy the helicopters before they drop off the Loa Dust.
Check your weapon inventory. One of your rifles has infinite ammunition--obviously that’s the weapon you should equip! Pierce is handling the driving duties. It’s your job to shoot down the helicopters. Since you have no control over driving, it can be tough to get your orientation. Monitor your mini-map for the location of incoming helicopters and keep your targeting reticule positioned on the helicopter as long as possible while you attempt to shoot it down.
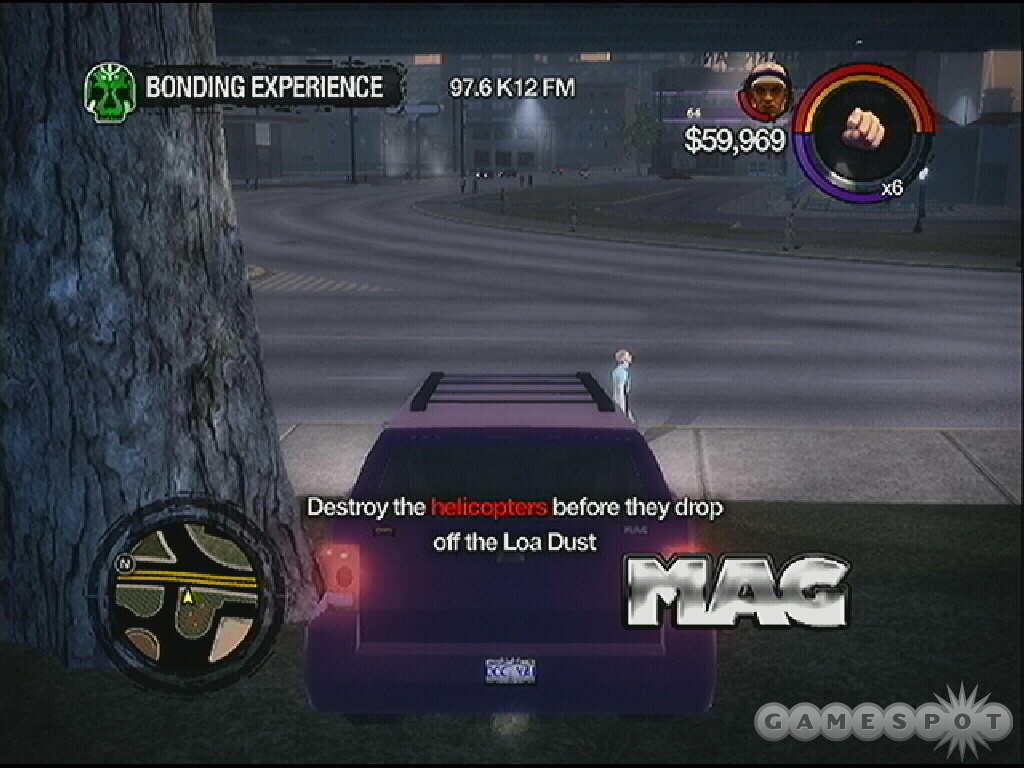
There are six helicopters in total.
- The first helicopter appears soon after Pierce pulls away. Look for it on the left side of the vehicle. It flies pretty low and provides an easy target.
- Pierce drives down a dirt road and hits a small jump. Right after the jump, look for the second helicopter to appear on the right side. It then moves overhead and eventually positions itself on the left side. You must work quickly to down this helicopter; it’s the hardest target of the six and if you miss your early opportunities, it’s tough to get a line of fire as it moves behind buildings on its way to the drop site.
Objective: Get on a boat.
The next couple choppers are flying over the water so you’ll have to abandon the car for a boat. Wait for Pierce to indicate as such. He’ll park the car. Get out and run down the dock and get into the boat.
- Look for the third helicopter on the mini-map after Pierce starts driving the boat. It will move overhead and become a rather easy target for your assault rifle.
- The fourth helicopter, still over the water, appears soon after the third. It begins on the right side and then moves onto the left side. Once again it’s an easy target for your automatic weapon.
Objective: Get in Pierce’s car.
The remaining two helicopters are back over land. Pierce pulls the boat back up to shore. Get out and follow Pierce to the truck and wait for him to take it. Get inside.
- The fifth helicopters appears on your side of the truck. Start shooting and the chopper weaves around. Line up your shot; you’ll have several easy opportunities for a shot so be patient despite the hectic movements of the helicopter.
- The sixth and final chopper appears ahead and flies low making it an easy target. Ignore the pursuing Samedi and target the sixth and final helicopter.
The mission ends once you have destroyed all six helicopters. Should any of them read the drop point, the mission ends in failure and you must restart from the last checkpoint.
Riot Control (Sons of Samedi)
Apparently the junkies that count on the Samedi shipments are feeling left out--cause you keep destroying those shipments! The lack of product has made them quite angry and the Samedi point them in your direction. Whatever they can get from the Saints, they get to keep! And they aren’t going to ask nicely.
Objective: Defend the warehouse.
Jonesin’ junkies with weapons interrupts a tranquil moment in the warehouse. The junkies appear from both the back and front entrances. Keep an eye on the mini-map and move toward each position and eliminate the threats as they enter the warehouse. Gather up discarded ammunition to keep your weaponry supplied. It’s possible one of your homies might get taken down; you have 30 seconds to revive if that happens. Move over your homie and follow the onscreen instructions.
While you and Shaundi hold off the junkies, Pierce went to go get the truck. Keep eliminating junkies until Pierce arrives back with the truck, which triggers the next objective.
Objective: Protect Pierce and Shaundi while they load up the truck.
You’ve been assigned protection duty while Pierce and Shaundi load 20 crates into the truck. The same tactics apply: watch for the junkies to enter from the back and front entrances of the warehouse. Also, watch for junkies coming from the direction of the parked truck. Note that some of the junkies toss Molotov cocktails; get out of the way quickly to avoid the fiery bath. Shoot junkies until Pierce and Shaundi get the truck loaded.
Objective: Get a car.
Pierce and Shaundi are ready to drive away in the truck but they need escort. Run toward the marked vehicle and get inside. Eliminate any junkies attempting to block your route.
Objective: Escort the truck to the Saints hideout.
This escort portion is pure chaos. The junkies will go straight for the truck. You may have a couple vehicles behind the truck at any point. When attacking the junkie cars, aim for the driver or the tires to put their pursuit to a stop. You will get banged around a lot and might even lose your car; just quickly get into another and return behind the truck. Be careful as you destroy junkie cars; get away from them when they are about to explode. The mission ends in success once Pierce and Shaundi get the truck to the hideout.
Eternal Sunshine (Sons of Samedi)
The time has come to go after Sunshine. Shaundi wants to assist but you aren’t having it--a strung out DJ almost took her out!
Objective: Head to the meat packing plant.
Grab a vehicle and drive along the marked route to the meat packing plant. As you get close, spot the red hostiles on your mini-map. Park the car and eliminate the defending Samedi as you approach the structure. Eliminate all of the guards outside and locate the marked door into the plant.
Objective: Find Mr. Sunshine.
Terminate the Samedi enemies inside the meat packing plant. Locate the stairs in the back right corner. Ascend to the next floor and clear the locker rooms; expect to find additional Samedi here. Locate the stairs on the opposite side. Continue up. Turn left and toward the railing to trigger a cut scene--Mr. Sunshine is standing on the opposite side of the area.
Objective: Kill Mr. Sunshine. Shoot Sunshine’s Voodoo Doll!
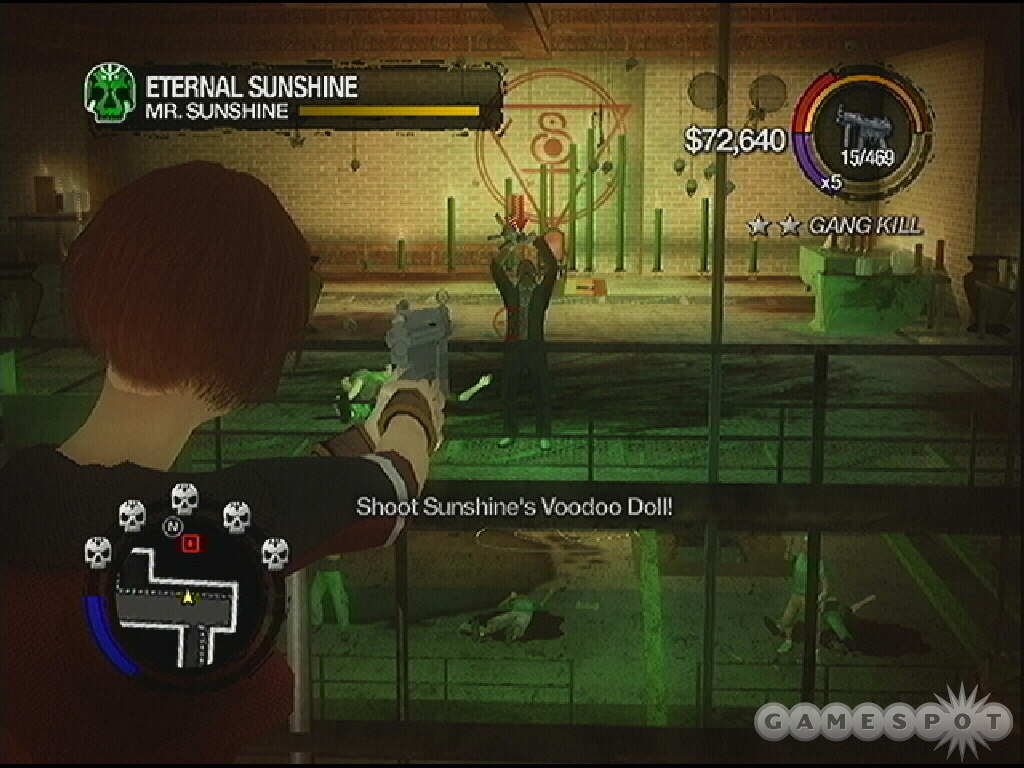
Begin by shooting all of Mr. Sunshine’s surrounding henchmen. You must clear them out to receive the next clue: Sunshine’s Voodoo Doll! Most of the time, Mr. Sunshine is invulnerable. However, when you clear the area around him, Sunshine will pull out his voodoo doll. Shoot the doll out of his hand (note the arrow marking its position). Once you’ve shot the doll away, Mr. Sunshine is vulnerable.
Start shooting! Mr. Sunshine will retreat; keep shooting until he’s out of your line of fire. He retreats to cover downstairs. You can’t worry about Sunshine while he’s behind cover. Concentrate all your attention on the plentiful Samedi henchmen coming into the plant.
Take cover and use food items as necessary to stay alive. Eventually Mr. Sunshine returns upstairs. Once again, he’s still invulnerable until the doll appears; so keep shooting henchmen, especially around him, until the doll comes out. Once Mr. Sunshine brings out the doll, shoot it out of his hand. Repeat your attack on Mr. Sunshine! Repeat until you have finished Mr. Sunshine off completely.
Assault on Precinct 31 (Sons of Samedi)
Shaundi has a plan on finding the General--the key is locating the General’s limo. You can do so by hacking the traffic cameras. Problem is those are at the police station. First, you’re going to need some disguises in order to infiltrate the police station.
Objective: Find the repairman.
A timer appears in the upper left corner; you only have about three minutes to find the repairman. Grab a vehicle and follow the marked route to the repairman’s van. Once you get close, the objective changes.
Objective: Hijack the repair van.
The repairman’s van is on the move so you’ll have to run it off the road in order to hijack it. Box the van into a tight area so the repairman can’t get away quickly, He’ll certainly try! Hijack as quickly as possible before it drives off.
Objective: Park the van at the police station.
Drive along marked route to the parking spot at the police station.
Objective: Enter the Police Station.
Listen to Shaundi: don’t show weapons in the station, you’ll blow your cover! Approach the marked entrance of the police station.
Objective: Check in at the front desk.
Walk to the front desk ahead. Stand on the marked location and then speak to the clerk when prompted.
Objective: Go to the camera room on the fourth floor.
Ascend the staircases to the fourth floor. As soon as you walk into the camera room, the police detect your presence.
Objective: Defend the room.
Shaundi needs time to work. While she handles the traffic cameras, you must defend the room from the plentiful police forces. Equip your favorite weapon and start shooting. The cops arrive primarily from the main staircase, but you may spot others through the opposite door (guarding your escape route, that helicopter). Kill everything that arrives. Gather up the discarded ammunition to keep your weaponry supplied.
Objective: Escort Shaundi out of the police station.
Shaundi mentions the rooftop helicopter--gotcha covered! Go through the back route and find the chopper. Eliminate any remaining police defenders (gather their weapons) and get inside the helicopter.
Objective: Get the equipment back to the hideout
There’s a police helicopter in pursuit. Ignore the threat and just keep moving toward the hideout’s rooftop. Fly low so you can land quickly. As soon as you’re over the hideout, decelerate and drop down onto the marker to finish the mission.
The Shopping Maul (Sons of Samedi)
The hacking mission pays off: the General limo is found. You wake Shaundi from her slumber--she’s along for the ride because you can’t find Pierce. Maybe she can be useful in a fight after all.
Objective: Head to the ambush location.
Don’t have long to move; a timer appears with approximately 100 seconds to reach your destination. Grab the nearest vehicle and go! When you reach the destination, park just outside the marker. Get out of the vehicle and sprint up the staircase and onto the marker. This triggers the next objective.
Objective: Kill the General’s escort

Ambush successful! A bus slams into the General’s limo. Total chaos ensues. When you regain control, there’s tons of Samedi escort to deal with. Shoot everything below your elevated position. Once you’ve cleared this area, descend and locate the remaining marked escort targets. You must eliminate them all to receive the next objective.
Objective: Go after the General!
Shaundi exclaims that the General is getting away! Get inside the mall to the marked spot at the elevator.
Objective: Track down the General.
Retrace yourr steps, which triggers the arrival of a Samedi gang vehicle. Kill the occupants then take the car. Drive through the mall toward the marked target. You can also abandon the vehicle if you wish, but there are a lot of enemies to deal with (which can be just driven past if you stay in the car). It’s possible to get stuck on steps, which will force you to get out of the vehicle. Get toward the marked location any means necessary.
Objective: Kill the General.
A Bulldog arrives and it has a roof-mounted machine gun. To complete the task, you must destroy the Bulldog. Equip your most damaging weapon (rocket launchers are always good). A shotgun also inflicts big damage but it requires you to be up close and personal. The Bulldog isn’t the only problem as additional Samedi forces continue to arrive throughout the battle. You must deal with them as well; though switch weapons so you are using less important ammunition against the easier Samedi targets.
You can still ascend an additional floor in the mall, and it’s not a bad spot to engage the Bulldog. Try hiding around corners and luring the Bulldog into an ambush. We managed to get the Bulldog stuck on a corner on the upper floor. We could then stand close (and not in the line of fire from its weapons) and could repeatedly fire the shotgun until the Bulldog exploded.
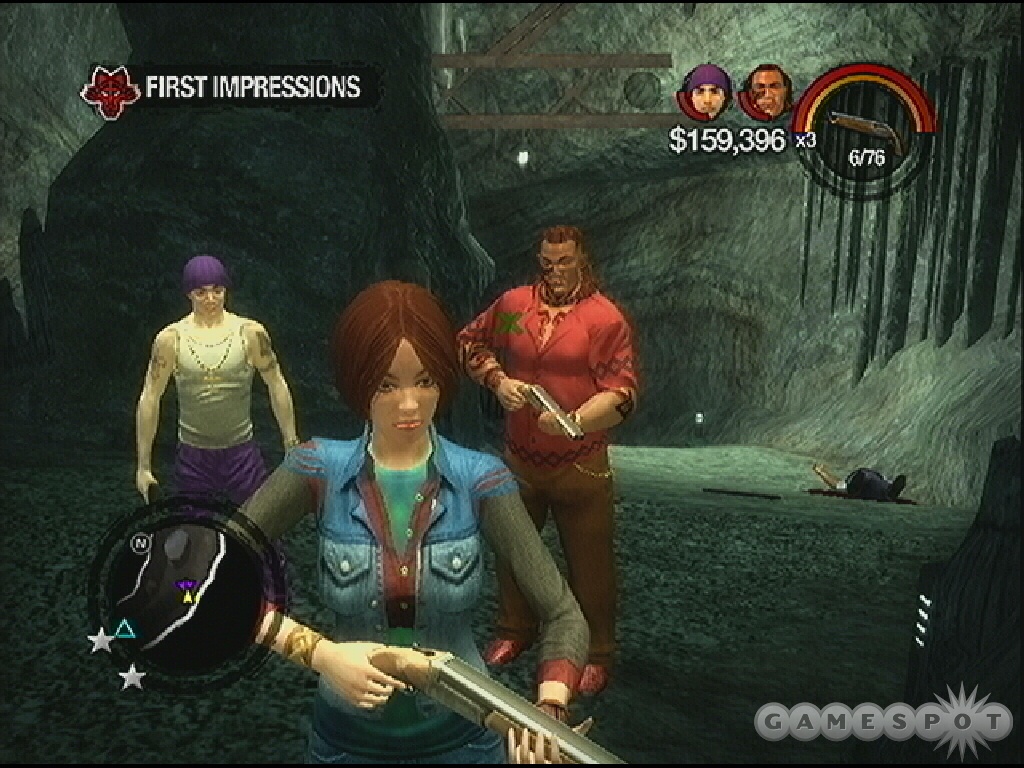
First Impressions (The Brotherhood)
Carlos takes you to meet Maero, the leader of the Brotherhood. It’s not long into the conversation that ambushing police officers ambush the position.
Objective: Escape with Maero and Carlos.
Eliminate the cops around your start position. Move up the incline to the marker and battle additional cops. Keep moving to the next marker stopping to battle cops. Watch the mini-map for the location of cops as some may appear behind you or in side alcoves. Cross the bridge and spot more cops in the distance. If you want, you can take the time to complete the tags on your way out but realize action still happens around you--meaning you and your homies can get shot!
Objective: Take the staircase up to exit at street level, or take the steps down to exit via the water.
Let’s take the staircase up to the street level. Continue up stairs to the marked exit door.
Objective: Take Maero back to his hideout.
Grab a vehicle and drive along the marked route back to Maero’s hideout. Expect police presence both in the form of roadblocks and in the form of pursing vehicles. Drive around the roadblocks and ignore the pursuit. Get to the marked location to complete the mission.
Reunion Tour (The Brotherhood)
You recognized him last mission but now you take the time to reacquaint yourself with an "old friend". You decide to recruit Donnie for some pro bono work--rigging Brotherhood trucks to explode.
Objective: Drive Donnie to the first truck.
Grab a vehicle and drive along the marked route to find the first Brotherhood truck. Get out and Donnie starts to work.
Objective: Guard Donnie while he plants the bomb.
While Donnie works on rigging the truck with a bomb you must defend him from the angry Brotherhood gang members attempting to stop you. Eliminate all of the Brotherhood members and gather their weapons and ammunition.
Objective: Get away from the truck and detonate the explosives.
Get back into your vehicle and drive forward. Once you are out of the blast radius, turn around so you can see the rigged truck. Detonate the bomb and enjoy the explosion.
Objective: Drive Donnie to the next truck.
The Brotherhood are certainly not happy right now so expect some pursuit. Drive to the next truck location by following the marked route. There are actually two trucks at this next location. Park at the next marker and Donnie will start work on planting the next bomb.
Objective: Guard Donnie while he plants the bomb.
Expect much more resistance this time! Donnie will have to complete two jobs. Brotherhood vehicles containing Brotherhood gang members will arrive frequently. Shoot the occupants and then the members once they’ve gotten out of the vehicles. Gather up the discarded ammo between attacks.
Objective: Get away from the truck and detonate the explosives.
Get into a vehicle and drive away from the truck until you are out of the blast radius. Turn around and face the truck and detonate the explosives.
Objective: Drive Donnie to the last truck.
Follow the marked route to the final truck parked nearby. Nothing you have done has calmed the Brotherhood so expect continued heavy resistance. Park your vehicle near the marked truck.
Objective: Guard Donnie while he plants the bomb.
Same deal: shoot the arriving Brotherhood while Donnie plants the bomb on the final truck.
Objective: Get away form the truck and detonate the explosives.
Get into your vehicle and start driving out of the blast radius. As you break the edge of the radius, a problem arises--the detonator isn’t working! And the Brotherhood have gotten into the rigged truck and are now in pursuit. A time appears in the upper left corner. When that timer reaches zero, the bomb detonates automatically.
Objective: Keep away from the truck.
You must move away from the truck to avoid the explosion. Make quick turns down streets and try to force the rigged truck to slow down by forcing it into traffic or to follow you through tight quarters. Successfully stay away from the rigged truck and you complete the mission successfully.
Waste Not Want Not (The Brotherhood)
The Brotherhood are keeping a tight lid on their current activities. Carlos doesn’t have any useful information--however you just came up with a good idea. It’s an amusing little plan that should really get under Maero’s skin. You have until 6 am to complete the mission--which translates to 15 minutes in real time. Note the timer in the upper left corner of the screen.
Objective: Go to Friendly Fire.
Sprint to the nearest vehicle and get inside. Drive quickly to the marker out front of the Friendly Fire store.
Objective: Buy a Geiger counter at Friendly Fire.
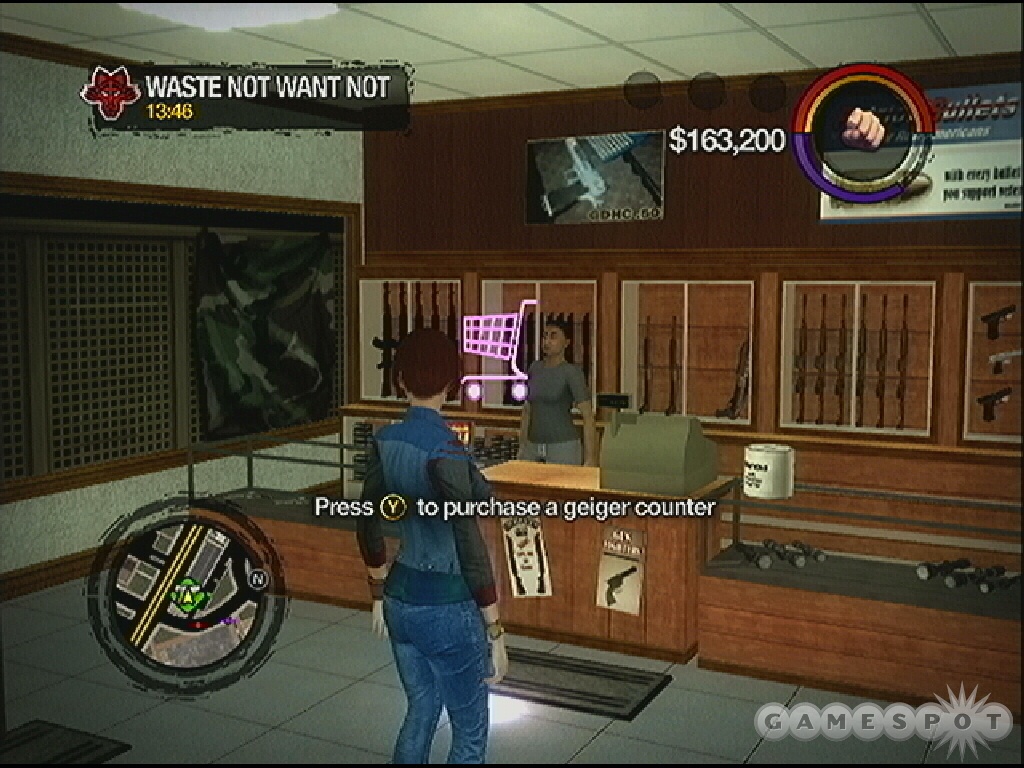
Walk into Friendly Fire. Approach the clerk and follow the onscreen instructions to buy the Geiger counter.
Objective: Take a vehicle to the power plant.
Return to your parked car and get inside. Drive to the marked location--it’s a boat. Get into the boat and start driving!
Objective: Get to the nuke plant.
Drive boat to marked location, the nuclear plant. As you get close, you’re notified that heavy security protects the plant. Note that your notoriety with the police went up a notch.
Objective: Track down some toxic waste, but don’t get spotted.
Take note of the "Radioactivity" meter in the upper left corner. That’s the Geiger counter. You’re looking for some toxic waste. As you get close, the meter rises; when you’re far away, the meter registers low or no radioactivity.
Start searching the nuclear power plant grounds. Take note of the onscreen hint for a clue to its location. Locating the toxic waste can be confusing, though; for example, if the toxic waste is above your location, the radioactive meter will still read strong. So if the meter registers near full strength but there’s nothing on the ground; look for a way to get above or below your current position. Continue to avoid security as you search or you may have to get into an unnecessary gunfight. When you spot the item on the ground, grab the toxic waste.
Objective: Get to the helipad.
Sprint to the marked location on the mini-map. It’s the helipad. Carlos is on his way with the rescue helicopter.
Objective: Kill the security guards so the helicopter can land. Defend the helipad until the helicopter returns.
Carlos can’t land the helicopter until you have eliminated all of the security guards charging the helipad. Stand close to the helipad and watch the mini-map to spot the incoming security guards--many coming from the staircase. Eliminate these guards with your preferred weapon (gather up discarded ammunition). Watch the meter on the upper left to know when you’re close to reaching the mark.
Objective: Get in helicopter.
Once Carlos lands, sprint to its location and get inside.
Objective: Deliver the toxic waste to the tattoo parlor.
Carlos is piloting the helicopter--you’re on weapon duty. Take the massive machine gun and start shooting the pursuing police choppers and boats. Watch the mini-map to find their locations. Put the targeting reticule on the chopper or boat and start firing. The helicopter takes a hit automatically--you will always crash at the end of this sequence.
Upon recovering from the crash, sprint to the closest car and grab it--a police car works fine too! With Carlos safely inside, drive along the marked route to the tattoo parlor, which completes the mission. Hopefully Maero will enjoy his latest ink!
Red Asphalt (The Brotherhood)
Apparently the radioactive tattoo you gave Maero isn’t going over very well--the Brotherhood have decided to enact their own brand of retaliation.
Objective: Head to Donnie’s Garage.
Grab a vehicle and drive along the marked route to Donnie’s garage.
Objective: Beat up Donnie until he tells you where Carlos is.
The Brotherhood protects the front of Donnie’s garage. Shoot all targets. Expect additional Brotherhood to arrive during the fight; keep an eye on the mini-map to spot incoming vehicles. Locate Donnie in the back room of the garage. Don’t shoot him with a weapon! Beat Donnie up with a melee weapon (a knife works as well) until the next objective appears.
Objective: Find the truck before Carlos dies.
Carlos is in trouble! Grab a fast vehicle and follow the marked route to the Brotherhood truck. It’s on the move so you need to work quickly. A new objective appears once you have gotten close to the Brotherhood vehicle--note that Carlos is being dragged behind it!
Objective: Damage the truck and force it to stop.
You must force the truck to stop dragging Carlos around. Damage the Brotherhood truck with weapons fire or by ramming it. You must inflict enough damage to force the Brotherhood truck to stop to complete the objective.
Objective: Go help Carlos.
Get out and approach the stopped truck. Pull out your favorite weapon and shoot the Brotherhood defending the truck and preventing you from reaching Carlos’ mangled body. Eliminate all of the area’s enemies then walk over to Carlos to complete the mission.
Bank Error in Your Favor (The Brotherhood)
Shaundi spots Maero’s girl Jessica dropping off a deposit at a bank--Shaundi was at the right place at the right time! Shaundi gives you a call. Time to continue the circle of revenge!
Objective: Head to the bank.
Grab a vehicle and drive along the marked route to the bank. Approach the marked entrance.
Objective: Go inside and take Jessica hostage.
Walk inside the bank and spot the marked Jessica. Sprint to Jessica and take her as a human shield.
Objective: Keep Jessica between you and the cops. The alarm has sealed the bank; use Jessica to shut off the lockdown.
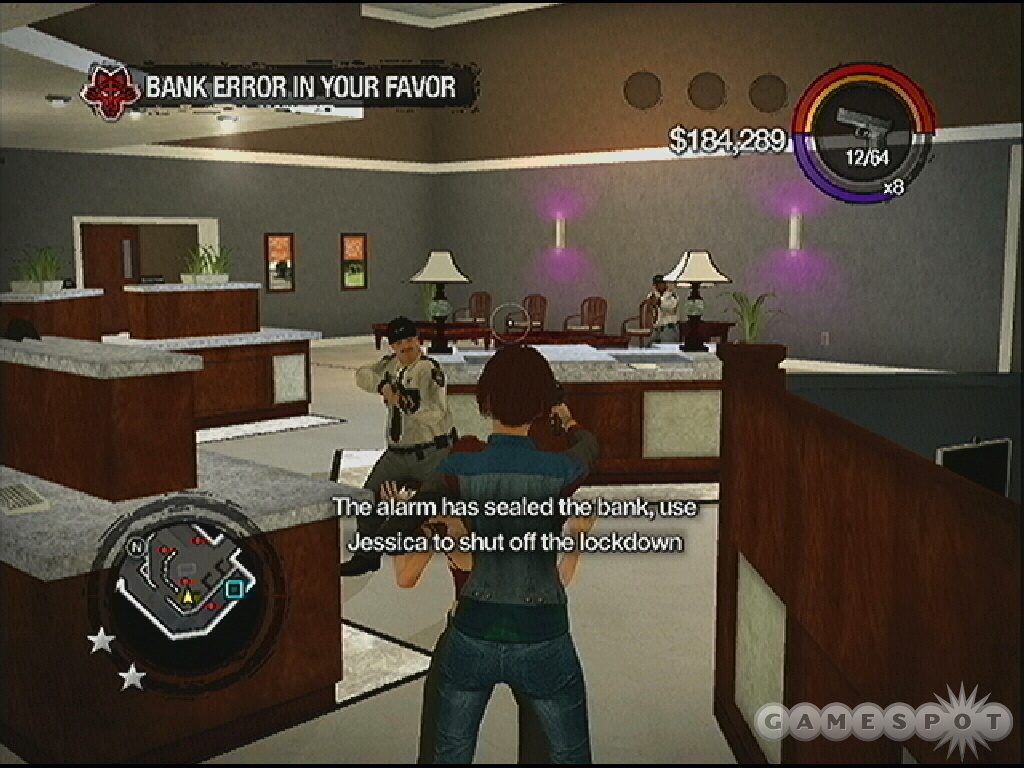
You must keep Jessica between you and the cops or the cops will start firing at you and inflict damage. Note that you can also just kill the cops inside the bank. It doesn’t really make the mission any more difficult--but could make it easier since trying to face every cop can pose problems, especially in the mission’s later stages.
Take Jessica to the back of the bank and go upstairs. Find the marked location at the back of the hall. Drag Jessica to the marked location. Follow the onscreen instructions and force Jessica to turn off the alarm. Grab Jessica again as a human shield.
Objective: The doors are open. Take Jessica to her car.
As you drag Jessica back downstairs into the bank lobby, SWAT troops arrive. Getting Jessica out of the bank with the SWAT presence can be tough. It may be easier just to shoot them all. Otherwise, wait for them to get through the bank entrance so you have a way out; don’t start going through when the SWAT have clogged the entrance forcing you to stick inside the bank with the SWAT shooting at your back.
Locate the marked car outside; it’s to the left. Approach the car and place Jessica in the trunk.
Objective: Bring the car to the University Arena.
You have a three police star rating--obviously law enforcement means business! You must get Jessica’s car safely to the University Arena. It can withstand plenty of damage but don’t hesitate. Watch out for the roadblocks and cops running into your car from behind. Drive around the roadblocks and take back route toward the arena. Get to the marked location at the University Arena and enjoy Maero’s monster truck surprise.
Thank You and Goodnight! (The Brotherhood)
The Saints still haven’t discovered what’s up with the Brotherhood’s shipment. You need to figure out who might have the information and how to get it out of them.
Objective: Pickup the fireworks truck from the warehouse.
Grab a vehicle and drive to the marked location at the warehouse. You’re there to pick up a fireworks truck.
Objective: Kill the Brotherhood guarding the truck.
There are twelve marked Brotherhood defending the fireworks truck. You must eliminate all twelve (take note of the counter in the upper left corner of the screen) to complete the objective. Search the warehouse grounds to find all of the Brotherhood defenders and eliminate them to gain access to the fireworks truck.
Objective: Get into the fireworks truck.
Approach the fireworks truck and get inside.
Objective: Throw fireworks boxes to defend the truck. Get to the arena.
You aren’t handling the driving--you’re handling the bombing! You face out the back of the fireworks truck and have access to the plentiful boxes of fireworks. Toss the boxes out at pursuing Brotherhood vehicles. You have infinite boxes so don’t hold back--keep tossing at the incoming vehicles. If cars are getting close then you aren’t tossing enough! Keep those enemy vehicles away and you will eventually reach the destination and complete the mission.
Retribution (The Brotherhood)
The Brotherhood are all over the Saints’ turf--driving around in big trucks and blowing stuff up. Time to put a stop to it.
Objective: Kill the four Brotherhood Lieutenants.
Take a vehicle to one of the marked locations. There are four locations marked on the mini-map; each represents a Brotherhood Lieutenant and his minions causing some sort of havoc in Saints’ territory. Note that these objectives can be completed in any order; we’ve essentially gone in location order so if these are different just skip around the walkthrough.
Objective: Stop the Brotherhood from destroying the store. Save the shop owner.
This is the one marked at the Brown Baggers liquors. Charge inside the store, equip your favorite weapon, and eliminate the Brotherhood inside. Damage is piling up, so move quickly! Save the shop owner inside from the Brotherhood beating to complete the objective.
Objective: Kill the Brotherhhood being arrested by the police.
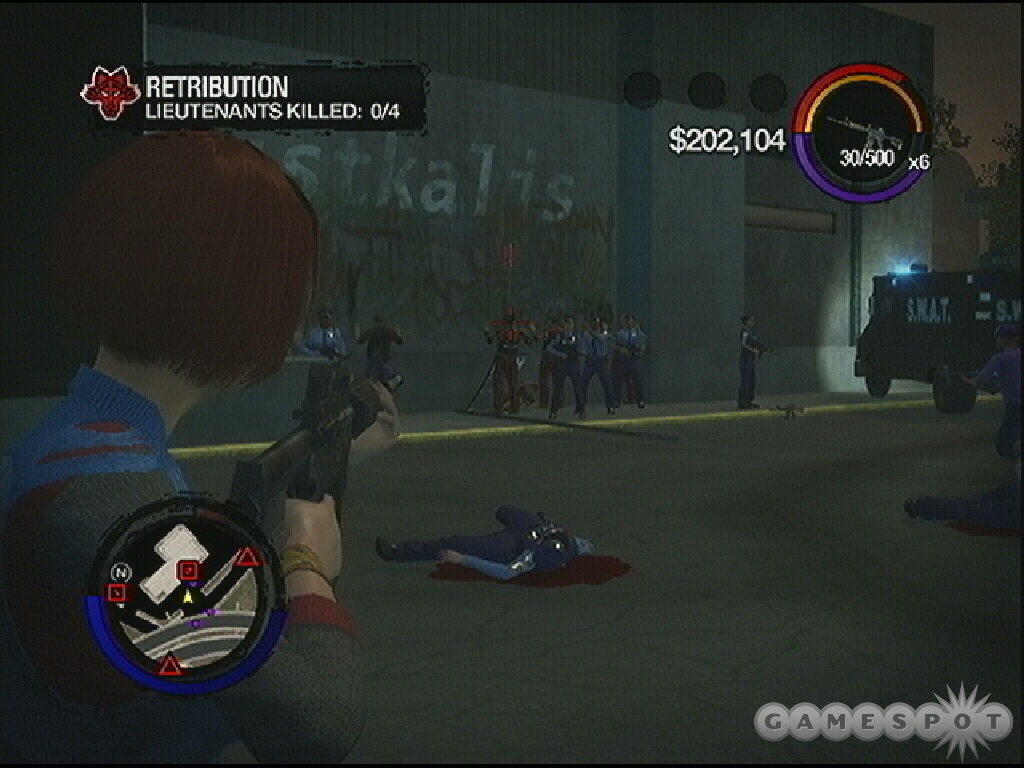
Drive to the Truck Yard district to this marked location. The police are arresting a group of Brotherhood. Jail is too good for them! Shoot the marked Brotherhood and complete the objective.
Objective: Break up the Brotherhood meeting and kill the Lieutenant.
Drive to the Barrio District and find the parking garage. Drive to the top of the garage and discover the Brotherhood meeting at the top. Eliminate marked targets and note that the Lieutenant drives off.
Objective: Chase down and kill the fleeing Lieutenant.
Drive off the parking garage and follow the fleeing Lieutenant. Shoot his vehicle as you pursue. Once it’s off the road, eliminate the driver and complete the task.
Objective: Stop the brotherhood from torching the docks.
Proceed to the Docks and Warehouse District. The Brotherhood are torching the docks; they’re driving around in a truck and tossing Molotov cocktails everywhere. Get behind the truck and shoot it or run it off the road. You can eliminate the truck from long or short range. Blow it apart to finish off the fourth Lieutenant and complete the objective.
Jail Bait (The Brotherhood)
The local news reports that several members of the Brotherhood are being released from prison. Time to greet them, Saints style.
Objective: Destroy the three prison buses before the Brotherhood are released.
The prison buses are marked on the mini-map. They’re currently on the move so you have to work quickly. It doesn’t take long for them to reach the destination, which obviously fails the mission. Go after the lead bus first; if you tackle with the last bus initially, you could find yourself very far behind the lead bus with little time left to destroy the remaining vehicles. Destroy all three buses to complete the objective.
Objective: Find a vehicle to intercept the prison boats. A boat is available for use at the Apartment Dock and two fighters are available at the airport.
You have a couple options to go after the prison boats. The marked route leads you to the docked boat. It’s the easiest method to eliminating the prison boats. Make sure you bring ammunition cause you’ll need pistol or sub machine gun ammo to destroy the prison boats. Drive the boat toward the marked location of the prison boats.
Objective: Destroy the boats.
Approach the marked boats and shoot (you can also ram the prison boats, but you risk flipping your own boat in the process). Once you see a prison boat burst into flames, switch targets to another boat. Repeat the process until all of the prison boats are destroyed.
The Enemy of My Enemy (The Brotherhood)
You join Shaundi for a stress-reducing game of Skeeball--you have a very unique style of playing. Shaundi tells you that apparently Maero is asking about an arriving shipment. Why are the Brotherhood asking about something they should already know about?
Objective: Find a way on board the cargo ship.
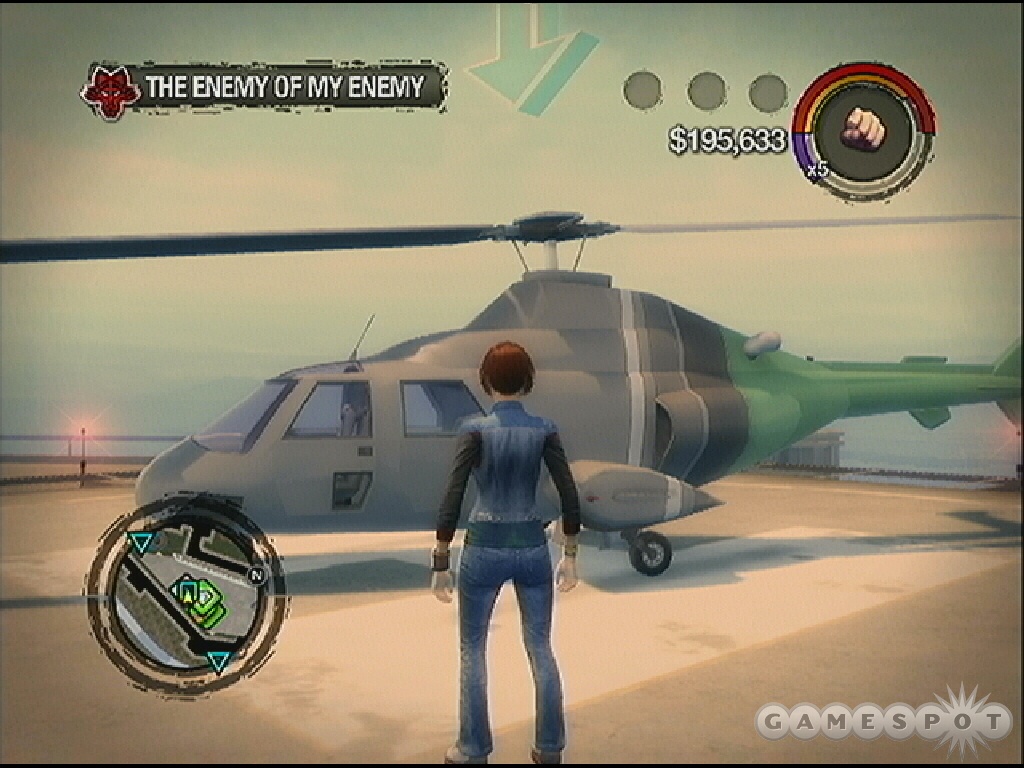
There are multiple markers on your mini-map: these are the various routes you can take to get onto the cargo ship. Follow the route to the hotel. Get inside and take the elevator up to the roof and you’ll find the helicopter. Perfect transport to get onto a cargo ship!
Objective: Eliminate the Ultor security team.
Land on the marked location on the cargo ship. Eliminate the guards outside. Go the front and rear of the boat. To get to the top rear of the boat, go inside the door and up the staircases. Eliminate all of the security team here to trigger the appearance of more enemies; they’re back on the opposite side of the boat. Enter the marked open door. Follow it into the storage room and blast the remaining troops to trigger the next cut scene.
Objective: Brotherhood gang members are coming after the cargo ship.
Go to the marked locations and grab ammunition for the RPG and assault rifle. You’ll need it! You’re about to face tons of enemies--plus you have to destroy several helicopters as well. Return to the ship surface. You will spot incoming helicopters and boats--these are dropping off the Brotherhood troops. It’s actually possible to shoot the incoming vehicles to eliminate the forces inside. Or you can just wait until the troops land on the boat and shoot them as they get close to your position.
One of the best places to stay is in the hallway at the top of the cargo hold (where you grabbed the ammunition). This is a natural chokepoint because the Brotherhood will move into the single doorway at the end of the hall. It’s easy to just mow them down as they attempt to enter. Gather the discarded ammunition when you can; just be careful when sticking your neck out of the door because it will get shot off!
Even after clearing out all of the troops you must still destroy the helicopters, even if technically they aren’t providing any direct threat. Use the RPG or any other weapon. The RPG can be a challenge since the helicopters are constantly moving but watch them for a moment and take note of the pattern--watch when the helicopter stops for a moment and fire the rocket then. You can also use a shotgun as the chopper gets close.
Objective: Another wave of Brotherhood gang members is coming after the cargo ship.
Once you have eliminated all troops and helicopters, you’re given 10 seconds to prepare for the next wave. Return to your position inside the hallway and wait for the Brotherhood troops to pour inside. Obliterate them as the Brotherhood attempt to infiltrate the hallway. There are three helicopters outside that must be destroyed as well to finish off the wave.
Objective: A third wave of Brotherhood gang members are coming after the cargo ship.
There’s a third and final wave of Brotherhood gang members approaching the cargo ship. Return to the position inside the hall and use the chokepoint to crush the Brotherhood troops. This final wave includes six helicopters circling around the cargo ship. Use the RPG, shotgun, assault rifle, and whatever means necessary to destroy all of the helicopters; eliminating this final wave of Brotherhood forces completes the mission.
The Siege (The Brotherhood)
The Saints now have the weapons cache stolen from the cargo ship. You know where Maero is and you have his guns: time to make a move against the Brotherhood!
Objective: Meet the Saints near the Brotherhood hideout.
Grab a vehicle and proceed toward the marked location near the Brotherhood hideout. As you drive, your notoriety with the Brotherhood slowly increases. This means the trip gets more hectic as you move--so be prepared for Brotherhood pursuit! Park the vehicle at the marked location.
Objective: Kill the Lieutenants to draw out Maero.
The Lieutenants are marked on the mini-map. Find the Lieutenants scattered throughout the dock area. Watch for the Brotherhood members using RPGs! Kill the marked Lieutenants to trigger the next objective.
Objective: Maero is in the warehouse; find a way in.
Get inside the warehouse and open the door into the stairwell. Ascend the staircase to the top.
Objective: Make your way to the roof.
Move through the Brotherhood hideout and obliterate the Brotherhood forces inside. Get to the back corner and find the marked door. Ascend to the fourth floor; clear this floor as well.
Follow the marker on the map to find the next staircase up. Continue to obliterate the Brotherhood forces inside. Gather up the discarded ammunition to keep your weapons supplied. Follow markers to the door marked "5" in the back corner. Ascend to the sixth floor. Bust through a couple doors and find Maero at the top.
Objective: Kill Maero.
This is a fairly simple boss battle against Maero--who’s not the smartest tool in the shed. When you are at long-range, Maero wields a mini-gun. When you are at close-range, Maero switches to explosives. You must use these tendencies to your advantage!
When Maero wields the mini-gun, sprint forward and leap into the recessed area in front of him. Stand close to the wall so the mini-gun can’t hit you. Wait until Maero switches tactics and begins to use the explosives--once he does, return to your previous position and equip a weapon, such as the assault rifle, and start firing on Maero. He’s now busy tossing explosives; avoid them should the explosives get close and continue to pelt him with weapons fire.
When Maero returns to his mini-gun, return to the recessed area in front of him and avoid the long-range weapon. Wait for him to switch to explosives and repeat. Continue until you have defeated Maero and completed the mission.
Showdown (The Brotherhood)
Maero summons you to the Ultor Arena. It’s showdown time! Of course, it’s a trap. A bunch of Brotherhood vehicles immediately surround you. Looks like, once again, you’ll have to fight your way out.
Objective: Kill Maero.
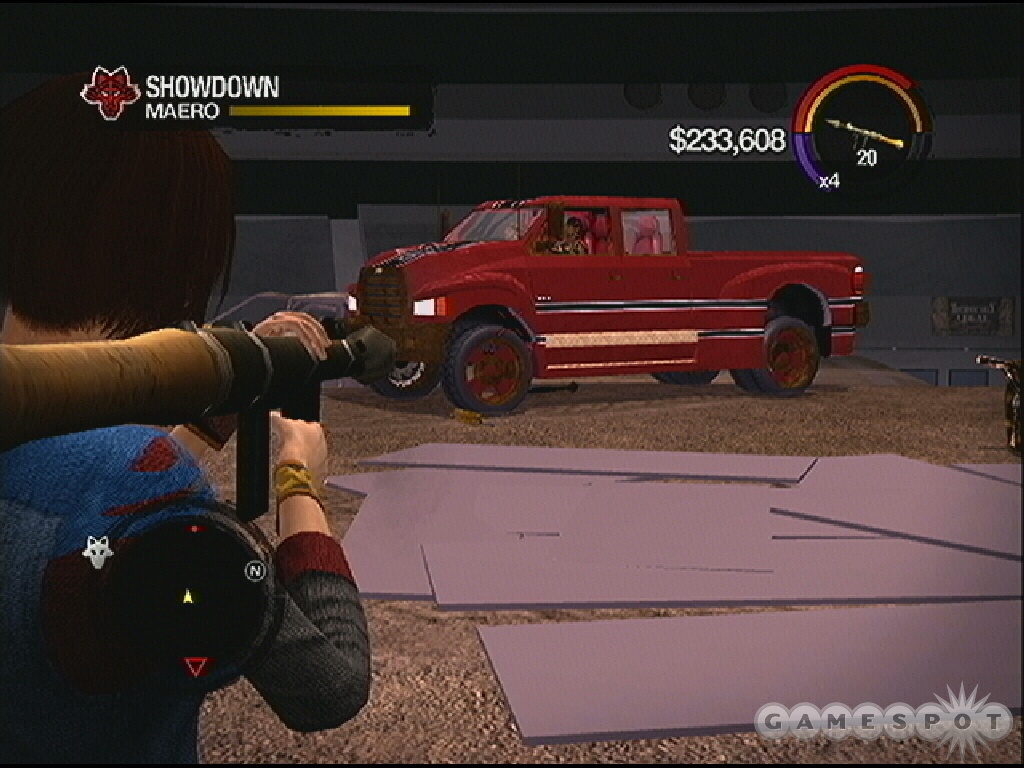
Jump over the barricade ahead of you and locate a couple RPGs. You’ll need the ammo to shoot the various Brotherhood vehicles attempting to run you over. Note that you don’t have to use the rocket launchers; you can use short-range bombardment from shotguns as well. Be careful when destroying the enemy vehicles; don’t shoot something too close or you’ll suffer damage and fire from the explosions.
Continue to bob and wave and eliminate the various Brotherhood vehicles. Eat food items to replenish your health and take cover as much as possible to give time for your health to regenerate. You’ll soon spot Maero in his huge monster truck. It’s intimidating but it’s very maneuverable. Take advantage of its slow turn rate and circle strafe around it while using your shotgun at close-range. Keep your targeting reticule pinned on the monster truck and circle around Maero’s truck while continuing to inflict damage. Destroy Maero’s truck to complete the mission.
Saint’s Seven (Ronin)
Pierce is playing with dollhouses again--well, actually it’s his complicated plan to take down the Ronin at Poseidon’s Palace, a casino over in the Marina district. Gat decides to change the plan: let’s just shoot stuff!
Objective: Head to the casino.
Grab a vehicle and drive along the marked route to Poseidon’s Palace in the Hotels and Marina district. Park your vehicle at the marker to trigger the next objective.
Objective: Take out the Ronin.
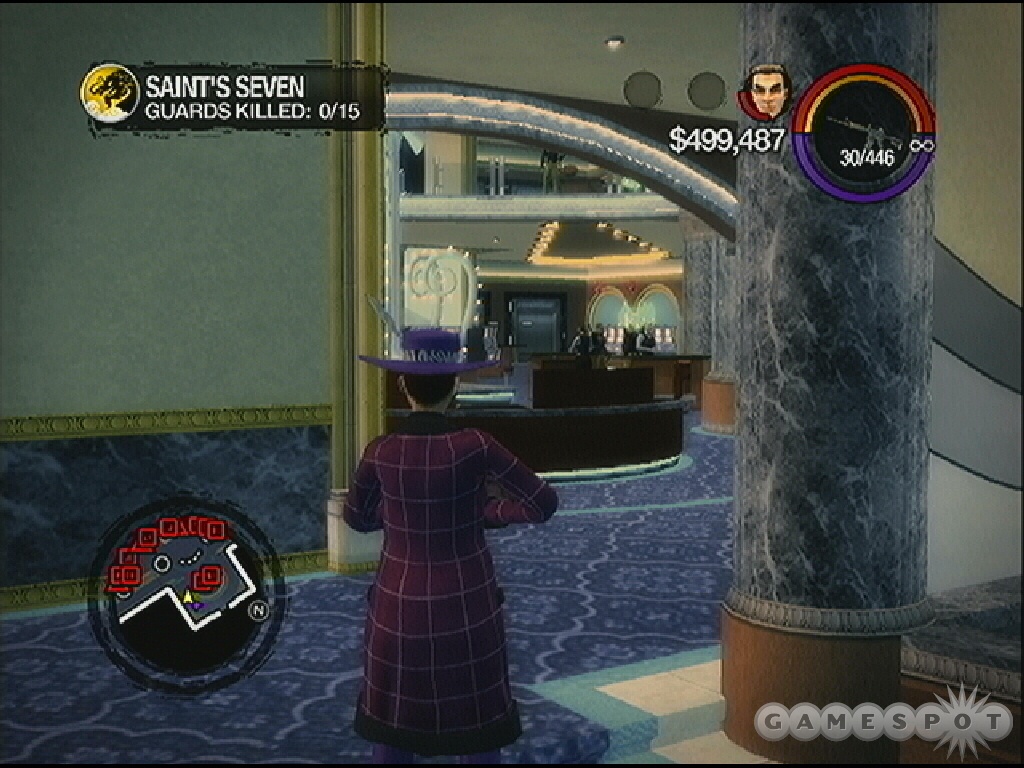
Gat’s plan was simple enough: barge through the front door and start shooting! There are 15 marked Ronin guards in all; get inside Poseidon’s Palace and start shooting. The casino games provide some cover. Equip your favorite weapon and target the Ronin. There are many downstairs among the games but you’ll find other marked guards on the upper floor.
Objective: Guard Gat while he rigs the doors with explosives.
Once you have eliminated all 15 marked Ronin guards, the next objective appears. Gat moves to rig the casino doors with explosives. Watch the mini-map to determine his location and stand close. More Ronin appear and they move toward Gat’s location. Gat will move from door to door as he sets the explosives; move along with him and protect him from the attacking Ronin. Repel their attack and wait for Gat to finish.
Objective: Keep away from the bombs.
Run away from the rigged doors and toward the casino’s front door.
Objective: Get the loot back to Aisha’s house.
The getaway truck isn’t the easiest thing to maneuver--it’s big and bulky but filled with cash! Expect both the police and Ronin to pursue the truck. Follow the marked route to Aisha’s house. Don’t worry about repelling the police and Ronin attack. Concentrate on effective driving. Don’t slam into a pole; getting the truck up to top speed takes time. Reach the marked location at Aisha’s house to finish the mission.
Laundry Day (Ronin)
The fallout from the casino heist continues--although Pierce doesn’t appreciate being known as the "unknown accomplice". Time to clean the dirty money.
Objective: Head to the used car salesman and buy an expensive car.
Grab a vehicle and drive along the marked path into the trailer park. You’ll find the used car salesman here next to his "expensive" car. Exit your vehicle and approach the salesman to automatically speak with him.
Objective: Take the car you bought. Head to the arms dealer and buy an expensive gun.
Get into your new acquisition and start driving toward the marked location, an arms dealer with an expensive gun. Along the way you receive a call--the Ronin are headed your way! Take note that you just received a two Ronin notoriety bump. Drive fast and efficient and avoid pursuers. Drive up to the arms dealer. If any Ronin arrive, eliminate them and then approach the arms dealer. After speaking with the arms dealer, you receive the AR-50 w/ grenade launcher.
Objective: Get back in the car. Go to the fence and re-sell the merchandise.
Return to your "expensive" vehicle and begin driving along the marked location toward the fence. Approach the fence to trigger the next task.
Objective: Protect the fence.
The fence takes control of the expensive car--you’re the passenger! Ronin are all over the place so expect a lot of pursuit. The good news is that you still have the AR-50 with grenade launcher and it has unlimited ammunition. That means unlimited grenades as well! So watch the mini-map to note the location of incoming Ronin pursuers and blast them with grenades as they get close to your vehicle.
When the fence says "Is the whole town trying to kill you?" then you’re about to approach a Ronin roadblock. Aim the grenade launcher forward and get ready to fire at the roadblock ahead. Launch the grenade high and long so you don’t place it right in front of your vehicle. Continue to blast pursuing cars. Don’t let the Ronin ram your vehicle or get close with their weapons fire. Once the fence reaches the marked location, the mission ends.
Road Rage (Ronin)
Gat brings home a Ronin hostage. Unfortunately he’s not very open with information--which results in Gat adding new color to Aisha’s carpet. Looks like you’re going to go after the Ronin while Gat cleans up.
Objective: Stop the Ronin before they get to the Saints hideout.
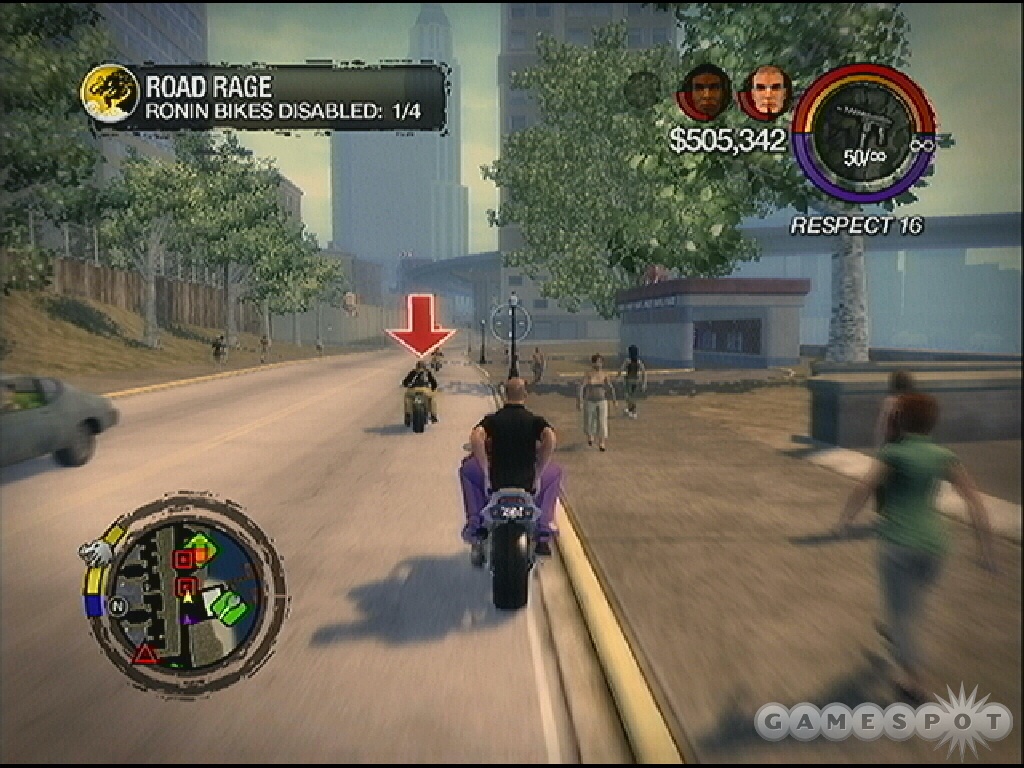
Ronin on their motorcycles are headed to the Saints hideout. Grab your own motorcycle and begin pursuit. You have unlimited sub machine gun ammunition to assist your effort. There are four Ronin bikes to start the mission. The task is simple: just shoot the rider or the bike and make it explode. The Ronin must be stopped to complete the mission.
After you eliminate a handful of Ronin bikes, three more join the chase. Eliminate all of the Ronin motorcycles to complete the mission.
Bleeding Out (Ronin)
Ronin have taken Aisha hostage! You and Gat are about to walk into the belly of the beast. Gat notices the back door open--something isn’t right. Aisha tries to issue a warning before she’s silenced, permanently. A huge firefight (and sword fight) ensues where Gat is critically injured.
Objective: Protect Gat until the ambulance arrives.
Gat lays wounded out front while more Ronin approach and attack. Equip your favorite weapon and start shooting the incoming Ronin. Keep them away from Gat’s body. You soon realize that an ambulance isn’t coming. Time for the Saints to help!
Objective: Kill the Ronin before help arrives
Continue to shoot the surrounding Ronin while you wait for the Saints’ vehicle to arrive. Once it arrives, get inside.
Objective: Protect the car with the rocket launcher until you get to the hospital.
The Saints’ homie drives the car while Gat rests in the back. You take the passenger seat armed with a rocket launcher! You have unlimited rocket launcher ammunition so don’t hesitate to fire early and often. Don’t hesitate to shoot everything! It’s a long ride to the hospital. Blast apart every pursuing car with your rocket launcher.
Orange Threat Level (Ronin)
Pierce hands over the passenger list--and the Ronin have every first class ticket purchased. Sounds like an interception is an order.
Objective: Drive to the airport before the Ronin arrive.
You have two minutes to reach the airport. Grab a vehicle and drive along the marked route to reach the airport. The marker is out front; once you reach the marked location, the timer disappears.
Objective: Use the back entrance to bypass security.
Follow the designated route and the markers to reach the back entrance of the airport. Reaching the last marker triggers the next objective.
Objective: Akuji’s plane arrived, head to the gate.

Sprint toward the marked gate. The next objective appears once you reach the marker.
Objective: Kill the Ronin Lieutenants.
There are four Ronin Lieutenants. Equip your preferred weapon and shoot the four marked Ronin Lieutenants.
Objective: Head to the second gate.
Proceed to the marked second gate. Eliminate any Ronin that attempt to block your path.
Objective: Chase down and kill the Ronin.
The final objective requires a unique ride--an airport cart! The Ronin drive off in a cart while you pursue in another. Catch up as quickly as possible. Like other chase objectives, if the Ronin’s cart gets too far ahead, a counter appears where you have just 30 seconds to get close or the Ronin escape. As you get close, equip a weapon and start shooting at the cart and its tires. Destroy the cart and eliminate the Ronin to finish the mission.
Kanto Connection (Ronin)
Pierce wants to step up in Gat’s absence--is he ready? An anonymous phone tip gives you the chance for revenge.
Objective: Head to Kanto.
Snag a vehicle and proceed along the marked route to Kanto.
Objective: Enter Kanto and find Jyunichi.
Go to the marker in front of Kanto. When you get inside you discover that Jyunichi is waiting for you with his gang of Ronin.
No guns for this fight! It’s a sword fight. You’ll use the left trigger to counter and the right trigger to attack. The goal is to kill Jyunichi but you will likely have to deal with the other Ronin as well. Note that once you eliminate the first batch of Jyunichi’s henchmen, another set of reinforcements arrives.
The Ronin are much easier to defeat than Jyunichi. Against the regular Ronin you can basically hack and slash your way to victory. But against Jyunichi you must use counters to avoid his attack; once he’s on the ground, use the right trigger to attack. Counter just as Jyunichi is about to attack. If you attempt to hack and slash him, he will counter every time and toss you to the ground inflicting decent damage. You can use food items to replenish health but don’t expect regeneration.
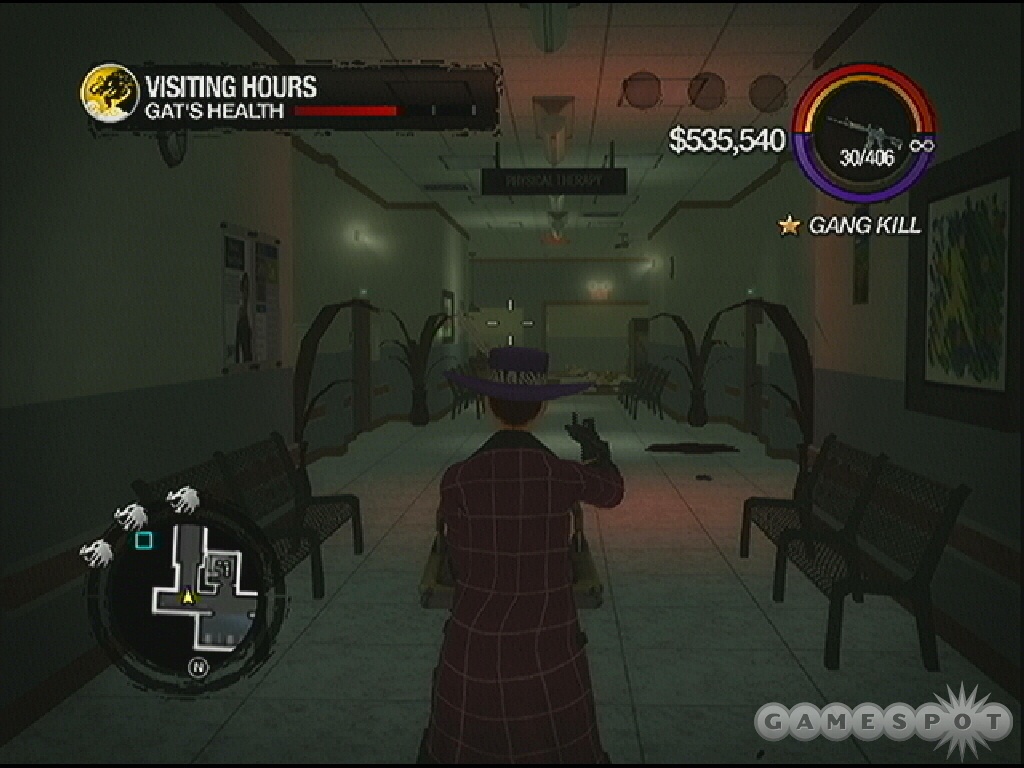
Visiting Hours (Ronin)
You visit Gat in the hospital with the good news: Jyunichi has been sliced to pieces. But during your visit, some Ronin thugs enter the hospital. Let’s get Gat out of here.
Objective: Go to the head of Gat’s bed. Get Gat out of the hospital.
Quickly move to the head of Gat’s bed and follow the onscreen instructions. You’re now pushing the gurney with weapon in hand. You can also use the sprint button to push faster. Gat’s health is constantly decreasing so you can’t lag around. Move quickly and shoot the Ronin that block your path. Follow the route to the marker and reach the floor’s exit. When you appear on the next floor, you’ve automatically administered some medicine to heal Gat--although his health is now decreasing again.
Objective: Head to the front door.
Proceed to the marked front door while shooting Ronin along the way. Release the gurney and open the hospital’s front door. Return to the gurney and push it outside.
Objective: Get in the ambulance.
The hospital’s exterior is cluttered with Ronin defenders. Not long after you spot the ambulance, some Ronin armed with a RPG launcher decides to destroy it. Looks like you’ll have to find a new escape route. Gat recommends escape via helicopter. Remember that Gat’s health is still decreasing so you must move quickly.
Objective: Head back to the elevator.
Return inside the hospital and proceed to the marked elevator. Use the action button to use the elevator. Follow the marker to the medical helicopter. Get inside.
Objective: Get back to the Saints hideout.
Fly the helicopter back to the Saints hideout. Land on the marker to complete the mission.
Room Service (Ronin)
Ultor has severed their ties with the Ronin--and Dane Vogel visits the Saints with information to deal.
Objective: Head to the Ronin hotel.
Grab a vehicle and drive along the marked route to the Ronin hotel.
Objective: Kill the Ronin on the ground floor.
Equip your favorite weapon--the assault rifle works well--and blast the Ronin occupying the hotel’s ground floor. Clear all Ronin to trigger the next objective.
Objective: Get to the elevator.
Proceed to the marked elevator and head upward.
Objective: Place the bombs one floor at a time. Move to the next floor.
Now you must move up one floor at a time and place two bombs on each floor until you reach the top, on which you’ll place one bomb--for a total of seven bombs. A timer starts once you have placed the first bomb: you’ll have four minutes to place the remainder of the bombs, eliminate some Lieutenants, and escape the hotel. Obviously it’s not just about placing bombs. Expect to face moderate Ronin resistance on each floor.
You don’t have to eliminate every single Ronin on each floor but note that you are vulnerable when placing bombs. Some of the Ronin wield rocket launchers, which can inflict big damage if you’re stuck placing a bomb. Attempt to clear a floor as much as possible while planting the bombs. Continue up each floor. When you reach the last staircase up to the final bomb placement, expect heavy Ronin resistance. Wait outside the stairwell and eliminate the Ronin that approach from the stairwell.
Objective: Head to the suite and kill the Ronin Lieutenants.
Locate the entrance on the same floor as the last bomb placement. Open the door and eliminate the Ronin Lieutenants inside. There are a few rooms to clear so search the entire suite to finish off all the Ronin enemies.
Objective: Climb the rail and base jump into the atrium.
Exit the suite and climb onto the railing overlooking the vast chasm down to the atrium. Leap off of the railing and, when prompted, press the action button to activate your parachute.
Rest in Peace (Ronin)
Aisha’s funeral isn’t a peaceful ceremony--the Ronin crash it. Now would be a great chance to enact some revenge, Saints-style, on Shogo.
Objective: Kill Shogo.
There is tons of gunfire to begin the mission. Scamper to find cover, such as behind a crypt, and use your favorite weapon to repel the Ronin attack. Seek out Shogo--he’s marked by an arrow--and shoot him. Shogo flees automatically after he’s suffered a significant portion of damage.
Objective: Kill the Ronin Lieutenants.
Forget Shogo for now--he’s gone--and concentrate your fire on the newest objective, seventeen Ronin Lieutenants! And because of the high Ronin notoriety, expect more reinforcements to arrive via vehicle. You can’t stand out in the open and withstand the aggressive attack; look to move behind cover and take hit and run shots against the Ronin and the marked Lieutenants. Follow the mini-map to the marked Lieutenants and eliminate all to complete the objective.
Objective: Find Shogo in the house.
Quickly approach the marked house.
Objective: Kill Shogo.
Shogo takes off on his Ronin motorcycle. You can follow on your own bike or grab a nearby car. The task is simple: chase Shogo down and shoot him. If you’re ready as soon as you gain control of your character, you can get off a significant amount of shots and inflict big damage before Shogo gets too far away. Don’t let him get too far ahead or he’ll escape (the 30 second timer appears and you have to get back close or he’ll get away). Shoot Shogo off his bike and eliminate him to complete the mission.
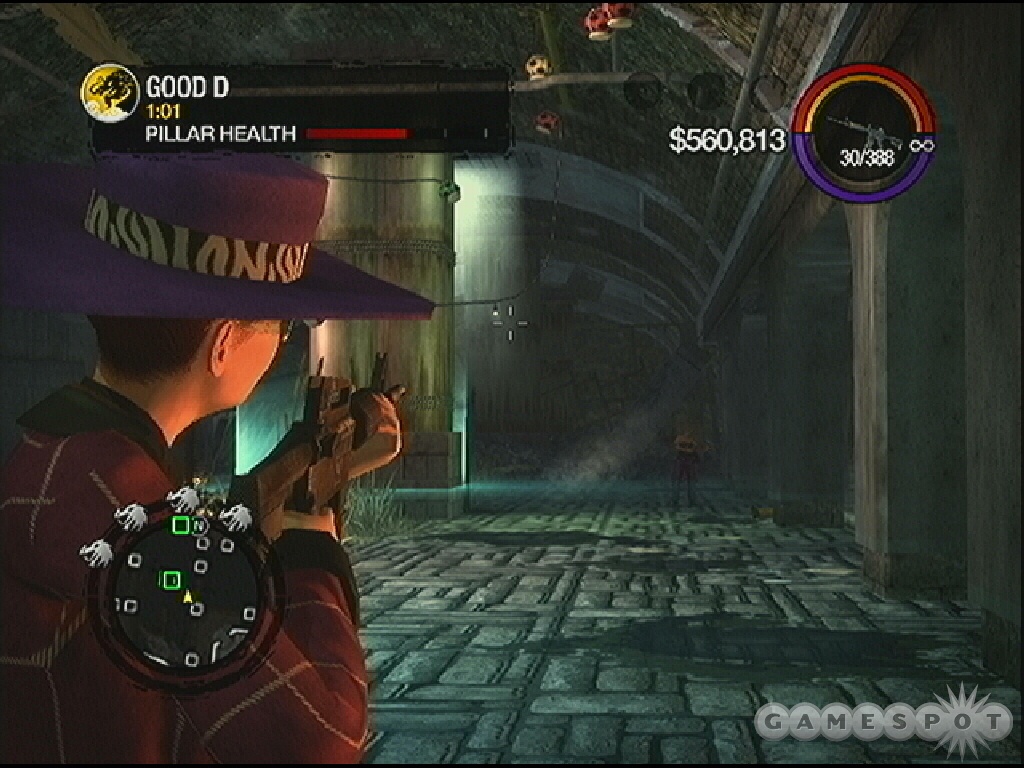
Good D (Ronin)
Mr. Wong pays the Saints a visit. He thanks you for your recent efforts against the Ronin--Wong is still bitter over his dog. Unfortunately the Ronin have followed Wong to the Saints’ hideout.
Objective: Find out what the Ronin are doing underground.
Sprint forward to the double doors and open them.
Objective: Stop the Ronin from blowing up the ceiling supports.
There are a couple pillars in this underground area; the pillar health bar appears in the upper left corner of the screen. Defend the area by remaining on the move. Scamper around the underground area to seek out incoming Ronin. Several of the Ronin attackers carry explosives and RPG launchers so be prepared to repel their attack as soon as possible.
Objective: The pillars are safe. Look for other Ronin demolition teams.
Remain in the underground area. Leap through the window and proceed through the area to find another set of ceiling supports under assault by the Ronin demolition teams.
Objective: Stop the Ronin from blowing up the ceiling supports.
There are four pillars in this much larger area. Maneuver around the room to intercept the Ronin attackers. Watch the stairs in the back section for most of the Ronin reinforcements. Obviously you should target rocket launcher Ronin immediately. If you hear explosives, ignore Ronin with guns and go for the more damaging threats.
Objective: Kill Kazuo Akuji.
Tons of Ronin clutter the area and Kazuo Akuji is among them. Look for his marked location and take aim. Eliminate the supporting Ronin as necessary but target the primary objective Kazuo Akuji and shoot him with your favorite weapon. Pump him full of bullets until the mission ends.
One Man’s Junk… (Ronin)
Gat’s protecting Mr. Wong when the Ronin attack. While Gat single-handedly massacres a bunch of approaching Ronin, Akuji locates Wong. You need to help!
Objective: Get to the dock before the Ronin destroy the Heritage Festival.
You have four minutes on the timer in the upper left corner. You also just received a four-level notoriety on the Ronin so the trip won’t be an easy one. Grab a vehicle and follow the marked route to the dock.
Objective: Get on the watercraft.
Time to switch vehicles! Exit your car and get onto the jet ski.
Obj: Get to the Heritage Festival before the Ronin destroy it.
Proceed along the marked route toward the Heritage Festival. There’s an enemy helicopter along for the ride--and it’s dropping bombs in front of your jet ski. Swerve from side to side to avoid the bombs. It’s not necessary to shoot down the helicopter--just avoid the bombs. Move left and right away from the explosions.
Objective: Kill the Ronin.
Twenty marked Ronin block the route to the Heritage Festival. That’s a lot of targets! Equip your most powerful weapon and work carefully throughout the docks to eliminate all of the marked Ronin.
Objective: Get on the junk boats and save Wong.
Wong’s health meter appears in the upper left corner of the screen. Get onto the first boat and proceed up to the second floor. Avoid moving through the flames so you don’t suffer unnecessary damage. Shoot the Ronin inside. Return outside and cross the bridge to the next boat.
On the second boat, go downstairs. Don’t walk down the stairs--there are flames here--but jump off the ledge to the lower floor. Go through the boat and onto the bridge to the next boat. Eliminate the Ronin as you move through. Cross to the next boat and go up the stairs to the marked location.
Objective: Kill Kazuo Akuji
It’s another sword fight! This works just like the earlier battle. You need to wait for Kazuo to attack and then counter with the left trigger. Once Kazuo is on the ground, attack wildly with the right trigger. Avoid hack and slash or Kazuo will counter with a throw. Watch for Kazuo to attack--watch his slow movement. Counter with the left trigger at the right time, just before he strikes. Once he’s on the ground, slash and attack.
Picking a Fight (Ultor Corp.)
Ultor’s Dane Vogel has a plan for Stilwater and, naturally, it doesn’t involve the Saints. Ultor security forces ambush your casual night at the bar.
Objective: Fight your way to an exit.
Blast the Ultor security forces and work your way down the stairs to the lower level. You’ll find the marked exit door on this floor. No need to rush things: take your time against the Ultor and gather up their discarded ammunition to keep your weapons fully stocked.
Objective: Go rescue Pierce and Shaundi.
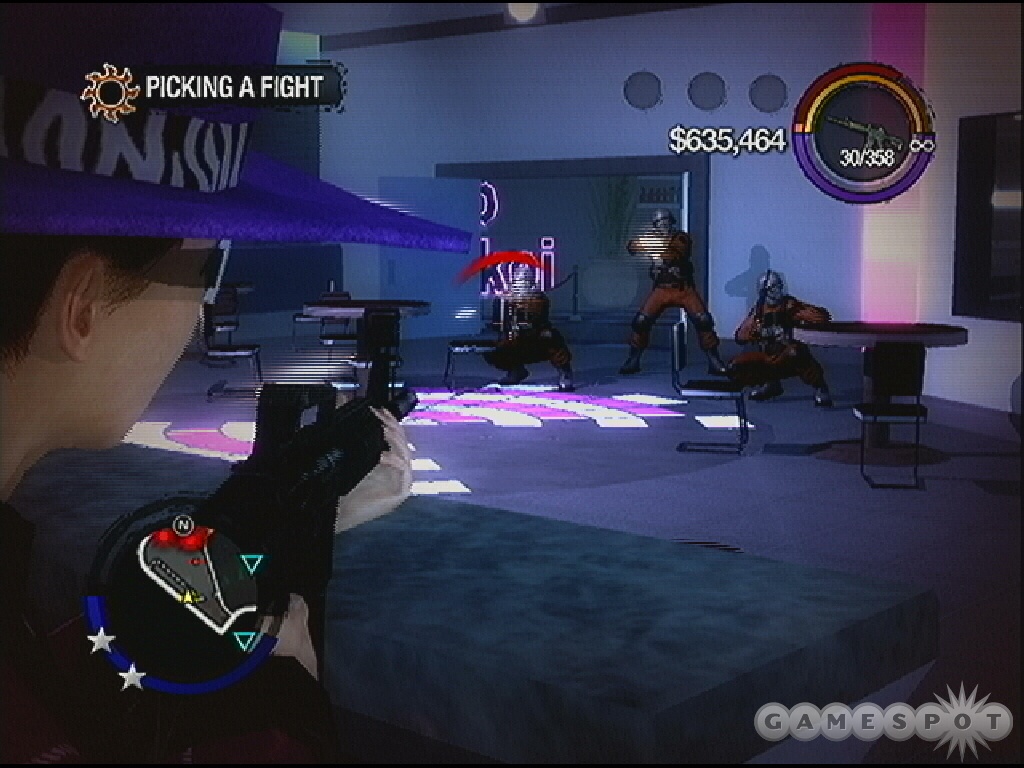
More Ultor security teams outside. Plus you certainly have a four star notoriety with the police too so expect them to crash the party as well. Your cell phone rings as you exit the bar; pick it up and listen to Gat inform you that Pierce and Shaundi may be under attack as well.
There are plenty of vehicles outside to choose from but why not go for the big boy: grab the Ultor "Bear" and take it for a spin. Don’t forget to use the mounted machine gun to blast away pursuing police. Follow the marked route toward the nearest Saints Lieutenant. Expect to face heavy resistance on the way in the form of SWAT and Ultor Bear roadblocks. Shoot or drive your way through.
Objective: Kill the Ultor assassins before Pierce dies.
The area features a horde of marked Ultor assassins. Eliminate all of the marked Ultor to free Pierce from danger. Take cover behind the Ultor Bear APCs if necessary as you clear out all of the assassins.
Objective: Now save Shaundi.
Grab an Ultor Bear--or better yet, an Ultor squad car because you’ll need something fast for later--and wait for Pierce to get inside. Drive along the marked route to Shaundi’s location. It’s a long way so expect more heavy resistance. The Stilwater police will continue their pressure pursuit and attempt to ram the Bear off of the road. Repel the police with the mounted machine gun. Shoot or ram your way through the plentiful Ultor roadblocks.
Objective: Disable but don’t destroy the Ultor van before they kill Shaundi.
If you took that Ultor squad car, you’ll need its speed. An Ultor Bear is okay too but the van isn’t slow but it’s not a sports car either. You need to shoot the van and deplete its health bar (upper left corner) to disable it. The van is headed for the beach; if it gets to its destination, the mission ends in failure. If you’re getting close to the destination, take shortcuts while the van weaves back and forth along the road toward the beach.
Pyramid Scheme (Ultor Corp.)
Ultor has built a massive research and development facility called the Pyramid. You have a plan: Pierce and Shaundi take out Ultor property while you and Gat check out the Pyramid.
Objective: Head to Saint’s Row.
Grab a vehicle and follow the marked route to the designated location in Saint’s Row.
Objective: Raise your Ultor notoriety to four stars.
Your Ultor notoriety is basically your police notoriety and the best way to elevate that to four stars is to attack civilians and, once you’ve angered the cops, start attacking the cops. Run over and attack civilians until you gain a star or two. Once you have the cops’ attention, wait for them to arrive and shoot them. By the time you get to three stars of police notoriety, tons of Ultor security vehicles will arrive--now you have plenty of targets!
Objective: Eliminate your notoriety at a Forgive and Forget.
Now you have to dodge all of that chaos you just created. Take a vehicle to the marked Forgive and Forget. Drive through roadblocks and away from pursuing cars as quickly as possible. Move inside the Forgive and Forget to remove your notoriety and complete the objective.
Objective: Enter the base while the Ultor are distracted.
With your notoriety gone, take your vehicle along the marked route and to the designated location.
Objective: Use the secret entrance and meet Gat in the base.
Get out of your vehicle and hop over fence. Leap into the water. Swim to the marker. Look to the right and get onto the ledge. Proceed into the sewer tunnels. Follow the tunnels down to the marked location near Gat.
Objective: Find the keycard for the lab doors.
Go through the underground area. You can just move past all the workers, although any security encountered will be alerted to your presence (note your increased notoriety). You can repel the fire from security officers or just keep sprinting through the base. Follow the hallways down to a recreation room and find the keycard on the table.
Objective: Plant bombs in each of the labs upstairs.
The labs are marked on the mini-map. Go up stairs until you’re on the same floor as the labs. Visit each lab and stand on the marker; use the action button to plant a bomb. The timer doesn’t start until all three bombs have been planted. Note that your notoriety is increased; expect more harassment from the security officers.
Objective: Exit the base before the bombs detonate.
You have about one minute and 45 seconds to get of the base. The marked exit is on the same floor. Run down the exit tunnel where a cut scene interrupts the action. When you regain control, run straight across and then left. Shoot the security team then get into the Ultor Bear. Get up to full speed and drive through the exit wall and out to freedom.
Salting the Earth…Again (Ultor Corp.)
You receive an anonymous tip on the location of some Ultor executives. Likely a trap but you’re going anyway!
Objective: Grab a watercraft and get to the yacht.
Grab a car and drive it to the marked location on the mini-map to find a jet ski.
Objective: Get to the yacht. Ultor is onto you; they’ve sent an attack helicopter.
Drive the jet ski to the marked location, it’s the Ultor yacht holding a party for the Ultor executives.
Objective: Kill the Ultor execs.
Drive up to the back of the yacht and get off of the jet ski and onto the Ultor boat. It’s a big yacht with multiple floors. Move through the yacht’s interior--attack the Ultor security personnel first because they actually fire back. Eliminate the room’s Ultor executives once the threats have been neutralized. Proceed up stairs to the top and search each floor to find the marked executives. You must eliminate each one to trigger the next objective.
Objective: Get to the speedboat and chase down the last exec.
Follow the map to the marked speedboat and get inside. By now you’re raised quite the ruckus, expect police boats to join the chase. Chase the marked Ultor boat. Shoot the Ultor boat until it’s destroyed.
…And a Better Life (Ultor Corp.)
The Saints are going to take down Ultor Corp. chairman Dane Vogel. Gat’s in position when security ambushes him; a shot goes off and Dane Vogel escapes.
Objective: Disable Vogel’s Limo before he gets away.
Grab an Ultor squad car. Vogel’s limo pulls onto the road just ahead. It’s not particularly fast so keeping up with it isn’t a problem--the problem is the number of Ultor security forces ramming your car off of the road. Stick as close to the limo as possible and fire your weapon until you deplete the health bar completely. Once the health bar reaches zero, Vogel’s limo turns around and heads back to the Phillips building.
Follow Vogel’s limo toward the Phillips building. Once there you receive a phone call from Gat with a suggestion: grab a helicopter to take out the security. Sprint to the marked location to find the chopper. Expect plenty of Ultor defenders scattered around. Eliminate the threats as you move but focus on getting to and into the helicopter.
Objective: The building is in lockdown; destroy the security stations.
There are four security stations in all. They are positioned along the outside of the Phillips building; each security station is higher than the last. Elevate the helicopter to reach the closest security station. Once the mini-map reveals that you are on the same level as the security station, circle around the Phillips building until you find it. It’s small and tough to see; look for the flashing red arrow marking its location. Shoot it with a missile.
There are other problems too: Ultor attack helicopters. There’s one flying around as you begin your attack on the security stations. Ignore the stations and target the helicopter. Put your targeting reticule on the Ultor attack helicopter and wait for a missile lock. Fire with a missile lock to destroy the helicopter. Additional Ultor attack helicopters will appear over the course of the task; watch for a notification that another chopper is on the way.
Objective: Get to the top of the building.
With all four security stations destroyed, ascend to the top of the Phillips building and fly close to trigger a cut scene.
Objective: Kill Vogel.
Proceed toward the marked target--it’s Vogel. Eliminate the Ultor security forces inside before going after Vogel. Equip your favorite weapon and shoot the Ultor troops. When you face Vogel, take out the RPG launcher for fun and blast him with a single shot.
Chapter 2 - Stronghold Missions
This section provides walkthroughs for the Saints Row 2 stronghold missions. These are missions apart from the main story but will appear on the map during the course of the story. For instance, as you are working through the Sons of Samedi story missions, the Sons of Samedi stronghold missions also appear on the map. Completing the stronghold missions provide added Saints territory (which could prove useful during the course of other missions) and additional money per day.
Stilwater Caverns (3rd Street Saints)
Objective: Go to the homeless area and destroy the shanties.
Follow the marked route toward the designated location. Eliminate any bums that attempt to slow you down.
Objective: Destroy the shanties.
This is simple this time because you can actually shoot the shanties--you don’t have to grab bums and toss them into the shanties to destroy them. Shoot the bums that retaliate. Shoot the shanties and destroy every single one to complete the stronghold task.
Elysian Fields Trailer Park (Sons of Samedi)
For years, the Sons of Samedi have been using the trailer park for their product. If you can find out which trailers, you can make their product go boom! Another blow to the competition!
Objective: Find a map of the trailer park.
Advance toward the Laundromat; you’ll discover that Samedi gang members surround the location. Hang around for a bit and see if any nearby policemen start a fight--use the added firepower to your advantage. Eliminate all of the Samedi outside while using the buildings as cover. Retreat if injured and wait for your health to regenerate or gobble a food item. Continue toward the Laundromat.
Kill the gang members inside (the windows are likely broken by this point). Open the door and finish off any remaining targets. Enter the next door inside the building. Shoot all of the gang members inside the game room area. Bust through the next couple doors and clear out the back storage room. Grab explosives off the table then read the map on the marked location.
Objective: Use explosives to blow up the trailers with dust labs in them.
Return outside and move toward the marked trailers--there are five total. You grabbed explosives off the table; these are satchel charges, which you will use to blow apart the trailers. Obviously Samedi gang members clutter the trailer park; expect it to get more cluttered over time because your notoriety will increase as you continue to eliminate trailers and gang members.
Eliminate any hostiles that fire upon you as you work toward each trailer. Equip a satchel charge, stick it on a trailer, then retreat. Blow it up from a safe distance. If you’re lucky, the explosion will take out several gang members or even gang vehicles for added respect bonuses. Continue to each one in turn retreating as necessary. The firefight can get intense so don’t hesitate to back away and look for a safe spot to regroup or regenerate.
Bavogian Plaza Drug Labs (Sons of Samedi)
The Samedi have converted the second floor of a sex shop to a drug lab. Take out the clientele and the dust labs--they’re too busy to see you coming!
Objective: Find the back room and kill the crackheads.
Enter the porno shop. Even with guns armed you won’t attract attention quite yet--at least until you attempt to open the door into the back room. You can get a head start and begin shooting the Samedi gang members or wait until they are triggered by you opening the back door.
Search each of the private booths for a crackhead. Eliminate each on sight. If you miss, one might attempt to flee. Chase him down and terminate. Watch out for any gang members attempting to stop your mission. Search both sides of the room and all booths. Go back into the bar area and find any remaining crackheads before receiving the next objective.
Objective: Head upstairs and destroy the drug equipment.
Find the marked staircase on the far side of the private booths. Ascend the stairs to find the marked entrance. Search all of the rooms on this upper floor to find Samedi gang members as well as the drug equipment. Keep your distance from the drug equipment when shooting it--it will explode! Destroy all four pieces of equipment.
Objective: Head to the fire escape.
Find the marked fire escape on this upper floor. Open the door to trigger the next objective.
Objective: Head to the rooftop and kill the Samedi.
Terminate the Samedi waiting on the other side of the door.
Objective: Destroy the helicopter.
Continue up to the roof killing Samedi gang members along the way. With all of the ground forces out of the way, take aim at the helicopter. Use your favorite long-range weapon and target the helicopter. Destroy it to complete the mission.
Stilwater University Student Union (Sons of Samedi)
It’s Cultural Day at Stilwater University! The Samedi use the event for recruitment. Time to put a stop to that!
Objective: Kill the Samedi recruiters.
There are five Samedi recruiters total. Move forward from your start position and find the first recruiter. Expect to face other Samedi gang members hanging around. Terminate every hostile before moving onward. Discover another recruiter among the booths; the final three are found further in the courtyard beyond the current location.
Objective: Get to the student union.
Proceed to the marked location to receive the next objective. Expect to face Samedi resistance along the way.
Objective: Kill the remaining Samedi.
There are tons of marked Samedi and you must eliminate them all to complete the mission. Make sure you search upstairs in the Student Council to locate any remaining hidden Samedi.
Sunnyvale Gardens Fishing Dock (Sons of Samedi)
The fish at the Sunnyvale Gardens Fishing Dock are stuffed with Samedi Loa Dust. These shipments are being moved in the boats. Take out the fish in the freezers and then destroy the boats--more destruction of the competitions drug business.
Objective: Destroy the drug stashes.
There are Samedi gang members all over the fishing docks. Work patiently and eliminate all of the Samedi as you explore the exterior of the docks. Search the structures and find the doors that lead into the dock freezers. The fish inside contain the product. Shoot the hanging fish to destroy the Loa Dust.
Note that if you stand too close when you shoot the fish, the released Loa Dust will affect your senses. Continue through each freezer and destroy six sets of hanging fish. Watch for any additional Samedi gang members that attempt to stop you; there may also be Samedi defenders inside the freezers that try and protect the fish.
Objective: Destroy the Samedi boats.
If you haven’t approached the boats yet then you’ll face more Samedi resistance on this side of the docks. Note that there’s also one Samedi gang member wielding a rocket launcher. Take your time to eliminate all of the Samedi defenders. You can also explore the freighter adjacent to the docks and clear out the Samedi gang members there (a future objective involves the tanker so it doesn’t hurt to get a head start).
With the docks cleared, approach the boats and shoot them with explosives or a shotgun for quick destruction.
Objective: Plant a bomb on the fuel chute of the freighter.
Once you have destroyed all the Samedi boats, a new objective appears. Move onto the freighter. Doors that were previously locked are now open on the right side of the boat. Move inside these open doors and eliminate the Samedi defenders. Work your way down into the freighter. Advance to the marker and plant the bomb as prompted.
As soon as you set the bomb, sprint out of the ship. Return the docks and keep running away from the freighter. Grab any Samedi vehicle left behind and drive out of the blast radius. Once the freighter explodes, the mission ends successfully.
Sommerset Apartments (The Brotherhood)
The southern housing at the university is run by the Brotherhood. If you want to take control of the neighborhood, you’ll have to evict them.
Objective: Get to the apartments.
Approach one of the marked apartments. It doesn’t matter which order you choose; the task remains the same for each of the apartments and the strategy remains basically the same. Approach the apartment of your choice; expect Brotherhood resistance as you get close.
Objective: Kill the Lieutenants running this operation.
Ascend the staircase up the apartment complex and eliminate the Brotherhood defenders. Search the room and eliminate the marked Lieutenants inside to complete the objective.
Complete these tasks for each of the apartments. Move to the next marked apartment, ascend the stairs, and search the room to find the marked Lieutenants. Kill the Lieutenants to complete the objective. You will face increased Brotherhood resistance as you continue through the mission. You may want to drive between the marked apartments to work faster.
Objective: Destroy the mobile drug lab.
After you complete the three marked apartments, a new objective appears. There’s a mobile drug lab and it requires destruction! Grab a vehicle and drive it to the marked mobile drug lab. Run it off the road and blast it apart with your shotgun--or the weapon of your choice. Destroying the mobile drug lab completes the stronghold.
Imperial Square Pagodas (The Brotherhood)
Pierce suggests getting some protection rackets going. Let’s start in Chinatown!
Objective: Destroy the items in front of the stores to get the shop owners to come out.
There are four shop owners; note their marked locations on the mini-map. When approaching a shop, take out the Brotherhood defenders. Cause damage in front of the particular shop by shooting the tables and chairs. When you create enough havoc, the shop’s owner finally emerges.
Objective: Shake down the shop owner, but don’t kill them.
Don’t kill the shop owner! Don’t shoot him with a firearm. Instead, hit the shop owner with a melee weapon. Continue to do so until you complete the objective and trigger the next one.
Objective: You scared the shop owner, move on to the next store.
There are three more shop owners to intimidate. Move to each marked location, eliminate the Brotherhood defenders, create damage to the storefront, and then beat up the shop owner with a melee weapon. Complete all four to trigger the next objective.
Objective: Get to the Pagoda Hotel.
Proceed to the marked location. Expect to face heavy Brotherhood defenders around the hotel.
Objective: Beat up the hotel owner.
Open the door into the hotel. Be careful inside; there are tons of Brotherhood defenders scattered in the lobby and the hotel owner is among them. If you aren’t careful with your weapons fire, you may inadvertently kill the hotel owner, which fails the objective. Use a melee weapon against the hotel owner; beat him up but don’t kill him.
Poseidon Alley Docks (The Brotherhood)
Maero went from Donnie’s Garage to the docks to set up some sort of business deal. If you could hijack one of the trucks, you could join the convoy and then ambush the meeting.
Objective: Hijack the Brotherhood truck.
Proceed forward from your start position; note that it’s marked on the mini-map. Clear out the Brotherhood gang members from around the truck. Don’t destroy the truck! Get inside the truck once you have cleared out the defenders.
Objective: Wait for the Brotherhood vehicle.
Wait patiently for the Brotherhood vehicle to arrive.
Objective: Follow the Brotherhood vehicle to the meet spot.
Pull in behind the Brotherhood vehicle. Don’t let it get too far ahead or you will have 30 seconds to catch up or fail the mission. Stick close and follow the Brotherhood vehicle to the meet spot.
Objective: Kill the Brotherhood
Simple enough! Just pull out your favorite weapon and eliminate all of the Brotherhood at the meet spot. You’ll face a group outside the warehouse and another set of gang members inside the warehouse. There a few on the lower floor inside the warehouse but most, including the primary targets, are on the upper floor.
Wardill Airport Hangers (The Brotherhood)
Shaundi used to date a guy named Ritchie, a baggage handler. Apparently Ritchie overheard Maero in a hanger working a deal. Perhaps you can bust up their plans.
Objective: Get to the Brotherhood computer before they wire the money.
Head to the right and open the marked door ahead of you. Get into the hanger. Eliminate the Brotherhood forces on the ground floor. Use the ramp to go to the catwalks over the plane. Battle more Brotherhood troops as you work toward the marked computer. Follow marker to office and approach the computer. Follow the onscreen instructions to transfer the money.
Objective: Defend the computer while the money is transferred to your account.
You have about a minute before tons of Brotherhood gang members arrive to retake the computer. Stick close to the computer and shoot the Brotherhood gang members as they enter through the office window. Be aware that one of the Brotherhood members wields an RPG!
Objective: Head outside and break up the deal.
Exit the office and return to the bottom of the hanger. Return outside and eliminate any Brotherhood attackers blocking the path.
Objective: Destroy the Brotherhood trucks.
Move around to the right side and find the trucks on the opposite side of the hanger. Expect to face a handful of Brotherhood defenders, including additional defenders that arrive in more vehicles. Clear out all of the defenders before going after the trucks. Destroy the trucks with a shotgun or explosives.
Objective: Blow up the planes.
Next you must destroy four planes--but keep in mind that these are mobile! In fact, the first place is already preparing for take off. Ignore the planes closest to your position and instead sprint down the runway toward the furthest plane--or better yet, grab a vehicle and drive to the plane. It’s on the move and will take off if you don’t act quickly. Eliminate any Brotherhood defenders along the way.
Destroy the lead plane with a shotgun or explosives. The next plane is on the move by now. Return toward its location and blow it apart with a shotgun or explosives. Watch for additional Brotherhood defenders attempting to stop the carnage. Blast apart all four planes to complete the task.
Suburbs Strip Club (Ronin)
One of Pierce’s girls works at the Technically Legal club and claims that a member of the Ronin is getting a little touchy feely. Time to teach the thug a lesson.
Objective: Enter the strip club and kill the Ronin Lieutenants.
Enter the Technically Legal strip club and target the marked Ronin Lieutenants. Equip your favorite weapon and blast away. Search the ground floor, including the office, to find all of the Ronin Lieutenants.
Objective: Head upstairs and kill the remaining Ronin.
There are more Ronin in the club. Head upstairs and search all of the private rooms. The Ronin are marked on the mini-map; search each room that contains a Ronin and eliminate.
Objective: Go to the roof and kill the reinforcements.
A bunch of Ronin gang members surround the exterior of the strip club. Proceed up to the rooftop and target the marked Ronin in the parking lot. Watch out for the Ronin wielding rocket launchers. Back off if you’re under heavy attack--there’s a lot of firepower pointed in your direction. Note that there are thirteen reinforcements in all.
Humbolt Park Science Museum (Ronin)
The center of the Stilwater Science Center is a server running an adult website ring. Take it out and put a blow to the Ronin’s business ventures.
Objective: Get to the server room.
The science museum is cluttered with Ronin gang members. Eliminate the Ronin as you move up the staircases toward the server room. There’s no hurry--just eliminate the Ronin as you push forward toward the server room.
Objective: Destroy the servers.
The server room is tightly packed. If you just charge inside you could find yourself in a little trouble--there’s a lot of firepower pointed in your direction, which could cause your health bar to deplete very quickly. Be prepared to retreat if necessary so you can eat food or wait for your health to regenerate. Destroy the marked servers to complete the objective.
Objective: Head to the doors. Kill the reinforcements.
Proceed to the marked location, which triggers the reinforcements. The marked reinforcement is a helicopter. You’ll face other Ronin troops as well but the mission ends once you have destroyed the helicopter. When you’re in the long glass-enclosed hallway, shoot out the windows so you have a shot at the chopper. Destroy the helicopter with either the RPG launcher or a shotgun.
Amberbrook Museum Pier (Ronin)
Ronin are setting up shop for some sort of deal. Something big is going down. A sniper rifle should prove handy to see what’s going on…and to eliminate the Ronin.
Objective: Kill the first group of Ronin guards.
The area is cluttered with Ronin. No need to rush the mission. Eliminate each Ronin guard carefully with your favorite weapon. If you don’t have one already, one of the Ronin guards likely carries a sniper rifle.
Objectove: Kill the next group of guards.
Locate additional Ronin guards at the top of the ruins-like structure. Once again just work patiently through all of the targets--back off if necessary to replenish your health.
Objective: Destroy the boats.
A bunch of Ronin gang members occupy the pier. Descend toward the pier and eliminate the gang members before approaching the primary targets, the boats. You’ll find them at the bottom of the area, obviously in the water. The boats can’t withstand much damage--a couple shots and the boats blow apart.
New Hennequet Rec Center (Ronin)
The Ronin have an underground casino going in a recreation center. Time to break up that business!
Objective: Meet the Saint.
Go inside the area and approach the Saint.
Objective: Head to the back room. Find the underground casino.
Proceed to the marked location and follow it into the underground casino. Eliminate the Ronin guards.
Objective: Destroy the casino games.
You must inflict $100,000 in damage to the underground casino--this means destroying the slot machines. It takes quite a few so get ready to shoot a bunch of machines! Watch for the Ronin to storm into the casino when you begin the destruction of the games. Be prepared to repel your attack.
Objective: Destroy the games in the next room.
Proceed into the adjacent room and face off against more Ronin guards. There are more casino games in this section; you must once again inflict $100,000 in damage.
Objective: Continue to the counting room.
Proceed to the marked location to find the Ronin counting room.
Objective: Destroy the Ronin cash boxes.
There are twelve cash boxes in all. Go from room to room eliminating the Ronin defenders and destroy the marked cash boxes. Obviously you should target the Ronin defenders first, since the cash boxes can’t fire back! Destroy the cash boxes in a room and then move to the next until you have eliminated all twelve.
Objective: Take the elevator back to the first floor.
Go to the marked location to find the elevator.
Objective: Kill the reinforcements.
There are twelve reinforcements located inside the rec center. Move around the rec center and use the mini-map to locate all twelve reinforcements. Kill all of the marked targets to finish the mission.
Rounds Square Shopping Center (Ultor Corp.)
This Ultor Corp. stronghold is tough to locate; it appears on the mini-map but going to the spot doesn’t appear to reveal the mission location. That’s because it’s inside the mall. Go inside and use the elevator to enter the mall. Move around the corner and find the mission trigger.
Objective: Kill the Ultor execs while they shop.
Locate the four Ultor execs marked on the mini-map. They may be positioned on multiple floors of the mall so you may need to go upstairs or downstairs to locate each target. Note that you must deal with various security forces along the way; expect to battle the security guards as you approach each Ultor executive.
Objective: Kill the remaining Ultor execs in the conference room.
Proceed to the marked location to find the conference room and the Ultor executives inside. Shoot all of the marked executives to complete the task. Don’t neglect the security forces, which are actually firing back!
Objective: Escape the mall.
Time to get out of the mall. A cut scene reveals that Ultor APCs are blocking the exits. Ultor troops now clutter the mall and APCs block routes. Go through the main entrance. Shoot the Ultor troops and sprint around the APCs and complete the stronghold.
Chapter 3 - Activities
Saints Row 2 activities aren’t mandatory to complete the storyline; however, story missions require "respect" to activate and one of the best ways to accumulate respect is to complete activities. Nearly every activity has two locations in Stilwater; each location has six levels to complete. You unlock something after completing three levels and after completing six levels; and in some activities, you receive an additional unlock for completing both locations.
Note that the activities featured in this section are the ones required to complete for the Crime Lord achievement on the Xbox 360. Racing, Chop Shop, and Hitman are not considered activities and thus are not required to receive the Crime Lord achievement.
Mayhem
Objective: Cause widespread carnage to earn cash and respect.
Blowing stuff up--what could possibly be more entertaining? The objective in Mayhem is easy: meet the specified damage requirement in the upper left corner of the screen. When you damage items in succession, you build a combo meter. Increasing the combo means scoring more damage per item. As the combo meter increases you have less time to hit the next target before the combo meter resets. Obviously the key to Mayhem is maintaining a high combo so all of your destruction provides the most cash possible.
Target selection is vital. Going after people or cars isn’t particularly productive. There just isn’t that many people or cars to keep the combo meter high. Instead, you need to seek out areas with tons of targets. Take a shot at tables and chairs cluttered together or piles of garbage or a large group of people or cars. But then there’s the best target in all of Mayhem: fences!
It sounds pretty boring but fences, whether its white picket fences or wooden fences or iron fences--it doesn’t matter--provide the biggest bang for the buck. This is because there’s usually a long stretch of a wide target. You can continue to hit target after target, which builds the combo meter meaning your next strike provides even more cash. When you build that combo meter high, don’t hesitate and make sure your shots all ring true so you don’t lose it!
Obviously the rocket launcher is the weapon of choice. You don’t have to worry about ammo in Mayhem. The RPG may fire a bit slow but it’s fast enough to maintain a high combo meter, especially when you seek out the target of choice: fences! Don’t neglect it! Take the time to run around until you find an area with a bunch of fencing and it will pay off with an easy completion of this activity.
Red Light District: Give a reporter something worth covering…like blowing things to smithereens.
- Level 3 Unlock: Crib Customization Discount 5%
- Level 6 Unlock: Crib Customization Discount 15%
Nuclear Power Plant: A power plant worker wants you to cause damage so the city will stop worrying about the possible nuclear meltdown that might shutdown the plant.
- Level 3 Unlock: Flamethrower
- Level 6 Unlock: Annihilator RPG
Heli Assault
Objective: Complete objectives with the attack helicopter to earn cash and respect.
Sample objectives include destroying particular objects and enemies but mostly it’s about protection against enemy targets. Most of the missions will have Pierce or Shaundi driving from stop to stop while you blast away potential threats, such as Brotherhood and Ronin vehicles and helicopters. The missile will be your primary weapon; don’t expect to use the chain gun as often. Face targets to lock onto them with your missile; avoid placing any obstructions between you and the target.
Watch the mini-map so you know exactly where the enemy threat is located. You can also tell if it’s a car or a helicopter (note the arrow position denoting whether the target is below or above your position). The main issue is your helicopter’s health. Pierce or Shaundi’s van can withstand a lot of abuse (though it does become an issue on the level six missions). However your helicopter can’t! Make sure you aren’t ramming into buildings, towers, or other obstructions. You can actually damage your missile launcher, which basically means mission over unless you get really proficient with the chain gun.
Concentrate on flying and accurate targeting. Note that both Heli Assault’s also include a "Saints grab the skids" sequence. The van breaks down or runs out of gas and you must lower the chopper over the Saints so they can grab onto the helicopter’s skids. You can’t land but must hover over them. Clear out all enemies first then hover over the Saints. While flying to the marked destination, stay low so the Saints don’t fall off.
Barrio District: Pierce wants to move some product through the Barrio.
- Level 3 Unlock: 5% Reduced Bullet Damage
- Level 6 Unlock: 15% Reduced Bullet Damage
Trailer Park District: Ronin aren’t making things easy for Shaundi’s deliveries. Provide support in an attack helicopter!
- Level 3 Unlock: Weapon Store Discount 5%
- Level 6 Unlock: Weapon Store Discount 15%
Insurance Fraud
Objective: Throw yourself into harm’s way to earn cash and respect.
The basics are simple: use the trigger buttons to dive in front of oncoming traffic. The more you bounce around, the higher the medical bills. You will be told to drive to a particular district. Note that you do not have to participate in the same district. Just drive to the district to start the Insurance Fraud activity but then you can move to any location to conduct business.
This is extremely important because where it tells you to go isn’t always the best spot to get action. In fact, the best way to clear all levels of Insurance Fraud is to head straight for the freeway. There are tons of fast moving cars here. You will never have to worry about waiting for another vehicle to arrive--they’re always there!
There’s one more element to Insurance Fraud: the Adrenaline meter. Each time you score some fraud, the meter rises. Fill the meter completely and those bounces get even bigger allowing you to chain together "crazy amplified hits" and combinations. The key to racking up big fraud numbers is to get hit by multiple cars, multiple times. Bounce around on the same car or bounce back and forth between multiple cars and watch the dollar amounts rise exponentially.
While you’re in the air after a big hit, use the control stick to maneuver your limp body. Target additional cars; bounce on the top of cars or drop right in front of another moving car. Note that there are certain locations on the map that provide extra adrenaline. Unfortunately these are in relatively low-traffic areas. It’s much easier to just eschew those spots and go straight to the freeway. You have plenty of time to rack up fraud. Get to a highway by any means necessary and conduct business there. Many more cars means a lot more opportunity for big hits and combos.
Factories District: You have been offered a unique opportunity: insurance scam! Just throw yourself in front of some cars and let business take care of itself.
- Level 3 Unlock: Sprint Increase (you can now sprint for twice as long)
- Level 6 Unlock: Sprint Increase (you can now sprint forever)
Museum District: A female doctor is hoping to get ahead in her world but she’ll need to treat a lot of injuries in a short amount of time to appear incredibly proficient. That’s where you come in.
- Level 3 Unlock: Reduced Vehicle Damage 5%
- Level 6 Unlock: Reduced Vehicle Damage 15%
Snatch
Objective: Bring hos back safely from their abusive pimps to earn cash and respect.
Take a vehicle and go to the marked locations on the mini-map. Whistle for the girl to "join your party" and she’ll get into your car. Then return along the marked route back to the drop spot. Repeat until you’ve met the "girl quota" noted in the upper left corner of the screen. Sounds simple enough.
Well, the first problem is that gang members and pimps aren’t going to let you have the girl that easy. As soon as you whistle for the girl to come over, the enemies in the area are tipped off and attack. You may have to retaliate before driving off in order to ensure safety. Note that the Snatch activity becomes much, much easier when the Saints own the territory. If the Saints own the territory, then random Saints on the streets will fire at enemies for you; plus you can even get one to ride around in your car for additional support.
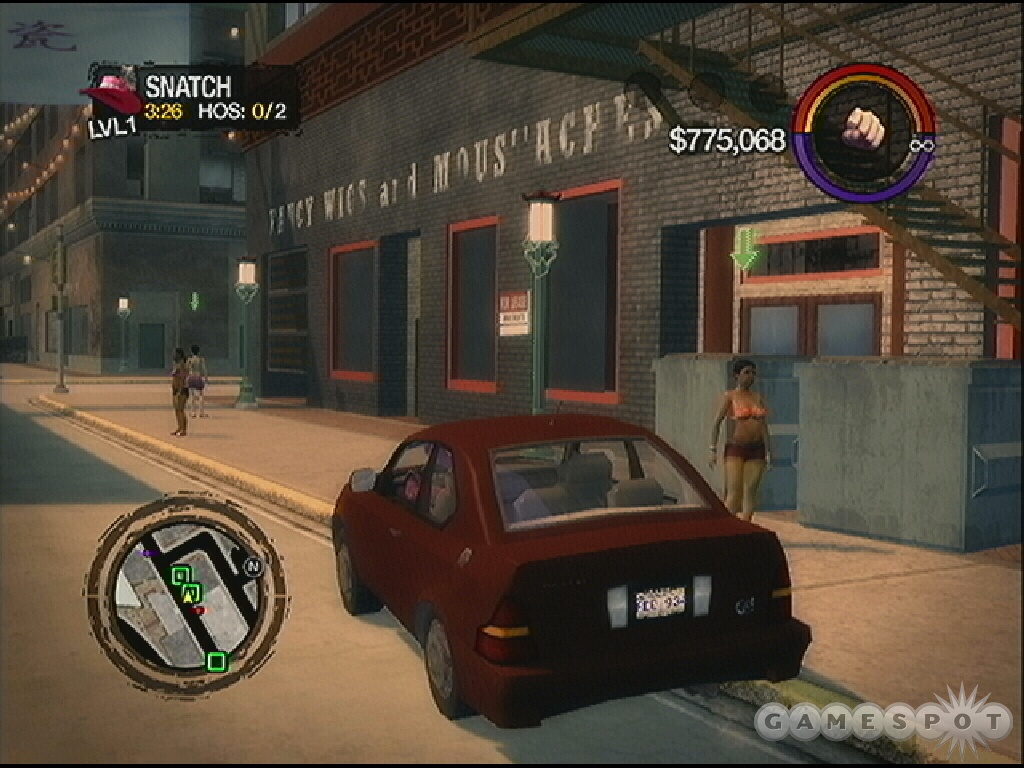
You can pick up from one to three girls at a time--if there’s space in your car then you can get another girl. This saves time from driving back and forth to the drop spot. Fill up your car before returning back. Also note that you can switch cars at any time. You may find your ride deteriorating under enemy weapons fire. Call for a vehicle delivery or jack another car and continue onward. You can even use a Forgive and Forget to help alleviate some of the heat.
It’s possible that a pimp may attempt to retake one of the girls you dropped off. This happens soon after you pull away. When it happens, turn around quickly and return to the drop spot. Shoot the car before it leaves; aim for the driver to force it to stop. If the pimp gets out, he may grab the girl and use her as a human shield. Be careful here! The mission fails if the girl dies.
Ignore the timer. There’s plenty of time to complete these Snatch activity missions. Instead, concentrate on keeping your vehicle in good shape and grabbing as many girls as you can for each trip. Get enough girls with each trip to cut down on the number of times you have to go back out.
Downtown District: Sounds like a lazy guy doesn’t want to go fetch his girls. You offer to help while he can continue his "sitting on a park bench" daily routine.
- Level 3 Unlock: Gal 43 sub-machine gun
- Level 6 Unlock: Unlimited SMG Ammo
Chinatown District: The massage parlor is closed! All the girls are gone! Looks like you’re going to be in charge of getting them back!
- Level 3 Unlock: Health Regeneration 2x
- Level 6 Unlock: Health Regeneration 3x
Fight Club
Objective: Complete in brutal fighting matches for cash and respect. Pick up and eat food to recover health.
The first rule about Fight Club isn’t don’t talk about Fight Club. It’s "kill all fighters and survive to win the match." Consider Fight Club an exercise in hit and run melee attacks. Get in some blows then back off before multiple fighters surround you, which is the fastest way to watch your health reduce to zero.
Perform melee combinations on fighters. Once you have reduced their health by over half, you can perform a finisher. Knock them to the ground then use the action button. Follow the onscreen control prompts (such as mashing one trigger, both triggers, or a specific button). If you hit the wrong button, the meter goes down quickly; hit the right button and it rises. When it reaches the top, you perform the finisher; if it falls to the bottom, the fighter escapes the hold.
Additional weapons appear in the ring during the fight--stuff like a cinder block, trashcan, hockey stick, wooden beam, etc. Grab these and use them against the other fighters. When you spot a couple fighters engaged in combat, let them fight. Concentrate on the other fighters. Continue your hit and run techniques--perform a combo, back off, and circle the ring to prepare for another shot.
Each time you finish off a fighter, a food item is dropped into the ring. So if you have full health items and you’re damaged, eat a health item after you perform a finisher. Then you can just grab the new item to replenish your stock.
Ultor Dome: You check the locker room and find an upset fighter: he doesn’t have doctor clearance to fight. You volunteer to take his spot.
- Level 3 Unlock: Pumped Up: 15% Increased Melee Damage
- Level 6 Unlock: Pumped Up: 30% Increased Melee Damage
Stilwater Prison District: A security guard says that the inmates have a good way of venting frustration: fight club!
- Level 3 Unlock: Legal Lee
- Level 6 Unlock: Troy
Trail Blazing
Objective: Race to the finish for cash and respect. Bonus seconds earned from ramming people and cars are added to your timer at each checkpoint.
Trail Blazing is racing with a twist. Of course the main objective is to get through all of the checkpoints before time expires but there’s a twist: you don’t have enough time to get to all the checkpoints. To get more time you must ram cars and people. Ram a car and you gain one second; ram a person and you gain two seconds. These seconds are added to the timer when you reach the next checkpoint.
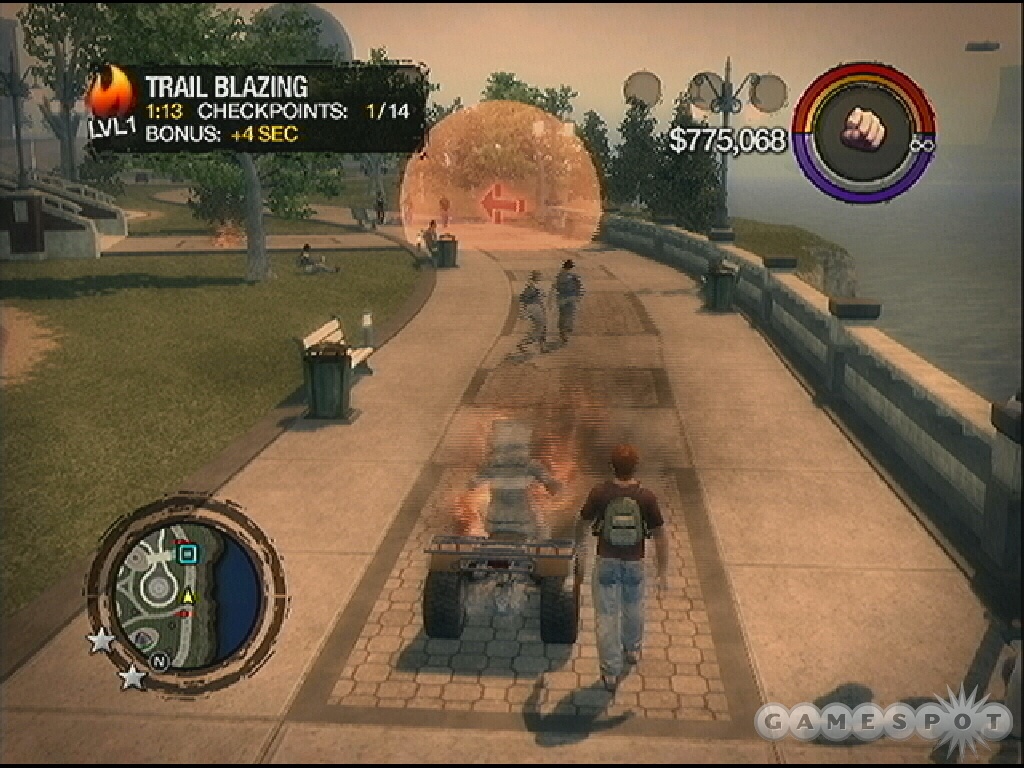
Watch for little patches of fire on the ground. Hit these gasoline trails and the fire shoots to barrels and other explosives to destroy the cars and people around you. Make sure you hit all of the gasoline trails to add maximum time. When traveling from checkpoint to checkpoint, look for cars and people to ram. While you shouldn’t veer way off course, you will still need the additional time to survive. Aim for the people; hit cars close together and close to pedestrians to inflict collateral damage for more time.
Apartments District: The frat brothers at Theta want to knock the Gamma brothers down a peg.
- Level 3 Unlock: Brotherhood Notoriety Reduced
- Level 6 Unlock: Brotherhood Notoriety Reduced
Downtown District: You meet Chuck Mueller, who creates "edgy, urban" action movies. He’s making "Bangers On Fire" and there’s a perfect part for you!
- Level 3 Unlock: Reduced Explosion Damage 5%
- Level 6 Unlock: Reduced Explosion Damage (-15%)
- Unlocked Upon Activity Completion: Fire Fighter Suit
Septic Avenger
Objective: Spray sewage all over your targets to earn cash and respect.
The Septic Truck moves on rails--meaning you don’t control its direction you only control its speed. You can stop the truck to concentrate on launching the sewage on the marked targets. Stop the truck at each target and cover the target with sewage until you receive the money.
Although the marked targets are the most rewarding, other targets provide cash too. Cop cars and even standard cars are $1,000. Keep the cops and SWAT vans at bay with sprayed sewage. Not only do you get the cash bonus but you keep them from shooting at the septic truck. This activity is pretty simple and fairly straightforward. Stop the truck at targets, spray until completion, and then move on to the next target. Repeat until you have cleared the mission requirements. Between targets, go after cops and other targets for additional cash.
Suburbs Expansion District: A real estate agent thinks property values are too high here: he can’t sell anything. He wants you to douse the area in sewage to get things back to a reasonable level.
- Level 3 Unlock: Improved Weapon Accuracy 5%
- Level 6 Unlock: Improved Weapon Accuray 15%
Redlight District: An angry woman wants you to ruin the value of some of Ultor’s property. Sewage works good!
- Level 3 Unlock: Food and Liquor Store Discount 5%
- Level 6 Unlock: Food and Liquor Store Discount 15%
- Unlocked Upon Activity Completion: Septic Truck
Demolition Derby
Objective: Complete in an eight car demolition derby and destroy your opponents’ cars to earn cash and respect. Select your car for the demolition derby. Winning derbies will earn you derby points, which you can use to buy upgrades.
The goal isn’t only about survival. You must meet the damage requirements. So you can’t simply sit back and avoid collisions because you won’t rack up any damage cash. You must become an active participant in the derby, which means balancing attack with survival.
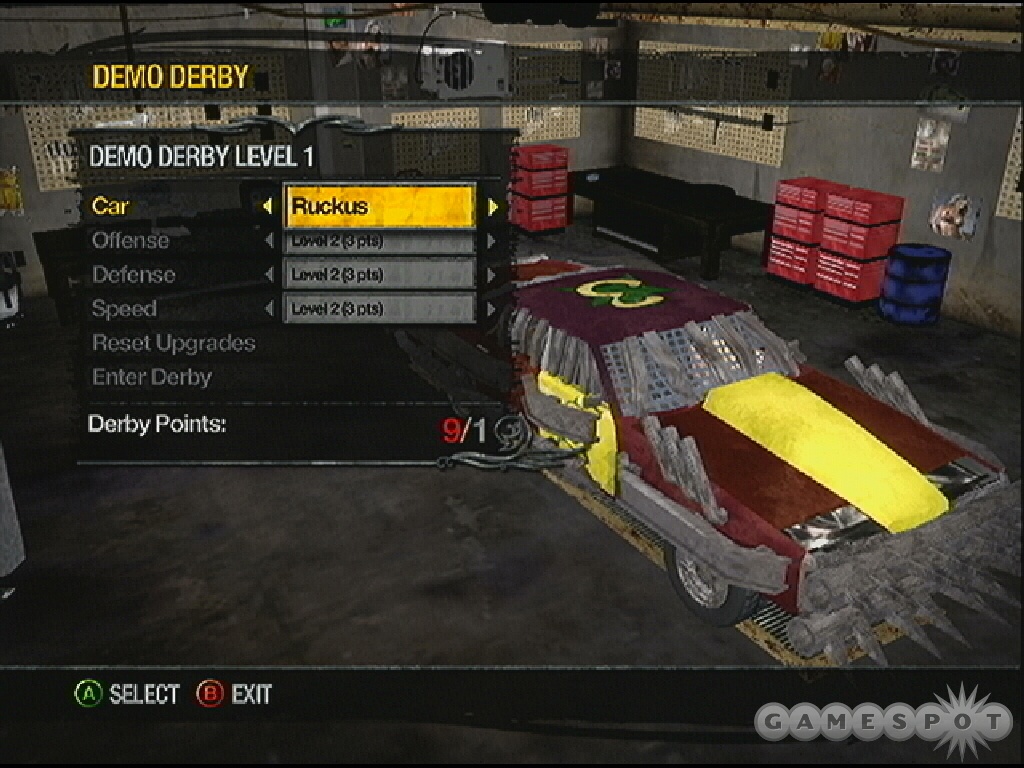
The best way to cause big damage is to use your nitrous! Point your vehicle at a competitor’s car and trigger the nitrous. Use the speed boost as extra power. Slam into the competitor’s car for big damage. If you cause the "killing blow" you will receive an explosion bonus. Look for opportunities to attack from long-range providing ample time for the nitrous to get your vehicle to top speed. It also makes "aiming" for the competitor’s car easier.
Between races upgrade your car. Start with attack then add defense and increase from there. Don’t leave any points unused. Each category has two levels with the first level requiring one derby point; the second level requires two derby points.
Stilwater University District: The mullet man says there’s no way you can win the Demolition Derby. Time to prove him wrong!
- Level 3 Unlock: Mechanic Discount 5%
- Level 6 Unlock: Mechanic Discount 15%
- Unlocked Upon Activity Completion: Demo Derby Vehicles
- Unlocked Upon Activity Completion: Special Derby
Crowd Control
Objective: Protect a celebrity from crazed fans to earn cash and respect.
While the celebrity meets and greets fans, watch out for the marked "crazy fans" that attempt to annoy (or beat) the celebrity. Intercept the crazed fans and keep them away from the celebrity. If a crazed fan gets close, the celebrity’s annoyance meter rises; if it rises completely, the Crowd Control mission fails.
In the early stages, Crowd Control is pretty simple. When a crazed fan runs up, grab him in the human shield position and toss him away. Each area has specific "throw zones" for added cash. Like throw a guy into a SWAT van or into a tree being cut down by workers. But with each stage comes higher difficulty: more crazed fans!
Grab a bat that’s discarded after you intercept a crazed fan and equip it. As the number of crazed fans increase, you’ll have to beat them away with a bat instead of worry about tossing them into various objects. In fact, it’s better to just toss a couple guys for the big money but then focus entirely on beating down incoming crazed fans. It’s not as much money but it’s faster and keeps the celebrity happy.
Going toe to toe with the crazed fans has a downside. Make sure you aren’t hit buy a swinging bat. The recovery time is brutal; while you’re on the ground, the crazed fans are annoying the heck out of the celebrity. Move around and as the crazed fans charge the celebrity, intercept with a swing of the bat.
The final moments of the last stage is the biggest challenge because some of the crazed fans use firearms to pelt the celebrity. Run around quickly and maul every crazed fan with your baseball bat. This happens as you near the monetary requirement so you don’t need many more whacks to complete the mission.
Suburbs District: Archibald Nice wants to hire you to protect his entertainment clients. He’s got a lot of talent about to walk the red carpet and wants to make sure those crazy fans stay away.
- Level 3 Unlock: Clothing Store Discount 5%
- Level 6 Unlock: Clothing Store Discount 15%
Hotels and Marina District: A film producer has a couple of flicks opening soon and needs some security for his stars. You’re just the person for the job!
- Level 3 Unlock: Pepper Spray
- Level 6 Unlock: Chainsaw
Escort
Objective: Drive around town and keep the paparazzi away from your car to earn cash and respect.
Pick up clients and let them have a good time while you avoid the news vans and private investigators hot on your tail! Check the "Pleasure" and "Footage" meter in the upper left corner of the screen. The goal is to get the "Pleasure" meter filled while preventing the "Footage" meter from getting filled. If the "Pleasure" meter fills completely, the mission is a success; if the "Footage" meter fills complete, you fail the task.
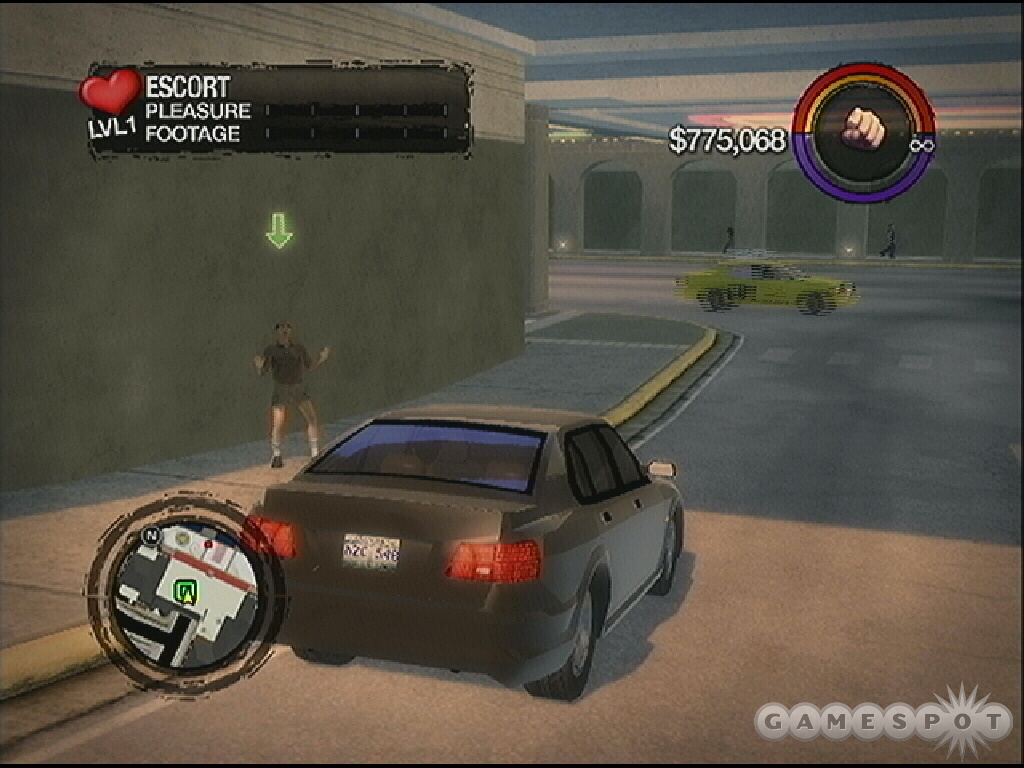
Escort is about fulfilling mid-mission objectives and driving fast and efficiently. Look for long straight seconds to avoid the pursuing paparazzi--you’re faster than they are so get up to full speed instead of trying to dodge them by making frequent turns. You can also try and get them rammed in tight traffic but expect your pursuers to be proficient drivers.
As mentioned, you will have to complete certain mission tasks to keep the client’s pleasure meter from going up. For instance you may have to take the client over to a brothel or drive him over to a fast food restaurant or show him some nifty driving tricks. You will not receive any pleasure while you are in the middle of a mid-mission task. For instance, if you have to complete an "Oncoming Traffic" bronze star then you won’t receive any pleasure until you complete that task. But that doesn’t stop the paparazzi from getting footage. Complete the tasks as quickly as possible.
On tougher levels, watch for the news van roadblocks. If you see one in the distance, turn around and head the other way. Even busting through a roadblock adds footage (you can hear the cameras snapping shots as you drive through). Keep up your speed on long straight sections and just drive back and forth. As soon as you receive a new mid-mission task, complete it as soon as possible to keep the pleasure meter rising.
Stilwater University District: You contact a "romance manager" who needs a driver to move his girls to his clients.
- Level 3 Unlock: Sons of Samedi Notoriety Reduced.
- Level 6 Unlock: Sons of Samedi Notoriety Reduced.
Red Light District: A charming pimp has some work for you--provide a ride for particular individuals while they entertain other particular individuals.
- Level 3 Unlock: Vehicle Delivery: You can now use your cell phone to have vehicles in your garage delivered to you for $1,000.
- Level 6 Unlock: Vehicle Delivery: You can now use your cell phone to have vehicles in your garage delivered to you for free.
- Unlocked Upon Activity Completion: Escort Vehicles
Drug Trafficking
Objective: Provide protection for drug deals around Stilwater to earn cash and respect.
In Drug Trafficking, you ride in the passenger seat while the dealer drives around to various meet and greets to conduct his business. You have unlimited pistol ammunition, which helps but often the "competition" requires more powerful ammunition to hold at bay. Before attempting this activity, make sure you are well stocked with shotgun and assault rifle ammunition just to be on the safe side.
Your services will be needed both on the ride between deals and during the deals. Get out of the van and protect the dealer while he conducts the deal. Shoot the gang members that arrive to disrupt the transaction.
The most important thing to realize for Drug Trafficking is that you don’t have to use the dealer’s vehicle the entire time. In fact, in the case of the Airport District Drug Trafficking, the dealer’s van is a slow, weak hunk of junk. You can switch cars at any point and even call for vehicle delivery. Grab something nice from your garage. Have you captured one of those SWAT APCs yet? Those work pretty good. If your car suffers big damage, get out and fend off the attackers and get another. Don’t stick around in an exploding vehicle.
Occasionally the deal goes sour and the guy attempts to run off without paying the money. Shoot the marked junkie to complete the objective. Each level, your notoriety with the opposing gang gets higher and higher, which means more and more vehicles chasing you between deals and more arriving at the deals. When shooting at pursuing vehicles, aim for the tires and the driver. Knocking tires out slows down the vehicle; terminate the driver and the vehicle swerves off the road.
Airport District: Tobias’ cousin has some business for you--he’s a baggage handler at the airport. There’s a bunch of baggage with stuff that can’t get through customs.
- Level 3 Unlock: XS-2 Ultimax shotgun
- Level 6 Unlock: Unlimited Shotgun Ammo
Hotels and Marina District: Liz needs your help selling some product. Go along for the ride and protect her from enemies.
- Level 3 Unlock: Ronin Notoriety Reduced
- Level 6 Unlock: Ronin Notoriety Reduced
Fuzz
Objective: Impersonate one of Stilwater’s Finest and provide quality footage to the FUZZ crew for cash and respect.
Your cop outfit looks so good! With a cameraman in tow, you respond to various disturbances and enact justice Saints style--perfect reality television! Drive to the various locations and deal with the scenario. Make sure your cameraman is nearby to get the footage. You need to increase the "footage" meter to full to complete the task. Occasionally the cameraman will have certain requests ("Flamethrowers are standard issue, right?"). Use those weapons for extra footage.
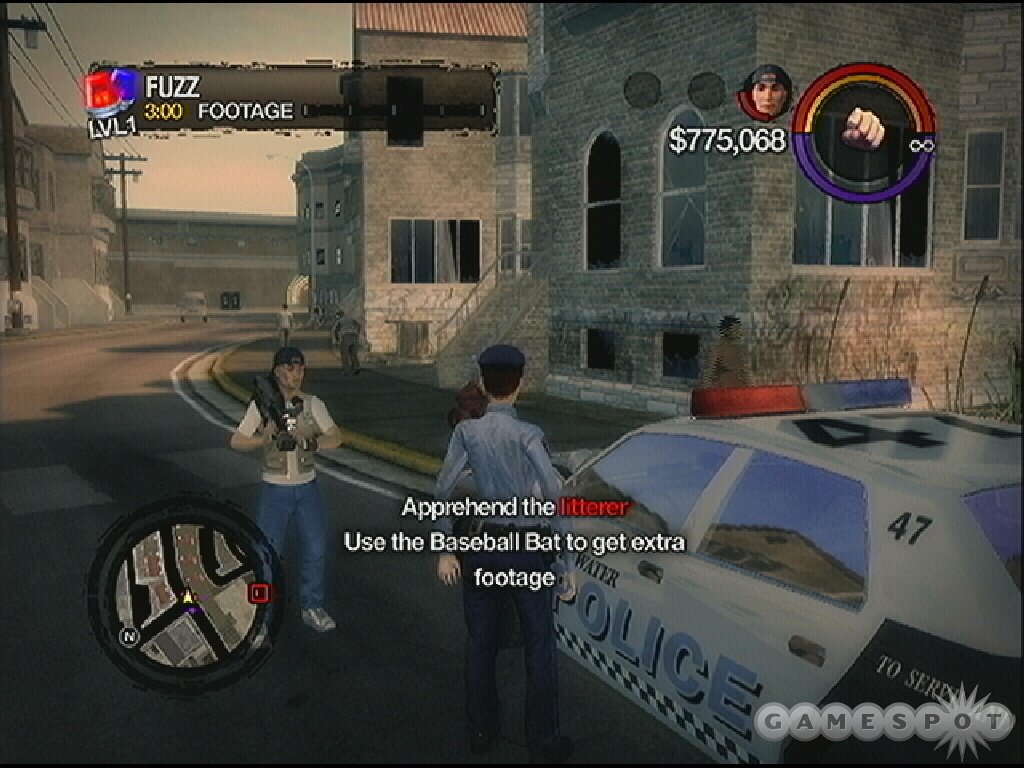
Enjoy some of the twisted scenarios, such as the amusing college pranks or the "Battle of the Century" and go from task to task dishing out justice and it won’t take long to complete all levels and gather your unlocked rewards.
Suburbs Expansion District: A casting director’s assistant wants to cast you in tonight’s episode of FUZZ. Apparently the regular officer is in the hospital but you’re a perfect match--you just have to pretend to be a cop!
- Level 3 Unlock: Police Notoriety Reduced
- Level 6 Unlock: Police Notoriety Reduced
Projects District: Legal Lee has some ongoing cases against the police department. He wants you to get on the cop show Fuzz to essentially sabotage the police department: make them look less than nice on their television show!
- Level 3 Unlock: Kobra pistol
- Level 6 Unlock: Unlimited Pistol Ammo
Chapter 4 - Diversions, Minigames, and Secrets
As you would expect, Saints Row 2 features an extensive set of optional diversions, minigames, and secret locations. This section provides some tips on completing diversions and minigames, discovering secrets such as the big purple bunny, and completing the secret mission "Revelation".
Taxi
Objective: Help Stilwater’s citizens get around! Deliver customers to their destinations for cash.
The basics are simple: pick up a fare and drive that fare to the marked destination. Expect a few twists. For instance, some passengers want you to drive especially fast and wild. Others want you to drive calm and slow. You may also encounter a robber; to get him out of the cab you will have to perform a particular driving task, such as getting an "oncoming traffic" star.
The amount of cash received for the fare depends on your performance. If you’re asked to drive quickly, then you will receive less money if you aren’t racing wildly. If you’re asked to drive slowly and start ramming fences then you will lose cash. If the fare reaches zero, the passenger decides to get out of the cab and you’ll have to find a new fare.
Complete all 10 levels in succession. You can fail a fare but you can’t leave the taxi or get it destroyed or you have to start over. Finish all levels and you unlock a special variant of the taxi at your crib garage.
Fire Truck
Objective: Help out Stilwater’s Finest! Put out fires around the city for cash.
Can’t find a fire truck? Call the fire emergency number, which is 555-3473 or 555-FIRE. Look for it in your phonebook. Once you’re inside the fire truck, activate the diversion. It’s your job to put out Stilwater’s fires. These fires are raging inside buildings; you’ll exit the fire truck with extinguisher in hand and scamper inside the building to put out the fire. The extinguisher has limited "ammo" and if you need to refill it, you must return to the truck.
There are 10 levels in all and you must complete all 10 without stopping. You receive additional time for each level completed. If you fail, you must start over from the beginning. To put out a fire, just point the extinguisher at the fire and spray. Avoid stepping in flames or you will lose valuable time. Note that the fire can spread too--primarily by other people running through flames and into other objects. The upper left corner reveals how many fires the location has and need to be put out. The mini-map also marks the location of the fires.
The driving distance between locations isn’t too far but the fire truck isn’t exactly the most nimble vehicle in the game. Drive carefully so you don’t waste time backing up or adjusting the truck after you rammed a wall. Complete all 10 levels and you unlock a special variant of the fire truck as well as a fireman’s outfit.
Ambulance
Objective: Help out Stilwater’s Finest! Revive victims with CPR or shock paddles for cash.
Locate an ambulance driving the rounds through Stilwater or just call 911 on your phone--an ambulance will arrive at your location and attempt to administer healing. Instead just steal the ambulance!
Your job is to drive the ambulance to marked accident locations and perform chest compressions or shock paddles on the injured motorists. There are 10 levels in all and you must complete all 10 levels with the same ambulance in the allotted time. But don’t consider time much of an issue. Getting from accident location to accident location doesn’t take long.
When you reach a victim, approach and use the action button. Follow the onscreen control scheme to use the chest compressions and the shock paddles respectively. Revive the required number of motorists at each accident scene before moving onward. Complete all 10 levels and receive a special ambulance variant as well as the shock paddles melee weapon.
Tow Truck
Objective: Repossess vehicles from troubled owners for cash.
Steal a tow truck to begin this diversion. The delinquent vehicles appear on the mini-map. You must drive the tow truck to the vehicle location, back the tow truck to the vehicle’s front or rear side, and follow the onscreen instructions to attach the tow truck to the vehicle. Like other diversions, there are 10 levels to complete and an allotted time to complete them within. Sounds simple enough, right? Well, it’s the toughest diversion for a number of reasons.
First, the tow truck with vehicle attached is tough to maneuver. Second, the latter levels feature an elevated police notoriety, which means your tow truck will be under assault. Since the tow truck must survive for all 10 levels, this becomes a significant challenge. Police cruisers will just ram you to pieces while you attempt to pick up vehicle after vehicle meet the requirements.
To make this diversion easier, make some preparations beforehand. Steal a tow truck and take it to a mechanic and add all of the body upgrades to strengthen the vehicle. Bring the upgraded tow truck to a safe house so it’s in your garage (saving your game). Return the upgraded car to a mechanic, get out and back in to activate the diversion.
The first six or seven levels are fairly easy. Don’t rush them because time isn’t as important as keeping the tow truck intact. Don’t be careless. Don’t ram the tow truck into cars or walls and cause unnecessary damage. When approaching a car to repossess, get out and shoot the guards before approaching with the tow truck. Grab vehicles from the rear; this position is easier to maneuver. Avoid the police roadblocks. Don’t drive through them or you will suffer big damage. Take it slow with larger vehicles because spinning out is far worse--that’s a lot of time for you to recover while the police are ramming and shooting your tow truck.
Here’s another easy method. Do the diversion co-op and have your partner drive the repossessed vehicle back to the mechanic while you take the tow truck. Once there, attach the car and drive into the marker. Your co-op partner can also shoot the pursuing cops as necessary. Finish all 10 levels and unlock a special tow truck variant.
Drive By
Objective: Drive by and kill gang members from inside your vehicle for cash. Note only kills shot from inside your vehicle count.
To initiate the Drive By diversion, just take any vehicle and drive by some hostile gang members and shoot them from your vehicle. The prompt appears onscreen; press the action button to begin the diversion. There are 10 levels in all to complete; you must complete all 10 levels in the allotted time. The mini-map reveals the location of gang members. You must shoot the gang members from the car. You receive less cash should some of the targets perish by other means.
You can use any vehicle for the diversion and even switch at any point. So if you are beginning to suffer big damage, switch vehicles rather than risk waiting for the car to explode. Some of the gang members on the latter levels wield rocket launchers.
Ho-ing
Drive to Technically Legal in the Suburbs; there are other locations to start this diversion as well. Find Technically Legal just north of the On the Rag clothing store. Go inside and proceed to the back office marked "Authorized Personnel Only" and approach the marker. Use the action button to begin the diversion.
Using the thumb sticks, find the "special spots" then move the other analog stick in the indicated directions. It’s straightforward and simple. There are 10 levels in all. Complete all 10 levels of Ho-ing and you unlock a special pimp outfit.
Hostage
Objective: Drive at high speeds to evade the cops until your hostage breaks down and pays. If you slow down your hostage will escape.
Steal a car with a passenger already inside; a prompt appears onscreen to begin the diversion. A timer appears on the upper left corner of the screen. You must evade police and keep the hostage in the car for the entire time remaining. If you slow down too much, the hostage will escape. Complete this diversion on long straight sections of road so you keep turns to a minimal. Beware of roadblocks--the police aren’t too happy about the hostage situation!
There are no levels to complete in Hostage. Each time you complete a Hostage, you must steal another car with a passenger inside to start it again. Complete 10 in all and you receive a special ATV variant.
Mugging and Hold-Ups
While walking down the streets of Stilwater, pull out a weapon and aim it at someone for a few seconds while in "fine aim" mode. Keep your targeting reticule on the target until the victim raises his or her arms and eventually drops some cash. Occasionally the victim will cower and not release money or the victim may just run away.
There are a few unlocks for completing muggings. Complete 30 successful muggings to unlock the Paintball Mask. Complete 50 successful muggings to unlock Jane Valderama, the female newscaster, as a homie. Achieving 50 muggings also unlocks an Xbox 360 achievement.
A similar task to mugging is hold-ups. Go into one of the stores and point a weapon at the shopkeeper while in "fine aim" mode. It will initiate a hold-up and the storekeeper will lead you to the safe.
Racing
Participate in a variety of race formats throughout Stilwater. There are your standard car races but there are also boat and jet ski races as well. In some races you must simply finish the course in the allotted time. Move through all of the checkpoints and become the first vehicle to arrive at the finish line. Take advantage of shortcuts and avoid slamming into walls or getting bumped around by competitors.
Gambling
Locate the Poseidon’s Palace casino in the Hotels and Marina District. It’s the seashell-shaped building on the map. Inside the casino you’ll find Blackjack and Video Poker machines. Standard poker and blackjack tips apply when trying to make some money by gambling on these machines.
Zombie Uprising
Check the television in your loft. You can watch any viewed cut scene on the television and you can also play the video game Zombie Uprising! The rules are simple: kill all of the zombies. There are 345 zombies total and they arrive in a series of waves. The problem isn’t the number of zombies, cause they’re pretty slow, but it’s the lack of weaponry and ammunition.
Make every shot count. For zombies with heads, aim for the head to eliminate the zombie in as few shots as possible. For zombies without heads, aim for the chest. Continue to gather weapons and conserve as much ammunition as possible. Look for food items dropped throughout the course of the game and keep an eye on your health--it can disappear quickly if you’re attacked. Don’t get surrounded and run away from zombies on fire. One more zombie of note: the small, quick zombies are explosive. Shoot them before they get close.
One of the best places to go is the staircase in the back area. Zombies clutter the area so you’ll have to get rid of them before occupying the area. But once there, you can stand in the alcove adjacent to the staircase and you can’t get surrounded. Just stay there and shoot every zombie that attempts to get close. Once you exhaust weapons, search for more. A word of caution: if you explore the upper interior, don’t leave the game zone more than once or you will have to start over from the beginning! As it warns you: leaving would unleash the zombie terror onto the world! Complete Zombie Uprising to unlock the zombie mask.
Vengeance Mission
Drive to the Stilwater Police station in the Saints Row District. It’s on the southern side of the district. Go up a few floors to the S.R.P.D. Detective Bureau. Proceed through the door into the Detective Bureau. You’ll spot three Saints markers in the room. Listen to the wiretap conversations by pressing the action button on each marker.
After listening to the wiretap conversations, move into the adjacent office and find a fourth Saints marker. Use the action button on the marked location to pick up the Julius file. This automatically adds Dex’s phone number to your cell phone. Open your phone and call Dex--it’s in the phonebook section. You’re instructed to meet Dex at the old church and he’ll tell you where to find Julius. Drive to the old church in the Saints Row district (just north of your current location) and find the Ultor mission marker out front.
Revelation (Ultor Corp.)
You get the jump on Julius but it doesn’t take long to discover this was just a setup by Dex. The church is now under attack.
Objective: Defend the church.
The Masako squad members are marked on the map. Eliminate all of them to complete the objective. Note that some may appear upstairs so be prepared to explore.
Objective: Another Masako unit is one the way. Kill them.
A couple more sets of Masako squad members arrive--the first reinforcements feature four and the second batch features five. The smoke grenades make spotting the enemies a bit tougher but just use the mini-map as your guide. Be prepared to explore upstairs to find any squad members lurking up there.
Objective: Help Julius defend the west side.
Exit the church and follow Julius to its west side. You’ll find eight marked Masako squad members assaulting the church’s western side. Look for the Ultor APC to pull up. More than likely you have a four star notoriety by this point--so expect more trouble for standard police forces.
Objective: Defend the east side.
Follow Julius to the eastern side of the church and fight four more Masako squad members as well as the other security forces that arrive.
Objective: Help Julius defend the south side.
Eight more Masako squad members attack the church’s southern side. This also triggers the arrival of an attack chopper. You’re instructed to fall back to the church for cover.
Objective: Destroy the helicopter
Destroy the chopper with the RPG launcher or other weapon. You may have a five star notoriety by now, so expect plenty of additional security teams to arrive and attack your position.
Objective: Get to Julius’ car.
Sprint to the marked location on the mini-map to find Julius’ car.
Objective: Protect Julius’ car.
Julius takes the wheel while you occupy the passenger seat. Julius mentions some goodies in the backseat--you have infinite ammunition to defend Julius’ car and this includes infinite ammo for the annihilator RPG launcher and the AR-50 grenade launcher. Blow apart everything behind and in front of the car. The annihilator RPG works wonders on infinite repeat. Julius drives to the museum area and amphitheater. Get out and note that you still have infinite ammo.
Objective: Destroy the helicopters.
There are tons of ground troops in the area. You can go after them or just concentrate on the two helicopters flying overhead--as soon as the helicopters are destroyed, the mission ends. Use the annihilator RPG launcher to lock onto the aircraft. Destroy the choppers and the mission ends--as does Julius. Completing this mission unlocks the Vengeance achievement on the Xbox 360.
The Purple Bunny
Purchase a "Shark" jet ski at the Ship It vehicle shop. Drive it toward the prison island northwest from that location and west of the Suburbs. Ride northwest from the northern side of the prison island and find a secret island called "Ruin Island". Park the jet ski next to the island and walk up the staircase to the top. You’ll see an arrow pointing you in a new direction.
Return to the jet ski and drive it in the direction the arrow pointed. You’ll encounter another secret island called Lookout Island. It’s northwest from Ruin Island in case you get a bit lost. Park the ski nearby and go up the incline to the top of Lookout Island and find another arrow. Get back on the ski and drive in the arrow’s direction.
It’s approximately southwest from Lookout Island. It’s a third island with an arrow. Follow this last arrow to a small island with an object on top. Walk up to the object and the island disappears, forcing you to drop into the water. Notice the arrows surrounding you--look in their direction and see the rising purple bunny. Volition fans will know it as the Cabbit. Note that you can reach this final island from Lookout and bypass that third island. Just search for it southwest of Lookout Island.
More Island Hopping
From the prison island, go due west from its northern point. Slant a bit to the north and you should see a small island with a waterfall. Go onto the island and discover it’s a "Super Secret Area" called Volition Oasis. Search through the waterfall and find the Volition statue.
Head due west from the southern part of the prison island and search off the map. It’s a bit to the south from the southern section of the prison island. You’ll encounter Shipwreck Cove.
Vehicle Surfing
How about trying a little vehicle surfing? Jump onto an occupied car and wait for it to move. An onscreen prompt appears--hit the action button then to start vehicle surfing. The object is simple: stay on the car! Use the left analog stick to keep the indicator in the middle of the screen. Think of it like Tony Hawk Saints Row style. You can also use the action button to perform a handstand. The goal is to stay on as long as possible. Reach three gold stars and you unlock the Surf’s Up achievement on the Xbox 360 and unlock a Traffic Cone hat.
Base Jumping
Get into a plane or helicopter and fly up high. Hit the action button to exit the vehicle. While freefalling, hit the action button to activate your parachute. During your fall, another prompt should appear on screen to begin the base jumping diversion. Now you can attempt to land on the marked target!
Streaking and Flashing
If you want to streak, just enter your crib and change your wardrobe. Select "Outfits" and then "Remove all current clothing" and then go have fun! If you want to flash, then purchase a "Flasher Coat" from the Let’s Pretend store in the mall.
Taunting
When you don’t have gang notoriety, drive around until you locate a gang member. Get out of the car and walk over to the gang member. Perform a taunt at the gang member. Taunt more gang members for additional stars.
More Shops
There are some stores you won’t be able to find on the main map because they’re inside the Nob Hill mall. Get inside the mall in the High End district. Once inside you’ll find a number of unique stores, such as Brass Knuckles (2nd floor), Phuc Mi Phuc Yue and Apollo’s (3rd Floor), Nobody Loves Me, Let’s Pretend, Company of Gyros, and Freckle Bitch’s (4th Floor), and Leather & Lace (5th Floor). Shop for clothes in the mall for some unique outfits--perfect for your style!
Chop Shop
Objective: Steal cars for cash and respect.
Get one of the car lists from the activity markers in the corresponding district and then go on the hunt. Locate the car at any point and bring it back to the corresponding chop shop to collect your cash and respect reward. If you have trouble finding a car, select that car from the chop shop list and go over to that specific district. Get out of a vehicle and enter a store. Exit the store and that particular car should spawn and be indicated on your head’s up display. Try again if not.
Apartments District
- Swindle: Found in University District. Reward: $1,000 cash and +200 respect.
- Betsy: Found in Arena District. Reward: $1,250 cash and
+250 respect. - NRG V8: Found in Barrio District. Reward: $1,500 cash and +300 respect.
- Raycaster: Found in Chintatown District. Reward: $1,750 cash and +400 respect.
- Melbourne: Found in Airport District. Reward: $2,000 cash and +500 respect.
- Bezier: Found in Apartments District. Reward: $2,500 cash and +600 respect.
- Cosmos: Found in Projects District. Reward: $3,000 cash and +700 respect.
- Status Quo: Found in Red Light District. Reward: $3,500 cash and +800 respect.
Downtown District
- Go!: Found in Trailer Park District. Reward: $1,000 cash and +200 respect.
- Taxi: Found in Suburbs Expansion District. Reward: $1,250 cash and +150 respect.
- Wellington: Found in Downtown District. Reward: $1,500 cash and +300 respect.
- Alaskan: Found in Hotels and Marina District. Reward: $1,750 cash and +400 respect.
- Varsity: Found in Downtown District. Reward: $2,000 cash and +500 respect.
- Zenith: Found in Hotels and Marina District. Reward: $2,500 cash and +600 respect.
- Justice: Found in Suburbs Expansion District. Reward: $3,000 cash and +700 respect.
- Titan: Found in Downtown District. Reward: $3,500 cash and +800 respect.
Suburbs District
- Mockingbird: Found in Suburbs District. Reward: $1,000 cash and +200 respect.
- Churchill: Found in Suburbs Expansion District. Reward: $1,250 cash and +250 respect.
- Hammerhead: Found in Downtown District. Reward: $1,500 cash and +300 respect.
- Compton: Found in Museum District. Reward: $1,750 cash and +400 respect.
- Topher: Found in Hotels and Marina District. Reward: $2,000 cash and +500 respect.
- Quota: Found in High End Retail District. Reward: $2,500 cash and +600 respect.
- Five-O: Found in Suburbs District. Reward: $3,000 cash and +700 respect.
- Ambulance: Found in Suburbs Expansion District. Reward: $3,500 cash and +800 respect.
Truck Yard District
- Voxel: Found in Barrio District. Reward: $1,000 cash and +200 respect.
- Magma: Found in Projects District. Reward: $1,250 cash and +250 respect.
- Attrazione: Found in Red Light District. Reward: $1,500 cash and +300 respect.
- Superiore: Found in Airport District. Reward: $1,750 cash and +400 respect.
- Venom Classic: Found in Chinatown District. Reward: $2,000 cash and +500 respect.
- Eiswolf: Found in Saints Row District. Reward: $2,500 cash and +600 respect.
- Socialite: Found in Apartments District. Reward: $3,000 cash and +700 respect.
- Peacekeeper: Found in Saints Row District. Reward: $3,500 cash and +800 respect.
Docks and Warehouses District
- Voyage: Found in Docks District. Reward: $1,000 cash and +200 respect.
- Danville: Found in Truck Yard District. Reward: $1,250 cash and +250 respect.
- Mag: Found in Projects District. Reward: $1,500 cash and +300 respect.
- Bag Boy: Found in Airport District. Reward: $1,750 cash and +400 respect.
- Backhoe: Found in Barrio District. Reward: $2,000 cash and +500 respect.
- Bulldozer: Found in Factories District. Reward: $2,500 and +600 respect.
- Delivery Truck: Found in Saints Row District. Reward: $3,000 cash and +700 respect.
- Longhauler: Found in Red Light District. Reward: $3,500 cash and +800 respect.
Chop Shop Unlocks
- One Chop Shop List Completed: The Mongoose Buggy
- Three Cop Shop Lists Completed: Unique Saints Kent (Combine)
- Five Chop Shop Lists Completed: 75% Mechanic Discount, Chop Shop customization item
Hitman
Objective: Eliminate targets for cash and respect.
Get your target list from the activity marker. Follow the instructions from the target list and take note of the target’s clothing and appearance. Search the designated district, if there is one, and perform the necessary actions to force your target out of hiding.
Barrio District
- Alvan: Arena District, abandoned drive-in theater. Drive a couple 40oz’s to make him feel comfortable enough to come out.
- Brad: Barrio District. Throw up a tag in Barrio to earn his respect and draw him out in the open.
- Anoop: Get enough cops on you and Anoop will respond.
- Frank: Give the cab company a call (555-455-8008) and Frank will be the one to show up.
- Scott: Have some food delivered (555-6328) and take him out.
- James: Suburbs, Technically Legal. Take up some of the girls’ time. Do some Ho-ing to convince him you’re for real.
Saints Row District
- Apoop: Barrio, On Track. Wait on the dance floor and he’s bound to show up.
- Larry: Trailer Park District. Blend into the trailer park crowd by wearing a wifebeater T-shirt (Men’s Tank Top) and they’ll welcome you as one of their own. Larry will most likely be lounging in a lawnchair.
- Seabaugh: Marina, Pirate Ship. Go by the pirate ship restaurant and you’ll see him soon enough.
- Mr. Flegal: Red Light District, Tattoo Parlor. He will only show up to criticize your choice in tattoos after you get one.
- Lt. Freeball: Stir up enough trouble and he’ll show up.
- Russell: Underground Caverns.
Hotels and Marina District
- Jeremiah: Marina/Museum Districts. Ride a motorcycle around the Marina and Museum Districts and you’re sure to see him.
- Nate: Marina, Poseidon Casino. Play some casino games and you’re sure to find him.
- Brian: Just call 911 and he’ll come as fast as possible to "help" you.
- Chris: Museum Gift Shop.
- Randy: Marina District. Buy a boat or a wavecraft and he’ll show up to see what you picked up.
- Nick: Marina, Heron Hotel. Take the elevator to his floor and you should have no trouble finding him.
Trailer Park District
- Shannon: Trailer Park District. Start a fight in the area and someone is bound to call him.
- Jim: Stilwater Nuclear District. Head to the nuke plant and call the hazmat team at 555-OOPS.
- Roje: Suburbs, Music Store. Go there and buy a couple music tracks.
- Mike: Downtown District. You need to get "smoked", in other words die, and admitted as a patient.
- Clint: University District. Go to the stadium on campus and blend in by drinking some 40oz’s.
- Greg: Freckle Bitch’s. Buy one of each item from the Freckle Bitch’s menu and he’ll show up and try to sell you on some franchise opportunities for Company of Gyros in his mascot outfit.
Stilwater Prison District
- Everett: Red Light District. Kill a pimp and get some info on where he’s staying.
- Justin: Suburbs, cemetery. Head to the Suburbs cemetery between 10pm and 4am to find him.
- Chris: Arena, Projects Districts. Ride a motorcycle around there.
- Tim: Call the fire department at 555-FIRE.
- Mitri: Factories District. Drive some beer around there to let him know you’re not a cop and he should show himself.
- Frank: If you cause enough trouble, Troy will have no choice but to call the Feds in.
Hitman Unlocks
- One Hitman List Completed: Hand Grenades in crib weapon locker.
- Three Hitman Lists Completed: Satchel Charges in crib weapon locker.
- Five Hitman Lists Completed: Unlimited Rifle and Sniper Ammunition.
Chapter 5 - Cheat Codes
Open up your cell phone during gameplay and dial the cheat code number to unlock the cheat.
| CHEAT CODE | UNLOCKS |
|---|---|
| #1 | Full Health - Replenishes your health to full. |
| #1040 | Give Ambulance - Puts this vehicle into your garage. |
| #1041 | Give Anchor - Puts this vehicle into your garage. |
| #1042 | Give Atlasbreaker - Puts this vehicle into your garage. |
| #1043 | Give Attrazione - Puts this vehicle into your garage. |
| #1044 | Give Blaze - Puts this vehicle into your garage. |
| #1045 | Give Backhoe - Puts this vehicle into your garage. |
| #1046 | Give Bagboy - Puts this vehicle into your garage. |
| #1047 | Give Baron - Puts this vehicle into your garage. |
| #1048 | Give Bear - Puts this vehicle into your garage. |
| #1049 | Give Bootlegger - Puts this vehicle into your garage. |
| #1050 | Give Bulldog - Puts this vehicle into your garage. |
| #1051 | Give Bulldozer - Puts this vehicle into your garage. |
| #1052 | Give Compton - Puts this vehicle into your garage. |
| #1053 | Give Eiswolf - Puts this vehicle into your garage. |
| #1054 | Give FBI - Puts this vehicle into your garage. |
| #1055 | Give Five-O - Puts this vehicle into your vehicle. |
| #1056 | Repair Car - Repairs all damage to your vehicle. |
| #1057 | Give Hollywood - Puts this vehicle into your garage. |
| #1058 | Give Justice - Puts this vehicle into your garage. |
| #1059 | Give Kent - Puts this vehicle into your garage. |
| #1060 | Give Mag - Puts this vehicle into your garage. |
| #1061 | Give Longhauler - Puts this vehicle into your garage. |
| #1062 | Give Mongoose - Puts this vehicle into your garage. |
| #1063 | Give Oring - Puts this vehicle into your garage. |
| #1064 | Give Phoenix - Puts this vehicle into your garage. |
| #1065 | Give Quasar - Puts this vehicle into your garage. |
| #1066 | Give Quota - Puts this vehicle into your garage. |
| #1067 | Give Rampage - Puts this vehicle into your garage. |
| #1068 | Give Raycaster - Puts this vehicle into your garage. |
| #1069 | Give Reaper - Puts this vehicle into your garage. |
| #1070 | Give Septic Avenger - Puts this vehicle into your garage. |
| #1071 | Give Shaft - Puts this vehicle into your garage. |
| #1072 | Give Stilwater Municipal - Puts this vehicle into your vehicle. |
| #1073 | Give Superiore - Puts this vehicle into your garage. |
| #1074 | Give Taxi - Puts this vehicle into your garage. |
| #1075 | Give The Job - Puts this vehicle into your garage. |
| #1076 | Give Titan - Puts this vehicle into your garage. |
| #1077 | Give Toad - Puts this vehicle into your garage. |
| #1078 | Give Varsity - Puts this vehicle into your garage. |
| #1079 | Give Venom Classic - Puts this vehicle into your garage. |
| #1080 | Give Vortex - Puts this vehicle into your garage. |
| #1081 | Give Zenith - Puts this vehicle into your garage. |
| #11 | Infinite Ammo - Gives you infinite ammo for all weapons. |
| #12 | Heaven Bound - The dead all go to Heaven. |
| #1200 | Time Set Noon - Sets the current time to Noon. |
| #15 | Drunk Pedestrians - Everybody’s on crunk juice. |
| #16 | Evil Cars - All cars try to run you over. |
| #18 | Low Gravity - Stilwaters’ gravity generators are at quarter power. |
| #19 | Pedestrian War - Hatred, Anger, Suffering, everybody hates each other. |
| #2 | Car Mass Hole - Your vehicle has infinite mass and smashes other vehicles out of the way. |
| #20 | Raining Pedestrians - Hallelujah, it’s raining peds. |
| #200 | I Am Giant - You ate your green beans, you grow big. |
| #201 | Itty Bitty - Homie, you shrunk yourself. |
| #202 | Everybody Must Get Shrunk - All peoples, all over the world, get shrunk. |
| #2400 | Time Set Midnight - Sets the current time to Midnight. |
| #3 | Milk Bones - Melee attacks are extremely deadly. |
| #35 | Add Gang Notoriety - Bumps gang notoriety one star with each use. |
| #36 | Never Die - You will never die. |
| #4 | Add Police Notoriety - Bumps police notoriety one star with each use. |
| #4976 | Gyro Daddy - Puts this vehicle into your garage. |
| #5 | Player Pratfalls - Use triggers to pratfall, like in Insurance Fraud. |
| #50 | No Cop Notoriety - Removes all existing police notoriety. |
| #51 | No Gang Notoriety - Removes all existing gang notoriety. |
| #6 | Infinite Sprint - You can sprint forever. |
| #666 | Wrath of God - Lightning! |
| #7 | Super Explosions - Explosions are 4x bigger. |
| #711 | Give Horizon - Puts this vehicle in your garage. |
| #712 | Give Snipes 57 - Puts this vehicle in your garage. |
| #713 | Give Tornado - Puts this vehicle into your garage. |
| #714 | Give Wolverine - Puts this vehicle in your garage. |
| #7266837 | Peewee - Puts this vehicle into your garage. |
| #728237 | Destroy - Puts this vehicle into your garage. |
| #78665 | Overcast - Changes the current weather. |
| #78666 | Heavy Rain - Changes the current weather. |
| #78668 | Light Rain - Changes the current weather. |
| #78669 | Clear Skies - Changes the current weather. |
| #8 | Super Saints - The Saints are bad muthas. |
| #801 | Give Kaneda - Puts this vehicle into your garage. |
| #802 | Give Kenshin - Puts this vehicle into your garage. |
| #803 | Give Melbourne - Puts this vehicle into your garage. |
| #804 | Give Sabretooth - Puts this vehicle into your garage. |
| #805 | Give Sandstorm - Puts this vehicle into your garage. |
| #806 | Give Widowmaker - Puts this vehicle into your garage. |
| #825 | Give Hurricane - Puts this vehicle into your garage. |
| #826 | Give Miami - Puts this vehicle into your garage. |
| #827 | Give Python - Puts this vehicle into your garage. |
| #828 | Give Shark - Puts this vehicle into your garage. |
| #829 | Give Skipper - Puts this vehicle into your garage. |
| #9 | Unlimited Clip - You never have to reload because your clip runneth over forever. |
| #920 | Give 12 Gauge - Adds this weapon to your inventory. |
| #921 | Give 44 - Adds this weapon to your inventory. |
| #922 | Give AR200 - Adds this weapon to your inventory. |
| #923 | Give AR-50 - Adds this weapon to your inventory. |
| #924 | Give AR-50/grenade launcher - Adds this weapon to your inventory. |
| #925 | Give AS14 Hammer - Adds this weapon to your inventory. |
| #926 | Give Baseball Bat - Adds this weapon to your inventory. |
| #927 | Give Chainsaw - Adds this weapon to your inventory. |
| #928 | Give Fire Extinguisher - Adds this weapon to your inventory. |
| #929 | Give Flame Thrower - Adds this weapon to your inventory. |
| #930 | Give Flashbang - Adds this weapon to your inventory. |
| #931 | Give GAL43 - Adds this weapon to your inventory. |
| #932 | Give GDHC - Adds this weapon to your inventory. |
| #933 | Give Grenade - Adds this weapon to your inventory. |
| #934 | Give Kobra - Adds this weapon to your inventory. |
| #935 | Give K6 - Adds this weapon to your inventory. |
| #936 | Give Knife - Adds this weapon to your inventory. |
| #937 | Give Machete - Adds this weapon to your inventory. |
| #938 | Give McManus 2010 - Adds this weapon to your inventory. |
| #939 | Give Mini-gun - Adds this weapon to your inventory. |
| #940 | Give Molotov - Adds this weapon to your inventory. |
| #941 | Give Nightstick - Adds this weapon to your inventory. |
| #942 | Give NR4 - Adds this weapon to your inventory. |
| #943 | Give Pepperspray - Adds this weapon to your inventory. |
| #944 | Give Pimp Cane - Adds this weapon to your inventory. |
| #945 | Give Pipebomb - Adds this weapon to your inventory. |
| #946 | Give RPG - Adds this weapon to your inventory. |
| #947 | Give Annihilator RPG - Adds this weapon to your inventory. |
| #948 | Give Samurai Sword - Adds this weapon to your inventory. |
| #949 | Give Satchel Charge - Adds this weapon to your inventory. |
| #950 | Give Shock Paddles - Adds this weapon to your inventory. |
| #951 | Give SKR-9 - Adds this weapon to your inventory. |
| #952 | Give Sledgehammer - Adds this weapon to your inventory. |
| #953 | Give Stungun - Adds this weapon to your inventory. |
| #954 | Give T3K - Adds this weapon to your inventory. |
| #955 | Give Crowbar - Adds this weapon to your inventory. |
| #956 | Give Tombstone - Adds this weapon to your inventory. |
| #957 | Give VICE9 - Adds this weapon to your inventory. |
| #958 | Give XS-2 Ultimax - Adds this weapon to your inventory. |
| #969 | Give Pimp Slap - Adds this weapon to your inventory. |
| #cashmoneyz (#2274666399) | Give Cash - Instantly gives you $1,000. |
Chapter 6 - Xbox 360 Achievements
The table below reveals Saints Row 2 Xbox 360 achievements, their descriptions, and the corresponding gamerscore reward. Note that the "secret achievements" are revealed below so you may find story spoilers in these achievements.
| ACHIEVEMENT | DESCRIPTION | GAMERSCORE |
|---|---|---|
| Welcome Back | Complete the Saints revival prologue. | 5 |
| Seppuku | Defeat the Ronin. | 40 |
| Brother’s Keeper | Defeat the Brotherhood. | 40 |
| Remind Me of the Babe | Defeat the Sons of Samedi. | 40 |
| Crime Lord | Complete all levels of all activities. | 50 |
| Velvet Rope | Complete all levels of Crowd Control. | 15 |
| Demolition Man | Complete all levels of Demolition Derby. | 15 |
| Purple Haze | Complete all levels of Drug Trafficking. | 15 |
| Trickster | Complete all levels of Escort. | 15 |
| Do Not Talk About It | Complete all levels of Fight Club. | 15 |
| Reality Star | Complete all levels of FUZZ. | 15 |
| HeliGood | Complete all levels of Heli Assault. | 15 |
| Stuntman | Complete all levels of Trail Blazing. | 15 |
| Ambulance Chaser | Complete all levels of Insurance Fraud. | 15 |
| Splatster Chief | Complete all levels of Septic Avenger. | 15 |
| …But it Sure is Fun | Complete all levels of Snatch. | 15 |
| Blue Collar | Complete all levels of Tow Truck, Fire Truck, Ambulance, and Taxi diversions. | 10 |
| Duke of Stilwater | Find all stunt jumps in Stilwater. | 10 |
| Maverick Goose | Find all flying stunt locations in Stilwater. | 10 |
| Hi Fidelity | Find all CDs in Stilwater. | 10 |
| All-City | Find and spray all 50 tags in Stilwater. | 10 |
| Where’s My Car? | Deliver all the cars to the chop shops. | 10 |
| Hello 47 | Kill all Hitman targets. | 10 |
| 2 Quick 2 Pissed | Complete all races in Stilwater. | 10 |
| Romero’s Hero | Complete the Zombie Uprising video game. | 5 |
| Surf’s Up | Get 3 gold stars in Vehicle Surfing. | 5 |
| Duelist | Complete all Ronin missions in co-op. | 25 |
| Pot Luck | Complete all Samedi missions in co-op. | 25 |
| Separated at Birth | Complete all Brotherhood missions in co-op. | 25 |
| Partners in Crime | Complete all campaign missions in co-op. | 25 |
| Confidence Men | Complete all levels of all activities in co-op. | 100 |
| True Pal | Defeat your partner in a co-op diversion. | 10 |
| Strong Armed | Complete the Strong Arm tutorial. | 10 |
| Saint’s Seven | Win all seven Ranked Strong Arm Activities, and win on all seven Strong Arm maps. | 30 |
| Spread the Love | Host and win an Xbox Live Party Game. | 30 |
| Tested | Win 10 Xbox Live Strong Arm matches. | 10 |
| Hoodlum | Earn 7 Multiplayer Badges. | 30 |
| Made | Earn 15 Multiplayer Badges. | 30 |
| Kingpin | Earn 30 Multiplayer Badges. | 40 |
| A Brighter Future | Defeated the Ultor Corporation epilogue. | 80 |
| Vengeance | Exacted revenge on Julius. | 15 |
| Going the Distance | Threw someone a long, long way. | 5 |
| Love Thy Neighbor | Grabbed 50 human shields. | 5 |
| Aww Nuts! | Hit 100 lifetime nut shots. | 5 |
| Stilwater Welcoming Committee | Mugged 50 citizens of Stilwater. | 5 |
| I’m Not Addicted! | Gambled $500,000 total lifetime. | 5 |
| Trash Talker | Taunted 50 gang members. | 5 |
| Soprano | Sung Along to the Radio | 10 |
| Still Addicted to tha Row | Played Saints Row 2 in single player or co-op for a combined 50 hours. | 20 |
Got a news tip or want to contact us directly? Email news@gamespot.com
Join the conversation