Silent Hill 3 Walkthrough
This walkthrough gives you everything you need to know to help Heather find her way through Silent Hill, including solutions for every puzzle and tips on beating or sneaking past every monster. It also includes costume codes, tips on how to get every ending, and instructions on how to unlock secret weapons.
Design by Katie Bush
Silent Hill 3 is Konami's latest addition to its popular survival horror series. Like the previous games, Silent Hill 3's gameplay consists of a combination of combat, exploration, and puzzle solving in environments that shift between the normal world and the dark, sinister "otherworld." You'll assume the role of the game's heroine, Heather, as she fights against grotesque monsters and solves devious puzzles to unravel the dark mysteries of her dreams and the people around her.
This GameSpot Game Guide to Silent Hill 3 will tell you everything you need to know to beat the game, including:
- A rundown of game basics including weapons and monster listings, and general strategies
- A full walk-through with tips on avoiding dead ends full of monsters that will sap your health and ammunition
- Complete solutions for every puzzle in the game, at all three difficulty levels
- Listings of game secrets, including unlockable outfits and strange weapons
- Descriptions of all three different endings and how to achieve them.
Table of Contents
Game BasicsWalk-Through
Normal Shopping Mall
Dark Shopping Mall
Hazel Street Subway Station
The Train
Underground Passage
The Sewers
Construction Site
Normal Office Building
Dark Office Building
Normal Brookhaven Hospital
Dark Brookhaven Hospital
Lakeside Amusement Park
Chapel
Puzzle Solutions
Hard Bookstore Puzzle
Hospital Patient Wing Puzzle
Hard Hospital Patient Wing Puzzle
Crematorium Puzzle
Hard Crematorium Puzzle
Tarot Cards Puzzle
Hard Tarot Cards Puzzle
Item Lists
Game Basics
Weapons
Knife
Location: Initially in your inventory
Range: Melee
Damage: Low
Speed: High
Description: The knife is only useful until you get the steel pipe. It's not very accurate, and does little damage. Use it only if you're almost out of ammo.
Handgun
Location: Normal mall, after fighting your first closer
Range: Medium to high
Damage: Medium
Speed: High
Description: A trustworthy friend. Very useful for fighting lone monsters, especially those damn double-heads.
Steel Pipe
Location: Dark mall, in the bar south of the bookstore.
Range: Melee
Damage: Medium
Speed: Medium
Description: The pipe is not a bad weapon at all. It can be very useful against numb bodies and closers. Not a good idea to use it against a group.
Shotgun
Location: Train on platform 2 in the subway station.
Range: Short to medium
Damage: Medium to high
Speed: Medium
Description: The shotgun should mainly be used against groups of smaller enemies or one big enemy. Its main downside is its low accuracy.
Maul
Location: Underground passage, in the room where you got the map.
Range: Melee
Damage: High
Speed: Low
Description: The maul is just too slow to be useful. It's a lot like the big knife in Silent Hill 2--nice damage, but almost impossible to use.
Katana
Location: 5th floor of the office building, in the art gallery.
Range: Melee
Damage: Medium to high
Speed: High
Description: The best melee weapon by far. It has the speed and accuracy of the knife, the power of the maul and a fairly good range.
Stun Gun
Location: Heather's bedroom.
Range: Very short
Damage: Medium to high
Speed: Low
Description: A pretty girl like Heather needs some self-defense, even in normal life. This weapon might be powerful, but it's a real pain to use. Unless you can master it, you'll hardly ever use it.
Submachine Gun
Location: Basement of the hospital.
Range: Good
Damage: High
Speed: Very high
Description: Now THIS is what I'm talking about! This baby is sure to chop any foe to tiny pieces in seconds. While firing, you can press up and down to aim up and down, a must for killing double-heads and pendulums. The only downside is the lack of ammo.
Secret weapons are listed in the Secrets section of this Game Guide.
Monsters
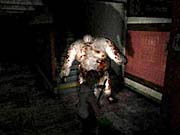
Double-Head
Appearance: They look like mummified dogs with split heads. Not a pretty sight.
Where: Everywhere
Damage: Low
Speed: High
Attacks: Double-heads charge and jump, biting your knees.
Closer
Appearance: They're about eight feet tall, with really big arms.
Where: Everywhere
Damage: Medium
Speed: Low
Attacks: Closers attack by flailing their arms. Some attacks will throw you down on the ground.
Numb Body
Appearance: Give a fish legs and put it in a straight jacket, that should give you some idea of what a numb body looks like.
Where: Beginning of the game, hardly any in later parts.
Damage: Low
Speed: Low
Attacks: Numb bodies bump into you to cause damage.
Pendulum
Appearance: It looks like some balls with spears coming out of it. It can fly.
Where: Everywhere, first seen in dark mall.
Damage: Low to medium
Speed: Medium to high
Attacks: They attack with the spears sticking out of their body and by attaching themselves to your face.
Insane Cancer
Appearance: A big fat monster.
Where: First seen in train station, appears regularly from there.
Damage: Medium to high
Speed: Low
Attacks: Punching you with its arms.
Slurper
Appearance: It looks a lot like an anteater, but of course far less pretty.
Where: First seen in the dark office building.
Damage: Medium
Speed: Medium
Attacks: Slurpers bump into you, and will sometimes knock you down.
Nurse
Appearance: The nurse is back, and she looks even better! They come in two versions: with a steel pipe and with a handgun.
Where: The hospital
Damage: Medium (pipe) to high (handgun)
Speed: Low
Attacks: The nurses attack you with a pipe, or with a gun (duh).
Scraper
Appearance: Like the missionary boss, only slightly less powerful. It can't block your shots either.
Where: The chapel.
Damage: High
Speed: High
Attacks: Slashing with its claws.
Characters
Heather
Heather is the heroine of this story. She lives with her father Harry in a big city. On a normal day she's shopping in a mall when suddenly weird things start to happen. She has to survive, and if possible also put an end to the nightmare. And what happened in her past? What has she forgotten?
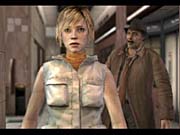
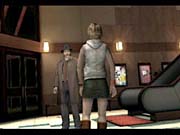
Douglas
Douglas is a detective, around 50 years old. He was hired by Claudia to find Heather. But what does he really know? What is his role in this nightmare?
Claudia
Every story needs a villain, and in SH3 it's Claudia. Wherever she goes there seems to be trouble. What does she want from Heather? Is she part of her lost past?
Vincent
Vincent appears to be a normal guy, but is he hiding something sinister? Can he be trusted? Or is he really on Claudia's side?
Valtiel
This is the main monster in the game. You never fight him, but you see him on different occasions. He's the thing that's turning the red valves, and that sometimes comes to drag Heather away after you die. But what does he want from Heather? Is he really evil, or might he be there to protect her?
General Strategies
Fight or not?
Especially in the beginning of the game, ammo and health kits are rare. If you don't watch out, you'll be out of handgun bullets in no time. On the other hand, fighting the monsters with melee weapons is dangerous to your health. So what to do if you run into two closers with just 10 bullets left? Run. It's no shame to run, it's better than to try and fight a battle you can't win right?
Melee or ranged?
Melee weapons usually are slower and weaker than guns, but their advantage is that they don't cost any ammo. Try melee fighting weak and slow enemies, like the closer and the numb body, to avoid wasting bullets. If you're up against a group, try taking some of them out with a gun, and then switch to melee to take out the last one. It saves a lot of ammo, and doesn't cost as many health items as fighting them all with melee weaponry.
Save
Those save-points aren't there for show you know. Use them! That is of course unless you're trying to get a perfect score, by using a minimal amount of saves. But you never know what's going to be around the corner, and if it turns out to be nasty and lethal you'll have to redo large parts just because you didn't save.
Check your map
Hey, this one's pretty obvious. On your map all the things you need to know are marked, whether it's a puzzle, a save-point, or a locked door. Use it to find your way around, and, if you're stuck, to check where you haven't been before.
Tired?
If Heather is panting because she's tired from the running, simply enter any door and she will be good as new. Entering the menu also seems to work.
Don't give up
The puzzles might sometimes be hard, but they're not impossible. Same goes for the monsters. There is always a solution, you just didn't look hard enough. Go over all possibilities, and if you still don't know after that, hey, that's what this guide is for, right?
Walk-Through
Choose your difficulty levels, and than sit back and enjoy the opening cinematic. The items referred to in this walk-through refer to the Normal difficulty level. You'll get fewer items on Hard, and more items on Easy. Puzzle solutions for all three difficulty levels can be found in the Puzzle Solutions portion of this guide.
Dark Amusement Park
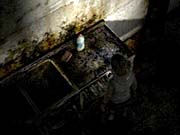
In the opening movie, you'll see a dark amusement park, with a monster running through it. You'll then see Heather walking in that park. She doesn't seem to know where she is. You gain control of her. First, have a look at your inventory. You already have some weapons (handgun, submachine gun, steel pipe, knife), some healing items, a radio and a flashlight.
You can explore this area as much as you want. There are some nice shots of the man-sized bunny costumes, and cages with weird monsters in them. In the next room there's a big pit, and a couple of monsters. You can enter a store, but there's nothing to find. If you enter the door labeled "Mountain Coaster", you'll have to fight some tough monsters. Even if you survive that, there will be more monsters in the next area. There's no use in fighting, because you must die to move on to the next part of the game. In other words: you're supposed to die! If you do make it all the way through the park, you'll arrive at the roller coaster. If you start walking on its tracks, Heather will get hit by a cart, and die anyway.
Normal Shopping Mall
After a cutscene, you'll regain control of Heather in a women's bathroom. In her inventory, Heather has got her house-key, her lucky pendant, and a knife. On the mirror is a red sign. This is a save-point. You'll find these things throughout the game, and they are marked on the map (but you don't have one right now). If you examine it, Heather will say she knows the sign from somewhere, she has seen it before.
Heather doesn't want to go back out of the restroom because Douglas is still there, so exit out the window. You'll be in an alley. There's only one way out, through the door further down the alley. Go through, and you'll end up in some kind of corridor that seems to be for the shop owners and mall employees. Just walk through it--only the doors at the end can be opened. This next area is a small part of the mall. There are several stores, but only one is accessible. Go to the store with the half-closed shutter and enter, which will trigger a cutscene.
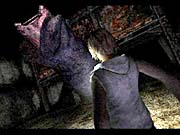
Normal Shopping Mall - cont.
Here Heather will find a handgun lying on the ground. She picks it up and than sees a monster in the store. The monster seems to be doing some nasty things to a human. It notices Heather, and attacks her. Heather empties her gun on it, but it's still standing. She's starting to freak out when the monster falls down anyway. After you regain control of Heater, check out the dead monster and the human body to find out what Heather is thinking about them. Pick up the handgun bullets on the bench. Get behind the counter and open the door there. To your left will be double doors leading back to the previous corridor, but all you'll find there are two double-heads, so stay out of there. Check the board opposite the elevator to find the map of the mall. Exit through the door labeled 'Exit' and climb the stairs.
In here you'll encounter a new type of monster, a numb body. Kill it, then head into the corridor. Most doors are locked, except for two on the north side. The first one has a double-head eating some beef jerky. Kill the double-head or not (it's your choice), but remember to get the beef jerky. It serves well as a distraction. Back in the corridor, turn right, and check the doors on the right to find the second opened room. In here, there's a save-point, two health drinks, handgun bullets and a table with a key under it in the corner. You can't get the key yet, because Heather can't reach it. If you save here, Heather will once again try to remember where she saw the sign before. She brings up a book and an altar, even though she doesn't know where that altar came from. Exit the save room and make your way to the central area of the mall.
Many parts are closed off. There are two closers (those big guys) walking around the gap to the first floor. Try to avoid them or kill them. Avoiding them is better, because they're easy to outrun and you want to save your ammo for when you really need it. There are only two stores here that are of significance. One is the bookstore, but it's locked, the second is the bakery. Go there now. In the bakery, pick up the pair of tongs and read the brochure on the counter if you want. Head back to the save room and use the pair of tongs at the table to get the key to the bookstore. Go to the bookstore, which is in the same area as the bakery. Note that after you got the key, the hallway next to the save room will be filled with numb bodies.
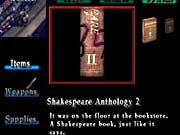
Here you'll find your first puzzle. There are five books on Shakespeare lying on the ground. They are labeled I to V (Roman numbers). Before starting the puzzle, check the rest of the store. There are some handgun bullets on the counter. Behind the counter is a locked door with a keypad. Right, let's start puzzling! Check the Puzzle Solutions part for the solution and some hints.
Enter the code in the keypad on the door behind the counter, and enter to trigger another cut-scene where you meet Claudia. When you regain control, go to the elevator. Enter. When the elevator stops, a radio will fall from it's ceiling. Pick it up. This radio has the same function as in Silent Hill 2: whenever a monster is nearby, it starts emitting static. Exit the elevator.
Dark Shopping Mall
You enter another elevator. It's dark. When a light suddenly flashes, Heather sees a monster outside the elevator-cage. She ignores it, and as the elevator starts to move she wonders how she got into this mess, and if it's all just another dream. In the next hallway there are some double-heads to be fought. Near the toilets you'll find the first-aid room. Enter. Here you'll find health drinks, an ampoule, and a save-point. Save your game, then head out, and to the north.
In the central area there are three closers walking around. Avoid them if you can, or try to kill them (this takes lots of ammo, though). As you exit the corridor, make a right, then left into the narrower hallway. Follow it. Enter the room to the left of the women's bathroom. Here you'll find your trustworthy flashlight, as well as some handgun bullets and a first aid kit. Exit and enter the women's bathroom (this is the one you started in). Take the bleach, and knock on the locked door for a useless scare. Continue to the east. You'll arrive in the part of the mall that you visited first. Go to the clothing store again (where you got your gun). Take the hanger. Head back to the central area with the three closers, and enter the door on the northwestern end. There's a ladder hanging from the ceiling in this room. Use the hanger to get it down, then climb up.
You'll be at the west end of the 2nd floor. Go up the escalator in nearby. There's a closer in this area, and a double-head nearby. You can enter the women's bathroom here, but it seems to be useless. Opposite of the escalator is a locked door with a moon painted on it, but it's locked. Instead, go into the first shop on your right when you come from the escalator. Here you'll see a grilled dog...getting hungry? Examine the dog to find a cooked key. Also find the health drink and the first aid kit from behind the counter. Go down the escalator, back to the second floor.
You hear some static, but it's not coming from your radio. It comes from the TV in a shop to the south of the escalators. Check out the TV and you'll see a little video. A little girl sits up, and says "Daddy...". Around the corner here you'll find a second TV with a save sign on it. Save if you want, then enter the double doors next to the save-point. You're inside a jewelry shop. Pick up the walnut from one of the cases. You can exit through the back door, or go back to the first TV and enter the store there. Be warned: in this store you'll have to fight some numb bodies, and you don't get anything for it. In this store, that looks like a clothing store, you can also exit through the back door. Whether you go through the clothes store or the jewelry, you'll end up in the corridor where you met Claudia, so if you want to avoid extra combat, just use the jewelry store exit. A closer is walking around. Make your way to the eastern door and unlock it with the cooked key.
Here, pick up the two health drinks and the steel pipe. The pipe is a really useful melee weapon for fighting numb bodies and closers, but it's a little too slow for double-heads. When you get your new weapon, exit through the double doors. You'll be at the central area. Some numb bodies have been waiting for you. After you give them a warm welcome with your pipe or gun, head to the bakery (you still know where it is right? The south-east part of the central area). Inside, pick up the detergent near the sink. Exit through the back door.
Dark Shopping Mall - cont.
You'll be in a hallway with a fan. Next to it is a button to switch it off, so press it. Then, enter the door next to it. Here you'll see a cloud of bugs, Heather can't get past them. You'll need some sort of anti-bug spray to get rid of them. Well, have a look at the chemicals in your inventory, it says on the labels to not mix them. A basic rule in adventure games: if a sign tells you not to do something, do it! Next to the door you came through is an empty garbage bin. Use the bleach and the detergent on it. Gas alert! Heather automatically exits the hallway. Switch the fan back on, than go into the bug hallway.
The bugs are gone, so walk past that part. After a while you can open a door on the right side. Find some beef jerky and three batches of handgun bullets. Go back to the hallway. Continue north, and turn right at the intersection. Open the first door on the left. Kill the closer inside if you want, then exit through the double doors. Here, you'll fight a new type of monster. It's called the pendulum. It can fly, does a good amount damage, and has high stamina. Avoid it if you can. There are also some double-heads here. From the double doors, head left, then right. In the northwest part of this area is another pair of double doors that you can open. When inside, find the vise lying on one of the beds. Use your walnut on it to receive a moonstone. Exit the way you came, go right, and unlock the door at the end of the walkway.
You're back in the central area. Head back to the escalators, be warned because there are some new monsters hanging around, including a Pendulum. Head up to the third floor, and use the moonstone on the locked door opposite of the escalators (the one with the moon on it). Go around the pit, and then down the ladder. Get ready for a boss fight!
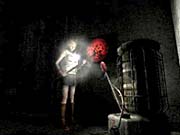
Boss: Splitworm
Difficulty: Easy
You'll climb down to a closed off area. As you walk away from the ladder, it falls down, leaving you no way out. And to make matters worse, you're attacked by a giant purple snake. It can come out of 6 holes, 3 on either side of the room. It can travel to any hole from his current location, so don't think that when he exits on one side he'll also come out on that side. When it comes out, it opens its mouth, screams a bit, and then either crosses the room or retreats. Its only attacks are stomping on the ground (doesn't hurt you, just stuns you for a second) and attacking you with the head (will take your health down to almost zero). Stay away from the head if you can. When the snake comes out of a hole, stand on the other side, facing its head right on. When it opens it mouth, fire three bullets into his head. Don't shoot any more than three at a time, because after three it will close. After that, retreat to a corner, and wait for it to disappear. As long as you stay away from its head, you're good to go. It takes exactly 14 bullets to kill it in normal difficulty.
Normal Shopping Mall (Again)
After you've killed the snake, everything seems to be back to normal. You're in the central area of the first floor. Head west, and duck under the shutter. In the next area keep going west, and enter the last shop on the right. This is the Happy Burger, where Heather woke up long ago. Check the store to find a save-point, some beef jerky, a first aid kit and three packs handgun bullets. Exit the Happy Burger, then exit the mall to start another cutscene.
Hazel Street Subway Station
Follow the path. After the first door, head left, and through the gates. As you leave the gates, turn right around the corner, and pick up the map of the subway. Check the garbage can next to the toilets for two packs of handgun bullets. Go down one of the stairs to platform 3 and 4 (not the one on the east). This next level has a lot of stairs leading to the platforms, that's why we'll refer to it as the stairs level. Find the stairs to platform 4 and go down. There's an occult magazine lying on the floor, read it if you want. Go down to the platform itself to find a health drink and a first aid kit. After that, go back up to the stairs level. Head east. There are two corridors leading east to the central part of this level, in the south one you'll find a save-point.
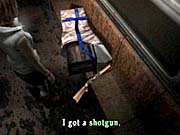
From the central stairs level, head east again. Go to the stairs leading to platform 1 on the northeast side of this level. There are some double-heads here. In this area there are four stairs: two up (one you came from, is locked), and two down. Go down both flights of stairs that lead down. Both lead to a dead end. At one dead end you'll find two health drinks and handgun bullets. At the other end you'll find a nutcracker. Head back to the stairs level. Go to the stairs leading to platform 2 on the south-east of this level. It's locked with a chain. Use the nutcracker on the lock to open it. Proceed down. Enter the train here and pick up the shotgun shells and of course the shotgun. You now have a powerful weapon. The shotgun's downside is its low accuracy.
Blocking the stairs leading up, there will now be a new monster, called an insane cancer. They're very slow, big, and fat. You don't have to kill it, but you might feel like testing your new shotgun, so go ahead. Either way, you mustn't go back up the stairs with the fatty in front of it, so go around these stairs and go down using the other stairs. Still with me? You're now in the hallway with the two dead ends, where you got the nutcracker. Find the stairs to platform 3 and go down. On the platform, fight the double-heads if necessary, than continue to the east end. The camera will focus on a door next to the tracks, with a red light over it. Jump down on the tracks and check the door. It's broken. You'll now hear the sound of a train approaching, so get your pretty behind back on the platform.
If you made it (press X when facing the platform to climb), you'll see a cutscene where the train misses Heather by one inch. You'll see two doors open. Head west, unlock a gate, then keep going west until you can't go further. Now head up the stairs, and down the other ones. You'll be at the west end of platform 3. Enter the opened train doors. The doors close and the train starts to move.
The Train
In the first car there's a save-point. Use it, then start heading to the front of the train. You'll have to cross about 10 cars. There are some numb bodies around, an occasional insane cancer, and some items: a first aid kit and some shotgun shells. When you reach the end, the train will stop and the doors open. Exit.
Underground passage
Close to the train doors is a save-point. Save if you wish. You're now at the platform of an unknown station. Exit through the only door here. Go down the long stairs, then right, and follow this path until you come to a door. Enter it. In this next area you'll find a couple of those pendulum monsters as well as some numb bodies. Turn left and take the first door on the right. More numb bodies here. Have fun fighting them. From where you came in, take the first door on the right. Even more numb bodies, what a surprise! After you've taken care of them, turn left and enter the door.
Here you can pick up the underpass map, some handgun bullets, and the maul. The maul is another melee weapon. It deals lots of damage, but it's very slow. And in these narrow corridors, you got a big chance of hitting nothing but wall with it. It's not a great weapon at all; you're better of with the steel pipe. Anyway, when you're ready, enter the door opposite of the one you came through. In this next hallway you'll fight a big numb body. It's basically the same as the little ones, but it's bigger (duh), does more damage and has more hit points. There are also some little numb bodies here. Take the first door on the right. At the end of this little hallway you'll find two health drinks, some beef jerky and a wine bottle. Exit. Go south and then west, and you'll arrive at another dead end with some shotgun shells.
In this hallway, take the door on the east side. In this next hallway are no less than three pendulums. Either fight them or run past them. At the end of the path is some sort of shaft. Before you reach it, take a door on the left. There's a long walk north. Turn right when you exit it, and right again when you come to an intersection. Enter the big door. After fighting the numb bodies here, check your map to see that there are two rooms on the west side of this hallway. Enter the one on the south. Check the room for two health drinks and shotgun shells, as well as a save-point. Examine the heater next to the save-point, it's filled with kerosene. Use the wine bottle on it to get a bottle full of fuel. Now head for the room to the north. There's a machine here that doesn't work, and a ladder that leads down to a flooded area. Find the fuel tank of the machine, by using the bottle with fuel on it. Start the machine by flipping the nearby switch. Head down the ladder.
The Sewers
Head east out of the room, cross over a bridge and go down some stairs to a door. You'll now be in a sewer...yuck. Head south, fight the big numb body, and take the first door on the left. Walk all the way to the west, over another bridge. In the room at the end, collect an ampoule, handgun bullets and a dryer. Head back to the sewers, and enter the door opposite of the one you just came through. More numb bodies are here, so let them know how much you love them. Turn left at the intersection, and enter the door. Examine the memos here, and use the save-point if you want. Also pick up the health drink. Exit through the big metal door.
In this next area is a bridge over the water. Don't cross the bridge because there's big bad monster in the water that won't be nice to you. Instead, check the walls on this side for an outlet. Use the dryer on the outlet to fry the monster. Cross the bridge. There's only one path to the exit, along with two pendulums hanging around. At the end you'll find a ladder. Go up.
Construction Site
Walk around the building. There's a save-point on some drums, so save if you want. Enter the building. Pick up the two health drinks. Enter the only door that will open, to the stairs. Go up all the way to the 5th floor. Here enter a door into a pretty big area. Pick up the handgun bullets and the health drink. Take a look at the hole in the middle of the room. It's too dangerous to just drop down. Shove the big mattress lying next to the hole into it. Jump down onto the mattress. The door out of the room you're in now is kaput, so exit out of the hole in the wall. Walk around the building on the ledge, but beware of the pendulums. When you get to the other side, enter the window.
Normal Office Building
Exit the little office. Go to the end of the hallway, and enter the door here. You're in a room with mannequin dolls. Pick up the handgun bullets and the shotgun shells and examine all the dolls for a rather useless scare. Exit. From here, turn left and enter a door on the right. Fight the double-heads. From the door, head straight, and enter the dance studio. The first door on the left leads to a room with nothing but monsters, while the door straight ahead from where you enter the dance studio leads to an office. Here you'll find the map of the office building, a save-point and a drawer that is rusted shut. Exit and, while still in the dance-studio, enter the last door of the hall on the south end to find an ampoule and a first aid kit.
Exit the dance studio, and head north. Enter the door labeled 'Exit'. Go up to the fifth floor. From here, go to the art gallery (check your map). Enter the main painting room. Examine the paintings, note that one is missing. Exit out the back door. In this corridor you can find the screwdriver. In a small room on the west side you will find the katana, the best melee weapon in the game. Exit the art gallery, back to the room with the elevators. Enter the door opposite of the gallery, and fight the numb bodies. There's a room on the south side you can enter, but it only seems to hold an insane cancer, so ignore it. Go to the western corridor and head north. Enter the first door on the left and pick up the jack.
Now go back to the third floor, to the save-point in the dance studio. You've seen the drawer near to it? You couldn't open it before, but you can now that you got your screwdriver. Use it on the drawer to get the rope. Exit out to the room with elevators, and check the elevator on the west. It's partially opened. Use the jack to open it further. The elevator doors on the floor below seem opened too. Use the rope on the shaft to go down. Here you can find a save-point on a venting machine. Pick up some beef jerky. Go to the west where you'll find three doors labeled 'ECHO'. Open the one that is not broken. Go north, until you come in a room with a single bathtub. Examine it, and watch the nice cinematics.
Dark Office Building
Not again! While the screen is dark you hear a male voice saying something about an invasion of the Otherworld. When Heather regains consciousness, go to the south. Get the handgun bullets from the wheelchair. Exit east, and immediately go north into the clinic. Grab the picture from the couch--it's of Heather, and on the back is written: "Find the Holy one, kill her". Use the save-point nearby if you want. Enter the room next to the save-point and watch another cutscene.
Tale the oxydol, first aid kit and two health drinks from the shelves. Exit the clinic. Fight some double-heads and a new monster, the slurper. Go to the elevator and enter it. Head to the first floor. In front of the front doors is a monster you can't kill, so don't waste your ammo. Enter the Last Drop Cafe. There are some shotgun shells with an insane cancer lying next to it. Check the fridge to find some pork liver. Go back to elevator, and up to the fifth floor. Enter the door on the west. From this door, go left and right at the intersection. Enter the door here. Pick up the matchbook and two packs of handgun bullets. Exit the room. The first door on the right is also opened, but it only features a slurper behind bars. In the hallway, head east, until you bump into a glass screen. Now head north, and enter the painting room of the gallery. Use the save-point here if you wish.
Check out the painting that was first gone, Flame Purifies All. You might have already guessed it: you have to make a fire. Stand in front of the bin beneath the painting, then use the oxydol, matchbook and liver. When the painting is gone, open the hatch behind it. Walk down the stairs, and read the papers on the table. It's the middle part of some fairytale. Exit through the door. Go to the southeastern room on this floor. There's a bed with handgun bullets and a first aid kit on it, and some slurpers underneath it. Exit, and head to the door that leads to the next hallway. Enter it. Enter the last door of this new hallway. Pick up a silver coin. Thirsty? Use the coin on the drink machine in the corner to get the insurance key.
Go back to the elevator area on the fourth floor; you can unlock the doors to it. Go to the first floor, and use the key you just got to open the door on the west side. Head left, and follow the corridor until it's blocked. Be careful of the slurpers. Open the last door on the left. You'll be in a room full of blood. On one table is the end of the fairytale you read the middle of. Read it, and Heather will say the chant out loud, causing all monsters to disappear. Head to the elevator room of the first floor. The big monster is gone. Read the beginning of the fairytale lying on the ground and exit this wretched place.
Outside/Apartment
It's dark, and no one is around. From the doors, head left, and when you come to an alley on the left side, enter it. Follow it until you see the door to the Daisy Villa. Enter, and search around for a save-point. Enter your apartment--the camera zooms in on its door. This will start another scene with Claudia and leads into a boss fight.
Boss: Missionary
Difficulty: Medium

The main problem with this guy is that it can block bullets with its big razor claws. So if you try to shoot him in the face, there's a 99 percent chance that your shot will be lost (unless it just started an attack motion). So you have to hit it in the back or the sides. Here's a tactic that works pretty well: equip either the handgun or the shotgun. The shotgun is more powerful and has a higher success rate here, so it's preferred over the handgun. Stand still and wait. Use L2 to focus on the boss. When it comes, wait until it's only a few feet away, and then quickly run past it. You have to time this right: if you go too soon, it will turn around while attacking, so it will still be facing you. If you go too slow, it will hit you. If you timed it right, then after running past it, take two or three more steps (still running). Immediately stop running, mash the R2 button (Heather will turn around and aim at the monster) and then press X to shoot. You'll probably hit it in the side. If you hear the bullet on metal, your timing was wrong. Keep practicing. Repeat this pattern: wait, run past it, turn around, shoot. Don't shoot more than one bullet at a time.
After some shots it will go down. Shoot it in the head, and it will get up again and the whole thing starts again. The fourth time it goes down, it won't get up, so head over to it, and kick it. That's the end for that loser.
Another short scene ensures, but when you gain control again, head to Heather's bedroom and pick up the stun gun and two batteries for it. Then exit the apartment and take the door next to the save-point.
Silent Hill
You'll arrive at Jack's Inn. Douglas tells he will go to Leonard's house and asks Heather to go and investigate the hospital. You might now want to read the letter/diary of Harry, it's in your inventory. Now exit, and head to the hospital. There are some monsters on the way. Be sure to stop over at the Heavens Night bar, where you can find a first aid kit, shotgun shells, beef jerky and a pamphlet on Silent Hill. Continue to the hospital.
Normal Brookhaven Hospital
This place hasn't changed a bit since Silent Hill 2. As soon as you enter, you'll be attacked by two zombie nurses. Enter the door opposite of the entrance. Here you'll find a save-point, as well as the map and two health drinks. Exit and go to the doctor's lounge. Check the fridge for another health drink. Pick up two sets of handgun bullets. Read the notes on the table. They're about Leonard and someone named Stanley Coleman. They're staying in respectively room S12 and S07. Exit, and head to the visiting room. Here you'll find a part of Stanley Coleman's diary. He addresses himself to Heather, says he loves her, and wants to give her this doll. Heather won't touch the doll, so ignore it and exit. Head to the elevator and take it up to the second floor. Find another letter from Coleman. Enter the women's locker room. Get the shotgun shells, perfume, and nail polish remover. Exit, and head to the door to the patient wing. It's locked with a combination lock. The hints for this puzzle are posted on a nearby board. Check the puzzles section of this guide for the solution.
Enter the door to the patient wing. Watch out for the nurses, one even has a gun. Enter examination room 3. There's a guy here under a sheet. Read the article on him to find out no one knows his name, but his stuff is in M4. Check out the guy's arm. He's got a tattoo reading "the start time is my key." Exit. Enter M4. As you walk to the beds an alarm bell starts ringing. Examine the clock, and stop the annoying noise if you want. Note down the time. In my game it was 4.32, but it's random and should be different for everyone. Check out the briefcase lying on the bed. It has a number lock, four digits. Enter the time you just noted down here (in my case, I entered 0432). Get the instant camera. Exit this room. In M5 are some nurses, nothing special, so you might as well ignore that and head back to the first floor.
Go to the patient wing here. In room C2 you'll find a couple of nurses as well as an ampoule. Head to room C4. Here, you'll find another entry of Coleman's diary, and a key glued to the wall. Use the nail polish remover to get the stairwell key. Head over to the stairwell now. First, go down to the basement. Pick up the submachine gun, walk past the wheelchair, and pick up the submachine gun! Enter the room in the southeastern part of the basement. Here, check the trail of blood on the wall and the space between the wall and the shelf. Use your instant camera now, you'll get a photo of the back of the shelf, with a code carved into it. Take the stairs to the third floor. In the left cell of the special treatment room you'll find another Coleman diary. In the storeroom you'll find a save-point, as well as two health drinks and a stun gun battery.
Go into the third floor patient wing, by entering the code from the photo (4152) into the keypad. In this corridor there's some beef jerky lying on a bench. There are only three rooms here you can enter. The first one is S1, where you'll find a magazine on the mysterious Hope House of Silent Hill, and two health drinks. Then there's S7, Coleman's room, where you can find Coleman's last diary, with a smashed up doll. How sad. Your real goal is S12. When you enter it, a phone will ring, so pick it up. You'll have a telephone conversation with Leonard Wolf, the father of Claudia. First he thinks you are Claudia, but Heather says she's not, and wants to kill Claudia. Then Leonard asks Heather to help him, by going to the end of the patient wing of the second floor. Go there now.
There's a new door here. Enter it. You'll arrive in some sort of labyrinth. The path isn't difficult at all, and there are no monsters, so just follow it until you arrive at what looks like a save-point. When you examine the save-point, you'll see a video of young Heather, with the voice of nurse Lisa on the background, asking herself what is keeping Heather alive. After the video, the wall with the save-point has disappeared, so walk into the new hallway. Go up the ladder.
Dark Brookhaven Hospital
You're back at the third floor patient hall. The whole hospital is now crawling with slurpers, so watch your step. Head east and enter the day room. Exit it on the west side. Enter the storeroom for a really scary scene if you wish. After the scene, head to the elevator, and take it down to the second floor. In the man's locker room, you will get a call, from another guy who sings happy birthday to you. Otherwise, there's nothing special here. Exit and enter the women's locker room across the hall. Pick up the two health drinks and a plastic bag. You should now head back to the third floor, and go to Examination Room 4. Here's a body hanging from the ceiling, dripping of blood. Use the plastic bag on the bucket to get some blood. Head to the elevator, and take it all the way down to the basement (bottom left button). The crematorium is one big puzzle, check the Puzzles Solutions section for the solution.
On the first floor, you can enter the office, but there's nothing there. Go to the examination room. Here you'll find a save-point, an ampoule, and a letter to a doctor concerning a patient. Enter the day room from the north side to find some kind of notebook on the ground. Exit, and use the cremated key to unlock the entrance to the east side of the day room. Cross the day room, and enter the patient wing. Once again, admire the great blurry effect. Enter C1 to meet a nurse and get three health drinks and a first aid kit. Also in this room you can find a birthday card. Head down to C4. Use the save-point if you want, and examine the altar and the book. Use the blood in the bag on the altar. A ladder appears. Go down.
Boss: Leonard
Difficulty: Easy

After a long and rather pointless conversation, in which Leonard tells Heather he's the guardian of the seal, you have to fight him. He's not tough at all. Both the submachine gun and the shotgun work really well. Just shoot him until he goes down, then wait for him to get up again and repeat it.
After the fight things are back to normal. Heather wakes up in C4 and finds an amulet, in the shape of a save-point. Exit the hospital and trigger a cutscene.
Silent Hill
After the scene, head to the motel and enter your room. Beware of the monsters outside, mainly double-heads and pendulums. In the room, Vincent is waiting. He tells you that Douglas said that she must go to the other side of the lake. Vincent advises her to go through the amusement park. Exit, and follow Nathan Avenue to the northwest. After some time, you'll automatically be taken to the amusement park
Lakeside Amusement Park
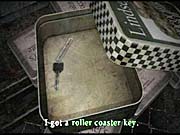
When she enters, Heather gets another 'headache'. She looks around, and everything appears as it was in her dream. Enter the door to the next area, turn right (watch out for closers), and enter the shop. Here you can find a save-point, two packs of handgun bullets, an ampoule, and beef jerky. Check the cookie tin next to the save-point to get the rollercoaster key. Exit the store and head left, enter the door labeled "Mountain Coaster." In this next area, kill the monsters (or run past them), then enter the next gate and turn left. Climb the stairs, but watch out for those pendulums. At the top, use the coaster key to open the control booth. Grab the health drink and switch the machine off with the control panel. Then enter the gates onto the tracks. Follow these tracks (use the R2 button to prevent from falling off). After a while, the coaster will reactivate, and a car comes heading in your direction at high speed. Heather jumps off the tracks to avoid it, triggering another cutscene.
The scene ends with Heather waking up on a ticket booth. Enter the nearby door. You're now at the Borley Haunted House. Use the save-point on the ticket booth. Enter the house. In the first room, a man will tell you about the house. Enter the next door and watch a scene involving a table covered in blood. First the male voice tells you that a family was murdered here, and then he says that that was a lie, and the only thing that happened here was a suicide. Enter the next room. An old man is sitting in a chair. Walk around him. Right before you reach the door, a body comes falling from the ceiling. The voice tells a story about the body, which appears to be real. Turn around and enter the black door. In this room, the ceiling will come down. Press R2 when the camera focuses on the ceiling, and carefully walk. You should be fine. Enter the door that the voice says is the exit. Of course, it's not. In the next hall, you'll be chased by a red mist that instantly kills you. So run as fast as you can. After another hallway with red mist, you'll be outside of the haunted house.
Fight the closers if you want, and enter the next area. Take the gate on the left side, and cross this next area to another gate. You're at some kind of stage. Get the chain from one of the benches in the audience, the red shoe from the stage and the health drink and shotgun shells from a bench close to the gate. Go back to where you fought the closers. In this place, there's some kind of attraction. Go up the platform of the attraction, and check out the central column. Attach the chain to it. Get off the platform. Opposite of it is a rusted shut gate. Use the other end of the chain on it. The control booth is open, so get in, and use the switch. The gate is opened. Also pick up the handgun bullets in the booth. Enter the gate you just opened. You'll meet with Douglas, triggering another scene.
Enter the gate you just came through, you're now at a new area. Turn right and enter the Fortune house. Read Douglas' notebook on the chair, it seems Harry Mason kidnapped Alessa. She later died in a fire at the age of 7. Claudia, who reported Alessa as missing, seemed to have used the name 'Heather' as an alias. Pick up the doll head from the table and use the save-point if necessary. Exit this room. Enter the door on the right, into the fairytale setting. Here you can find a Cinderella doll and a Snow White doll. On the tracks are some pictures of the doll's shadows. Something seems to be wrong...Use the doll head on Snow White and the Red Shoe on Cinderella. Now you can exit through the left door of the tracks. In the area with the dragon, exit through the normal door. In the next area, there's a little shop with a memo from Harry on the counter. After reading it, enter the gate to the left of where you started. There's a first aid kit lying on a bench. Continue to the Merry-Go-Round. As you get on, the thing starts to move and the horses come to life. Stay clear from their breath, and slash them apart from the side with your katana. After you've killed them all, a boss fight will start.
Boss: Memory of Alessa
Difficulty: Hard
It's...you! Or is it not? This boss starts with a knife, but it will change weapons when you deal enough damage. Against the knife, you should use your katana. Timing is everything, since she'll block your swing, unless she just started an attack motion. Then's the time to swing. Don't worry, you'll get it right after some practice. When you deal some damage, she'll run away. Chase her and finish her off.
Right after she dies, she'll appear again, now equipped with a handgun. That sounds scarier than it is. Just take cover behind a horse and wait for her to get close. If you attack her with your katana when you're close enough, she'll just use the gun as a melee weapon and won't shoot. After she goes down, she'll come back with a steel pipe. Use the same strategy as when she was armed with the knife. You can still use the katana, or switch to the steel pipe as well. After she dies again, she'll come back with a submachine gun! But the same thing as with the gun applies here: if you fight her at close range, she'll use her submachine gun as a melee weapon, and she won't shoot.
After the last version goes down, the Merry-Go-Round will stop. Examine the signs on the floor, and leave this attraction. You'll be in a long corridor, with a prayer written on the walls (in blood, naturally). Enter the door on the end after reading the sign on it.
Chapel
After the cutscene with Claudia, examine the altar for a save-point and get the eye of night tarot card. Examine the paintings if you want. Exit through the small door on the side. Pick up the beautifully drawn map from a nearby wall. Enter the confession booth, and listen to Claudia's confession. After some time, you'll be given a choice, whether to say you forgive her or not. This influences the ending. Read the section on Endings for more information. Exit the booth, and head east. The door on the south is locked, so take the door to the north. In this room you'll encounter a closer. There's nothing else special here, so exit out the southeast.
In this corridor, there are some insane cancers. Enter the southeast door. Pick up two packs of handgun bullets. Also in this room, find a cassette tape. Exit, back to the cancers, and exit through the north. In this corridor, you'll hear a girl crying and some footsteps. Ignore them for now, and exit the doors on the end of the hall. Use the big save-point if you want. Examine the paintings here, especially the one of Saint Alessa. Go back to the hall with the crying girl. If you look at the floor, you'll see some footsteps. Follow the trail, which will lead to a painting on the east wall. Shove the painting aside, and enter the next door. On this ledge, a new monster is walking around. It's called a scraper. Enter the door on the southwest. This is the library. Read the books about tarot and the religion. Pick up the moon tarot card. Vincent will enter. He says he's on your side, because you're both against Claudia. He gives you a book, the Otherworld Laws.

Exit the library, and go to the elevator in this area. You'll automatically go down one floor. Enter the door on the northwest, and turn left at the intersection. Enter the door here, and inside read the diary of Harry on the bed. Also find the two stungun batteries on the table. Exit this room and head to the western most room of this hall. Inside you find a hanged man tarot card, as well as three packs of shotgun shells. Exit, and go back to the elevator room. Don't go down yet. Instead enter one of the doors on the south side (only one is opened). This next room looks much like the previous one. You'll find a pendulum and a scraper here. Take the last door on the right, and in the next hallway enter the first door on your left. Cross the room with the closers, there's nothing of interest here. Enter the door on the other side. You'll hear that crying kid again. Follow the footsteps like you did before, they lead to a secret door. Open it, and enter the door behind it.
This is a room where they locked Alessa in. Find the fool tarot card, it's hidden in a book about some red jewel. Also, you can find three packs of handgun bullets and two ampoules here. Exit this room. The hallway is now filled with insane cancers. Head back through the room with the closers, and into the hallway. Take a left, and follow the path until you arrive at another door. This is Alessa's bedroom. You can find a save-point here. The door on the other side is locked, you have to solve a puzzle to get it open. Ignore it for now, and take the brass key next to the save-point. Exit, and head all the way back to that locked door on the first floor. Open it with the brass key. In the next hallway take the first door on your left, and you'll be in a classroom. Examine the lone desk, the letter from K.Gordon on the teacher's desk and take the submachine gun bullets. Exit through the east door. Take the first door on the right. Use the cassette tape on the tape deck, you'll hear a conversation between father Vincent and a unknown woman, they talk about Claudia. Also read the notes on Vincent on the desk, they are signed L.S.
Leave this room. Don't enter the room on the east side of this hall, it's only filled with scrapers. Instead take the other door on the west side. Pick up your fifth card, the high priestess tarot card. Also read Claudia's diary on the shelves. Now get back to the room with the tarot puzzle. First examine the hints on the bed, and then let's get puzzled! Refer to the Puzzle Solutions section for hints and solutions.
After you solve it, the door will unlock. Enter it (you might want to save first), and go down the long hallway. Enter the door on the end. You'll see a cutscene with Vincent and Claudia. After you regain control of Heather, go to your inventory and use the pendant with the red marble. Heather will swallow it, and then cough up a fetus. This is God? Yuck. Claudia is shocked and eats God so that she might give birth to her herself. She starts changing and throws herself in a hole in the ground. What are you waiting for? Let's end this now. Follow her.
Boss: God
Difficulty: Hard
Heather looks around, Claudia's clothes are empty on the floor. She is angry because she didn't get to kill Claudia, but then she sees God. Meet the final boss. She's a real nuisance. When God drops down, aim at her head and pop some bullets into it. After some damage (around 5 bullets from the handgun, 1 or 2 shots from the shotgun), she will get up again and start making fire. Avoid the fire by running, or use the handgun to pop a couple of rounds in her head, which will make her go down again. When she gets down again, shoot some more. Repeat this for a very long time. Just stay clear of her head and arms, and watch the fire and you're good to go.
If you're low on bullets, you use the maul while standing against the curb at hitting range next to the head (instead of in front of the head). If you position yourself correctly, then God can't hit you with her arm. She'll try, but will miss you.
Congratulations, you've beaten Silent Hill 3! Sit back, enjoy your ending, then watch your ranking and save the results. Unlock various goodies, and play it again!
Endings
Obviously, this section contains huge spoilers. You should only read this chapter if you want an ending you've seen explained, or if you want to see how to get a certain ending. You've been warned!
Normal Ending
Do's:
Avoid some enemies
Avoid damage as much as possible
Don'ts:
Don't kill a lot of enemies
Don't take a lot of damage
Don't forgive Claudia after her confession
Don't check back on Douglas in the park
Description: After killing the final boss, Heather kicks it some more, and then breaks down, crying over Harry. After that she walks away and goes back to the amusement park. Douglas is waiting on the bench. First she threatens him with a knife, but she's only joking. Douglas then calls Heather by her real name: Cheryl.
Possessed Ending
This theory is the most popular, though it isn't confirmed. To get the possessed ending, add 10 points for every enemy you've killed, one for every hp of damage received, and 1000 points if you forgave Claudia in the Chapel. Also, checking back on the wounded Douglas in the park seems to subtract points. Count up all these points. If you got more than 4000 you should get it. Playing the game on hard action mode seems to help. An unlimited submachine gun should help as well. The ending plays out much like the normal ending, except Heather actually kills Douglas.
Revenge/UFO Ending
Do's:
Kill every enemy (or at least more than 30) with your Sexy Beam (see the Secrets section on how to get it) or the Heather Beam.
Don'ts:
Use any other weapon
Description: This one's hilarious. As you enter your apartment, instead of showing the normal video of Harry's dead body, you now see a video in a comic book style. Heather enters, and complains to her dad about the whole situation. Her dad turns out to be an alien (Heather doesn't seem surprised at all). He promises to go to Silent Hill and bash some heads. Meanwhile, in the background you can see a fight between Harry Mason and a blond guy that can be no one but James from Silent Hill 2.
The scene changes to Silent Hill. The town is burned down by several UFOs. After that, the Silent Hill song will start. This is so funny, it's a bunch of Japanese guys singing a completely ridiculous song about SH. According to the song, Douglas sells fish, Vincent helps old ladies cross the street, and Heather is divorced with two kids.
Puzzle Solutions
Easy Level Differences
There are a couple of small puzzles that you don't have to do in easy difficulty.
- In the mall, you don't have to find any chemicals, and you don't have to get rid the bugs in the hallway. They aren't there.
- In the office building, you don't have to get a screwdriver to open the drawer; it's already opened.
- You won't have to do the crematorium puzzle at all, the key is right there.
Bookstore Puzzle
Difficulty: Easy
There are only two books on the ground: parts I and III. Parts II, IV and V have already been placed on the shelf.
HINT 1: Examine the books closely.
HINT 2: Put the books in the right order.
SOLUTION: Simply place book I in the first open spot and book III in the second open spot. You can now read the (random) code from the back of the books.
Difficulty: Normal
The text on the note by the door reads: "Fair is foul, foul is fair, put these books out of order."
HINT 1: Examine the books closely.
SOLUTION: When you examine the books, you'll see that there's something written on their backs. You can match those writing, so that they'll make numbers. For example, if you put V to the right of IV, you'll see that they match. Place the books in the shelf where you found them in such an order that they'll make a complete number. You'll get there with a bit of trying. The order I found was: I-IV-V-III-II, but it seems to be random. If you get it right, you'll see a four digit number code.
Bookstore Puzzle - cont.
Difficulty: Hard
This is the text of the memo next to the door:
Intro: In here is a tragedy ---
art thou player or audience?
Be as it may, the end doth remain:
all go on only toward death.
1: The first word at thy left hand:
a false lunacy, a madly dancing man.
Hearing unhearable words, drawn
to a beloved's grave --- and there,
mayhap, true madness at last.
2: As did this one playing at death,
find true death at last.
Killing a nameless lover, she pierced a heart rent by sorrow.
3: Doth lie invite truth?
Doth verity but wear the mask of falsehood?
Ah, thou pityful, thou miserable ones.
4: Still amidst lies, though the end cometh not,
wherefore yearn for death? Will thou attend thy beloved?
Truths and lies, life and death: a game
of turning white to black and black to white.
5: Is not a silence brimming with love
more precious than flattery?
A peaceful slumber preferred
to a throne besmirched with blood?
6: One vengeful man spilled blood for two;
Two youths shed tears for three;
Three witches disappeared thusly;
And only the four keys remain.
Outro: Ah but veryly...
In here lies a tragedy.
Art thou player or audience?
There is something which cannot become a puppet of fate or an onlooker,
peering into a cage.
HINT 1: This puzzle requires a certain amount of Shakespeare knowledge. If you don't have that, try searching the web for Shakespeare summaries, you'll get some pages that can be of great use.
HINT 2: The intro and outro don't really matter. Verse 1 to 5 refer to the five books you picked up. Verse 6 has got some crucial information.
HINT 3: First try finding out which book belongs to which verse. They tell you something about the order of the code. Than try to figure out the 6th verse.
SOLUTION: The intro, as said, doesn't matter, so skip it. Verse 1 to 5 refer to Shakespeare works. Each of the five books you picked up is a work by Shakespeare. You have to match the verses with the books, and put them in that order. You might first want to note down what every book is about. Now let's look at the verses. We're not going to explain why a verse is about that particular book, if you want to know, look for the summaries of Shakespeare's works on the internet.
Verse 1 - Hamlet - IV
Verse 2 - Romeo and Juliet - I
Verse 3 - Othello - V
Verse 4 - King Lear - II
Verse 5 - Macbeth - III
Put the books on the shelf in THIS order (IV-I-V-II-III). If you translate these Roman numbers to Arabic numbers now, you will get a five-digit code. But the door only requires four numbers. This is where the 6th verse comes in. Let's analyze verse 6:
One vengeful man spilled blood for two; (this is about Hamlet)
Two youths shed tears for three; (that must be Romeo & Juliet)
Three witches disappeared thusly; (a famous scene from Macbeth)
And only the four keys remain.
One man spilled blood for two, this means you got to multiply the number of the vengeful man (Hamlet) by two! Since Hamlet is book number 4 (IV), the number will be 8.
The two youths, Romeo and Juliet, cried for three. Meaning you should multiply the number of the R&J book, 1 (I) by three. So it becomes 3.
The three witches from Macbeth disappeared, so let's forget about the Macbeth number. Scratch away number 3.
After putting the books in place, you got this code: 4-1-5-2-3 (IV-I-V-II-III) Now apply the hints from verse 6: multiply the first number (Hamlet) by 2, the second by 3 (R&J), and lose the last number (Macbeth). You'll now get this code:
8-3-5-2
Hospital Patient Wing 2F
Difficulty: Easy
Read the note on the nearby board:
1. Press, move 2 right,
2. Press, move 1 up,
3. Press, move 2 down,
4. Press and the door shall open.
HINT 1: This seems to be some kind of route.
HINT 2: Try following this route on the keypad.
SOLUTION: The note is the route you have to follow on the keypad. In case you forgot, the keypad looks like this:
7 8 9
4 5 6
1 2 3
Now, after we pressed the first button, we must move two positions to the right. This means the first number must be in the left row (1, 4 or 7). After the second number we must move one up, so the first number can't be 7: then the second would be 9 and you can't move up from 9. The first is either 1 or 4. If it's one, the second will be 3 and the third will be 6, but from 6 we can't move two down. Therefore, the first can't be 1. It must be 4. From 4, you can follow the route: two right gives 6, one up gives 9, two down gives 3. This way we come to the solution:
4 - 6 - 9 - 3
Difficulty: Normal
The hints are posted on a board nearby:
The first is larger than the second.
The second is twice the third.
The third is smaller than the fourth.
The fourth is half the first.
Four of the numbers are not repeated,
Three are not in the top row,
Two are not in the right row.
One of the numbers is the final key.
HINT 1: You'll need some basic math knowledge for this one.
HINT 2: Write down the facts and try something out.
SOLUTION: For the solution, I will write Roman numerals instead of 'the first', 'the second and so on'. So if you see 'III' it means the third number.
Let's write down the hints:
I > II
II = 2*III
III < IV
IV = 0.5*I
With some logical thinking, you'll get to the solution this way:
- I is clearly the largest number.
- I must be even, since it's twice IV > Take 8 for I.
- Then IV must be 4.
- II must also be even. It's less than I but seems to be more than IV.
- The second sentence of the second verse reads: "Three are not in the top row". This would mean the top row of the numpad, the numbers 1 to 3.
- Since III is less than IV, and IV is 4, III must be on the top row. So II can't be on the top row, and must be more than 3 > II must be 6.
- And if II is 6, III is 3.
So the code you find is:
8-6-3-4
Hospital Patient Wing 2F - cont.
Difficulty: Hard
First, the text of the hints:
1. Pure eyes, blue like a glassy bead---
You are always looking at me
and I am always looking at you.
2. Ah, you're too meek---
beautiful, unspoiled:
thus I'm so sad, I suffer---
and so happy, it hurts.
3. I want to hurt you
and destroy myself
What you would think
if you knew how I felt.
4. Would you simply smile,
not saying a word?
Even curses from your mouth
would be as beautiful as pearls.
5. I place my left hand on your
face as though we were to kiss.
Then I suddenly shove my thumb
deep into your eyesocket.
Abruptly, decisively,
like drilling a hole.
6. And what would it feel like?
Like jelly?
Trembling with ecstasy, I obscenely
mix it around and around: I must
taste the warmth of your blood.
7. How would you scream?
Would you shriek "It hurts!
It hurts!" as cinnabar-red tears
stream from your crushed eye?
8. You can't know the maddening
hunger I've felt in the midst of
our kisses, so many of them
I've lost count.
9. As though drinking in your cries,
I bring my hopes to fruition:
biting your tongue, shredding it,
biting at your lips as if tasting
your lipstick.
10. Oh, what euphoric heights I would
reach, having my desires fulfilled
like a greedy, gluttonous cur.
11. I longed, too, for your cherry-tinted
cheeks, tasty enough to bewitch my
tongue.
I would surely be healed,
and would cry like a child.
12. And how is your tender ear?
It brushes against my cheek;
I want it to creep up to my lips so
I can sink my teeth into its flesh.
13. Your left ear, always hearing words
whispered sweet as pie---
I want it to hear my true feelings.
I never lied, no...
but I did have my secrets.
14. Ah, but what must you think of me?
Do you hate me? Are you afraid?
As though inviting you to the agony
at the play's end; if you wish, you
could destroy me--- I wouldn't care.
15. As you wish, you may destroy me
--- I wouldn't care.
HINT 1: This doesn't even seem like a hint. But it is. Try to find some sort of pattern.
HINT 2: A lot of these verses are about parts of the face.
HINT 3: Try drawing a face, and comparing it the numpad.
SOLUTION: This puzzle is just sick, and I'm not only talking about the rhyme. The hints just seem so useless...the only thing that seems to be useful is that it's all about someone's face. You wouldn't say so, but you have to draw a face in the same raster as that of the keypad. Let's do that now.
| 1 | 2 | 3 |
| 4 | 5 | 6 |
| 7 | 8 | 9 |
| EYE | EYE | |
| EAR | NOSE | EAR |
| CHEEK | MOUTH | CHEEK |
When you're done drawing, and you've got a ridiculous figure like above, let's analyze the verses. I only included the verses that matter for solving this.
Verse 5: He shoves his thumb into the left eye, seen from his position. This corresponds with number 1. This will be our starting position.
Verse 7: The blood streams down from the eye. Going down from number 1, we arrive at number 4.
Verse 9: This verse is clearly about the mouth. Our next number must be 8.
Verse 11: The next part of the face are the cheeks. There are two cheeks, so the next number can be either 7 or 9.
Verse 13: The last part is the left ear, seen from the position of the victim. Therefore, the last number must be 6.
Now we have these 5 numbers:
1 - 4 - 8 - 7/9 - 6
This is one number too many. Now this next part I'm not too sure about, but it seems you have to scratch away number 1. The reason might be because the eye is gone, so its number must be gone too. Now we've got two possibilities left:
4 - 8 - 7 - 6 or
4 - 8 - 9 - 6
If you try them both, you'll see that the last one is correct.
Crematorium
Difficulty: Easy
HINT 1: This isn't even a puzzle.
SOLUTION: Just walk up to the oven, the key will be right there.
Difficulty: Normal
If you examine the door of the stove, you'll see a 4 by 3 grid.
This is a map of the crematorium. Each square stands for a bed, all of which are arrayed in the same pattern. The beds have numbers on them.
The bottom of the raster is where the elevator is. You're now at the top. There are four Roman numbers written in the grid on the door of the stove. The Roman numerals scratched into the grid correspond to the number of the bed in the same position. So if there's a Roman number III in the left bottom square, the third number of the lock code must be 7 (which is the number of the bottom left bed). In this way, find the code and enter it into the lock.
Crematorium - cont.
Difficulty: Hard
This time around, each of the beds has got a poem on it. They're all about Birds. You can read them in the memo section of the menu.
1. Song of the Sparrow:
Who killed Cock Robin?
"The Sparrow," they said
"He wants them all dead
To him honey-sweet is their sobbin'."
2. Song of the Owl:
The Owl who forgot the sky
Resigned to his poor earthbound state
Hungry of full didn't matter at all,
He ate and he ate and he ate.
3. Song of the Thrush:
The grass the Thrush so loved to eat
Gave him sweet happiness
He sank ever deeper and finally fell
To destruction and fatal distress.
4. Song of the Robin:
Cock Robin, who hid the key away
Is ash in the oven all right.
The place he held is empty now
And the doors remain shut tight.
5. Song of the Lark:
The Lark's child lost all his words
And walled himself up all away.
Heart and mouth both locked up tight
In a cage where no one want to stay.
6. Song of the Dove:
The Dove's hope died, he chose his path
His flapping wings fell still
Drenched in scarlet there he lay
His cheeks pale white an chill.
7. Song of the Linnet:
He seeks out her soul by his own black ambition.
Frightening her out of her wits
Whispering love songs in her ear
What cruel Linnet wants, he gets.
8. Song of the Rook:
The black Rook is the praying sort
Who hears the gods in the skies
His whispered petitions go on without end
And glassy and dim are his eyes.
9. Song of the Wren:
The Wren with pure heart as yet unrefined
Makes us laugh unto his feeble lip-smacking
But still we all know he shall never grow old
And he knows not how much he is lacking.
0. Song of the Kite:
The Kite hot, crazy and panting mad
Sweet shackles that tease and excite
Death itself would drive him wild
Red blood that turns milky white.
Also, there's a poem written on the stove door.
1. Burn the one who knows no death
Pure, adored by those above
No prayers within, just simple love
2. And now the pining hunter
The flames longing for his rebirth
A distant flame within the earth.
3. Burn up that heavy body of his
Make it wind, dancing in the sky
That bottomless gut now a cloud, now a sigh
4. The sweet blood on his laughing lips
Now calls him to the gates of hell
There burns evermore that soulless shell.
5. Four bodies return to ashes
Thus the door is opened
Thus the door is opened
HINT 1: The poem on the door has five verses, but the last one doesn't matter.
HINT 2: Verse 1 to 4 each talk about a different bird.
HINT 3: Connect the verses with the corresponding birds, and their numbers.
SOLUTION: This one's not that hard, if you know what to do. The first four verses of the poem talk about 4 different birds. Just find out what bird that is, and find the number of its poem. This way you'll get 4 numbers, they're already put in the right order.
So, let's see what bird we're talking about.
Verse 1: The bird in this verse is pure, beloved, and can not die. This clearly corresponds to poem number 9, about the Wren.
Verse 2: The bird seems to have a connection with the earth. You can also find this in the poem about the Owl, poem number 2.
Verse 3: the key word is 'bottomless', implying that this bird eats a lot. You can't find this in the poems (only the one about the Owl, but we already have that one), but if you know something about birds you'll know that one bird really has a reputation of being a glutton: the Linnet, number 7 (actually, poem 7 seems to be about Coleman, since this is his bed).
Verse 4: The sparrow killed the Robin, according to poem 1. This would explain the blood around its lips. The number must be 1, the song of the Sparrow.
So now you have the code:
9 - 2 - 7 - 1
Tarot Cards
Difficulty: Easy
In the notebook you can read the following:
| A Fool | The Moon | |
| Eye of Night | ||
| Hanged Man | A Priestess |
HINT 1: How easy do you want it?
SOLUTION: Just place the cards in the places corresponding the ones in the notebook.
Difficulty: Normal
Right, let's first show the text:
1. Now the first thing you must know,
Is that there's something in each row.
But that is not the half of it:
Three would be too hard to fit.
2. The upside-down man under the ground,
to his right, to his left there is no one around
Leave him alone though his tears are profound.
3. The moon is up, above the sky,
Full or crescent, floating high.
Twinkling light sits like a clown
On the head of a crazy clown.
4. Your excellency praying to God most high
Do you think you can tell me why
You always look up at the night sky?
5. Do you have it now? You didn't forget?
One major point you mustn't omit.
And now at the last, before you take a whack
Here's one more hint to help you keep on track.
6. Scary and hateful that thing in the night
Better be careful - it's not on your right!
Turn to the left and you'll keep it in sight.
HINT 1: You wouldn't say, but the text refers to the position of the cards.
HINT 2: First, figure out what the cards are called in the verses.
SOLUTION: This puzzle can easily be solved with some sense of logic and a large part of guessing. Anyway, let's analyze the verses:
Verse 1: There must be one card in every row (horizontally, vertically and diagonally). There can be no more than 2 cards in one row though. Verse 2: The hanging man is on the bottom row. He's the only one on that row. The most logical place would be in the center, so that he has got two empty spaces on either side.
Verse 3: The moon is on the top row. Right underneath the moon is the fool.
Verse 4: The priestess is looking up at the sky. That means she must be on the center row; she has something above her, and the hanging man is the only one on the bottom row.
Verse 6: The monster is the Eye of the Night. It's on the left. This is what the priestess is looking at, so she must be on the left too.
Combining all the above hints, you come to this solution:
| Eye of the Night | Moon | |
| High Priestess | Fool | |
| Hanged Man |
Tarot Cards - cont.
Difficulty: Hard
There is hardly any text here, just a drawing and a little rhyme that has no real meaning. This is what the drawing looks like:
| ING OEI | WXX III | NXA VII |
| MOX XON | NOT HNG | XVH III |
| XAA JII | CXX IEI | CCX IHT |
HINT 1: Three letters appear very frequently.
HINT 2: The other letters don't matter.
HINT 3: Study the cards very closely.
SOLUTION: This one disappointed me, it's not nearly as tough as the other ones. Here's what you should do: scratch away all the letters, except for I, V and X. You'll get this pattern:
| II | XXIII | XVII |
| XX | O | XVIII |
| XII | XXII | XI |
Now, have a really close look at the cards, you'll see that each has a roman number written on it:
Fool: O
High Priestess: II
Hanged Man: XII
Moon: XVIII
Eye of the Night: XXII
Now simply put the cards in the right places:
| High Priestess | Eye of the Night | |
| Fool | Moon | |
| Hanged Man |
Secrets
Hidden things
Gold and silver pipe
How to get it: In the sewers, at the part where you have to put the dryer in the outlet, examine the pool. Heather will propose throwing in the steel pipe. Do so (doesn't work if you got the pipe equipped). She throws it in, and a fairy appears. She'll ask three very easy questions. If you answer them correctly, she'll give you back your steel pipe as well as a gold pipe and a silver pipe.
Use: Nothing special. They're not stronger than the steel pipe. It just looks fancy
Silencer
How to get it: In the construction site building, go to the floor where you have to shove a mattress in the hole. Here examine the walls, one wall has a different structure (the camera will focus on it). Heather thinks she can break the wall. Whack it with a melee weapon, like the maul. The wall will break and reveal the silencer and a pair of feet
Use: It will automatically be fitted on your handgun or submachine gun when you equip one of those weapons. It doesn't seem to influence damage or accuracy, it just makes the game less loud.
Secret weapons
These weapons must be unlocked by finishing the game in a certain way. In the score screen you will be told which weapons you unlocked.
Beam Saber
How to get it: Kill more enemies by melee fighting than by shooting.
Where: Found in the corridor where you encounter your first numb body in the mall. Used as a replacement door knob of a door on the far west end.
What: It's a cool green light saber. May the force be with you.
Range: Melee
Damage: High
Speed: Low
Description: It does some great damage, but it's slow and awkward to use. Even worse, whenever you get hit by an enemy, the beam disappears and you have got to activate the beam again (by pressing R2).
Flamethrower
How to get it: Kill more enemies by shooting than by fighting.
Where: In Helen's bakery in the mall, on the counter.
What: You don't have too worry about fuel for this weapon, because it has unlimited fuel!
Range: Short
Damage: Low
Speed: Very high
Description: The main downside of this weapon is the damage it does. Even with normal enemies it takes very long to kill them. But it has one major plus: its stopping power! This baby will keep any enemy at a safe distance if you fire it constantly. You can adjust your firing angle by pressing up and down while firing.
Unlimited Submachine Gun
How to get it: Kill the final boss with a melee weapon. Don't worry, it seems to be enough to just deliver the final blow with your katana or maul, so that you don't have to fight the whole battle with a melee weapon, you can just use your guns to weaken it and kill it off with a melee weapon.
Where: Turn left as you exit the bathroom you start in, it's at the blocked off end of the alley.
What: Just like the submachine gun, but now with unlimited ammo.
Range: Good
Damage: High
Speed: Very High
Description: It's no coincidence that this is the weapon everyone keeps talking about. It totally rocks. Remember, you can adjust the firing angle by pressing up and down while firing: a must for killing small enemies like the double-heads and numb bodies and also for Pendulums.
Heather Beam
How to get it: Make a total of 333 kills. This doesn't have to be in one game. For example: you can also get it by getting 100 kills the first time, 75 kills the second time and 175 the third time you play it.
Where: You got it from the beginning.
What: Unequip all weapons, and press R2 and X to fire. There are two firing modes: if you keep X pressed down, Heather will shoot a couple of homing missiles. If you press up and X at the same time, she will shoot a ball.
Range: Good
Damage: Low
Speed: High
Description: The Heather beam is a nice weapon, but not really useful. You want to unlock the Transform costume as well, so that you can use the more powerful Sexy Beam.
Sexy Beam
How to get it: Unlock the Heather Beam (see above) and the Transform costume (password = PrincessHeart). Equip the Transform costume to use it.
Where: You got it from the beginning.
What: You use it the same way as the Heather Beam. If you keep X pressed down, she will fire target seeking missiles. If you press up and X at the same time, you will fire from your eyes. Hold X down to keep firing.
Range: Good
Damage: Medium
Speed: High
Description: The Sexy Beam is way better than the Heather Beam. It fires more homing missiles, that are also stronger. The beam from her eyes isn't that powerful, but it has nice stopping power. A cool weapon, and everyone must use it to get the even cooler Revenge ending.
Costumes
After finishing the game once, you will get a new option in the main menu. Here you can enter a code into an old fashioned type-writer. If you have the correct code, you will unlock one of Heather's costumes. These are all pretty useless, except for the transform costume. All the codes are case-sensitive.
| 13e Rue: | Suspence |
| Block Head: | PutHere2FeelJoy |
| Don't touch: | TOUCH_MY_HEART |
| Game Reactor: | SH3_Wrestlarn |
| God of Thunder: | GangsterGirl |
| Golden Rooster: | cockadooodledoo |
| Heather: | HappyBirthDay |
| Killer Rabbit: | BlueRobbieWin |
| Onsen: | I_Love_You |
| Play: | sLmLdGhSmKfBfH |
| Royal Flush: | 01_03_08_11_12 |
| The light: | LightToFuture |
| Transform: | PrincessHeart |
| Transience: | ShogyouMujou |
| Zipper: | Shut_your_mouth |
About the Transform costume: Equip this one to get the Sexy Beam (you must first have the Heather Beam unlocked).
About the Royal Flush costume: When playing the game on hard puzzle mode for the second time, you will find the hints for this code among the books in the Chapel Library.
Other Secrets
Douglas in 'special' clothes
After finishing the game for the first time, highlight the 'Extra New Game' option in the main menu and press:
Up - Up - Down - Down - Left - Right - Left - Right - Circle - X
Now select the difficulty levels. You will hear Heather sigh. Now Douglas will walk around in his underwear in most cutscenes.
Extra Options menu
In the options screen, press one of the shoulder buttons (L1, L2, R1, R2) for the extra options. Here you can change the color of the blood, select the 'Beginner' and 'Extreme' difficulties for action, modify the bullet multiplier, and switch on the 'Life Bar' function.
Item Lists
Supplies
Health drink
Use: Restores a small part of your health.
First aid kit
Use: Restores a medium part of your health.
Ampoule
Use: Restores a big part of your health.
Handgun bullets
Use: Extra ammunition for your handgun.
Shotgun shells
Use: Extra ammunition for your shotgun.
Stungun batteries
Use: Extra ammunition for your stungun.
SMG bullets
Use: Extra ammunition for your submachine gun.
Beef jerky
Use: Distract enemies with a piece of meat.
Story Items
Flashlight
Where: In the room next to the women's bathroom on the first floor of the dark mall.
What: A small sized flashlight. It fits in the pocket on your jacket.
Use: Seeing in the dark. Switch on/off with the circle on your gamepad.
Radio
Where: The elevator right before the mall turns black, it falls down from the ceiling.
What: A small radio. It seems to be broken, because it won't receive normal stations.
Use: Emits static when monsters are nearby. You can turn it on and off and change the volume.
Pendant
Where: Initially in inventory.
What: Heather's lucky pendant, given to her by her father. Has a red marble inside. The marble is said to have special powers.
Use: After Claudia kills Vincent.
House Key
Where: Initially in inventory.
What: The key to Heather's apartment, number 102 of the Daisy Villa.
Use: To enter the apartment.
Pair of Tongs
Where: Helen's Bakery in the normal mall.
What: Tongs, used for picking up bread.
Use: Getting the key in the room with the save-point.
Key Taken with Tongs
Where: In the save-room on the 2nd floor of the normal mall, you need the tongs.
What: The label says "My Bestsellers."
Use: To enter the book store on the second floor.
Shakespeare Anthology I to V
Where: In the book store.
What: Books about Shakespeare. In normal riddle mode, they have got writing on their backs. In hard riddle mode, they each represent one of Shakespeare's works.
Use: To solve the bookstore puzzle (only two parts on easy riddles mode).
Bleach
Where: The toilet on the first floor of the dark mall.
What: Used for cleaning toilets. Do not mix.
Use: For gassing the moth creatures (not on easy riddles mode).
Hanger
Where: The clothes store where you fight the first closer, after the mall turns dark.
What: A simple hanger, for hanging clothes.
Use: Getting the ladder to the second floor down.
Bulletproof Vest
Where: The same store as the hanger.
What: A heavy kevlar vest.
Use: When equipped, you take less damage, but you're also heavier.
Cooked Key
Where: Next to the grilled dog in the restaurant on the third floor.
What: A key.
Use: Opening the back door to a bar on the second floor of the mall.
Walnut
Where: The jewelry on the second floor of the dark mall.
What: A good-sized walnut. It has something inside.
Use: Break it with the vise later on to take the moonstone inside.
Detergent
Where: Helen's Bakery in the dark shopping mall.
What: Another chemical used for cleaning toilets. Do not mix.
Use: For gassing the moth creatures (not on easy riddles modes).
Moonstone
Where: Inside the walnut from the jewelry. Use the vise in another room on the second floor to get it.
What: A small jewel.
Use: To open the door to the central area on the third floor.
Nutcracker
Where: In a tunnel under platform 1 and 2 of the subway station.
What: A tool for cracking open nuts.
Use: To remove the lock on the gate leading to platform 2 on the stairs level.
Story Items - cont.
Wine Bottle
Where: In a dead end hallway at the south west end of the underground passage.
What: An empty wine bottle.
Use: For filling with fuel from the heater, and than using the fuel to get a machine working so you can enter the sewers.
Dryer
Where: A room on the far west side of the sewers.
What: A normal hair dryer.
Use: For frying the sewer monster in the area with the bridge.
Jack
Where: At KNM auto parts on the fifth floor of the office building.
What: A jack for lifting cars up.
Use: To open the elevator doors on the third floor.
Screwdriver
Where: In the corridor behind the art gallery on the fifth floor.
What: A normal screwdriver.
Use: To open the drawer in the office of the dance studio on the third floor of the office building (not on easy riddles mode).
Rope
Where: In the drawer of the office of the dance studio.
What: A long piece of strong, white rope.
Use: To descend to the second floor through the elevator shaft.
Oxydol
Where: In the cabinet of the mental health clinic of the dark office building.
What: A bottle of liquid chemicals.
Use: To set fire.
Pork Liver
Where: In the fridge of the Last Drop Cafe.
What: Some liver that hasn't gone bad yet.
Use: To set fire.
Matchbook
Where: The smoking room of KNM Auto parts in the dark office building.
What: A book of matches.
Use: To set fire to the painting.
Silver Coin
Where: The northwest room of the fourth floor of the office building.
What: A small silver coin.
Use: To buy a drink from the machine in the same room.
Insurance Key
Where: From a soda can in the room with the coins, buy a drink from the vending machine.
What: The key to the insurance company on the first floor.
Use: Getting into the insurance company.
Nail Polish Remover
Where: In the hospital, the women's locker room on the second floor.
What: A fluid to remove nail polish.
Use: To get the key glued to the wall in room C4.
Perfume
Where: Next to the nail polish remover.
What: A bottle of weird smelling perfume.
Use: It seems to attract nurses.
Instant Camera
Where: In the room with the alarm bell, hospital second floor.
What: A Polaroid camera. You can see your photo in seconds.
Use: To get the code written on the back of shelf in the hospital basement.
Stairwell Key
Where: Glued to the wall in room C4.
What: The key to the eastern stairwell.
Use: Unlocks the stairwell.
Plastic Bag
Where: In the women's locker room of the dark hospital.
What: A small plastic bag.
Use: Fill it with blood in examination room 4, than use it on the altar in room C4.
Story Items - cont.
Cremated Key
Where: The basement of the dark hospital. Solve the puzzle to get it.
What: A key you found in the oven of the crematorium.
Use: Unlock the day room on the first floor.
Talisman
Where: Room C4, after the fight with Leonard.
What: A round tablet with a sign drawn on it in red.
Use: None.
Rollercoaster Key
Where: In the store of the amusement park.
What: The key for the coaster's control booth.
Use: Unlock the control booth.
Chain
Where: Lying on a bench in the stage area.
What: A long metal chain.
Use: To break open the gate using the attraction.
Red Shoe
Where: On the stage.
What: A small red shoe.
Use: To complete the Cinderella doll.
Doll Face
Where: The house of the fortune teller.
What: The wooden face of a doll.
Use: To complete the Snow White doll.
Douglas' Notebook
Where: The house of the fortune teller.
What: Douglas' notes on the investigation on Heather.
Use: Might determine the ending.
Eye of the Night Tarot card
Where: The church in the chapel.
What: A tarot card.
Use: To solve the puzzle in Alessa's room.
Cassette Tape
Where: The south east room of the first floor of the chapel.
What: A normal cassette tape, holding a conversation between Vincent and a cultist.
Use: Listen to it in a room at the south end of the first floor. Might influence the ending.
Moon Tarot Card
Where: In the library.
What: A tarot card.
Use: To solve the puzzle in Alessa's room.
Otherworld Laws
Where: Given to you by Vincent, in the library.
What: A book about the mysterious Otherworld.
Use: Unknown, might influence the ending.
Hanged Man Tarot Card
Where: On the far west room of the second floor, the morgue.
What: A tarot card.
Use: To solve the puzzle in Alessa's room.
Fool Tarot Card
Where: In Alessa's hospital room.
What: A tarot card.
Use: To solve the puzzle in Alessa's room.
Brass Key
Where: In Alessa's bed room.
What: A key.
Use: To open the door to the southern quarters on the first floor.
High Priestess Tarot Card
Where: In Claudia's bedroom, at the south end of the first floor.
What: A tarot card.
Use: To solve the puzzle in Alessa's room.
Index
Game BasicsWalk-Through
Normal Shopping Mall
Dark Shopping Mall
Hazel Street Subway Station
The Train
Underground Passage
The Sewers
Construction Site
Normal Office Building
Dark Office Building
Normal Brookhaven Hospital
Dark Brookhaven Hospital
Lakeside Amusement Park
Chapel
Puzzle Solutions
Hard Bookstore Puzzle
Hospital Patient Wing Puzzle
Hard Hospital Patient Wing Puzzle
Crematorium Puzzle
Hard Crematorium Puzzle
Tarot Cards Puzzle
Hard Tarot Cards Puzzle
Item Lists
Got a news tip or want to contact us directly? Email news@gamespot.com
Join the conversation