Myst V: End of Ages Walkthrough
Although Myst V is (possibly) the final game in the Myst series, that's no reason to go through it stumped and confused! GameSpot's Walkthrough gives you hints and solutions for all of the braintwisters in End of Ages.
Design: Collin Oguro
The world of Myst is one that's well-known to PC gamers. The first game in the series was released all the way back in 1993 on the Mac, and featured stunningly-rendered graphics to go along with a lengthy, puzzle-based story. A PC port followed two years later, and a full-fledged sequel, Riven, came out in 1997. The series had already sold a few million copies with just two games, so sequels were inevitable, and indeed followups came quickly, with Myst III: Exile, Myst IV: Revelation, and Uru: Ages of Myst all being released within the last five years.
Like all good things, though, Myst had to come to an end at some point, and that point seems to be now, with the release of the appropriately titled Myst V: End of Ages. While the series still has a lot of fans, the games themselves no longer sell as well as they once did, and Cyan Worlds, the developer of most of the titles in the series, recently shut the doors of its game development unit, indicating that End of Ages will be the final installment in the Myst series.
That said, though, the game's release has gone forward without a hitch, and no doubt there are plenty of people sitting at their computers and scratching their heads right about now. Myst V: End of Ages, like previous entries in the Myst series, has some head-scratchingly complex puzzles within its various settings. Have no fear, though, as GameSpot's Game Guide to Myst V is here, replete with puzzle solutions.
Walkthrough
As a note, we're going to do our damndest to get you through the game without spoiling the experience for you. We split most puzzles into three sections: a basic description of what needs to be done, a set of "Vague Hints" (patent pending) that will hopefully nudge you towards the solution on your own, and, if those fail, a full walkthrough and puzzle solution.
That said, some spoilers are almost unavoidable, thanks to the fact that our screenshots are visible on the page, particularly if you're reading the PDF version of this guide. There isn't much we can do about this, unfortunately, so you'd be wise to consult the guide only if you're really stumped!
K'Veer
You begin Myst V in a room with many doors; this is the same room that acted as Atrus' prison in the original Myst, for those of you who remember that far back in time. Most of these doors are locked at the moment, though, or at least unclickable. There's also a sealed Linking Book on a table near where you start the game; it's unopenable at the moment, though, so there's not much you can do but leave it alone.
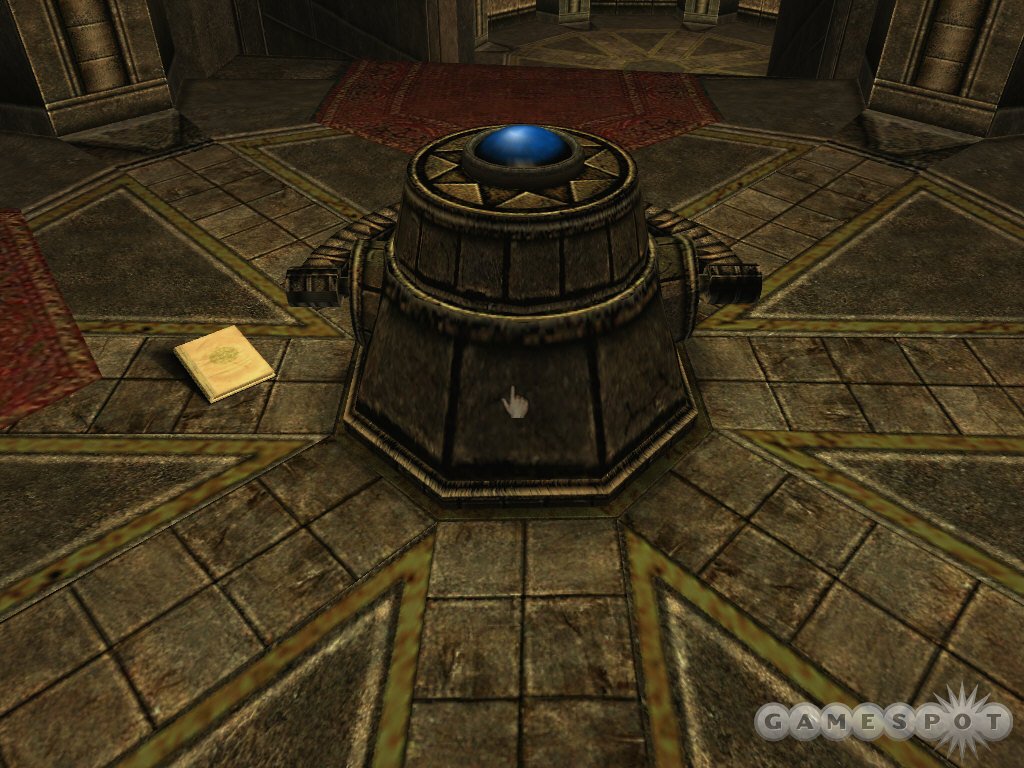
If you examine the room carefully, you'll notice that the door one space to the right of the book has a handle; clicking on the handle and dragging your mouse downwards will open the door. If you pass out into the hallway beyond the door and start heading down the steps, you'll eventually reach a journal and a savegame device near a floor light. The journal will allow you to record any notes that you'd like to keep track of during your gameplay, while the orb will instantly save your game when you click on it. The game also automatically saves your game when you exit the game, so there's no need to make manual saves unless you want to replay earlier puzzles again.
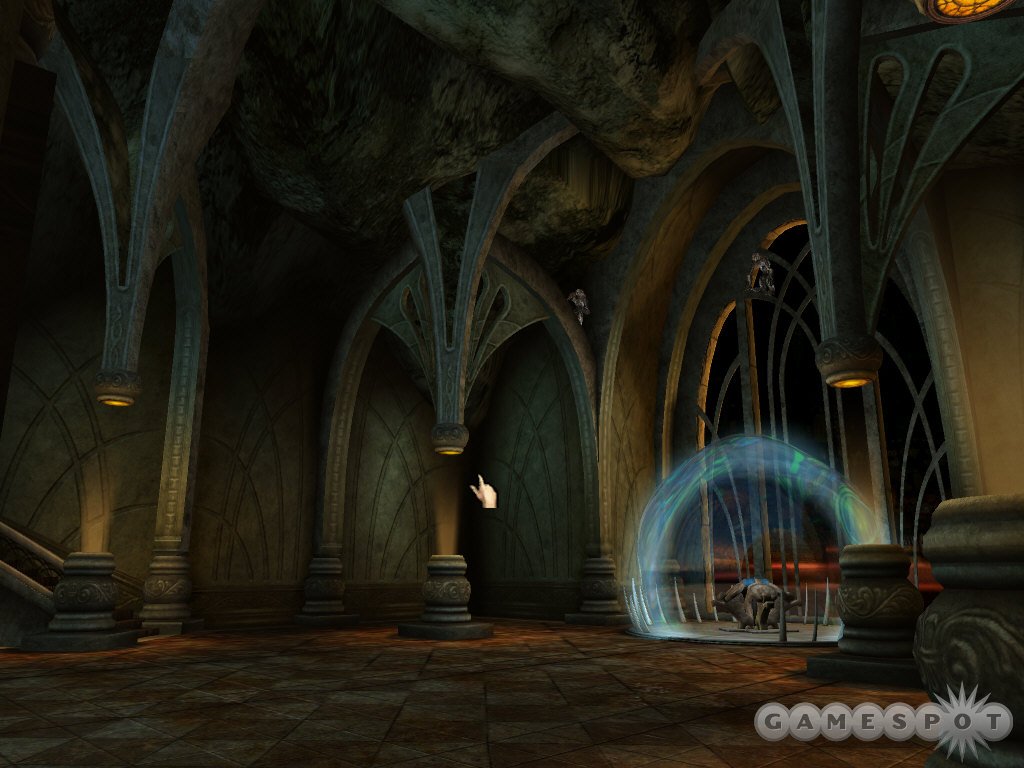
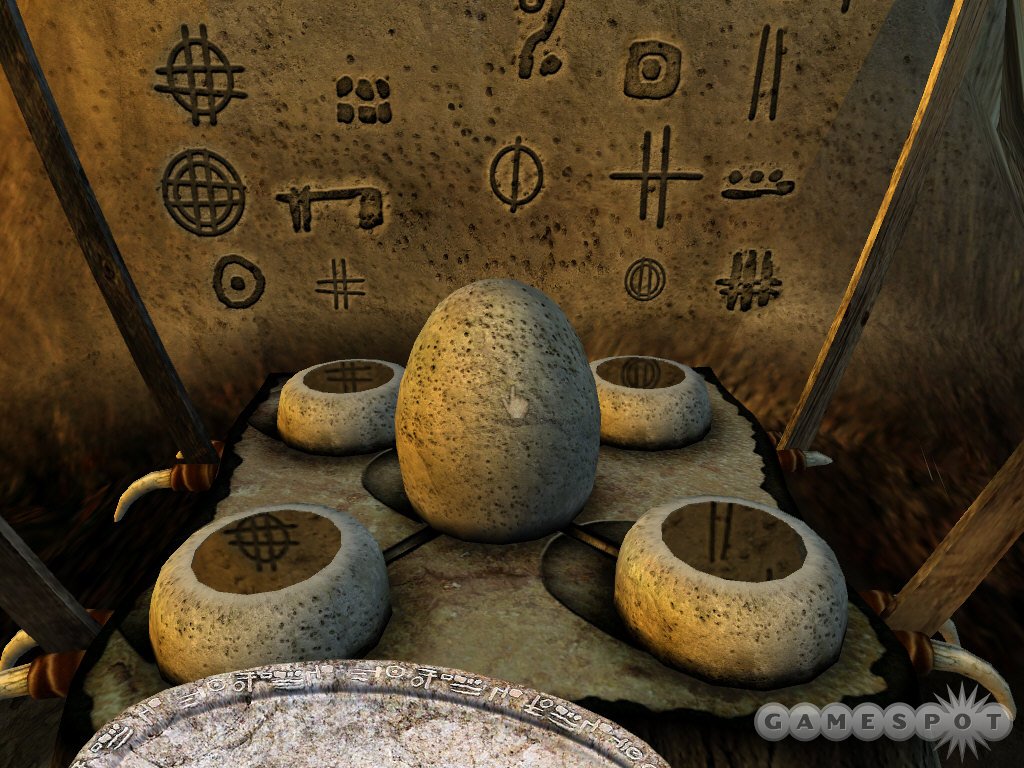
Inside the next room, you'll come across the first teleporter; a large, amorphous, translucent ball, which you can walk into. Do so now, and you'll note that the ball appears to reflect different environments every few seconds. For now, you can't teleport; you can only find the tablet in the middle of the pedestal here and click it. Doing so will solidify the images on the inside of the sphere. After you've touched the tablet, attempt to leave the sphere, and you'll have your first run-in with Yeesha, who'll ask you to travel to four different ages in an attempt to unlock the tablet from its place of holding. Immediately after she's done speaking, though, you'll meet with Escher for the first time; this individual seems to be at odds with Yeesha, and tells you not to trust her.
The Great Shaft
After the conversations cease, you'll find yourself at the top of a volcanic mountain, although you don't necessarily know this just yet; all you can see is a small area around you. Feel free to take a look around here. Many of the rocks in this area have a kind of primitive hieroglyphics on them, which apparently tell a story. It's difficult to interpret, but it does appear to tell of some kind of plague that arrived long ago and wiped out most of the inhabitants of the age. We could be wrong, though.
One of the stones here, near the large sword, doesn't appear to have any writing on it; if you wrap around to get between it and the wall of the area, though, you'll find a hole in the ground. Descend on the ladder there, and you'll come to a long hallway, where you'll find the first two of Yeesha's journals. There are 16 of these in all, and read together they'll reveal much of her past, as well as some of the backstory of the Myst series.
Continue down the hallway to the right, and you'll come to a small dormitory. Here you'll find another journal (with a symbol for your slate, whenever you find it), as well as a map of this place, a video recording of Yeesha (in the large globe by the door), and a book that's locked into a pedestal. This book will lead you to Diribo, the rest age.
The Great Shaft - Floor Puzzle
In order to continue down to the lower levels of the Great Shaft, you'll need to find some way to open up the air vents in the floor of the shaft, near the bottom of the elevator by the entrance to Todelmer. Escher says that this involves raising the floor, then powering the fans. Hmm...
What Needs To Be Done
Well, you need to raise the floor, then power the fans, duh! Escher says as much, and for once you'll get a relatively straightforward task to perform. Yeesha's seventh journal is located near one of the switches, as well, so be sure to grab it.
Vague Hints
Hmm, what do you have to work with? Two switches on either side of the lower floor, as well as a button in the middle of the floor. The two switches can be flipped, but the button is initially untouchable.
After the floor is raised, keep in mind that you'll have to flip two more switches in order to start the fans. One is immediately accessible to you, thanks to the raised floor, but the other one is not immediately visible. It's certainly not higher than you are, and it's not on the same level as the raised floor, which leaves...
How To Proceed
For the first section of this puzzle, all you have to do is flip the yellow and the blue switches here, then return to the bottom floor and press the button there. That'll raise the floor up to the upper level, near the elevator, and subsequently opens the path to another rest area, where you can find the Linking Book to Direbo, which will lead you to the pedestal leading to Noloben. Go through there and open up the gates over the bridges inside. Instead of moving on through to Noloben, though, let's finish off this puzzle, shall we?
As mentioned, there are two switches that you'll need to hit before you can turn on the fans here. One of them is near the rest area, so go ahead and grab Yeesha's journal and turn the switch so that it points to the left; the machinery behind the switch should turn on and start rotating after a second.
With the first machine turned on, you'll have to find the second switch and activate that one, as well. Since it's nowhere to be found, we'll have to look...below the floor? If you're stumped on this puzzle, keep in mind that there are a couple of seconds after pressing the button to move the floor before it actually starts moving.
In other words, you need to lower the floor again by hitting the switch on it, then, when it's at the bottom, press the switch again to raise it, but quickly move away from the center of the floor, towards the side of the room, before it can start its ascent. Doing so will leave you facing off against a large hole in the ground. Climb down one of the ladders, grab the ninth journal, and head down the long hallway nearby to flip the second fan switch. A ladder will appear and allow you to move on. You can find the tenth journal near the door at the end of the hall here; opening it will let you back into the Great Shaft. If you wish to climb back up to reach the book to Noloben again, you can, or, if you wish, you can start moving on further into the volcano. The book that leads to Laki'ahn is nearby, as well as the final two entries in Yeesha's journal. You might want to go into Laki'ahn's book and open the gates over the bridges there, rather than walk all the way back up to Noloben or the other ages, if you happen to need to return to any of them.
The First Age - Tahjira
The Cave
Tahjira is an icy Age, and apparently a prison world where criminals were sent to live out their lives. Sounds like a fun place to be! Unfortunately, you at first find yourself in a cave with no exit, save for the bubble you entered from. However, there is another way out of here besides just reverting back to Diribo. If you look around near the bottom of the ice ramp, you'll spot a symbol etched into the ice.
What You Need To Do
Well, you need to get out of the cave, obviously.
Vague Hints
Keep in mind what Escher said when deciding what to do.
You have a "heavy burden." Certainly would be nice to get rid of that weight...
How To Proceed
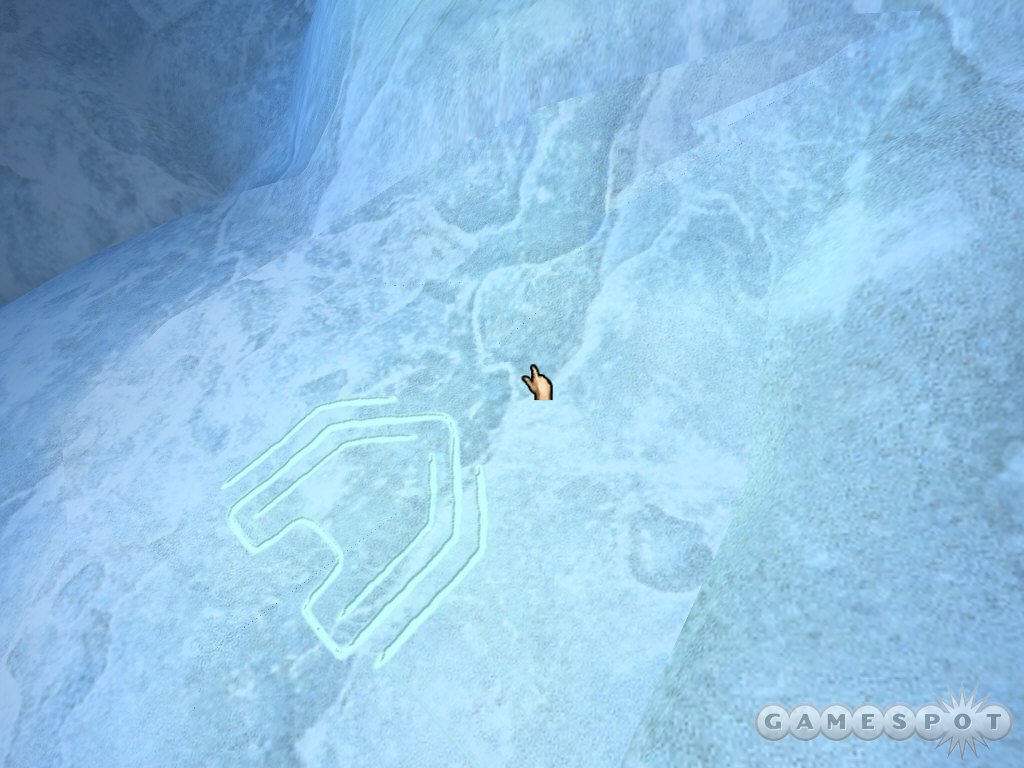
The symbol on the ground here actually isn't meant to be traced into your slate (although, if you attempt to do so, it may be mistaken for a pedestal further down the Age and let you warp ahead). Instead, stand on the slate symbol, and drop your slate. You may need to draw something on the slate to make a Bahro appear after you drop it. When the Bahro does appear, the ice beneath the symbol will crack. If you then grab the slate and walk on top of the crack, the ice will break and you'll be able to move on.
You'll find yourself near a ladder. You can't climb up without dropping the slate, so do so, ascend, then mark down the symbol on some scratch paper. Also mark down the symbol that appears within the slate shape on the wall; this is a power symbol that will command the Bahro to perform an action for you later on. Warp back to the first pedestal with the mark on the pedestal here, retrieve the slate, then draw the pedestal's symbol on the slate and drop it on the ground. When the Bahro reappears, it will take the slate and let you warp back to the pedestal you just came from via the first pedestal in the bubble.
The Prison
The prison area of Tahjira has been built up by the prisoners that used to dwell there, with a large set of steam-powered heat pipes. Unfortunately there's not any steam pumping through them at the moment, since there isn't any heat coming up from the ground to melt the ice. Not to worry, though; the Bahro will take care of that.
What You Need To Do
A bit of exploration here will reveal a few points of interest. First up are the steam huts; six or seven small structures scattered around the area with wooden switches on them. These are binary, on-off switches; flipping them now will send a gust of steam out of the top of the huts, but won't do anything of lasting value. The main structure here also has something of a diagram on it, with a rectangular drawing of pipes. If you walk around this structure, towards where all the pipe are running, you'll find the pipe diagram in the flesh, as it were. The pipes here are buried in a small lake. If you follow the pipes out of the ground to the point where the three smaller pipes converge, you should find some manipulable dials on the pedestal beneath them; these control the flow of the steam through the pipes in the lake itself. You'll have to move these around a bit when you find out how to create the steam.
Vague Hints
The symbol near the second pedestal can be traced onto your slate.
The pipes around the village carry the steam to the lake, but not before they meet up at the pipe junctions.
The controls on the pipe junction determine where the steam goes after it's in the pipes underneath the lake.
How You Need To Do It
Alrighty then. As you may have surmised, the circle/half-circle symbol, when etched onto a slate and dropped onto the ground, will cause steam to issue forth from the earth. You don't need to reproduce the symbol exactly, but you do need to get pretty close to it to let the Bahro interpret it correctly. If you trace the symbol on your slate, drop it on the ground, then walk two steps away from it, you should be able to turn around and watch the Bahro read the symbol; if it understands what you want, it'll start gesticulating towards the sky, your screen will flash, and voila, steam will start to issue forth. If it doesn’t understand what you're asking, it'll just scratch its head, and you'll have to try the symbol again until you use it correctly.
Note that after you correctly call for steam, the slate will reappear in the position where you dropped it. If you wait too long to pick it up, a Bahro will appear and return it to the first pedestal in this age, forcing you to warp back home and pick it up again before you can attempt the puzzle again. So be sure to pick it up as soon as first Bahro disappears, because the steam won't last forever. If you have the slate in your hands when the steam stops coming, then you'll be able to instantly re-draw it (after the first correct interpretation, the symbol will be saved on the slate, so this entails just one click of the mouse) and drop it again for more steam. Yay!
Anyway, the first order of business is to ensure that all of the steam huts in the prison area are switched on and are funneling steam towards the lake. To do that, first call for the steam from the Bahro by dropping the slate, then walk to each hut and make sure that they're switched so that steam is coming up from the top of them; you should also be able to see a bit of steam coming out of the large pipes attached to them. When all of the structures are bellowing forth steam, it's time to head to the junction pipes and manipulate the energy so that the lake is passable.
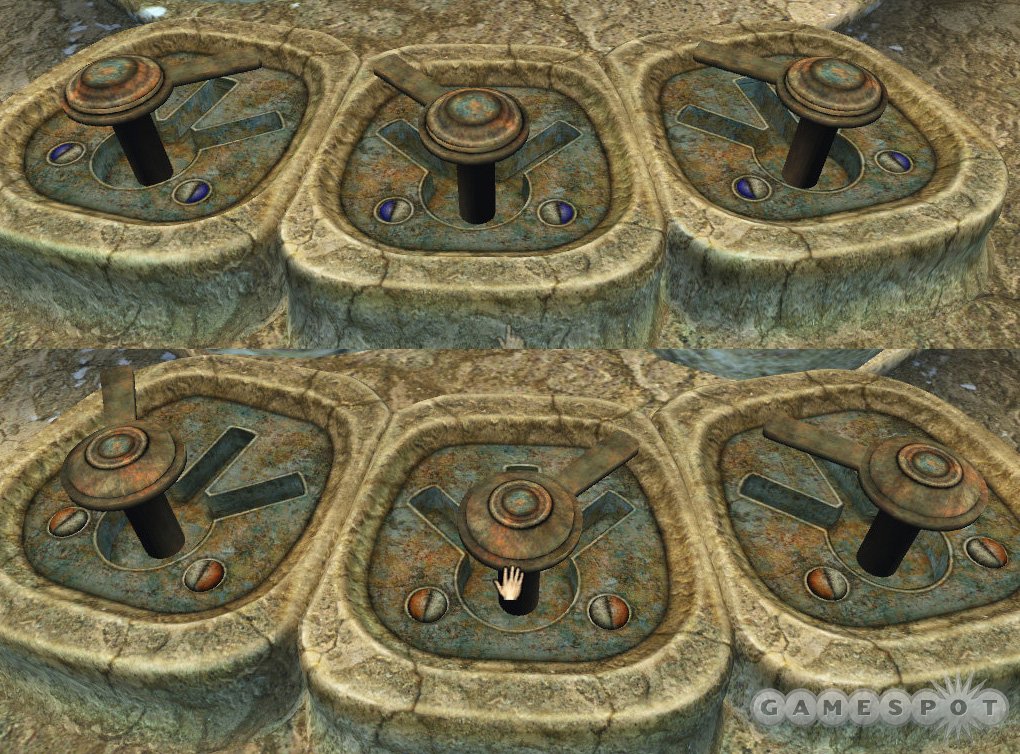
The pipes in the lake have a bunch of holes in their tops, and on top of the holes, there are small walkways. In order to get past the lake, you need to route the steam through the pipes in such a manner that the walkways pop up in a pattern over which you can actually walk; incorrect routing of the steam will lead to a set of dead ends. To route the steam, you'll need to use the three switches on each of the pipe junctions, near where the pipes stick into the lake.
We'll be honest and say that this phase of the puzzle is mostly just guesswork; we took a brute-force approach and turned one switch at a time, checking the lake after each turn, until we got the resolution that we wanted. The pipe diagram in the structure nearby doesn't help all that much, although it does tell you that the blue switches control the right half of the pipes, while the red switches control the left.
Anyway, in case you can't look at our snazzy screenshot, the leftmost blue switch needs to point to the right, the middle blue switch points to the left, and the rightmost blue switch points to the left. The leftmost red switch points to the left, the middle red switch points to the right, and the rightmost red switch points to the left. If you flip the switches in this particular pattern, a path should open up for you across the lake, allowing you to talk to Escher again. What a reward!
The Keep
If you can get across the lake, then you're almost done with the entire age of Tahgira. It's a short one! All that remains now is getting to the Keep, the central portal where the Tablet is held. Unfortunately, when you approach it, the keep floats away from you, preventing you from actually reaching it. Whatever shall we do?
Vague Hints
Well, what have you done in the past when you saw a symbol on a pedestal?
What To Do
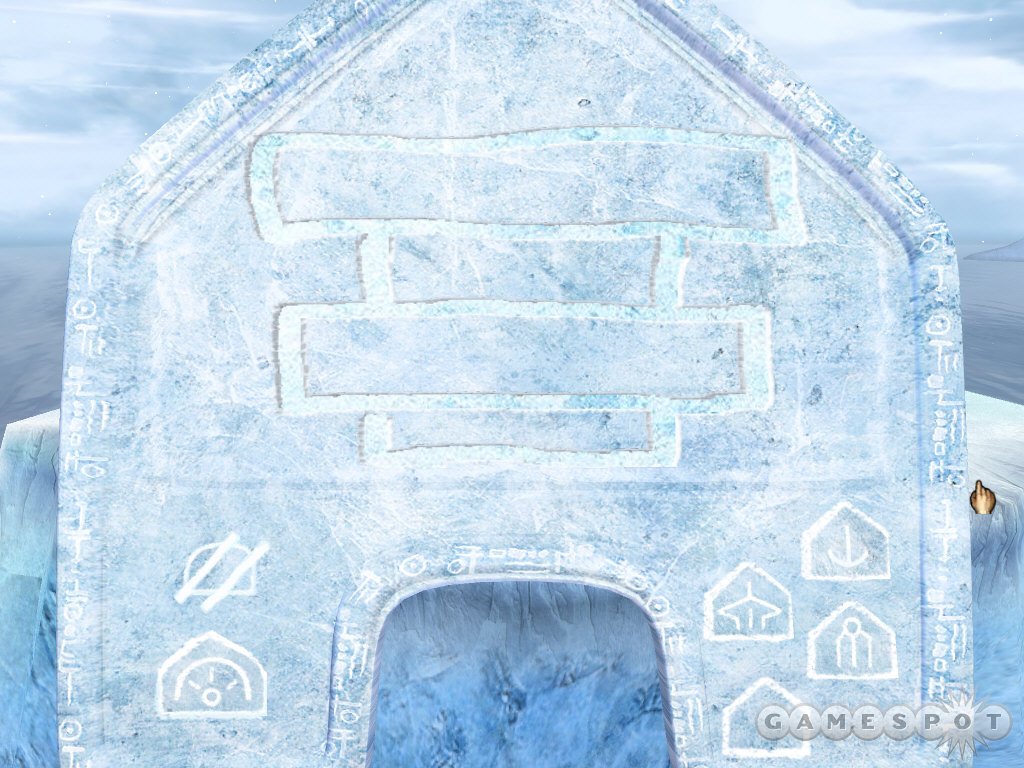
Well, if you look across the chasm that blocks you from accessing the Keep, you should be able to get a shot of the symbol on the keep's stand. What you have to do here is trace the symbol onto your slate, drop it, let the Bahro transport the slate to the Keep, then return to the first pedestal in the Age and warp from there to the Keep.
Unfortunately, the symbol required for this particular warp is extremely sensitive, and you'll need to have it correct both in terms of size and proportion. You can expect to go through a bunch of failed drawings before you get the right size and shape for your drawing. We really recommend that you take a close look at our screenshot for this symbol, and maybe even print it out, as it truly is a lot more sensitive than most of the other symbols you'll be working with in the game.
Back to the Shaft
When you've accessed the Keep in Tahjira, you'll be able to return to Descent and move on. From the rest area, move back down the hallway for another meeting with Escher. He'll point you towards a door near him, and tell you that your journey will begin when you pass through. Before you start figuring out how to open it, though, head into the empty hallway nearby to find the fourth Yeesha journal.
When you're ready to move on, flip the switch near the door to open it. (The other door here doesn't open just yet.) The hall leads to what Escher refers to as the Great Shaft. There isn't much to see here, but if you find the lever near the raised platform behind where Escher appears, you'll be able to call the elevator. Riding it downwards will lead to another section of the Shaft, where you'll find another rest area, with the fifth of Yeesha's journals in it. Nearby the next elevator heading down, you can find the sixth journal, but for now, you should avoid taking the elevator any further. Instead, return to the book inside and head through to the age of Todelmer.
Todelmer
The Red Room
Todelmer is something of a space age, with a large planet dominating the horizon. The first place you'll find yourself is on a large pillar, which is the central hub of a huge telescope array. If you look around a bit, you'll find a couple of things of interest. The first is a large red room with four screens and some kind of timing array in the middle; this room is currently unpowered, so there isn't much you can do with the machinery here. Outside this area, you'll find a path that's been blocked by fallen rocks and the sheared cable of one of the four individual telescopes on a nearby pillar. Guess you'll need to find some way to move the cable before you can proceed up, huh?
What You Need To Do
Your immediate concern is to power up the red room and figure out some way to clear the cable.
Vague Hints
The power controls are actually in the red room; they're just somewhat obscured.
As far as moving the cable goes, well, there's only one telescope interface that's not working. If anything's connected to the busted cable, it's probably that one, eh?
The large table of symbols in the middle of the red room doesn't mean anything. You'll see some of the symbols here again in the future, but they aren't matched up correctly on the table, so you can ignore it completely.
How You Need To Do It
First, walk along the narrow paths around the edge of the red room until you find the power controls. The left lever should be pointing straight out towards you, while the right lever should point to the right. If you've activated them correctly, the lights in the room should come on, and the small border around the blue window above the power switches should begin to rotate. When it has, you'll know that you're on the right track, and that the room has been powered up.
Now what you need to do is clear the cable from the path by manipulating the telescope array. As mentioned, one of the four telescope arrays is apparently broken, and shows only static where a starfield should be appearing. You don't need to bother with the symbols in this room, really; a bit of elementary futzing-about should let you stumble across the correct solution. There are only two sliders that you can manipulate here, one vertical and one horizontal, along with a flashing green switch that will move the cables when you press it. There are numerous symbols that pop up when you move the sliders, but they're unimportant; all you need to do here is jam the vertical slider all the way to the top, and move the horizontal slider all the way to the left, then hit the button, and you should be able to bypass the cables and walk up the steps.
The First Pillar Top
The top of the pillar has a few features which you can interact with. Note the appearance of a spyglass near the top of the steps; if you position yourself correctly you should be able to look through the telescope, which has a good amount of zoom on it. Also on the top of the pillar, there's a small room you can enter, which shows a diagram explaining how the full telescope array is positioned.
What You Need To Do
Well, you need to find some way to proceed from this first pillar, although it seems like something of a dead end.
Vague Hints
Your basic task here is to find a slate symbol with the spyglass. Unfortunately, the spyglass can't see the symbol at the moment, since the telescope array is blocking its line of sight. (You can, however, look through the spyglass and mark down the three symbols, which make up a set of coordinates, that appear on the side of one of the far pillars; these will be important a bit later on.)
So, in order to move on from here, you'll need to find some way to move the telescope array so that your spyglass has an unobstructed field of vision. If you need a hint, then keep in mind that moving the array has nothing to do with the red room down below; all the tools you need are up here on the summit, although they may be a bit obscure at first.
You might want to check around for buttons to press to see if you can find a secret.
How You Need To Do It
After you've marked the coordinates on the far pillar down on some scratch paper, head into the small room with the array map. The map itself is a bit of a red herring, apparently, as there's no real way to use the information on it in any useful away. Instead, when you're inside the room, close the door behind you; when you've done so, you should see a button on the wall. Clicking it will reveal a set of secret steps near the map. When they've descended fully, you can proceed down.
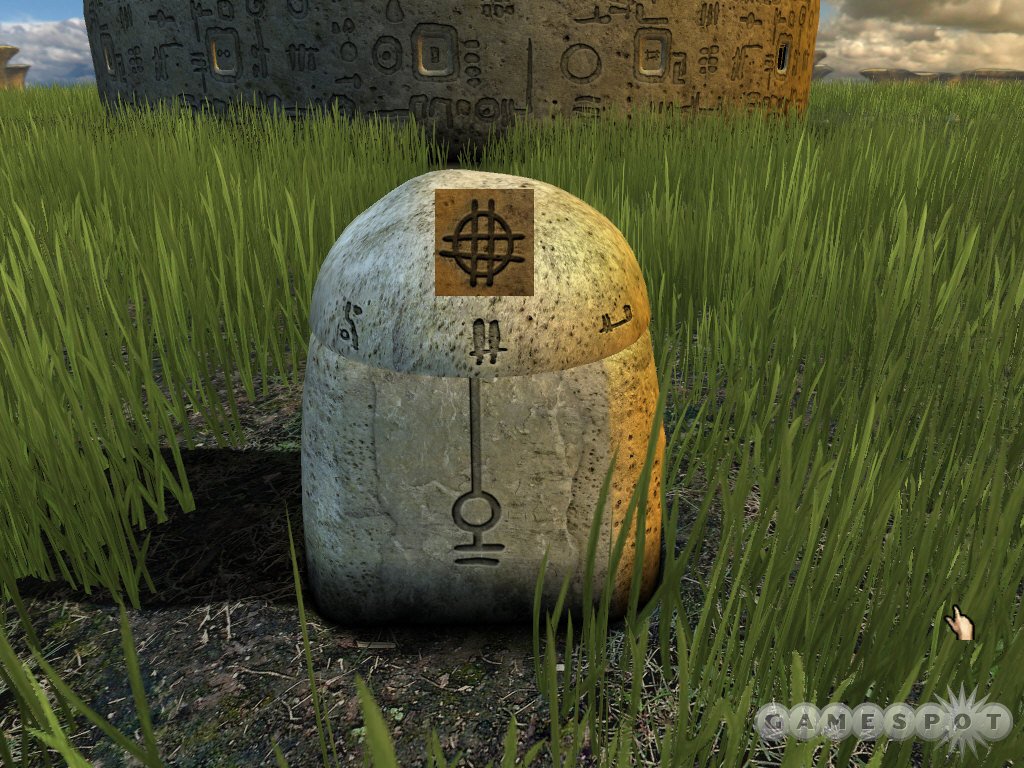
You'll come out near a small set of levers overlooking a dangerous-looking precipice. These levers can, indeed, move a large pulley on the upper portion of the pillar around. You need to manipulate them so that the lower gears turn once; this should entail leaving the top lever alone, and pulling the bottom lever down one time. When you see the gears turn once, you should be able to return to the top of the pillar, use the spyglass, and shift it almost completely to the left to find the second pedestal symbol through a gap in the larger pulley. It's on top of a distant pillar with two small yellow lights on it; if you still can't see it, try zooming in a bit. If it's really not there, you may need to fiddle around with the levers back down below until you get the pulley to move in such a direction as to open up your line of sight. This is the second symbol for the age, so mark it down on your slate and let the Bahro open up a new pedestal for your warping pleasure. It resembles a small circle on the top of the slate with three lines extending beneath it, each of which end in circles.
The Second Pillar
What You Need To Do
Your goal here is to, again, find another pedestal symbol. Unfortunately, you can't see it just yet; the telescope array is blocking you. You'll need to move it in order to open up your line of sight. You may be able to find something on the first pillar that will help you do so.
Vague Hints
Hmm, you should've found a set of coordinates with the first spyglass; perhaps there's another set visible through the second spyglass as well?
These coordinates look suspiciously similar to the circles and symbols on the machinery in the red room.
There are only two coordinates at this point.
How You Need To Do It
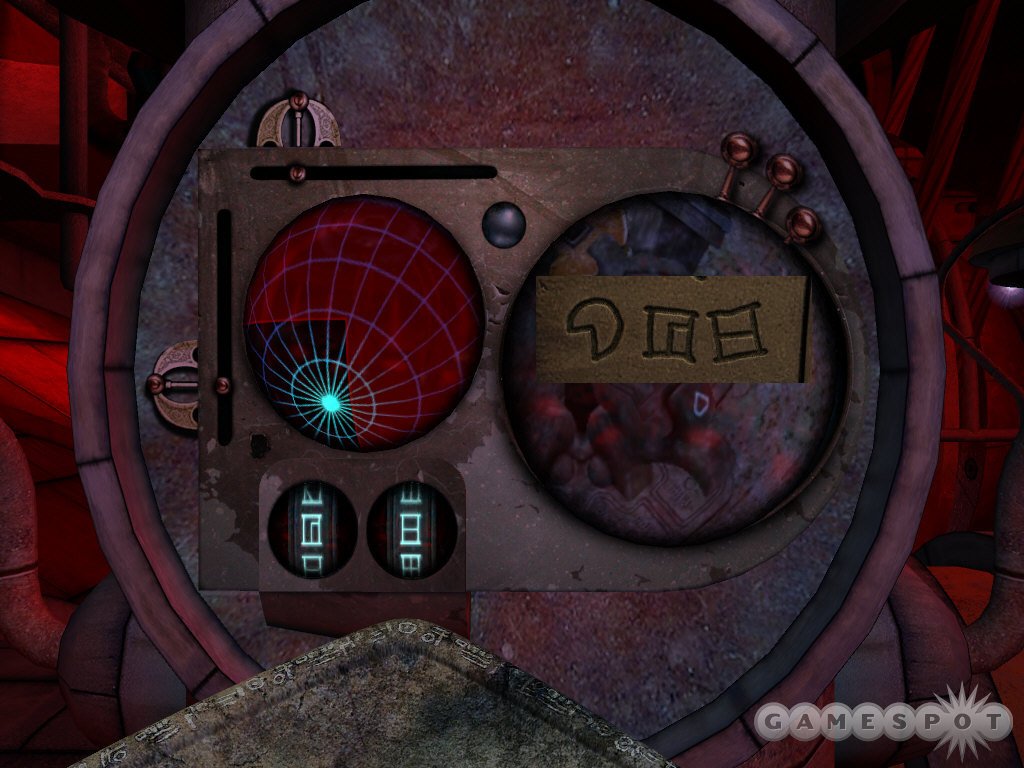
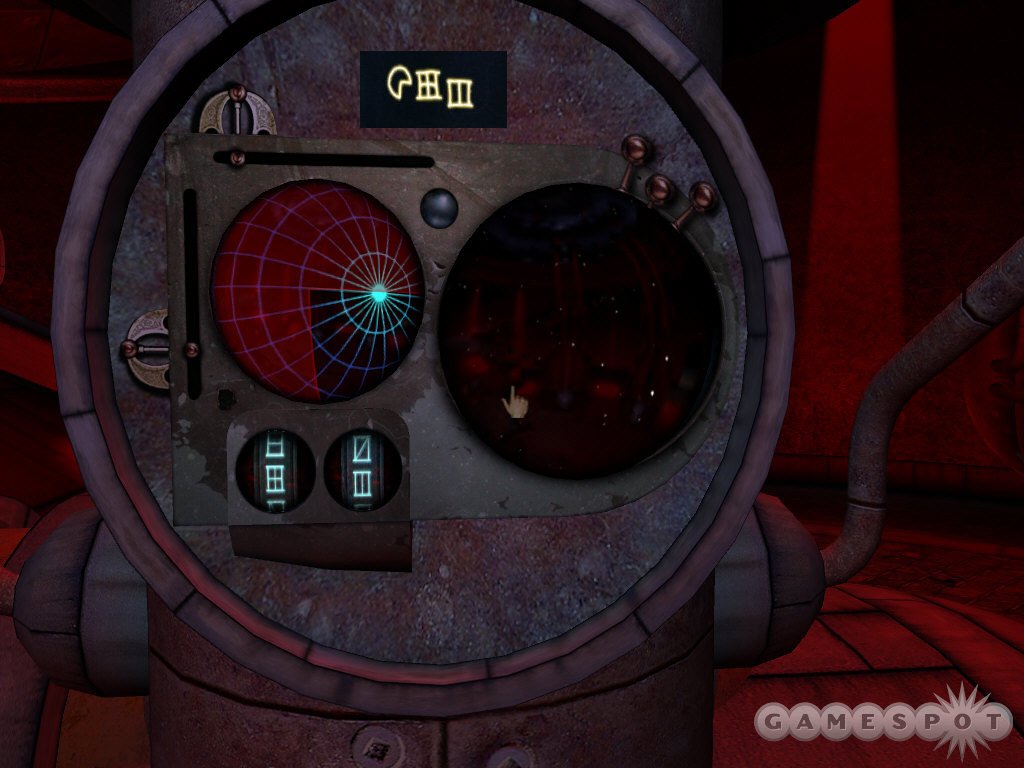
After warping to the second pillar via the second symbol, you'll find that you only have one area of interest; another spyglass that will let you look back onto the first pillar. The only aspect of the first pillar that's of any interest to you is another set of glowing coordinates; mark them down as accurately as possible before warping back to the first pedestal. You should have two sets of coordinates now: one from the first spyglass on the first pillar, and one from the second spyglass on the second pillar, which you just came from. They both have three symbols in them, with the first resembling a circle that's had a 90-degree section of it cut out, a la Pacman. The second two symbols in each line of coordinates are the azimuth and altitude of the desired point the telescope will eventually be looking at. It's important to realize here, though, that you're not really pointing the telescope at anything just yet; instead, you're simply attempting to move the machinery around so that you can see things a little better on the ground.
With both sets of coordinates in hand, you can return to the red room and use the machinery there to lock on to the coordinates. The first symbol in each pair of coordinates will tell you which machine to use; find the machine that matches the circle-symbol (each machine has a different quadrant of the red circle cut out). It should be the two machines closest to the door leading into the red room. When you approach the machine, use the two sliders to move the symbol readouts around until you find the two that match the symbols in the coordinates, then press the green button to move the telescope array.
When you've moved both machines into the correct positions, move back to the pedestal and warp to the top of the second pillar. Using the spyglass again, you should be able to peek directly through the center of one of the nearby telescopes and find the third symbol, which will take you to the third pillar.
The Third Pillar
The third pillar features a door leading into some kind of control room, but the room is currently unpowered, and thus the door can't be opened. There's also a set of steps near the pedestal here, at the bottom of which you can find another telescope. There might also be a cable car nearby, but it's probably just out of reach at the moment.
What You Need To Do
Remember what Escher said about finding something above you, and commanding the Bahro to do it? Sounds like you'll probably need to find another command symbol that will let you accomplish that. To do so you'll probably need to get into that control room somehow. That cable car is obviously part of the solution to this whole mess...can you get onto it somehow?
Vague Hints
You need to take a ride on the cable car here as well as enter the control room, but not necessarily in that order.
If you look through the spyglass near the cable car, you should be able to follow the cable it's connected to and find out where the opposite end is. Does it look familiar? If not, then the gigantic pulley on the top of this pillar should ring a bell.
How You Need To Do It
Your first goal here is to move the cable car into a position where you can actually walk onto it and climb down. If you warp back to the first pedestal, then climb all the way to the top of it and walk down the secret set of steps, you'll be at the other end of the cable car's path, where you flipped the levers way back when. Flip the uppermost lever so that it's pointing to the left, then keep flipping the bottom lever until the gears stop moving; this will move the cable car all the way towards the other end of the cable.
If you then return to the third pillar and walk down the steps, you'll be able to climb onto the cable car and climb down into the basket. There's a lever here that'll start the cable car, but first you need to power it up. To do so, walk up the nearby stairs until you find a power station. The right lever should be smack in the middle, while the left lever will need to go about 3/4 of the way to the top before the station will power up. It'll do the same thing as the first station when it cranks up, so you'll know when you're good to go. If you continue up the steps, you'll spot another symbol on the wall of the dome, and will be able to open the door leading outside. Write down the symbol, naturally, but don't use it yet.
Now that the cable car is active, hop onto the car and ride it. It'll stop near the middle of the cable, and you'll be able to spot the third set of coordinates on the inside of the waystation. Mark them down, then continue on to the first pillar.
Using The Telescope Array
As you may've guessed, you will eventually need to use the telescope array to peer into the heavens, so return to the red room. You'll need to use all of the information you've gathered thus far to figure out the symbol that will lead to the Keep.
What You Need To Do
Well, you have coordinates for the sole remaining telescope, in the back left of the red room. Maybe you should plug them in? You also have another symbol for your slate. Perhaps, just perhaps, they can be used together to find something out?
Vague Hints
This is a pretty simple section of the area, but can be frustrating if you miss on your first attempt. Save your game before activating the symbol, and be sure that the coordinates are entered correctly.
How You Need To Do It
Alright, so you have a symbol that speeds up time; this will, coincidentally, shift around the star field that appears in each of the three working screens inside the red room. The key screen here is the one to the back left of the room, with the lower-left quadrant of its area cut away. This is what matches up with the coordinates on the cable car midpoint, so enter them in and hit the green button before using the time speed-up symbol.
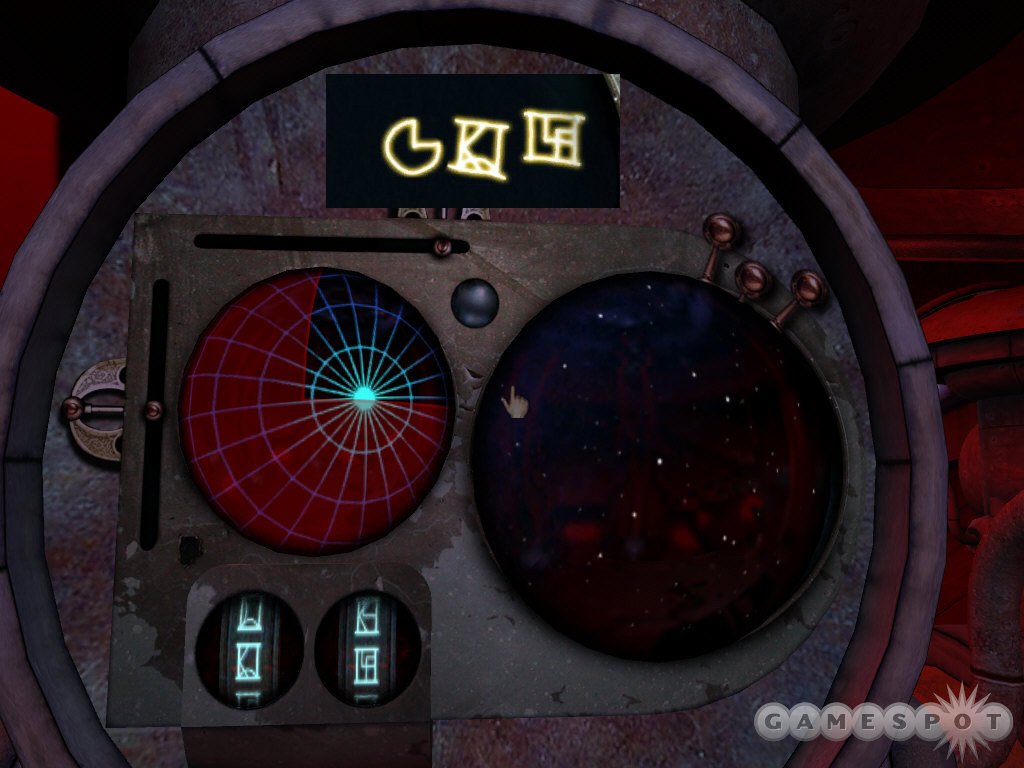
If you have the coordinates entered in correctly, then use the speed-up symbol, you should notice the rings around the planet in the screen moving rapidly, at least on the farthest magnification. What you need to do here is zoom the magnification in all the way (using the small tabs in the upper-right corner of the screen), then wait for a cycle of time to pass by. You might actually need to use the time speed-up symbol a couple of times before what needs to happen actually occurs; if time slows back down just as one set of the rings lands under the scope when it's at highest magnification, the screen will flash, and the symbol for the Keep will suddenly appear. Go you! If you happen to use the speed symbol too many times before you enter the correct coordinates, though, the rings can pass by the viewer, forcing you to use the speed symbol many, many times before they align properly again. It's best to reign your curiousity in, then, and only use the symbol when you're sure you have the correct coordinates in place.
When you have the Keep symbol, use it, then return to the first pedestal in the age to warp out to it. You'll need to climb down some steps to reach the Tablet, but when you do, you'll be able to hit the slate there to unlock the second of the four pedestals around the Keep, and end the Age. Halfway home!
Noloben
Your first trip to Noloben will reveal it to be a fairly placid place, with large, sandy beaches revolving around a plateau-like landmass that sticks up out of the water. You'll find yourself on one of these beaches initially, but will soon have to climb to the top of the plateau to discover what waits for you there. To begin with, though, you'll need to explore the bottom level of the area to get a clue to the puzzle on top of the plateau.
Note that there's a couple of caves in this area. One is near the small settlement, and is currently blocked off, while the cave around the corner from the rain-worship bench leads through to what's currently a dead end. If you cross the shallow water through the second cave, though, you'll come to a door with an odd symbol on it. What are the chances that you'll be returning here at some point? We're going to go out on a limb and say that they're pretty good.
Blame It On The Rain
What You Need To Do
Well, not so much. In order to give the Bahro commands, you'll first need to figure out the symbols that they'll respond to. For example, one of the symbols you can use in Noloben orders the Bahro to do a rain dance. To find the symbol, move around the corner from where Escher appeared and find the small shrine with four holes in the ceiling. Before you move in for a closer look, take a look at the symbol scrawled on the slate-shaped hole just before the shrine. This is the symbol that will cause the Bahro to instigate the rain.
How You Need To Do It
Feel free to scribe the symbol on your own slate, but it won't register with the Bahro that appears if you walk away. Hey, wait a minute - that slate shape is upside down! You'll need to take the symbol, flip it 180 degrees, and trace it onto your slate that way in order to get the Bahro to start the rain. You'll have to move two steps away from the slate for the Bahro to appear, but if you've drawn the symbol correctly, then you should be rewarded with the sweet feeling of rain on your shoulders.
The rain here serves one primary purpose: it'll fill the four holes in the shrine and let you see what symbols are reflected in them when they completely fill. It's a good thing you're precisely the same height as the Bahro are, or you'd probably see the wrong symbols! What a coincidence. At any rate, when the holes are full of water, you'll probably want to write down the four symbols that appear on a piece of scratch paper, as you will of course be required to refer back to them shortly.
With the symbols in your possession, feel free to explore the rest of the island. There's a cave here that leads to the opposite side of the area, but that's a dead end for the moment. Near the small settlement near the pedestal, you can find some remnants of civilization, as well as another dead-end cave. Also near this settlement, there's a rope ladder leading up to the top of the plateau. If you set the slate down on the ground, you'll have both hands free and will be able to climb up.
Ominous Structures
When you reach the top of the plateau, you'll be greeted by an odd dome structure that dominates the center of the surface. It's inscribed with numerous small symbols, and also has fifteen windows around the sides of it. There are also four smaller pedestals scattered around the dome, but for now, we're concerned with the big structure itself.
What You Need To Do
You need to find some way to get through the caves beneath the plateau if you want to move on. Doing so will require you to examine the dome and the pedestals quite closely.
Vague Hints
Well, you know that you need to find some way to tie in the four symbols you marked down earlier. They aren't immediately visible, but if you look closely enough, you'll find them.
Don't forget that you can open and close the windows on the dome, as well as look inside. Each of the windows has a rune on its outside edge, which look a lot like the runes on the pedestals.
How You Need To Do It
If you open up the windows here, you'll notice that you can see into the center of the dome. When you peek through a window, you should be able to see two windows on the far side of the dome; you'll notice that each window has a symbol above it. Most of these symbols are irrelevant, but four of them match up to the symbols you wrote down earlier, at the shrine. What you need to do now is match up the symbols on the inside of the dome with the runes on the windows beneath the symbols.
Since you can't open a window, poke your head in, and look up, this means that you'll have to look through the windows to find a symbol, then rotate around the outside of the dome to see the rune on the window underneath the symbol, then mark it down. This isn't overly difficult to do, although it may require some trial and error. First, close all of the windows on the outside of the dome. The basic process is to open up a window, peek inside, and see if you can spot any of the four symbols on the far side of the dome. If you can, leave your window open, then move seven spaces to the left or right and open the window there. If you then return to the initial window you opened, you'll be able to peek through again to check and make sure that the second window you opened is the one that’s actually underneath the symbol you were looking at before. If it isn't, you should hopefully be able to see how far off you were; if you were correct, head back to the second window, close it, and mark down the rune on the outside of the window.
Since there are four symbols to find, there are four runes that go alongside them. Said runes are: three horizontal solid lines stacked on top of one another, two horizontal lines of three dots apiece stacked onto each other, a horizontal solid line crossing two vertical solid lines, and a circle with a vertical line sticking out of the top. These are what you need to use on the four smaller pedestals to "unlock" the puzzle here. Unfortunately for you, some of the runes are repeated on different pedestals! Whatever shall we do?

Well, in order to figure out which runes go on which pedestal, you should first examine each pedestal, turning the tops so that you can see all of the runes on them, and marking down the number of times each rune appears. Two of the runes will appear twice, but one of them, the circle with the vertical line atop it, will only appear once, and the other, a single horizontal line with two vertical lines sticking through it, will appear three times. The key to figuring out which rune goes where will rely on finding the circle with vertical line symbol on one of the pedestals.
Obviously enough, when it does appear, you'll want to rotate the pedestal so that that particular run lines up in the middle. When you've found the pedestal with the circle/line, check around to see what other rune is on the pedestal; it's the set of three horizontal lines. Since there are only two sightings of this rune, and since this can't be the correct place to use it, find the other pedestal with the three horizontal lines and lign it up with the vertical line on the base of the pedestal. Before you do so, check which other rune appears on the pedestal...you can see where this is going. A process of elimination will let you move around all of the pedestals and line up the runes that you need.
Unfortunately, this puzzle is made a bit more complicated than it was in the demo, due to the fact that one of the symbols appears three times. You can be 100% of the placement of the circle/line and three horizontal line runes, but the other two pedestals will both have the remaining two runes. Still, there are only two ways you can configure these pedestals with the remaining runes, so a bit of guesswork won't necessarily kill you; you might have to make a couple of trips back down the ladder to figure out if you've done it right or not.
Note that there is an alternate solution to this puzzle. If you head back down to the bottom of this area and take a look at the tarp/rain puzzle again, you should notice that there are a number of shadows carved into its base. If you can match up the shadow with the direction of the sun in the environment, you should be able to compare it to the shadows cast by the pedestals on top of the mesa to determine where the symbols go. If you start by placing the six-dot symbol on the pedestal closest to the sun, you should be able to avoid the process of elimination outlined above.
The Lab
When you have all four of the pedestals lined up with the correct runes, then you can return to the bottom of the plateau via the ladder again. After picking up the slate, walk into the cave near the ladder; it's set into the cliff wall, and is easy to miss if you're not looking directly at it. The pedestals you've turned above have changed the path through the caves here to allow you to reach up into the interior of the dome.
What You Need To Do
If you head up the steps here, you'll be able to talk to Escher. He'll tell you to ascend to the top of his lab, and will also instruct you to seal the lab, and tell you that the Bahro are afraid of the place, and can't enter.
Vague Hints
Well, you've already unsealed the lab - maybe you have to seal it back up in the same manner?
Of course, doing so would prevent you from re-entering the lab via the caves. Maybe there's another way to get back in.
The Bahro won't enter the caves, which means that they can't inscribe the symbol on the first pedestal in the bubble on the beach. You'll have to find some way to do that yourself.
How To Do It
Alright, as Escher said, you need to find some way to seal off the lab before you can ascend to its top. The only way you have to do this is the pedestals atop the plateau. Before you start moving them around, though, you'll want to be sure that you can get back inside the lab when it's sealed. Unfortunately, the Bahro won't be able to use the symbol on the pedestal here to make it a waypoint, so you'll have to do so yourself. Draw the symbol on the pedestal on your slate, then place the slate onto the pedestal before warping back to the first pedestal/bubble area. This should hopefully get the symbol onto the pedestal there and let you warp freely back and forth between the two areas.
When that's done, return to the top of the plateau and seal off the lab. Don't get too fancy; just move each pedestal one turn to the right or left, then drop back down to the bubble teleporter and warp yourself inside the lab. The ladder at the very top of the area should be free for you to climb now.
Top Of The Lab, Ma!!!
You've reached the top of the lab, but don't have much to do. There's another pedestal here, as well as an odd machine that seems to focus light on the symbol-door across the shallow water through the second cave on the bottom floor of the area. When you stand directly in front of the telescope-thing, the door across the water will disintegrate, but when you step away from it, it'll immediately reconstitute itself.
What You Need To Do
Obviously, your goal here is to open the door across the water and somehow keep it open long enough for you to reach it. You'll need to find some way to trip the symbol on the ground beneath the telescope in order to keep its light-focusing mechanism active, though, or you'll never make it to the door before it resolidifies. Be sure to get the symbol for the third pedestal here inscribed; the Bahro have no trouble getting to this particular pedestal.
Vague Hints
Well, in order to get through the door, you obviously need to be in front of it when it opens, which means that something or someone else will have to depress the symbol. Escher doesn't seem to come at your beck and call...
Escher's last speech, as well as the pictures in his lab, also hold a bit of a clue to what you have to use here.
If a Bahro happens to be repelled by a picture on the slate, it'll leave the slate on the ground. Since the symbol will remain on the slate, though, the Bahro will eventually come back and check it out again.
How To Do It
This can be a little confusing if you don't know that a Bahro will re-check a slate that it doesn't understand, so long as it remains on the ground. If you bring your slate to the beach and try out the snake symbol that's in one of Escher's pictures (it looks somewhat like an E, oddly enough), you'll be treated to the appearance of a Bahro, which will take one look at the damn thing and reel back in pain. If you leave the slate on the ground, then it'll eventually appear again and do the same thing over again. Just like picking a scab - it hurts, but you can't help it!
Anyway, what you need to do here is draw the snake symbol on your slate, then drop it on the symbol of the tree at the base of the telescope-thing on top of Escher's lab. When you leave, a Bahro will appear, recoil in horror, etc. Don't bother to look at it, though; just use the pedestal to warp back to the first pedestal bubble, then walk from there through the second cave and out to the water. When you hit the water, find the path that'll let you walk through to the other side of the water, so that you're near the door. The Bahro will have disappeared from the telescope by now, so the door will be solid, but if you wait another 60 seconds or so, the slate will cause it to appear again, allowing you passage through the door and into the Keep. Write down the symbol, return to the first pedestal, grab the slate, inscribe the Keep symbol on it, and you're home free.
Laki'ahn
Welcome to Laki'ahn, which is another island age, in the vein of Noloben. This is the largest age you've encountered thus far, and thus has plenty of land for you to explore.
The Wind Gears
Pick up the slate from the pedestal and start looking around. If you follow the coastline and dart through a set of rocks, you should see the first symbol on the island; a set of wavy lines that would appear to be a power symbol used to command the Bahro. If you move on around the next little inlet, you'll be able to wade into some kind of sewer grate, then make it back to dry ground by walking up the ramp formed by a broken tusk. This will lead you up to an apparent dead end, with some dormant machinery hooked up to a windmill.
What You Need To Do
Well, it would appear that you need to find some way to open a passage to get out of this dead end. The machinery here obviously has something to do with it.
Vague Hints
Have you tried using the wavy-lines symbol on your slate yet? Can you think of any way that would interact with the machine, or what it's connected to?
In case you didn't know, you can walk around to the back of the machine and climb up the ramp there to reach the controls.
How To Proceed
If you've gotten this far, then you should've spotted the wavy-line symbol; this will call down a windstorm when drawn and dropped. Obviously enough, this is going to power the machine, since it's connected to a windmill.
The machine here controls the pod in the center of the nearby construct, which also contains the second pedestal of the age. To raise it up, pull the leftmost lever, the largest one, down; this will power up the machine. The two smaller levers are what actually move the pod around. Pull the smaller left lever once, and the right lever three times. This will rotate the pod so that you'll be able to get into it, which will let you see the symbol on the pedestal. (Technically, you can rotate the pod only once by pulling the right lever only once, and still wind up seeing the pedestal, but this will require you to walk all the way back to the bubble to pick up the slate again after you drop it.)
When you have the pedestal symbol, draw it on your slate and let the Bahro activate the pedestal as a teleporter, then grab the slate off of the pedestal and return to the machinery again. You'll have noticed that there are two exits from the little pyramid thing here; one of which was the way you came in, and one which leads off to the left. What you need to do now is use the machinery again to rotate the cage so that the gap in it leads off to the left, then open the doors leading on. This should entail activating the wind symbol again, then pulling the right lever three more times and pressing each of the buttons on the panel one time each. When that's done, return to the first pedestal and use the warp symbol there to warp inside the cage; you should find your path free and clear at this point.
The Arena
It would appear that the Laki'ahns were fond of their blood sports, as you'll find yourself in a miniature arena at this point.
What You Need To Do
You can see the next pedestal on top of a raised platform, but for now, it's inaccessible, and you can't see the symbol on it. You need to find some way to drop the platform. After it's been brought down, you'll need to find some way to raise it back up to the walkway so that you can move on.
Vague Hints
The buttons scattered around the platform are for setting the weight capacity of the platform. These are counted off by lines; four concentric circles means four units of weight, for instance. If you open up both buttons above the four concentric circles, then you're opening up eight units of weight in all.
If you set the weight capacity very low, then the platform will sink, but if you set the weight too high, it'll rise up above the walkway. A perfectly balanced platform will rise or sink to the level of the walkway and stay there.
There's a scale off to the left of the platform that will weigh whatever steps on it. Don't forget that the slate will add to your weight if you're holding it when you hop onto the scale.
The pedestal itself has a certain weight. You can't put it on the scale, but there is another way to figure out how much it weighs.
If you warp yourself to the pedestal on the platform, your weight will suddenly be added to it.
How To Proceed
To begin with, getting the pedestal's symbol is easy as cake; just close all of the weight symbols to drop the platform to the ground and grab it. Scribe it on your slate and drop it for the Bahro. After that's done, you'll be able to warp to the pedestal whenever you like.
Unfortunately, you'll have a harder time actually getting the platform to stop at the walkway; most of the settings of the weights will leave it either too high or too low. In order to get it to stop just at the right height, you'll need to figure out how much weight is on the platform when it's at the walkway, then add your own weight to that number before warping to the pedestal.
After a bit of elementary tinkering, you should find that the the pedestal weighs nine units. If you weigh yourself on the scale, you'll find that you weight six units, or seven units if you're holding the slate. You'll need to grab the slate off of the pedestal when you're about to move off of the platform, so you'll have to factor its weight into the equation as well. Thus, if you want a properly balanced platform, you'll need to set the platform to hold 16 units of weight before teleporting onto it. Do so by opening both eyes on the four-weight measure, both eyes on the three-weight measure, and both eyes on the one-weight measure. Doing so will set the platform to hold 16 units of weight, allowing you to return to the first pedestal, warp onto the pedestal on the platform, and drop precisely down to the walkway and step off.
Trade House Lock
After gaining access to the upper levels of the arena, look underneath the two large sculptures near the seats at either end of the path to unlock the doors in the arena itself. You'll find a door to the tradehouse near where you speak with Escher.
What You Need To Do
You need to find some way to get past the lock on the tradehouse door. The lock has five symbols on it, and they need to be clicked in the correct order to unlock the door.
Vague Hints
This isn't a puzzle; you need to find the correct combination for the door before you can pass through.
If you've been looking around carefully, you might've already seen the combination, but it's not in the arena.
Remember where Escher first spoke to you on this level?
How To Proceed

Head back to the first pedestal of the age and walk up the steps to the other locked door, near where Escher's first speech took place. If you look through the windows on the left side of the door, you should spot a piece of paper with a combination on it. Write it down and proceed back to the other locked door. You'll note that the triangle on the paper and the triangle on the door are upside-down, which should clue you in that the symbols on the paper were upside-down, and thus should be entered in in reverse order. So it'd be circle first, then square, then triangle, and so on.
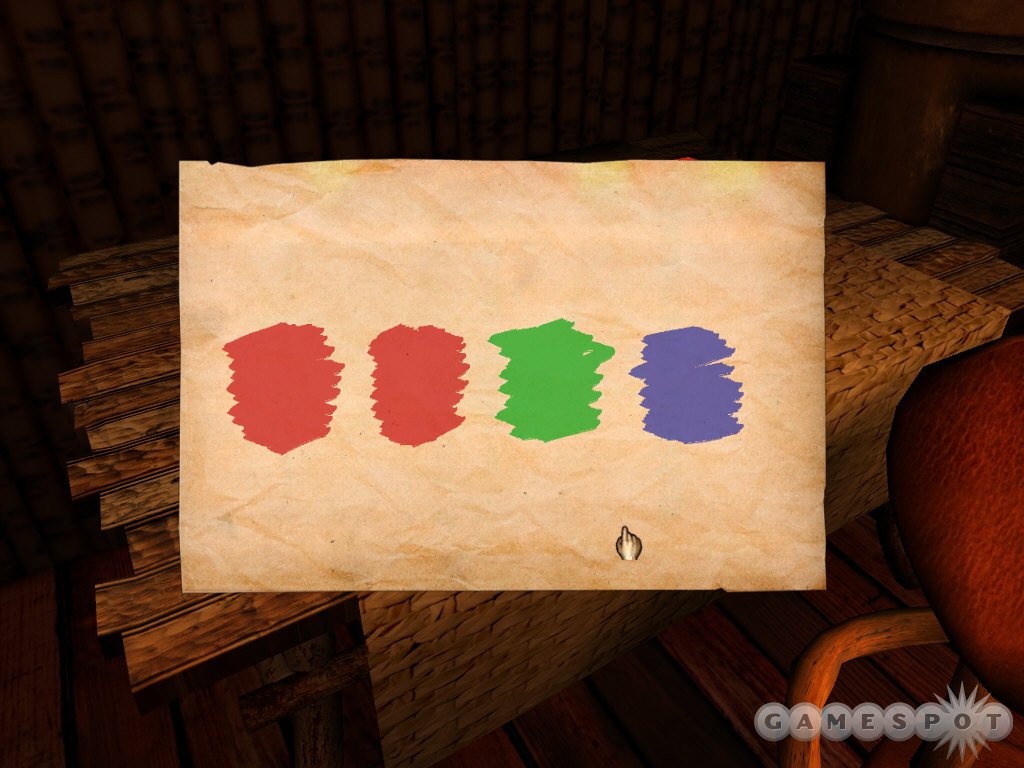
There's only one clue of note in the Trade House; you'll find a piece of paper with a few swaths of color on it on one of the tables within. Note the colors, then return to the Arena.
Maze Elevator
Remember when you hit the buttons underneath the sculptures in the arena after you first got off the walkway? Well, those opened some of the doors in the water at the bottom of the arena. Return down there (you can walk into the water via the bottom row of seats in the arena, but it's a one-way trip) and head into the halls beyond to find the maze elevator.
What You Need To Do
You need to somehow get to the top of the elevator. The elevator is raised by first raising the lever nearby to set the height, then stepping on the switch at the end of the nearby hallway.
Vague Hints
You can't be on the elevator and step on the switch at the same time, obviously.
The solution to this puzzle is similar in nature to that of the puzzle on top of the lab in Noloben, where you had to open the door to the Keep.
The snake symbol won't work here, though; you'll need to use a symbol specifically for this age. You didn't find it inside Laki'ahn, however.
How To Proceed
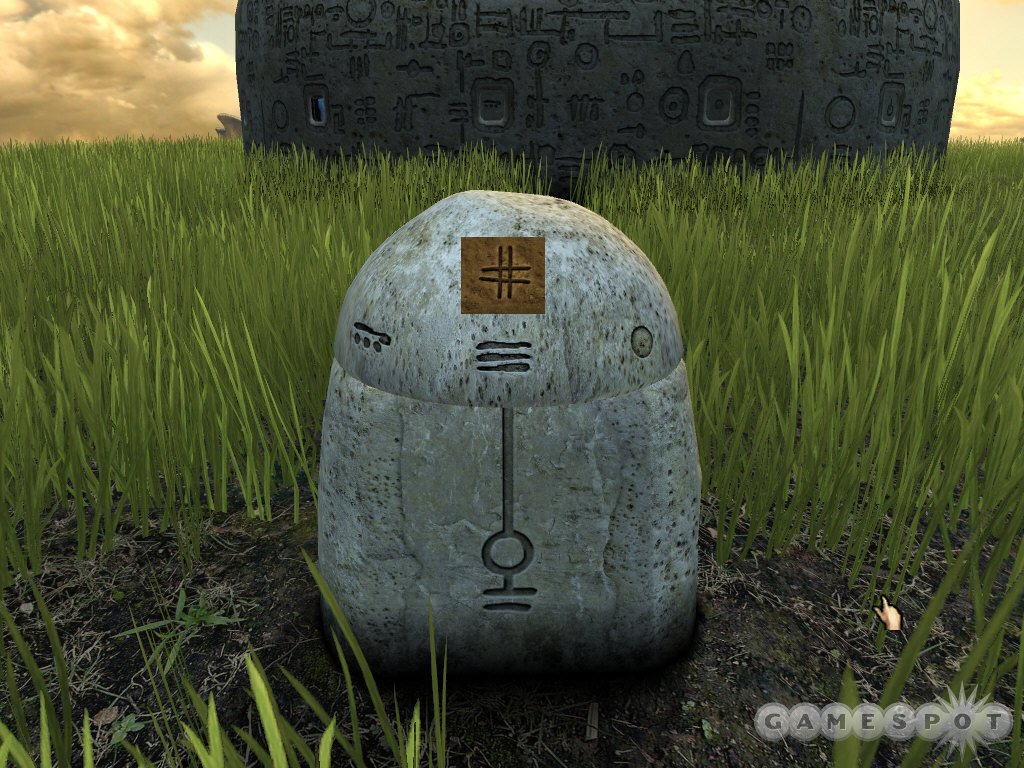
We certainly hope that you've been picking up all of Yeesha's journals that you've seen thus far, as you'll need one in order to find the symbol required to proceed. When you reach the elevator, stand on the pressure platform at the very end of the hall, then raise your slate and draw the symbol in Yeesha's seventh journal onto it. (Check the video here for a picture of it if you happened to not grab that journal.) After dropping the slate, move forward, raise the ballast on the elevator to the top of its little rail, then step onto the elevator and take a ride! If you don't get all the way to the top of the elevator, then your symbol wasn't recognized, so drop down and try again.
The Maze
A maze bars your progress. Whatever shall you do?
What You Need To Do
You need to navigate the maze here. Just finding your way through isn't enough; there are also a series of colored buttons that you'll need to press in the correct order in order to find the exit.
Vague Hints
Like with the trade house door, there is a specific solution to this puzzle, not something that you're just supposed to guess.
Speaking of the trade house, wasn't there some reason you went there in the first place?
How To Proceed
In the Trade House, you can find a piece of paper with four colors on it: red, red, green, blue. Starting from the top of the elevator, you'll need to find four buttons in this order and click on all of them to open the door leading on.
There are four hallways to take from the elevator area, two of which have red buttons at their ends. You'll need to try one of the red hallways and, if you can't find the correct color combination, double back and try the other one. It's a fairly short combination, though, so you should be able to bust through the two combinations fairly quickly.
Rock Puzzle
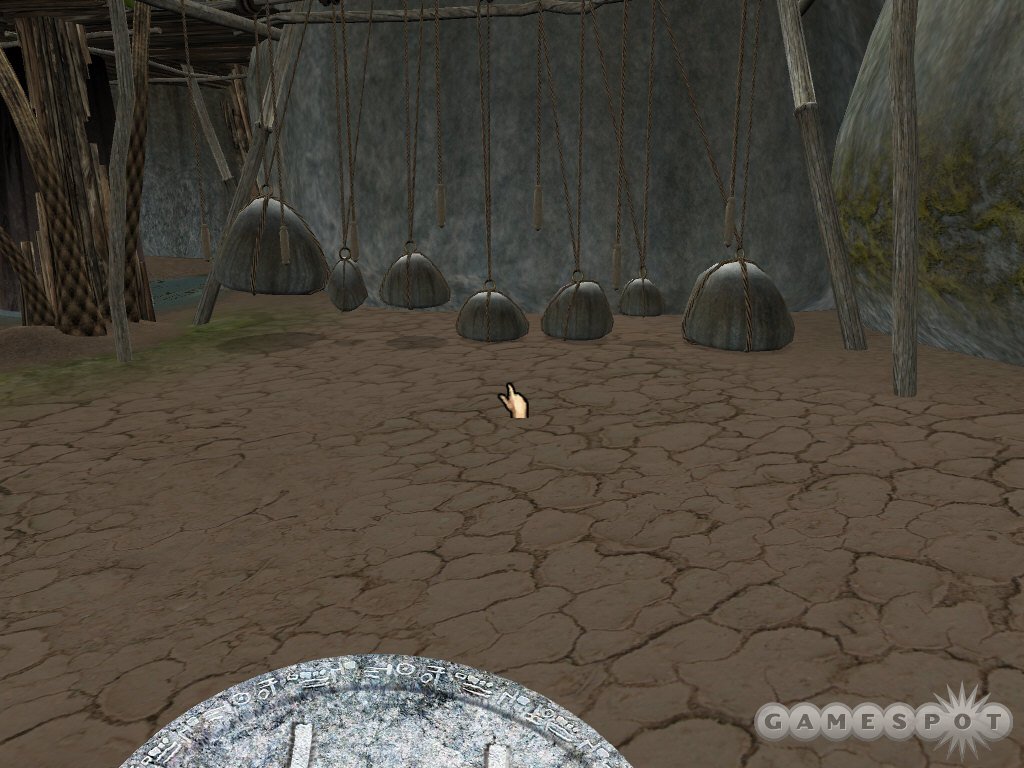
Outside the maze, you'll find another pedestal, so get it as a waypoint before looking around. Soon enough, you'll find another puzzle, in the form of a large structure on the beach, with a set of rocks tied to ropes at its bottom.
What You Need To Do
If you look around the area, you'll find two separate barriers weighted with more rocks. One is up in the air above the structure, while another is hidden away behind a boulder, near the beach. These are connected by a length of wood that acts as a lever.
Vague Hints
If you shuffle around the weights here, you'll notice that you can move one side of the lever up and down, but that the path through the boulder is blocked if either door is lowered all the way. What does that imply?
There's no solution to this puzzle hidden away somewhere; you just have to figure it out. It's mostly a case of trial and error.
How To Proceed
In order to make it through the boulder path, you need to somehow balance the lever so that both weighted doors are in the air at the same time. This will require most of the weight to be on the left side of the lever. We managed to solve the puzzle just by pulling up random weights until we stumbled across the solution, so feel free to look at our screenshot of the solution if you want to skip the mucking about and get right to the meat of the matter. (The rocks that need to be lifted are, counting from the left, the first, second, third, and sixth.) Otherwise, feel free to pull weights to your heart's content. It's a workout, if nothing else.
The Keep
You're almost at the end of the age, and thus almost at the Keep, which you can actually see by looking out the window in one side of the top of the structure. But how do you get there?
What You Need To Do
The Keep symbol is somewhere at the top of the structure. Find it.
Vague Hints

The symbol is hidden, but you won't be able to see it just by walking around and looking about.
You have more tools at your disposal than you may think. Be sure to use them all.
How To Proceed
Although it's obscured, the Keep symbol is indeed on top of the structure; it's just a matter of finding it. In order to do so, you'll need to use the symbol that causes a windstorm. If you bring up a good amount of wind, the flag near the window will flap over in your face, allowing you to jot down the symbol required to get to the Keep. Enter it onto your slate, warp to the keep, and you'll finally have access to the tablet that you so desire.
The Endgame
When you finally return to K'Veer, you'll be able to nab the Tablet from its resting spot in the Keep at long last. Your journey is almost over, but you still have one remaining choice to make. The time to decide between Escher and Yeesha is upon you. We won't give away anything here, but if you want to give Yeesha the tablet, then simply click on her, then head up to the Linking Book to Myst to speak with Escher after you've done so.
If you instead wish to return the Tablet to Myst as Escher requested, bring it to the Linking Book, head over to Myst, then place the Tablet into the receptacle in the small structure near the top of the hill path.
Of course, if you wish to avoid giving either of the standard endings, then there is an alternate (and better) ending available for you. In order to access it, though, you'll need to avoid giving the Tablet to either of the characters that are available as possible receptacles. Who does that leave? You could always try dropping the Tablet on the ground and seeing what happens.
Got a news tip or want to contact us directly? Email news@gamespot.com
Join the conversation