How to get movies on your PSP
Learn how to get movies from your PC to play on the Sony PSP!
How Do I Get Started?
So you've got a PSP now. And you've got video files on your PC in .avi, .wm, or some other format that won't run on your PSP. How do you convert your existing movie files into a format that will work on your PSP? Start by installing 3GP Converter--you can download it from this Japanese site. We also have a direct DLX download here. It's as easy as unzipping the file to any directory, but you'll also need Apple QuickTime installed to make it work. 3G Converter doesn't have a proper install program, but there is a setup program (setup.exe) that you'll need to run first.
Upon first running the setup program, you'll be confronted with a bunch of gibberish. That's because the program defaults to Japanese, and if you're like us, you probably don't have full Japanese language support installed. So the first step is to select "English" from the drop-down menu at the bottom of the setup window. That will change all of the program's settings and dialog boxes to a language that we can read.
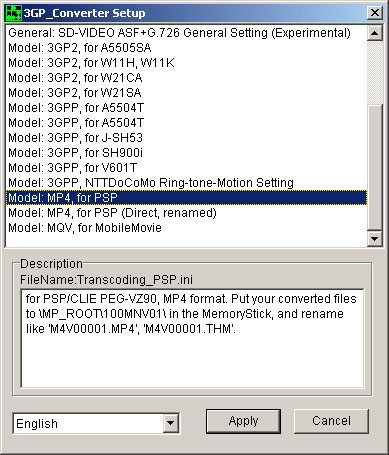
From there, you'll need to pick a PSP-ready preset for the program. That upper box--the one that just magically transformed into English--has two PSP settings: "Model: MP4, for PSP" and "Model: MP4, for PSP (Direct, renamed)."
The only difference in the two settings is that the direct/renamed setting is for pointing this encoder directly at your PSP's memory stick, if that's what you want. It will properly name the files for you and place them on the stick. But we're going to do this the long way. Why? Because chances are, you're going to want to keep backup copies of your PSP-ready movies on your PC so you can move them off and onto the unit. You'll want to keep the original file names, because otherwise you'll have no idea what's what. So pick the first "Model: MP4, for PSP" option and click "apply."
How To Use The Video Encoder
The converter should now launch. The first step is to click the select box and choose the directory for your PSP-ready files to go in. We selected the desktop, but that's just because we're messy. Just choose a location that you won't forget.
Once you've set that, you'll need to set your video and audio quality using the drop-down box in the middle of the program. Generally speaking, higher numbers for video bit rates mean better quality, but it also means the video file will take up more space on your memory stick. If you're encoding some fast-moving action, you might want to spring for the higher settings to improve frame rates. But if you're just trying to encode some comedies, we've found that 15 frames per second and 384kbps seem to work just fine for video. But, really, this is all about your tolerance for viewing compression. You can go all the way up to 1500kbps, if that's your thing, but you'll probably need a pretty big memory stick to fit anything of substance in that high of a rate.
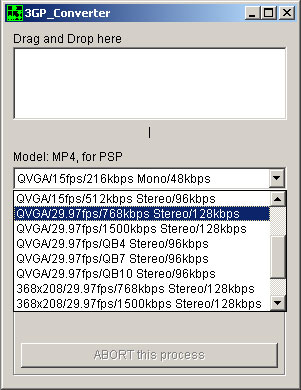
Once you've made your decision, take your source video file and drag it onto the converter. It will then start going. Once the processing meter has worked its way across, your file is in the proper format. But you'll still have to make sure it's named properly before moving it onto the PSP.
OK, I Have My Videos Encoded Properly. How Do I Get Them On The PSP?
The PSP requires a very specific format for its video file names. It's much stricter than, say, the process for putting MP3s onto the memory stick. You'll need to connect your PSP to the PC via USB and open up the memory stick file directory. Your PC will treat the memory stick like any other removable storage device, so just double click on the icon to open up the memory stick. You'll see a directory labeled "PSP." That's where all your saved games, music, and photos live. But for some reason, the video doesn't go there.
First, you'll need to create a new directory in the root folder of your memory stick called "MP_ROOT." You'll then need to create a "100MNV01" directory inside the MP_ROOT directory. You'll put your video files in this 100MNV01 directory.

But wait, before you go copying over files, they need to be named properly! Video files must be named in the format of M4Vxxxxx.MP4 where "xxxxx" is any five-digit number, like 00001 or 01323. The converter will also create a file with the extension THM. The THM file is a thumbnail image of your video that will show up in the PSP's menu to make it easier to browse videos, but you have to name the THM file to match your newly renamed video file. So if you're renaming "that guy gets kicked down the stairs and falls on his face.MP4" to "M4V00006.MP4," you'll also need to rename "that guy gets kicked down the stairs and falls on his face.THM" to "M4V00006.THM" for it to still work.
Once you're done with that, disconnect your PSP from the PC, go over to the video menu in the PSP, and hit play on your files. Happy viewing!
Got a news tip or want to contact us directly? Email news@gamespot.com
Join the conversation