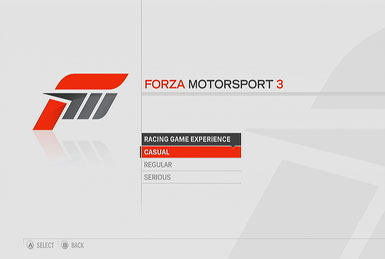
Forza 3 Primer Guide
Get up to speed with our Forza 3 Primer. Check it out for racing tips, how to tune your ride, and achievement details.
The latest game in the Forza series brings with it more cars, more tracks, and more help (in the form of "assists") than ever before. Of course, pretending you're a pro and driving like a pro are two different things, which is where we come in. We'll fill you in on what you need to know in order to remain competitive out on the circuit. So sit back and buckle up, as you're in for a ride.
Here's what you'll find in GameSpot's Forza 3 Primer Guide:
- Getting Started: Get the low down on the Forza basics, such as to properly use Assists.
- Racing Tips: Decrease your lap time and gain the lead position with our racing strategies!
- Upgrades and Tuning: Get some quick tips on how to tune your vehicle.
- Achievements: Find out how to unlock Forza 3's achievements.
Getting Started
Assists
One of the most important elements to familiarize yourself with are the "assist" settings, accessible before each race. Here, you can toggle various settings that impact your car's performance and your control over it, essentially making each race either easier or harder on yourself. These settings should allows players of all skill levels to remain competitive, but there is a cost.
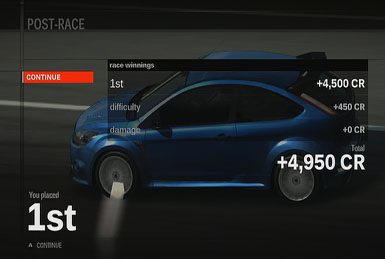
So here's how it breaks down. Winning first place in a race nets you a base amount of cash. If you have every assist enabled, you'll earn that total amount--nothing more. However, for every assist you deactivate, you'll earn a bonus amount--the fewer assists you use, the more cash you'll earn. For example, let's say an event rewards a first-place victory with $1000. If you play with all the assists turned on and and place first, you'll earn the base amount of $1000 dollars. However, if you disable some assists--let's say "stability control" (+5%) and "traction control" (+10%), you'll earn 15% more, netting you $1,150!
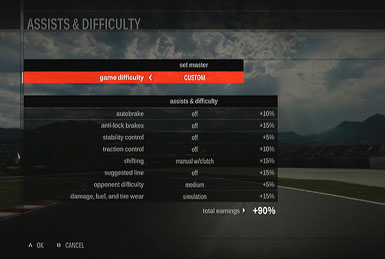
However, playing without any assists enabled should only be attempted by experts or the foolish. If you're neither, we actually recommend starting off with everything enabled and on the "easy" difficulty. As you already know, this will only net you the base amount for each victory, but it's enough to get you started. This will allow you to familiarize yourself with how the car controls, at which point you can then work on deactivating the assists, one at a time, until you're playing at comfortable difficulty level. As you get better, you can deactivate even more assists, until eventually you're racing without any help at all, netting you a 100% bonus for each victory! Not too shabby!
Assists and how they impact your earnings:
| Assist | Setting | Earnings Effect |
|---|---|---|
| Autobrake | Off | +10% |
| Anti-Lock Brakes (requires autobrake off) | Off | +15% |
| Stability Control | Off | +5% |
| Tractions Control | Off | +10% |
| Shifting | (manual) | +10% |
| Shifting | Manual w/Clutch | +15% |
| Suggested Line | Braking Only | +5% |
| Suggested Line | Off | +15% |
| Opponent Difficulty | Medium | +5% |
| Opponent Difficulty | Hard | +15% |
| Damage, Fuel, Tire Wear | Limited | +5% |
| Damage, Fuel, Tire Wear | Simulation | +15% |
Using Assists to earn Cash
Enable Simulation Damage: The default damage setting, Limited, will still let you damage your car; it'll just prevent systems from taking more than 50% damage. Unfortunately, that's generally going to be more than enough to cripple your car and prevent you from taking first place, which - let's be honest - should be your goal for every race you enter. If you're going to restart the race when you take enough damage anyway, you may as well set damage to Simulation mode. You'll earn 15% bonus for each race, and if you're able to get out front of the pack and avoid collisions, you're unlikely to take any damage anyway.
Bump the AI Settings: If you're interested in even more cash, then after racing a little while, you'll be able to set the A.I. Difficulty to Hard for a 15% bonus to your rewards. This isn't going to be an easy setting to deal with if you're like us and have a tendency to play with a loose, arcade-like driving style, but for races where you can bring a preponderance of firepower to bear, this is essentially free money. What we mean by this is that after you unlock certain powerful cars by winning races, you should find yourself absolutely dominating some of the races that they're eligible for, even without modding them.
True, some of the cars that you receive for winning races are going to be trash, especially early on, but some of them are expensive and powerful vehicles. The reason these cars will help you win on Hard difficulty is because they're going to simply outspeed most of the competition in the races that you've unlocked, allowing them to pull away from the pack in the straights, even over short straits, which thus makes these races much more forgiving of turning mistakes on your part. The aforementioned Impreza will be able to easily win races like the Asian Open, the AWD Shootout, and the Boosted Shootout, all without any modifications, even when the opponents are set to Hard.
You'll need to judge the relative strength of your car before deciding whether or not to run with Hard A.I., though, as harder A.I. settings in a field with relative parity will probably result in some swift drops to the back of the pack, unless you're quite good at following a proper line and cornering. Still, though, if you're able to beat cars with both simulation damage and Hard A.I. on, you can increase your winnings by 30% per race.
Maximum Cashola: Of course, if you're absolutely destroying the competition in a certain event, then feel free to switch all of the difficulty options so that you earn a 100% bonus for each victory. Just keep in mind that wwitching off all of your automated systems will result in a car that's very difficult to control while cornering.
Rewind
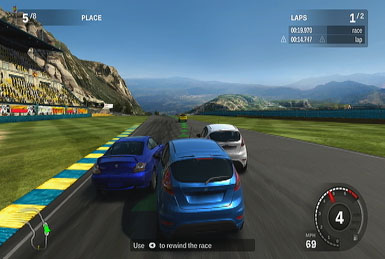
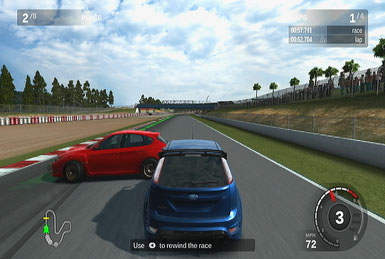
Beyond just assists, Forza 3 introduces a brand new "Rewind" feature. At any point during a race, you can tap the "Back" button to rewind the race about five-seconds back, allowing you to replay that segment. If it didn't rewind far enough back, simply tap "Back" again to rewind even further. You can use this feature as much as necessary during a race with no penalty (except for preventing you from placing on some online leaderboards). This can be a great tool to experiment with while racing--if you blow a corner, crash into a wall, or go off the track entirely, just rewind and try it again!
Racing Tips
Most of your education in Forza 3 is going to have to come on the track; there are simply too many tracks and cars to give you any kind of projected walkthrough to the game, besides the basics of "go fast". You'll want to also check your manual for more general tips, as it has some decent info on passing and turning.
Using The Line
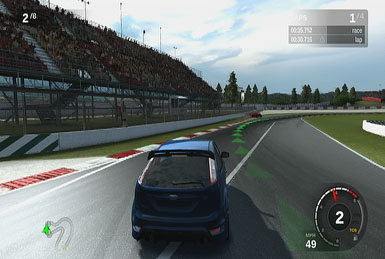
The racing line made famous in the original Forza is back, and as effective as ever. This baby, when enabled (remember, it's an Assist, so using it impacts your earnings) is essentially a tool that shows you when to brake and when to turn so that you can learn how best to approach a corner and get through it. It is customized for each course, and will change colors based on your speed, with green indicating that you should be going full-throttle, red indicating that you need to brake, and yellow conveying that you really need to slow down, while light yellow indicates that you're slightly above the desired speed.


The key to dealing with the line is, oddly enough, knowing when to ignore it. It is a fantastic tool for learning courses, but won't necessarily always apply to your car or driving style, so as you get a feel for how your favorite rides handle, you may find yourself using it more as a guideline than a hard and fast rule, or even turning it off altogether. The thing about the line is that it's a model of the path you follow in a perfect situation, and said situations are unfortunately somewhat rare, especially when dealing with numerous cutthroat A.I. opponents. It also doesn't always take into account the differences in braking and acceleration between all cars. You'll need to play around with a car on different tracks to see exactly how to adjust your path to the line. Cars with excellent braking may be able to travel into the red zone before pumping the brakes, for instance, while cars with oversteer or understeer may have to deviate from the line in order to get through turns.
Short Turns
One of the interesting aspects of the racing line is the way it often inserts yellow and red segments into short turns of no more than 20 degrees. Although top-end racing cars with extreme top speeds may find these handy, most of the cars you're going to be using throughout the game will be able to handle these turns simply by undercutting the line while staying at top speed, eliminating the need to brake; at worst you may just want to lay off the gas a bit before heading into the turn. (Turn 2 on the Maple Valley Raceway Short course is a good example of this.) The exception here is, of course, areas where chicanes or short turns precede sharp turns; if you attempt to speed through one of these, then you may find yourself poorly equipped to deal with the subsequent turn.
The line also doesn't usually take into account corner-jumping techniques. While corner-jumping and rail-riding isn't often a technique that will net you a big position bonus, mostly due to the way that the courses are laid out, it's worth noting that the line will never indicate when it actually might be faster to ride up onto a rail or jump a corner entirely. A bit of experimentation in areas with grassy terrain may net you some speed bonuses, but you can expect to damage your tires a bit even when you do find a quicker line. You will also take a time penalty when more than two of your wheels hit the grass at the same time, so if you're looking for a new time record, then this isn't your best bet, but if you just want to win a race, then you could do worse than attempting to jump a corner here and there.
Brake In, Gas Out
The primary difference between simulation racers and arcade racers comes in their handling of turning. If you're playing a game like Need For Speed: Underground, then you may be able to get through a turn by just hammering the accelerator and scraping along the outside wall until you come to the end of the turn, but in Forza 3, you're going to have to approach turns with a bit more respect. In other words, you're not going to be able to turn with the throttle open all the way; you're going to need to brake until your car hits a sweet spot of maneuverability and speed, allowing it to get through the turn as quickly as possible while still retaining control. When done properly, you'll gain speed over the course of a track, even if you spend a lot of time braking, since uncontrolled turn approaches will often send your car off the track, or force you to correct your path and cause significant time delays.
The most important thing to remember is to try and brake while you're still travelling in a straight line; braking while turning your car reduces the effectiveness of both actions. The "best" approach to a turn will usually have you braking while you're still approaching, reducing your speed to a manageable amount, and only then starting to turn while accelerating to try and stick to the line. On many courses, you won't be able to get from one corner to the next without braking at least a little while turning, but just remember that doing so decreases stability and will be likely to get you off the ideal racing line.

Also, keep in mind that you don't want to always wait for the line to turn red and then slam on the brakes. It's best to approach a turn while slowly easing onto the brake. Slamming on the brakes will cause a lot of instability in your tires and will often cause you to miss the sweet spot of speed for a turn, especially on the shorter turns. It's better to be going slower than faster in most instances, but if you do jam on the brakes, you can reduce the amount of friction that's available to you for turning. Ease on them when possible, but not to the point where you're getting passed.
Know The A.I.
One thing we can say for sure is that Forza 3's AI is pretty good for a racing game, especially with regards to how they pass. The cars here will, like human opponents, usually attempt to pass you up on a turn, and will often completely disregard the line while doing so. While they're perhaps a tad bit more tentative than the opponents in previous Forza games were, they'll still tend to undercut corners and even jump them in order to get ahead of you. They're not afraid of a little bumping, either, so be forewarned; they will usually hold off on being aggressive unless you bump them first, though.
If you happen to be out in front of a car that is your equal or superior in terms of speed, then, you're going to need to learn how to block off your foe properly. If you're using an exterior view, then you'll have to hit to check your rear view; in-car viewpoints have a handy rearview mirror already set up. (You can also use the right analog stick to look all around your car.) When you're in front of such a car, all you really have to do is do your best to keep yourself in front of them. They'll almost always try to pass you on the inside of a turn and proceed to block you off when they get past you, using their car as a shield to prevent you from accelerating and passing them, or they'll just push away if they're capable of it and dust you.
In order to prevent this strategy from working, you will, of course, have to try and stay in front of their car when they head inside on a turn. This is going to result in a pretty awkward turn for yourself, as well, but so long as you prevent them from getting past you it won't matter much, as you'll both be forced to slow way down; so long as you're still directly in front of them, they won't have much recourse but to follow your lead and wait for another opportunity to pass.
If a car does manage to bypass you, you should immediately try and get around it, if possible, as it will have taken the turn awkwardly in most cases and will require a bit more time than you to get up to full speed. The key here is to avoid actually ramming into them, unless damage is turned off; a good collision after a turn can wipe out your progress in a race and force you to restart it.
Upgrades and Tuning
Whether you're bringing a Lotus Elan or a mighty TVR Cerbera Speed 12 to bear on your favorite track, delving into Forza 3's tuning options will let you get a bit more bang for your buck. This section of the guide is intended to give you a very, very basic overview of the tuning commands in Forza 3 Motorsport. It'll only be a matter of time before there are FAQs detailing tweaks and tuning tips for the most popular cars in Forza 3, but for now, you're going to have to adjust and tune your cars yourself. We're not going to delve into specific recommendations here, just tell you basically what the settings do and how they'll affect your car.


Upgrades
As in the Gran Turismo games, Forza 3 will allow you to both buy upgrades to your cars and tweak their settings manually. (Manually tuning car settings will indeed usually require you to have purchased some upgrades first.) If you're intimidated by the tuning screen's complexity, then, well, don't worry about it; just buy the upgrades that you can and leave the tuning options on default. Upgrades alone will work to increase the raw power and stats of a car, so if you're just looking for something "better," just take it to the shop and buy whatever parts you can afford for it.
Upgrades are expensive, but most cars can be given a large (100-150 point) boost by purchasing a Race Weight Reduction package for them in the Platform and Handling section of the upgrades menu. Reducing the weight of a car won't usually affect its top speed, but it will make it quicker to accelerate, quicker to stop, and easier to handle, and usually at a relatively cheap price, too. That's usually going to be the first thing you want to buy for a car, but keep in mind that heavier cars are going to benefit from weight reduction a bit more than cars that are already pretty light. For instance, the heaviest car in the game, the Bentley Continental GT, will see its numerical rating go from B574 to A749 solely from a weight reduction upgrade (mostly due to the fact that its acceleration jumps from 4.4 to 6.0!) while the lightest, the Lotus Elan Sprint, will only go from D145 to D153 from a race weight reduction upgrade.
After the weight reduction, you'll want to bump yourself over to the engine upgrades and try to get the biggest acceleration gains that you can. Race cams and valves are good boosts for the money, but if you have cash to spare, you can throw all of your credits at the car and attempt to get the biggest bang for the buck that you can.
Tuning
Tuning can get you closer to a car that handles the way you like it, but it's also somewhat easy to screw things up if you don't know what you're doing. (You can always revert to the initial settings for your car, though, in case you happen to, say, entirely cut out the brakes.)
Tires
The main tire setting is pressure. You can increase the pressure here if you want more control in turns, but you overdoing this will result in more sudden slips when the tires suddenly lose their grip. Less pressure will increase grip by allowing more of the tire to contact the road, but the side effect of this is that you'll take slightly longer to turn off the forward axis.
Gearing
Properly tuning gearing ratios is one of the black arts of car adjustment; it can be difficult to adjust these properly unless you really know what you're doing, especially if you're adjusting the ratios individually, but well-tuned gear ratios can greatly increase your ability to succeed on a given course.
Higher ratios here (i.e. moving the sliders to the right) will increase your acceleration, while lower ratios (moving the sliders to the left) will increase overall speed. Luckily, with Forza 3's built-in benchmarking utility, you can quickly get feedback on the efficacy of your ministrations and correct any mistakes you might be making before you get too out of hand. In our experience, most cars can get a bit more top speed by individually adjusting the top gear, but it will take you longer to reach said top speed, so you'll only want to perform such tuning when dealing with a course with fairly long straights.
You can also attempt to twiddle with the lower gears and tighten up the ratios there for better acceleration on courses with lots of sharp turns, but in our experience, the preset settings were usually suitable for most situations.
Alignment
Camber: Camber affects how your car's wheels are tilted towards each other. A zero-degree camber means that the wheels are perfectly aligned when resting on a flat surface; negative camber will tilt the tops of the wheels inward; and positive camber will tilt the tops of the wheels outward from the body of the car. Increasing negative camber will reduce understeer, while reducing negative camber will reduce oversteer. You can adjust this individually for each axis, so if you find your rear wheels slipping on corners (we're looking at you, Tom's Z382 Soarer), you may want to try adjusting the rear axis by itself to see if you can't correct this.
Toe: Toe is similar to camber, but along a different axis. A negative degree of toe will result in "toe-in," where the fronts of your wheels will be closer together than the rear, while a positive degree of toe will result in "toe-out," where the fronts of the wheels will be farther apart than the rest of the wheel. For the front axle, toe-in will increase your turning ability but hurt your overall stability, while the situation is reversed with toe-out. Any kind of severe toe will decrease your tire lifetimes, meaning that you probably don't want to fool around with these settings too much if you're going out on an endurance race.
Caster: Caster affects the tilt of the steering pivot relative to the vertical axis. Only positive caster angles seem to be possible in Forza 3, meaning that the top pivot of the axis will be further towards the rear of the car than the pivot that actually connects to the wheel. A positive caster will increase the amount of camber that wheels are affected with while turning, allowing you to run with lower inherent camber numbers. On heavier vehicles, though, lower caster angles can increase responsiveness while turning, so you'll need to fine tune this in conjunction with your camber for maximum responsiveness in turns.
Anti-Roll
Anti-roll stiffness will affect how rigid the bar between the inside and outside tires is kept in a curve. Increased rigidity in the front anti-roll bar will increase understeer, giving you a bit more safety in blown corners, but it's mostly noticeable in long, flat corners, rather than in sharp turns. If you find that a car has too much oversteer in long corners, reduce stiffness and see if that helps.
Springs
Your spring settings affect how well your car handles uneven ground and cornering. Soft springs are a good thing when dealing with uneven ground and bumps, as stability will increase due to the increased movement of the springs. Stiffening the springs will decrease the speed of their movement, giving you improved control in corners.
Your spring settings are going to be something you should adjust on a track-by-track basis. Tracks that force you through elevation changes through turns, such as many of the mountain point-to-point tracks, will benefit from setting a softer spring setting, as you'll gain stability. On flat tracks with sharp turns, though, you're going to want to have somewhat stiffer springs, as you'll be able to turn more precisely. You'll still need to be wary of sudden elevation changes, especially when it comes to grip pads on corners. If you hit a grip pad with two wheels while your springs are set relatively stiff and happen to bump those wheels into the air, it'll be quite difficult to regain control while still turning.
Ride Height: Ride height can be modified in the Springs menu as well. Generally speaking, you're going to want to lower the ride height as much as possible, as this is going to lower your car's center of gravity and increase cornering stability by letting your tires grip the road more closely. If you get too low, however, you can find yourself scraping the ground when heading over sharp bumps, which will affect your speed. If you're willing to test a car out on the track before using it in a race, you may want to just completely lower this setting all the way and take your car out for a spin on a course with some elevation changes. If you find yourself scraping the tarmac, start upping the height until you find something comfortable.
You can also attempt to adjust the front and rear height individually to increase downflow and give you more oversteer and a bit more acceleration off the line. You're going to want to have a lower front end than a rear in this case, but don't overdo it, or you'll have a hard time toeing the line in turns.
Damping
Damping acts as something of a counterbalance to your spring settings, in that you can manually adjust how quickly the springs recoil into their original state after absorbing a shock. There are two settings here: bump damping, and rebound damping.
Bump Damping: Bump damping controls how quickly the springs will recoil upwards after absorbing a shock from the road. Stiffening these settings will prevent the springs from coiling too quickly, thus preventing your car from diving too much when braking into a curve. These are individually adjustable on the front and rear, and you'll always want to have stiffer dampers in the front of a car than in the rear. When you have to brake hard when entering a turn, most of the energy in your car will shift forward, thus compressing the forward springs more than the rear; to keep your car balanced, you'll thus want to make sure that your front springs are a bit more resistant. Good braking emphasizes the shifting of weight to the fore of the car without too great of a "dive" effect, which will reduce traction on the rear tires and make for a less stable turn.
That said, you can overdo the stiffening of your dampers, especially if you also stiffened up the springs themselves for extra control. If you have stiff springs and dampers, you're going to have a lot of control, but your car will be quite bouncy; you'll want to soften up the dampers to get yourself back some stability and control over uneven surfaces. Overstiffening the front dampers in particular will prevent adequate weight-shifting and increase your braking distance.
Rebound Damping: Rebound damping controls how quickly your springs return to their normal positions after absorbing a shock. These need to be stiffer than the bump dampers, as they act to return stability to your car after braking, but setting them too high will likewise increase your braking distance.
Aero
Downforce: Downforce is an important component of a car's overall handling capabilities. When you've set up a car so that air flows more quickly underneath it than over it, the different air pressures will cause a net downward force on your car, thus causing your entire car to grip the road a little more tightly. This will give you better grip on your tires and increased control, but will also cause increased tire wear. Note that you can overdo downforce, which will cause your car to be sucked into the ground by a massive difference in pressure; this will result in sluggish handling, so try to stay in the sweet spot if possible.
Braking
Balance: With the balance bar, you can adjust the balance of braking forces between the front and rear brakes. Biasing this towards the rear will let you turn in more quickly, but will reduce stability, while favoring the front brakes will increase your stability while braking; helpful for those cars that tend to shudder or shake when you're slamming on the brakes.
Pressure: This affects the sensitivity of the brakes relative to the amount of force you apply to the brake pedal (or, if you're using a controller, the left trigger). This setting will largely depend on your car and the specific track you're working with. Having a higher pressure will increase brake sensitivity, which can be helpful on hairpins, but will make it more difficult to feather the brake on wider turns. By the same token, reducing total pressure will make it easier to feather due to the fact that the brakes will be less sensitive, but will make it tougher to lock up your brakes when going full-speed into a corner. Reducing pressure all the way will cut out your brakes entirely - try doing this on one of your buddies' Xboxes and see what happens the next time they load up a race!
Note that pressure here won't have much of an effect on your braking distance; brake balance is what you want to tweak for that.
Differential
Acceleration: Increasing acceleration differentials can help prevent squealing tires when powering through corners by increasing traction, thus letting you accelerate more quickly when coming out of a turn. If you push this setting too high, though, you can stiffen up your turning and reduce response.
Deceleration: Higher deceleration differentials will increase the traction of your wheels when braking into a turn, thus giving you mildly shorter stopping distances. On 4WD and especially rear-wheel drive cars, increasing your deceleration differential will also increase traction while braking, thus helping you turn in, but as with acceleration differentials, setting this too high will make for sluggish turns.
4WD Cars: Note that 4WD cars will have Acceleration and Deceleration settings for both their front and rear wheels, since power from the engine is used to rotate all of them. They'll also have a torque setting, which will enable them to shift power either front or rear, to increase or reduce oversteer and make the car handle more like a RWD or FWD car, within a limit.
Xbox 360 Achievements
Note that there are Spoilers on this list.
| Achievement Name | How To Earn | Reward |
|---|---|---|
| Bottomed Out | Jump five feet. | 5 |
| Car Level 1 | Achieve Car Level 1 in Season Play mode. | 5 |
| Car Level 2 | Achieve Car Level 2 in Season Play mode. | 5 |
| Car Level 3 | Achieve Car Level 3 in Season Play mode. | 5 |
| Car Level 4 | Achieve Car Level 4 in Season Play mode. | 5 |
| Car Level 5 | Achieve Car Level 5 in Season Play mode. | 5 |
| Demon | Travel in excess of 200mph. | 5 |
| Drift Lap | Earn over 100,000 points in a single lap. | 5 |
| Drifter | Earn over 1,000 points in a single drift section. | 5 |
| Interior | Win a race using cockpit mode. | 5 |
| Auctioneer | Sell a car in the Auction House. | 10 |
| Buyer | Buy something using the storefront. | 10 |
| Curator | Upload a photo or movie to Forzamotorsport.net | 10 |
| Director | Complete your first Forza Motorsport movie. | 10 |
| Driver Level 1 | Reach Driver Level 1 in Season Play mode. | 10 |
| Driver Level 2 | Reach Driver Level 2 in Season Play mode. | 10 |
| Driver Level 3 | Reach Driver Level 3 in Season Play mode. | 10 |
| Driver Level 4 | Reach Driver Level 4 in Season Play mode. | 10 |
| Driver Level 5 | Reach Driver Level 5 in Season Play mode. | 10 |
| Driver Level 6 | Reach Driver Level 6 in Season Play mode. | 10 |
| Driver Level 7 | Reach Driver Level 7 in Season Play mode. | 10 |
| Driver Level 8 | Reach Driver Level 8 in Season Play mode. | 10 |
| Driver Level 9 | Reach Driver Level 9 in Season Play mode. | 10 |
| Driver Level 10 | Reach Driver Level 10 in Season Play mode. | 10 |
| Entrepreneur | Sell a Tuning Setup, Design, or Vinyl Group from your storefront. | 10 |
| Grease Monkey | Create a car tuning file for your | 10 |
| Lapper | Complete a time trial | 10 |
| Painter | Create a paint job or vinyl group. | 10 |
| Shutterbug | Take a photo of your car. | 10 |
| Sniper | Win an auction by outbidding someone. | 10 |
| Weekday Event | Complete your first weekday event in Season Play mod | 10 |
| Weekend | Complete your first weekend event in Season Play mode. | 10 |
| Driver Level 15 | Reach Driver Level 15 in Season Play mode. | 15 |
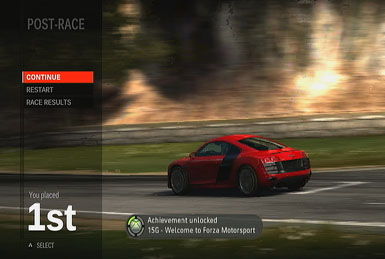
| Welcome to Forza Motorsport | Complete the very first race in the game. | 15 |
| Driver Level 20 | Reach Driver Level 20 in Season Play mode. | 20 |
| Driver Level 25 | Reach Driver Level 25 in Season Play mode. | 25 |
| World Traveler | Race at every track location in the world. | 25 |
| Driver Level 30 | Reach Driver Level 30 in Season Play mode. | 30 |
| Driver Level 35 | Reach Driver Level 35 in Season Play mode. | 35 |
| Driver Level 40 | Reach Driver Level 40 in Season Play mode. | 40 |
| Driver Level 45 | Reach Driver Level 45 in Season Play mode. | 45 |
| Connoisseur | Own (at least) one car from every manufacturer. | 50 |
| Driver Level 50 | Reach Driver Level 50 in Season Play mode. | 50 |
| Year 1 | Complete the first year of Season Play. | 50 |
| Year 2 | Complete the second year of Season Play. | 50 |
| Year 3 | Complete the third year of Season Play. | 50 |
| Year 4 | Complete the fourth year of Season Play. | 50 |
| Year 5 | Complete the fifth year of Season Play. | 50 |
| Solid Gold | Achieve a gold trophy in every single race in the Event list in Season Play mode. | 80 |
Got a news tip or want to contact us directly? Email news@gamespot.com
Join the conversation